
Bauble Cardigan – Free Crochet Cardigan Pattern (Sizes XS–5XL)
The Bauble Cardigan – Free Crochet Cardigan Pattern (Sizes XS–5XL) is copyrighted by I Need It Crochet. You may not copy, share, change, or sell the pattern itself. Also, you may not claim this pattern as your own. All pictures contained in this pattern fall under the copyright and may not be used.
Finished items made from the Bauble Cardigan – Free Crochet Cardigan Pattern (Sizes XS–5XL) belong to you, and you may do what you wish with them. If you choose to sell them on Etsy, I would very much appreciate it if you credited me as the pattern designer.
Where Can I Buy The Pdf?
The entire pattern is available to view for free on this page (you just have to scroll down to see it). But if you would prefer to have a printable pdf copy of the pattern, you can purchase it for a small fee from my Ravelry and Etsy stores. Just click the graphics below.
This pattern is 17 pages long and contains 18 pictures and detailed instructions of how to complete your crochet cardigan. Plus 2 photo tutorials for the Bead stitch and 3rd loop only stitch. A printable pdf will be easier to follow, and you can make notes on it as you go. I find it to be the easier option. But if you like to use the online version, it is here 24/7 for you to view. Enjoy!

Bauble Cardigan – Free Crochet Cardigan Pattern (Sizes XS–5XL)
Bauble Cardigan – Free Crochet Cardigan Pattern (Sizes XS–5XL)
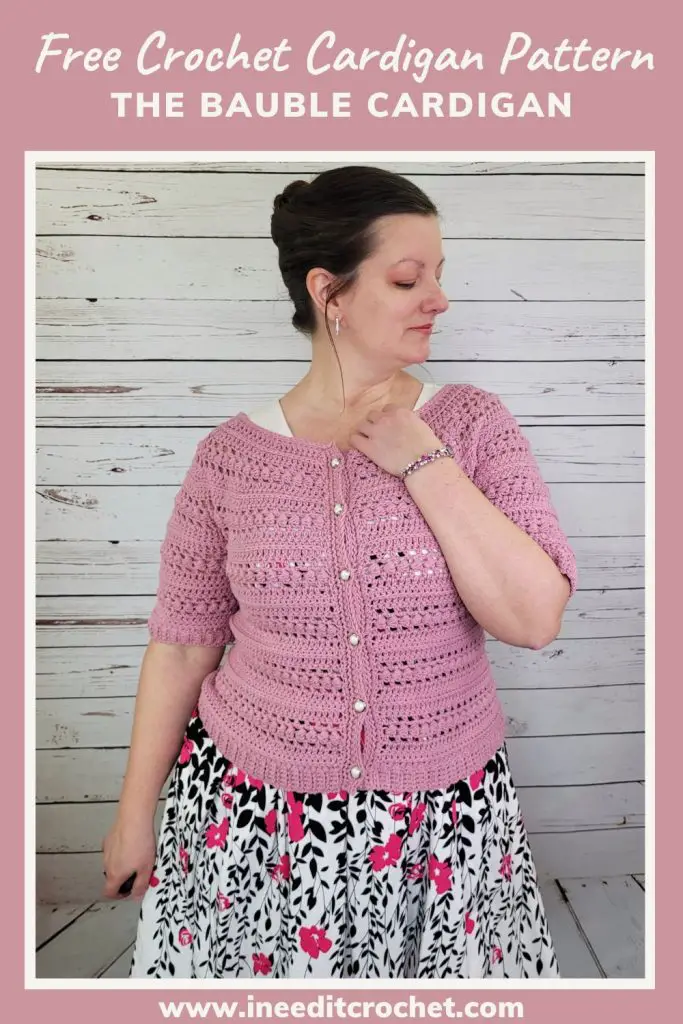
Want to Pin it for later?
Click the image below and save the pin to your favourite crochet pattern boards!
Bauble Cardigan – Free Crochet Cardigan Pattern (Sizes XS–5XL)
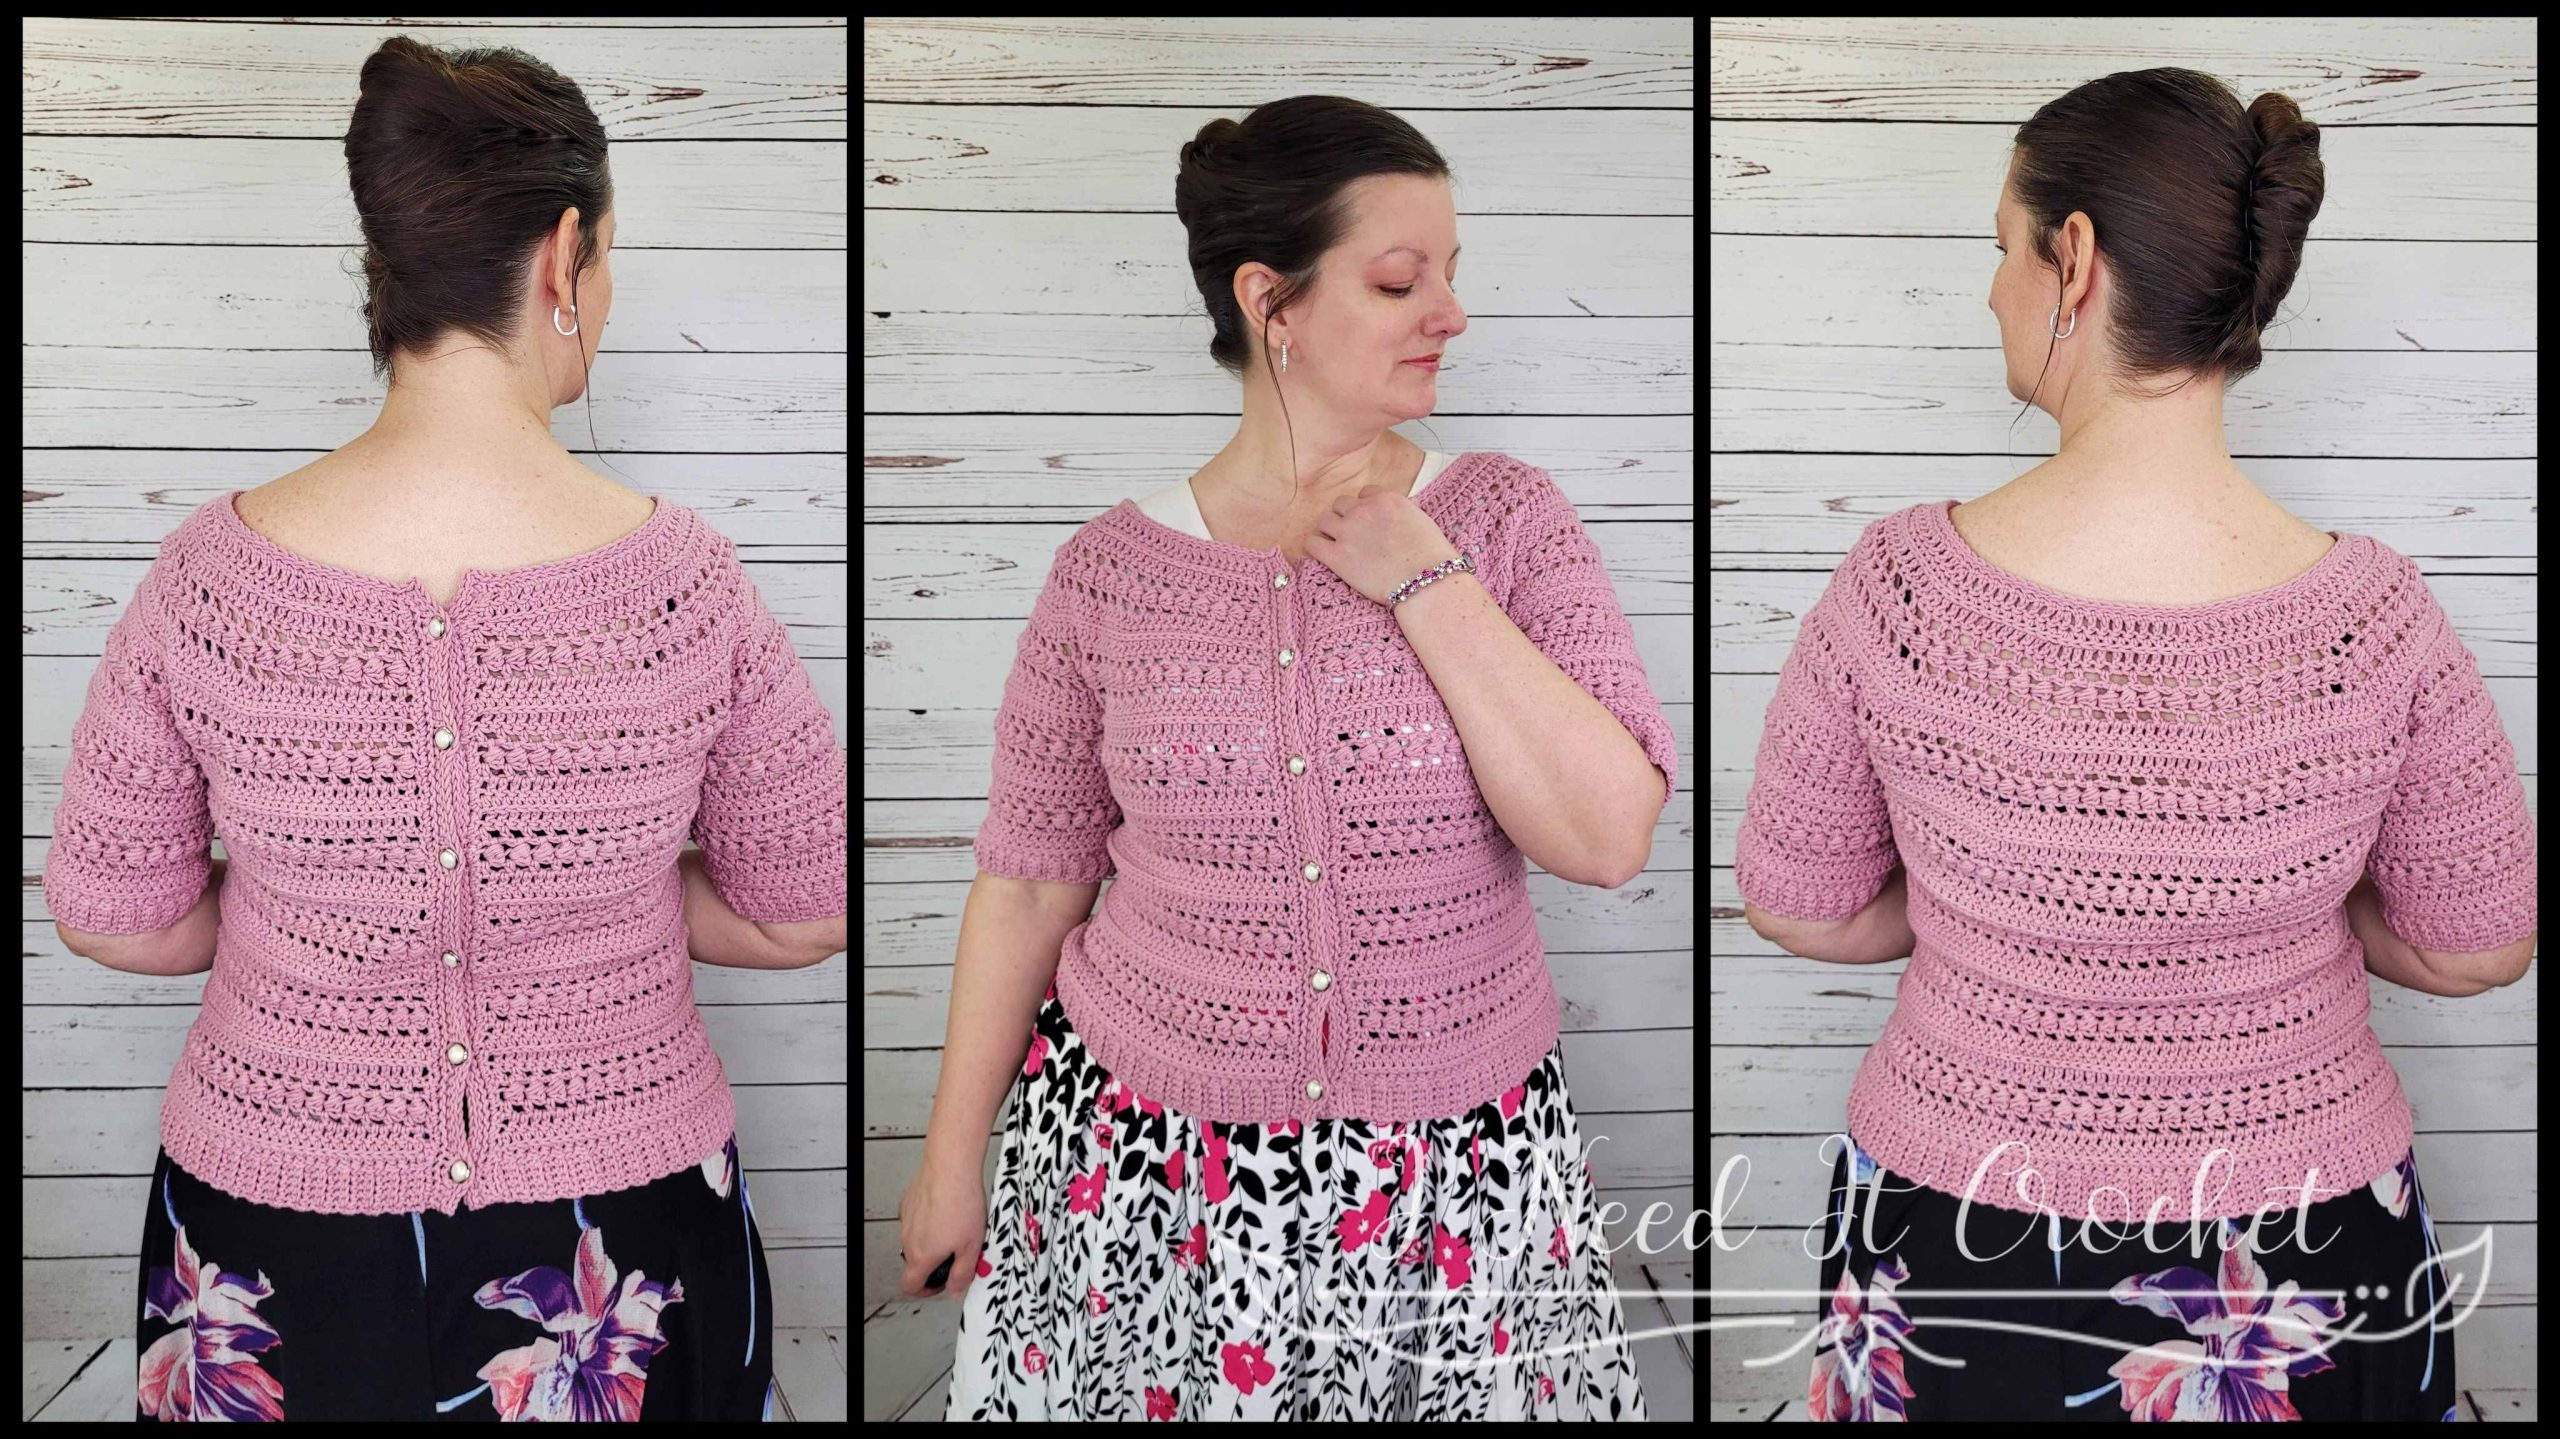
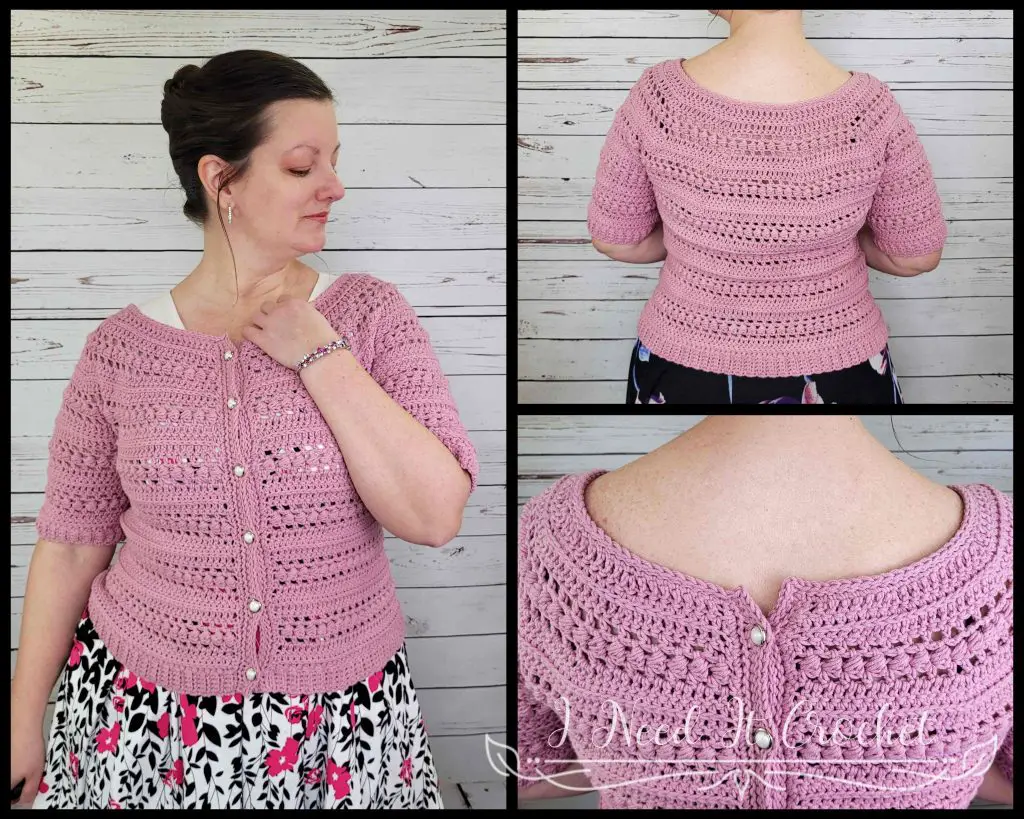
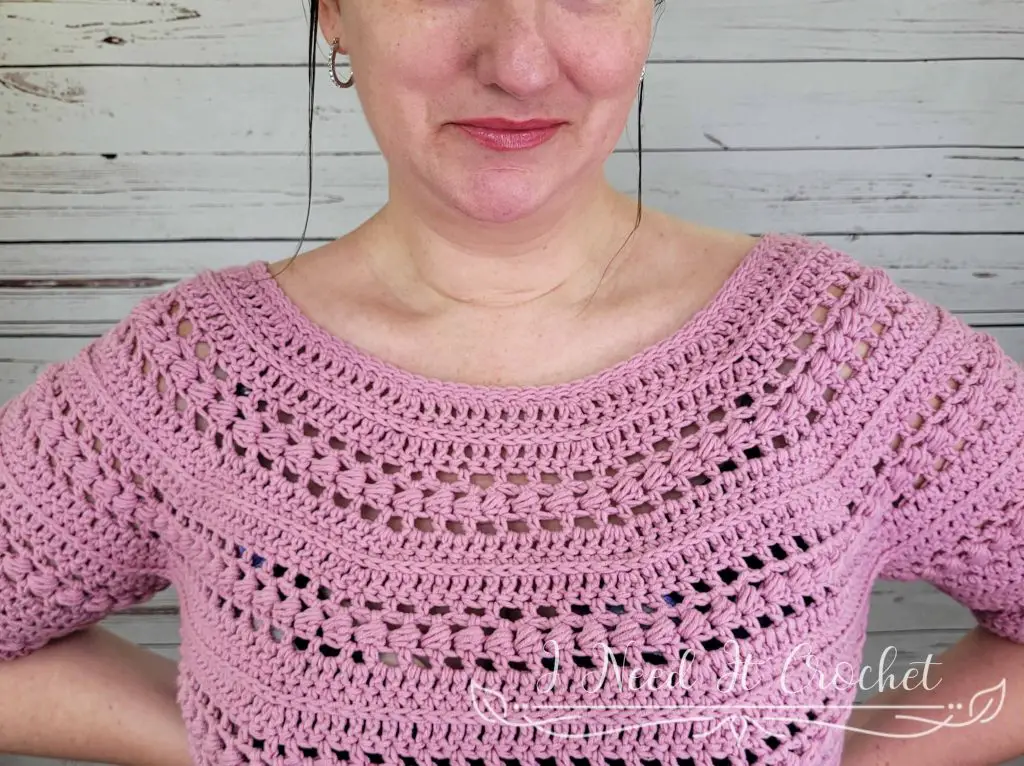
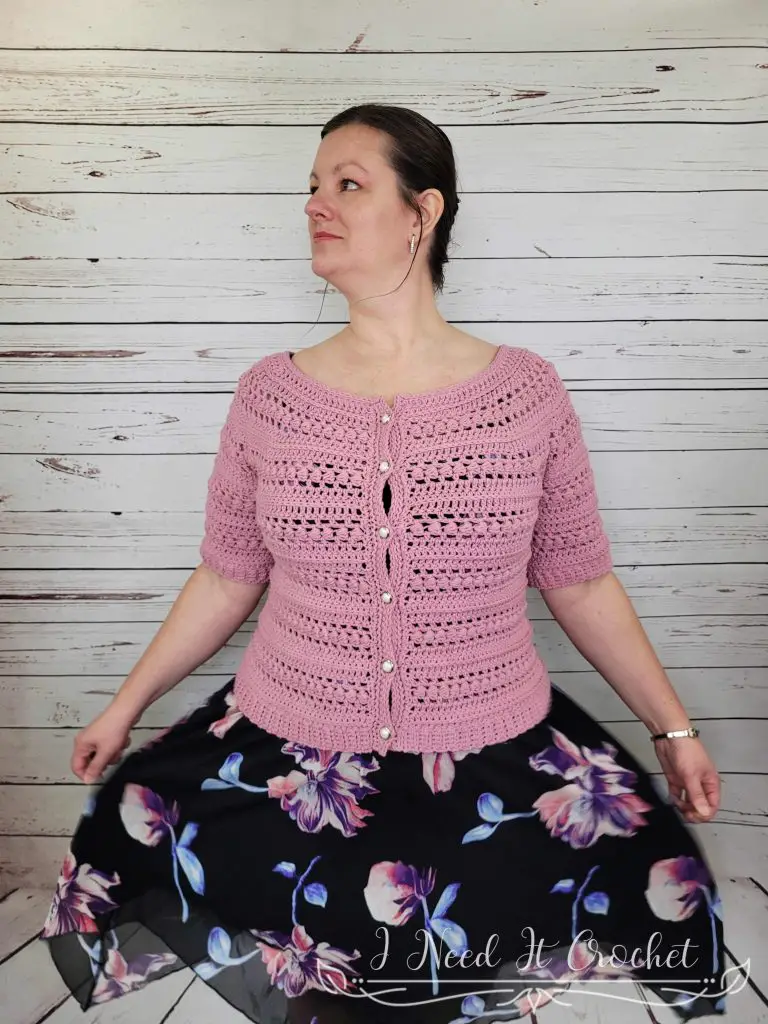
As with many of my crochet designs, this cardigan began with a simple spark of inspiration that just wouldn’t let go. I’ve always loved the look and feel of combining basic stitches—like double and half-double crochets—with rows of bead stitches. The result is a beautiful balance of texture and drape that works so well in garments.
If you’ve been following me for a while, you might recognize this stitch pattern from a few of my other designs—the Bauble Tee, Bauble Bandana Cowl, Bauble Slouch Hat, Bauble Gloves, and Bauble Leg Warmers. It’s a favorite of mine for a reason! And this time, I wanted to bring it into a fresh, wearable piece that’s both practical and pretty: a cozy round yoke cardigan.
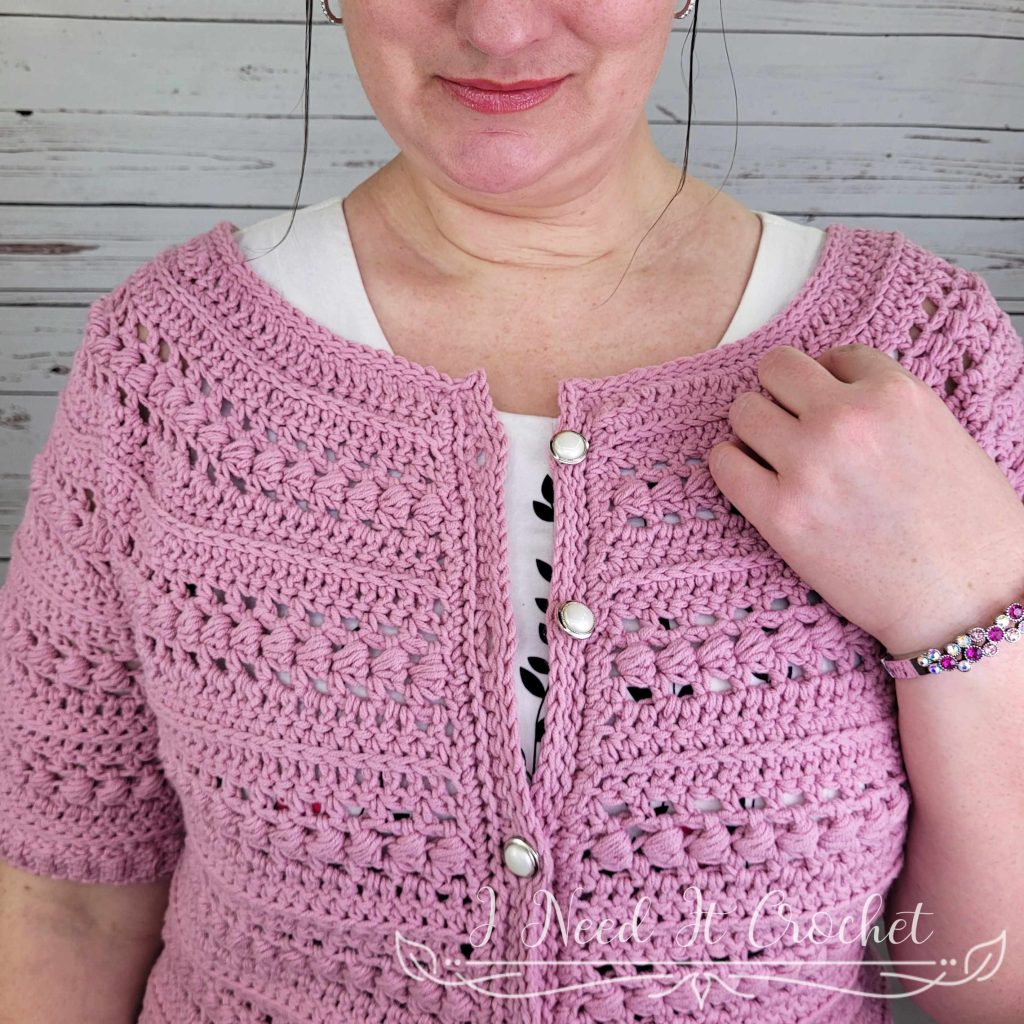
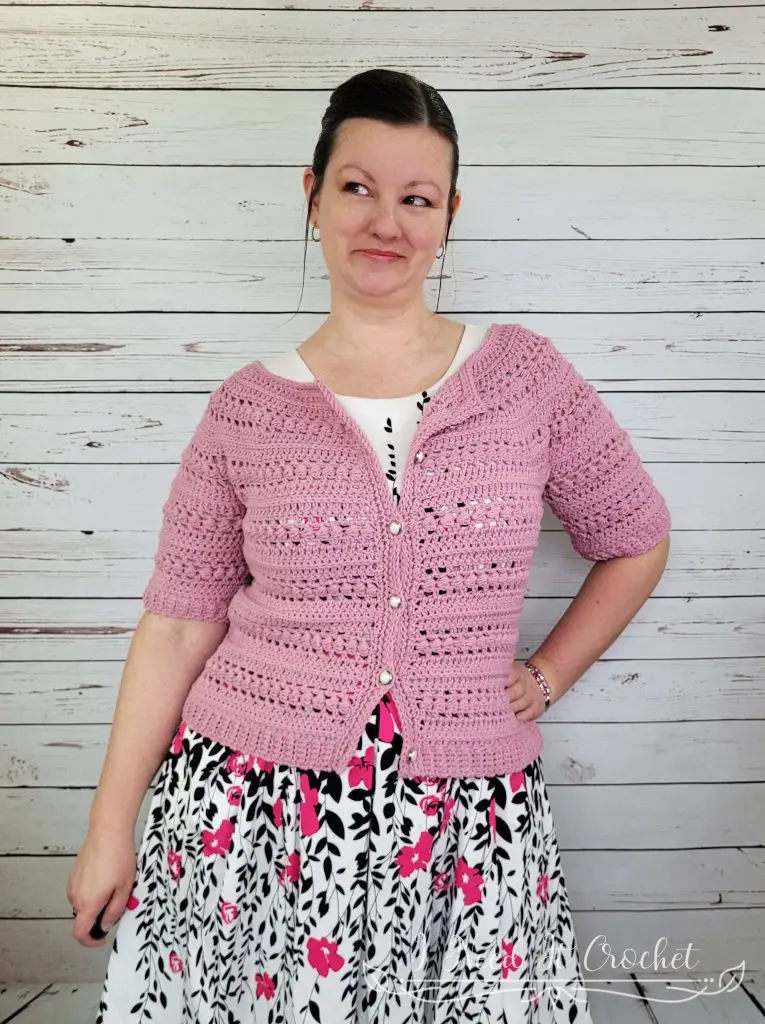
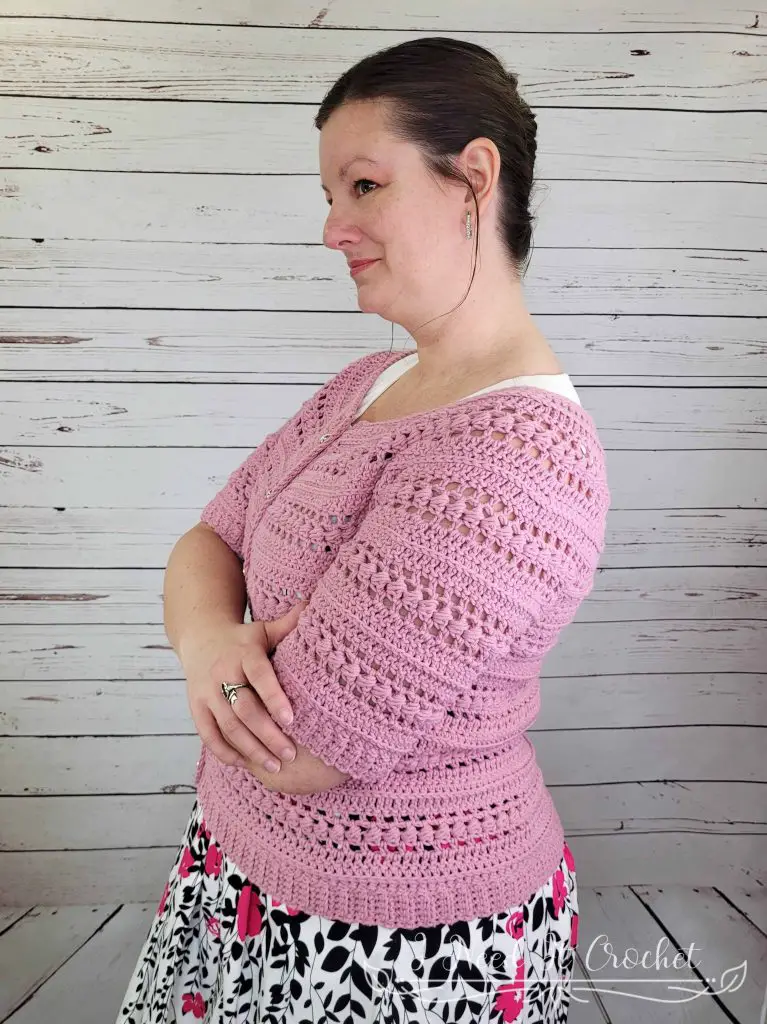
This free crochet cardigan pattern is designed with layering in mind. I wanted something I could throw on over a summer dress for a light, feminine look, or pair with jeans and a t-shirt for something a little more casual. Whether you’re crafting a breezy summer cardigan or a transitional piece for cooler weather, this design offers flexibility, comfort, and style all in one.
The pattern is worked from the top down, with a seamless construction and customizable length, making it a great option for beginners and seasoned crocheters alike. So if you’re on the hunt for a free crochet pattern for a cardigan that’s both easy to wear and fun to make, you’ve come to the right place!
Pattern Features & Sizing
The Bauble Cardigan is a top-down, round yoke crochet cardigan designed with comfort and versatility in mind. It features a seamless construction, so there’s no need to worry about sewing pieces together. The stitch pattern—made up of simple double crochets, half-double crochets, and bead stitches—adds a lovely texture while keeping things interesting as you work.
This crochet cardigan pattern is written for sizes XS to 5XL, with notes on how to adjust length and fit. Whether you prefer a cropped summer cardigan or something a little longer for cooler days, you can easily customize this project to suit your personal style.
Yarn & Tools Used
- Yarn used: I used Go Handmade Yarns Cosy, which is a 60% Cotton, 40% Acrylic, #3 DK weight yarn. Any yarn of similar weight would work.
- Yardage: Approximately 600 (700, 800, 900, 1000, 1100, 1200, 1300, 1400) yds for the length shown.
- Hook size: 5.5mm, or whatever hook you use to obtain gauge.
Choose a yarn with good drape and stitch definition to highlight the texture. A lightweight cotton or cotton-blend yarn is perfect for a breathable summer crochet cardigan, while wool or acrylic blends are great for layering in cooler months.
Customization Tips
One of the best things about this pattern is how easily you can make it your own. Here are a few ways to customize your crochet cardigan pattern:
- Adjust the body length: Make it cropped, hip-length, or tunic-style.
- Change up the sleeves: Go short, three-quarter, or full-length based on your needs.
- Pick a different yarn: Try a summery cotton or cozy wool blend.
- Add closures: Buttons, ties, or even a belt can change the whole vibe.
Frequently Asked Questions (FAQ)
This pattern is best suited for intermediate crocheters. It uses a combination of stitch techniques—including bead stitches and a round yoke construction—that may be challenging for newer crocheters. If you’re confident with reading patterns and have experience with shaping and texture, you’ll enjoy the process. Step-by-step photos are included to help guide you through the key parts!
You can view the full pattern for free right here on my blog! Prefer a printable version? Grab the ad-free PDF on Ravelry or Etsy.
Absolutely. Just check your gauge and use a yarn with similar weight and drape. Lightweight (#3) or DK yarns are ideal.
Always follow your yarn label’s care instructions. Most cotton and cotton-blend yarns are machine washable—just use a gentle cycle and lay flat to dry.
Ready to get started? Scroll down to view the full free crochet cardigan pattern below, or grab your printable version now:
Bauble Cardigan – Free Crochet Cardigan Pattern (Sizes XS–5XL)
Finished Sizes:
Instructions given to fit size X-small; changes for small, medium, large, X-large, 2X-large, 3X-large, 4X-large and 5X-large are in ()
XS (S, M, L, XL, 2XL, 3XL, 4XL, 5XL)
Body Circumference: 28” (32”, 36”, 40”, 44”, 48”, 52”, 56”, 60”)
Finished Length: Customizable. Length on model shown is 21”
Sleeve Circumference: 11″ (11 1/2″, 12″, 13″, 14 1/2″, 16 1/2″, 18, 19 1/2″ 20 1/2″)
Materials:
I used Go Handmade Yarns Cosy, which is a 60% Cotton, 40% Acrylic, #3 DK weight yarn.
Any yarn of similar weight would work.
Approximately 600 (700, 800, 900, 1000, 1100, 1200, 1300, 1400) yds for the length shown.
5.5mm Hook
Stitch Markers
Yarn Needle
Scissors
Measuring Tape
Gauge:
See gauge swatch instructions below. Be sure to always check your gauge. It will save you much time and heartache.
Abbreviations:
RS = Right Side
WS = Wrong Side
Sk = Skip
Sp = Space
St = Stitch
Ss = Slip Stitch
Ch = Chain
Sc = Single Crochet
Hdc = Half Double Crochet
Dc= Double Crochet
BLO = Back Loop Only
Difficulty:
Intermediate
Notes:
Ch1 or ch2 at the beginning of a row is never considered a stitch.
Ch1 between Hdc is always considered a stitch.
Ch3 at the beginning of a row is always considered a Dc.
A Bead Stitch counts as 2 stitches.
I have added many pictures to help you along the way.
The model above (that’s me) has a 40” bust and is wearing a size L.
Choose your size according to your largest measurement (bust/waist) and how you would like the cardigan to fit. For a close-fitting cardigan, choose the size closest to your largest measurement. For a loose cardigan, choose a size 2-3” larger.
Gauge Swatch Pattern
With 5.5mm Hook
The instructions below will create a gauge swatch that is 5” (10 ¼”) wide x 5” (10”) high. If you are making a larger size and/or you sometimes find your tension is off, I recommend making the larger swatch. But, of course, that is completely up to you.
Ch 20 (40)
- Hdc in 2nd ch from hook and each ch across. Turn. – 19 (39) st
- Working the row in 3rd LO: Ch3. Dc in next st and each st across. Turn. – 19 (39) st
- Ch1, hdc in 1st st. *Ch1, sk1 st, hdc in next st. ** Repeat from * to ** across. Turn. – 19 (39) st
- Ch2, sk 1st st. Bd in next ch1 sp. *Sk next st, bd in next ch1 sp.** Repeat from * to ** until only 1 st left. Dc in last st. Turn. – 19 (39) st
- Ch1, hdc in 1st st. *Ch1, sk1 st, hdc in next st. ** Repeat from * to ** across. Turn. – 19 (39) st
- Ch3. Dc in next ch sp and each st and ch sp across. Turn. – 19 (39) st
- Ch1. Hdc in 1st st and each ch across. Turn. – 19 (39) st
Repeat rows 2-7 until you have a total of 10 (20) rows.
Your swatch should measure 5” (10 ¼”) W x 5” (10”) H. .
Bauble Cardigan – Free Crochet Cardigan Pattern (Sizes XS–5XL)
Instructions
The pattern is worked from the top down, starting at the neck and working down to finish the body. Next, the trim will be added to the bottom, front, and neck edges. Finally, the sleeves are added. There is no sewing.
Yoke
With 5.5mm Hook (or the hook you used to achieve gauge)
- (WS) Ch 89 (89, 99, 99, 99, 109, 109, 119, 119). Dc in back bar of 4th ch from hook and next 6 (5, 6, 6, 4, 7, 7, 7, 4) ch. 2dc in next ch. *Dc in next 9 (7, 8, 8, 6, 7, 7, 8, 7) ch. 2dc in next ch.** Repeat from * to ** until only 8 (7, 7, 7, 6, 9, 9, 8, 6) chs left. Dc in each remaining ch. Turn. – 95 (97, 107, 107, 110, 119, 119, 129, 131) st
- (RS) Ch1. Hdc in 1st 9 (8, 8, 8, 7, 9, 10, 9, 7) sts. 2hdc in next st. *Hdc in next 10 (8, 9, 9, 7, 8, 8, 9, 8) sts. 2hdc in next st.** Repeat from * to ** until only 8 (7, 8, 8, 6, 10, 9, 9, 6) sts left. Hdc in each remaining st. Turn. – 103 (107, 117, 117, 123, 131, 131, 141, 145) st
- Working in 3rd lo: Ch3. Dc in next 8 (7, 8, 8, 11, 9, 9, 9, 6) sts. 2dc in next st. *Dc in next 11 (9, 10, 10, 10, 9, 9, 10, 9) sts. 2dc in next st.** Repeat from * to ** until only 9 (8, 8, 8, 11, 10, 10, 9, 7) sts left. Dc in each remaining st. Turn. – 111 (117, 127, 127, 133, 143, 143, 153, 159) st
- Ch1. Hdc in 1st st, ch1, sk1 st. *Hdc in next st, ch1, sk1 st.** Repeat from * to ** 3 (2, 5, 5, 2, 3, 3, 6, 2) more times. Hdc in next st, Ch1, do not sk a st. [Repeat from * to ** 6 (5, 5, 5, 6, 5, 5, 5, 5) more times. Hdc in next st, ch1, do not sk a st.] Repeat from [ to ] until only 9 (9, 13, 13, 7, 11, 11, 15, 7) sts left. Repeat from * to ** until only one st left. Hdc in last st. Turn. – 119 (127, 137, 137, 143, 155, 155, 165, 173) st
- Ch2, sk 1st st. Bd in next ch1 sp. *Sk 1 st, bd in next ch1 sp.** Repeat from * to ** 9 (7, 8, 8, 7, 6, 6, 9, 5) more times. Sk 1 st, 2bd in next ch1 sp. [Repeat from * to ** 11 (10, 11, 11, 12, 11, 11, 11, 11) more times. Sk 1 st, 2bd in next ch1 sp.] Repeat from [ to ] until only 11 (9, 9, 9, 9, 8, 8, 10, 6) ch1 sp left. Repeat from * to ** until 1 st left. Dc in last st. Turn. – 127 (137, 147, 147, 153, 167, 167, 177, 187) st {including 63 (68, 73, 73, 76, 83, 83, 88, 93) bd sts}
- Ch1. Hdc in 1st st, ch1, sk1 st. *Hdc in next st, ch1, sk1 st.** Repeat from * to ** 3 (3, 5, 5, 2, 4, 4, 6, 2) more times. Hdc, ch1, do not sk a st. [Repeat from * to ** 7 (6, 6, 6, 7, 6, 6, 6, 6) more times. Hdc, ch1, do not sk a st.] Repeat from [ to ] until only 11 (9, 15, 15, 9, 11, 11, 17, 9) sts left. Repeat from * to ** until 1 st left. Hdc in last st. Turn. – 135 (147, 157, 157, 163, 179, 179, 189, 201) st
Measurement Check: Lay your project flat on the floor, and using a soft measuring tape, measure the length of your last row. Your last row should be 35 ½” (38 ½”, 41 ¼”, 41 ¼”, 42 ¾”, 47”, 47”, 49 ¾”, 52 ¾”) long.
- Working in sts and ch1 sp: Ch3. Dc in next 10 (9, 14, 14, 13, 11, 11, 11, 15) sts. 2dc in next st. *Dc in next 15 (13, 13, 13, 14, 13, 13, 14, 12) sts. 2dc in next st.** Repeat from * to ** until only 11 (10, 15, 15, 13, 12, 12, 11, 15) sts left. Dc in each remaining st. Turn. – 143 (157, 167, 167, 173, 191, 191, 201, 215) st
- Ch1. Hdc in 1st 12 (10, 16, 16, 14, 12, 12, 12, 16) sts. 2hdc in next st. *Hdc in next 16 (14, 14, 14, 15, 14, 14, 15, 13) sts. 2hdc in next st.** Repeat from * to ** until only 11 (11, 15, 15, 14, 13, 13, 12, 16) sts left. Hdc in each remaining st. Turn. – 151 (167, 177, 177, 183, 203, 203, 213, 229) st
- Working in 3rd lo: Ch3. Dc in next 15 (15, 15, 15, 13, 12, 12, 11, 15) sts. 2dc in next st. *Dc in next 16 (14, 15, 15, 16, 15, 15, 16, 14) sts. 2dc in next st.** Repeat from * to ** until only 15 (15, 16, 16, 15, 13, 13, 13, 17) sts left. Dc in each remaining st. Turn. – 159 (177, 187, 187, 193, 215, 215, 225, 243) st
- Ch1. Hdc in 1st st, ch1, sk1 st. *Hdc in next st, ch1, sk1 st.** Repeat from * to ** 8 (4, 6, 6, 8, 5, 5, 7, 3) more times. Hdc in next st, Ch1, do not sk a st. [Repeat from * to ** 8 (8, 8, 8, 8, 8, 8, 8, 8) more times. Hdc in next st, ch1, do not sk a st.] Repeat from [ to ] until only 19 (11, 17, 17, 19, 13, 13, 19, 11) sts left. Repeat from * to ** until only one st left. Hdc in last st. Turn. – 167 (187, 197, 197, 203, 227, 227, 237, 257) st
- Ch2, sk 1st st. Bd in next ch1 sp. *Sk 1 st, bd in next ch1 sp.** Repeat from * to ** 15 (21, 18, 14, 14, 14, 14, 14, 14) more times. Sk 1 st, 2bd in next ch1 sp. [Repeat from * to ** 15 (22, 18, 15, 16, 15, 15, 16, 15) more times. Sk 1 st, 2bd in next ch1 sp.] Repeat from [ to ] until only 17 (23, 20, 17, 16, 16, 16, 16, 15) ch1 sp left. Repeat from * to ** until 1 st left. Dc in last st. Turn. – 175 (193, 205, 207, 213, 239, 239, 249, 271) st {including 87 (96, 102, 103, 106, 119, 119, 124, 135) bd sts}
- Ch1. Hdc in 1st st, ch1, sk1 st. *Hdc in next st, ch1, sk1 st.** Repeat from * to ** 8 (12, 13, 7, 8, 5, 5, 8, 4) more times. Hdc, ch1, do not sk a st. [Repeat from * to ** 9 (13, 14, 9, 9, 9, 9, 9, 9) more times. Hdc, ch1, do not sk a st.] Repeat from [ to ] until only 21 (29, 29, 17, 21, 15, 15, 19, 11) sts left. Repeat from * to ** until 1 st left. Hdc in last st. Turn. – 183 (199, 211, 217, 223, 251, 251, 261, 285) st
Measurement Check: Lay your project flat on the floor, and using a soft measuring tape, measure the length of your last row. Your last row should be 48” (52 ¼”, 55 ½”, 57”, 58 ½”, 66”, 66”, 68 ½”, 75”) long.
Bauble Cardigan – Free Crochet Cardigan Pattern (Sizes XS–5XL)
- (WS) Working in sts and ch1 sp: Ch3. Dc in next 25 (38, 29, 23, 20, 25, 14, 19, 18) sts. 2dc in next st. *Dc in next 25 (39, 29, 23, 19, 21, 19, 19, 18) sts. 2dc in next st.** Repeat from * to ** until only 26 (39, 30, 24, 21, 26, 15, 20, 18) sts left. Dc in each remaining st. Turn. – 189 (203, 217, 225, 233, 261, 263, 273, 299) st
Size XS: Your Upper Body is complete. You should have a large round piece that looks similar to Figure 1 below. Skip rounds 14-21 and continue on to the instructions below.
- (RS) Ch1. Hdc in 1st n/a (40, 44, 24, 22, 26, 16, 20, 19) sts. 2hdc in next st. *Hdc in next n/a (40, 42, 24, 20, 22, 20, 20, 19) sts. 2hdc in next st.** Repeat from * to ** until only n/a (39, 43, 25, 21, 27, 15, 21, 19) sts left. Hdc in each remaining st. Turn. – n/a (207, 221, 233, 243, 271, 275, 285, 313) st
Size S: Your Upper Body is complete. You should have a large round piece that looks similar to Figure 1 below. Skip rounds 15-21 and continue on to the instructions below.
- (WS) Working in 3rd lo: Ch3. Dc in next n/a (n/a, 43, 24, 21, 26, 15, 20, 23) sts. 2dc in next st. *Dc in next n/a (n/a, 43, 25, 21, 23, 21, 21, 23) sts. 2dc in next st.** Repeat from * to ** until only n/a (n/a, 44, 25,22, 27, 16, 21, 24) sts left. Dc in each remaining st. Turn. – n/a (n/a, 225, 241, 253, 281, 287, 297, 325) st
Size M: Your Upper Body is complete. You should have a large round piece that looks similar to Figure 1 below. Skip rounds 16-21 and continue on to the instructions below.
- (RS) Ch1. Hdc in 1st st, ch1, sk1 st. *Hdc in next st, ch1, sk1 st.** Repeat from * to ** n/a (n/a, n/a, 11, 9, 12, 6, 9, 10) more times. Hdc in next st, Ch1, do not sk a st. [Repeat from * to ** n/a (n/a, n/a, 13, 11, 12, 11, 11, 12) more times. Hdc in next st, ch1, do not sk a st.] Repeat from [ to ] until only n/a (n/a, n/a, 25, 23, 27, 17, 21, 25) sts left. Repeat from * to ** until only one st left. Hdc in last st. Turn. – n/a (n/a, n/a, 249, 263, 291, 299, 309, 337) st
Size L: Your Upper Body is complete. You should have a large round piece that looks similar to Figure 1 below. Skip rounds 17-21 and continue on to the instructions below.
- (WS) Ch2, sk 1st st. Bd in next ch1 sp. *Sk 1 st, bd in next ch1 sp.** Repeat from * to ** n/a (n/a, n/a, n/a, 19, 34, 20, 20, 26) more times. Sk 1 st, 2bd in next ch1 sp. [Repeat from * to ** n/a (n/a, n/a, n/a, 21, 35, 20, 21, 27) more times. Sk 1 st, 2bd in next ch1 sp.] Repeat from [ to ] until only n/a (n/a, n/a, n/a, 21, 36, 21, 21, 27) ch1 sp left. Repeat from * to ** until 1 st left. Dc in last st. Turn. – n/a (n/a, n/a, n/a, 273, 297, 311, 321, 347) st {including n/a (n/a, n/a, n/a, 136, 148, 155, 160, 173) bd sts}
Size XL: Your Upper Body is complete. You should have a large round piece that looks similar to Figure 1 below. Skip rounds 18-21 and continue on to the instructions below.
- (RS) Ch1. Hdc in 1st st, ch1, sk1 st. *Hdc in next st, ch1, sk1 st.** Repeat from * to ** n/a (n/a, n/a, n/a, n/a, 18, 12, 9, 15) more times. Hdc, ch1, do not sk a st. [Repeat from * to ** n/a (n/a, n/a, n/a, n/a, 21, 11, 12, 15) more times. Hdc, ch1, do not sk a st.] Repeat from [ to ] until only n/a (n/a, n/a, n/a, n/a, 41, 29, 23, 33) sts left. Repeat from * to ** until 1 st left. Hdc in last st. Turn. – n/a (n/a, n/a, n/a, n/a, 303, 323, 333, 357) st
Size 2X: Your Upper Body is complete. You should have a large round piece that looks similar to Figure 1 below. Skip rounds 19-21 and continue on to the instructions below.
- (WS) Working in sts and ch1 sp: Ch3. Dc in next n/a (n/a, n/a, n/a, n/a, n/a, 29, 22, 37) sts. 2dc in next st. *Dc in next n/a (n/a, n/a, n/a, n/a, n/a, 28, 25, 39) sts. 2dc in next st.** Repeat from * to ** until only n/a (n/a, n/a, n/a, n/a, n/a, 31, 23, 38) sts left. Dc in each remaining st. Turn. – n/a (n/a, n/a, n/a, n/a, n/a, 333, 345, 365) st
Size 3X: Your Upper Body is complete. You should have a large round piece that looks similar to Figure 1 below. Skip rounds 20-21 and continue on to the instructions below.
- (RS) Ch1. Hdc in 1st n/a (n/a, n/a, n/a, n/a, n/a, n/a, 24, 38) sts. 2hdc in next st. *Hdc in next n/a (n/a, n/a, n/a, n/a, n/a, n/a, 26, 40) sts. 2hdc in next st.** Repeat from * to ** until only n/a (n/a, n/a, n/a, n/a, n/a, n/a, 23, 39) sts left. Hdc in each remaining st. Turn. – n/a (n/a, n/a, n/a, n/a, n/a, n/a, 357, 373) st
Size 4X: Your Upper Body is complete. You should have a large round piece that looks similar to Figure 1 below. Skip round 21 and continue on to the instructions below.
- (WS) Working in 3rd lo: Ch3. Dc in next n/a (n/a, n/a,n/a, n/a, n/a, n/a, n/a, 38) sts. 2dc in next st. *Dc in next n/a (n/a, n/a, n/a, n/a, n/a, n/a, n/a, 41) sts. 2dc in next st.** Repeat from * to ** until only n/a (n/a, n/a, n/a, n/a, n/a, n/a, n/a, 39) sts left. Dc in each remaining st. Turn. – n/a (n/a, n/a, n/a, n/a, n/a, n/a, n/a, 381) st
Size 5X: Your Upper Body is complete. You should have a large round piece that looks similar to Figure 1 below. Continue on to the instructions below.
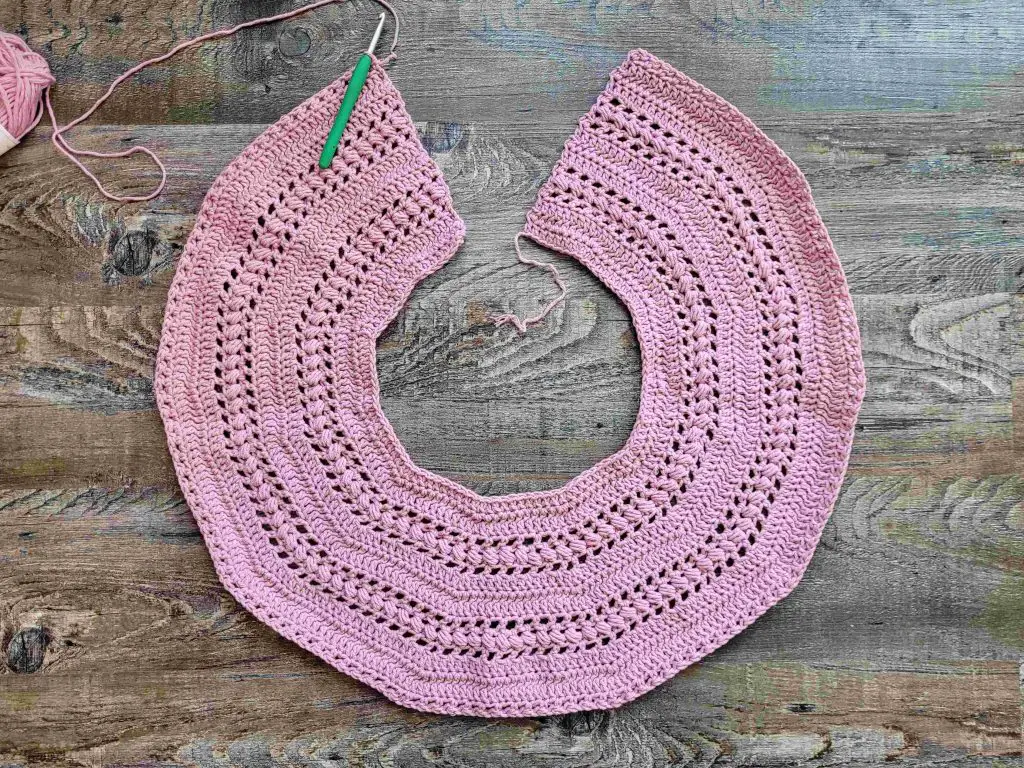
Figure 1
Lower Body
We will now work on the lower body. We will create spaces for each arm hole in the first row.
- Work this round according to your size.
Sizes XS & 3X:
Ch1. Hdc in 1st st and next 26 (n/a, n/a, n/a, n/a, n/a, 49, n/a, n/a) sts. Sk next 42 (n/a, n/a, n/a, n/a, n/a, 68, n/a, n/a) sts (armhole made). Hdc in next 53 (n/a, n/a, n/a, n/a, n/a, 99, n/a, n/a) sts. Sk next 42 (n/a, n/a, n/a, n/a, n/a, 68, n/a, n/a) sts (armhole made). Hdc in next st and each st to end. Turn. – 105 (n/a, n/a, n/a, n/a, n/a, 197, n/a, n/a) st
Sizes S & 4X:
Working in 3rd LO: Ch3. Dc in next n/a (28, n/a, n/a, n/a, n/a, n/a, 51, n/a) sts. Sk next n/a (44, n/a, n/a, n/a, n/a, n/a, 74, n/a) sts (armhole made). Dc in next n/a (61, n/a, n/a, n/a, n/a, n/a, 105, n/a) sts. Sk next n/a (44, n/a, n/a, n/a, n/a, n/a, 74, n/a) sts (armhole made). Dc in next st and each st to end. Turn. – n/a (119, n/a, n/a, n/a, n/a, n/a, 209, n/a) sts.
Sizes M, XL, & 5X:
Ch1. Hdc in 1st st, ch1, sk1. *Hdc in next st, ch1, sk1.** Repeat from * to ** to n/a (n/a, 14, n/a, 18 , n/a, n/a, n/a, 25) times. Hdc in next st, ch1. Sk next n/a (n/a, 47, n/a, 55, n/a, n/a, n/a, 79) sts (armhole made). Repeat from * to ** n/a (n/a, 33, n/a, 40, n/a, n/a, n/a, 56) times. Hdc in next st, ch1. Sk next n/a (n/a, 47, n/a, 55, n/a, n/a, n/a, 79) sts (armhole made). Repeat from * to ** until 1 st left. Hdc in last st. Turn. – n/a (n/a, 133, n/a, 165, n/a, n/a, n/a, 225) st
Size L:
Ch2, sk 1 st st, bd in next ch1 sp. *Sk next st, bd in next ch1 sp.**Repeat from * to ** n/a (n/a, n/a, 16, n/a, n/a, n/a, n/a, n/a) more times. Sk next n/a (n/a, n/a, 51, n/a, n/a, n/a, n/a, n/a) sts (armhole made). Bd in next ch1 sp. Repeat from * to ** n/a (n/a, n/a, 37, n/a, n/a, n/a, n/a, n/a) more times. Sk next n/a (n/a, n/a, 51, n/a, n/a, n/a, n/a, n/a) sts (armhole made). Bd in next ch1 sp. Repeat from * to ** until 1 st left. Dc in last st. Turn. – n/a (n/a, n/a, 149, n/a, n/a, n/a, n/a, n/a) st
Size 2X:
Ch3. Dc in next n/a (n/a, n/a, n/a, n/a, 43, n/a, n/a, n/a) sts. Sk next n/a (n/a, n/a, n/a, n/a, 62, n/a, n/a, n/a) sts (armhole made). Dc in next n/a (n/a, n/a, n/a, n/a, 91, n/a, n/a, n/a) sts. Sk next n/a (n/a, n/a, n/a, n/a, 62, n/a, n/a, n/a) sts (armhole made). Dc in next st and each st to end. Turn. – n/a (n/a, n/a, n/a, n/a, 179, n/a, n/a, n/a) st
Your piece should now look similar to Figure 2. The bust section should measure 27” (31”, 35”, 39”, 43”, 47”, 51”, 55”, 59”) and each arm section should measure 11″ (11 1/2″, 12″, 13″, 14 1/2″, 16 1/2″, 18, 19 1/2″ 20 1/2″). Be sure to measure across the top of your last row, following the curve.
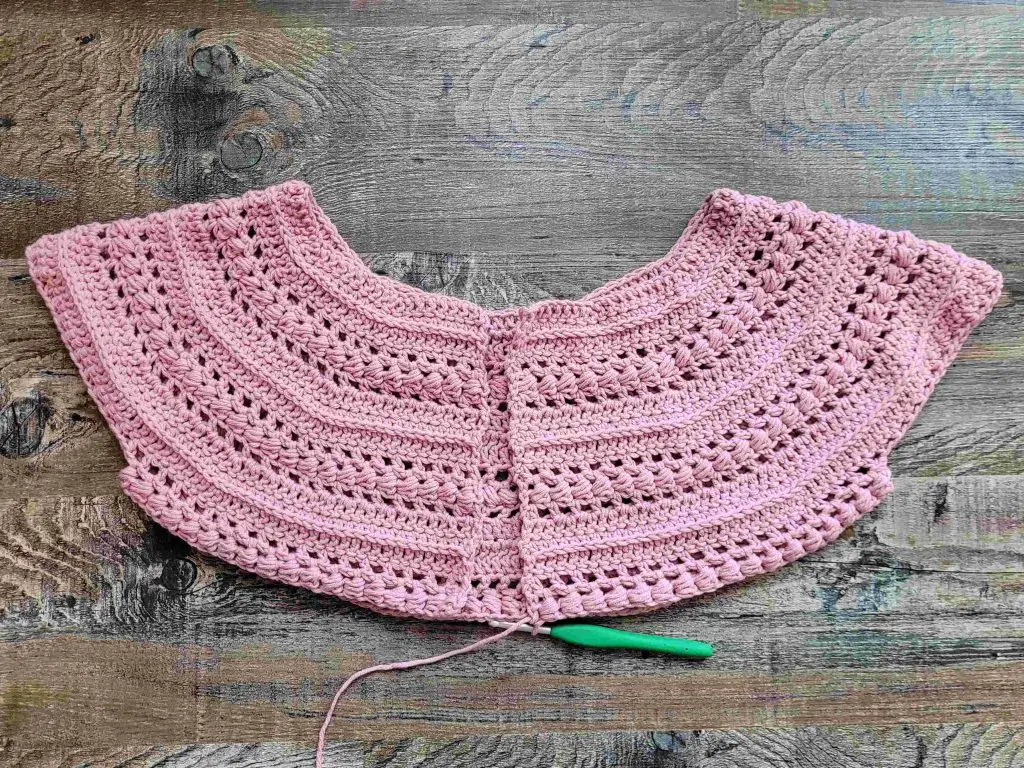
Figure 2
From here, you will be working evenly in the same stitch pattern as before. Begin with the row that is marked with your size and continue on with the subsequent rows. For example: If you are making a size L, you would begin at row 5 and continue to rows 6 & 7. Then you would follow the instructions below.
- Sizes XS & 3X begin here: (WS) Working in the 3rd LO: Ch3. Dc in next st and each st to end. Turn. – 105 (119, 133, 149, 165, 179, 197, 209, 225) st
- Sizes S & 4X begin here: (RS) Ch1. Hdc in 1st st, ch1, sk1 st. *Hdc in next st, ch1, sk1 st.* Repeat from * to ** until 1 st left. Hdc in last st. Turn. – 105 (119, 133, 149, 165, 179, 197, 209, 223) st
- Sizes M & 5X begin here: (WS) Ch2, sk 1st st. Bd in next ch1 sp. *Sk 1 st, bd in next ch1 sp.** Repeat from * to ** until 1 st left. Dc in last st. Turn. – 105 (119, 133, 149, 165, 179, 197, 209, 225) st
- Size L begin here: (RS) Ch1. Hdc in 1st st, ch1, sk1 st. *Hdc in next st, ch1, sk1 st.* Repeat from * to ** until 1 st left. Hdc in last st. Turn. – 105 (119, 133, 149, 165, 179, 197, 209, 225) st
- Size XL begin here: (WS) Ch3. Dc in next ch sp and each st and ch sp to end. Turn. – 105 (119, 133, 149, 165, 179, 197, 209, 225) st
- Size 2X begin here: (RS) Ch1. Hdc in 1st st and each st to end. Turn. – 105 (119, 133, 149, 165, 179, 197, 209, 225) st
Repeat rows 2-7 until you have achieved your desired length minus 1 ½”. End with a repeat of row 7. For the cardigan pictured, I worked a total of 22 rows for the lower body. Once you have your desired length, work round 8 below.
- (WS) Working in 3rd LO: Ch1. Sc in 1st st and each st across. Turn. – 105 (119, 133, 149, 165, 179, 197, 209, 225) st
Bauble Cardigan – Free Crochet Cardigan Pattern (Sizes XS–5XL)
Bottom Ribbing
The bottom hem is finished off with a ribbed trim.
- (RS) Ch6 (see Figure 3). Sc in back hump of 2nd ch and each ch across (see Figure 4). Ss to st you chained from. Ss to next st (see Figure 5). Turn. – 5 st + 2 ss
- (WS) Sk 2 ss, sc in blo of next 4 sts. Sc in both loops of last st (see Figure 6). Turn. – 5 st
- (RS) Ch1. Sc in 1st st. Sc in blo of next 4 sts (see Figure 7). Ss to next 2 unworked sts (see Figure 8). Turn. – 5 st + 2 ss
Repeat rows 2 & 3 across the bottom of your sweater. For your last repeat of row 3, you will need to work a ss2tog to incorporate the last st. Then, work the last repeat of row 2 as normal. Do not bind off. Your project should look similar to Figure 9 below.
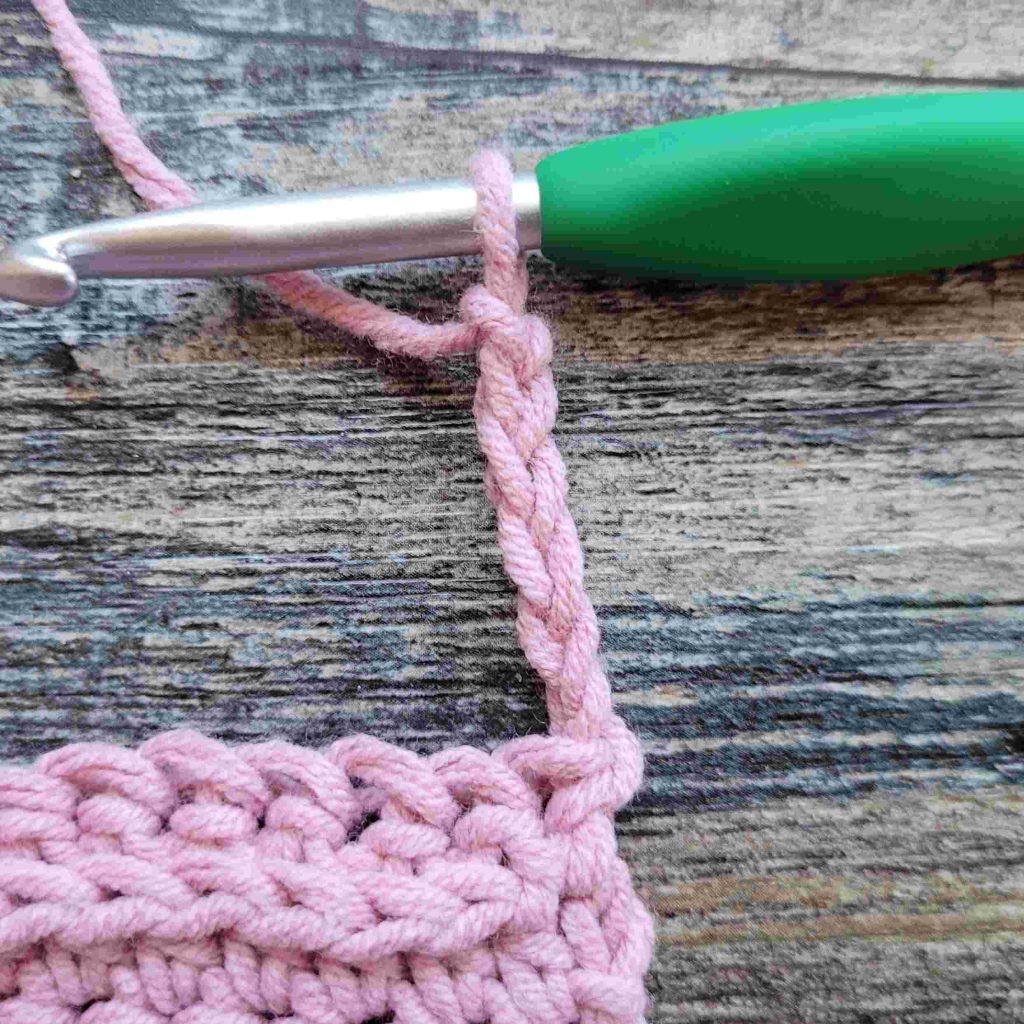
Figure 3
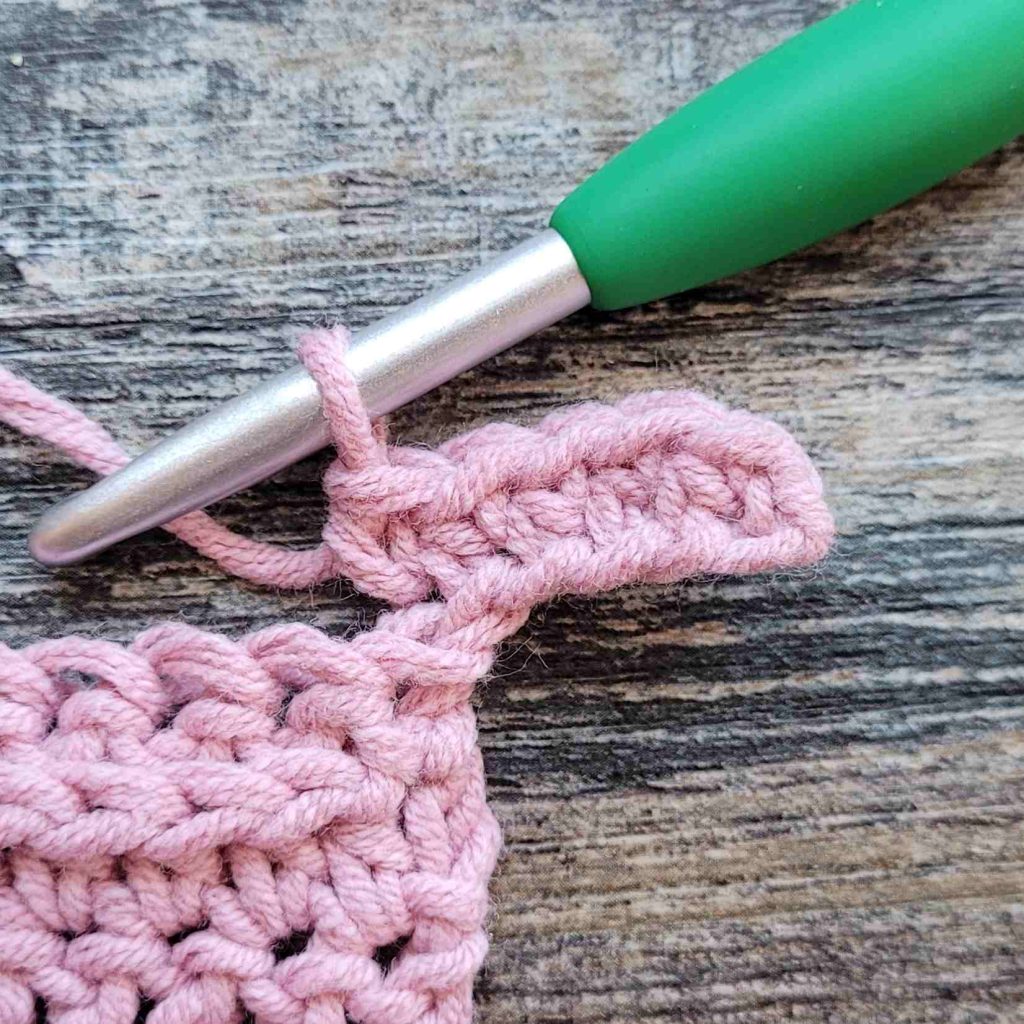
Figure 4
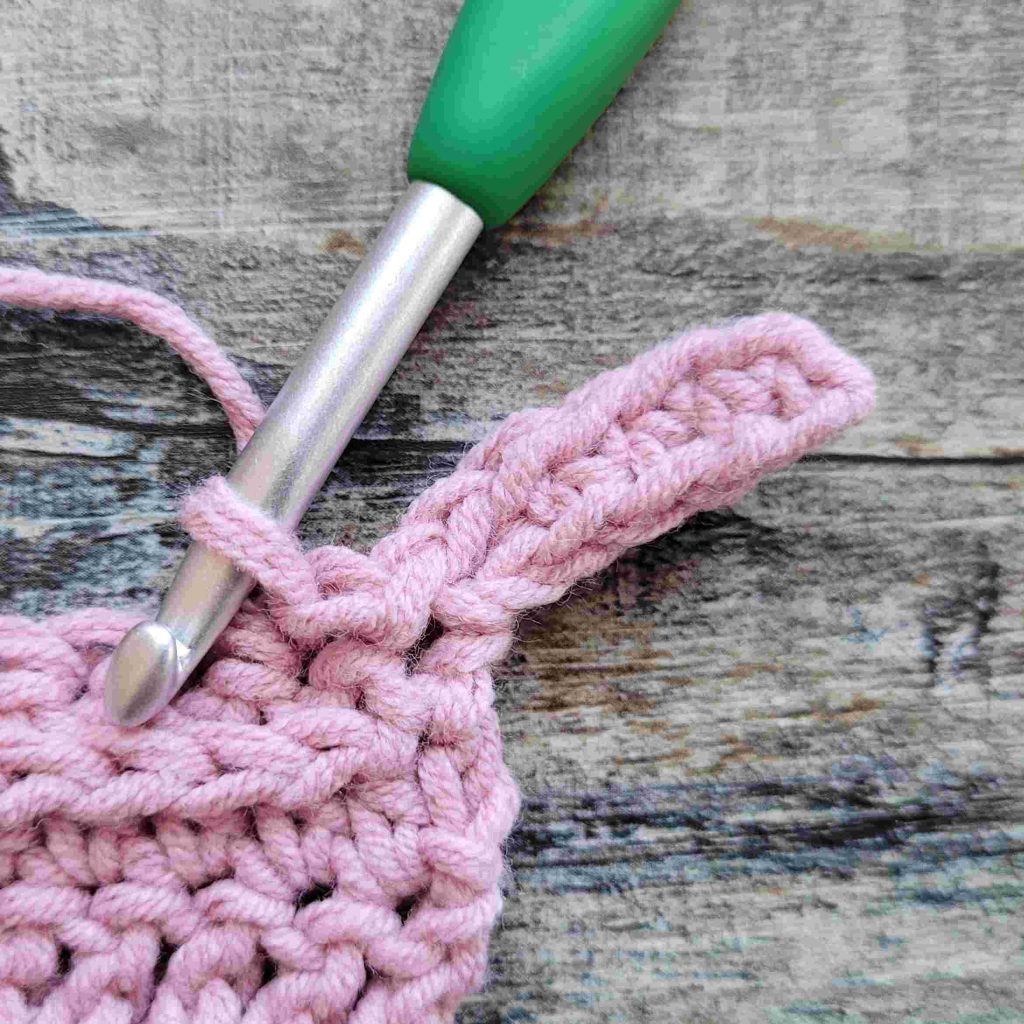
Figure 5
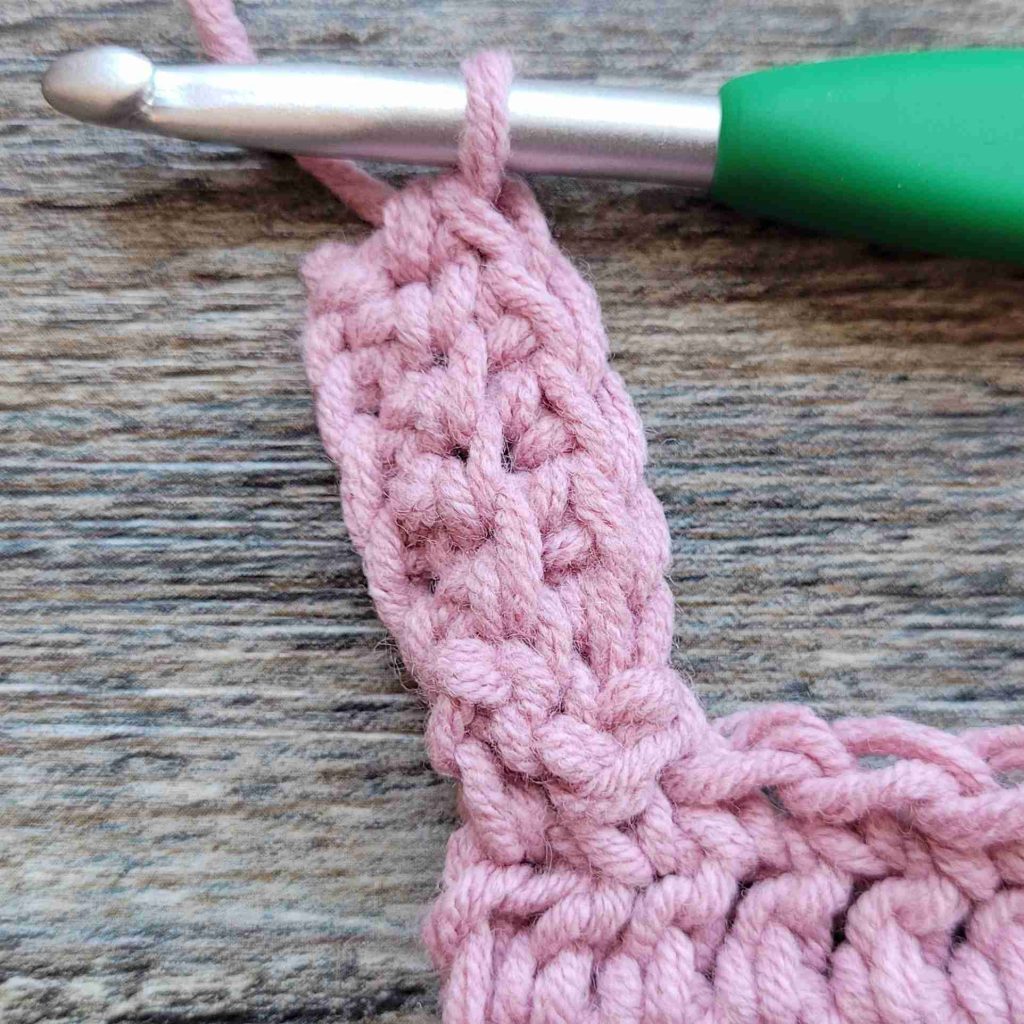
Figure 6
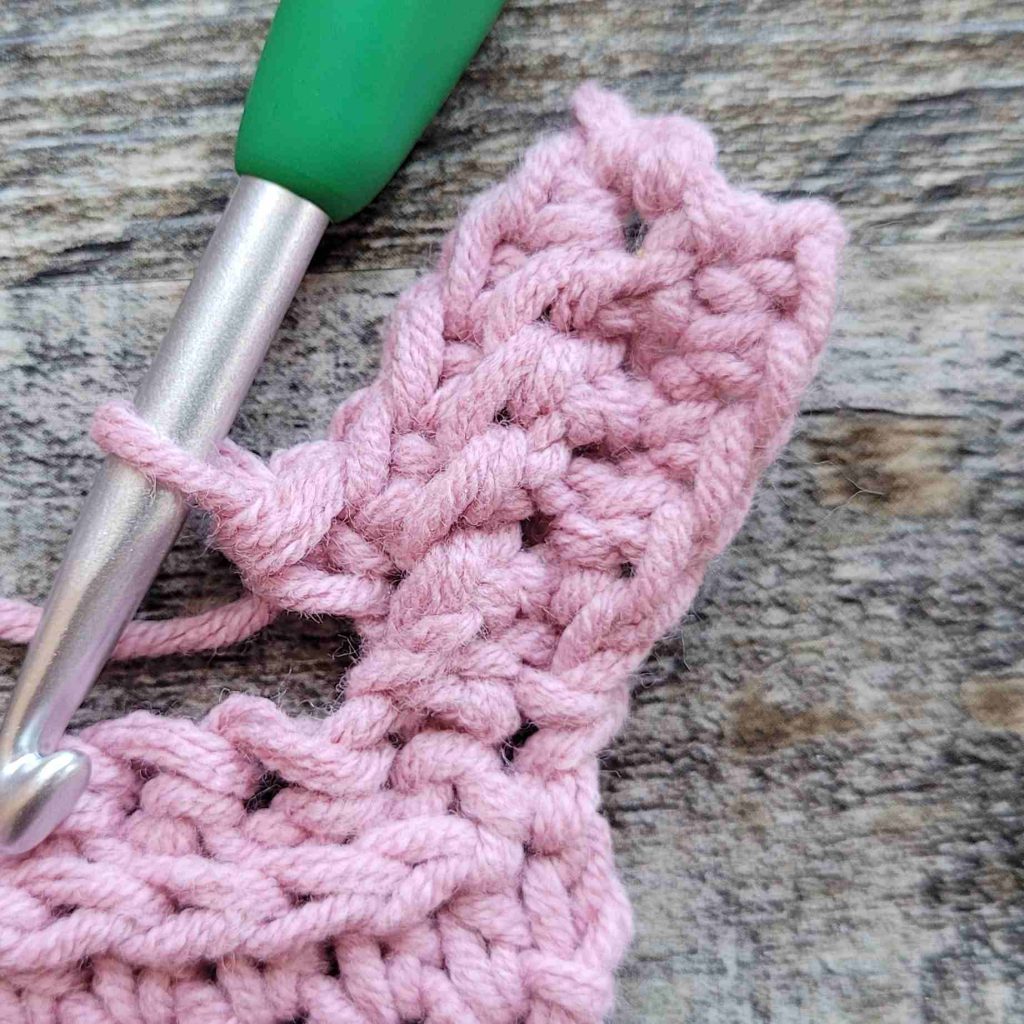
Figure 7
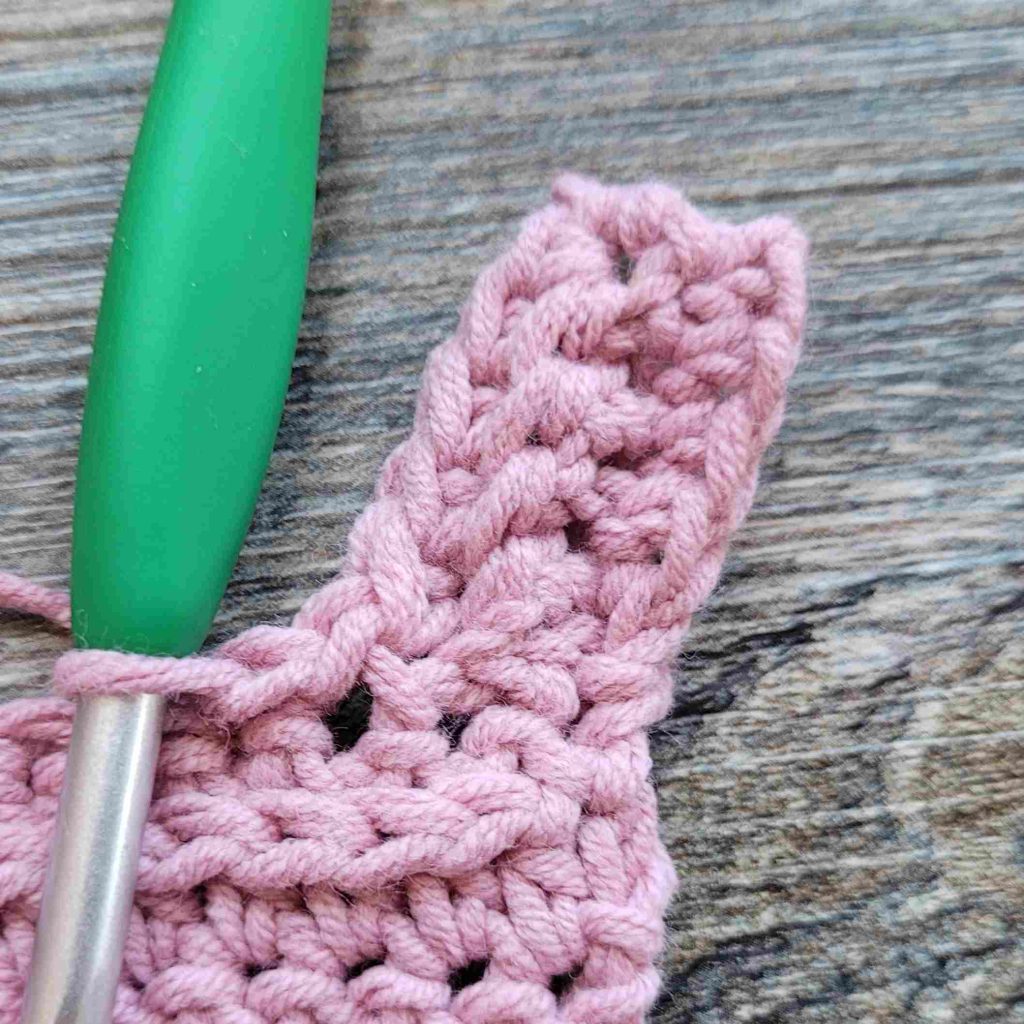
Figure 8
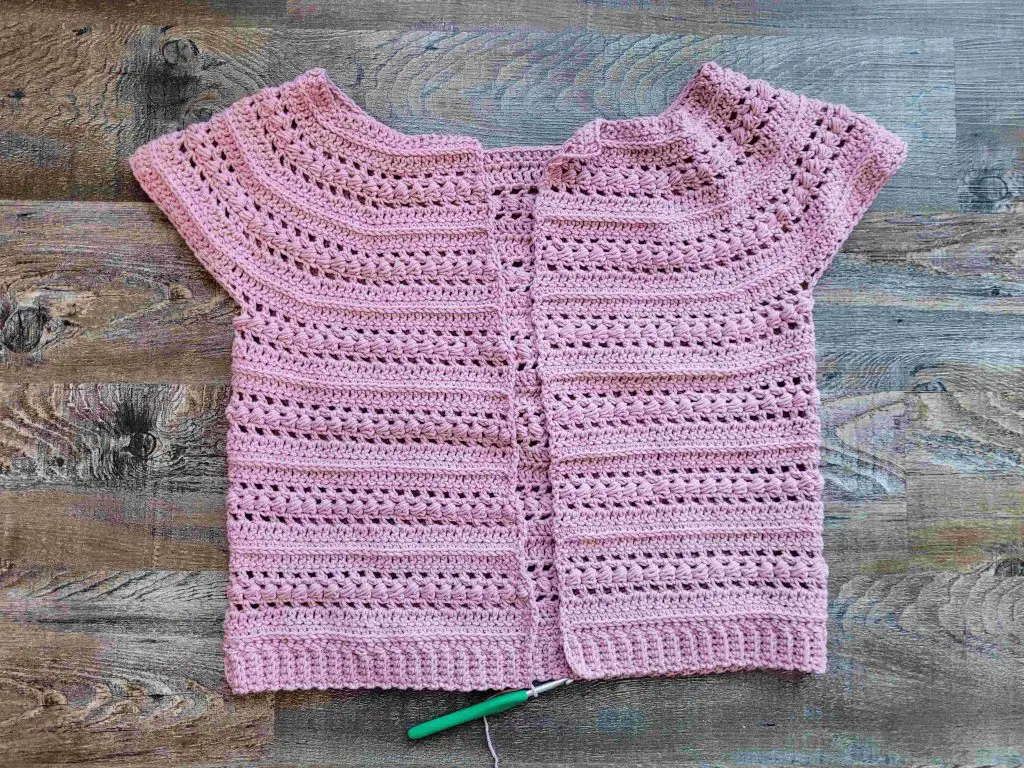
Figure 9
Front And Neck Edging
We will now add a trim to the front and neck edges. We will begin by adding a row of sc first running up the right side of the front, then along the neck edge, and finally down the left side of the front (see illustration in Figure 10).
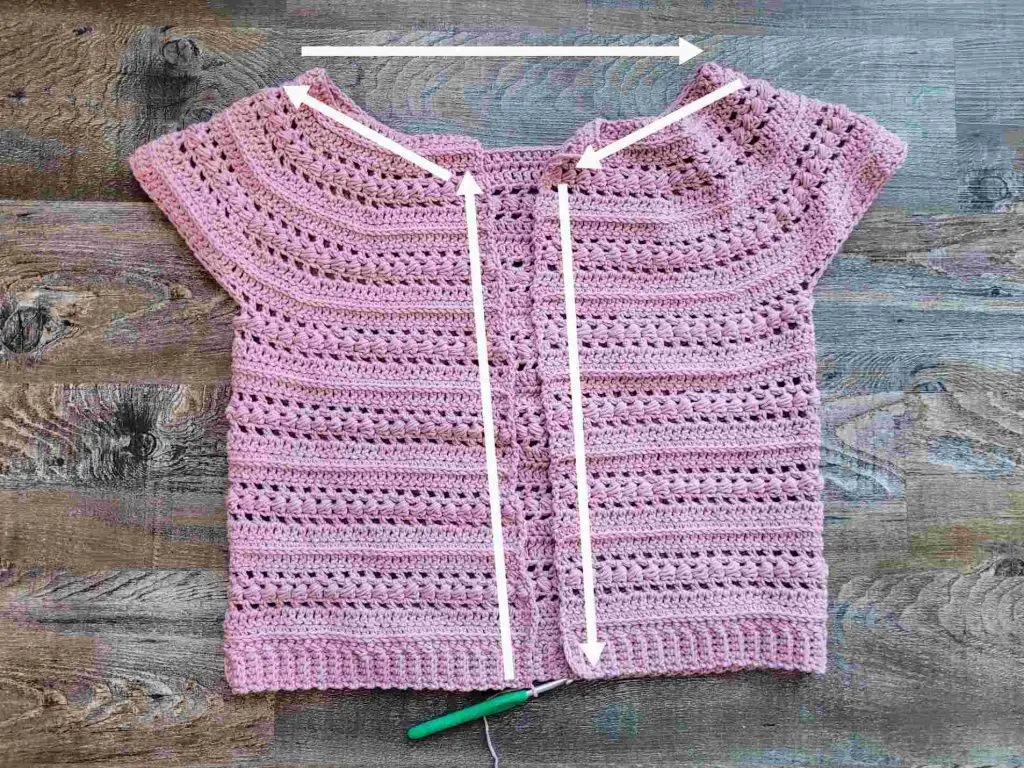
Figure 10
- (RS)- Ch1, sc in 1st st. Sc in blo of next 4 sts. Sc up the rest of this side in the following manner:
- Place 1 sc in sc row.
- Place 1 sc in each hdc and hdc, ch1 row.
- Place 2 sc in each dc row.
- Place 2 sc in each bd row.
- Your edge should lay flat like mine does in Figure 11.
– Work in this manner until your reach the the dc row at the top (see Figure 12). Work 1 sc in the side of the dc row, then (sc, ch1, sc) in top of dc (1st ch of neck edge) (see Figure 13).
– Sc in each ch around the edge of the neck until only 1 ch left. (Sc, ch1, sc) in last ch (see Figure 14).
– Work 1 sc in the side of the 1st dc row. Sc down the other side of the front in the same manner as you did for the first side (see Figure 15) until you reach the ribbing.
– Sc in blo of first 4 ribbing sts. Sc in both loops of last st. Turn. Your project should now look similar to Figure 16 below.
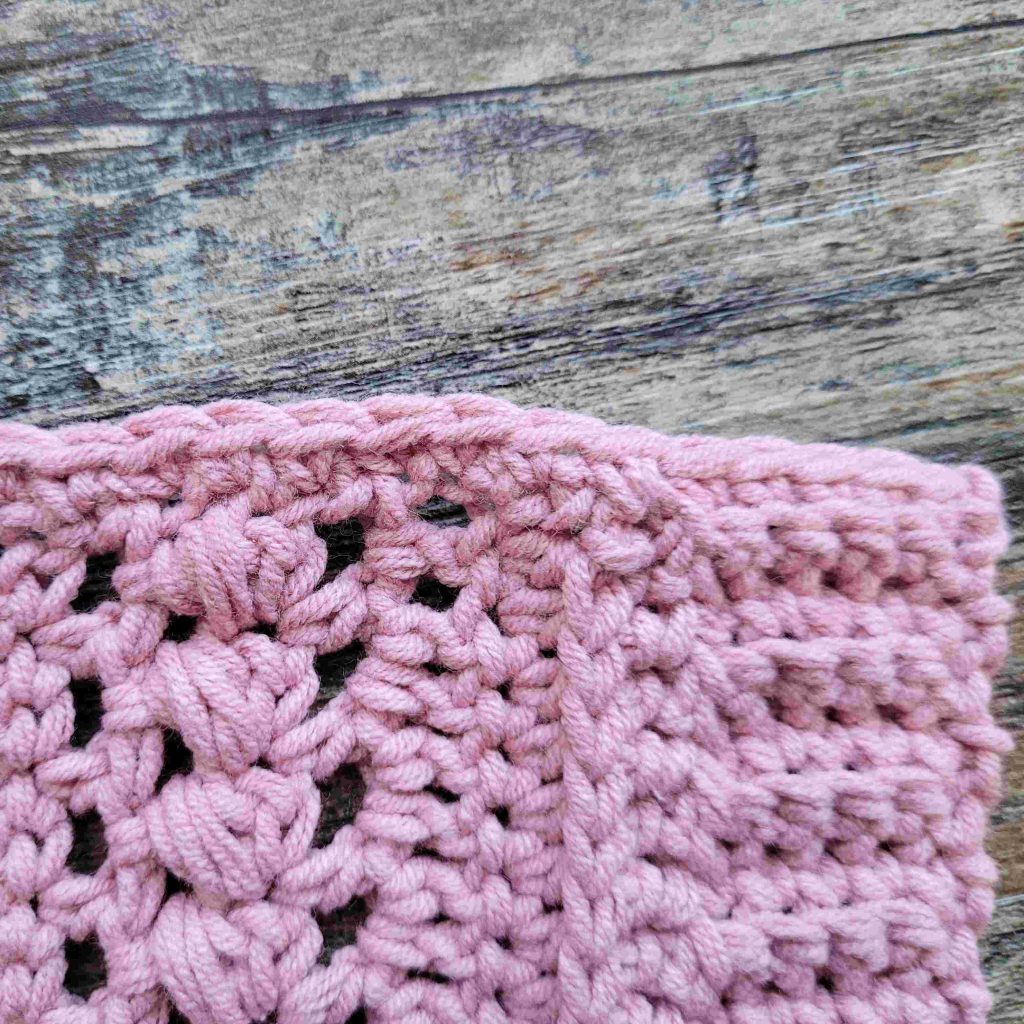
Figure 11
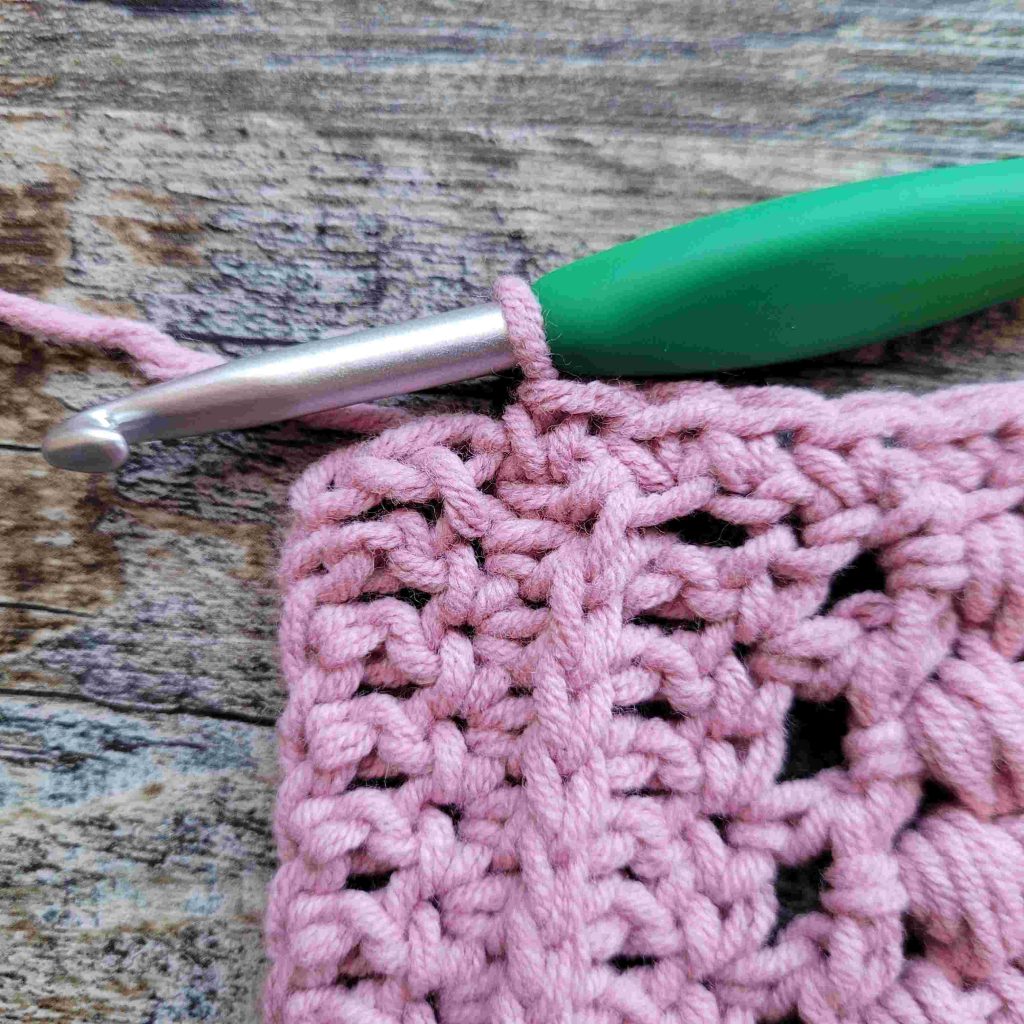
Figure 12
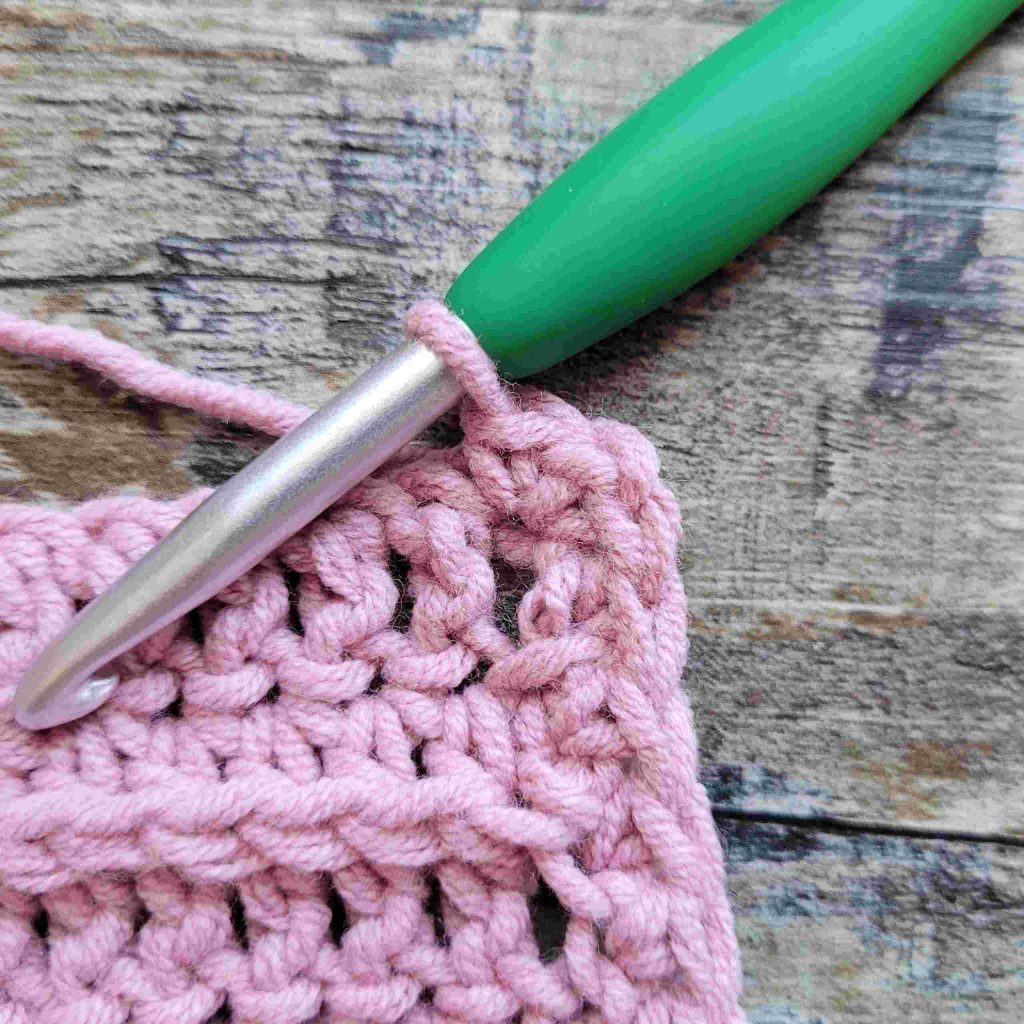
Figure 13
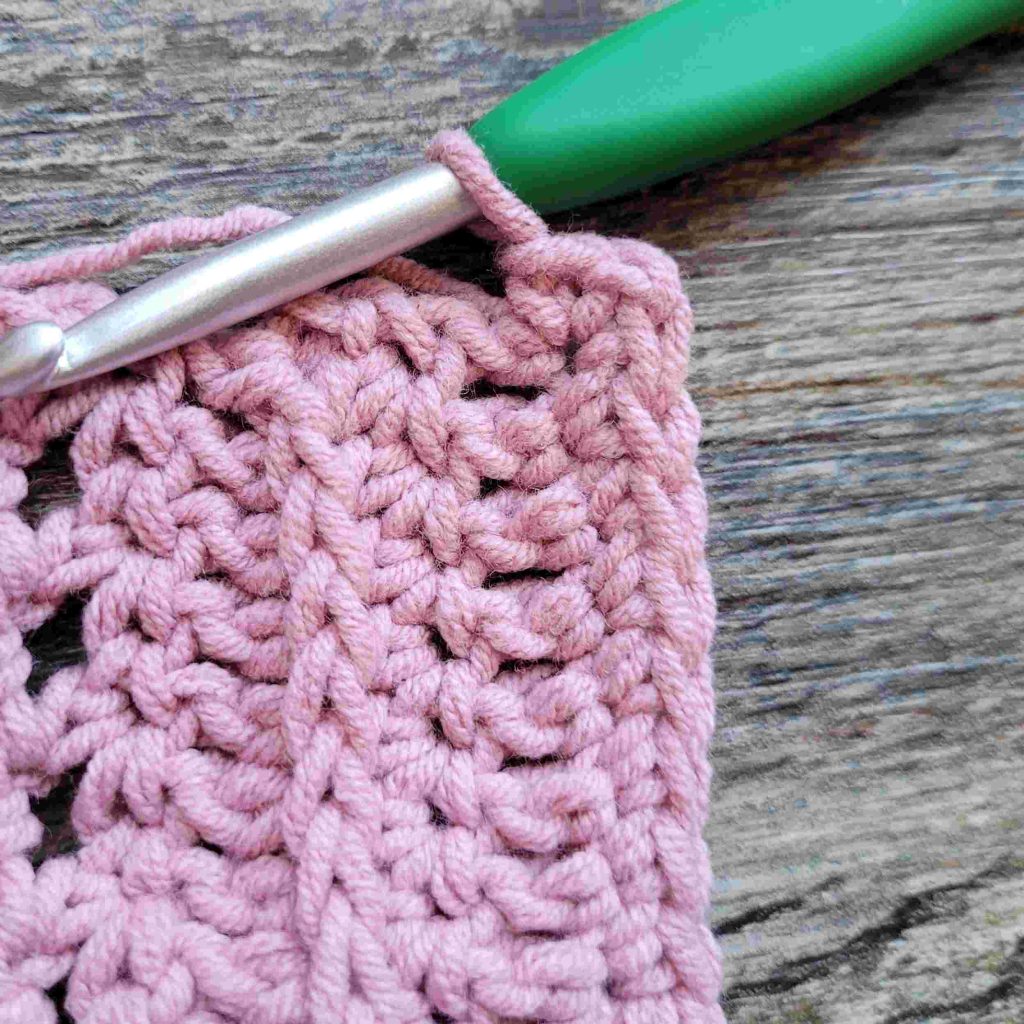
Figure 14

Figure 15

Figure 16
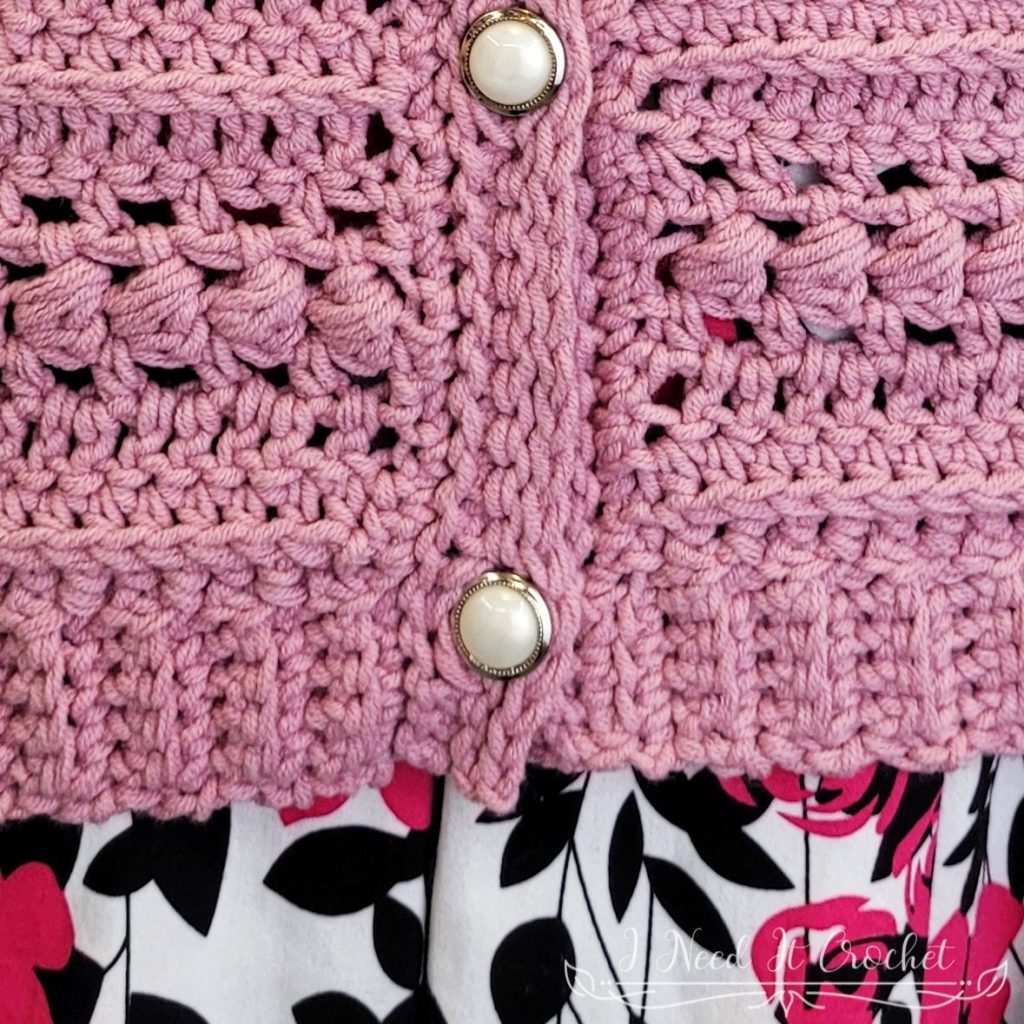
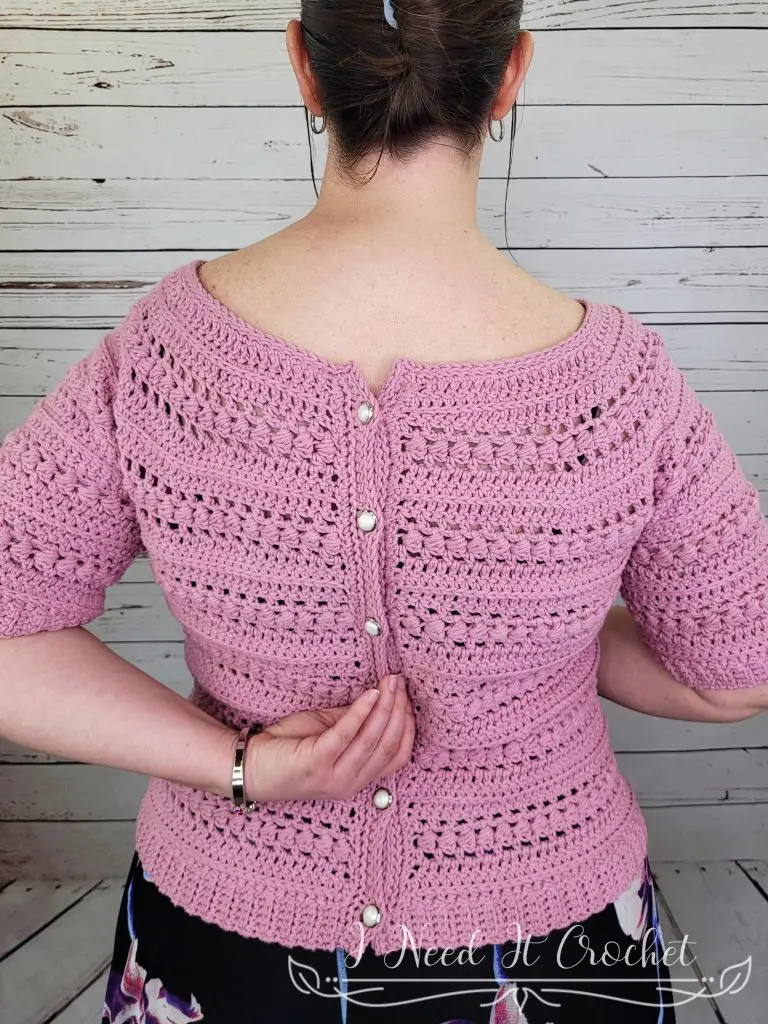
If you are adding buttons to your sweater, it is at this point that you should figure out the buttonhole placement. To do this, I laid my sweater flat and placed the buttons where I would like them to be along the edge of my sweater (see Figure 17). Then, I used bobby pins (locking stitch markers also work well) to mark where I should place the button holes (see Figure 18). Be sure the button holes are evenly spaced.
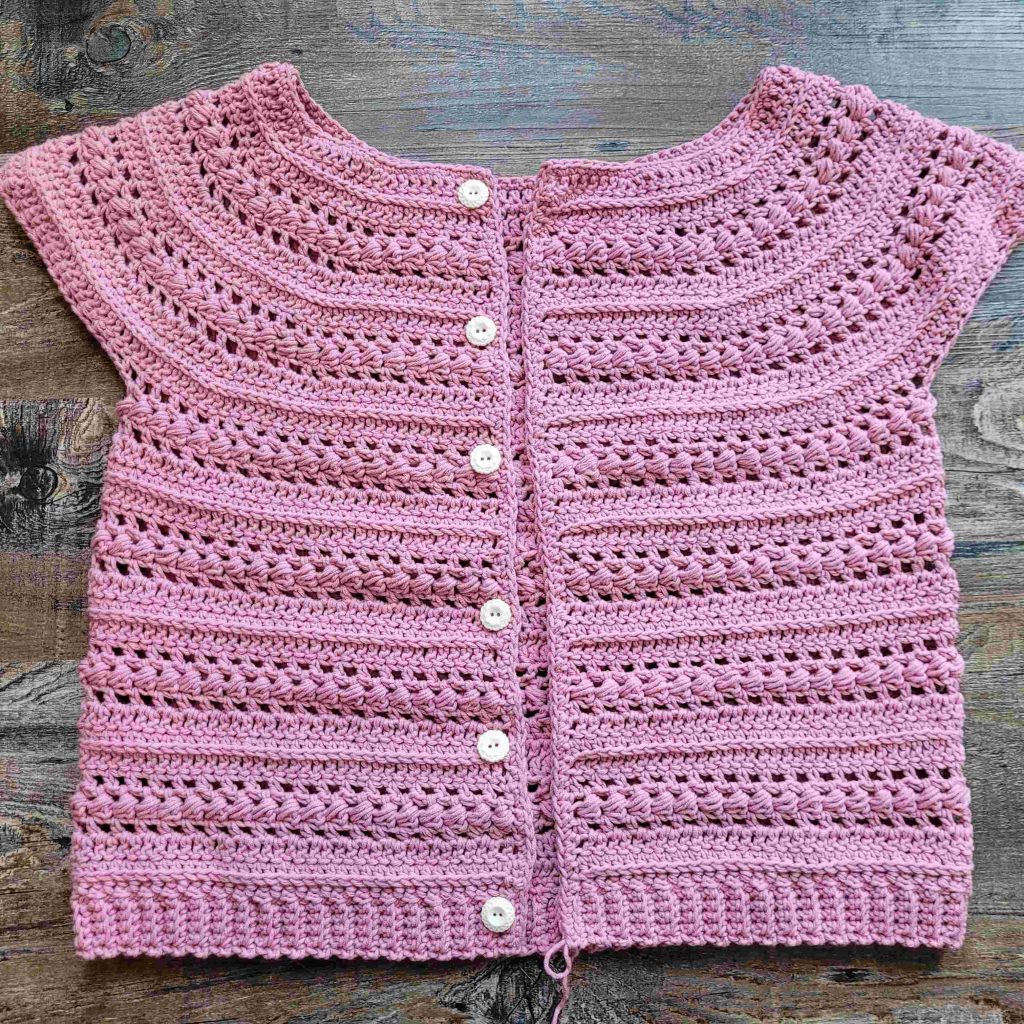
Figure 17
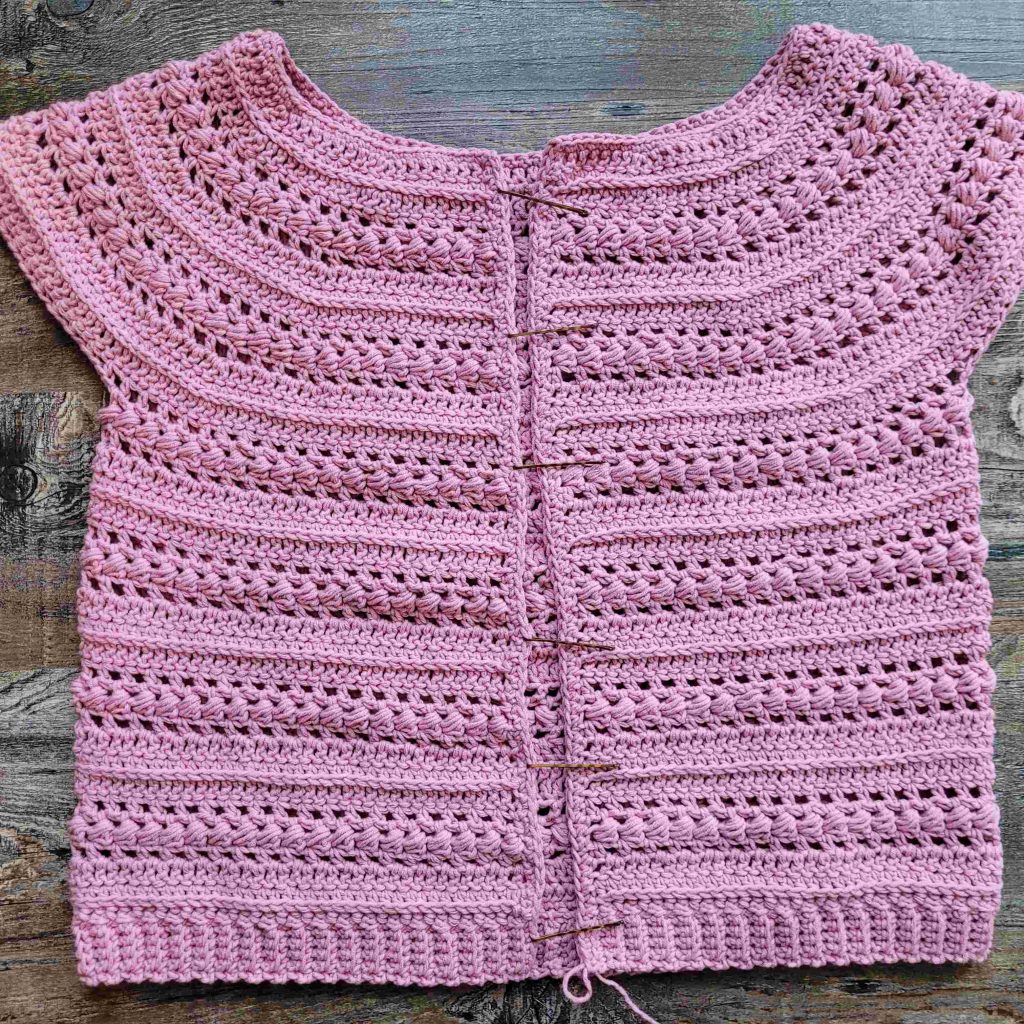
Figure 18
Bauble Cardigan – Free Crochet Cardigan Pattern (Sizes XS–5XL)
Now we will add rows of slip stitches. First, we will work the left front edge. Next, we will work the neck edge. Then, we will work the right front edge. Finally, we will finish off with one more row to all three edges. Note: If you find your edges starting to pucker or pull in, try using a larger hook for your slip stitch rows.
- (WS) Ch1. Ss in blo of each st up the left side, ending in the ch1 of the (sc, ch1, sc) at the top. Turn.
- (RS) Ch1. Ss in each st down the left side. Turn.
- (WS) Ch1. Ss in blo of each st up the left side until you get to the top. Rotate your work ¼ turn clockwise.
- Ch1. Work 2 ss in the side of the edging rows. Ss in blo of each st on neckline.
- Ch1. Ss in blo of each st down right side.
- (RS) Ch1. Ss in each st up the right side, ending in the ch1 at the top. Turn.
If you are adding buttons: This row is where you should add the button holes. Each time you reach a st marker, ch2, and sk 2 sts. Feel free to adjust the number of chains to fit with your buttons. - (WS) Ch1. Ss in blo of each st down the right side. Turn.
- (RS) Ch1. Ss in each st up the right side until you get to the top. Rotate your work ¼ turn clockwise.
- Ch1. Work 2 ss in the side of the edging rows. Ss in each st around neckline.
- Ch1. Ss in each st down the left side. Bind off.
Sleeves
We will now add the sleeves. They are worked in the same stitch pattern as before. Join your yarn in the 1st available st near the underarm of your sleeve. Note: You may notice a hole in the underarm after completing round 1. After the sleeve is complete, we will fix that with the starting end of your yarn. So be sure to start with an extra long yarn tail.
- Work this round according to your size. Pay attention to your stitch count.
Sizes XS & 3X: Join with right side facing you.
Ch1. Hdc in 1st st and next 42 (n/a, n/a, n/a, n/a, n/a, 68, n/a, n/a) sts. Ss to join to 1st st. Turn. – 42 (n/a, n/a, n/a, n/a, n/a, 68, n/a, n/a) st
Sizes S & 4X: Join with wrong side facing you.
Working in 3rd LO: Ch3. Dc in next n/a (44, n/a, n/a, n/a, n/a, n/a, 74, n/a) sts. Ss to join to 1st st. Turn. – n/a (44, n/a, n/a, n/a, n/a, n/a, 74, n/a) st
Sizes M, XL, & 5X: Join with right side facing you.
Ch1, hdc in next st (decrease made), ch1, sk1. *Hdc in next st, ch1, sk1.** Repeat from * to ** around. SS to join to 1st st. Turn. – n/a (n/a, 46, n/a, 54, n/a, n/a, n/a, 78) st
Size L: Join with wrong side facing you.
Ch2, bd in next ch1 sp. *Sk1 st, bd in next ch1 sp.** Repeat from * to ** around. Ss to join to 1st st. Turn. – n/a (n/a, n/a, 50, n/a, n/a, n/a, n/a, n/a) st
Size 2X: Join with wrong side facing you.
Ch3. Dc in next n/a (n/a, n/a, n/a, n/a, 61, n/a, n/a, n/a) sts. Ss to join to 1st st. Turn. – n/a (n/a, n/a, n/a, n/a, 62, n/a, n/a, n/a) st
From here, you will be working evenly in the same stitch pattern as before. Begin with the round that is marked with your size and continue on with the subsequent rounds until you have achieved your desired length minus 1 ½”. End with a repeat of row 7. For example, if you are making a size L, you would begin with round 5, then continue to rounds 6 & 7. Then follow the instructions below. For my sleeves, I only worked 10 rounds before moving on to the cuff. But you are welcome to make your sleeves as long or as short as you please!
- Sizes XS & 3X begin here: (WS) Working in the 3rd LO: Ch3. Dc in next st and each st around. Ss to join to 1st st. Turn. – 42 (44, 46, 50, 54, 62, 68, 74, 78) st
- Sizes S & 4X begin here: (RS) Ch1. Hdc in 1st st, ch1, sk1 st. *Hdc in next st, ch1, sk1 st.** Repeat from * to ** around. Ss to join to 1st st. Turn. – 42 (44, 46, 50, 54, 62, 68, 74, 78) st
- Sizes M & 5X begin here: (WS) Ch2, bd in next ch1 sp. *Sk1 st, bd in next ch1 sp.** Repeat from * to ** around. Ss to join to 1st st. Turn. – 42 (44, 46, 50, 54, 62, 68, 74, 78) st
- Size L begin here: (RS) Ch1. Hdc in 1st st, ch1, sk1 st. *Hdc in next st, ch1, sk1 st.** Repeat from * to ** around. Ss to join to 1st st. Turn. – 42 (44, 46, 50, 54, 62, 68, 74, 78) st
- Size XL begin here: (WS) Ch3. Dc in next ch1 sp, and each st and ch1 sp around. Ss to join to 1st st. Turn. – 42 (44, 46, 50, 54, 62, 68, 74, 78) st
- Size 2X begin here: (RS) Ch1. Hdc in 1st st and each st around. Ss to join to 1st st. Turn. – 42 (44, 46, 50, 54, 62, 68, 74, 78) st
Repeat rounds 2-7 until your sleeve is the desired length minus 1 ½”. End with a repeat of row 7. Then, work round 8 below.
- (WS) Working in the 3rd LO: Ch1. Sc in 1st st and each st around. Ss to join to 1st st. Turn. Do not bind off. – 42 (44, 46, 50, 54, 62, 68, 74, 78) st
Bauble Cardigan – Free Crochet Cardigan Pattern (Sizes XS–5XL)
Sleeve Cuff
The cuff is worked in short rows off of the last round of the sleeve. You should have the RS of your work facing you.
- (RS) Ch5. Sc in 2nd ch and each ch across. Ss to st you chained from. Ss to next st. Turn. – 4 st + 2 ss
- (WS) Sk 2 ss, sc in blo of next 3 sts. Sc in both loops of last st. Turn. – 4 st
- Ch1. Sc in 1st st. Sc in blo of next 3 sts. Ss to next 2 unworked sts of sleeve. Turn. – 4 st + 2 ss
Repeat rows 2 & 3 all the way around the sleeve edge, ending with a repeat of row 2.
With the wrong side facing you, slip stitch the ends of the cuff together, working through the bottom of the first row and back loop of the last row. Bind off.
Use the starting yarn end to whip stitch the hole in the underarm closed. Attach your buttons, weave in your ends, and you’re done!
I hope you love your new crochet cardigan, and I look forward to seeing all of your beautiful pictures on Ravelry!
If you’d like to know when I post new patterns and tutorials like the Bauble Cardigan – Free Crochet Cardigan Pattern (Sizes XS–5XL), head on over to my Facebook and Instagram and give me a like and a follow!
If you enjoyed the Bauble Cardigan – Free Crochet Cardigan Pattern (Sizes XS–5XL), you may want to check out my other designs!
Bauble Cardigan – Free Crochet Cardigan Pattern (Sizes XS–5XL)
And until next time… Happy Hooking! 😉
Just stunningly beautiful! I can’t wait to make this. Thank you so much for generously sharing your lovely designs.
Oh my goodness, I am so flattered! Thank you! <3