

Free Crochet Shawl Pattern – Thalassa Shawl
Thalassa Shawl – A Dreamy, Easy Crochet Shawl Pattern for Summer
If you’re searching for the perfect crochet summer shawl pattern, you’re in the right place! The Thalassa Shawl is a soft, lightweight design that’s as meditative to make as it is beautiful to wear. Whether you’re headed to the beach, lounging in your backyard, or just looking for a light layer to throw over your shoulders, this easy free crochet shawl pattern – Thalassa Shawl is the perfect project.

Free Crochet Shawl Pattern – Thalassa Shawl
The Free Crochet Shawl Pattern – Thalassa Shawl is copyrighted by I Need It Crochet. You may not copy, share, change, or sell the pattern itself. Also, you may not claim this pattern as your own. All pictures contained in this pattern fall under the copyright and may not be used.
Finished items made from the Free Crochet Shawl Pattern – Thalassa Shawl belong to you, and you may do what you wish with them. If you choose to sell them on Etsy, I would very much appreciate it if you credited me as the pattern designer.
Where Can I Buy The Pdf?
The entire pattern is available to view for free on this page (you just have to scroll down to see it). But if you would prefer to have a printable pdf copy of the pattern, you can purchase it for a small fee from my Ravelry and Etsy stores. Just click the graphics below.
This pattern is 11 pages long and includes a full picture tutorial for the double slip stitch. A printable pdf will be easier to follow, and you can make notes on it as you go. I find it to be the easier option. But if you like to use the online version, it is here 24/7 for you to view. Enjoy!

Free Crochet Shawl Pattern – Thalassa Shawl
Free Crochet Shawl Pattern – Thalassa Shawl
Inspired by the Rhythm of the Sea
From a very young age, I’ve always been drawn to water. Whether it’s a lake, a river, the ocean, or even a quiet marsh, I could spend hours simply being near it. That lifelong connection is probably why I have such a soft spot for shell patterns.
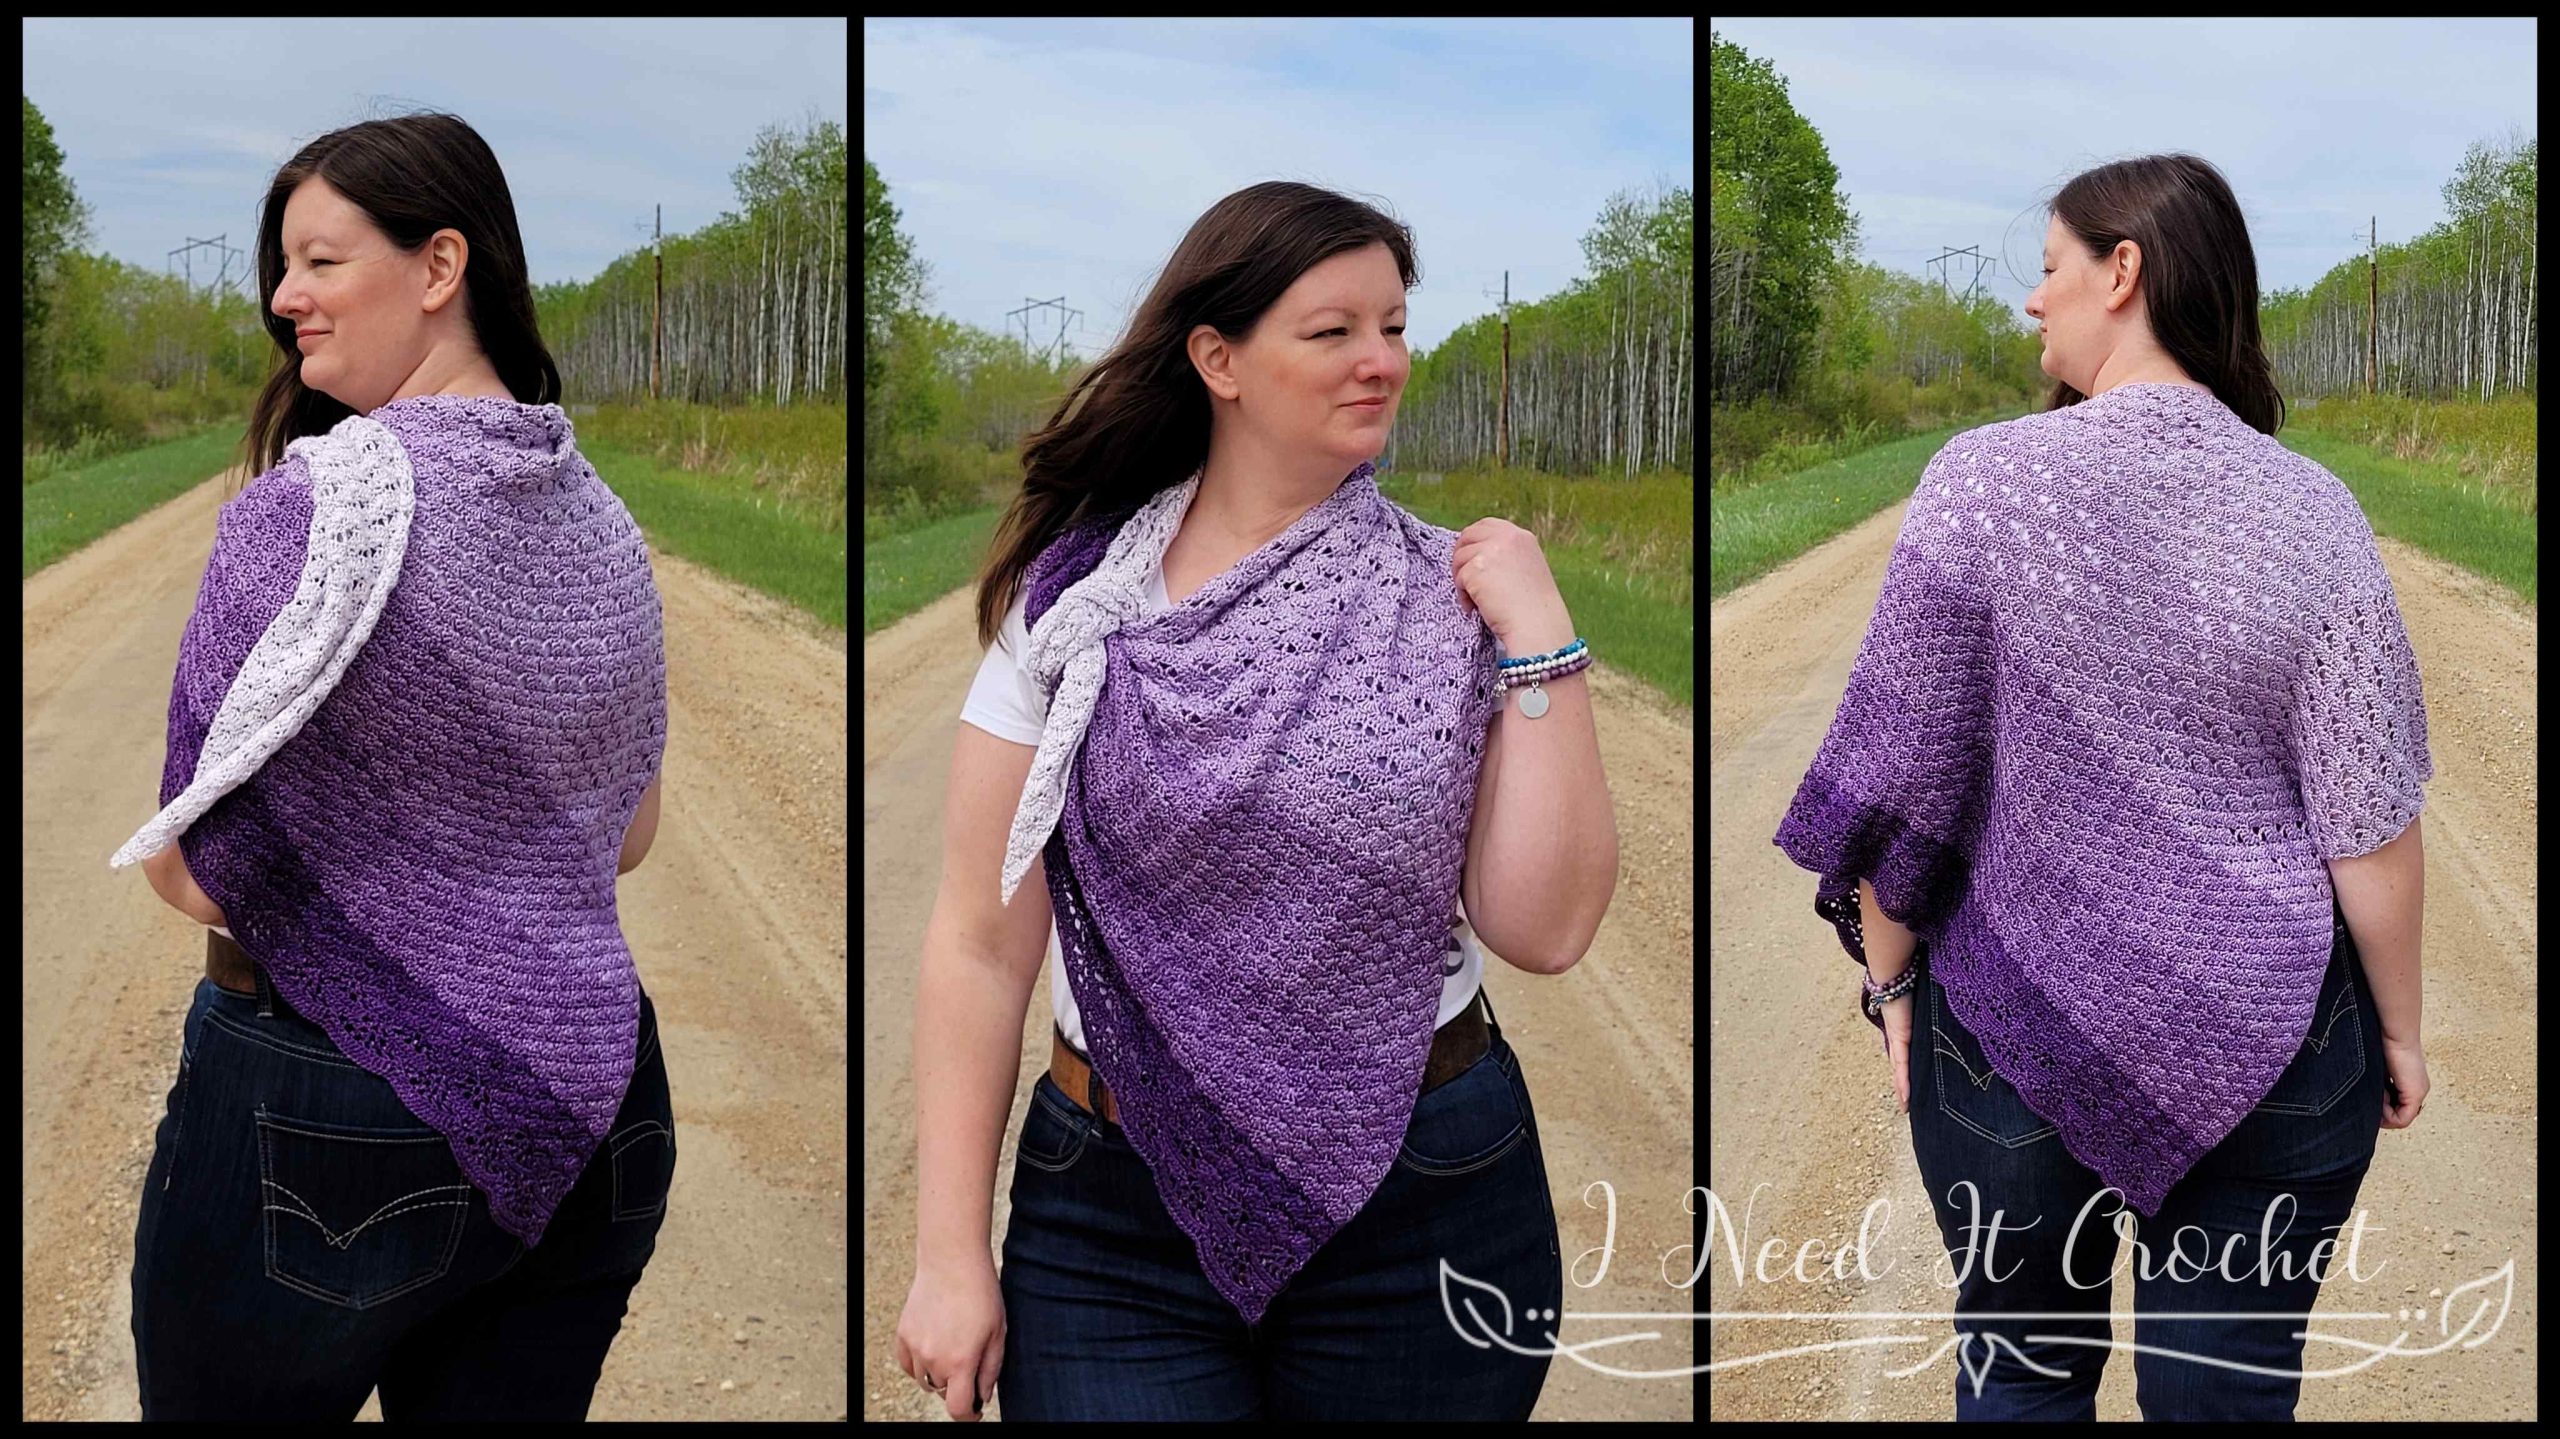
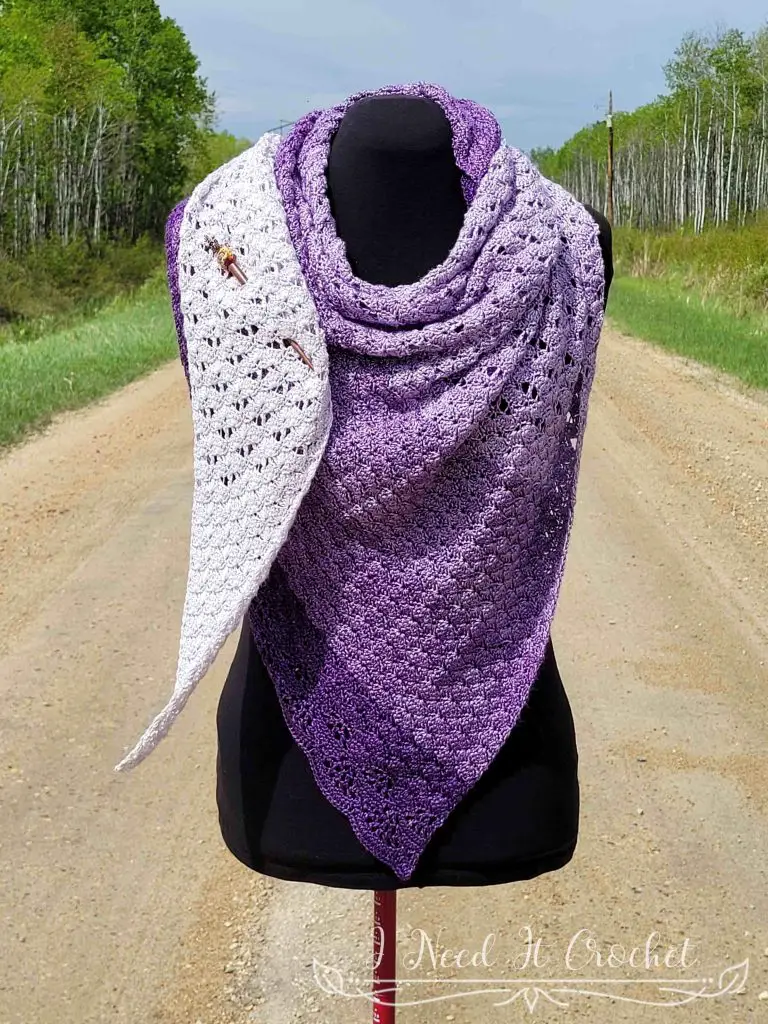
The Thalassa Shawl features a softly fading shell design, finished with a delicate lace edge. The shell pattern ebbs and flows like the tides, which inspired me to name it after Thalassa, a goddess of the sea.
For this design, I used Allure yarn from Expression Fiber Arts. It’s a luxurious 100% silk that feels unbelievably soft and smooth in your hands. The colour kit I chose, called Arwen’s Gown, flows beautifully from pure white to a deep, regal purple, enhancing the graceful wave of the stitches and adding a magical, oceanic feel to the finished piece.
A Special Collaboration with Expression Fiber Arts
I’m so happy to be collaborating with Expression Fiber Arts again. Their yarns are always a dream to crochet with, and their team is just as lovely — friendly, authentic, and truly down-to-earth.
Want to use the same yarn I did? You can find the Arwen’s Gown Allure Fingering kit on the yarn page here, and use the code EFA-Allure-Silk15 to get 15% off your yarn purchase.
This pattern and yarn were made for each other, and I hope you enjoy stitching up your own version just as much as I enjoyed designing it.
Free Crochet Shawl Pattern – Thalassa Shawl
A One-Piece Crochet Shawl Pattern
This crochet shawl pattern is worked in one piece, row by row. It’s approachable for adventurous beginners and relaxing for more experienced crocheters.
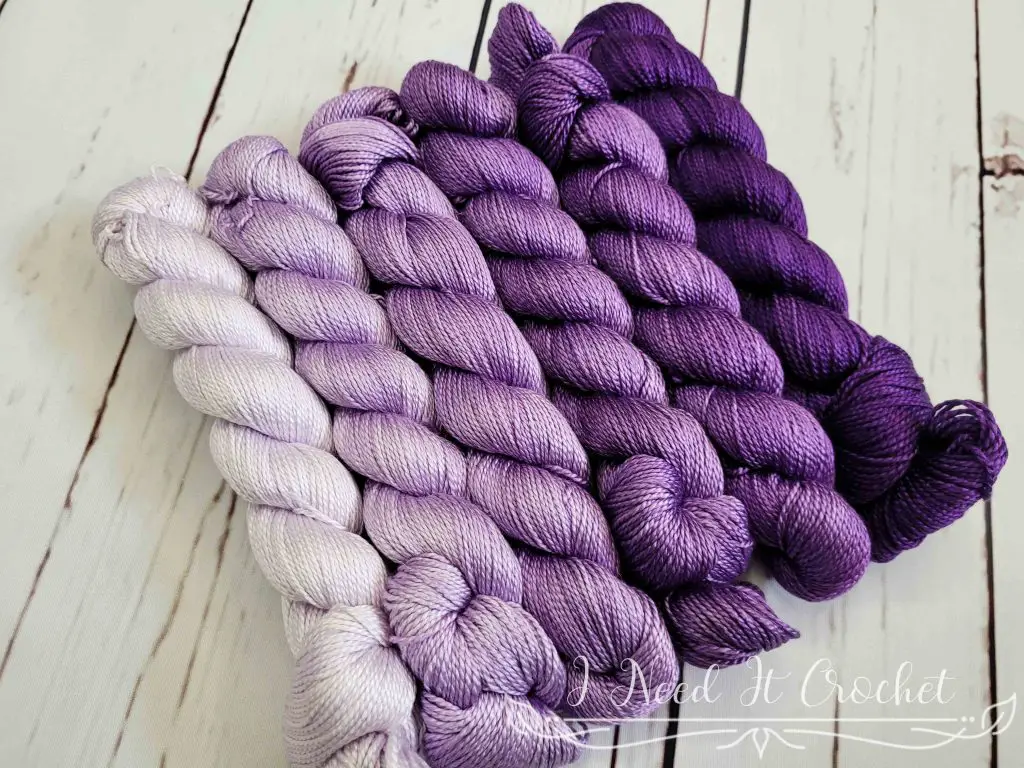
I used the Arwen’s Gown Allure Fingering kit from Expression Fiber Arts, which includes six stunning colours. My goal was to use as much of each colour as possible while changing colours only at the end of rows for a clean finish. Here’s how I spaced out the colour transitions in my version:
- Colour #1: Rows 1–67
- Colour #2: Rows 68–96
- Colour #3: Rows 97–114
- Colour #4: Rows 115–128
- Colour #5: Rows 129–141
- Colour #6: Rows 142–155
Of course, you can customize your colour changes however you’d like—this is your shawl, after all!
Free Crochet Shawl Pattern – Thalassa Shawl
Let’s Talk About the Yarn
For this shawl, I used Allure Fingering from Expression Fiber Arts, and it truly lives up to its name. This 100% Mulberry silk yarn has an elegant sheen and the most luscious drape, which is perfect for a light, flowing shawl. The fibres glide effortlessly through your fingers as you crochet, making the experience feel just as luxurious as the final piece.
Silk takes dye beautifully, and it shows here. The colourway I chose, Arwen’s Gown, transitions smoothly from pure white to deep purple, with rich saturation and eye-catching depth. With 218 yards per 50g skein, this 2-ply yarn has a lovely structure and a soft, long-wearing finish. It’s one of those yarns that’s as delightful to touch as it is to look at. A perfect treat when you’re ready to create something truly special.
Why You’ll Love This Crochet Summer Shawl Pattern
- ✅ Lightweight and breathable – perfect for warm weather
- ✅ Soothing, repetitive stitches with elegant results
- ✅ Works beautifully with gradient or tonal yarn kits
- ✅ Beginner-friendly with just enough detail to keep it interesting
- ✅ An easy-to-wear shape that drapes like a dream
Frequently Asked Questions
The Thalassa Shawl is a great easy crochet shawl pattern for adventurous beginners. If you’re comfortable with basic stitches and working in rows, you’ll be able to follow along. The repeating shell stitch is relaxing and intuitive once you get the hang of it.
I used the Arwen’s Gown Allure Fingering kit from Expression Fiber Arts, which includes six 50g skeins of fingering weight silk yarn (approximately 1,308 yards total). You’ll want a similar amount if you’re using a different yarn.
Yes, you can substitute with another fingering weight yarn. For the best results, look for something with a soft drape and good stitch definition. Keep in mind that using a yarn with less drape than silk (like cotton or acrylic) will slightly change the look and feel of the shawl.
Absolutely. This is a crochet summer shawl pattern designed to be lightweight, breathable, and perfect for layering over tanks, sundresses, or swimwear. The open stitchwork and silky yarn keep it airy and comfortable in warm weather.
On To The Free Crochet Pattern!
Finished Sizes:
Instructions given to make an asymmetrical triangle shawl measuring 75” x 62” x 45”, with added notes for making a larger shawl.
Materials:
I used Expression Fiber Arts Allure Fingering, which is 100% Mulberry Silk, #1 Fingering weight yarn.
Any yarn of similar weight would work.
Approximately 1308 yds.
4mm Hook
Stitch Markers
Yarn Needle
Scissors
Measuring Tape
Difficulty:
Easy
Abbreviations:
Rs = Right Side
Ws = Wrong Side
Sk = Skip
Sp = Space
St = Stitch
Ss = Slip Stitch
Ch = Chain
Sc = Single Crochet
Dc = Double Crochet
Dss = Double Slip Stitch (see Tutorial here)
Sc2tog = Single Crochet 2 Together
Dc2tog = Double Crochet 2 Together
Gauge:
If you are using a different yarn, gauge is not very important with this shawl. Use a hook that suits your yarn and gives it a good drape.
If you are using the same yarn I used and you would like to achieve the same drape, you may want to get close to the gauge I achieved.
I have noted in the pattern at which points you should measure for gauge.
Notes:
Ch1 at the beginning of a row is never considered a stitch.
Ch1 between stitches is considered a stitch.
Ch3 at the beginning of a row is considered a dc.
Instructions
This shawl is created in one piece, worked in rows. For my version, I used the Arwen’s Gown Allure Fingering kit, which contained six colours. My aim was to use as much of each colour as possible while still switching colours at the end of a row rather than in the middle. I’ve outlined below which rows I changed colours on:
Colour # 1: Rows 1-67
Colour #2: Rows 68-96
Colour #3: Rows 97-114
Colour #4: Rows 115-128
Colour #5: Rows 129-141
Colour #6: Rows 142-155
Body
With 4mm hook, make a slip knot.
- Ch3. 2dc in 3rd ch from hook. Turn. – 3 st
- Ch1. Sc in 1st st. Sk 1 st, 3dc in last st. Turn. – 4 st
- Ch1. Sc in 1st st. Sk 2 sts, 5dc in last st. Turn. – 6 st
- Ch3, 3dc in 1st st. Sk 1 st, sc in next st. Sk 2 sts, 3dc in last st. Turn. – 8 st
- Ch1. Sc in 1st st. Sk 2 sts, 5dc in next st. Sk 2 sts, sc in next st. 3dc in last st. Turn. – 10 st
- Ch1. Sc in 1st st. Sk 2 sts, 5dc in next st. Sk 2 sts, sc in next st. Sk 2 sts, 3dc in last st. Turn. – 10 st
- Ch1. Sc in 1st st. Sk 2 sts, 5dc in next st. Sk 2 sts, sc in next st. Sk 2 sts, 5dc in last st. Turn. – 12 st
- Ch3, 3dc in 1st st. Sk 1 st, sc in next st. Sk2 sts, 5dc in next st. Sk 2 sts, sc in next st. Sk 2 sts, 3dc in last st. Turn. – 14 st
- Ch1. Sc in 1st st. *Sk 2 sts, 5dc in next st. Sk 2 sts, sc in next st.** Repeat from * to ** once. 3dc in last st. Turn. – 16 st
- Ch1. Sc in 1st st. *Sk 2 sts, 5dc in next st. Sk 2 sts, sc in next st.** Repeat from * to ** until there are 3 sts left. Sk 2 sts, 3dc in last st. Turn. – 16 st
- Ch1. Sc in 1st st. *Sk 2 sts, 5dc in next st. Sk 2 sts, sc in next st.** Repeat from * to ** until there are 3 sts left. Sk 2 sts, 5dc in last st. Turn. – 18 st
- Ch3, 3dc in 1st st. Sk 1 st, sc in next st. *Sk 2 sts, 5dc in next st. Sk 2 sts, sc in next st.** Repeat from * to ** until there are 3 sts left. Sk 2 sts, 3dc in last st. Turn. – 20 st
- Ch1. Sc in 1st st. *Sk 2 sts, 5dc in next st. Sk 2 sts, sc in next st.** Repeat from * to ** until 1 st left. 3dc in last st. Turn. – 22 st
Gauge Check: Your project should now be approximately 4” high (from the 1st row to the last row on the straight edge) and 3 ½” wide (across the top of the last row). If you are working with the same yarn and making the same size as I did, it is recommended you stay as close to gauge as possible. If you are using a different yarn or making a different size, gauge is less important.
- Repeat row 10 – 22 st
- Repeat row 11 – 24 st
- Repeat row 12 – 26 st
- Repeat row 13 – 28 st
- Repeat row 10 – 28 st
- Repeat row 11 – 30 st
- Repeat row 12 – 32 st
- Repeat row 13 – 34 st
- Repeat row 10 – 34 st
- Repeat row 11 – 36 st
- Repeat row 12 – 38 st
- Repeat row 13 – 40 st
- Repeat row 10 – 40 st
- Repeat row 11 – 42 st
Gauge Check: Your project should now be approximately 8 ¾” high and 7” wide. If you are working with the same yarn and making the same size as I did, it is recommended you stay as close to gauge as possible. If you are using a different yarn or making a different size, gauge is less important.
- Ch3, 3dc in 1st st. Sk 1 st, sc in next st. *Ch2, sk 2 sts, dc in next st. Ch2, sk 2 sts, sc in next st. Sk 2 sts, 5dc in next st. Sk 2 sts, sc in next st.** Repeat from * to ** until 3 sts left. Ch2, sk 2 sts, dc in last st. Turn. – 44 st
- Ch1. Sc in 1st st. *Sk 2 sts, 5dc in next st. Sk 2 sts, sc in next st.** Repeat from * to ** until 1 st left. 3dc in last st. Turn. – 46 st
- Ch1. Sc in 1st st. Ch2, sk 2 sts, dc in next st. Ch2, sk 2 sts, sc in next st. *Sk 2 sts, 5dc in next st. Sk 2 sts, sc in next st. Ch2, sk 2 sts, dc in next st. Ch2, sk 2 sts, sc in next st.** Repeat from * to ** until 3 sts left. Sk 2 sts, 3dc in last st. Turn. – 46 st
- Ch1. Sc in 1st st. *Sk 2 sts, 5dc in next st. Sk 2 sts, sc in next st.** Repeat from * to ** until there are 3 sts left. Sk 2 sts, 5dc in last st. Turn. – 48 st
- Ch3, dc in 1st st. Ch2, sk 1 st, sc in next st. Sk 2 sts, 5dc in next st. Sk 2 sts, sc in next st. *Ch2, sk 2 sts, dc in next st. Ch2, sk 2 sts, sc in next st. Sk 2 sts, 5dc in next st. Sk 2 sts, sc in next st.** Repeat from * to ** until 3 sts left. Ch2, sk 2 sts, dc in last st. Turn. – 50 st
- Ch1. Sc in 1st st. *Sk 2 sts, 5dc in next st. Sk 2 sts, sc in next st.** Repeat from * to ** until 1 st left. 3dc in last st. Turn. – 52 st
- Ch1. Sc in 1st st. *Sk 2 sts, 5dc in next st. Sk 2 sts, sc in next st. Ch2, sk 2 sts, dc in next st. Ch2, sk 2 sts, sc in next st.** Repeat from * to ** until 3 sts left. Sk 2 sts, 3dc in last st. Turn. – 52 st
- Ch1. Sc in 1st st. *Sk 2 sts, 5dc in next st. Sk 2 sts, sc in next st.** Repeat from * to ** until there are 3 sts left. Sk 2 sts, 5dc in last st. Turn. – 54 st
- Repeat row 28. – 56 st
- Repeat row 29. – 58 st
- Repeat row 30. – 58 st
- Repeat row 31. – 60 st
- Repeat row 32. – 62 st
- Repeat row 33. – 64 st
- Repeat row 34. – 64 st
- Repeat row 35. – 66 st
- Repeat row 28. – 68 st
- Repeat row 29. – 70 st
- Repeat row 30. – 70 st
- Repeat row 31. – 72 st
- Repeat row 32. – 74 st
- Repeat row 33. – 76 st
- Repeat row 34. – 76 st
- Repeat row 35. – 78 st
- Repeat row 28. – 80 st
- Repeat row 29. – 82 st
- Repeat row 30. – 82 st
- Ch1. Sc in 1st st. *Ch2, sk 2 sts, dc in next st. Ch2, sk 2 sts, sc in next st.** Repeat from * to ** until 3 sts left. Ch2, (dc, ch1, dc) in last st. Turn. – 84 st
- Ch3, dc in 1st st. Ch2, sk 1 st, sc in next st. Sk 2 sts, 5dc in next st. Sk 2 sts, sc in next st. *Ch2, sk 2 sts, dc in next st. Ch2, sk 2 sts, sc in next st. Sk 2 sts, 5dc in next st. Sk 2 sts, sc in next st.** Repeat from * to ** until 3 sts left. Ch2, sk 2 sts, dc in last st. Turn. – 86 st
- Ch1. Sc in 1st st. *Ch2, sk 2 sts, dc in next st. Ch2, sk 2 sts, sc in next st.** Repeat from * to ** until 1 st left. Ch2, dc in last st. Turn. – 88 st
- Ch1. Sc in 1st st. *Sk 2 sts, 5dc in next st. Sk 2 sts, sc in next st. Ch2, sk 2 sts, dc in next st, ch2, sk 2 sts, sc in next st.** Repeat from * to ** until 3 sts left. Sk 2 sts, 3dc in last st. Turn. – 88 st
- Ch1. Sc in 1st st. *Ch2, sk 2 sts, dc in next st. Ch2, sk 2 sts, sc in next st.** Repeat from * to ** until 3 sts left. Ch2, (dc, ch1, dc) in last st. Turn. – 90 st
- Ch3, 3dc in 1st st. Sk 1 st, sc in next st. *Ch2, sk 2 sts, dc in next st. Ch2, sk 2 sts, sc in next st. Sk 2 sts, 5dc in next st. Sk 2 sts, sc in next st.** Repeat from * to ** until 3 sts left. Ch2, sk 2 sts, dc in last st. Turn. – 92 st
- Ch1. Sc in 1st st. *Ch2, sk 2 sts, dc in next st. Ch2, sk 2 sts, sc in next st.** Repeat from * to ** until 1 st left. Ch2, dc in last st. Turn. – 94 st
- Ch1. Sc in 1st st. Ch2, sk 2 sts, dc in next st. Ch2, sk 2 sts, sc in next st. *Sk 2 sts, 5dc in next st. Sk 2 sts, sc in next st. Ch2, sk 2 sts, dc in next st. Ch2, sk 2 sts, sc in next st.** Repeat from * to ** until 3 sts left. Sk 2 sts, 3dc in last st. Turn. – 94 st
- Repeat row 55. – 96 st
- Repeat row 56. – 98 st
- Repeat row 57. – 100 st
- Repeat row 58. – 100 st
- Repeat row 59. – 102 st
- Repeat row 60. – 104 st
- Repeat row 61. – 106 st
- Repeat row 62. – 106 st
- Repeat row 55. – 108 st
- Repeat row 56. – 110 st
- Repeat row 57. – 112 st
- Repeat row 58. – 112 st
- Repeat row 59. – 114 st
- Repeat row 60. – 116 st
- Repeat row 61. – 118 st
- Repeat row 62. – 118 st
- Repeat row 55. – 120 st
- Repeat row 56. – 122 st
- Repeat row 57. – 124 st
- Repeat row 58. – 124 st
- Ch1. Sc in 1st st. *Sk 2 sts, 5dc in next st. Sk 2 sts, sc in next st.** Repeat from * to ** until there are 3 sts left. Sk 2 sts, 5dc in last st. Turn. – 126 st
- Ch3, 3dc in 1st st. Sk 1 st, sc in next st. *Ch2, sk 2 sts, dc in next st. Ch2, sk 2 sts, sc in next st. Sk 2 sts, 5dc in next st. Sk 2 sts, sc in next st.** Repeat from * to ** until 3 sts left. Ch2, sk 2 sts, dc in last st. Turn. – 128 st
- Ch1. Sc in 1st st. *Sk 2 sts, 5dc in next st. Sk 2 sts, sc in next st.** Repeat from * to ** until 1 st left. 3dc in last st. Turn. – 130 st
- Ch1, sc in 1st st. Ch2, sk 2 sts, dc in next st. Ch2, sk 2 sts, sc in next st. *Sk 2 sts, 5dc in next st. Sk 2 sts, sc in next st. Ch2, sk 2 sts, dc in next st. Ch2, sk 2 sts, sc in next st.** Repeat from * to ** until 3 sts left. Sk 2 sts, 3dc in last st. Turn. – 130 st
- Ch1. Sc in 1st st. *Sk 2 sts, 5dc in next st. Sk 2 sts, sc in next st.** Repeat from * to ** until there are 3 sts left. Sk 2 sts, 5dc in last st. Turn. – 132 st
- Ch3, dc in 1st st. Ch2, sk 1 st, sc in next st. Sk 2 sts, 5dc in next st. Sk 2 sts, sc in next. *Ch2, sk 2 sts, dc in next st. Ch2, sk 2 sts, sc in next st. Sk 2 sts, 5dc in next st. Sk 2 sts, sc in next st.** Repeat from * to ** until 3 sts left. Ch2, sk 2 sts, dc in last st. Turn. – 134 st
- Ch1. Sc in 1st st. *Sk 2 sts, 5dc in next st. Sk 2 sts, sc in next st.** Repeat from * to ** until 1 st left. 3dc in last st. Turn. – 136 st
- Ch1. Sc in 1st st. *Sk 2 sts, 5dc in next st. Sk 2 sts, sc in next st. Ch2, sk 2 sts, dc in next st. Ch2, sk 2 sts, sc in next st.** Repeat from * to ** until 3 sts left. Sk 2 sts, 3dc in last st. Turn. – 136 st
- Repeat row 83. – 138 st
- Repeat row 84. – 140 st
- Repeat row 85. – 142 st
- Repeat row 86. – 142 st
- Repeat row 87. – 144 st
- Repeat row 88. – 146 st
- Repeat row 89. – 148 st
- Repeat row 90. – 148 st
- Repeat row 83. – 150 st
- Repeat row 84. – 152 st
- Repeat row 85. – 154 st
- Repeat row 86. – 154 st
- Repeat row 87. – 156 st
- Repeat row 88. – 158 st
- Repeat row 89. – 160 st
- Repeat row 90. – 160 st
- Repeat row 83. – 162 st
- Repeat row 84. – 164 st
- Repeat row 85. – 166 st
- Repeat row 86. – 166 st
- Ch1. Sc in 1st st. *Sk 2 sts, 5dc in next st. Sk 2 sts, sc in next st.** Repeat from * to ** until there are 3 sts left. Sk 2 sts, 5dc in last st. Turn. – 168 st
- Ch3, 3dc in 1st st. Sk 1 st, sc in next st. *Sk 2 sts, 5dc in next st. Sk 2 sts, sc in next st.** Repeat from * to ** until there are 3 sts left. Sk 2 sts, 3dc in last st. Turn. – 170 st
- Ch1. Sc in 1st st. *Sk 2 sts, 5dc in next st. Sk 2 sts, sc in next st.** Repeat from * to ** until 1 st left. 3dc in last st. Turn. – 172 st
- Ch1. Sc in 1st st. *Sk 2 sts, 5dc in next st. Sk 2 sts, sc in next st.** Repeat from * to ** until there are 3 sts left. Sk 2 sts, 3dc in last st. Turn. – 172 st
- Repeat row 111. – 174 st
- Repeat row 112. – 176 st
- Repeat row 113. – 178 st
- Repeat row 114. – 178 st
- Repeat row 111. – 180 st
- Repeat row 112. – 182 st
- Repeat row 113. – 184 st
- Repeat row 114. – 184 st
- Repeat row 111. – 186 st
- Repeat row 112. – 188 st
- Repeat row 113. – 190 st
- Repeat row 114. – 190 st
- Repeat row 111. – 192 st
- Repeat row 112. – 194 st
- Repeat row 113. – 196 st
- Repeat row 114. – 196 st
- Repeat row 111. – 198 st
- Repeat row 112. – 200 st
- Repeat row 113. – 202 st
- Repeat row 114. – 202 st
- Repeat row 111. – 204 st
- Repeat row 112. – 206 st
- Repeat row 113. – 208 st
- Repeat row 114. – 208 st
- Repeat row 111. – 210 st
- Repeat row 112. – 212 st
- Repeat row 113. – 214 st
- Repeat row 114. – 214 st
- Repeat row 111. – 216 st
- Repeat row 112. – 218 st
- Repeat row 113. – 220 st
- Repeat row 114. – 220 st
If you would like to make a larger shawl than what I have created, you will need to add rows here. Beginning from row 111, add any multiple of 8 rows. It needs to be a multiple of 8 in order for the edging stitch pattern to work out. Then, work the Edging rows below. Keep in mind that your stitch count will differ from the ones below.
Edging
- Ch1. Sc in 1st st. *Ch1, sk 2 sts, (dc, ch1, dc) in next st. Ch1, sk 2 sts, sc in next st. Sk 2 sts, 5dc in next st. Sk 2 sts, sc in next st.** Repeat from * to ** until 3 sts left. Ch1, sk 2 sts, (dc, ch1, 2dc) in last st. Turn. – 222 st
- Ch4 (counts as dc + ch1). Dc in next st. *Ch1, dc in next st/ch sp.** Repeat from * to ** 2 more times. Sk 2 sts, sc in next 3 sts. [Sk 2 sts, dc in next ch sp. Repeat from * to ** 4 more times. Sk 2 sts, sc in next 3 sts.] Repeat from [ to ] until 8 sts left. Sk 2 sts, dc in next ch sp. Repeat from * to ** 3 more times. Ch1, dc2tog over last 2 sts. Turn. – 225 st
- Ch1. Sc2tog. Sc in next st. *2sc in next ch sp. Sc in next st** Repeat from * to ** 2 more times. [Sk 1 st, sc in next st. Sk 1 st, sc in next st. Repeat from * to ** 4 more times.] Repeat from [ to ] across. Turn. – 262 st
- Ch4, dc in 1st st (counts at dc, ch1, dc). Ch1, sk 1 st, sc in next 9 sts. *Ch1, sk 2 sts, (dc, ch1, dc) in next st. Ch1, sk 2 sts, sc in next 9 sts.** Repeat from * to ** across. Turn. – 265 st
- Ch1. Sc in 1st 7 sts. [Sk 2 sts, dc in next ch1 sp. *Ch1, dc in next st/ch sp.** Repeat from * to ** 3 more times. Sk 2 sts, sc in next 5 sts.] Repeat from [ to ] until 6 sts left. Sk 2 sts, dc in next ch1 sp. Repeat from * to ** 3 more times. Turn. – 266 st
- Ch4 (counts as dc + ch1). Dc in next ch1 sp. Ch1, dc in next st. Ch1, dc in next ch1 sp. Ch1, sk 1 st, dc in next ch1 sp. Ch1, dc in next st. Sk 2 sts, sc in next st. [Sk 2 sts, dc in next st. *Ch1, dc in next ch1 sp. Ch1, sk 1 st, dc in next ch1 sp. Ch1, dc in next st.** Repeat from * to ** once. Sk 2 sts, sc in next st.] Repeat from [ to ] until 4 sts left. Sk 2 sts, dc in next st. Ch1, 2dc in last st. Turn. – 268 st
- Ch1, 2sc in 1st st. SC in next st. Sc in next ch1 sp. Sc3tog. [*Sc in next 2 st/ch1 sp. 2sc in next st/ch1 sp.** Repeat from * to ** 2 more times. Sc in next 2 st/ch1sp. Sc3tog.] Repeat from [ to ] until 10 st left. Repeat from * to ** 3 times. Sc in last st. Turn. – 288 st
- Ch1, hdc in 1st 3 sts, 2hdc in next st. Hdc in next 4 sts, 2hdc in next st. Hdc in next 3 sts, sk 1 st, hdc in next st. *Sk 1 st, hdc in next 3 sts, 2hdc in next st. Hdc in next 4 sts, 2hdc in next st. Hdc in next 3 sts, sk 1 st, hdc in next st.** Repeat from * to ** until 4 sts left. Sk 1 st, hdc in next 2 sts. 2hdc in last st. Turn. – 289 st
- Ch1, ss in 1st st. Dss in next st and each st across. Work 1 more ss into last st. Bind off. – 290 st
Weave in your ends, and you’re done! If you used a natural fiber like I did, I highly recommend blocking your project.
I hope you love your new crochet shawl, and I look forward to seeing all of your beautiful pictures on Ravelry!
If you’d like to know when I post new patterns and tutorials like the Crochet Shawl Pattern – Thalassa Shawl, head on over to my Facebook and Instagram and give me a like and a follow!
If you enjoyed the Crochet Shawl Pattern – Thalassa Shawl, you may want to check out my other designs!
Whether you’re relaxing by the water or just dreaming of it from your favourite crochet spot, the Thalassa Shawl is a peaceful, meditative make that brings a little bit of ocean magic into every stitch. I hope you love creating it as much as I loved designing it — and I can’t wait to see your version!
If you do make one, be sure to tag me on Instagram (@ineeditcrochet) and use #thalassashawl so I can admire your work. 💜

Free Crochet Shawl Pattern – Thalassa Shawl
And until next time… Happy Hooking! 😉