
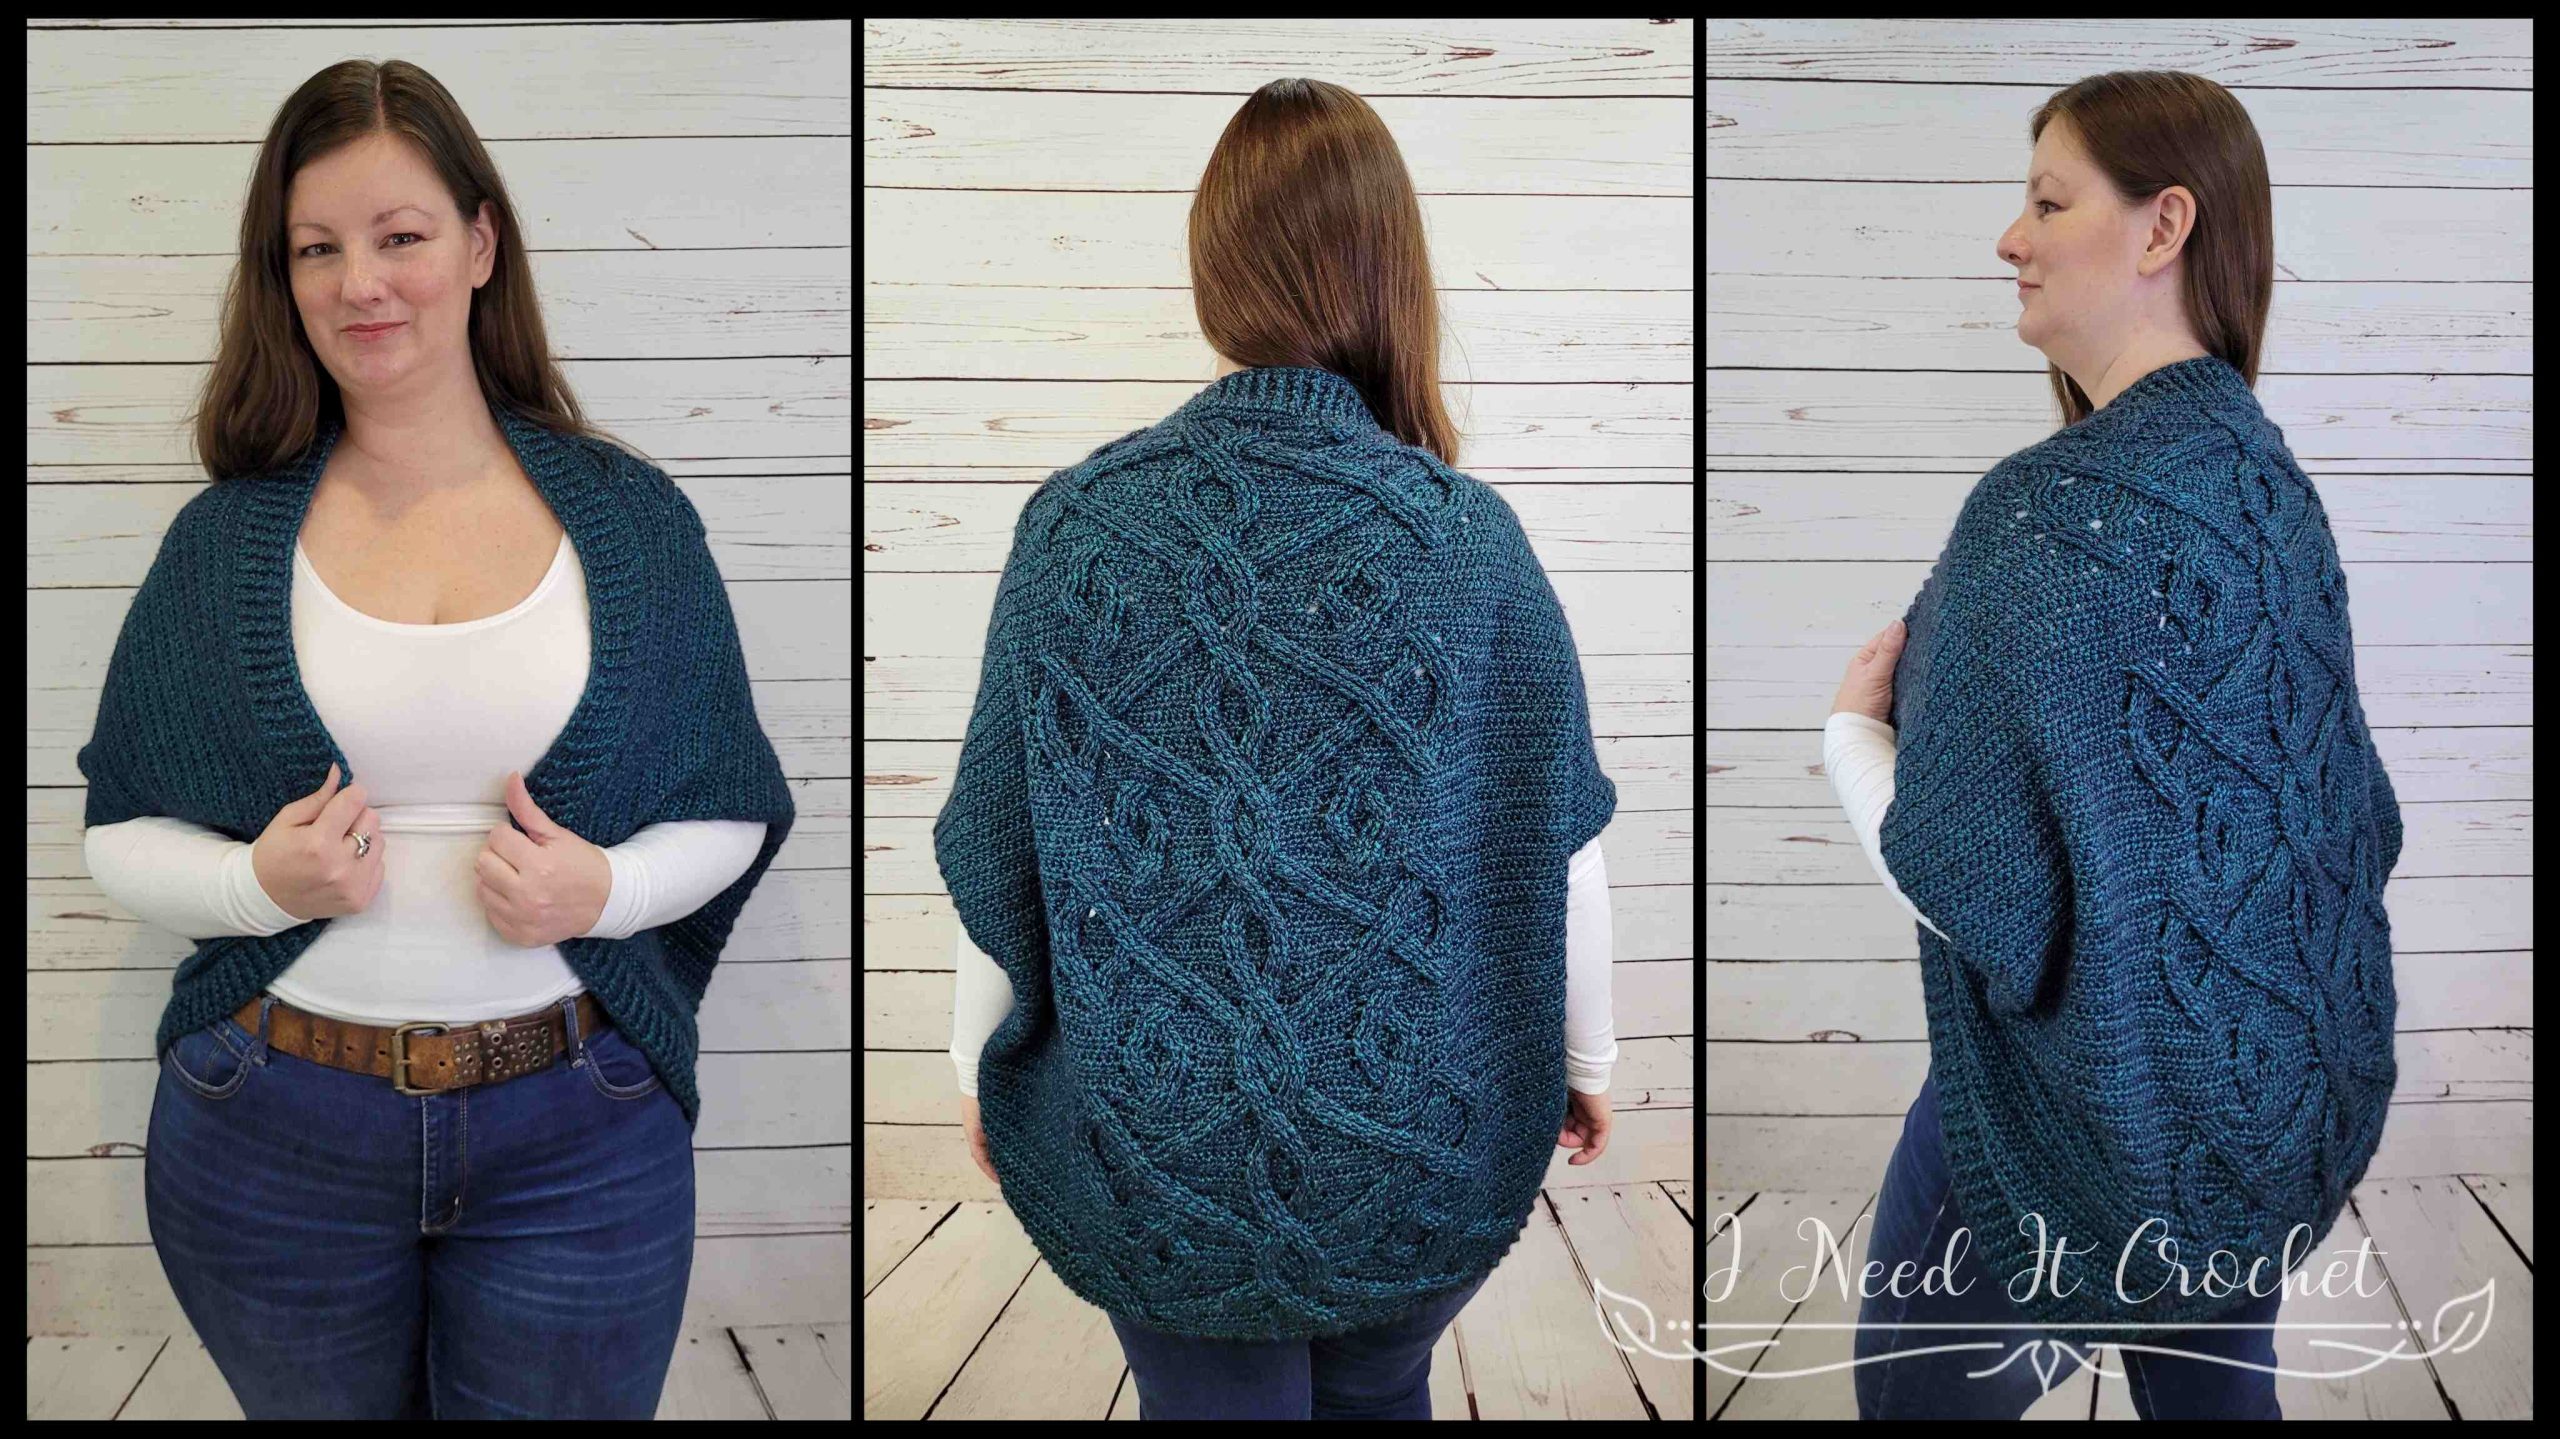
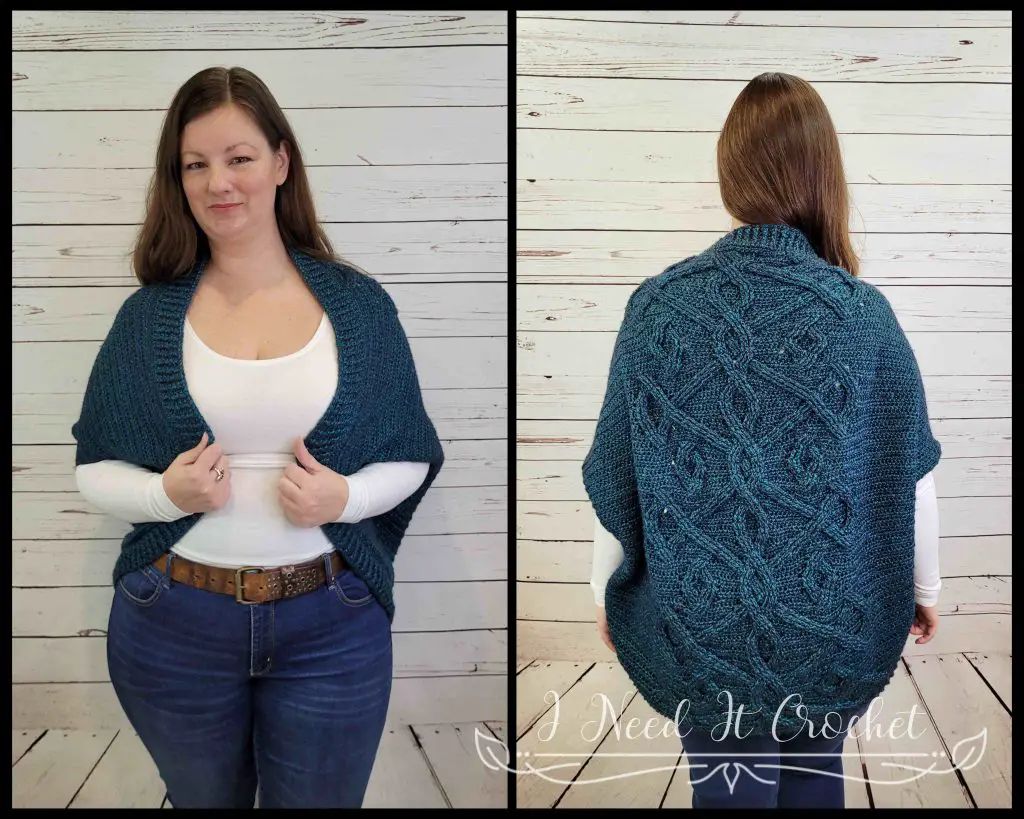
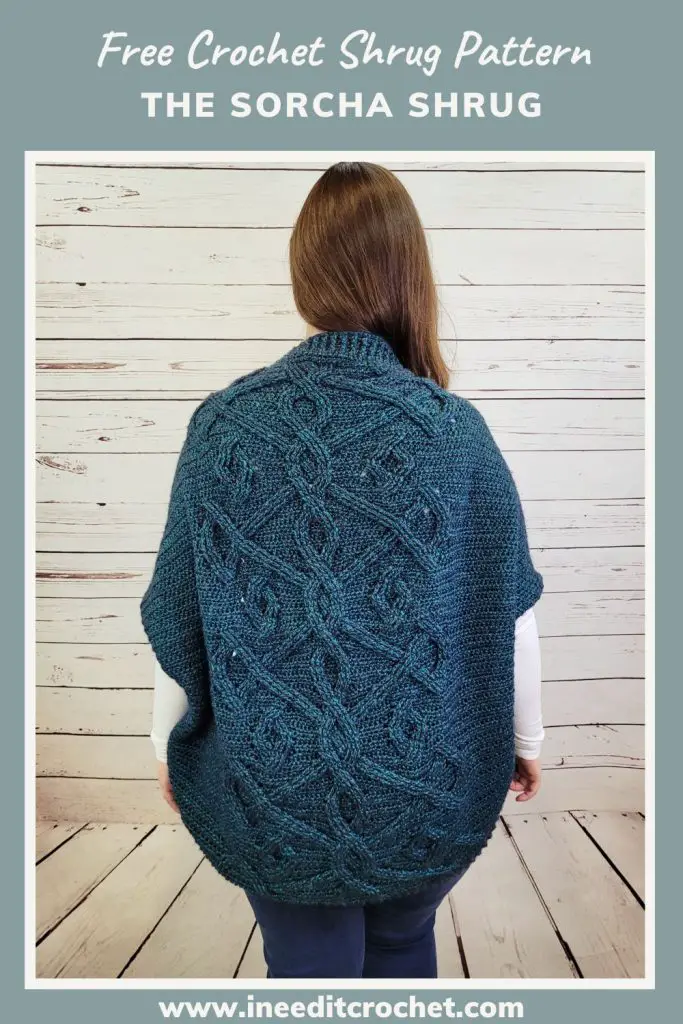
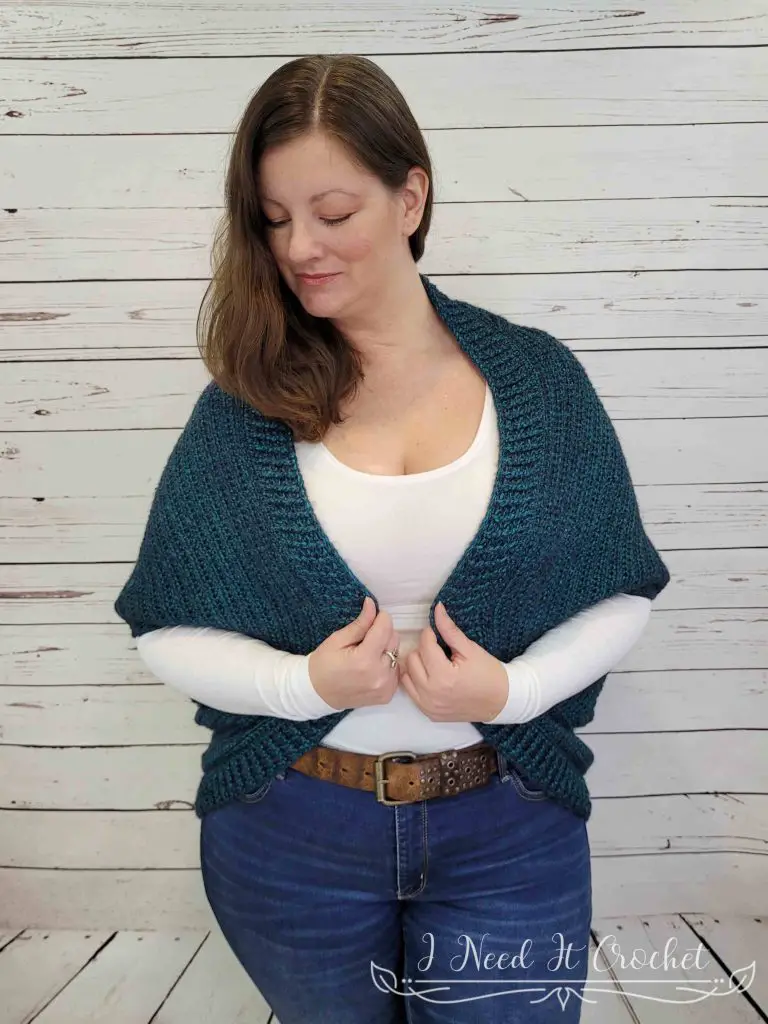
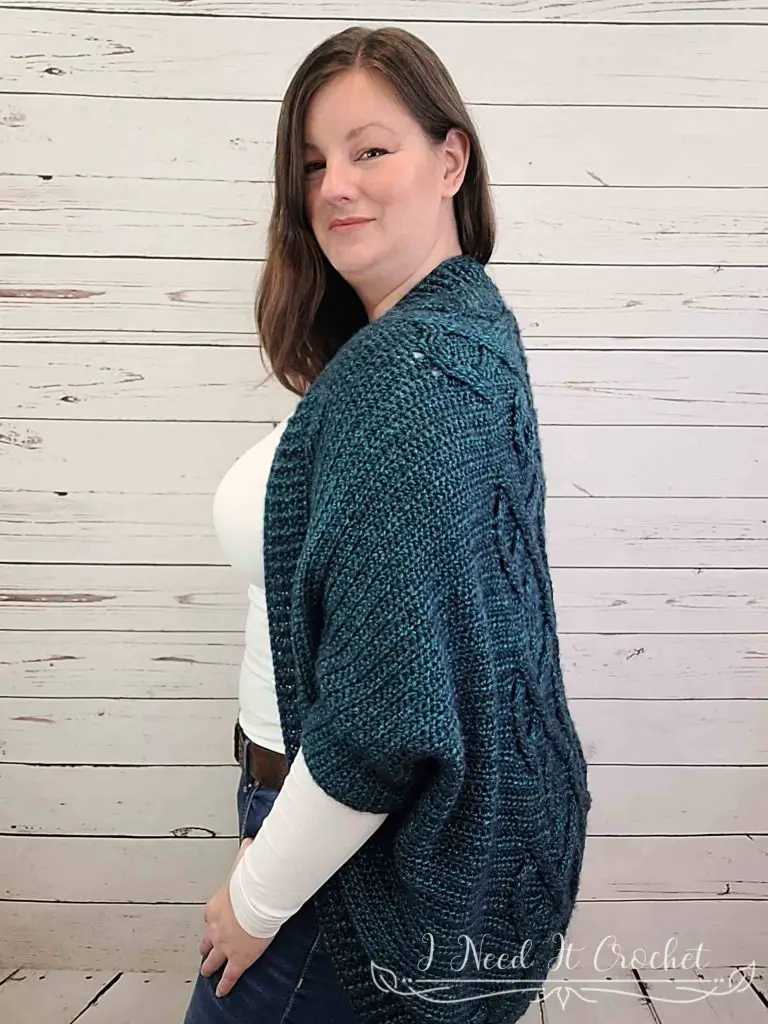
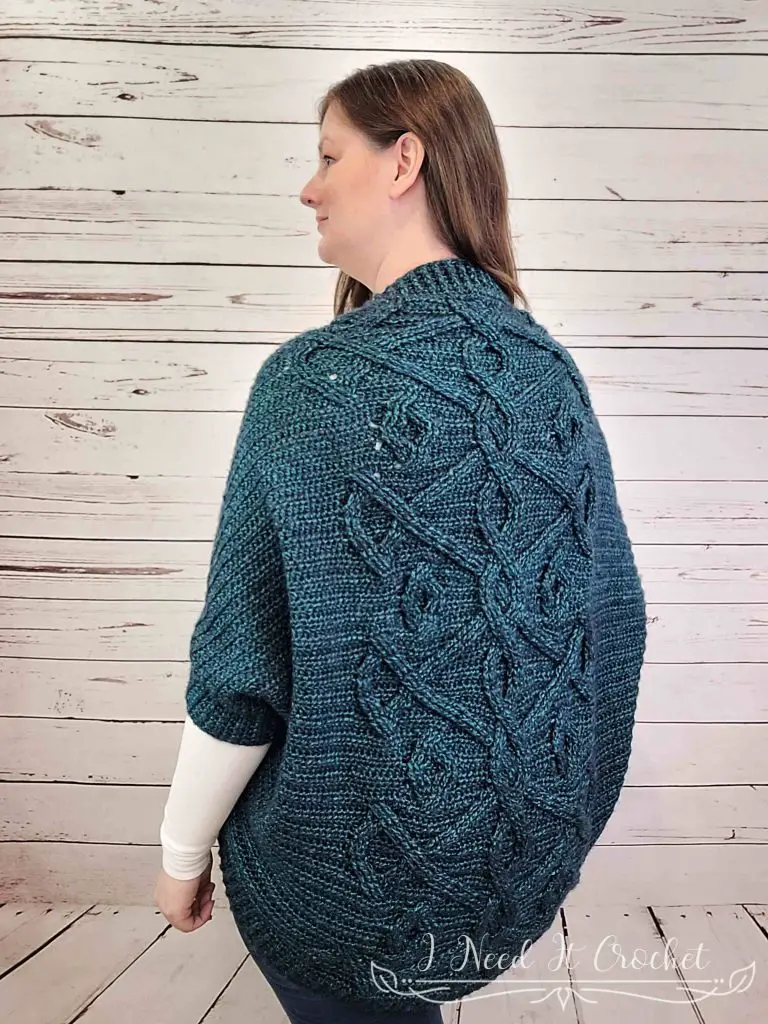
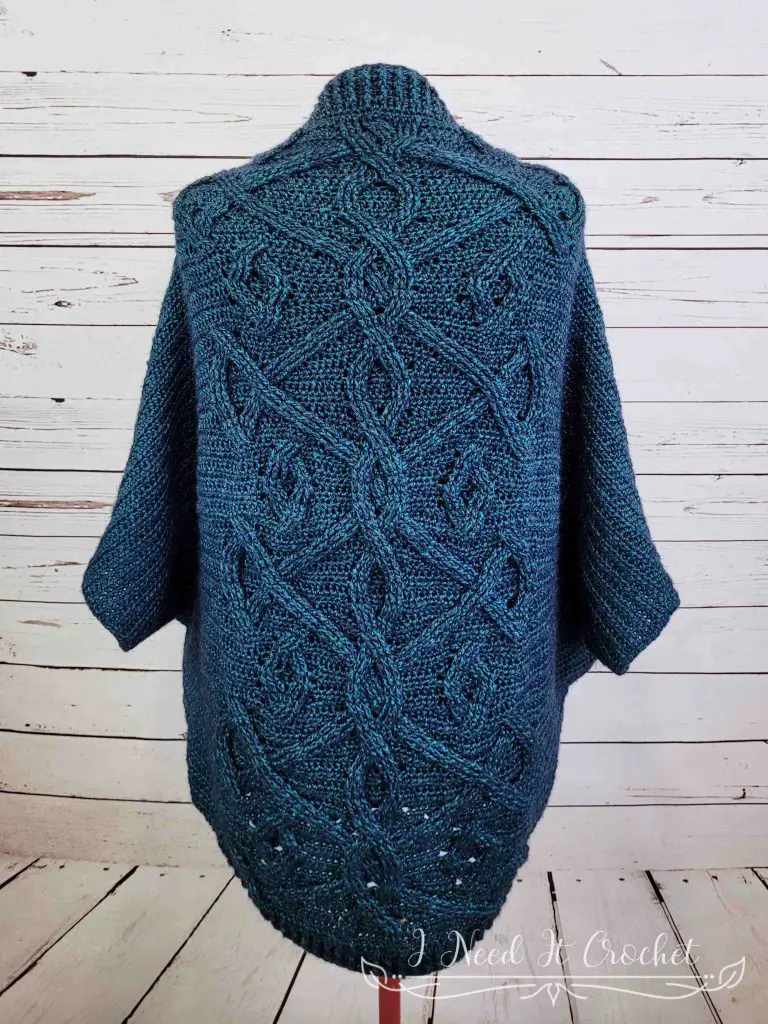
Free Crochet Shrug Pattern – Sorcha Shrug
The Free Crochet Shrug Pattern – Sorcha Shrug is copyrighted by I Need It Crochet. You may not copy, share, change, or sell the pattern itself. Also, you may not claim this pattern as your own. All pictures contained in this pattern fall under the copyright and may not be used.
Finished items made from the Free Crochet Shrug Pattern – Sorcha Shrug belong to you, and you may do what you wish with them. If you choose to sell them on Etsy, I would very much appreciate it if you credited me as the pattern designer.
Where Can I Buy The Pdf?
The entire pattern is available to view for free on this page (you just have to scroll down to see it). But if you would prefer to have a printable pdf copy of the pattern, you can purchase it for a small fee from my Ravelry and Etsy stores. Just click the graphics below.
This pattern is 24 pages long and contains 103 pictures and detailed instructions of how to complete your crochet shrug. It also includes a chart for the crochet cable pattern for easy reference. A printable pdf will be easier to follow, and you can make notes on it as you go. I find it to be the easier option. But if you like to use the online version, it is here 24/7 for you to view. Enjoy!

Free Crochet Shrug Pattern – Sorcha Shrug
Free Crochet Shrug Pattern – Sorcha Shrug
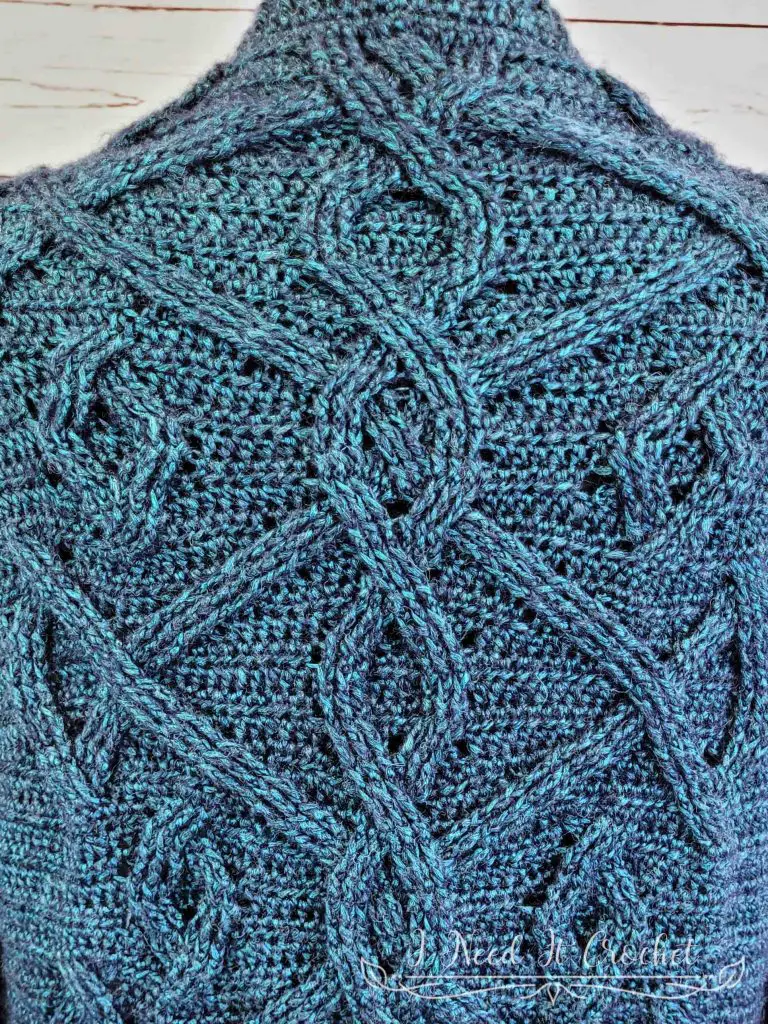
From the first moment I learned to make crochet cables, these intricate designs have held a very special place in my heart. I fell in love with the beautiful textures and unique patterns that could be created.
Since designing, I’ve written other patterns using older, well-established cable designs. However, for this project, I wanted to challenge myself, so I got out my graph paper and pencil and designed my own cable pattern. I had no idea it would be so much fun!
The cable design used in this pattern is more intricate than others, so if you’ve never worked cables before, I recommend you learn with something a little simpler.
Want to Pin it for later?
Click the image below and save the pin to your favourite crochet pattern boards!
Free Crochet Shrug Pattern – Sorcha Shrug
Free Crochet Shrug Pattern – Sorcha Shrug
Finished Sizes:
Instructions given to fit size X-small/small; changes for medium/large, X-large/2X-large, 3X-large/4X-large, and 5X-large/6X-large are in ()
XS/S (M/L, XL/2XL, 3XL/4XL, 5XL/6XL)
To fit Bust: 33”-37” (37”-42”, 42”-50”, 50”-58”, 58”-66”)
Shoulder Width: 14”-15” (15 ½”-17”, 17 ½”-18”, 18”-18 ½”, 18 ½”-19”)
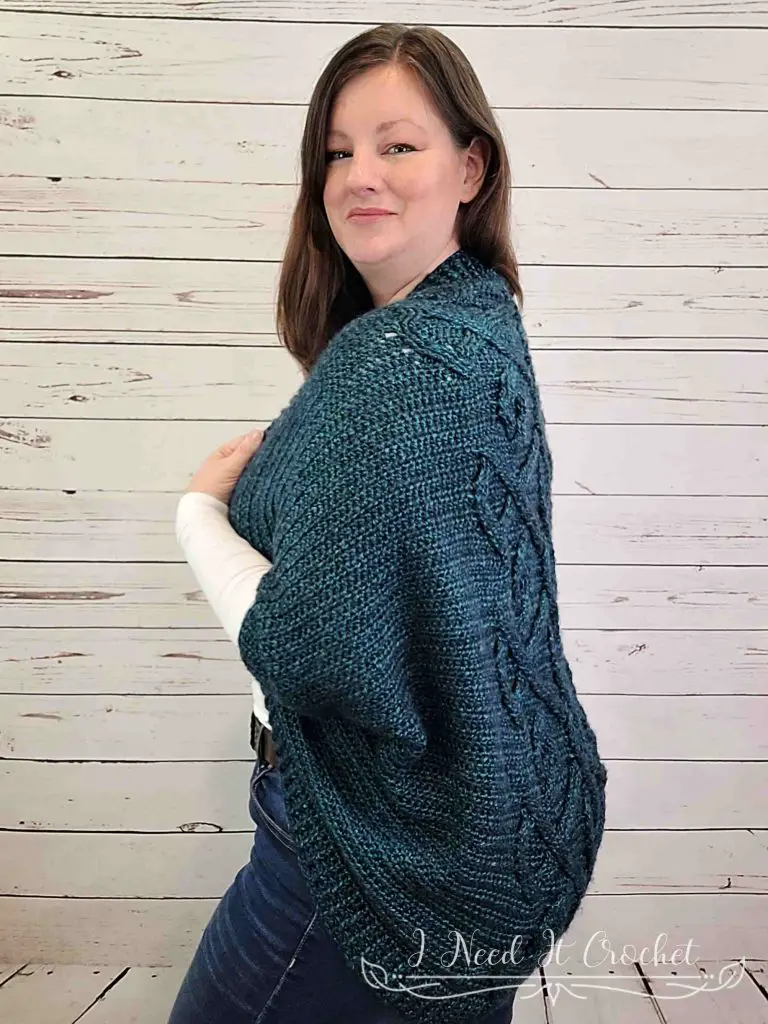
Finished Length: Customizable. Length on model shown is 32”.
Materials:
I used Hobbii Yarns Metallico, which is a 70% Polyamide/21% Acrylic.9% Merino Wool, #4 Worsted weight yarn.
This yarn leans to the lighter side of worsted.
Any yarn of similar weight would work.
Approximately 1400 (1500, 1600, 1700, 1800) yds.
5mm Hook
5.5mm Hook
Stitch Markers
Yarn Needle
Scissors
Measuring Tape
Gauge:
I have provided gauge for a small swatch and a large swatch. If you are making a larger size and/or you sometimes find your tension is off, I recommend making the larger swatch.
Gauge width is more important with this pattern than gauge height.
16 (32) hdc sts x 12 (24) rows
= 4” (8”) x 4” (8”) square.
Abbreviations:
RS = Right Side
WS = Wrong Side
Sk = Skip
St = Stitch
Ss = Slip Stitch
Ch = Chain
Sc = Single Crochet
Dc = Double Crochet
Tr = Treble Crochet
Fpdc = Front Post Double Crochet
Bpdc = Back Post Double Crochet
Fptr = Front Post Treble Crochet
Bptr = Back Post Treble Crochet
Notes:
This pattern has a difficulty level of Intermediate to Advanced.
Ch1 and ch2 at the beginning of a row/round is never considered a stitch.
Ch3 at the beginning of a row is considered a dc.
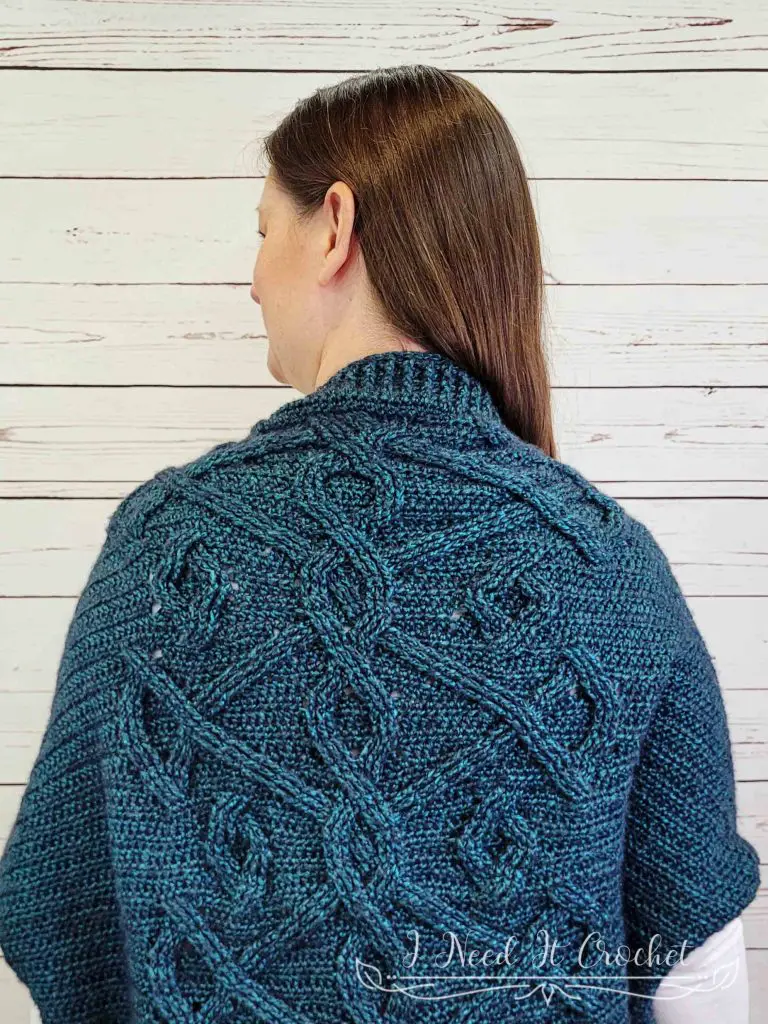
The model above (that’s me) has a 40” bust and is wearing a size M/L.
Choose your size according to your bust and shoulder measurements. For a look like mine, choose the size closest to your measurements. For a cozy, oversized look, choose the next size up.
Free Crochet Shrug Pattern – Sorcha Shrug
Instructions
This shrug is made with a simple design. We will begin by making a large rectangle, which we will fold in half to sew the arm holes. Then, we will create the ribbed edging while working in the round. The arm holes are finished off with a row of single crochet.
Working in front of sts just made: This means that when you work the next stitches, they will cross in front of the stitches you just made as you are currently looking at them.
Working behind sts you just made: This means that when you work the next stitches they will cross behind the stitches you just made as you are currently looking at them.
Body
Begin with a yarn tail about 16” long.
With 5mm hook (or the hook used to obtain gauge)
- Ch 143 (163, 193, 221, 255). Hdc in 2nd ch from hook and each ch across. Turn. – 142 (162, 192, 220, 254) st
- (RS) – Ch1. Hdc in 1st 47 (57, 72, 86, 103) sts. Fpdc in next 3 sts.
– *Hdc in next 6 sts. Fpdc in next 3 sts. Hdc in next 6 sts. Fpdc in next 3 sts.**
– Sk 3 sts, fptr in next 3 sts (see Figure 1). Working in front of 3 sts just made, fptr in 3 skipped sts (see Figure 2).
– Fpdc in next 3 sts. Repeat from * to **.
– Hdc in last 47 (57, 72, 86,103) sts. Turn. – 142 (162, 192, 220, 254) st
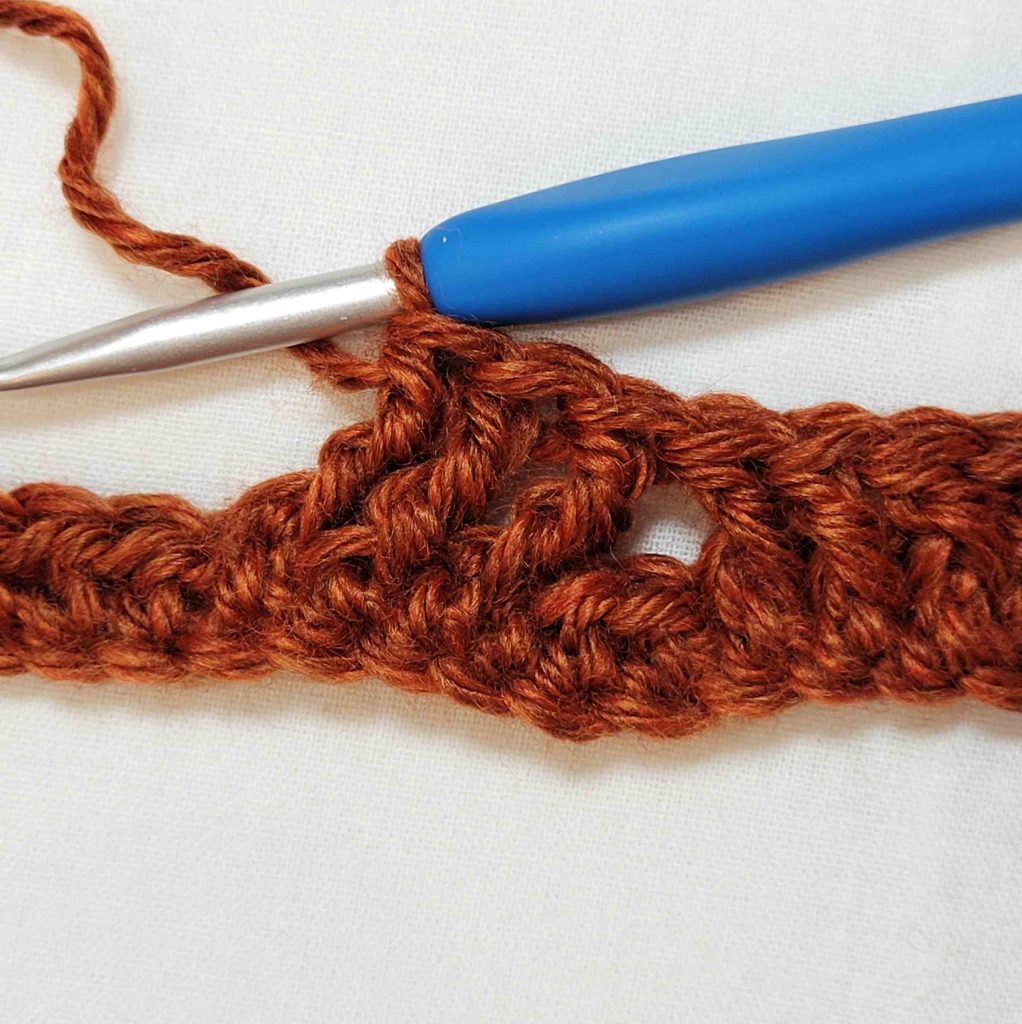
Figure 1
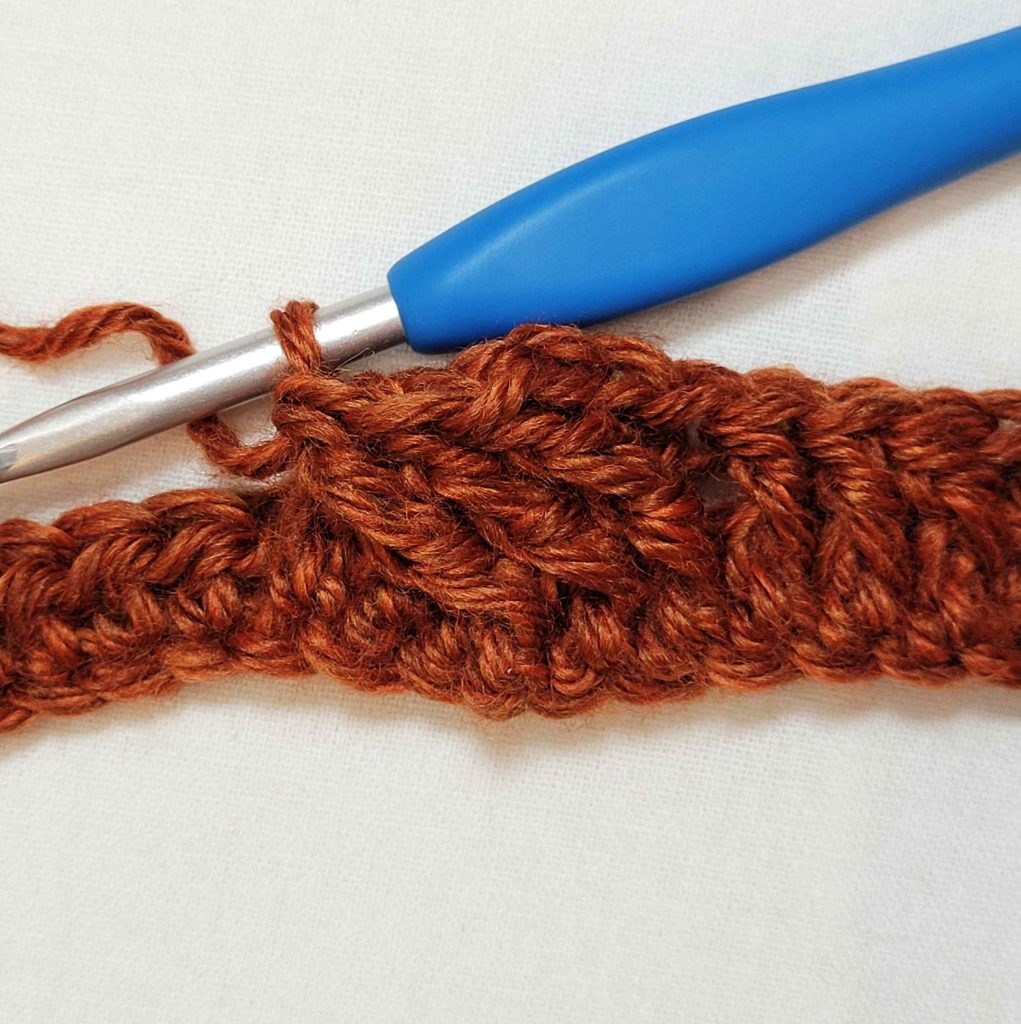
Figure 2
- (WS) – Ch1. Hdc in 1st 47 (57, 72, 86, 103) sts.
– *Sk 3 sts, tr in next 3 sts (see Figure 3). Working behind 3 sts just made, bptr in 3 skipped sts (see Figure 4).
– Sk 3 sts, bptr in next 3 sts (see Figure 5). Working in front of sts just made, tr in 3 skipped sts (see Figure 6. Figure 7 shows what this looks like from the right side of your work.)**
– Hdc in next 6 sts. Bpdc in next 12 sts. Hdc in next 6 sts.
– Repeat from * to **. Hdc in last 47 (57, 72, 86, 103) sts. Turn. – 142 (162, 192, 220, 254) st
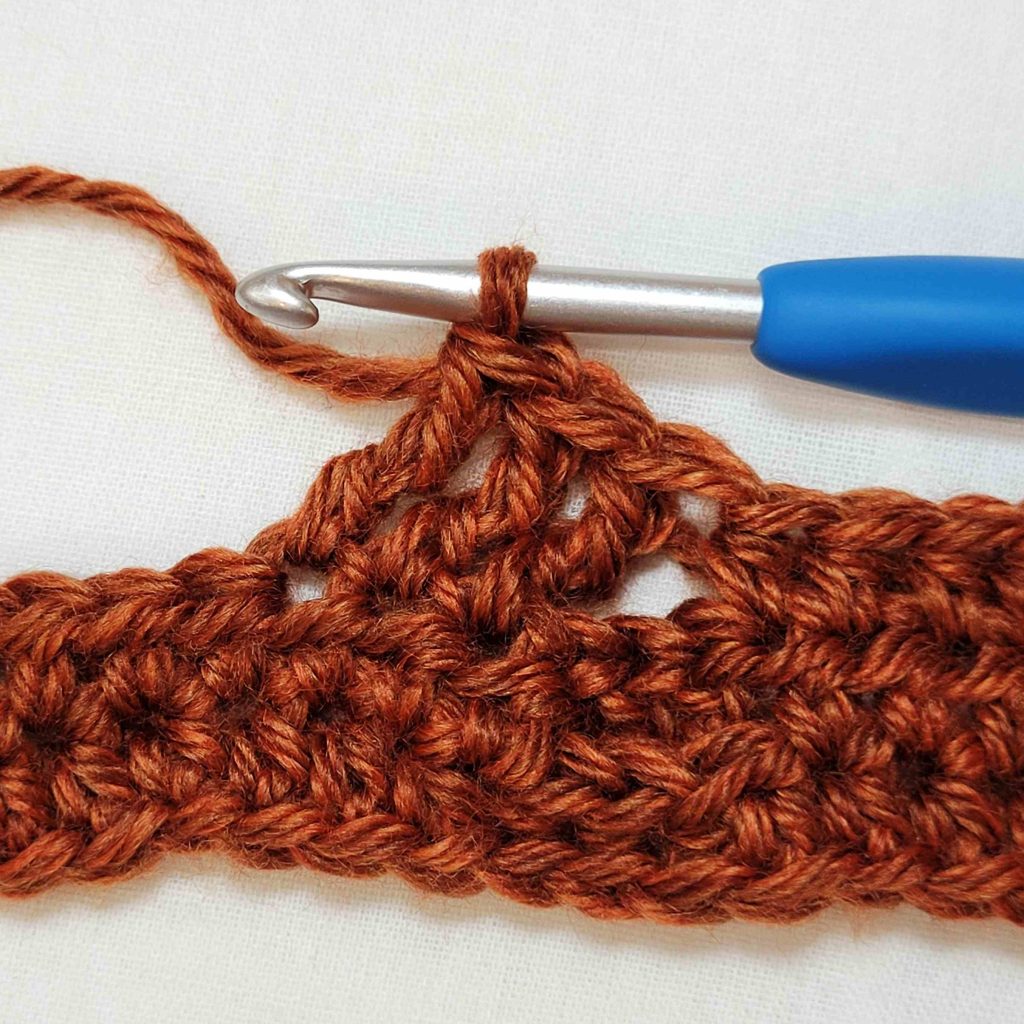
Figure 3
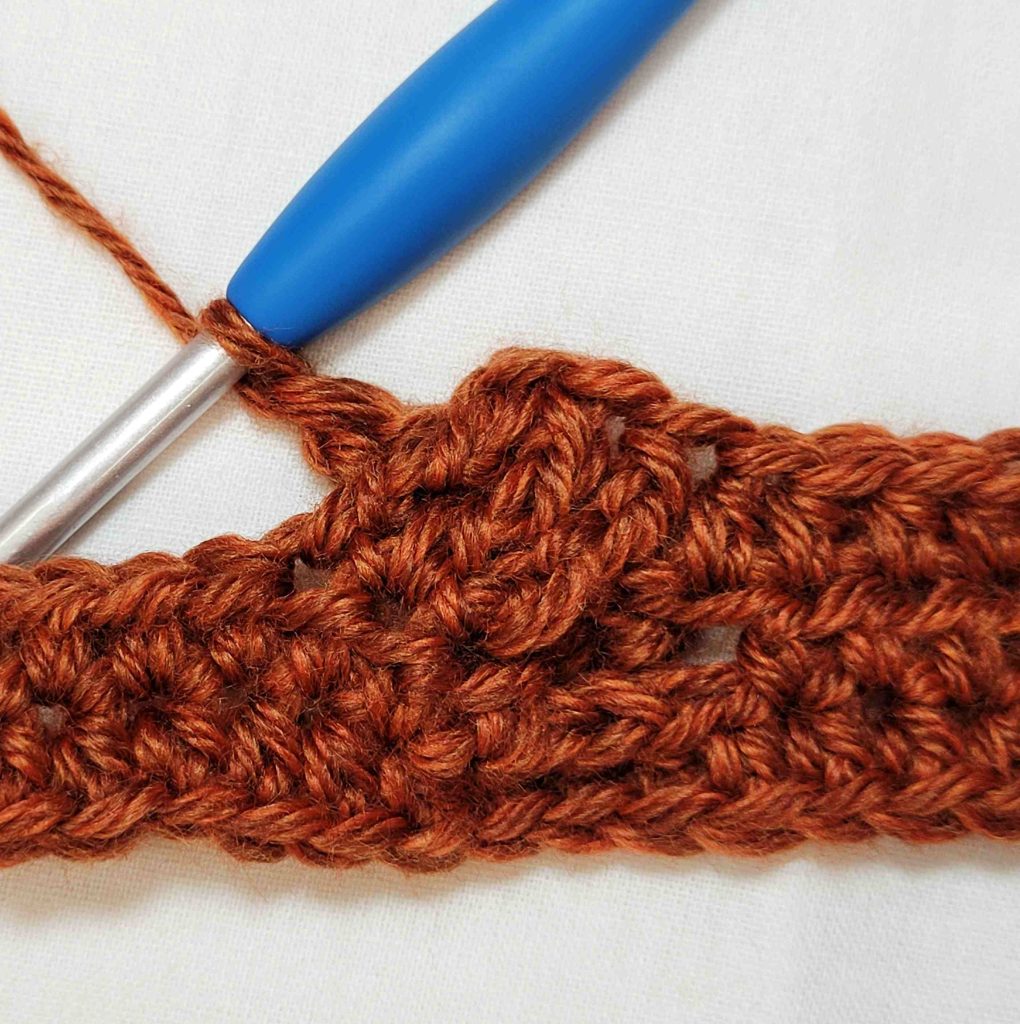
Figure 4
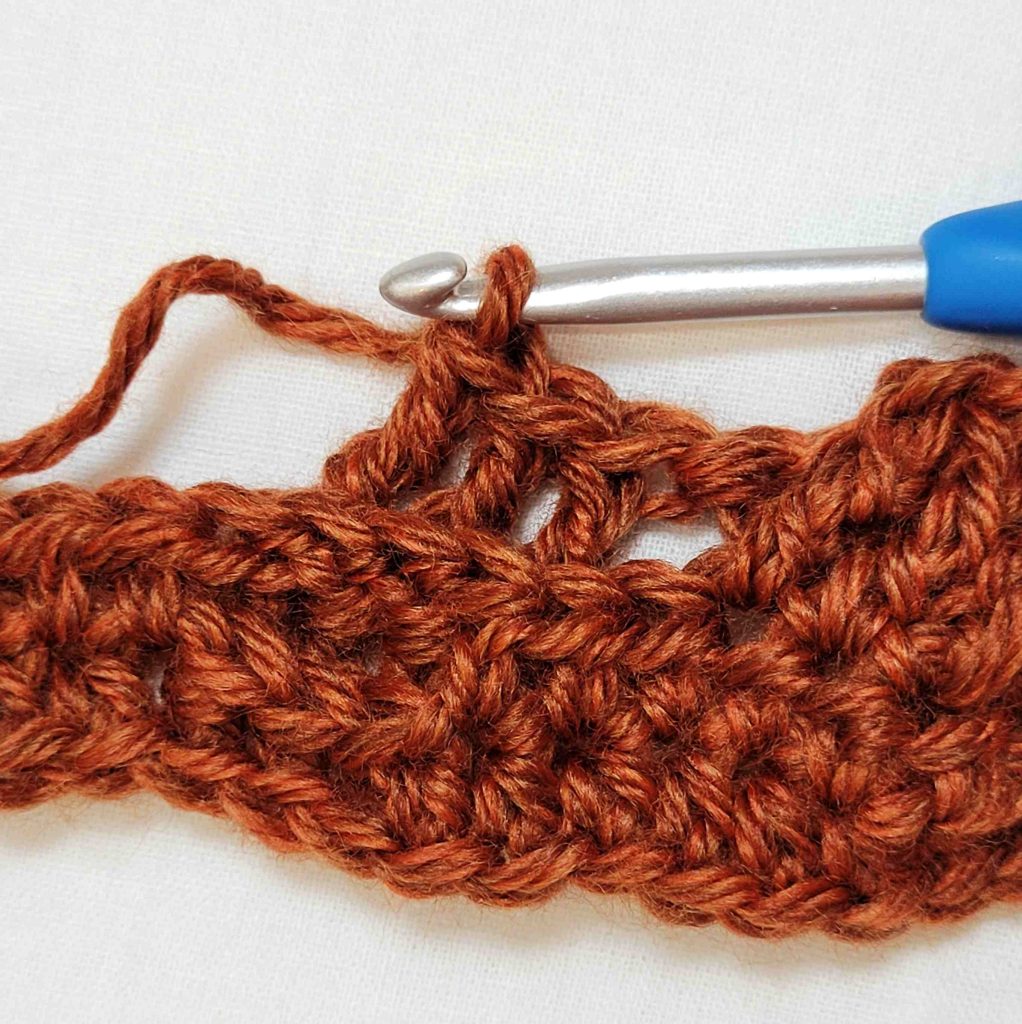
Figure 5
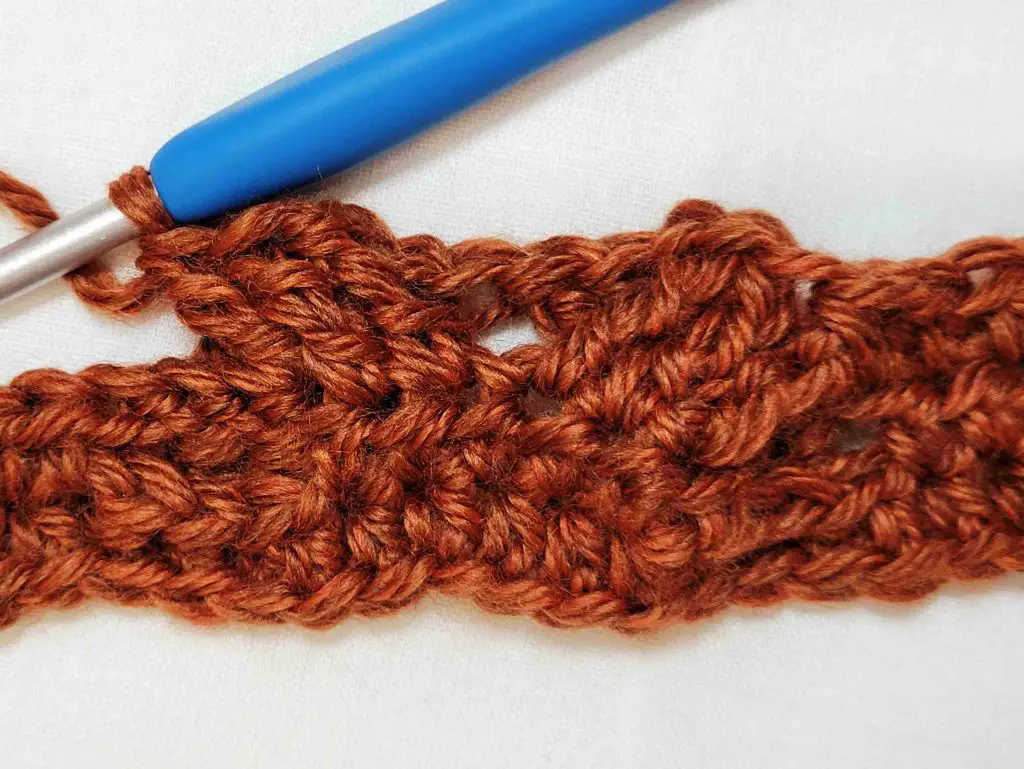
Figure 6
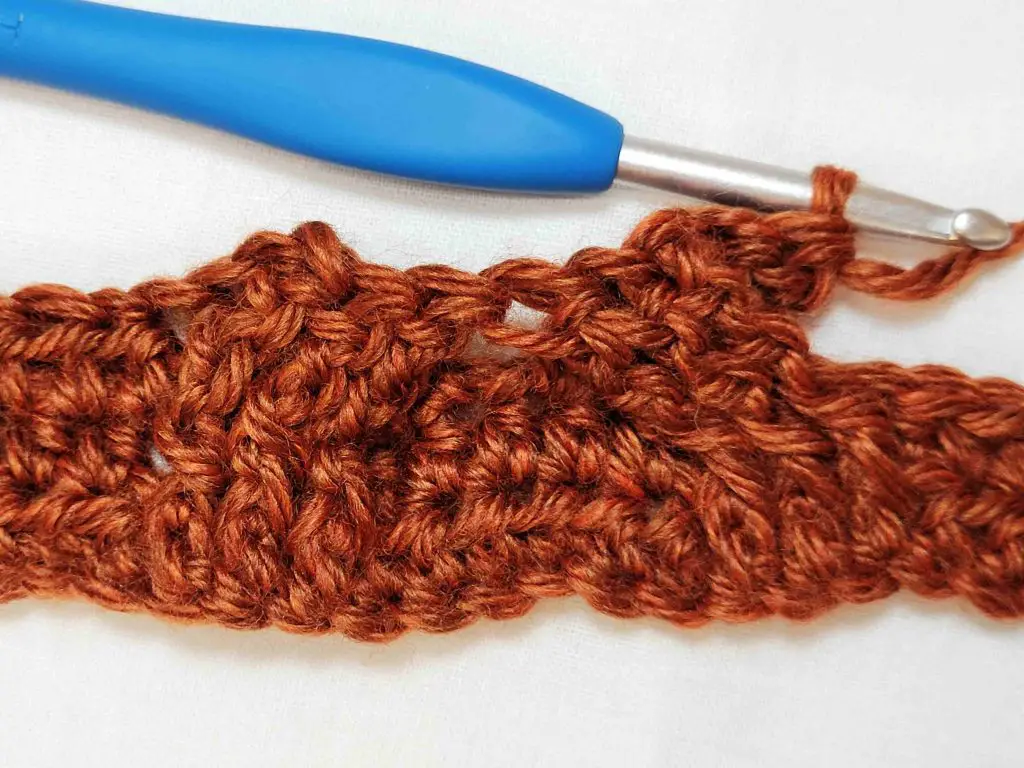
Figure 7
- – Ch1. Hdc in 1st 50 (60, 75, 89, 106) sts. Fpdc in next 6 sts (see Figure 8). Hdc in next 9 sts.
– Sk next 3 sts, fptr in next 3 sts (see Figure 9). Working in front of sts just made, fptr in 3 skipped sts (see Figure 10).
– Sk 3 sts, fptr in next 3 sts (see Figure 11). Working behind sts just made, fptr in 3 skipped sts (see Figure 12).
– Hdc in next 9 sts. Fpdc in next 6 sts. Hdc in last 50 (60, 75, 89, 106) sts. Figure 13 shows row 4 completed. Turn. – 142 (162, 192, 220, 254) st
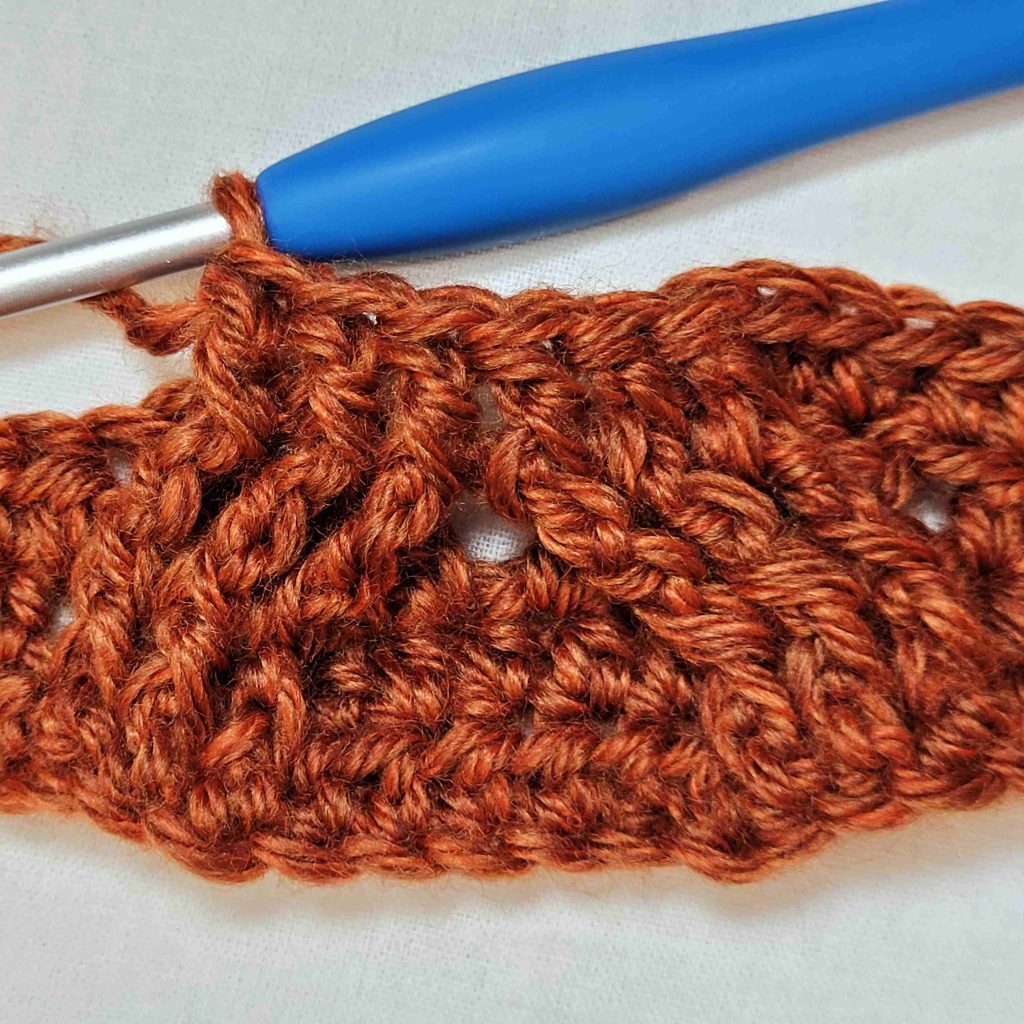
Figure 8
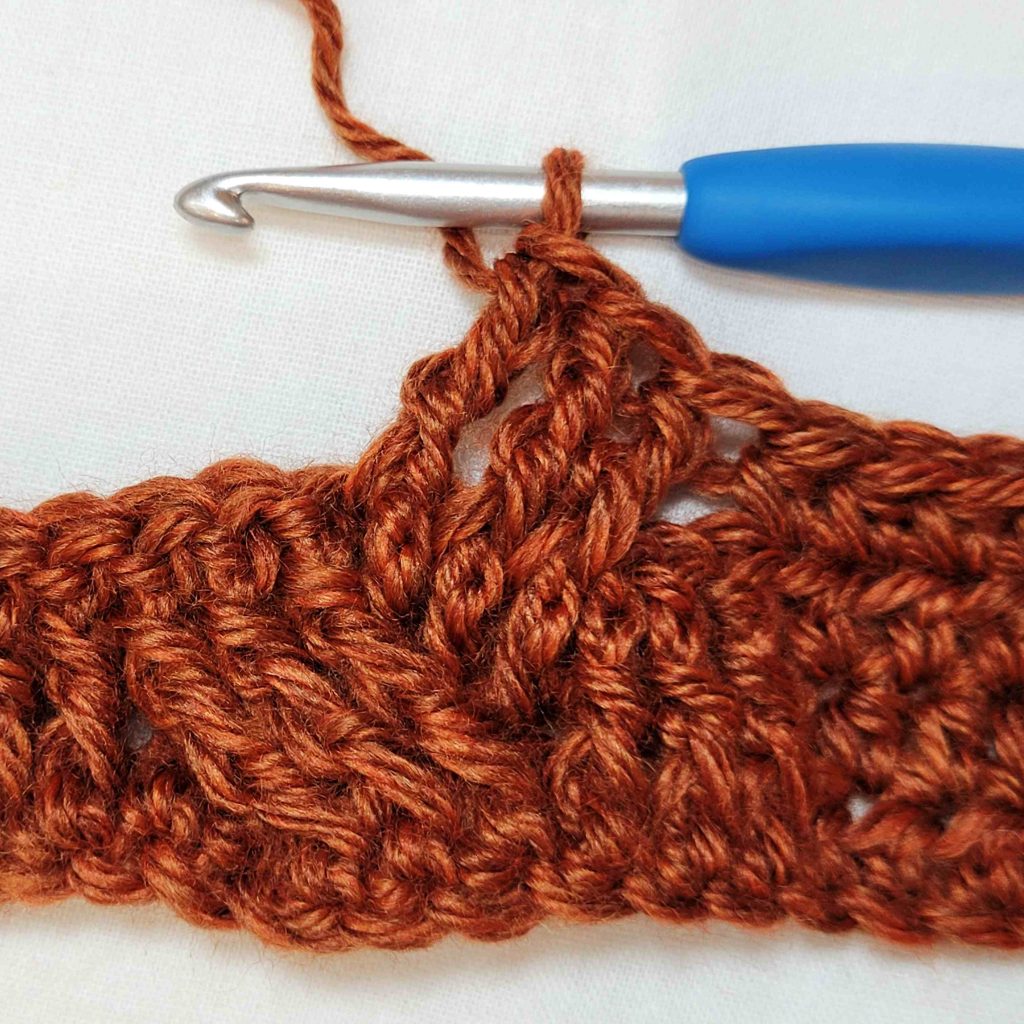
Figure 9
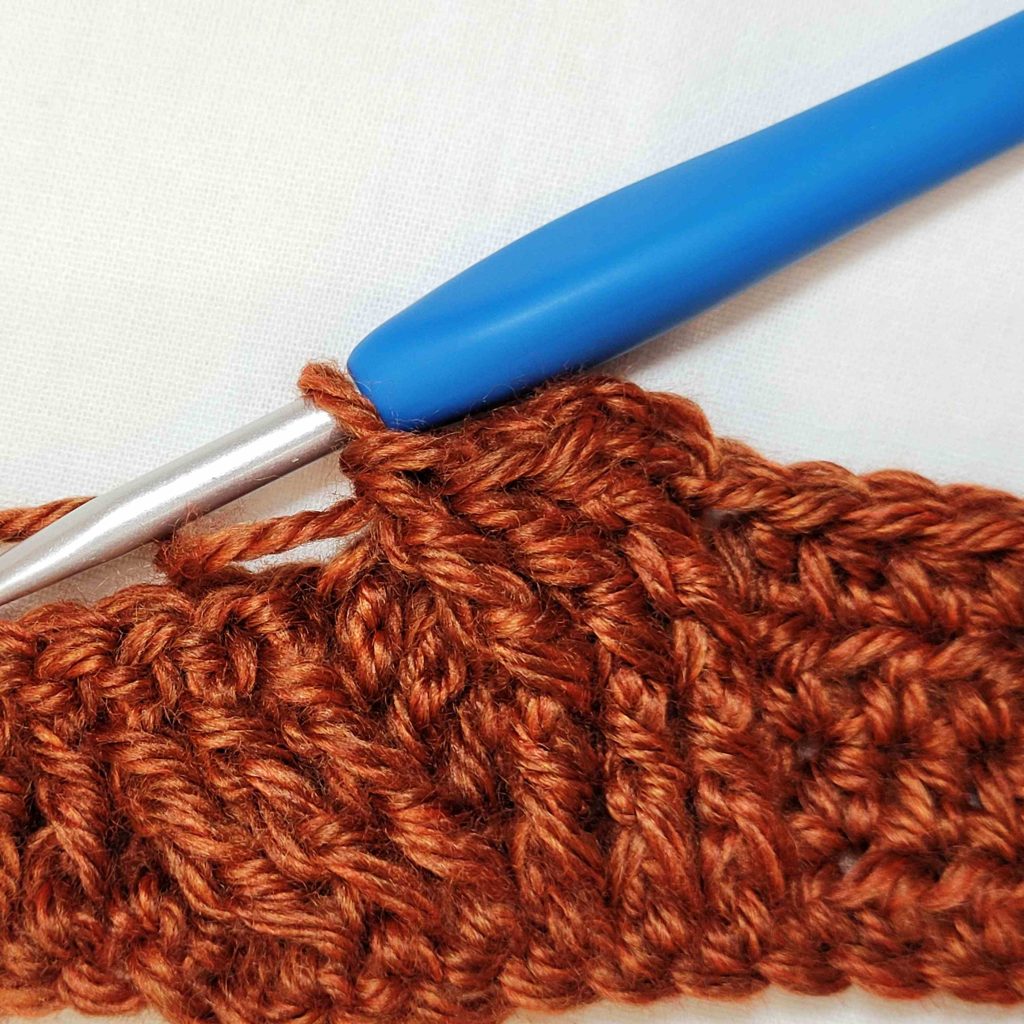
Figure 10
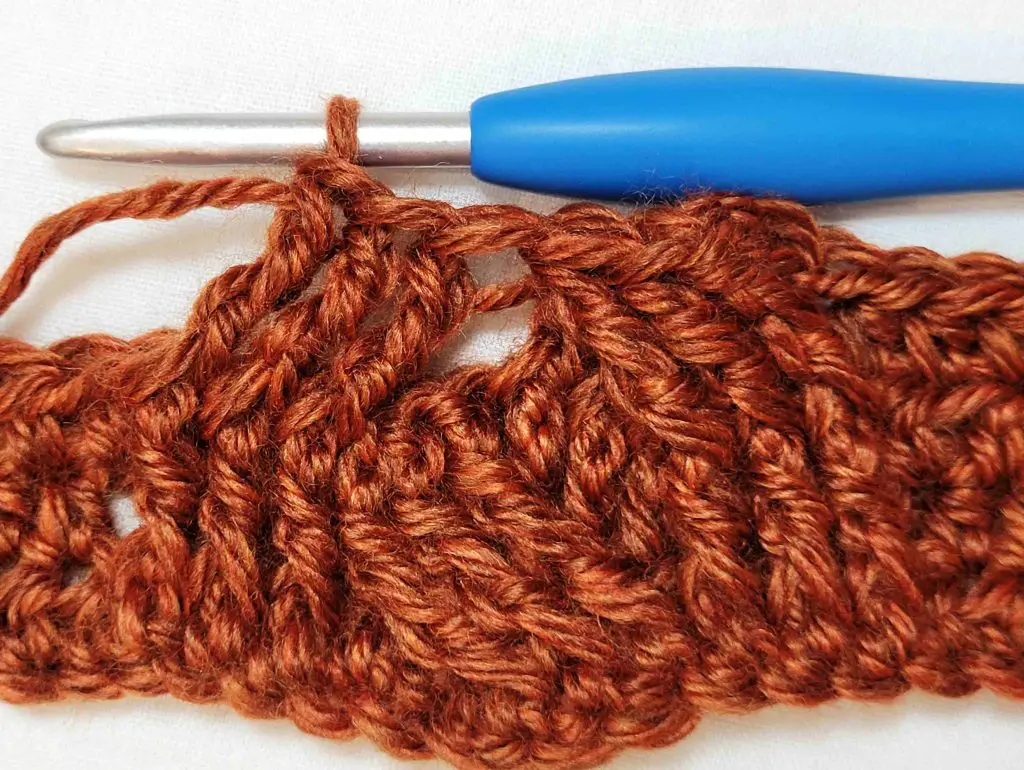
Figure 11
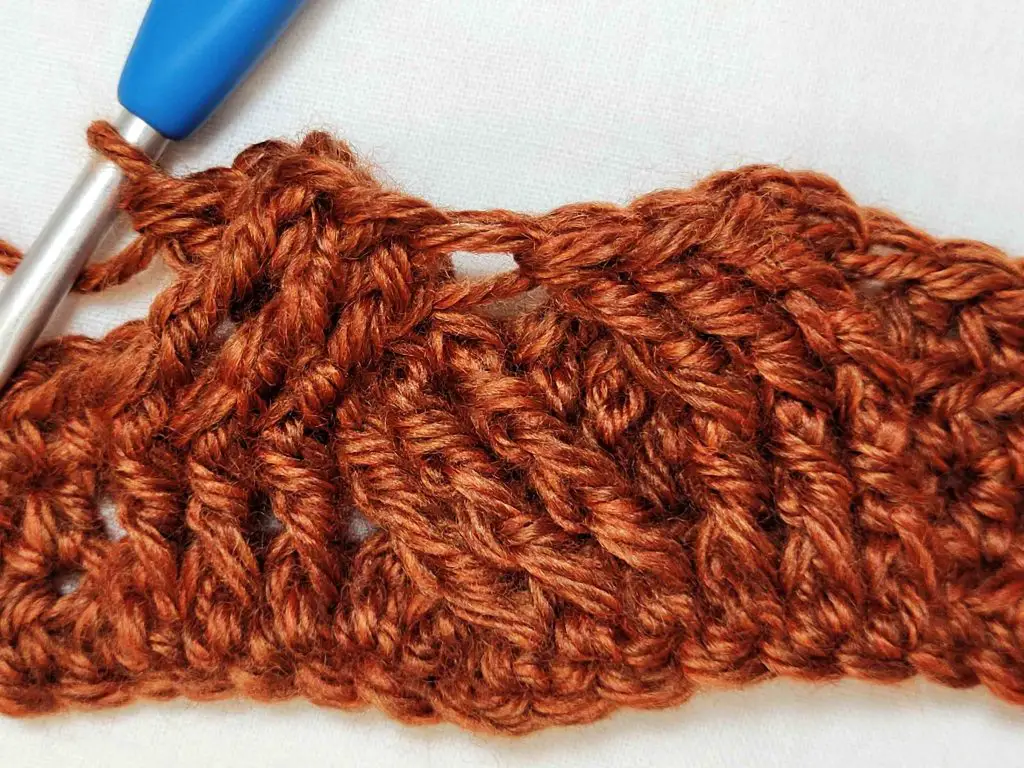
Figure 12
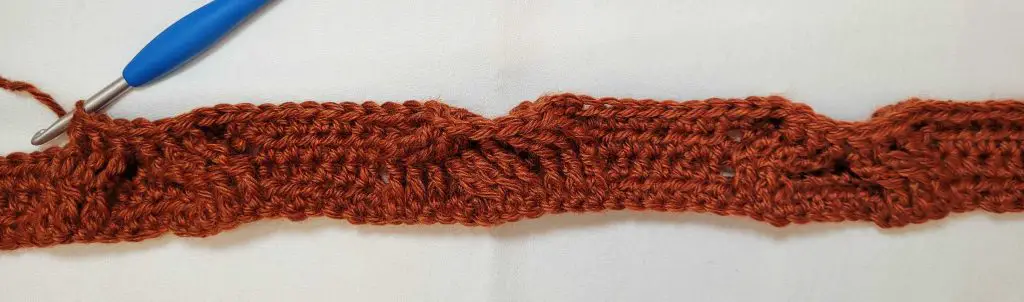
Figure 13
Free Crochet Shrug Pattern – Sorcha Shrug
- – Ch1. Hdc in 1st 50 (60, 75, 89, 106) sts.
– *Sk 3 sts, bptr in next 3 sts (see Figure 14). Working behind sts just made, bptr in 3 skipped sts (see Figure 15).**
– Hdc in next 6 sts. Sk 3 sts, bptr in next 3 sts (see Figure 16). Working in front of sts just made, tr in 3 skipped sts (see Figure 17).
– Bpdc in next 6 sts. Sk 3 sts, tr in next 3 sts (see Figure 18). Working behind sts just made, bptr in 3 skipped sts (see Figure 19).
– Hdc in next 6 sts. Repeat from * to **. Hdc in last 50 (60, 75, 89, 106) sts. Turn. – 142 (162, 192, 220, 254) st
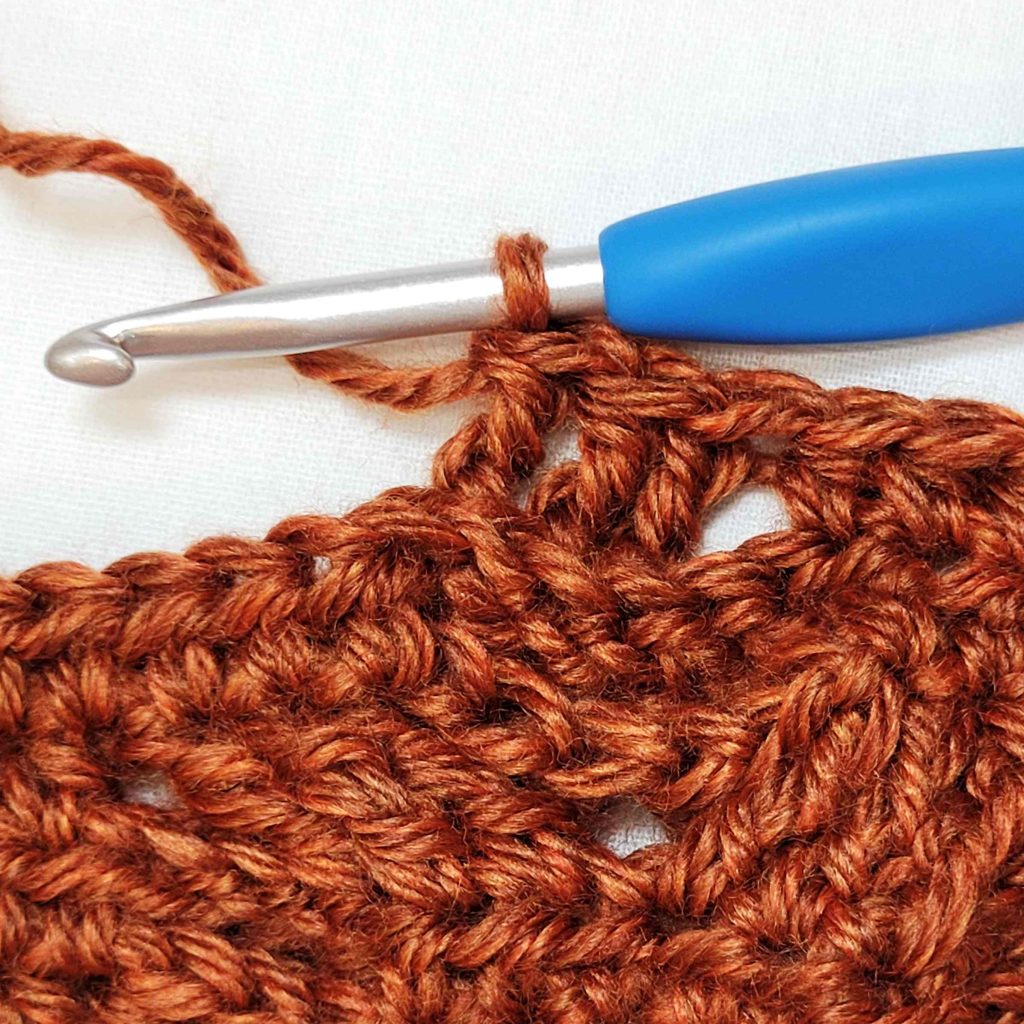
Figure 14
Figure 15
Figure 16
Figure 17
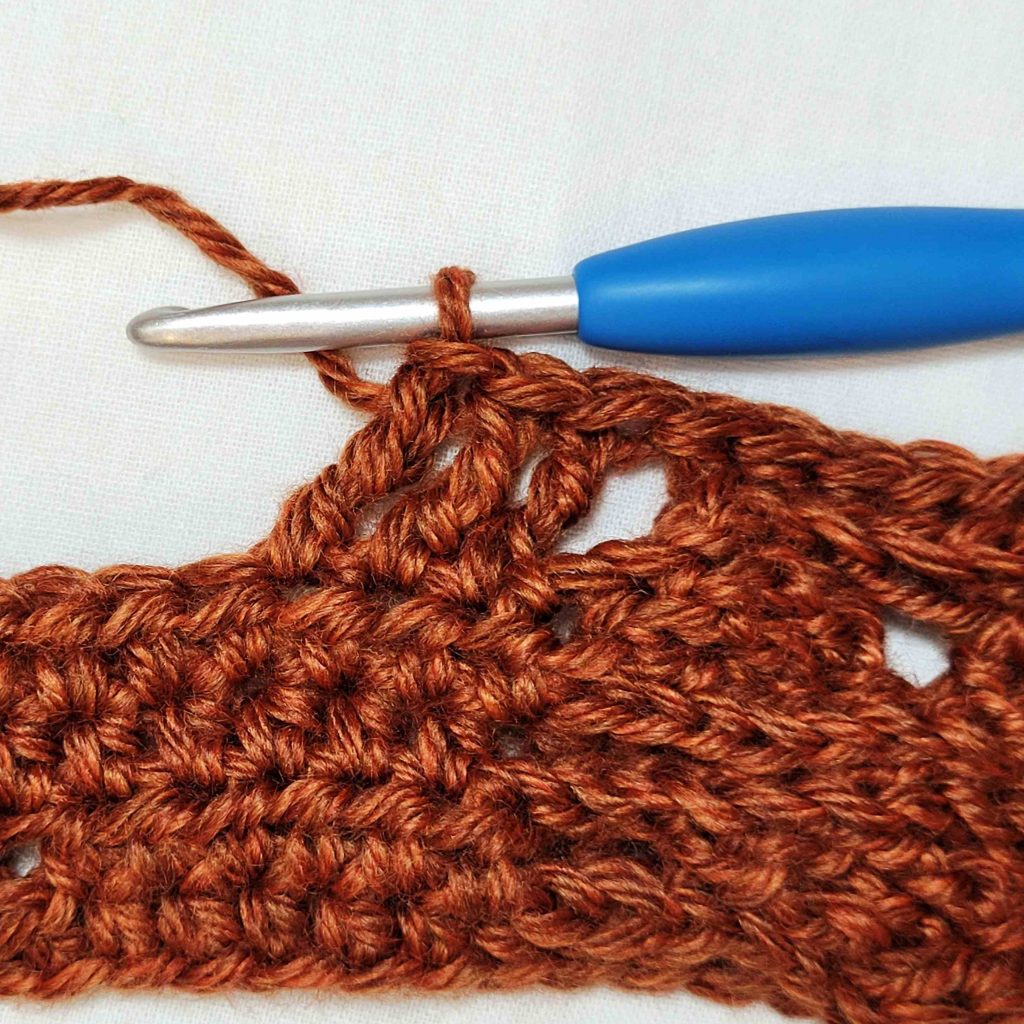
Figure 18
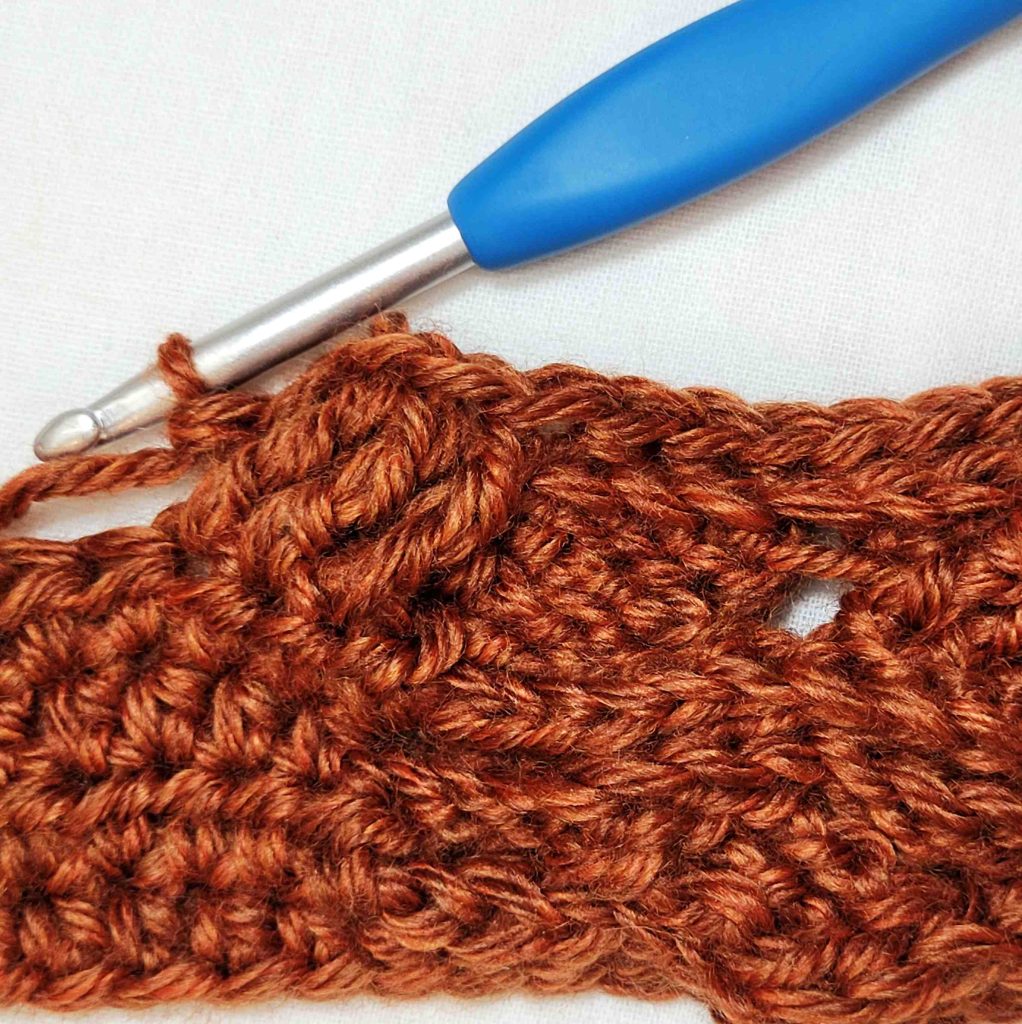
Figure 19
- – Ch1. Hdc in 1st 41 (51, 66, 80, 97) sts. *Sk 3 sts, fptr in next 3 sts (see Figure 20). Working in front of sts just made, fptr in 3 skipped sts (see Figure 21).**
– Hdc in next 12 sts. Sk 3 sts, fptr in next 3 sts (see Figure 22). Working behind sts just made, tr in 3 skipped sts (see Figure 23).
– Hdc in next 3 sts. Repeat from * to ** (see Figures 24 & 25). Hdc in next 3 sts.
– Sk 3 sts, tr in next 3 sts (see Figure 26). Working in front of sts just made, fptr in 3 skipped sts (see Figure 27).
– Hdc in next 12 sts. Repeat from * to **. Hdc in last 41 (51, 66, 80, 97) sts. Figure 28 shows row 6 completed. Turn. – 142 (162, 192, 220, 254) st
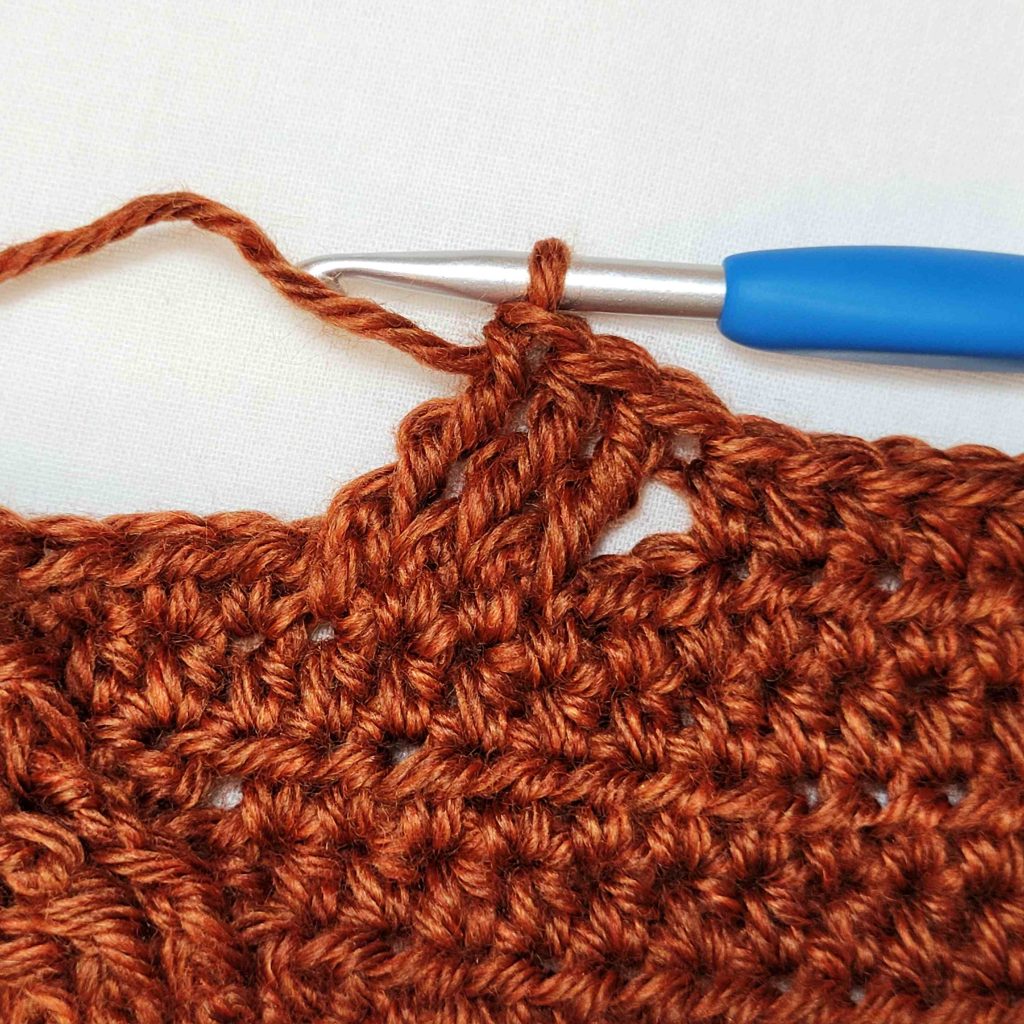
Figure 20
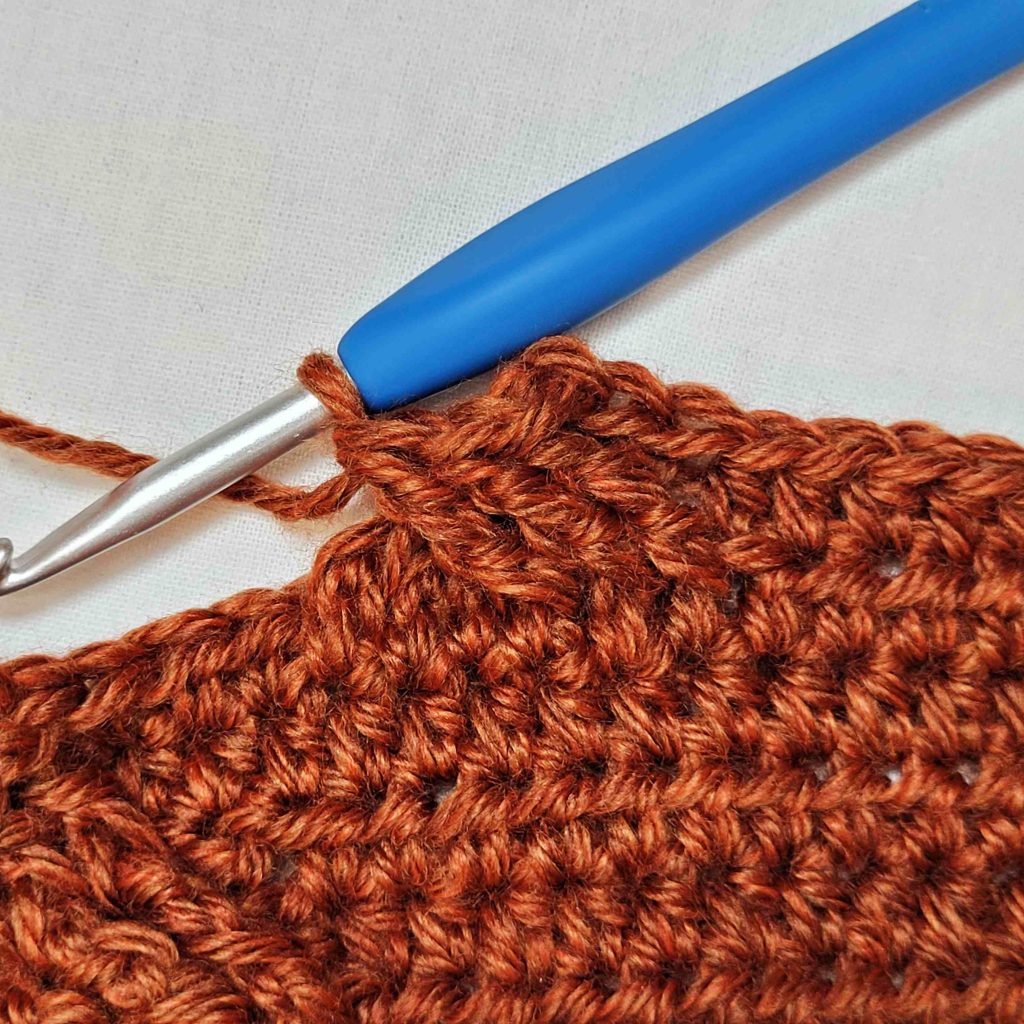
Figure 21
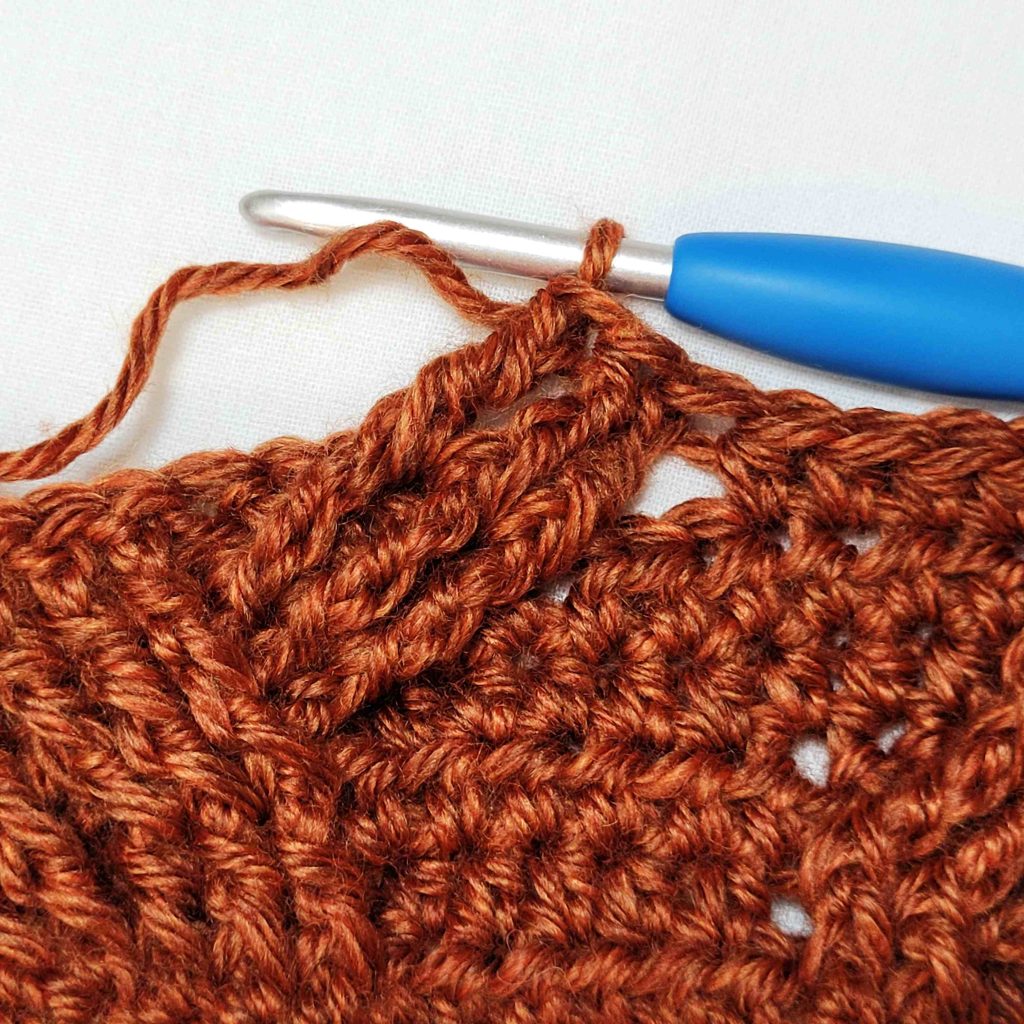
Figure 22
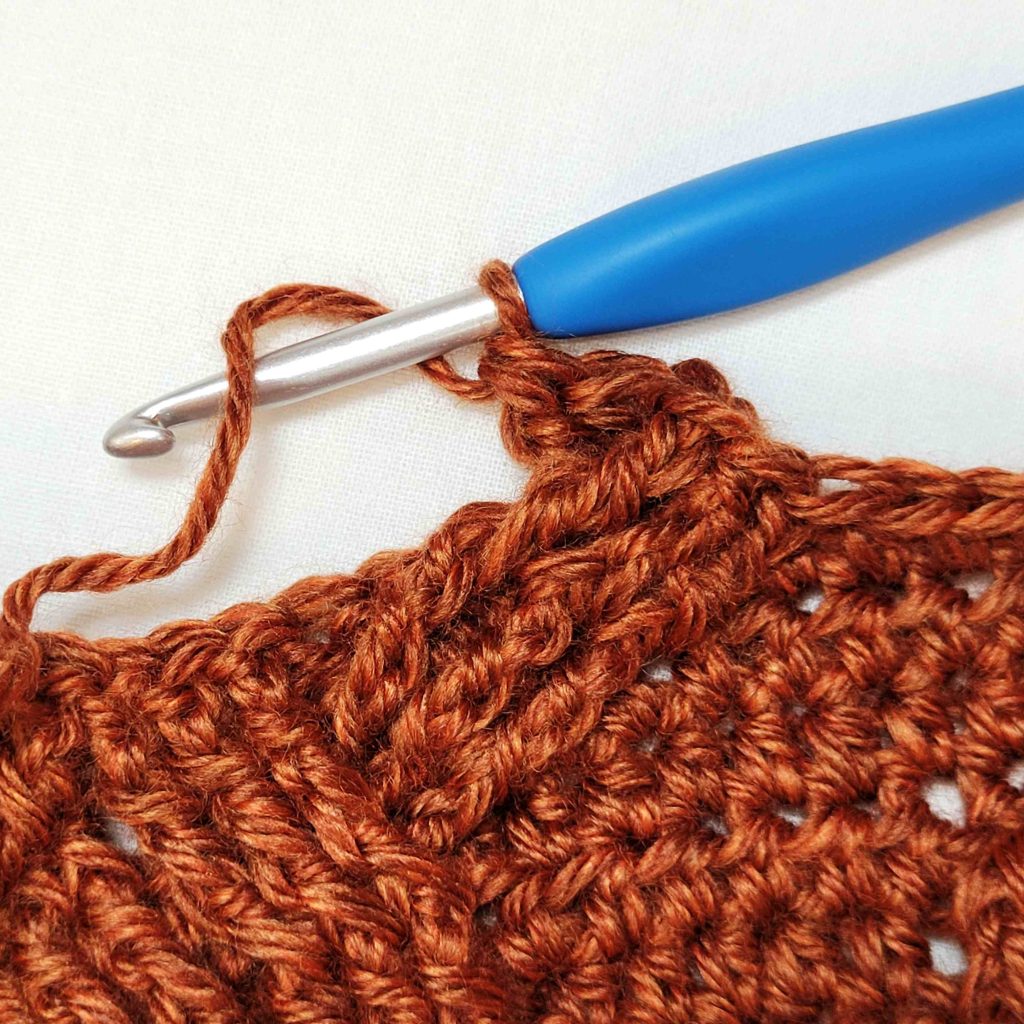
Figure 23
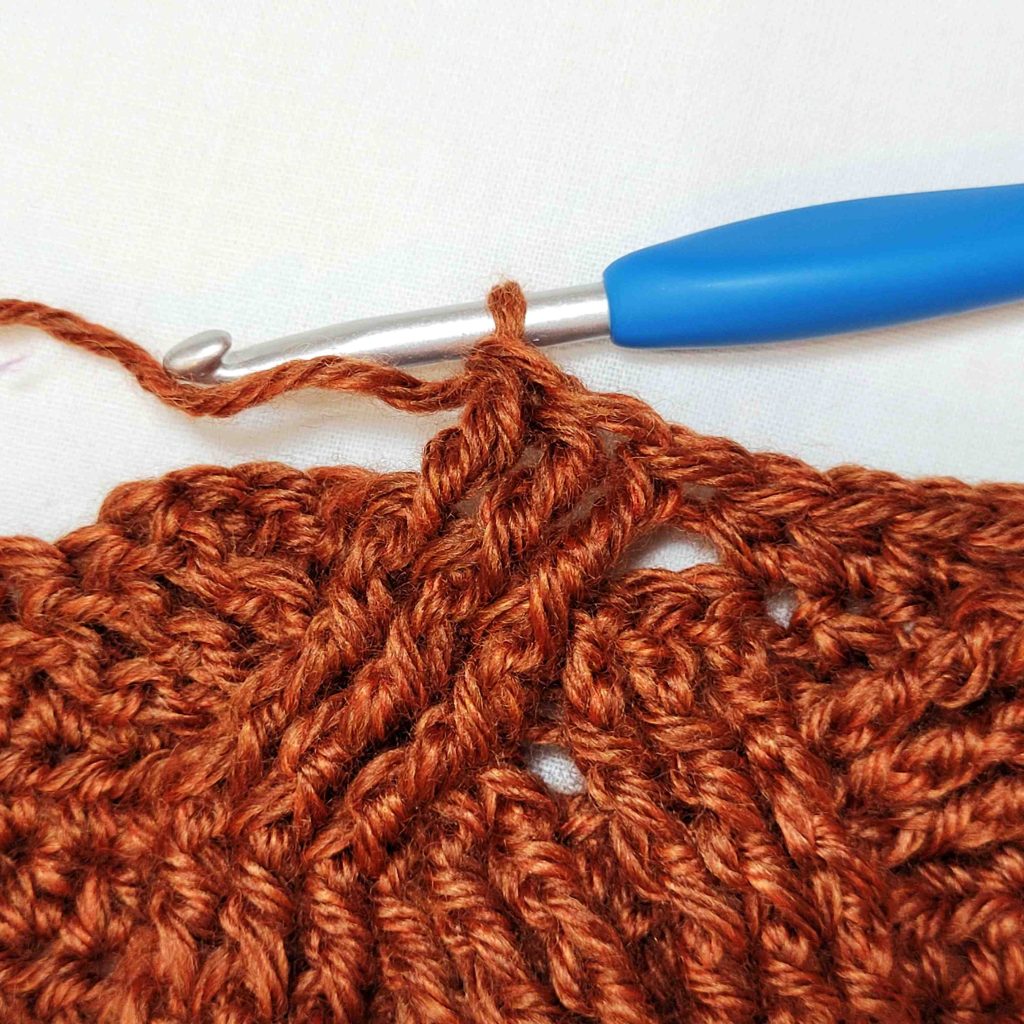
Figure 24
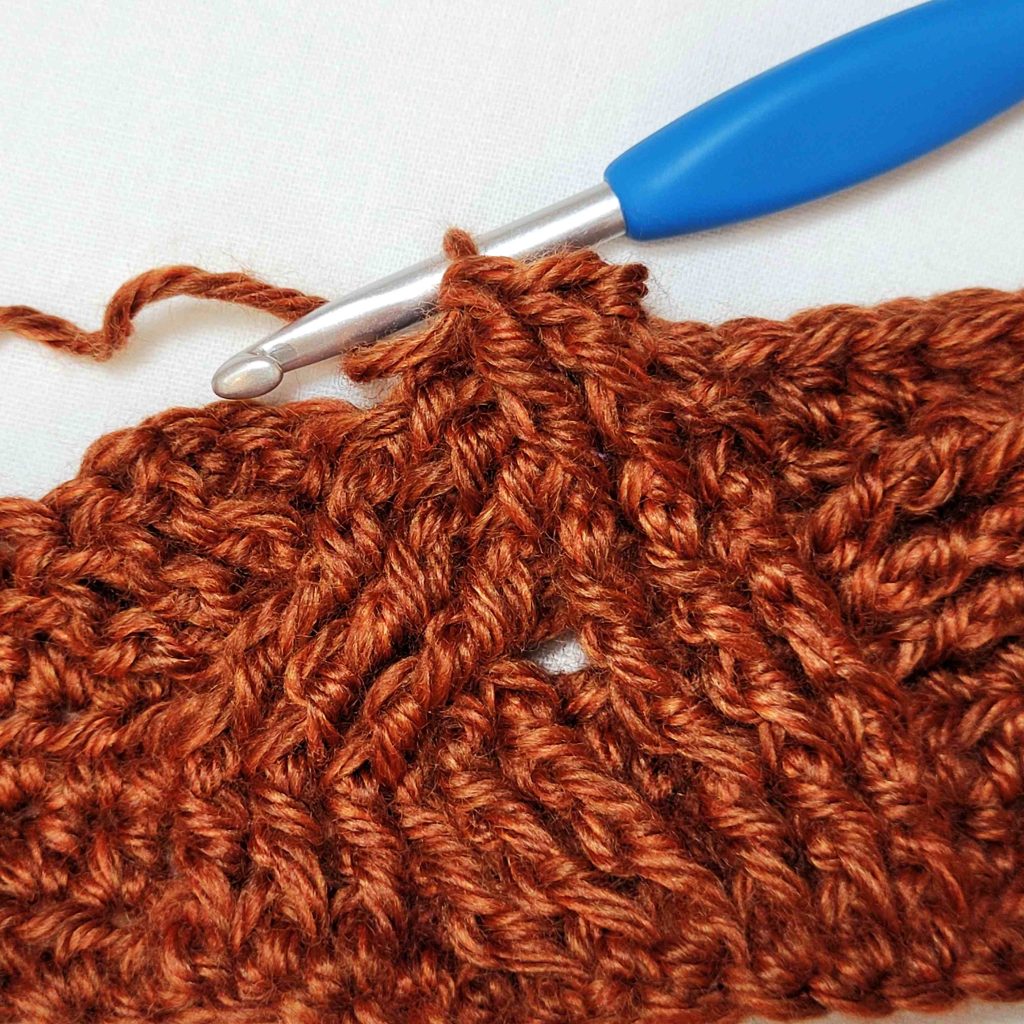
Figure 25
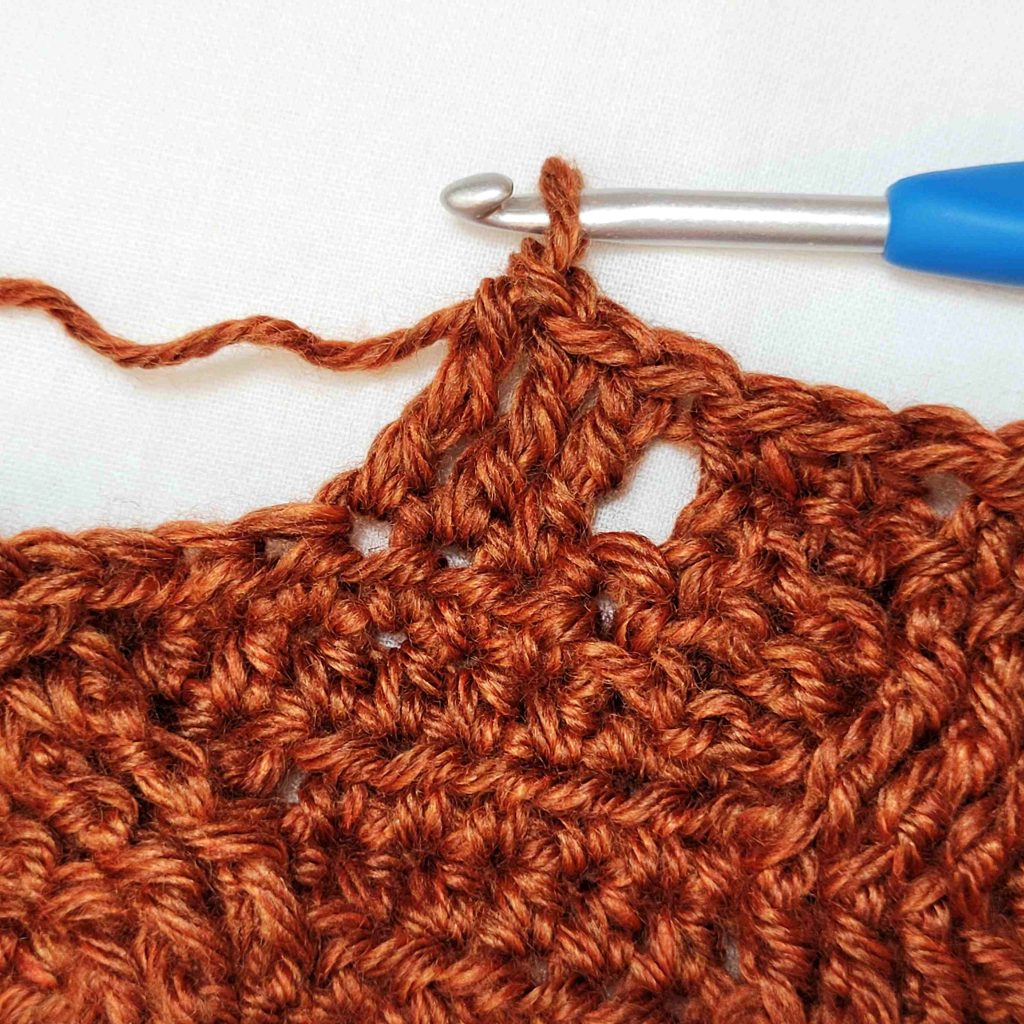
Figure 26
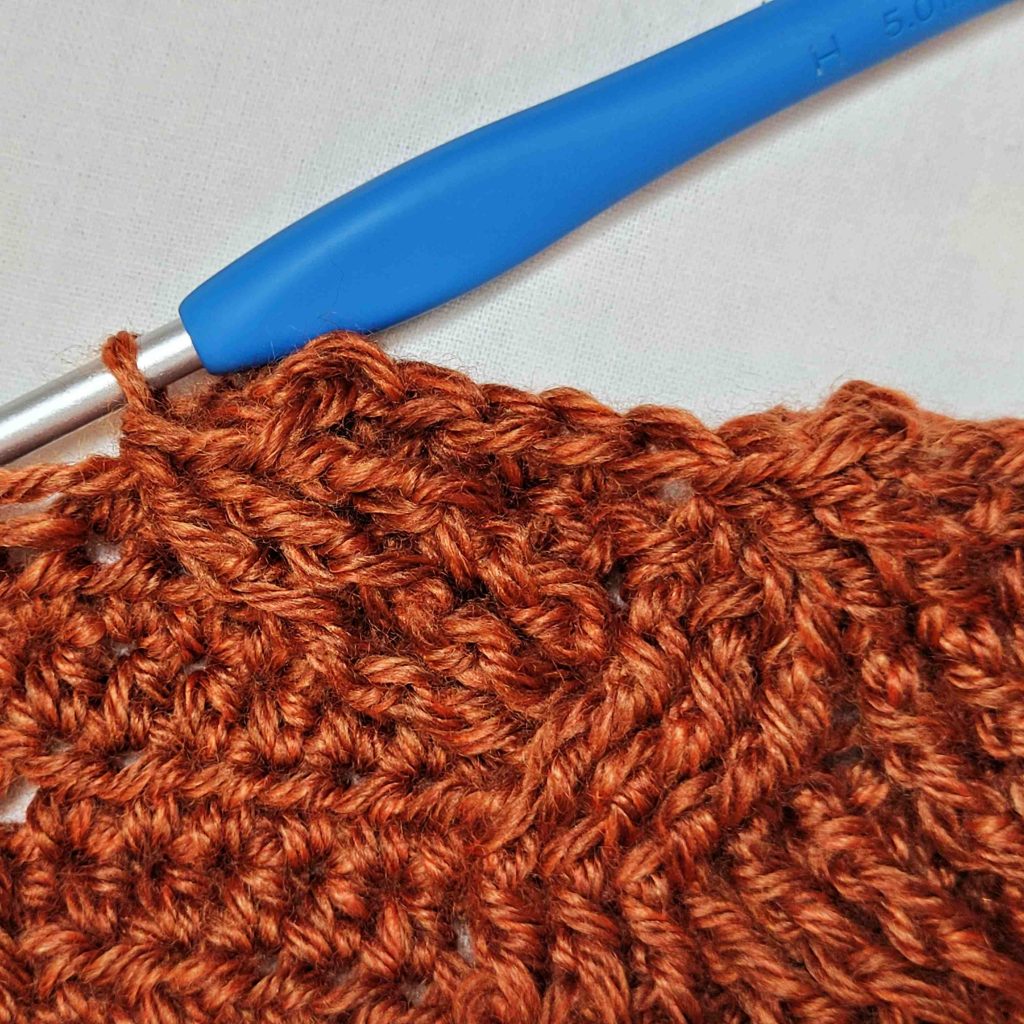
Figure 27
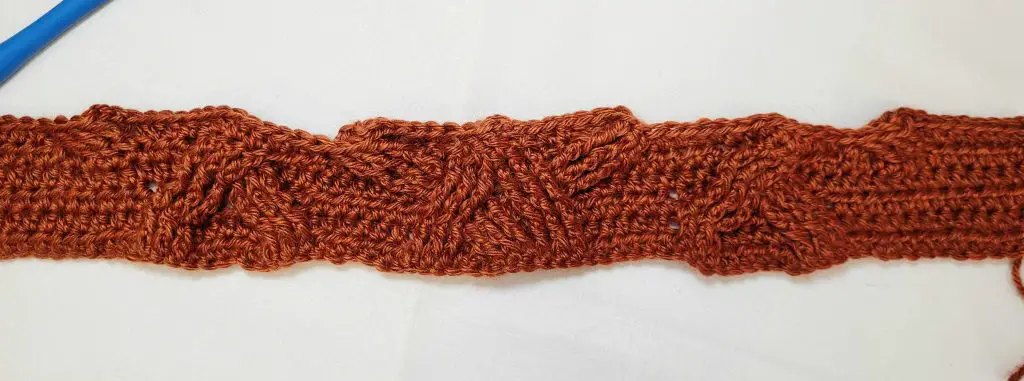
Figure 28
Gauge check: Your project should be approximately 34” (39”, 46”, 53”, 61”) wide. If your project is an inch or two wider than expected, it shouldn’t change the look too much. If it is narrower than expected, or more than 2” wider, I would try again with a different sized hook.
- – Ch1. Hdc in 1st 41 (51, 66, 80, 97) sts. Bpdc in next 6 sts. Hdc in next 9 sts.
– Sk 3 sts, bptr in next 3 sts (see Figure 29). Working in front of sts just made, tr in 3 skipped sts (see Figure 30).
– Hdc in next 6 sts. Bpdc in next 6 sts. Hdc in next 6 sts.
– Sk 3 sts, tr in next 3 sts (see Figure 31). Working behind sts just made, bptr in 3 skipped sts (see Figure 32).
– Hdc in next 9 sts. Bpdc in next 6 sts. Hdc in last 41 (51, 66, 80, 97) sts. Turn. Figure 33 shows right side of completed row 7. – 142 (162, 192, 220, 254) st
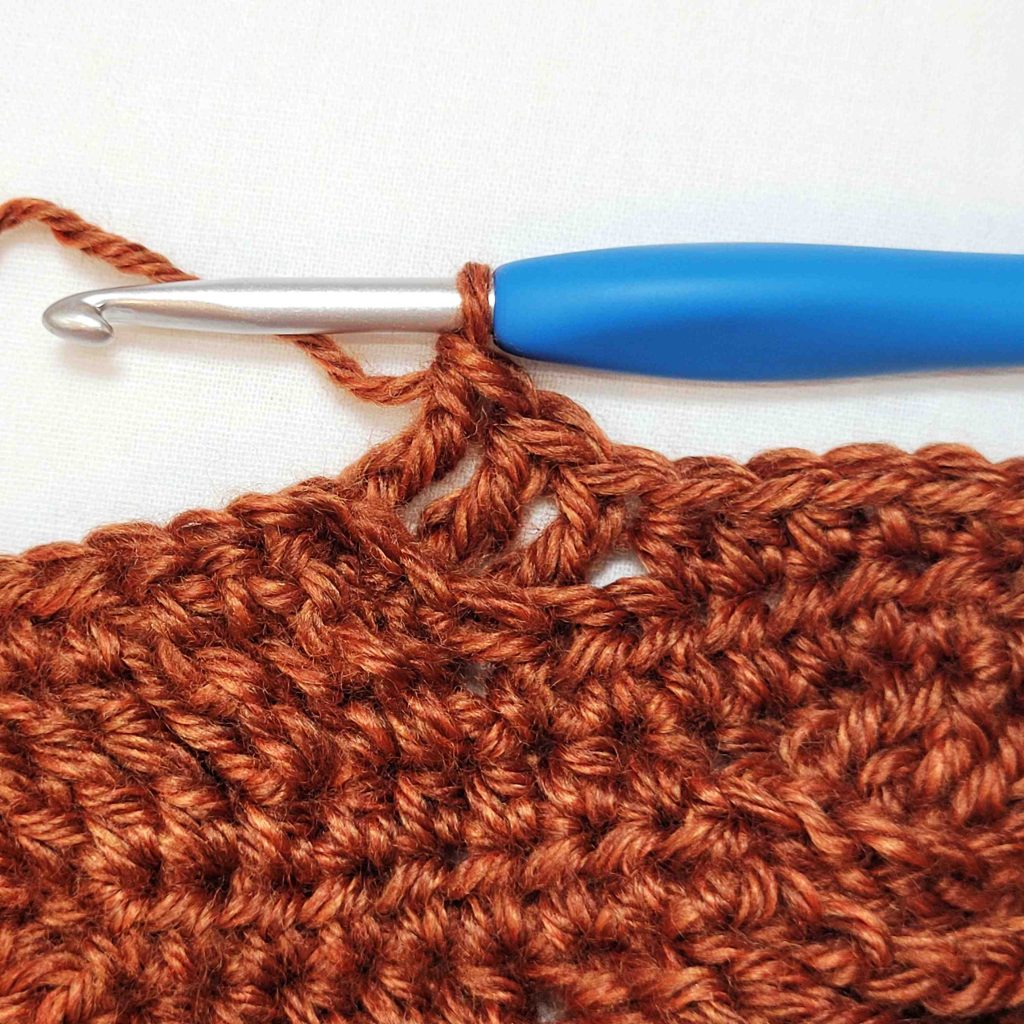
Figure 29
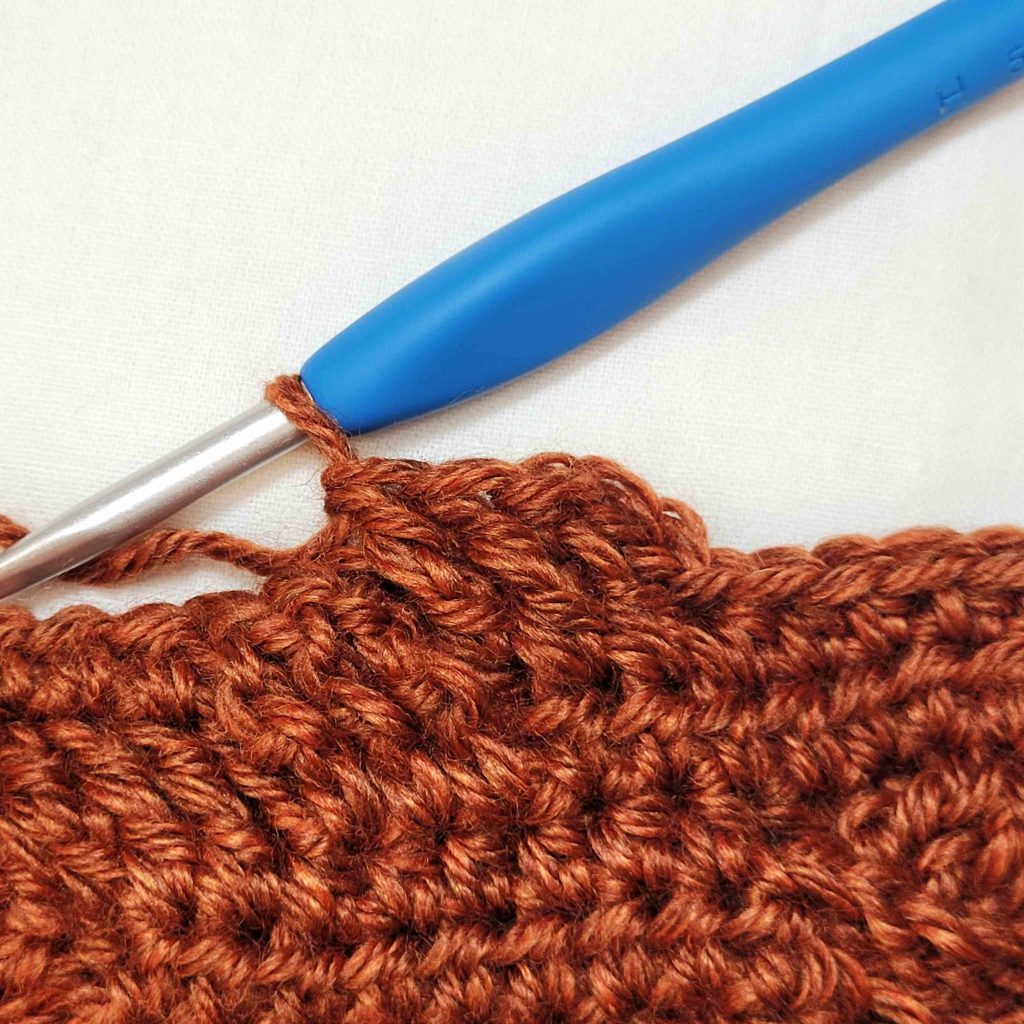
Figure 30
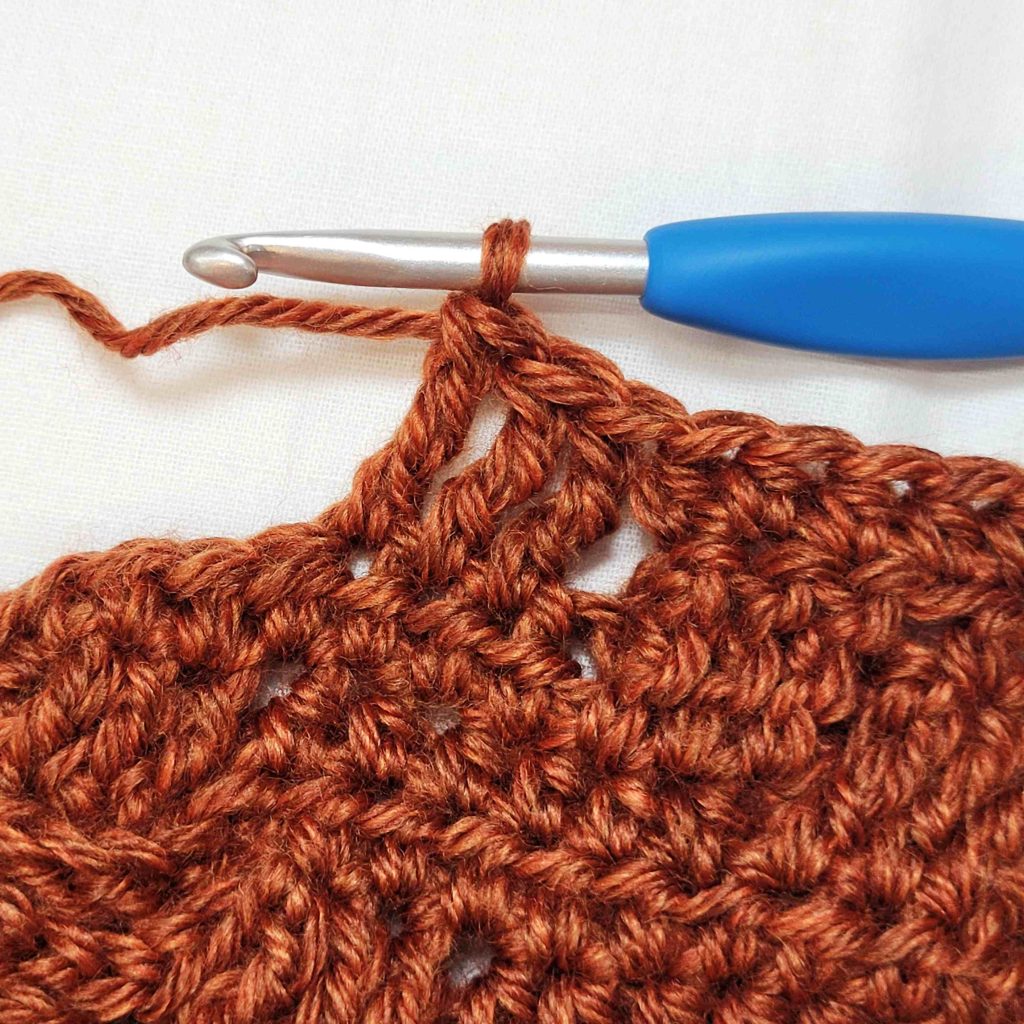
Figure 31
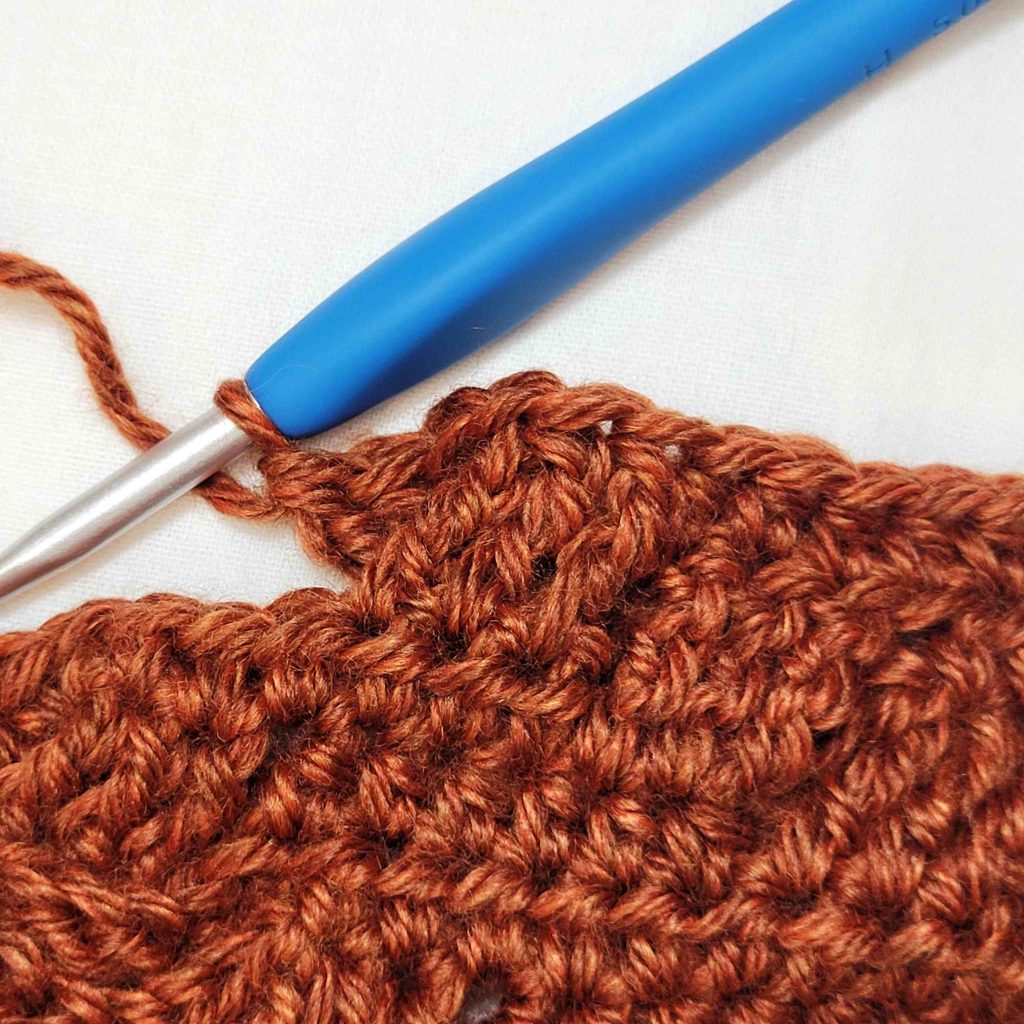
Figure 32
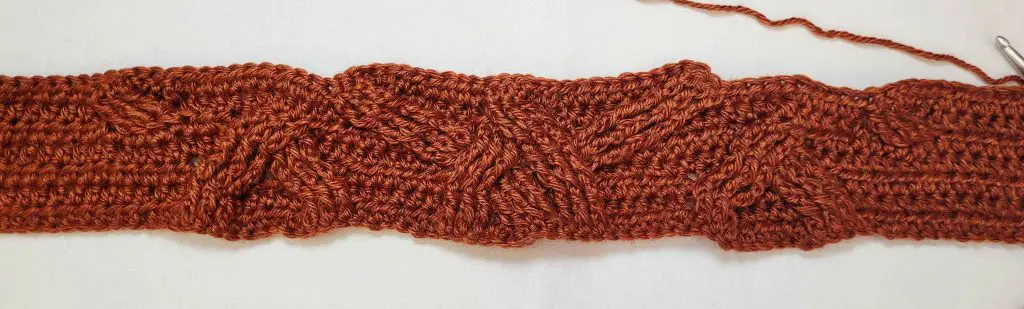
Figure 33
Free Crochet Shrug Pattern – Sorcha Shrug
- – Ch1. Hdc in 1st 38 (48, 63, 77, 94) sts. *Sk 3 sts, fptr in next 3 sts (see Figure 34). Working behind sts just made, tr in 3 skipped sts(see Figure 35). Sk 3 sts, tr in next 3 sts (see Figure 36). Working in front of sts just made, fptr in 3 skipped sts (see Figure 37).**
– Hdc in next 3 sts. Sk 3 sts, fptr in next 3 sts (see Figure 38). Working behind sts just made, tr in 3 skipped sts (see Figure 39).
– Hdc in next 6 sts. Repeat from * to **. Hdc in next 6 sts.
– Sk 3 sts, tr in next 3 sts (see Figure 40). Working in front of sts just made, fptr in 3 skipped sts (see Figure 41).
– Hdc in next 3 sts. Repeat from * to **. Hdc in last 38 (48, 63, 77, 94) sts. Figure 42 shows row 8 completed. Turn. – 142 (162, 192, 220, 254) st
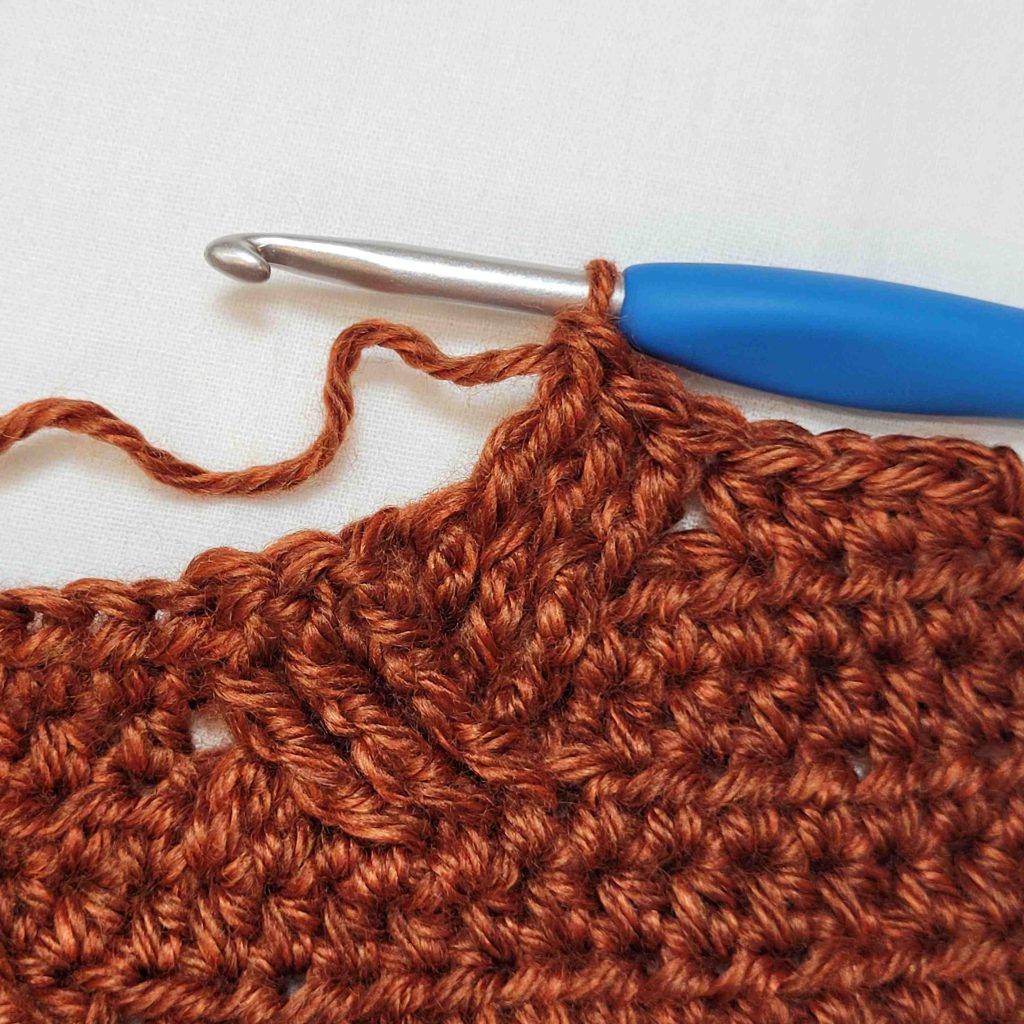
Figure 34
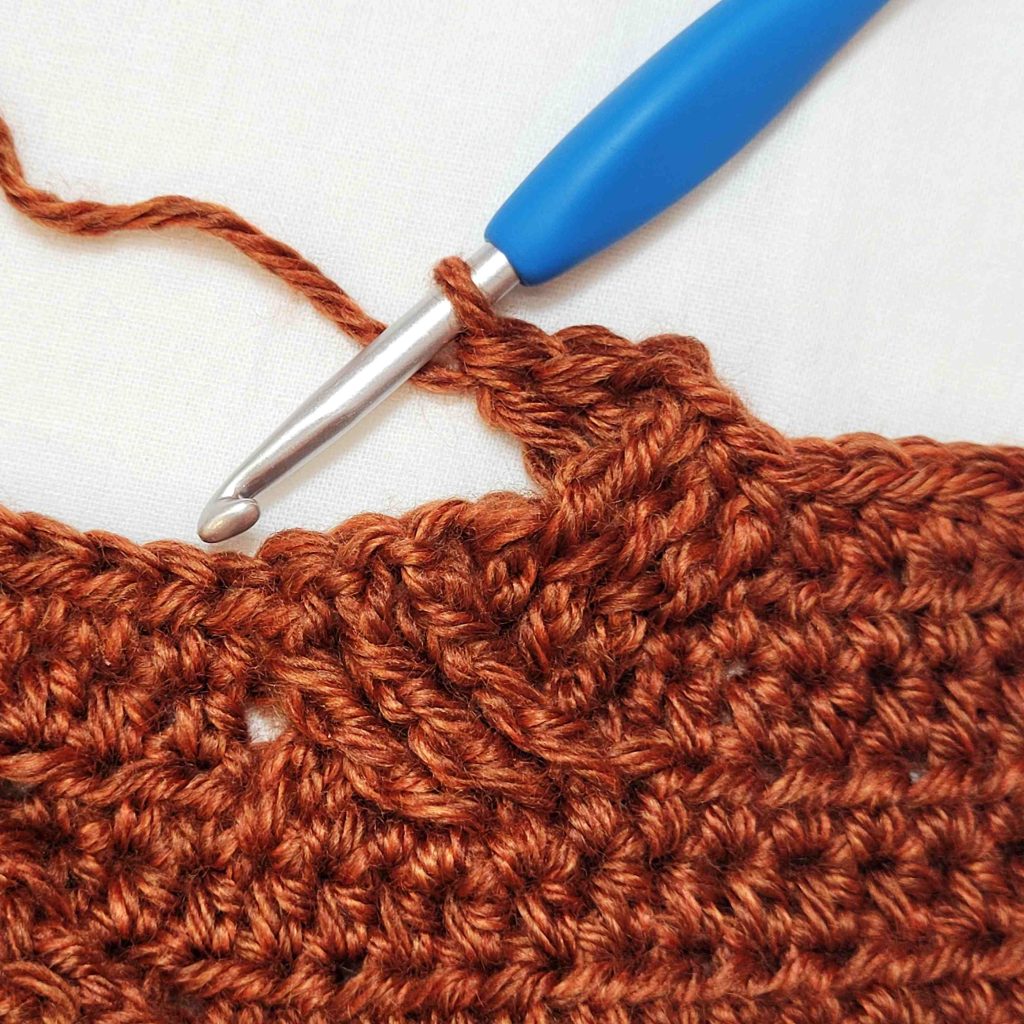
Figure 35
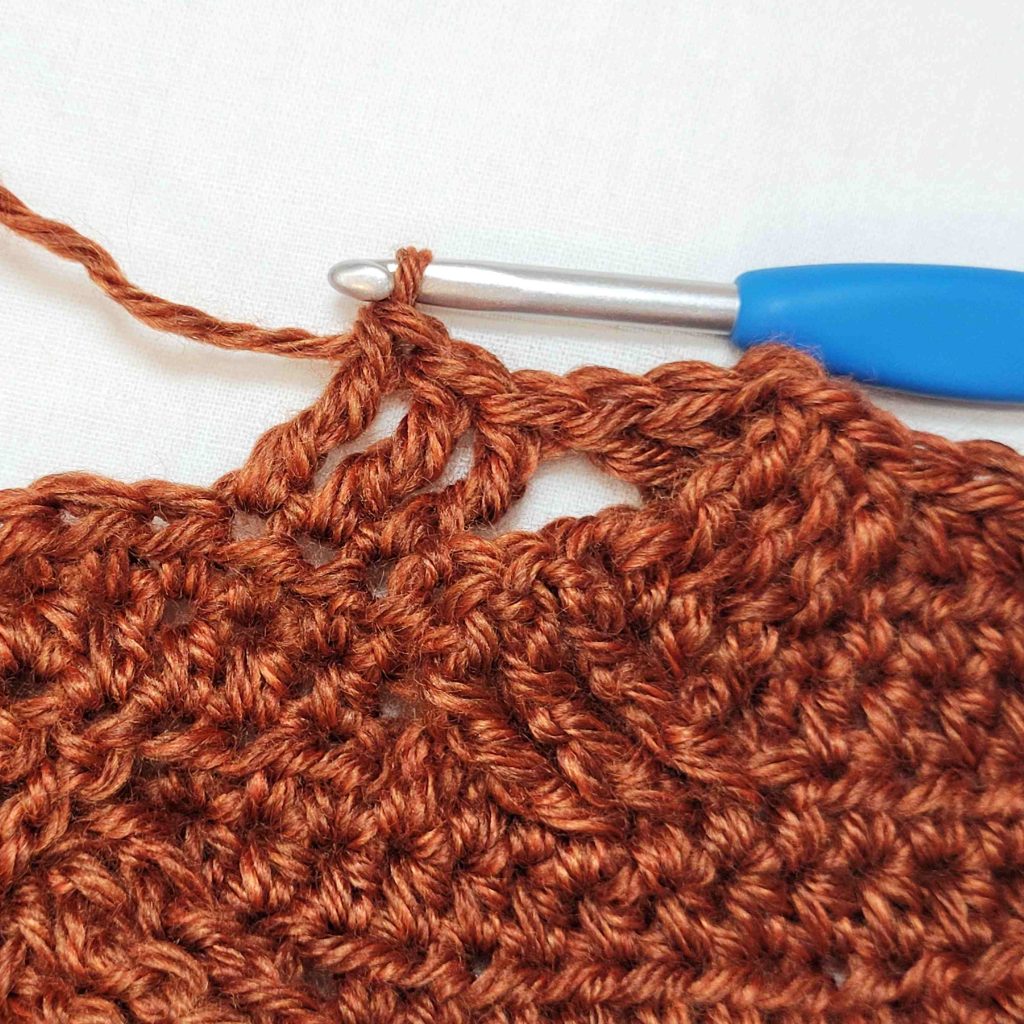
Figure 36
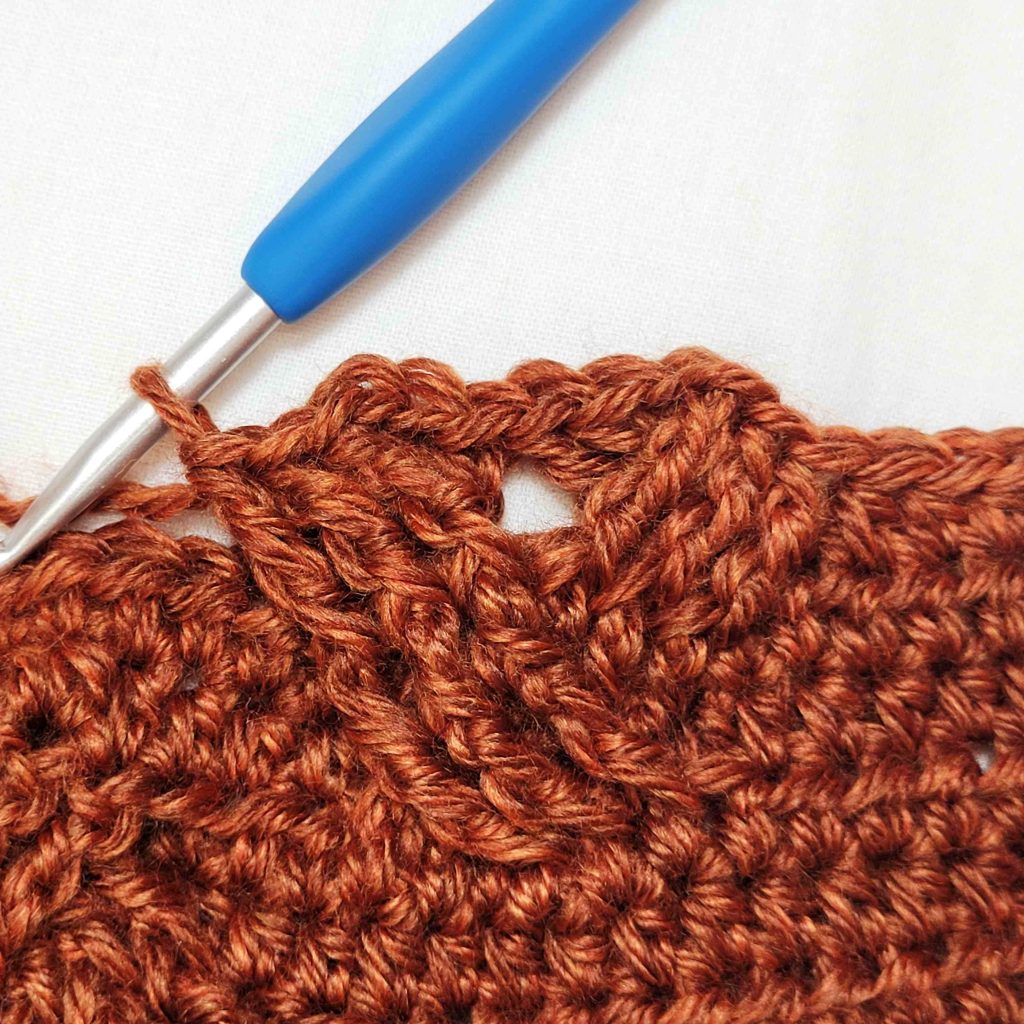
Figure 37
Figure 38
Figure 39
Figure 40
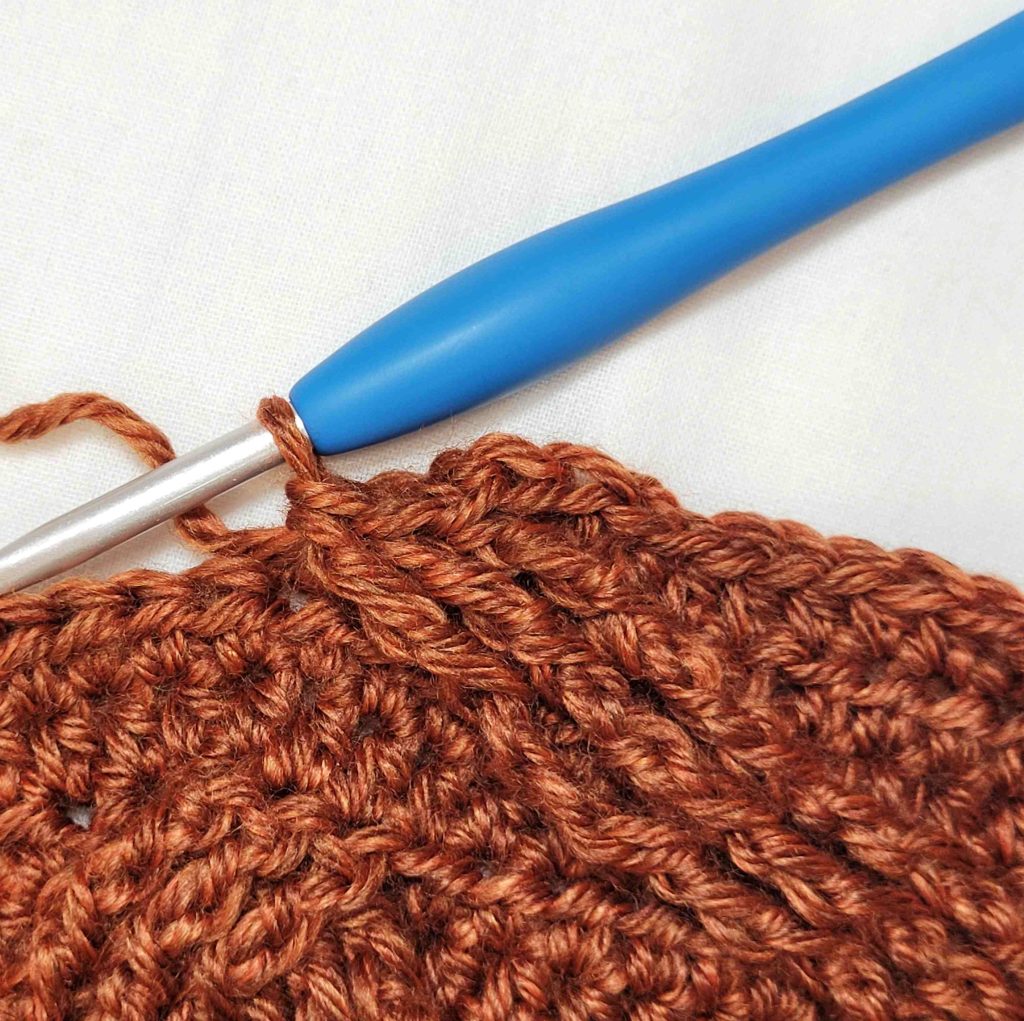
Figure 41
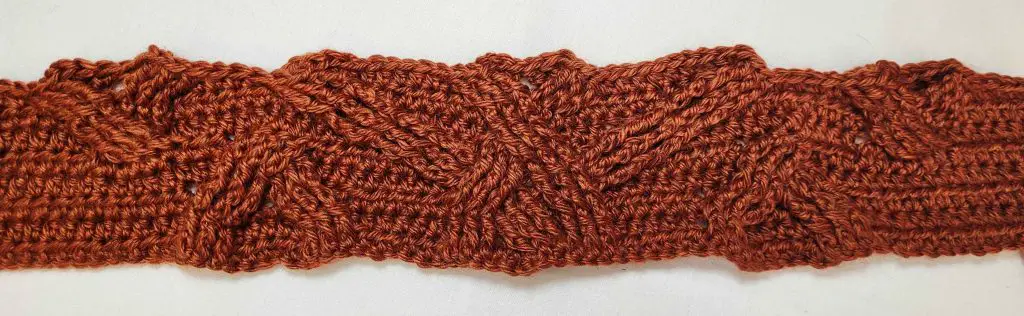
Figure 42
- – Ch1. Hdc in 1st 38 (48, 63, 77, 94) sts.
– *Bpdc in next 3 sts. Hdc in next 6 sts. Bpdc in next 3 sts.**
– Sk 3 sts, bptr in next 3 sts (see Figure 43). Working in front of sts just made, tr in 3 skipped sts (see Figure 44).
– Hdc in next 9 sts. Repeat from * to **. Hdc in next 9 sts.
– Sk 3 sts, tr in next 3 sts (see Figure 45). Working behind sts just made, bptr in 3 skipped sts see Figure 46). Repeat from * to **.
– Hdc in last 38 (48, 63, 77, 94) sts. Turn. Figure 47 shows right side of completed row 9. – 142 (162, 192, 220, 254) st
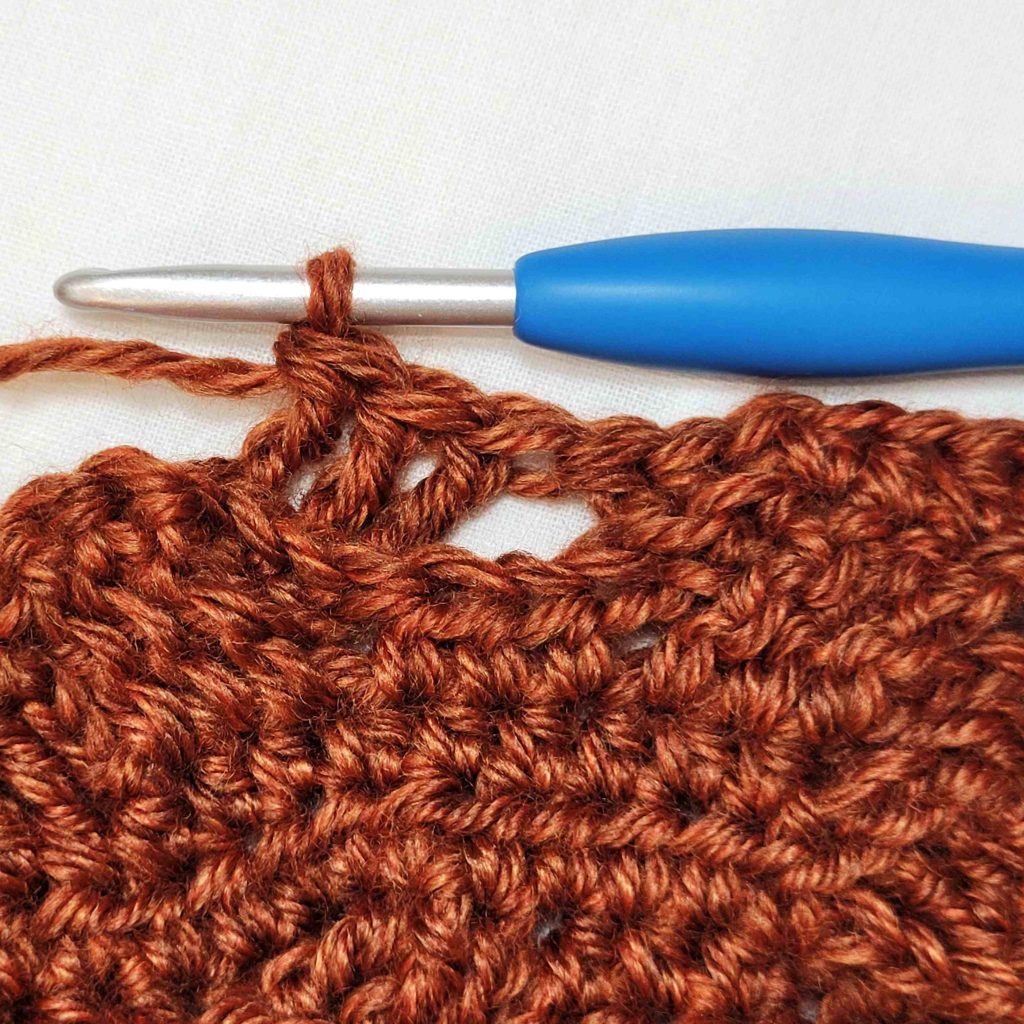
Figure 43
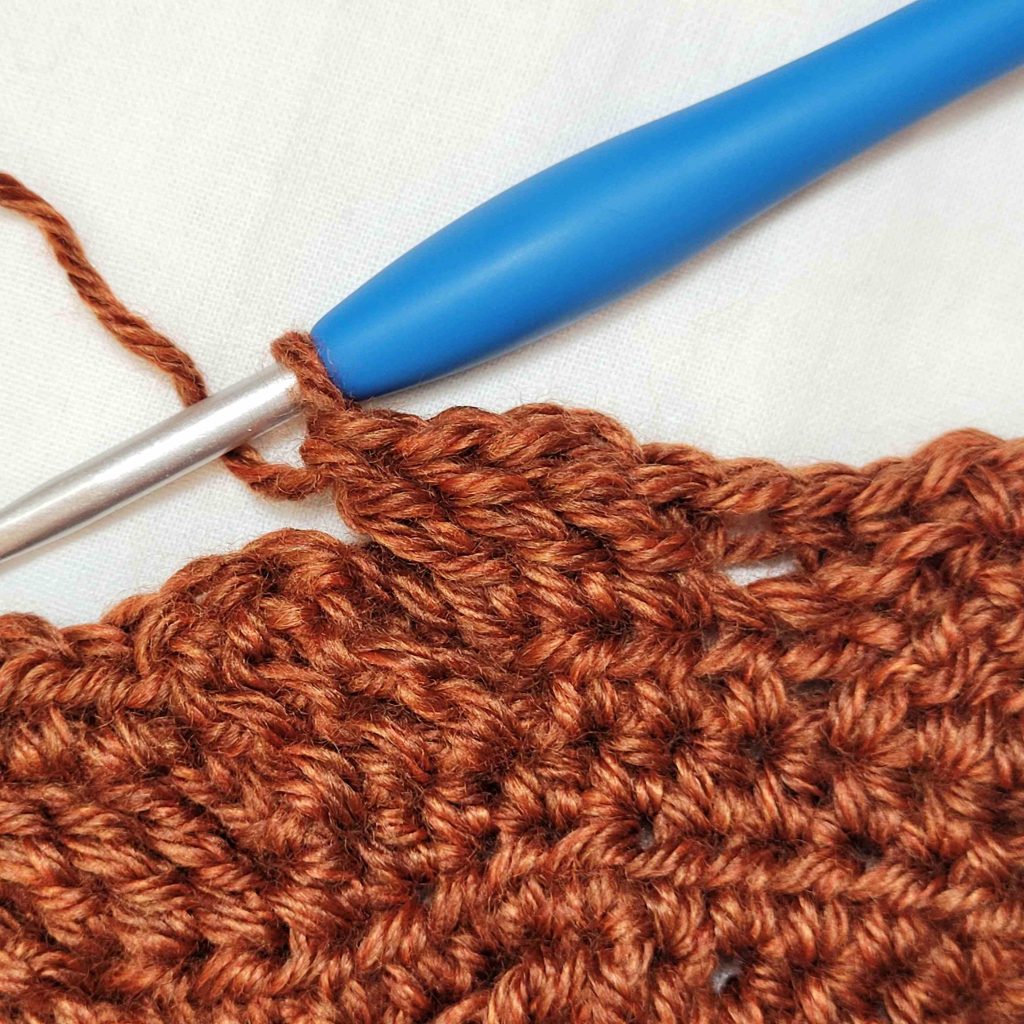
Figure 44

Figure 45
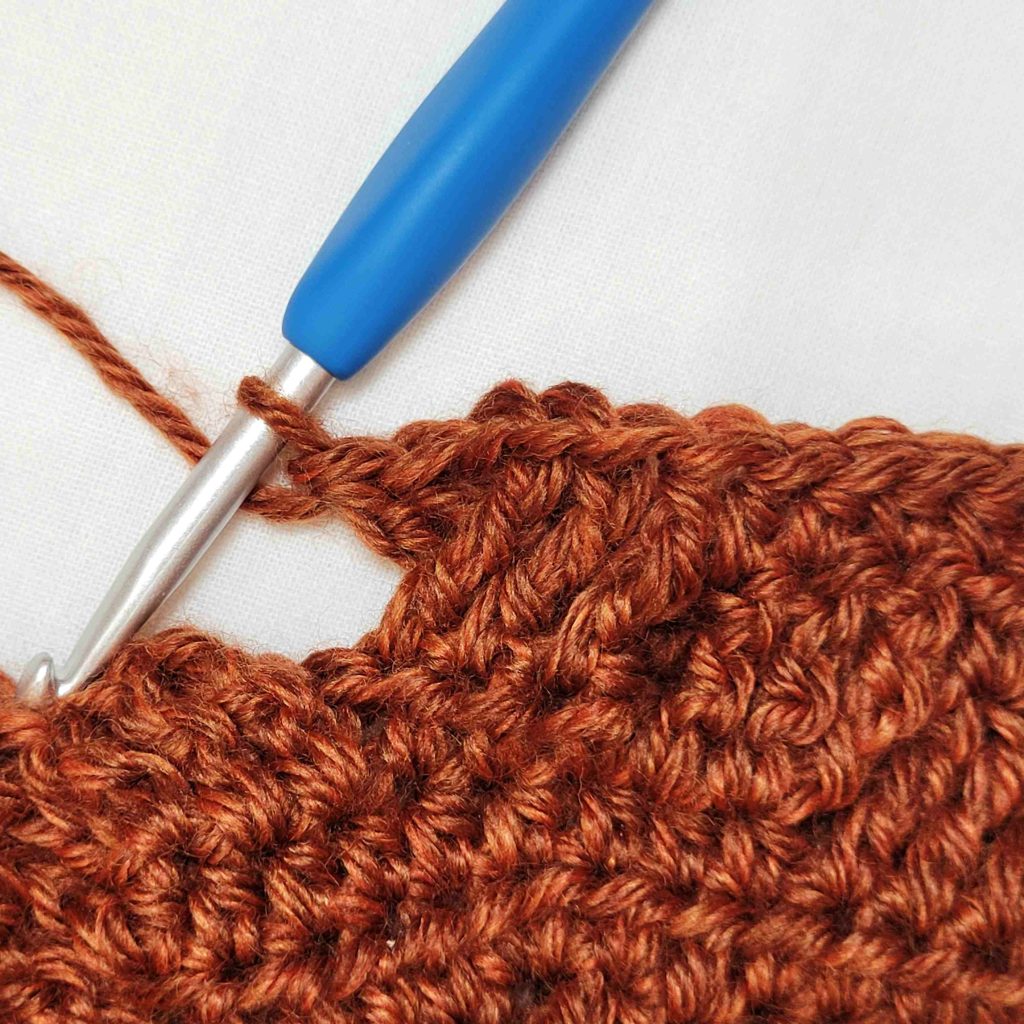
Figure 46
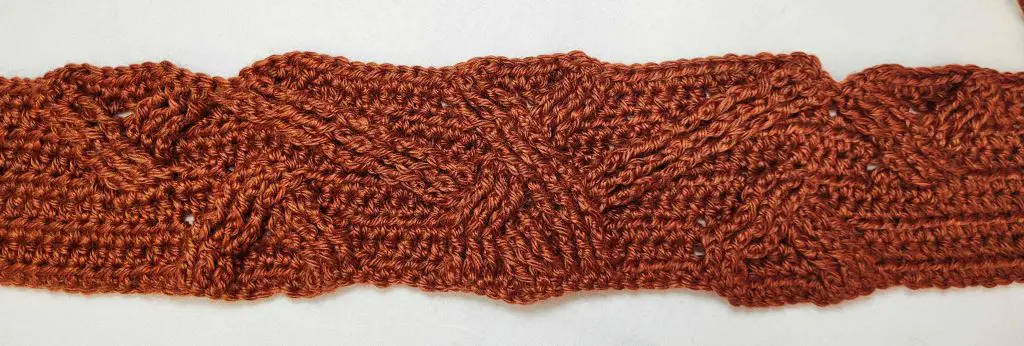
Figure 47
- – Ch1. Hdc in 1st 38 (48, 63, 77, 94) sts. Fpdc in next 3 sts. Hdc in next 6 sts.
– *Sk 3 sts, fptr in next 3 sts (see Figure 48). Working in front of sts just made, fptr in 3 skipped sts (see Figure 49).**
– Hdc in next 12 sts. Fpdc in next 3 sts. Hdc in next 6 sts. Fpdc in next 3 sts. Hdc in 12 sts.
– Repeat from * to ** (see Figures 50 & 51).
– Hdc in next 6 sts. Fpdc in next 3 sts. Hdc in last 38 (48, 63, 77, 94) sts. Figure 52 shows row 10 completed. Turn. – 142 (162, 192, 220, 254) st
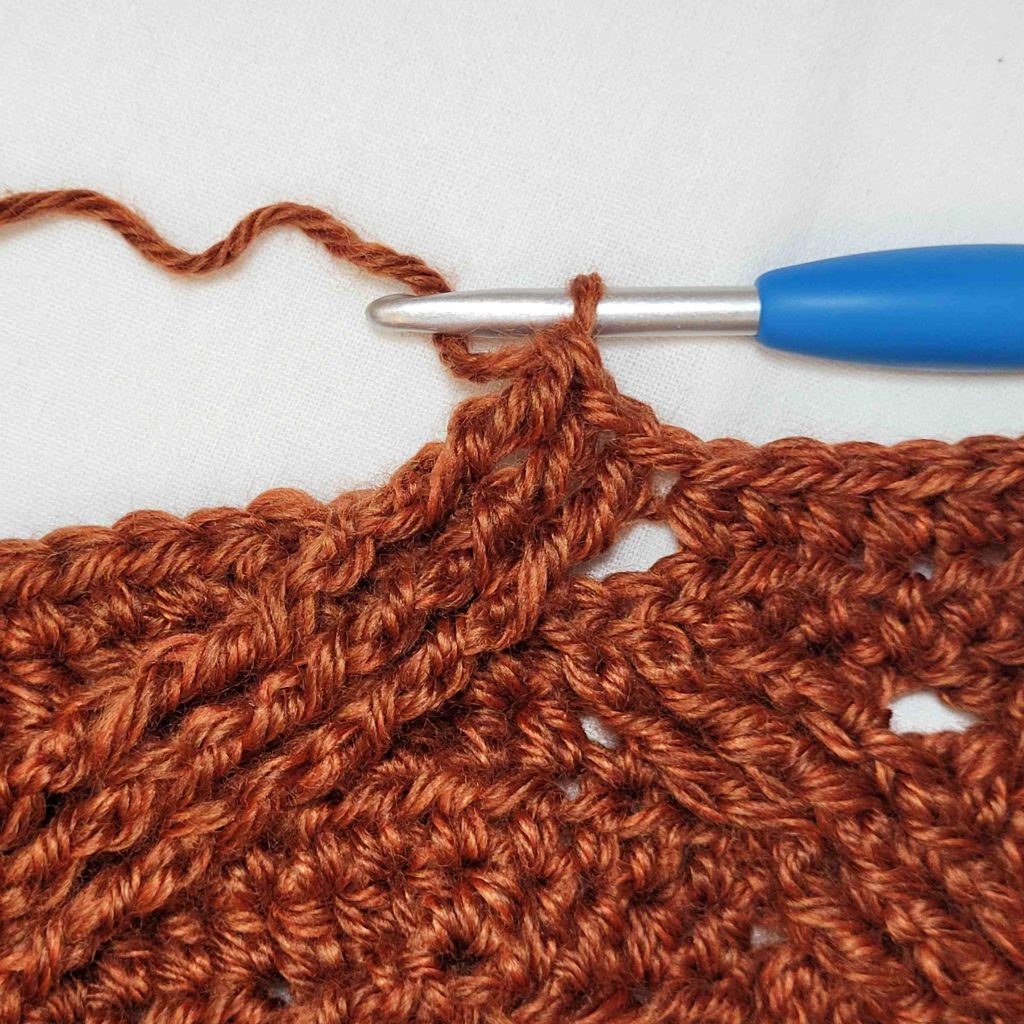
Figure 48
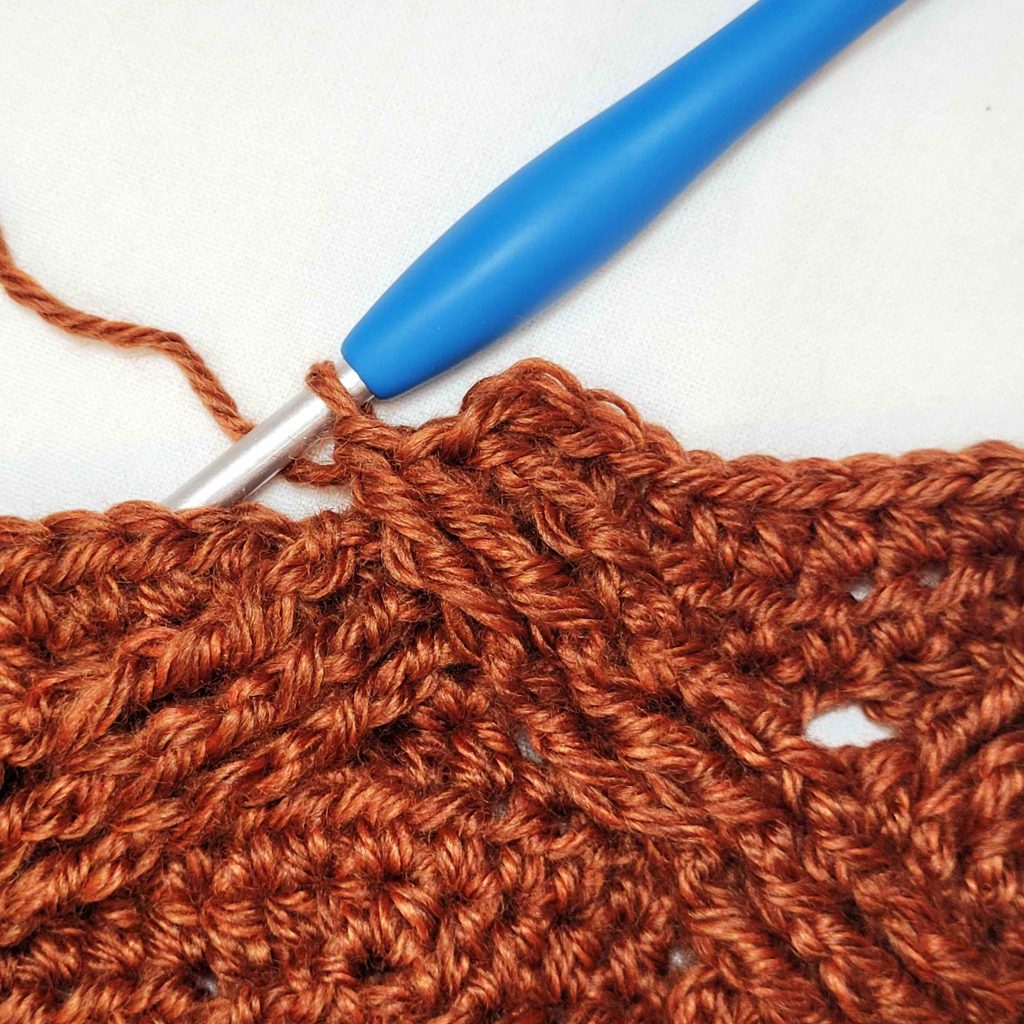
Figure 49
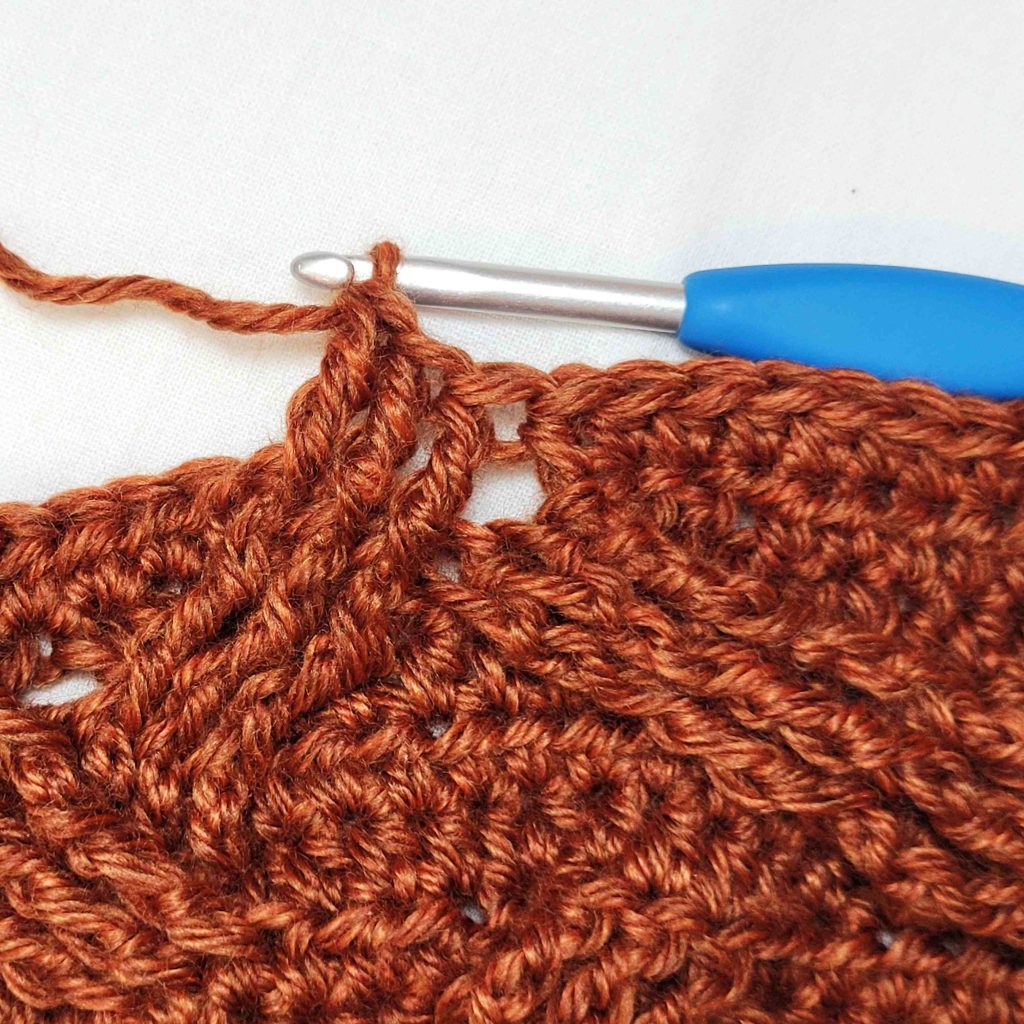
Figure 50
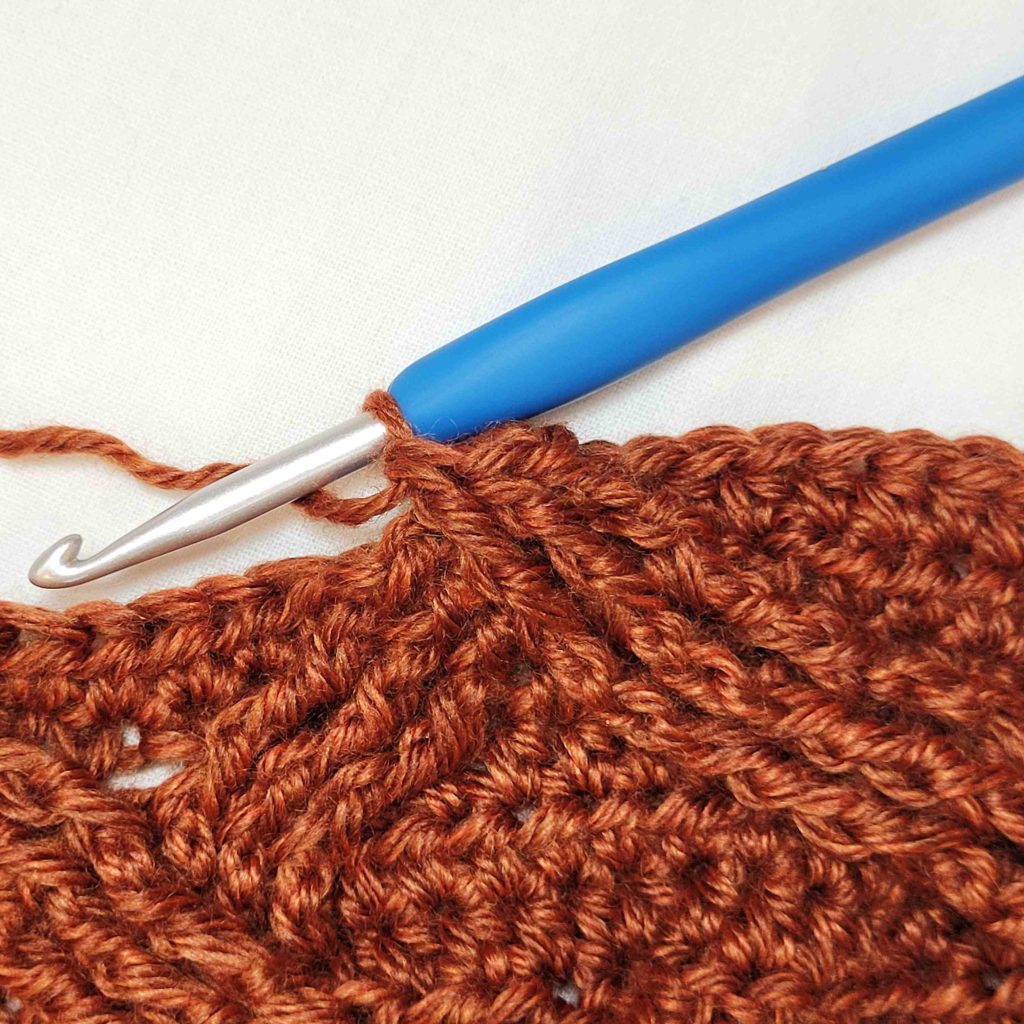
Figure 51
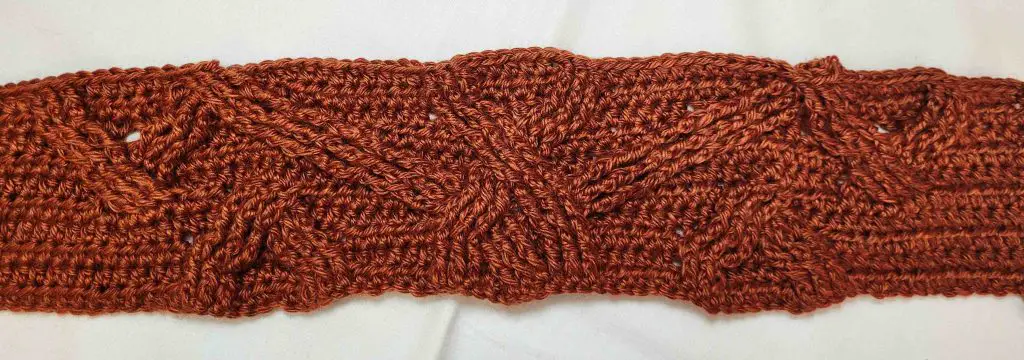
Figure 52
Free Crochet Shrug Pattern – Sorcha Shrug
- – Ch1. Hdc in 1st 38 (48, 63, 77, 94) sts.
– *Bpdc in next 3 sts. Hdc in next 6 sts. Bpdc in next 3 sts.**
– Sk 3 sts, tr in next 3 sts (see Figure 53). Working behind sts just made, bptr in 3 skipped sts (see Figure 54).
– Hdc in next 9 sts. Repeat from * to **. Hdc in next 9 sts.
– Sk 3 sts, bptr in next 3 sts (see Figure 55). Working in front of sts just made, tr in 3 skipped sts (see Figure 56).
– Repeat from * to **. Hdc in last 38 (48, 63, 77, 94) sts. Turn. Figure 57 shows right side of completed row 11. – 142 (162, 192, 220, 254) st
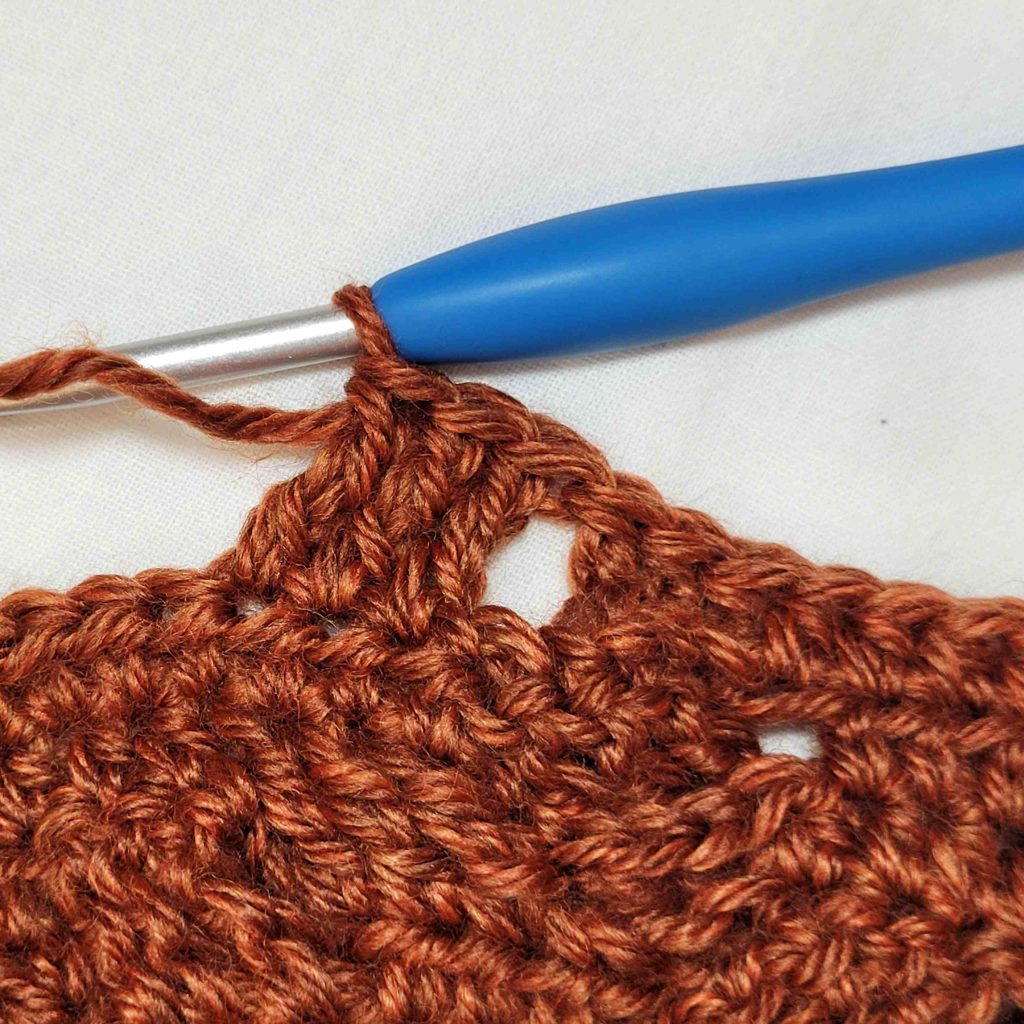
Figure 53
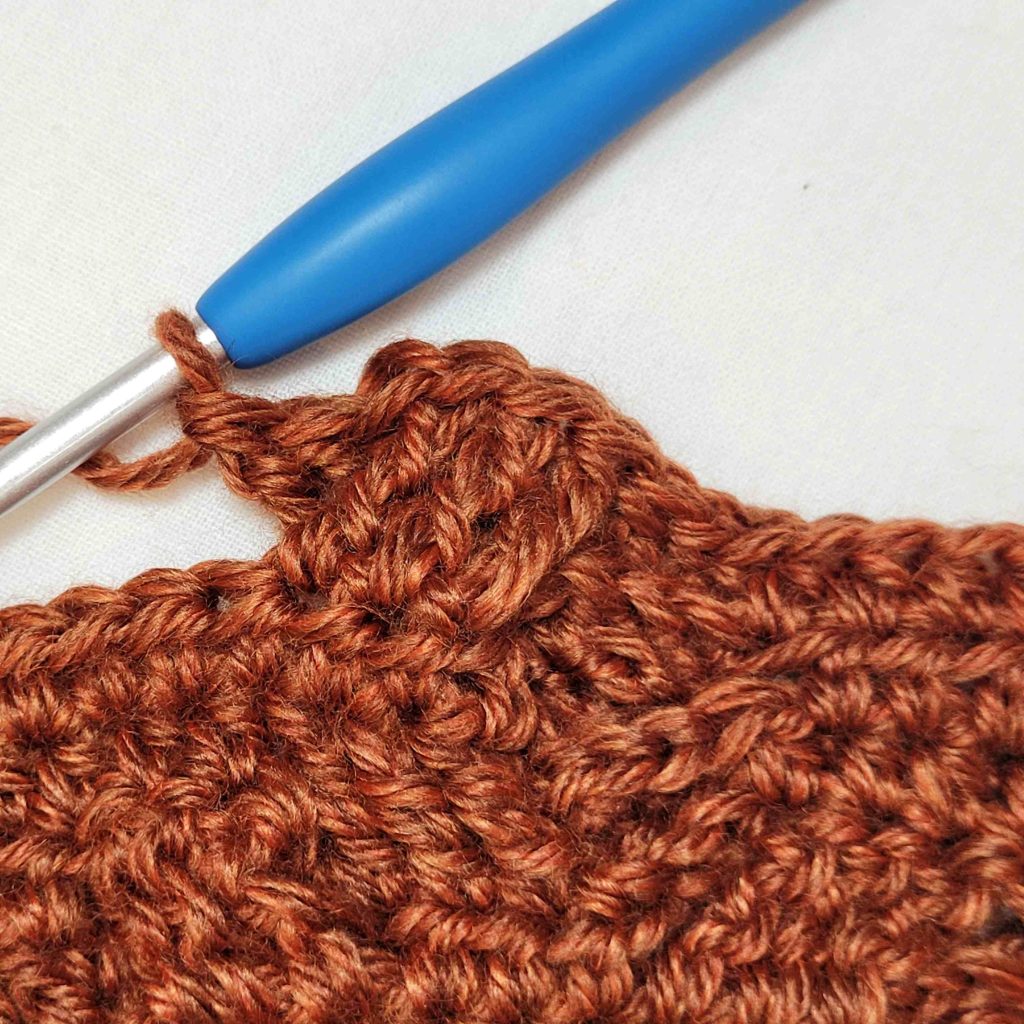
Figure 54
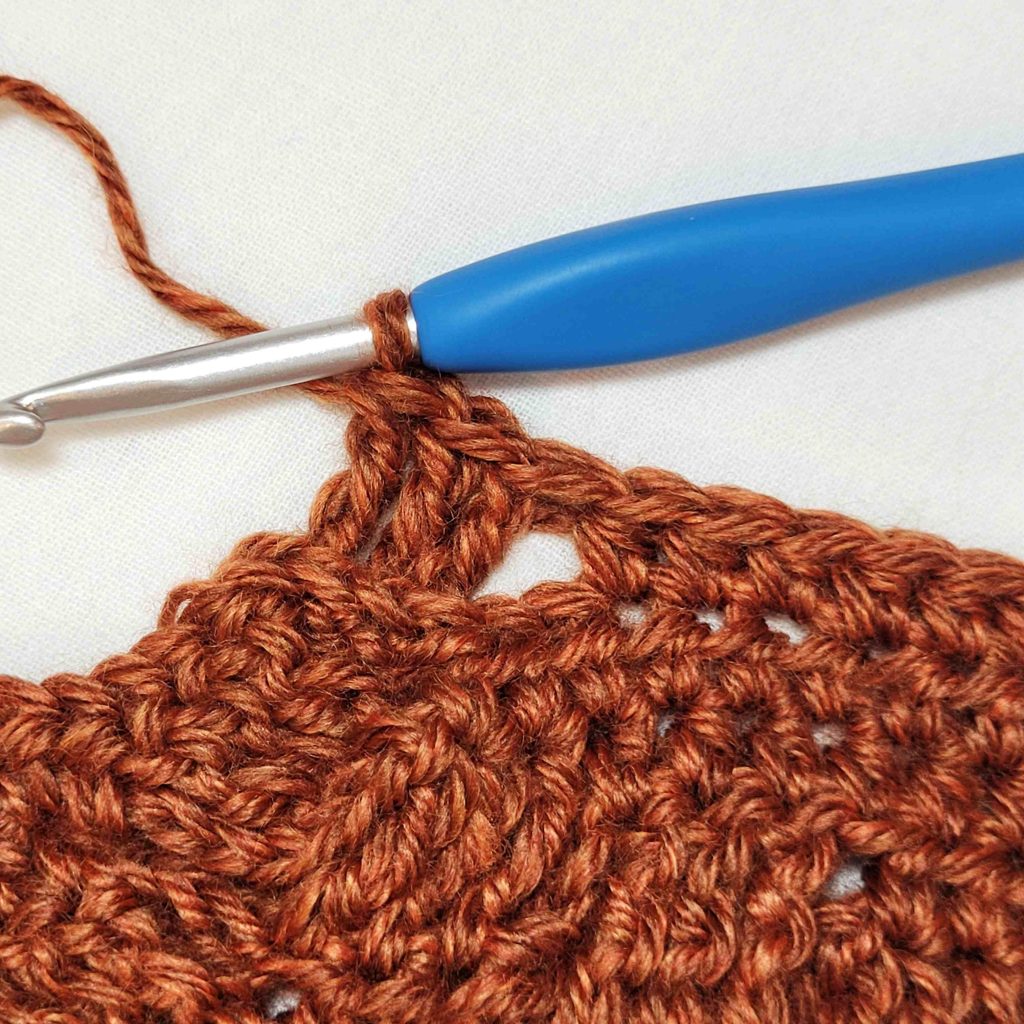
Figure 55
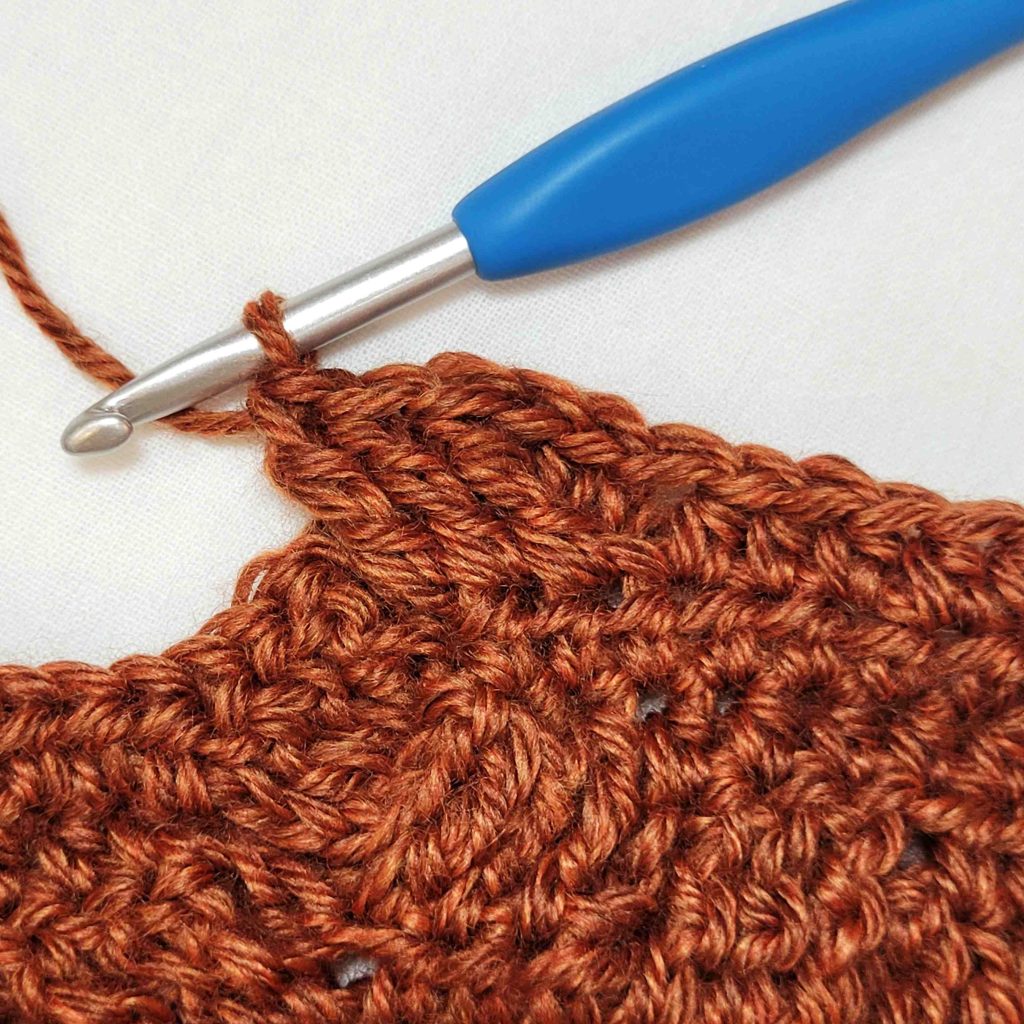
Figure 56
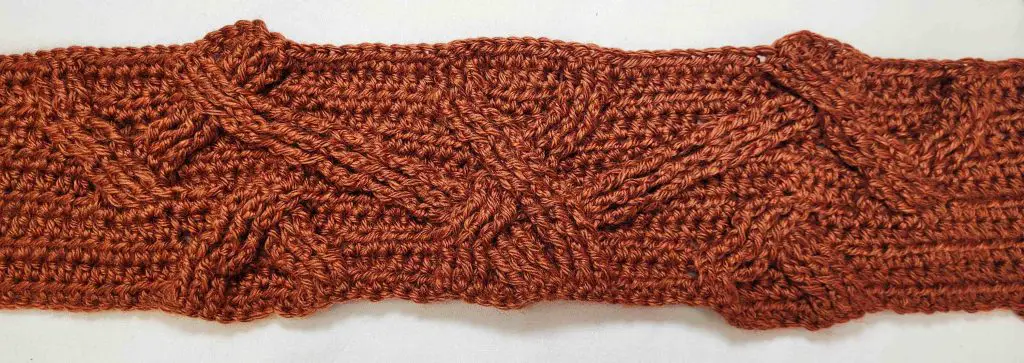
Figure 57
- – Ch1. Hdc in 1st 38 (48, 63, 77, 94) sts.
– *Sk 3 sts, tr in next 3 sts (see Figure 58). Working in front of sts just made, fptr in 3 skipped sts (see Figure 59). Sk 3 sts, fptr in next 3 sts (see Figure 60). Working behind sts just made, tr in 3 skipped sts (see Figure 61).**
– Hdc in next 3 sts. Sk 3 sts, tr in next 3 sts (see Figure 62). Working in front of sts just made, fptr in 3 skipped sts (see Figure 63).
– Hdc in next 6 sts. Repeat from * to **. Hdc in next 6 sts.
– Sk 3 sts, fptr in next 3 sts (see Figure 64). Working behind sts just made, tr in 3 skipped sts (see Figure 65).
– Hdc in next 3 sts. Repeat from * to **. Hdc in last 38 (48, 63, 77, 94) sts. Figure 66 shows completed row 12. Turn. – 142 (162, 192, 220, 254) st
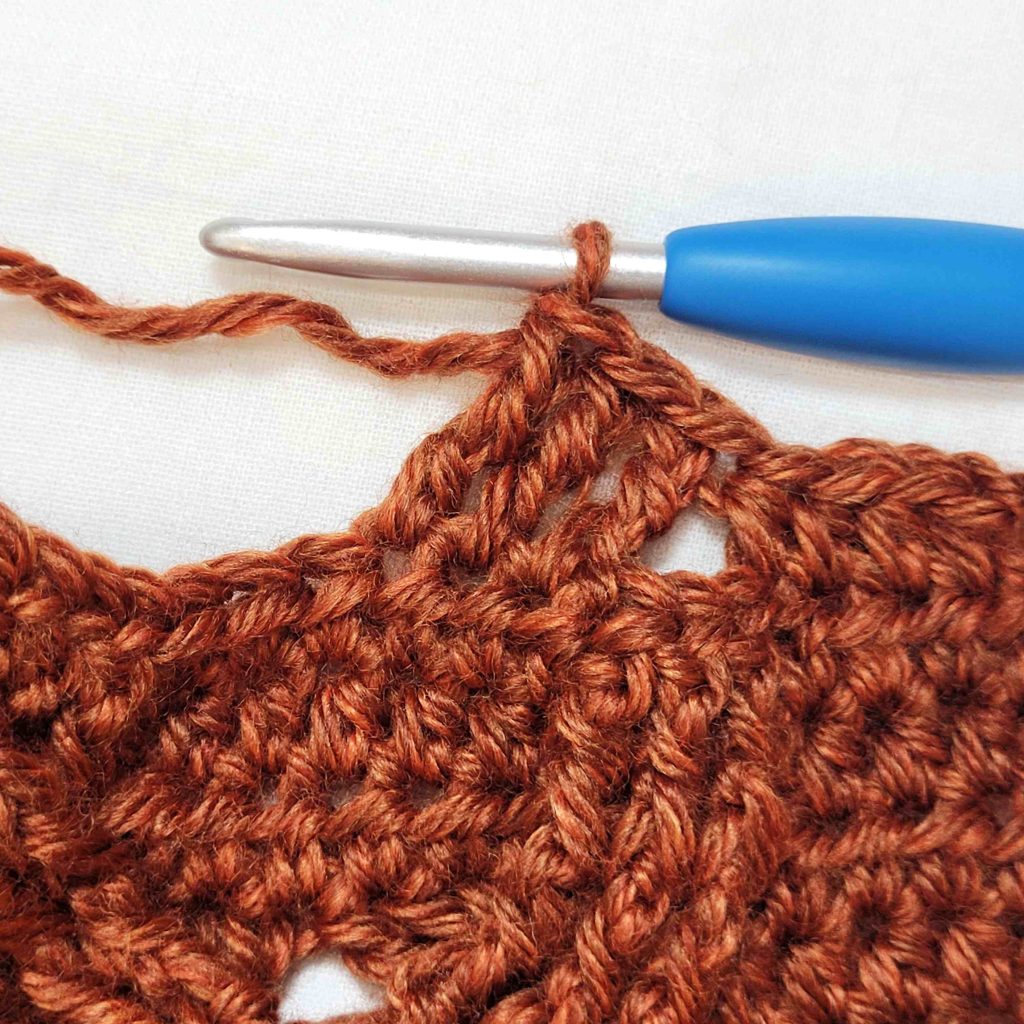
Figure 58
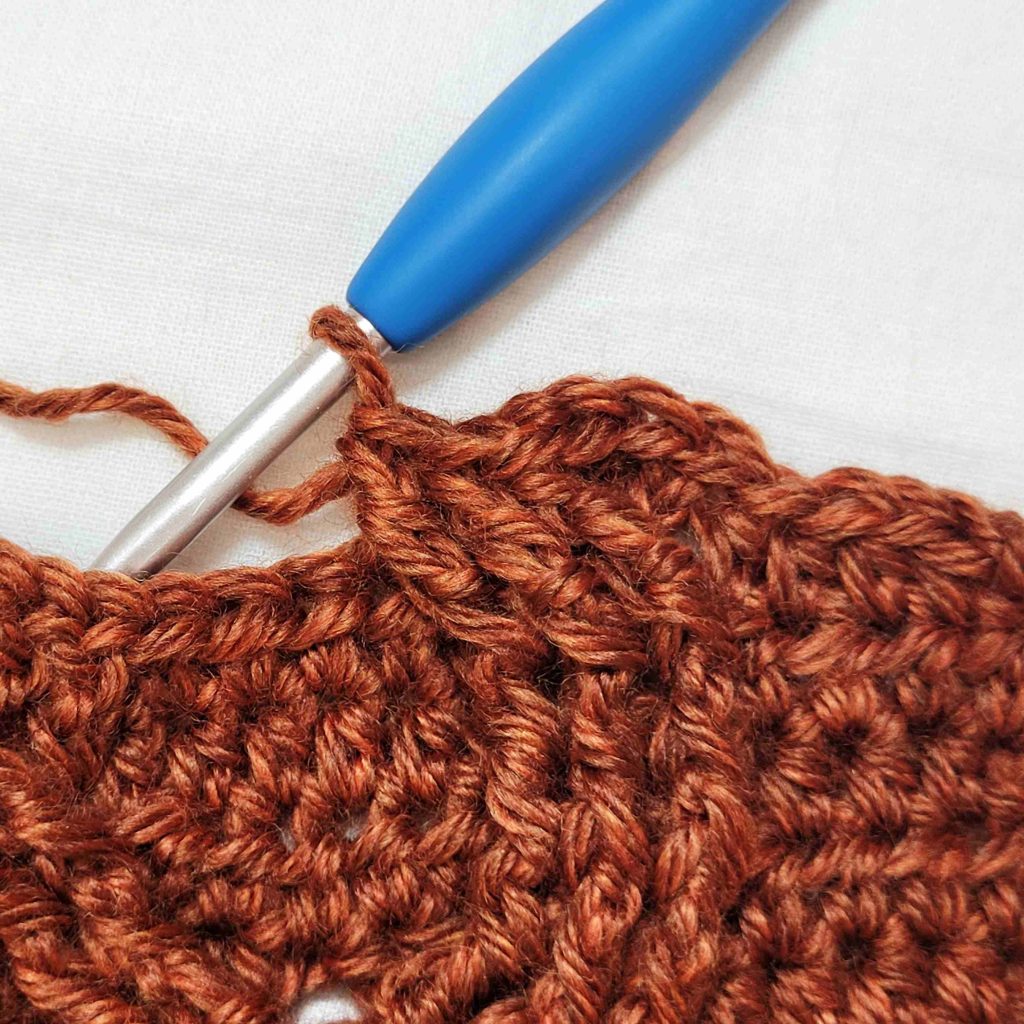
Figure 59

Figure 60
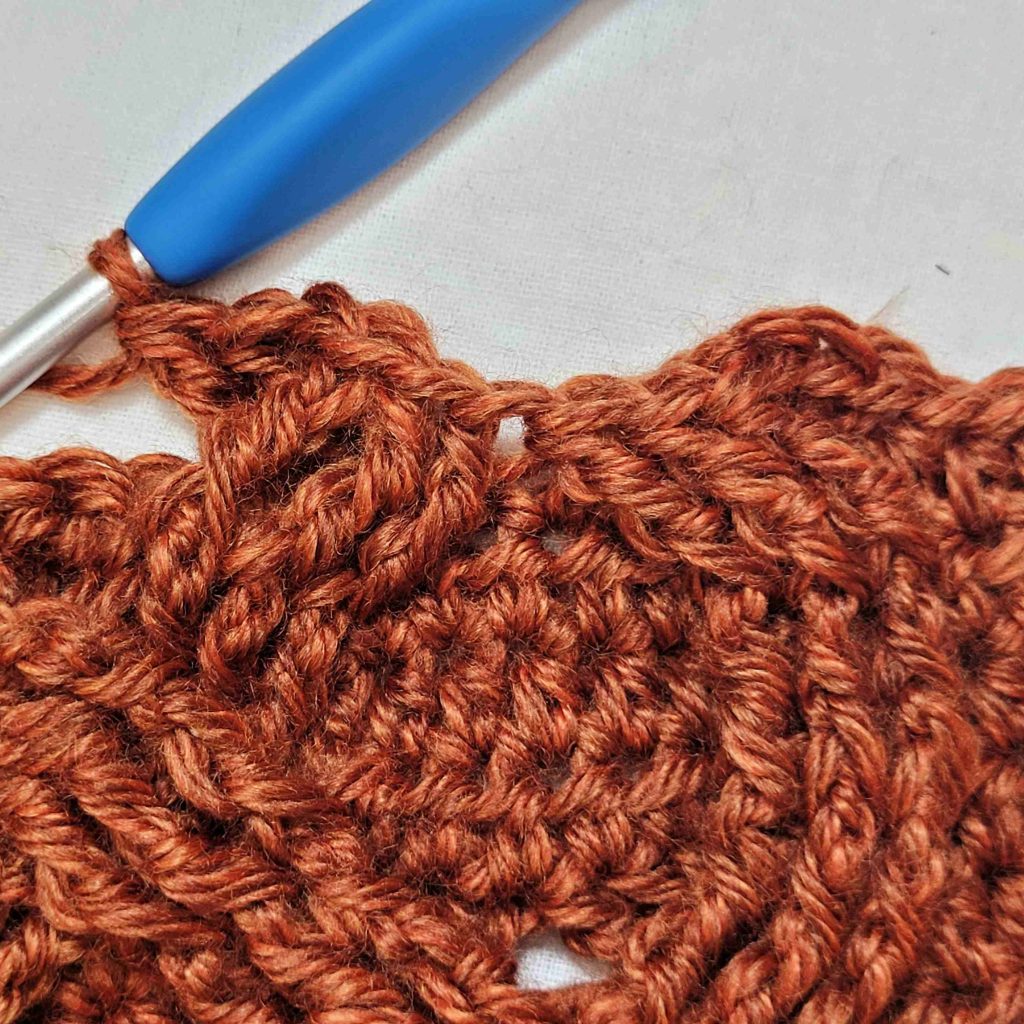
Figure 61
Figure 62
Figure 63
Figure 64
Figure 65
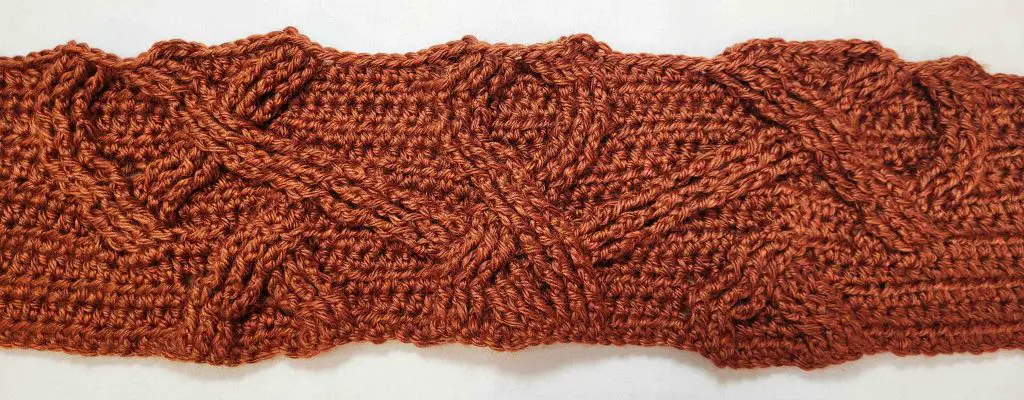
Figure 66
- – Ch1. Hdc in 1st 41 (51, 66, 80, 97) sts. Bpdc in next 6 sts. Hdc in next 9 sts.
– Sk 3 sts, tr in next 3 sts (see Figure 67). Working behind sts just made, bptr in 3 skipped sts (see Figure 68).
– Hdc in next 6 sts. Bpdc in next 6 sts. Hdc in next 6 sts.
– Sk 3 sts, bptr in next 3 sts (see Figure 69). Working in front of sts just made, tr in 3 skipped sts (see Figure 70).
– Hdc in next 9 sts. Bpdc in next 6 sts. Hdc in last 41 (51, 66, 80, 97) sts. Turn. Figure 71 shows right side of completed row 13. – 142 (162, 192, 220, 254) st
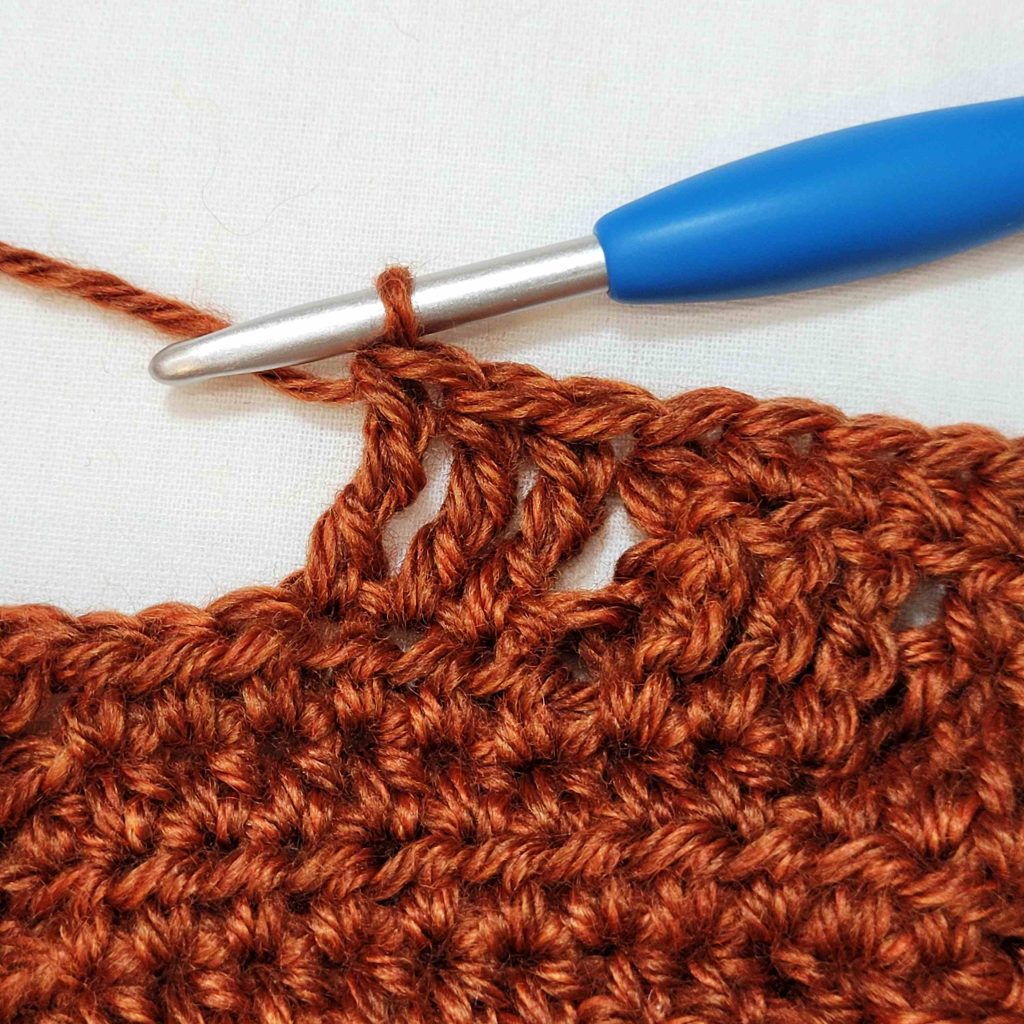
Figure 67
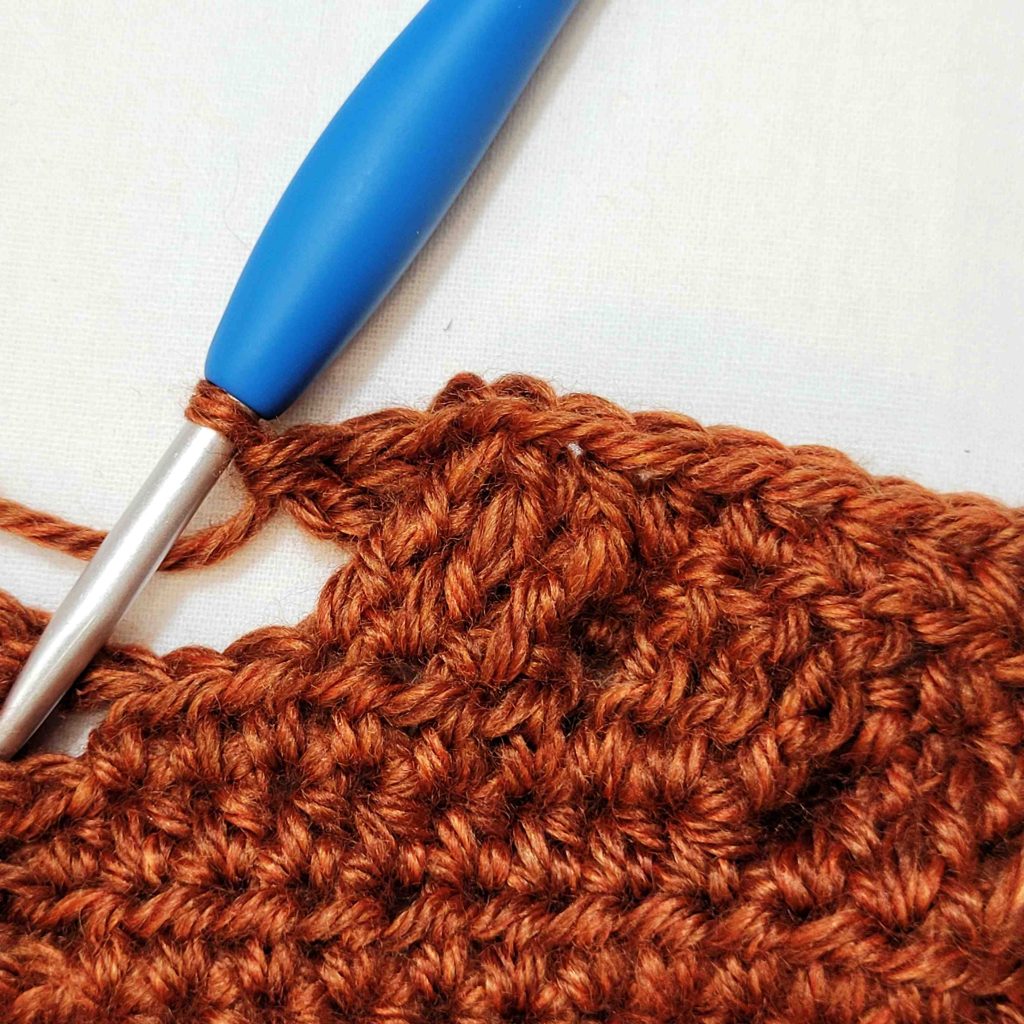
Figure 68
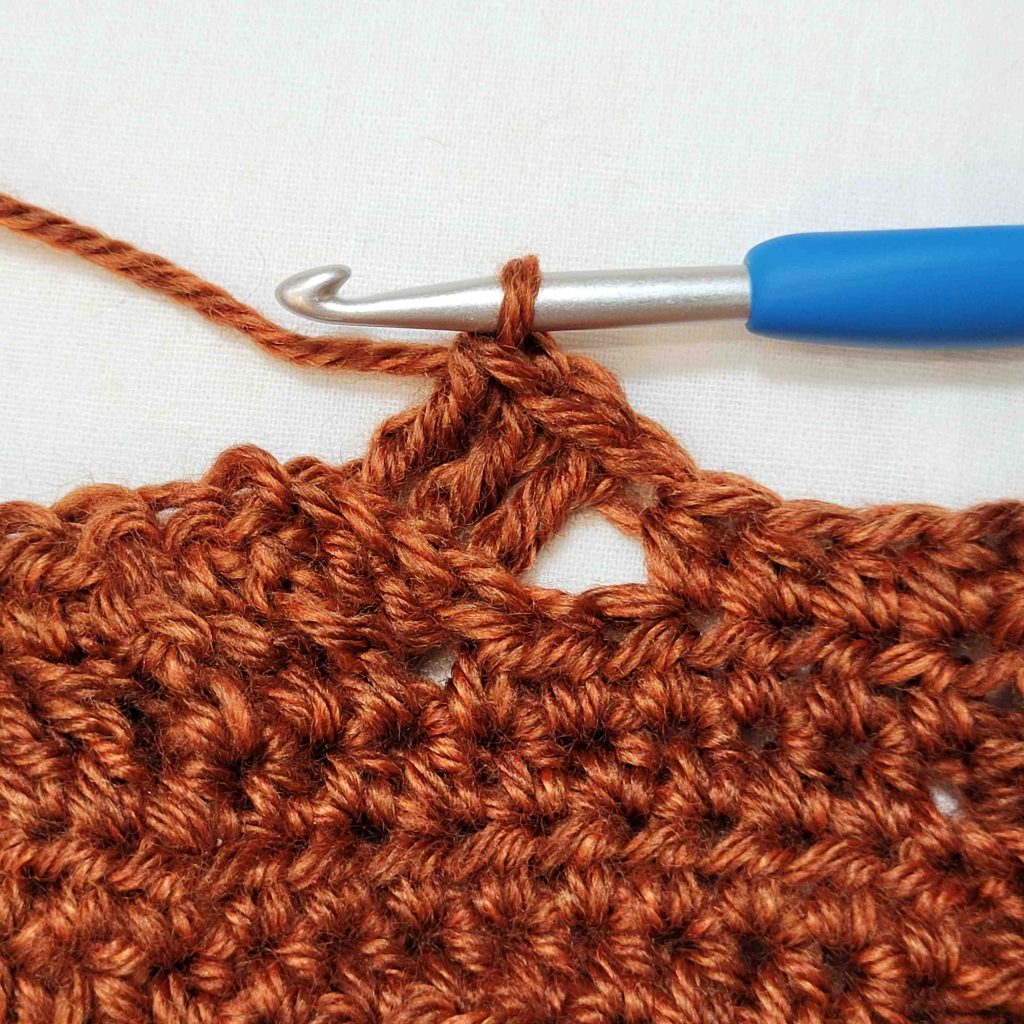
Figure 69
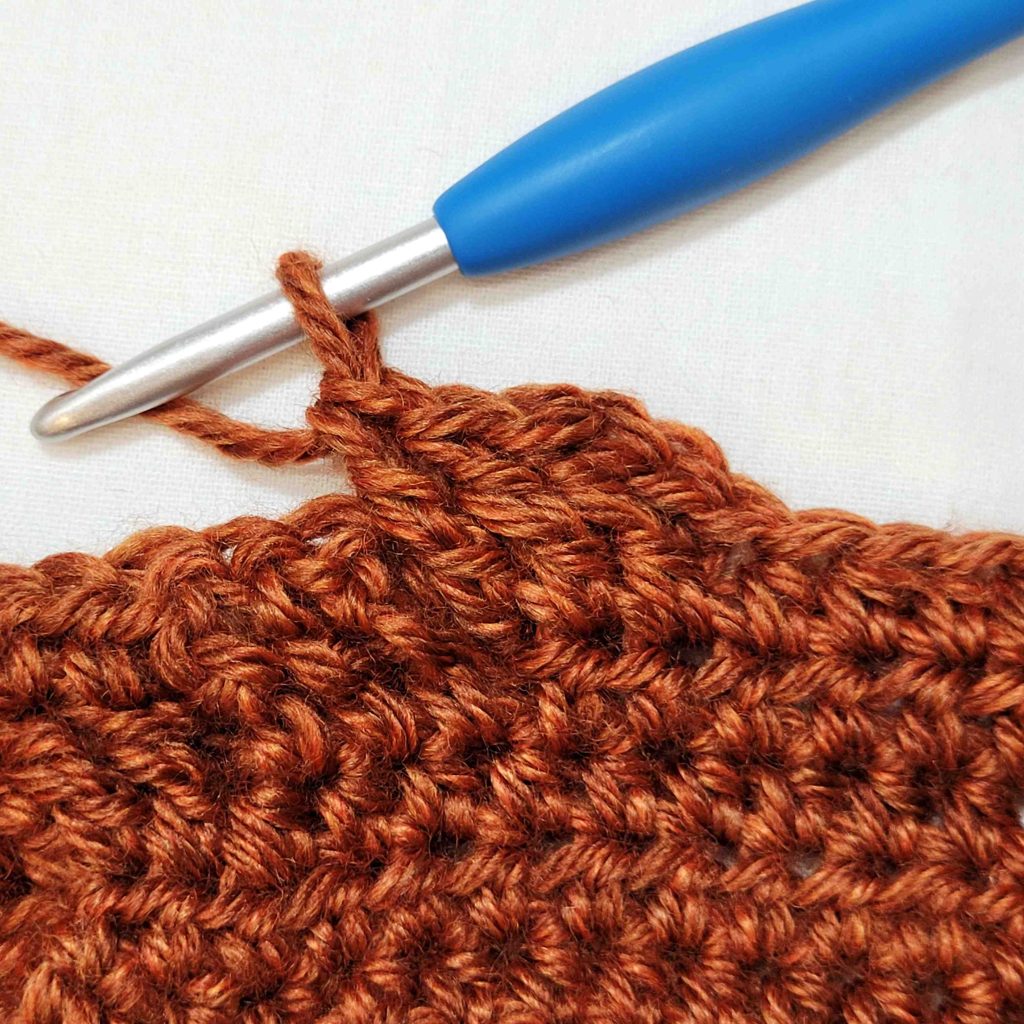
Figure 70
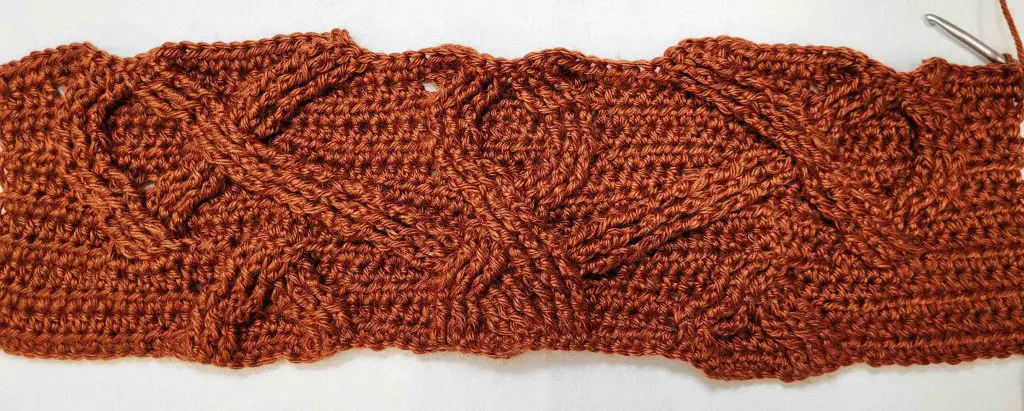
Figure 71

Free Crochet Shrug Pattern – Sorcha Shrug
- – Ch1. Hdc in 1st 41 (51, 66, 80, 97) sts.
– *Sk 3 sts, fptr in next 3 sts (see Figure 72). Working in front of sts just made, fptr in 3 skipped sts (see Figure 73).**
– Hdc in next 12 sts.
– Sk 3 sts, tr in next 3 sts (see Figure 74). Working in front of sts just made, fptr in 3 skipped sts (see Figure 75).
– Hdc in next 3 sts. Repeat from * to **. Hdc in next 3 sts.
– Sk 3 sts, fptr in next 3 sts (see Figure 76). Working behind sts just made, tr in 3 skipped sts (see Figure 77).
– Hdc in next 12 sts. Repeat from * to **. Hdc in last 41 (51, 66, 80, 97) sts. Turn. Figure 78 shows completed row 14. – 142 (162, 192, 220, 254) st
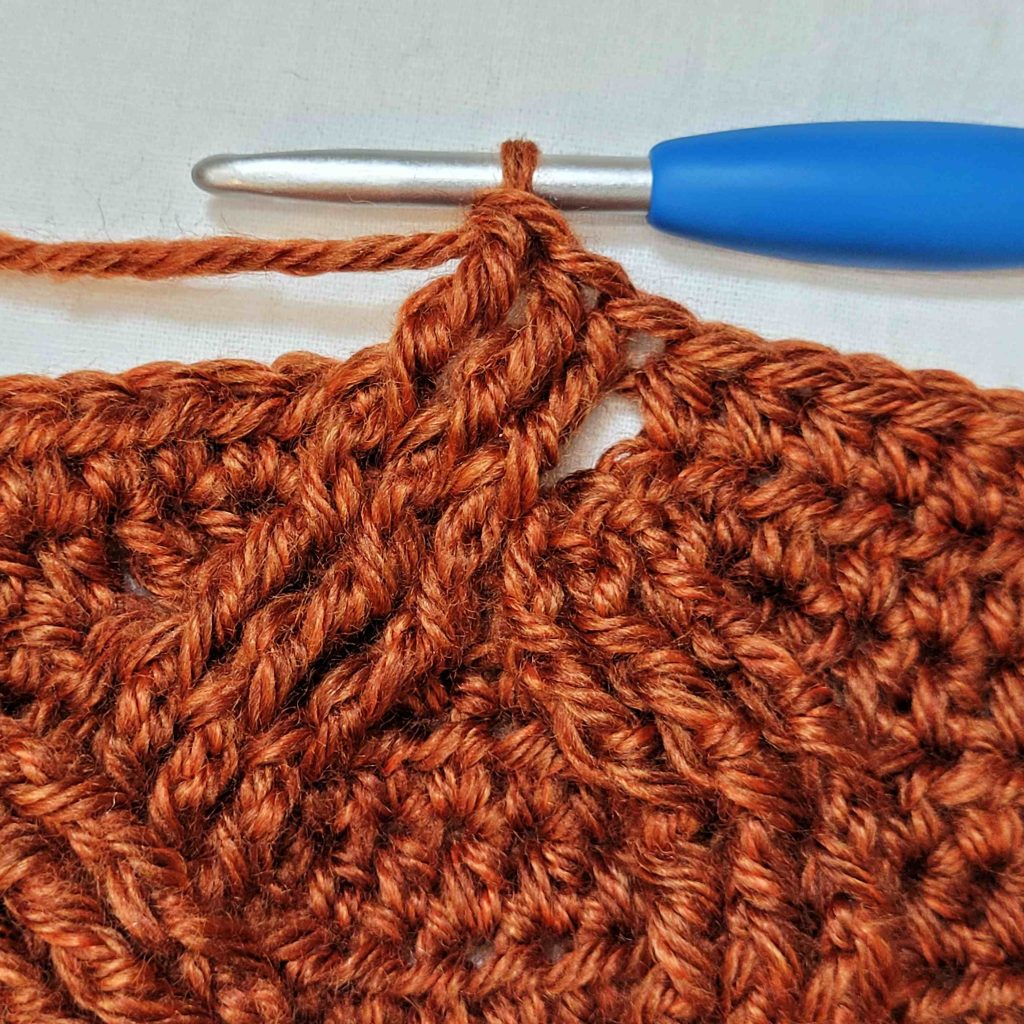
Figure 72
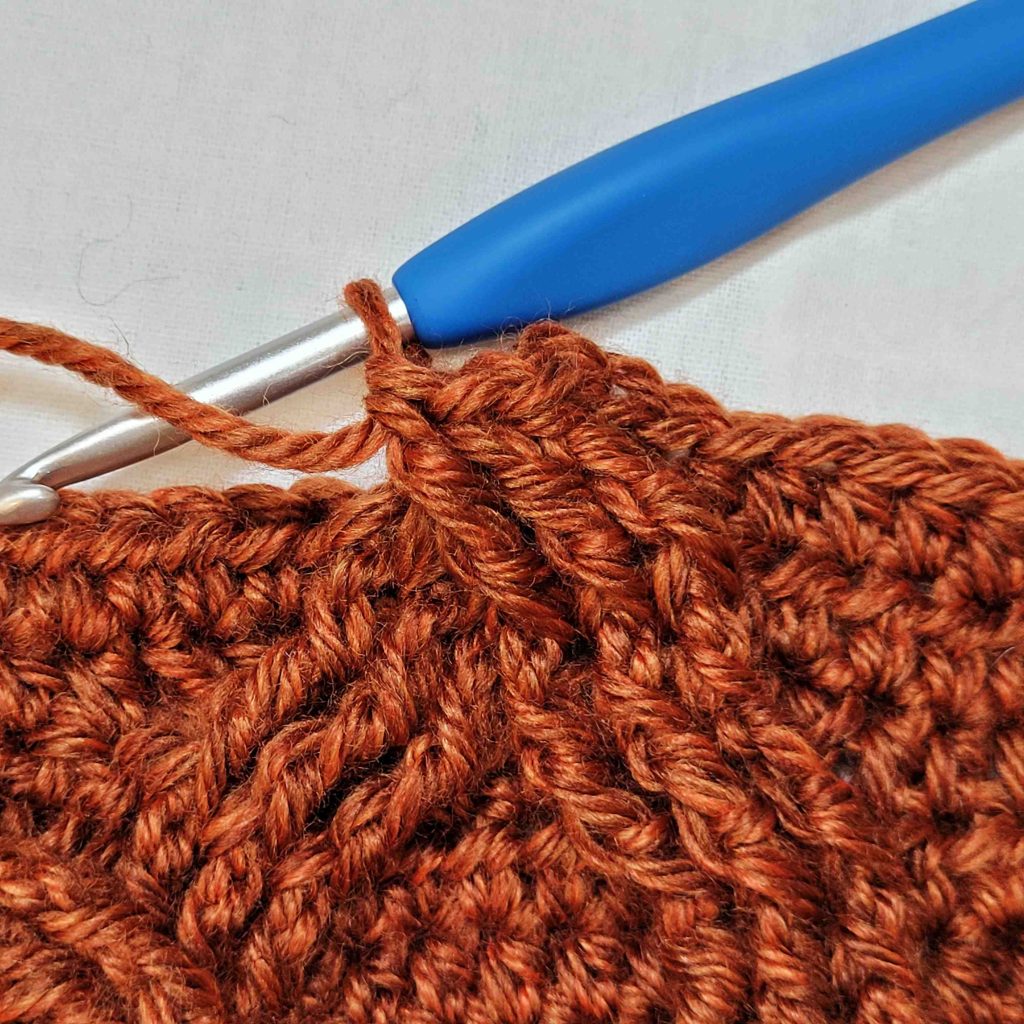
Figure 73
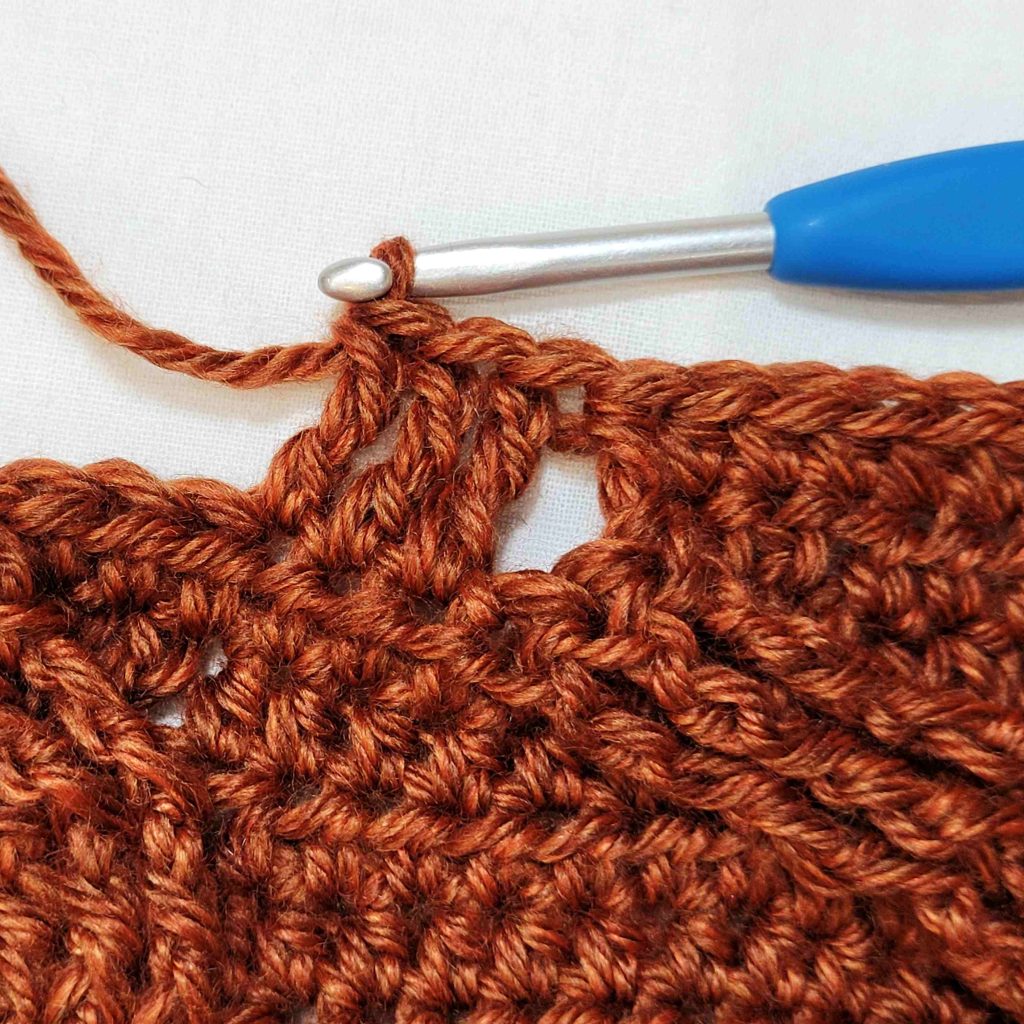
Figure 74
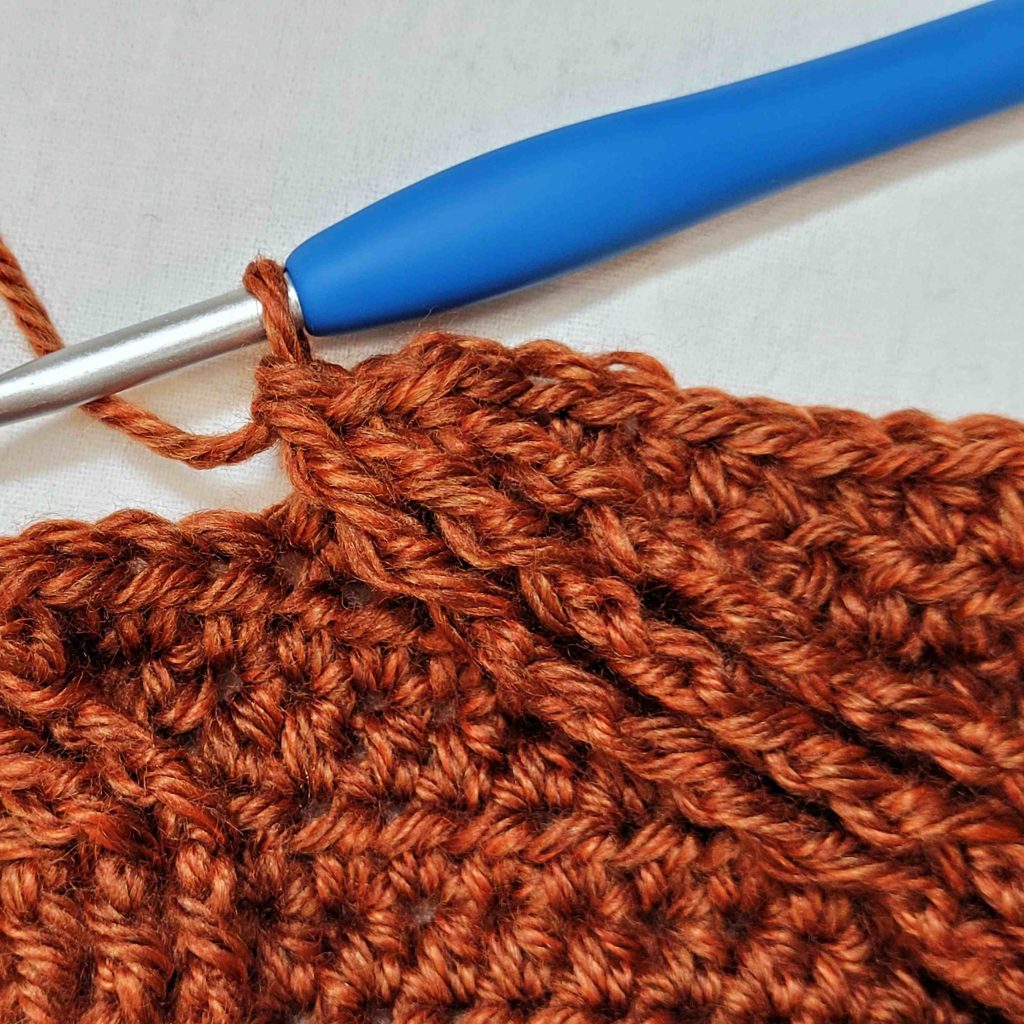
Figure 75
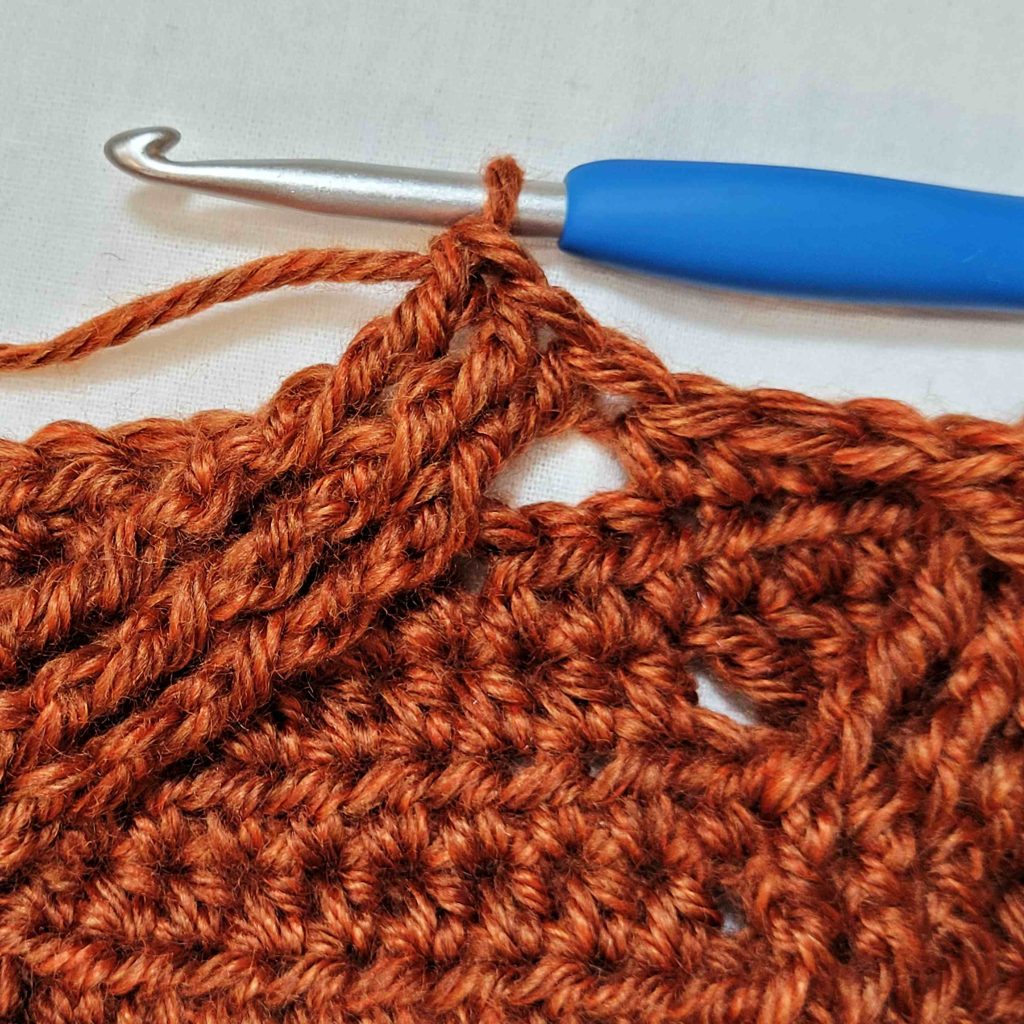
Figure 76
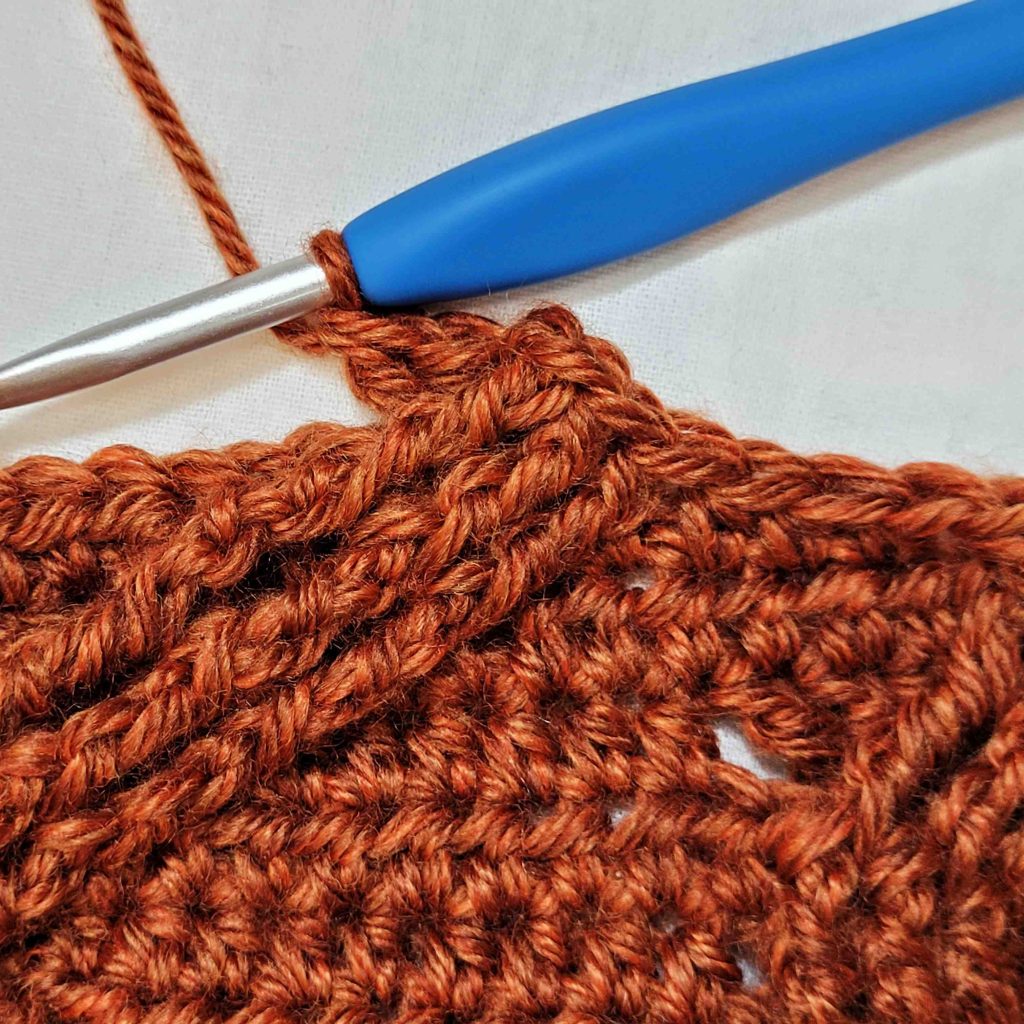
Figure 77
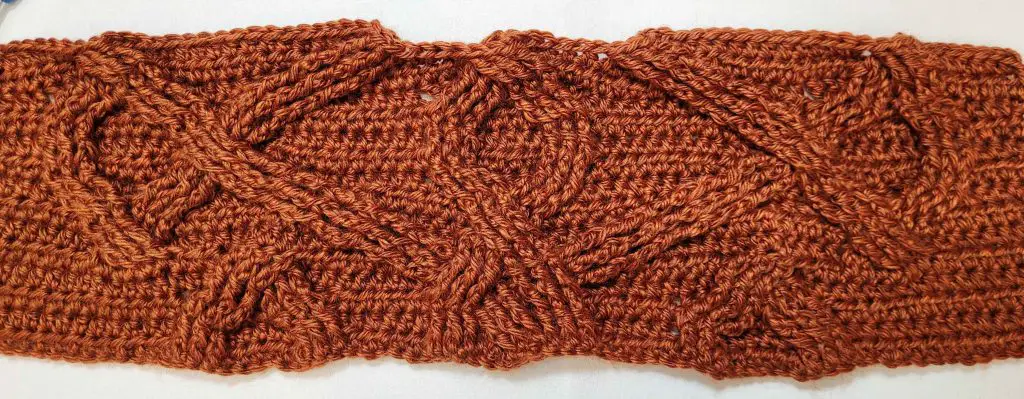
Figure 78
- – Ch1. Hdc in 1st 50 (60, 75, 89, 106) sts.
– *Sk 3 sts, bptr in next 3 sts (see Figure 79). Working behind sts just made, bptr in 3 skipped sts (see Figure 80).**
– Hdc in next 6 sts.
– Sk 3 sts, tr in next 3 sts (see Figure 81). Working behind sts just made, bptr in 3 skipped sts (see Figure 82).
– Bpdc in next 6 sts.
– Sk 3 sts, bptr in next 3 sts (see Figure 83). Working in front of sts just made, tr in 3 skipped sts (see Figure 84).
– Hdc in next 6 sts. Repeat from * to **. Hdc in last 50 (60, 75, 89, 106) sts. Turn. Figure 85 shows right side of completed row 15. – 142 (162, 192, 220, 254) st
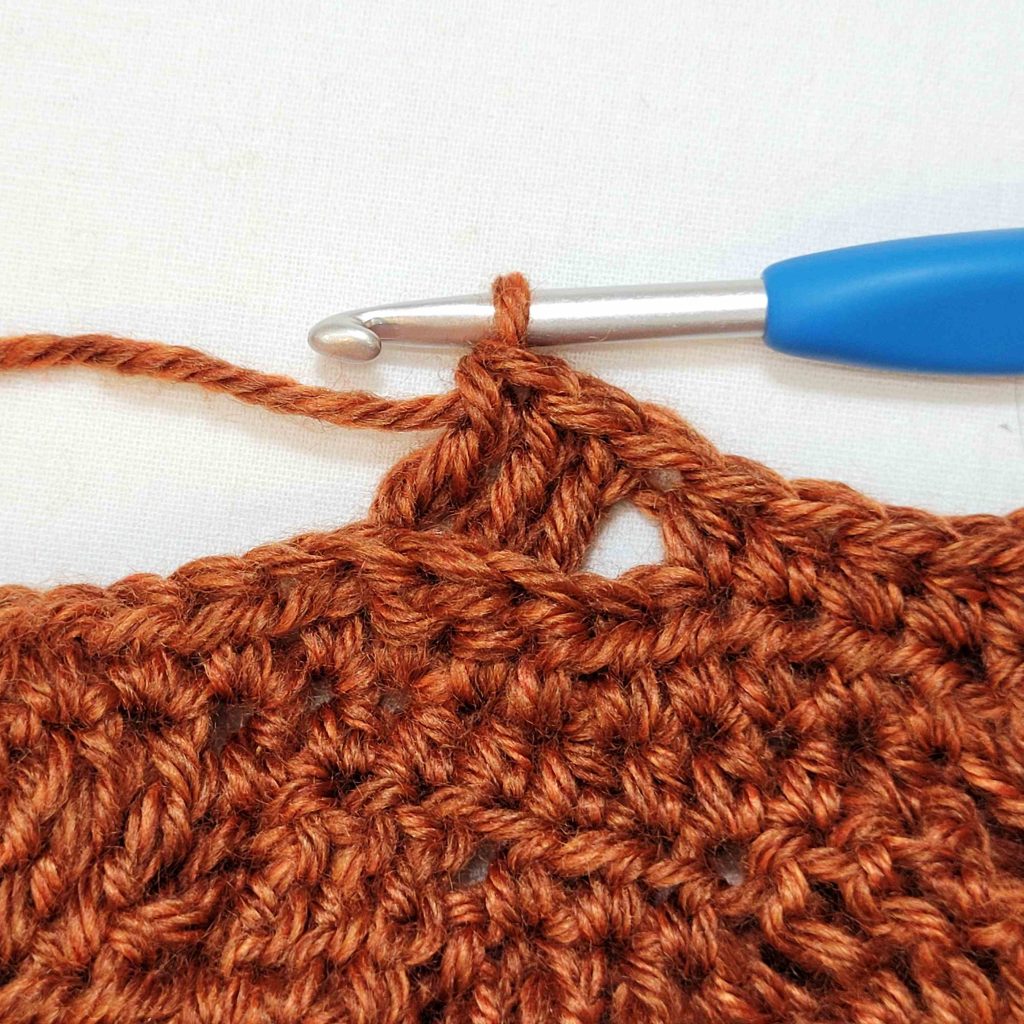
Figure 79
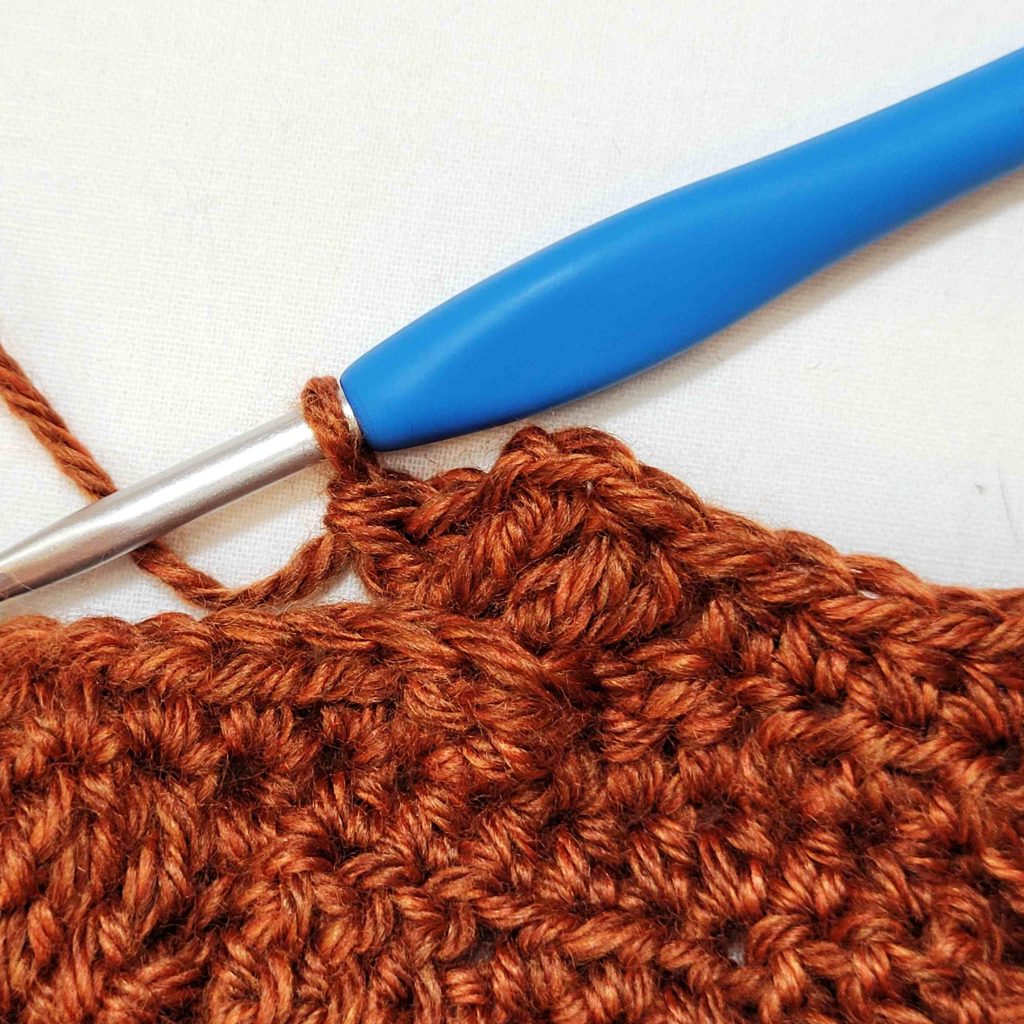
Figure 80
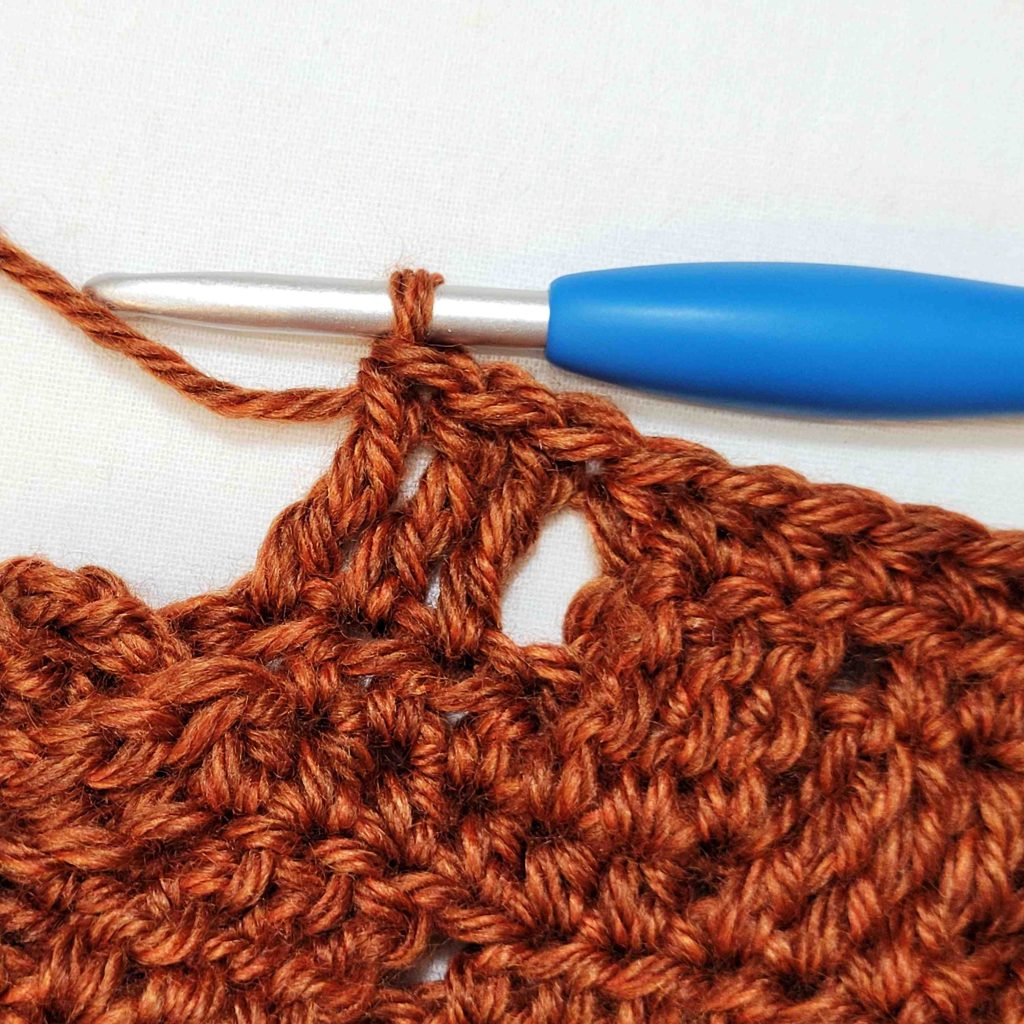
Figure 81
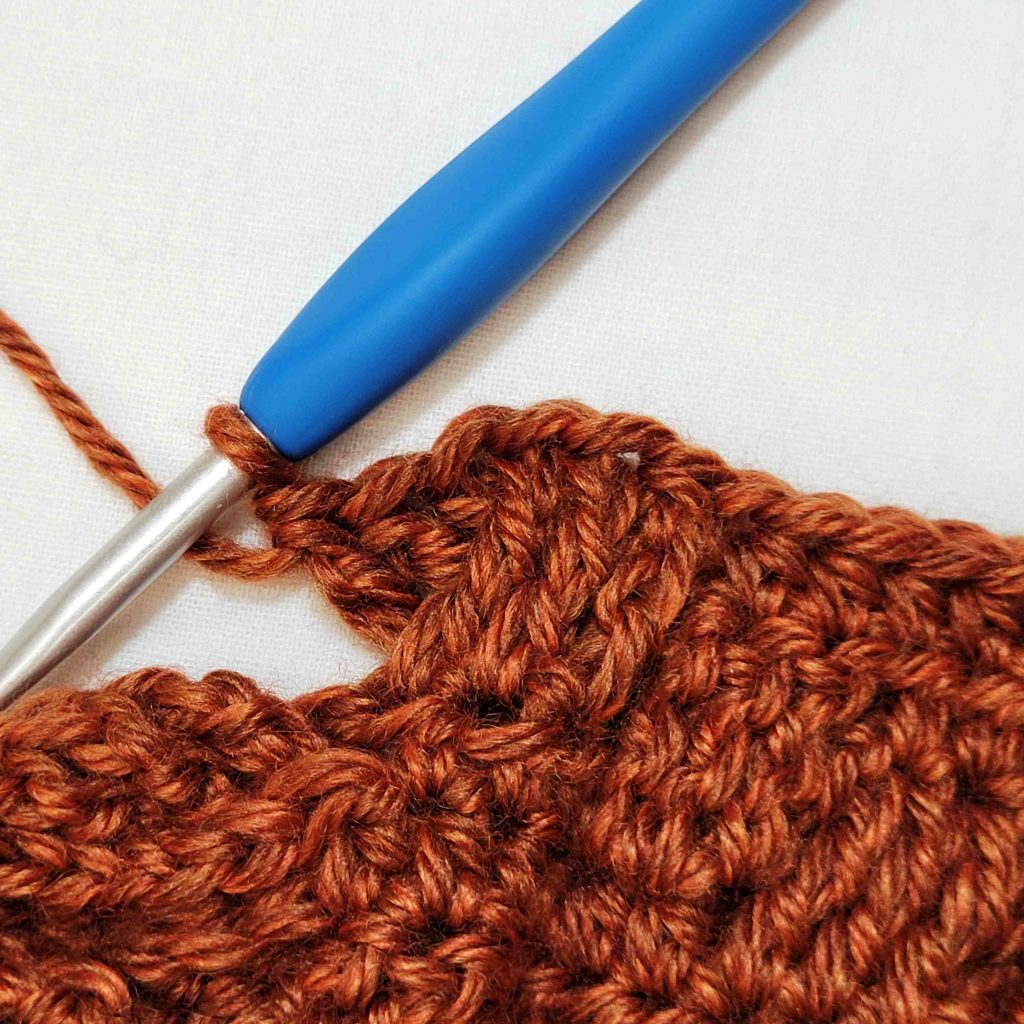
Figure 82
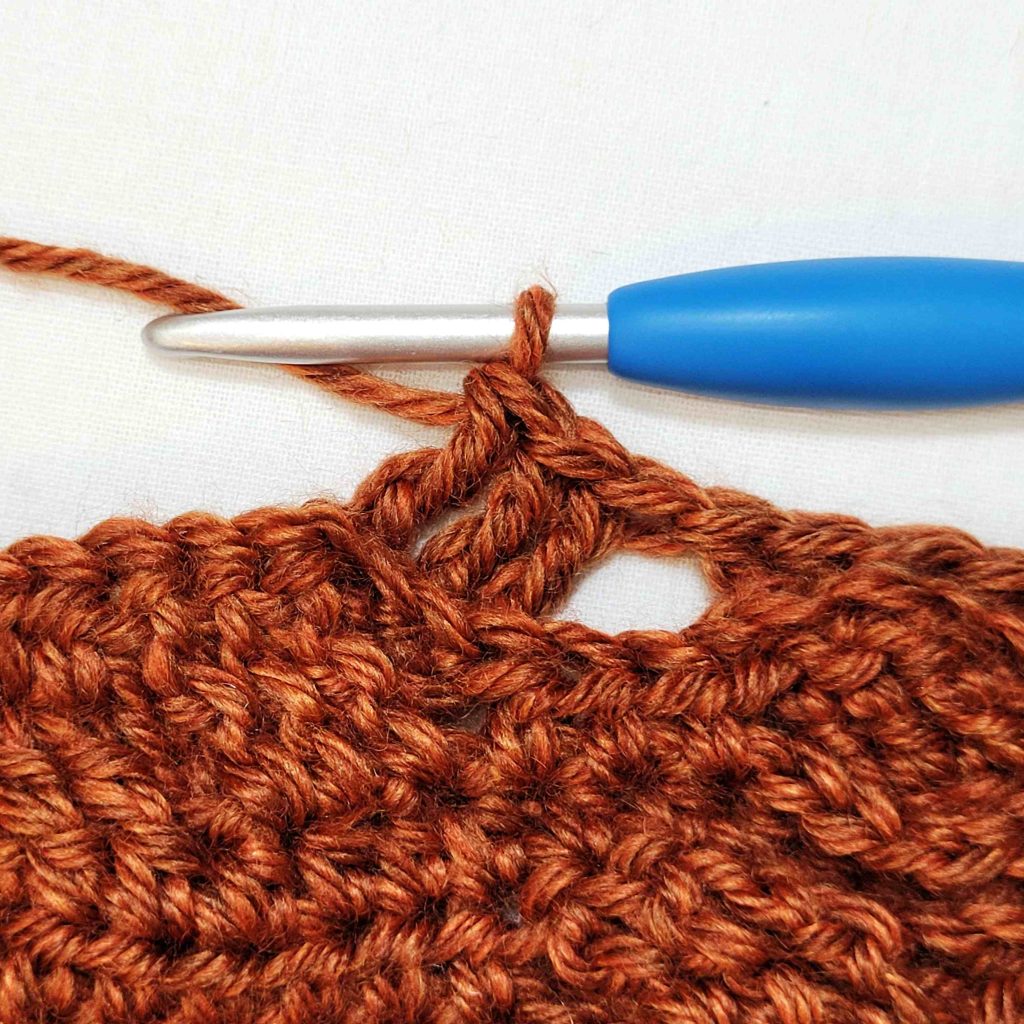
Figure 83
Figure 84
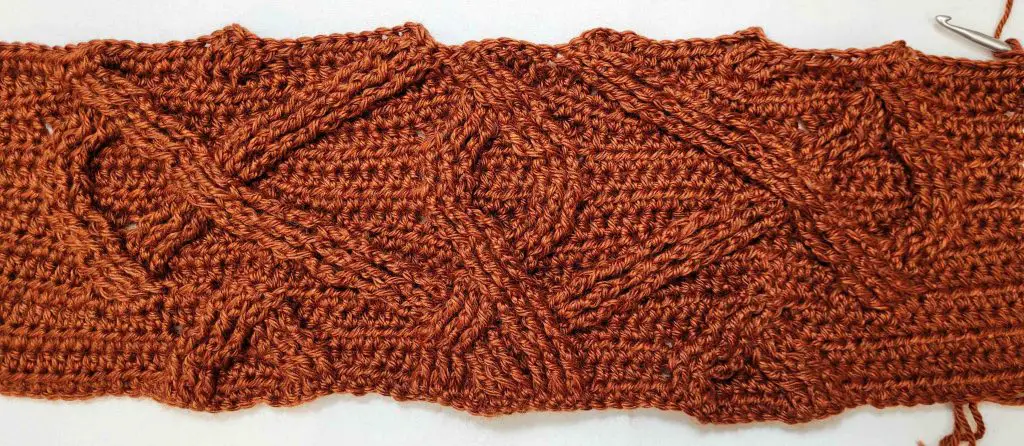
Figure 85
- – Ch1. Hdc in 1st 50 (60, 75, 89, 106) sts. Fpdc in next 6 sts. Hdc in next 9 sts.
– Sk 3 sts, fptr in next 3 sts (see Figure 86). Working behind sts just made, Fptr in 3 skipped sts (see Figure 87).
– Sk 3 sts, fptr in next 3 sts (see Figure 88). Working in front of sts just made, fptr in 3 skipped sts (see Figure 89).
– Hdc in next 9 sts. Fpdc in next 6 sts. Hdc in last 50 (60, 75, 89, 106) sts. Figure 90 shows completed row 16. Turn. – 142 (162, 192, 220, 254) st
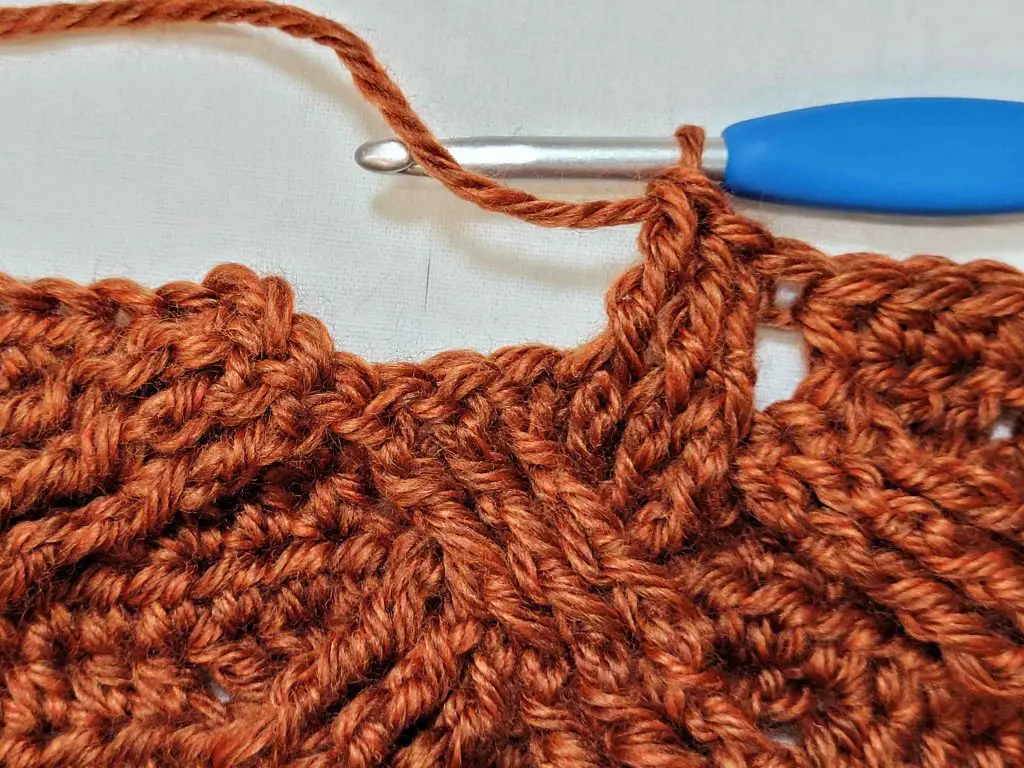
Figure 86
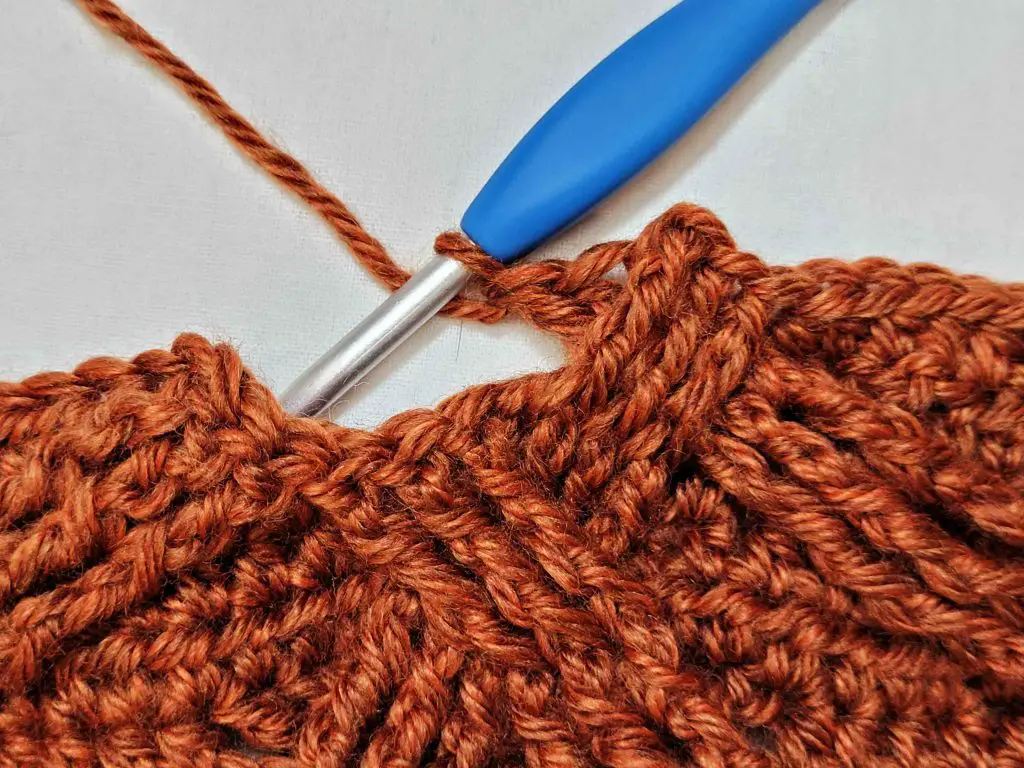
Figure 87
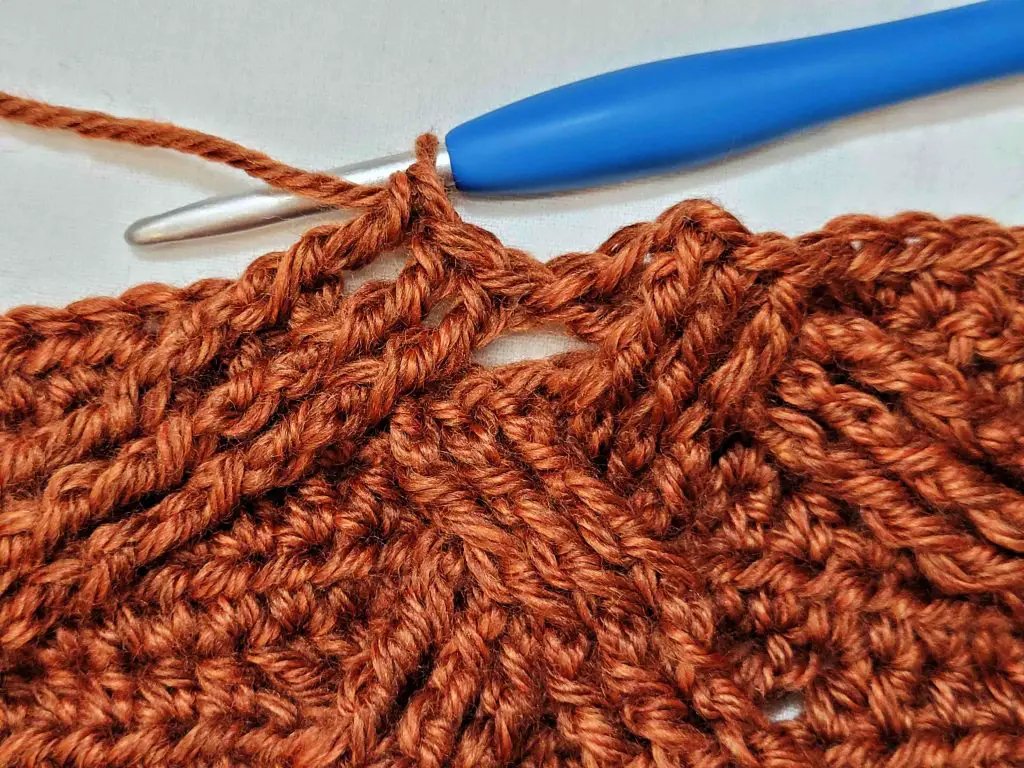
Figure 88
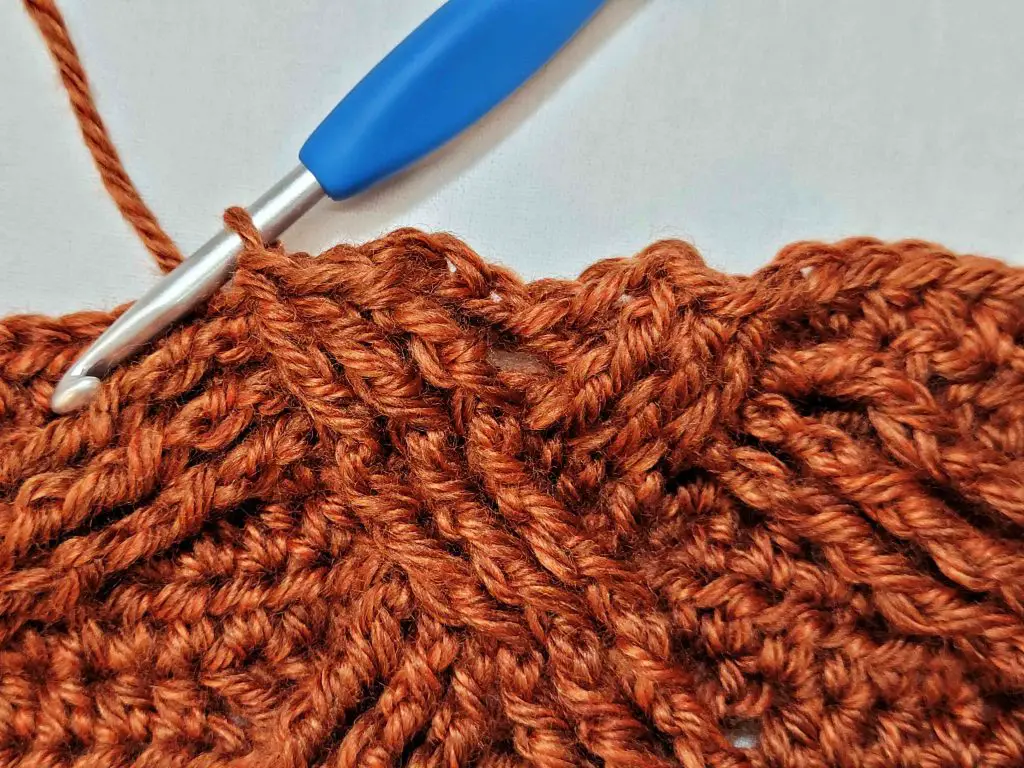
Figure 89
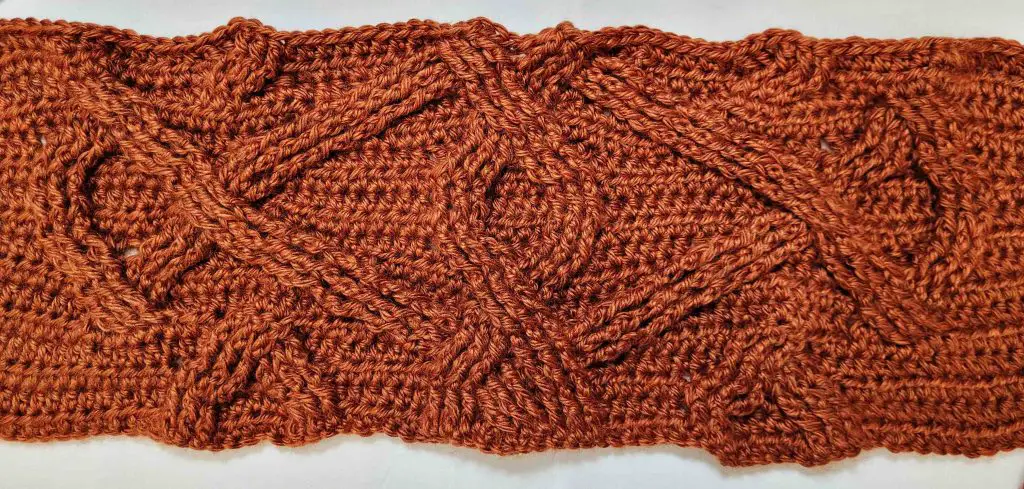
Figure 90
Free Crochet Shrug Pattern – Sorcha Shrug
- – Ch1. Hdc in 1st 47 (57, 72, 86, 103) sts. *Sk 3 sts, bptr in next 3 sts (see Figure 91). Working in front of sts just made, tr in 3 skipped sts (see Figure 92). Sk 3 sts, tr in next 3 sts (see Figure 93). Working behind sts just made, bptr in 3 skipped sts (see Figure 94).**
– Hdc in next 6 sts. Bpdc in next 12 sts. Hdc in next 6 sts.
– Repeat from * to **. Hdc in last 47 (57, 72, 86, 103) sts. Turn. Figure 95 shows right side of completed row 17. – 142 (162, 192, 220, 254) st
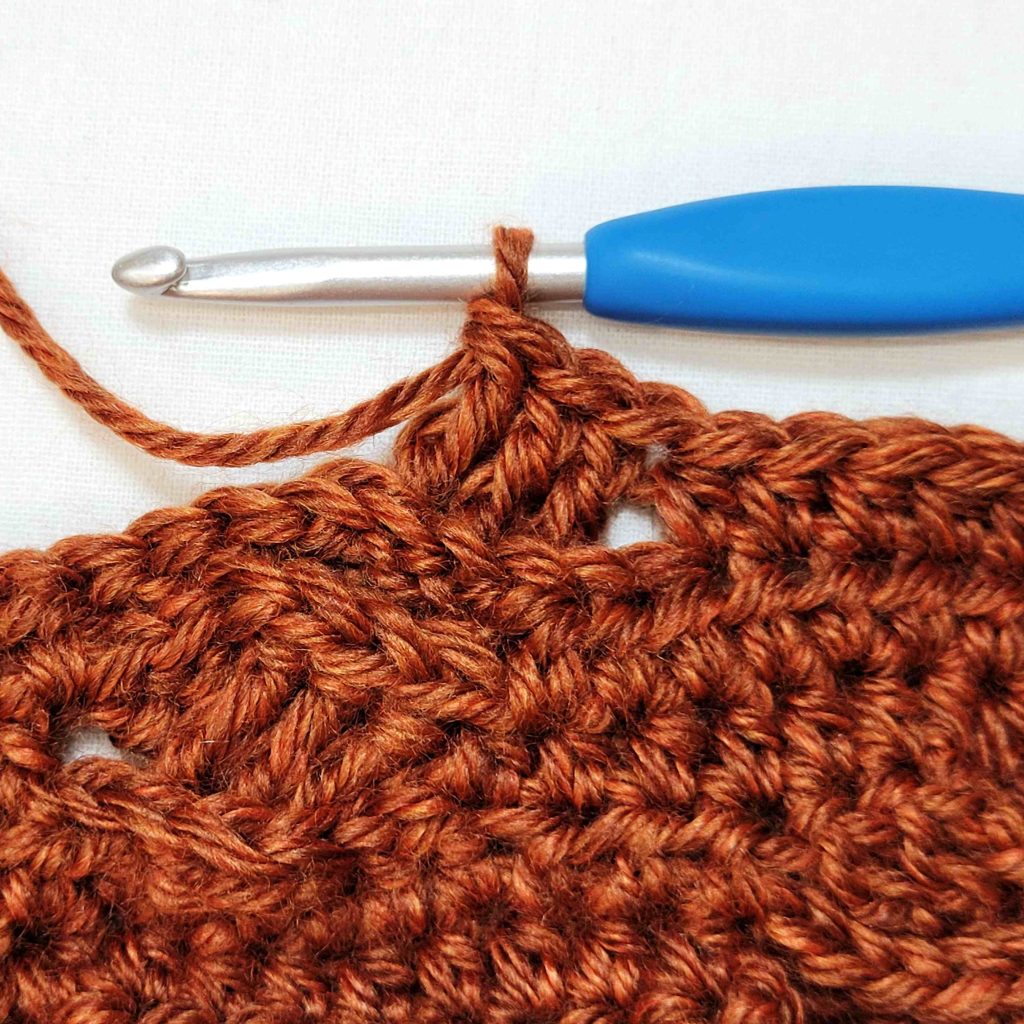
Figure 91
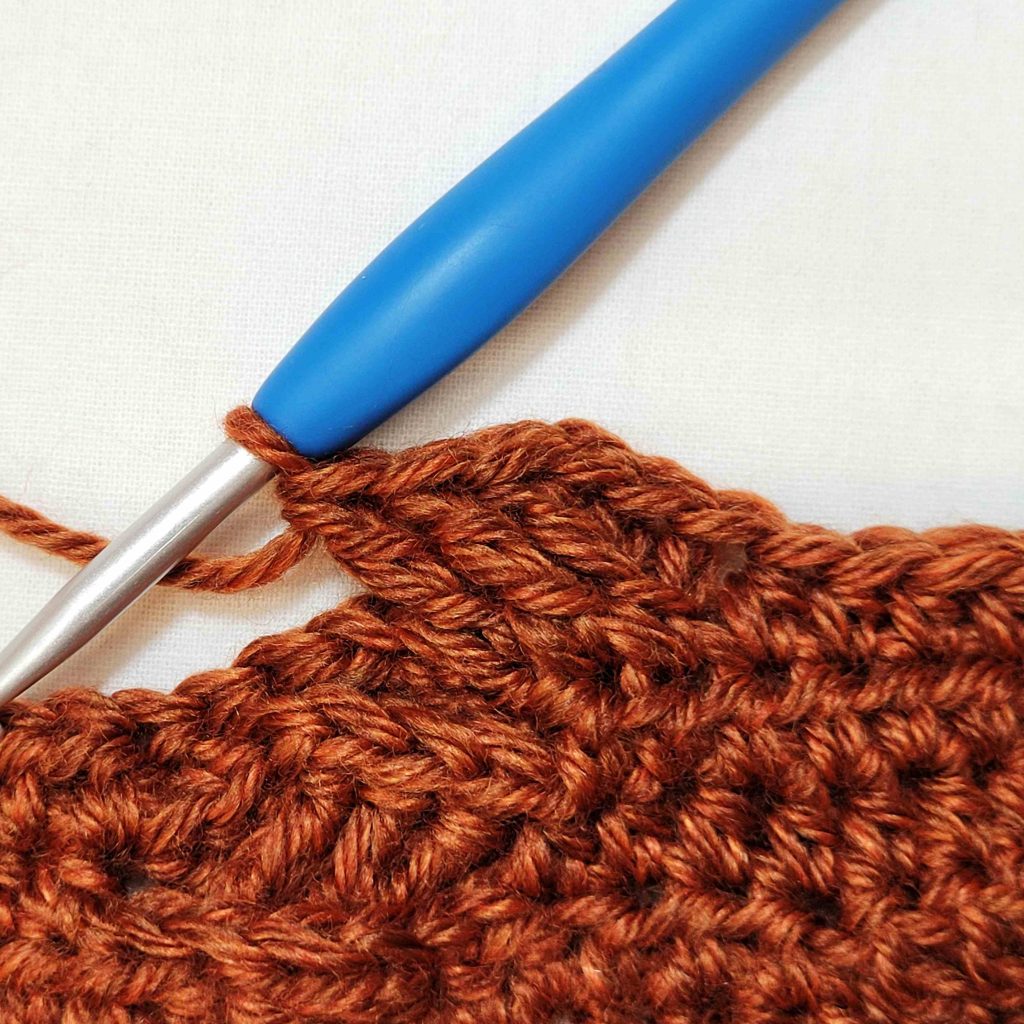
Figure 92
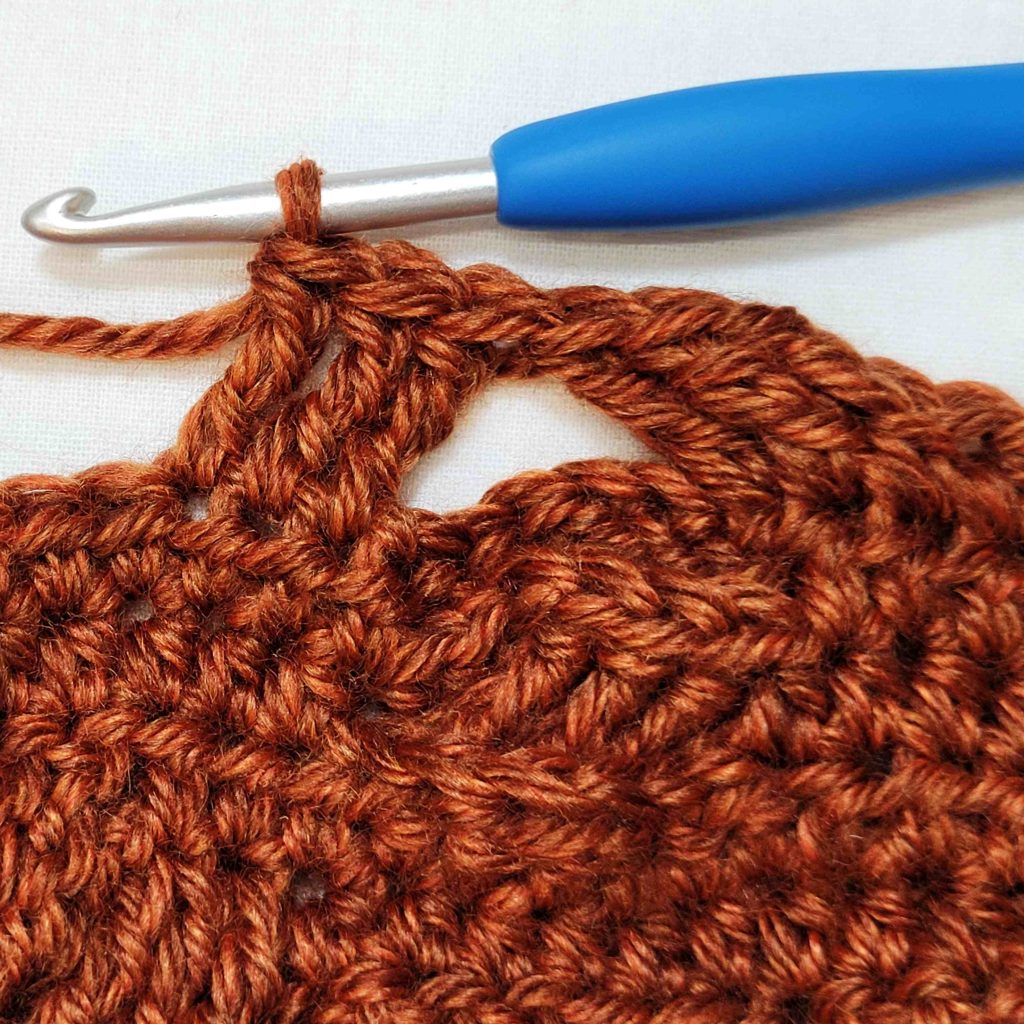
Figure 93
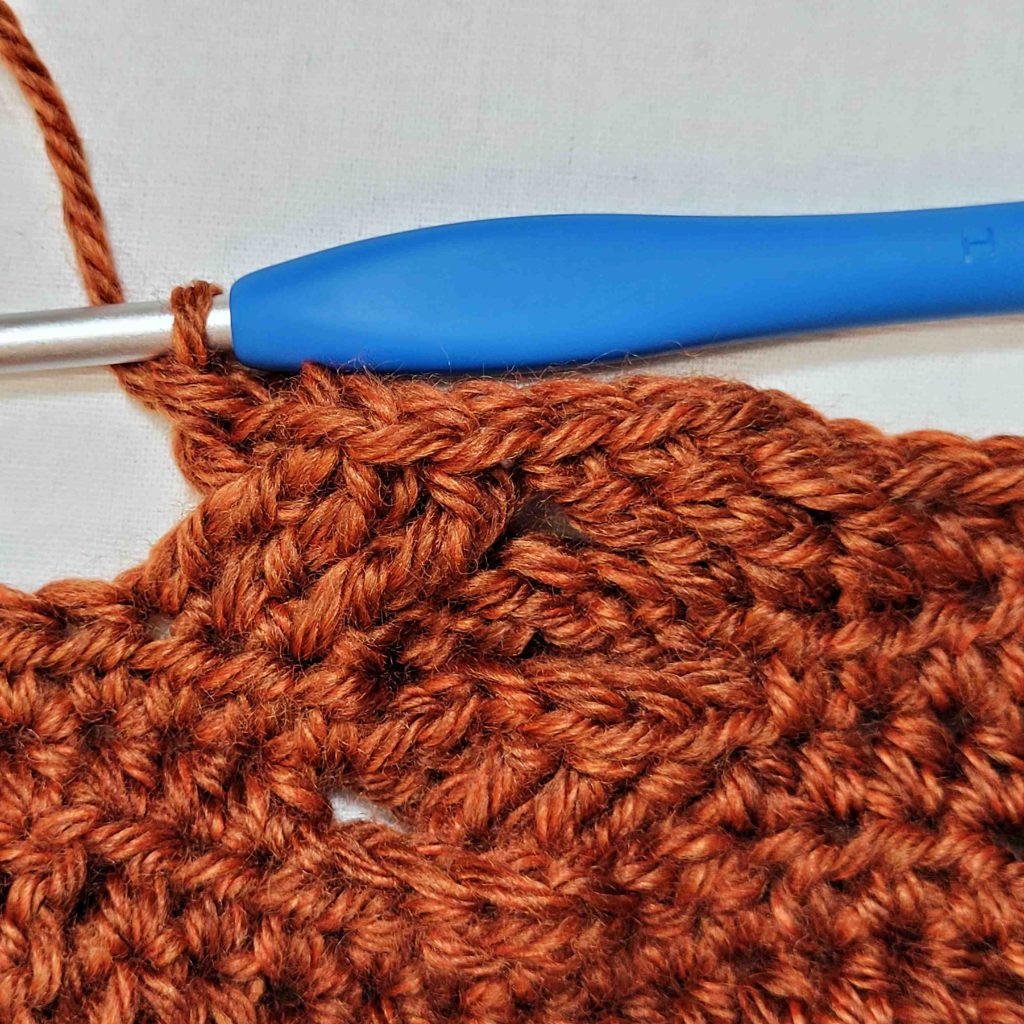
Figure 94
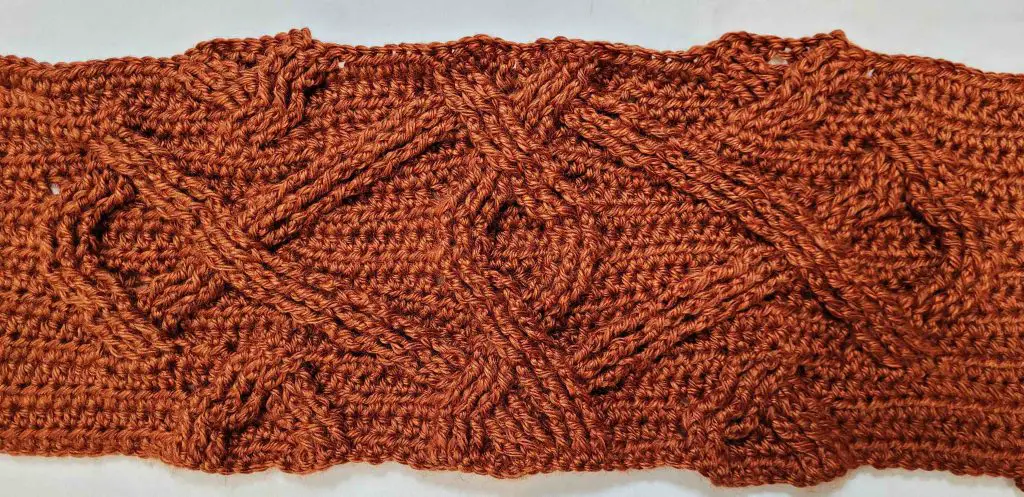
Figure 95
- – Ch1. Hdc in 1st 47 (57, 72, 86, 103) sts. Fpdc in next 3 sts.
– *Hdc in next 6 sts. Fpdc in next 3 sts. Hdc in next 6 sts. Fpdc in next 3 sts.**
– Sk 3 sts, fptr in next 3 sts (see Figure 96). Working in front of 3 sts just made, fptr in 3 skipped sts (see Figure 97).
– Fpdc in next 3 sts (see Figure 98). Repeat from * to **.
– Hdc in last 47 (57, 72, 86, 103) sts. Figure 99 shows completed row 18. Turn. – 142 (162, 192, 220, 254) st
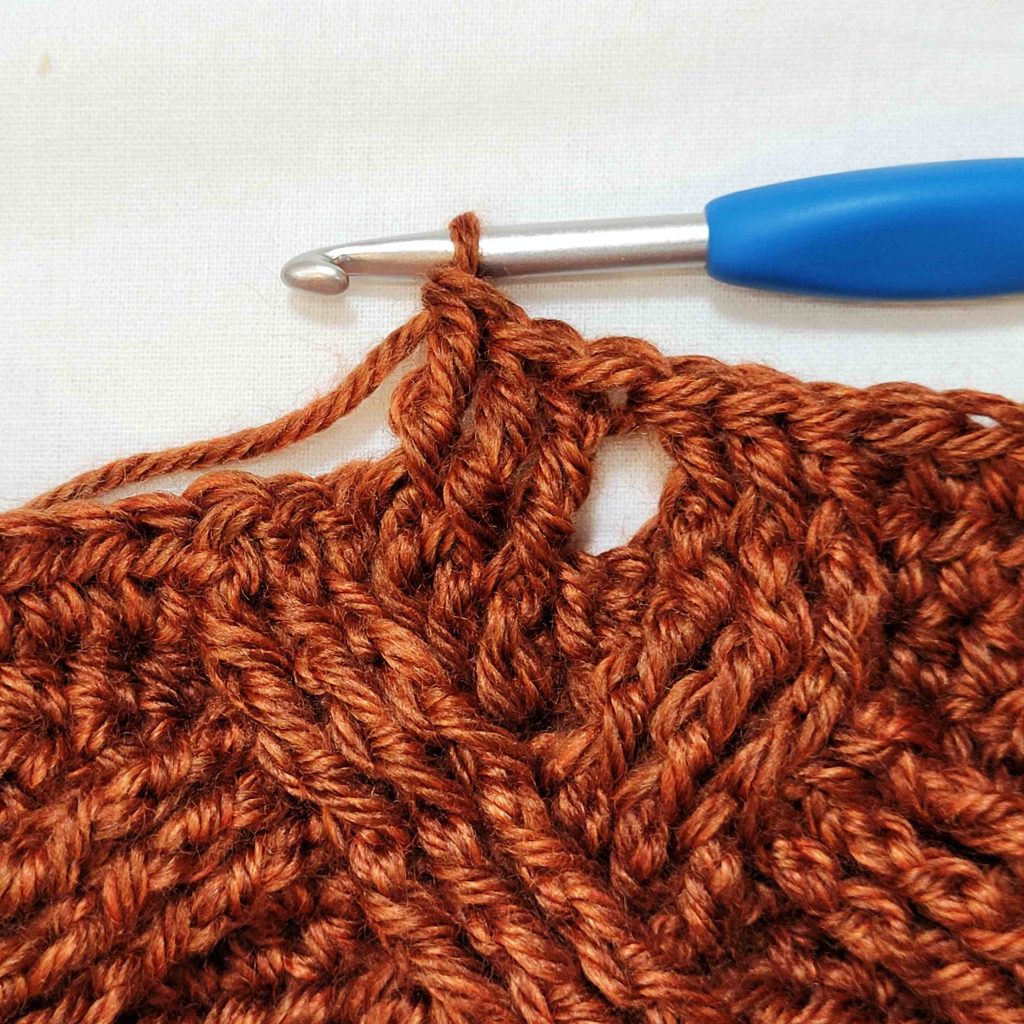
Figure 96
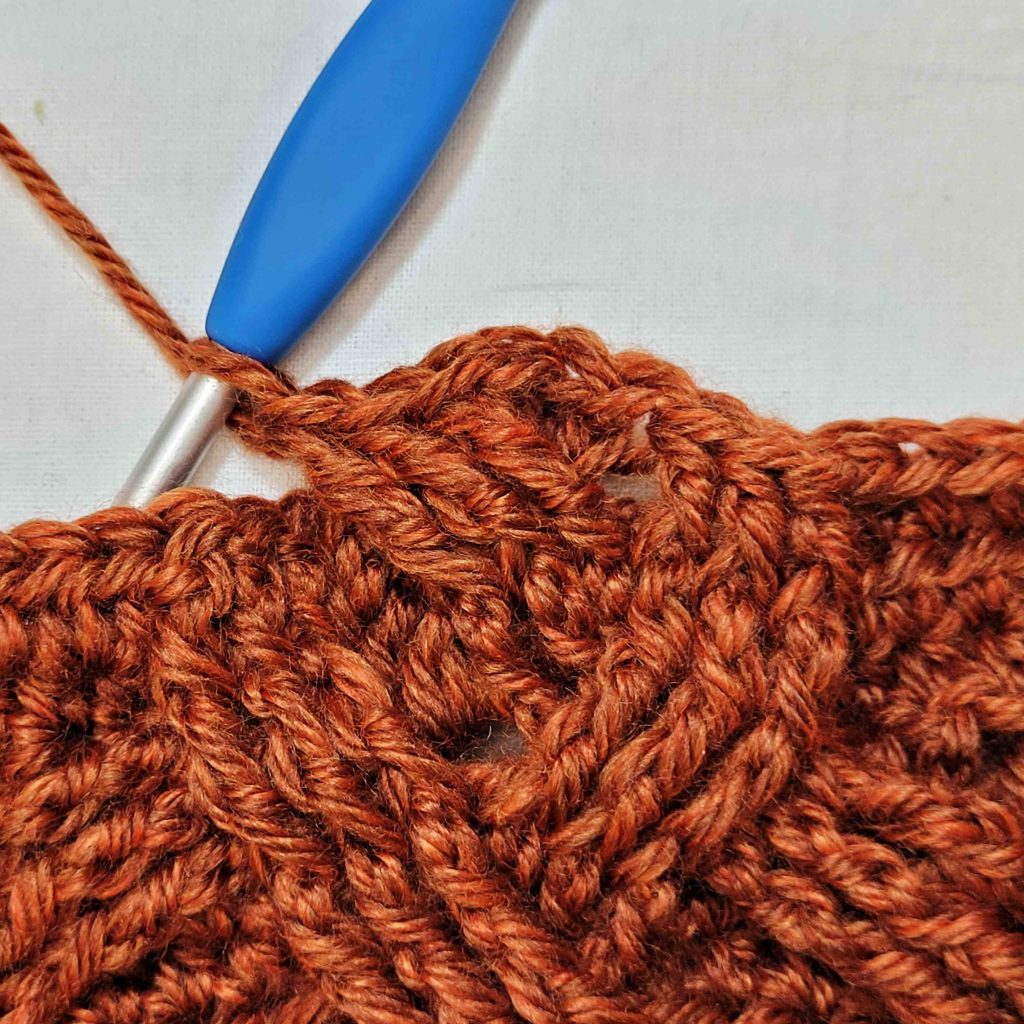
Figure 97
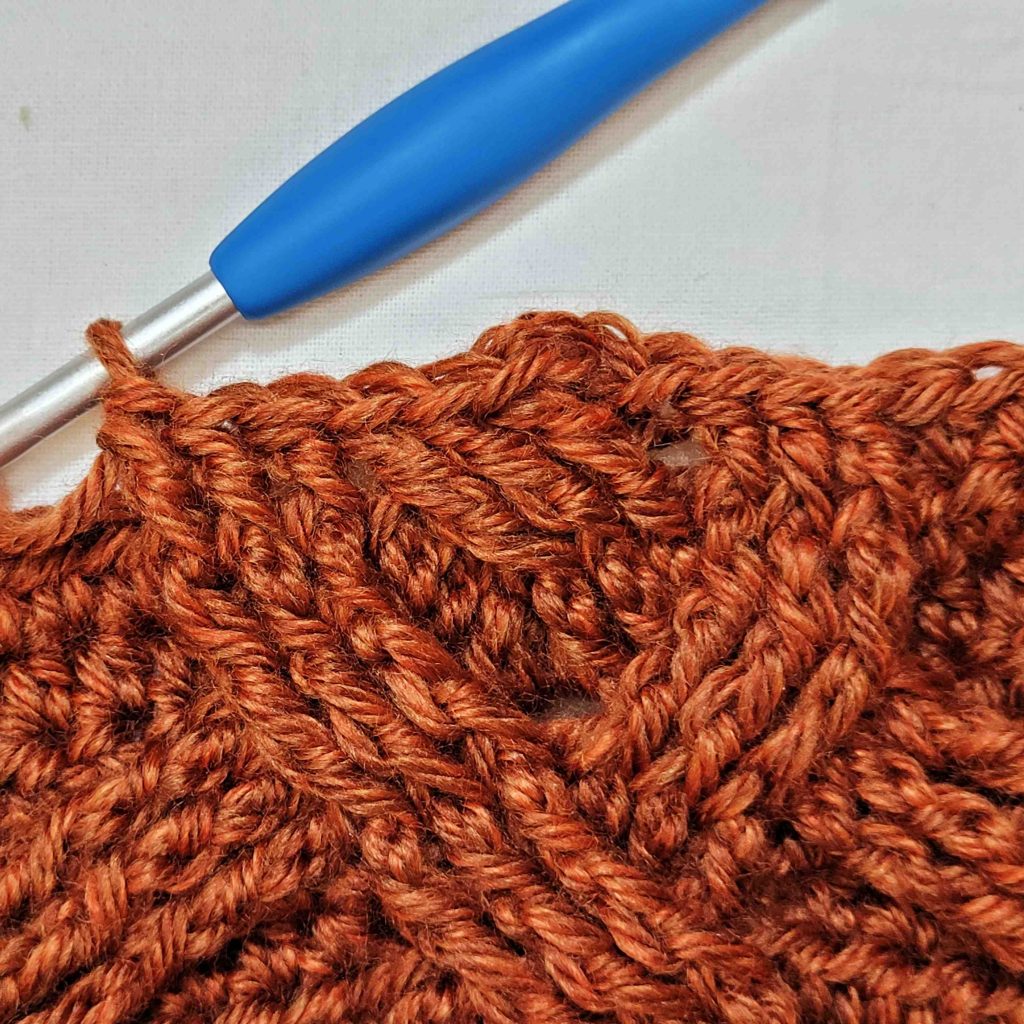
Figure 98
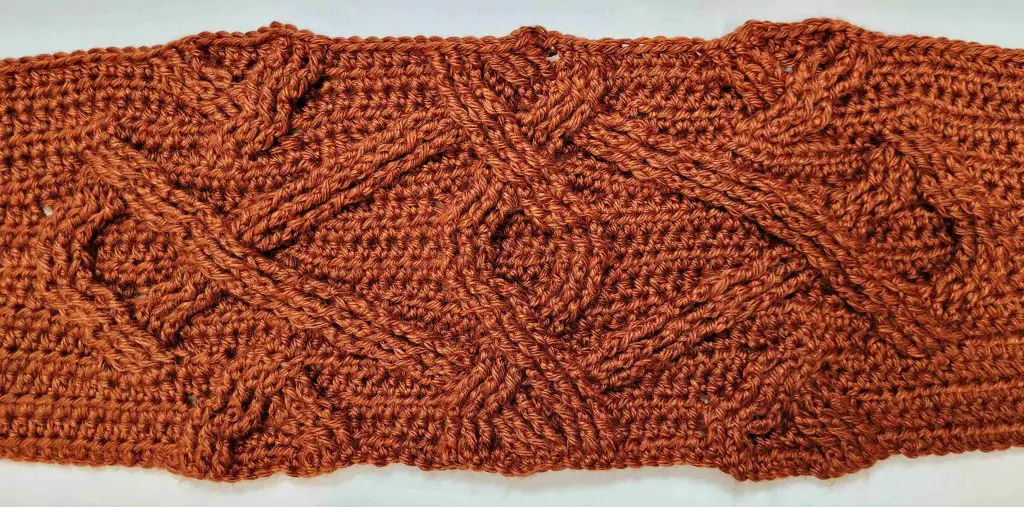
Figure 99
Repeat rows 3-18 until your rectangle is 26” H or until you have reached your desired length minus about 6″. Be sure to end with an even numbered row. I have added a stitch diagram of the cable pattern on the following page. Bind off, leaving your yarn tail about 16” long. Note: Your middle may be a bit longer than the sides of your rectangle. In this case, you should measure the height at the side of your project.
Note: The height of your rectangle will change the look. For the shrug shown on the model, I worked until the rectangle was 26″ high. Once the ribbed edging was added, the finished shrug sat at about 32” below the shoulders. If you would like your shrug to be longer or shorter than the one pictured, simply add or subtract rows. Be sure to always end with an even numbered row. Your project should look similar to Figure 100.
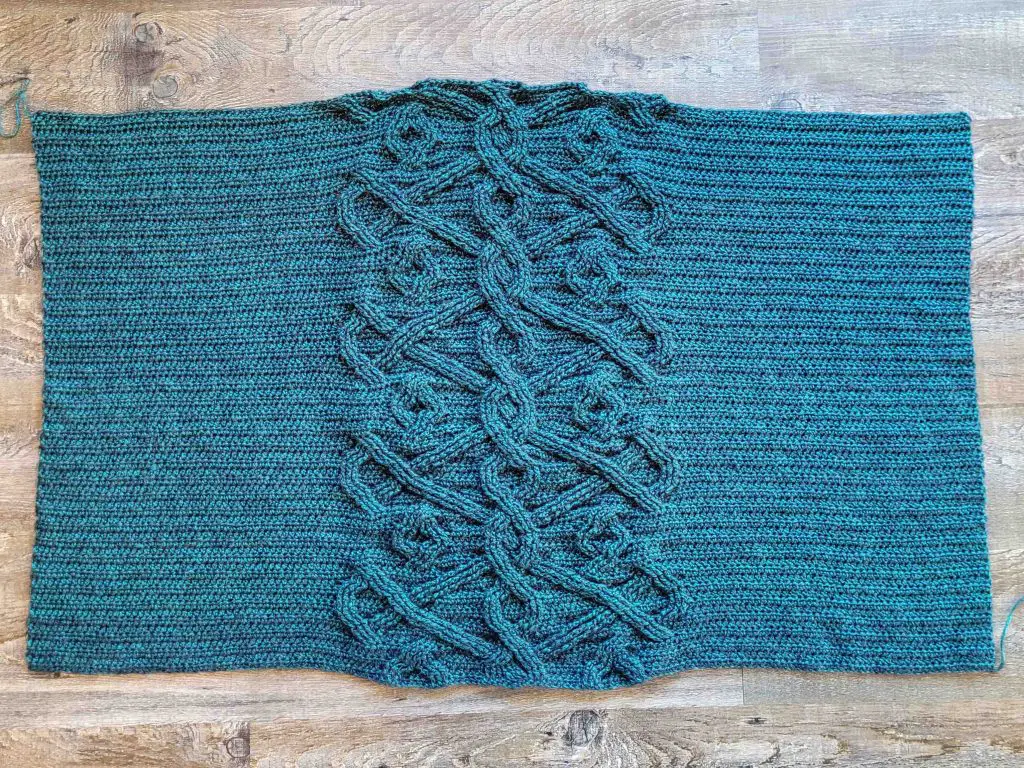
Figure 100
Sewing The Sleeves
- Lay your rectangle out so that the right side is facing up and the top row is farthest from you.
- Fold the rectangle in half, bringing the bottom up to the top. (See Figure 101)
- Decide how large you would like your sleeves to be. I wanted my arm holes to be 10” around, so I placed my stitch marker 5” up from the fold. Use a locking stitch marker to pin the two layers together. (See Figure 102)
- Place another locking stitch marker at the corner, again pinning the two layers together. (See Figure 102)
- Repeat for the other side.
- Use your long yarn tails to whip stitch the two layers together from the corners, up to the arm holes. You should now have something resembling Figure 103.
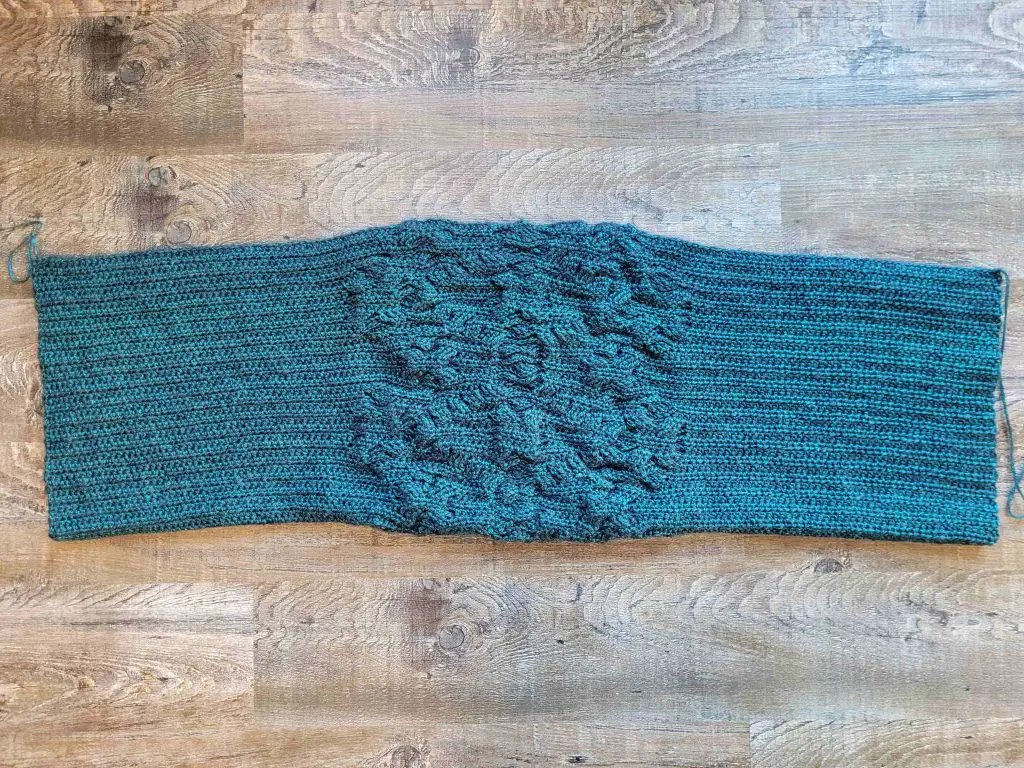
Figure 101
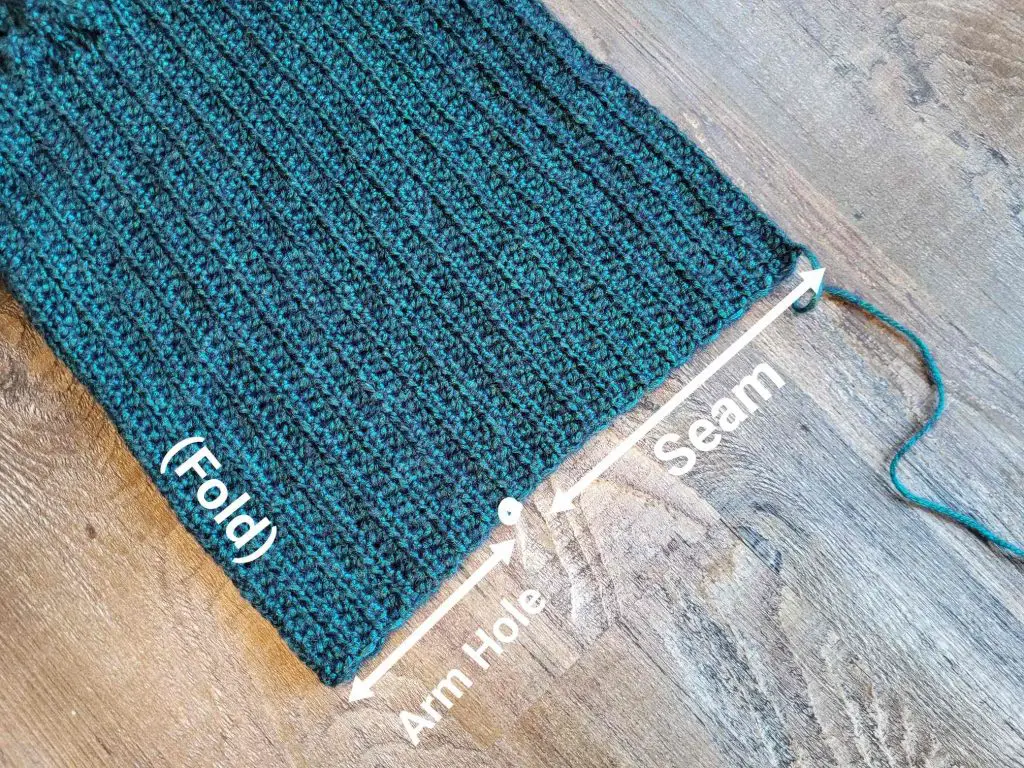
Figure 102
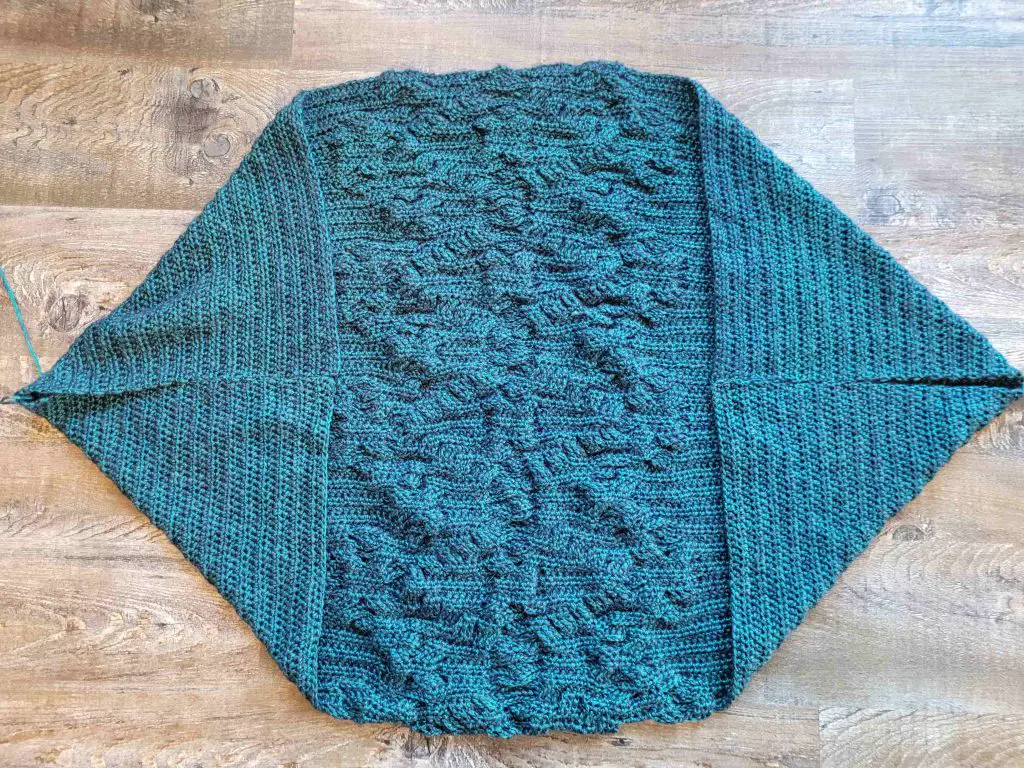
Figure 103
Finishing The Arm Holes
Turn your shrug right side out. Join your yarn anywhere on the edge of a sleeve with the right side facing you and sc evenly around the edge. I find that my edges come out even if I sc in the following manner: 1 sc in the end of the 1st row, 2 sc in the end of the next row. Repeat that pattern until all rows have been worked. Once you have made it all the way around the sleeve edge, ss to the 1st sc and bind off. Repeat for the other sleeve.
Outer Edging
For the edging we will be working in the round, joining at the end of each round, and turning. Begin by joining your yarn anywhere on the outer edge with the right side facing you.
Important Note: When working the outer edging, I increased my hook size by ½ mm (going from a 5mm to a 5.5mm). This is because the ribbing stitch tends to pull in a bit tighter than the hdc rows we worked in the body. If you use the same size hook as you did for the body of the shrug, your ribbing will be tighter, causing the edging to pull in and the body to poof out. Therefore, I recommend you increase your hook size for the ribbing as I have done.
Using 5.5mm hook (or ½ mm larger than hook used to obtain gauge)
- (Right Side) Ch1. Sc in 1st st and each st around. Ss to join to 1st st. Turn. – 284 (324, 384, 440, 508) st
- (Wrong Side) Ch3. Dc in next st and each st around. Ss to join to 1st st. Turn. – 284 (324, 384, 440, 508) st
- Ch2. Fpdc in 1st st. Bpdc in next st. *Fpdc in next st. Bpdc in next st.** Repeat from * to ** around. Ss to join to 1st st. Turn. – 284 (324, 384, 440, 508) st
- Ch2. Bpdc in 1st st. Fpdc in next st. *Bpdc in next st. Fpdc in next st.** Repeat from * to ** around. Ss to join to 1st st. Turn. – 284 (324, 384, 440, 508) st
Repeat rounds 3 and 4 until you have a total of 7 rounds (counting from round 1).
- Ch1. Sc in 1st st and each st around. Ss to join to 1st st. Bind off. – 284 (324, 384, 440, 508) st
Weave in your ends, and you’re done!
I hope you love your new crochet shrug, and I look forward to seeing all of your beautiful pictures on Ravelry!
If you’d like to know when I post new patterns and tutorials like the Free Crochet Shrug Pattern – Sorcha Shrug, head on over to my Facebook and Instagram and give me a like and a follow!
If you enjoyed the Free Crochet Shrug Pattern – Sorcha Shrug, you may want to check out my other designs!
Free Crochet Shrug Pattern – Sorcha Shrug
And until next time… Happy Hooking! 😉