
Free Crochet Top Pattern – Double Trouble Tank
The Free Crochet Top Pattern – Double Trouble Tank is copyrighted by I Need It Crochet. You may not copy, share, change, or sell the pattern itself. Also, you may not claim this pattern as your own. All pictures contained in this pattern fall under the copyright and may not be used.
Finished items made from the Free Crochet Top Pattern – Double Trouble Tank belong to you, and you may do what you wish with them. If you choose to sell them on Etsy, I would very much appreciate it if you credited me as the pattern designer.


Or… Just scroll down to see it for free!
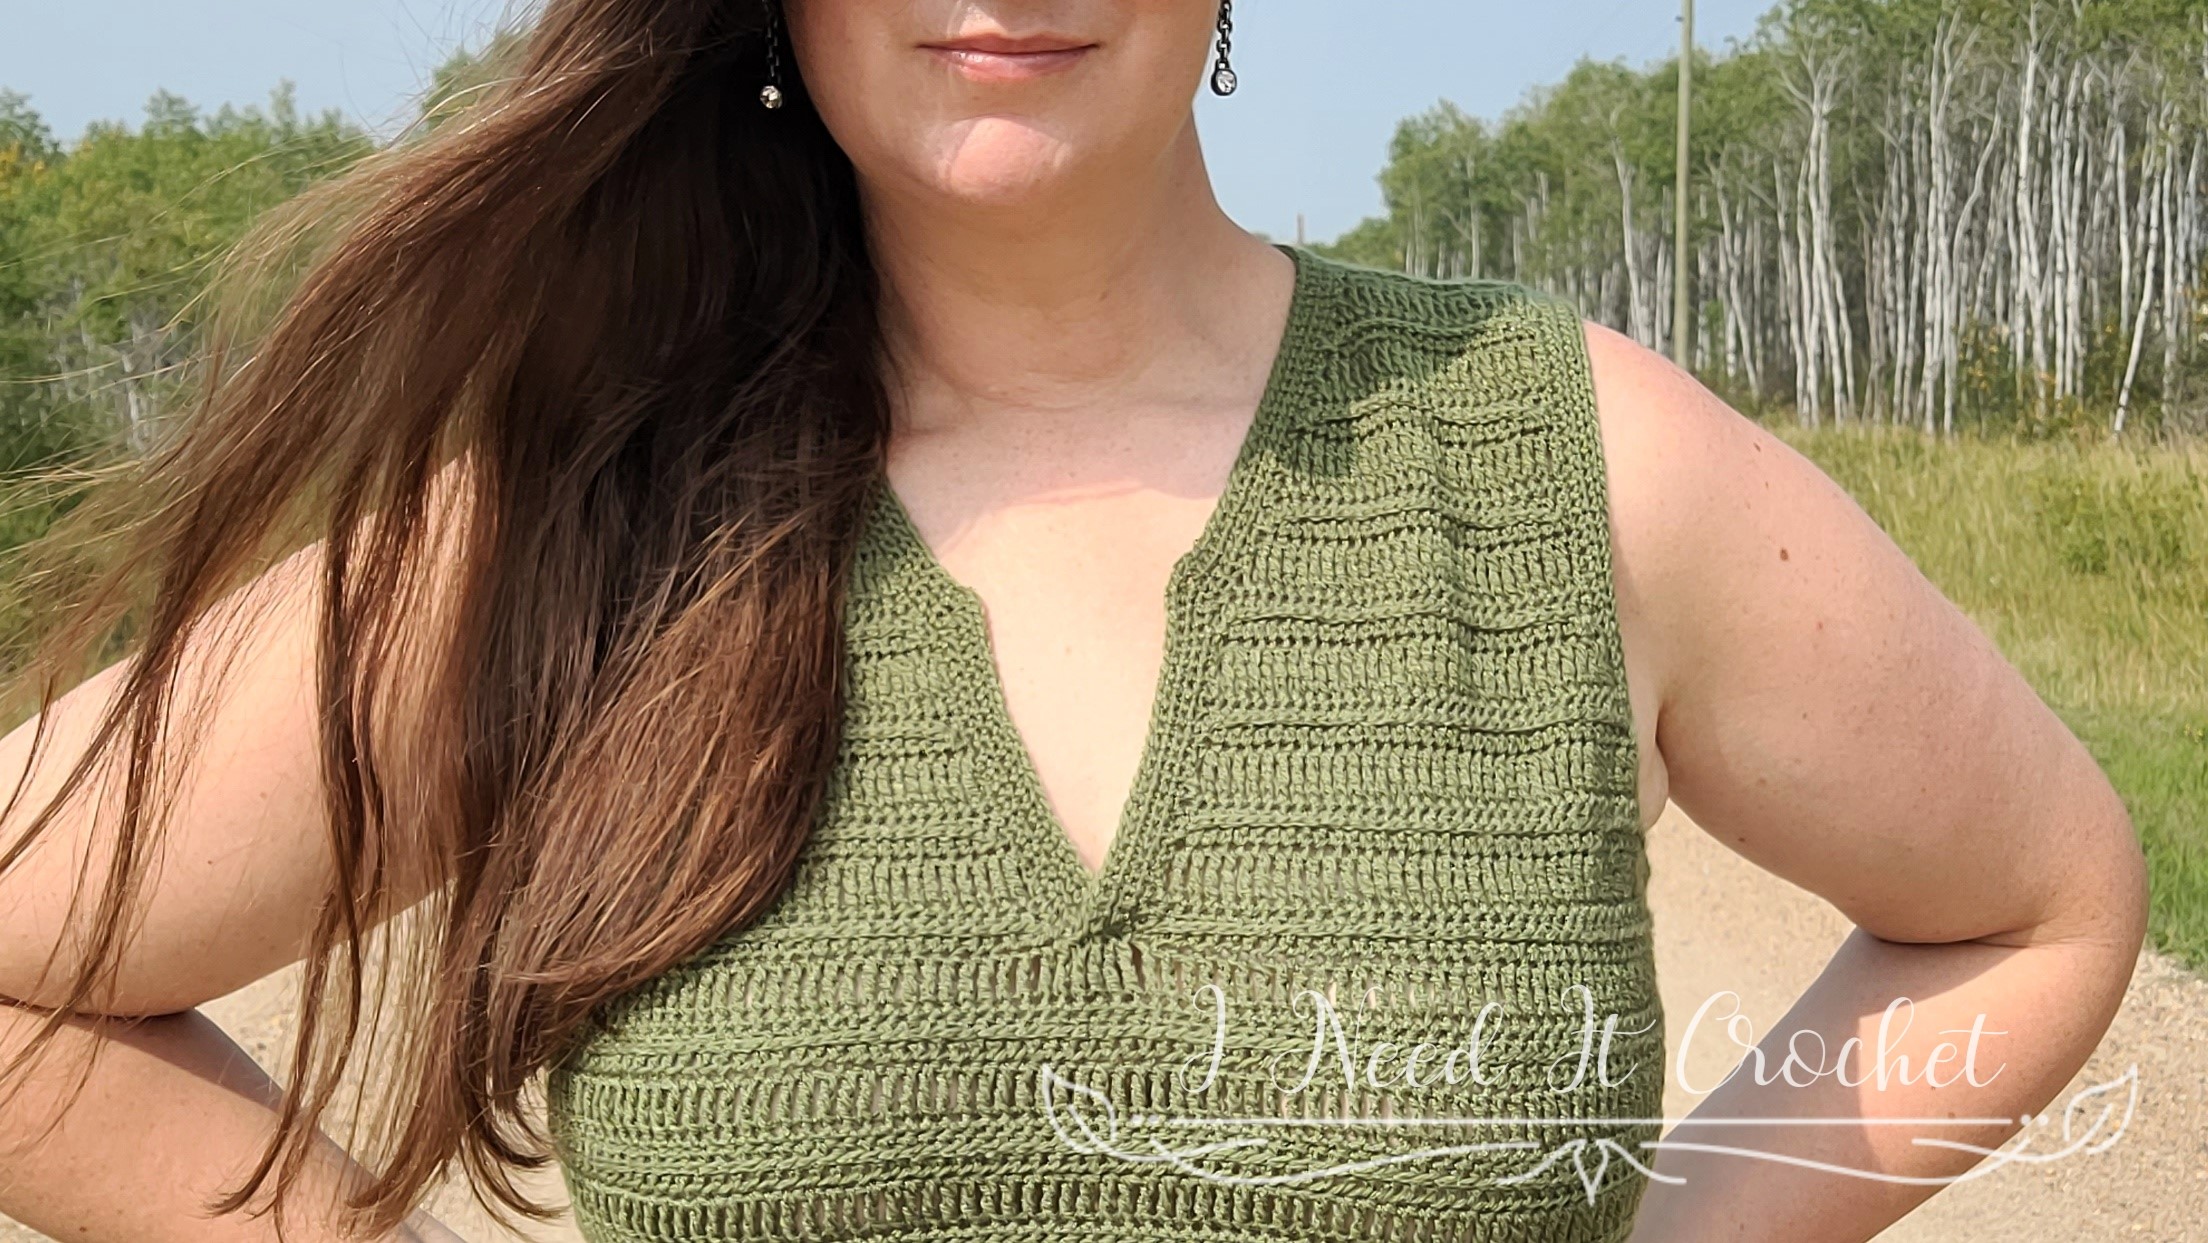
One of the reasons I love to design crochet top patterns is I get to play with different necklines. I’ve been wanting to create a Henley collar for quite some time, and I’m glad to have finally had the opportunity.
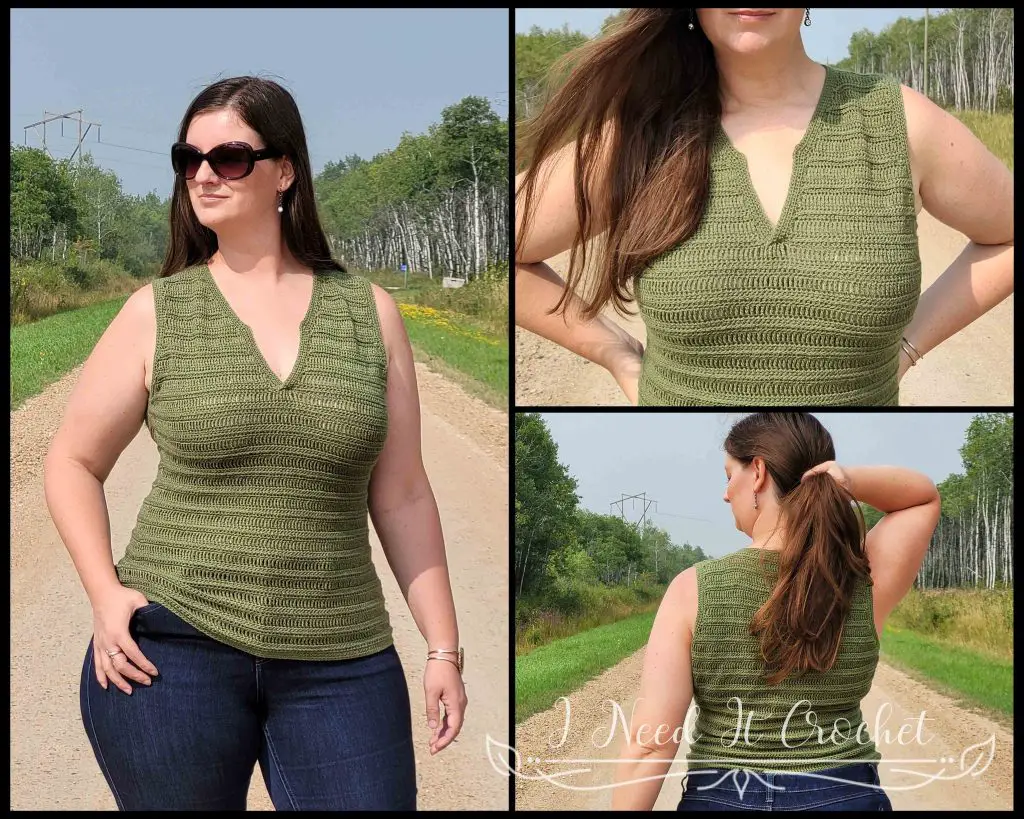
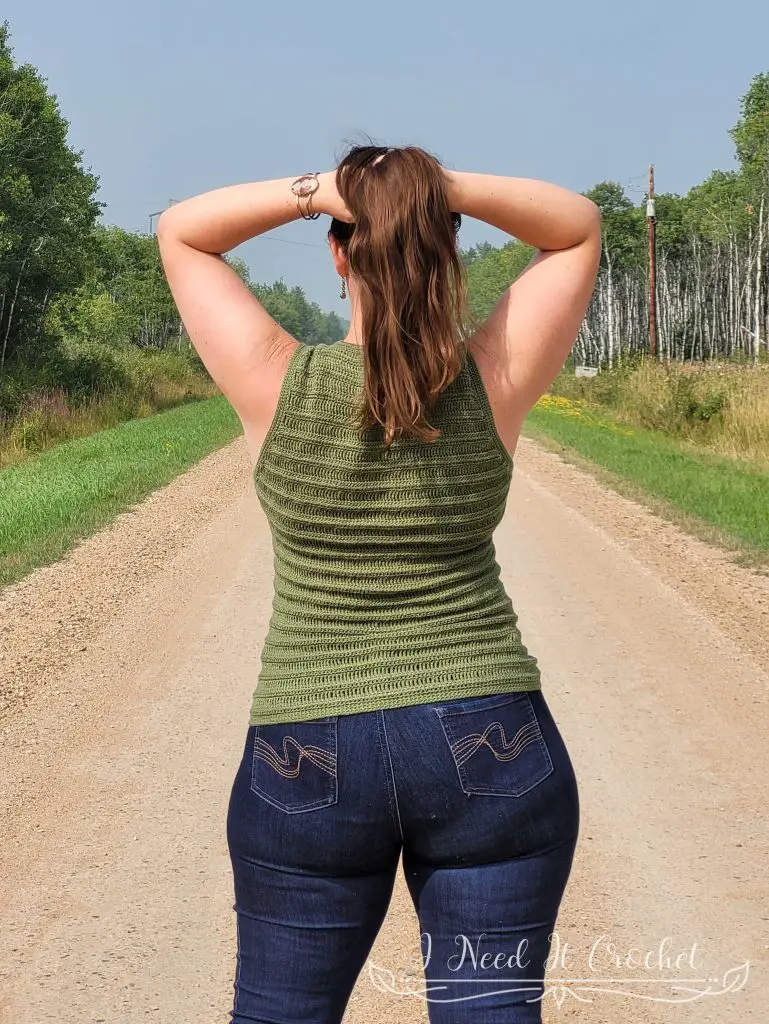
The Double Trouble Tank features a stitch pattern that keeps your interest and results in a flattering ribbed effect that pairs beautifully with the plunging Henley collar. The instructions include optional waist shaping and customizable length. Wear it with your favourite shorts or jeans, or layer it under a blazer for a more professional look.

Free Crochet Top Pattern – Double Trouble Tank
How To Crochet The Free Crochet Top Pattern – Double Trouble Tank
Finished Sizes:
Instructions given to fit size X-small; changes for small, medium, large, X-large, 2X-large, 3X-large, 4X-large and 5X-large are in ()
XS (S, M, L, XL, 2XL, 3XL, 4XL, 5XL)
Bust Circumference: 28” (32”, 36”, 40”, 44”, 48”, 52”, 56”, 60”)
Waist Circumference: Customizable
Finished Length: Customizable.
Materials:
I used Loops & Threads Woolike, which is a 85% Acrylic, 15% Nylon, #1 Super Fine weight yarn.
Any yarn of similar weight would work.
Approximately 800 (900, 1000, 1100, 1200, 1300, 1400, 1500, 1600) yds.
4mm Hook
Stitch Markers
Yarn Needle
Scissors
Measuring Tape
Abbreviations:
RS = Right Side
WS = Wrong Side
Sk = Skip
St = Stitch
Ss = Slip Stitch
Ch = Chain
Sc = Single Crochet
Dc = Double Crochet
Tr = Treble Crochet
3rd Lo: Third Loop Only
Sc2tog = Single Crochet 2 Together
Hdc2tog = Half Double Crochet 2 Together
Tr2tog = Treble Crochet 2 Together
Gauge:
See gauge swatch instructions below. Be sure to always check your gauge. It will save you much time and heartache.
Notes:
Ch1 at the beginning of a row is never considered a stitch.
Ch3 at the beginning of a row is considered a dc.
Ch4 at the beginning of a row is considered a tr.
The model above (that’s me) has a 39” bust and is wearing a size L.
Choose your size according to your largest measurement (bust/waist) and how you would like the top to fit. For a close-fitting top, choose the size closest to your largest measurement. For a loose top, choose a size 2-3” larger.

Free Crochet Top Pattern – Double Trouble Tank
Gauge Swatch
The instructions below will create a gauge swatch that is 4” (8”) wide by 4” (8”) high. If you are making a larger size and/or you sometimes find your tension is off, I recommend making the larger swatch. But, of course, that is completely up to you. Also, the width of your swatch is much more important than the overall height. So if your width is on point but your height is off, I recommend using the hook that gives you the correct width.
With 4mm hook
- Ch 23 (45). sc in 2nd ch from hook and each ch across. Turn. – 22 (44) st
- Ch1. Hdc in 1st st and each st across. Turn. – 22 (44) st
- Ch1. Hdc in 1st st. Hdc in 3rd lo of each st until 1 st left. Hdc in last st. Turn. – 22 (44) st
- Ch4 (or standing tr). Tr in each st across. Turn. – 22 (44) st
- Ch1. Sc in each st across. Turn. – 22 (44) st
Repeat rows 2-5 until you have a total of 14 (28) rows. Your swatch should measure 4” (8”) W by 4” (8”) H.
Instructions
This project is made from the top down. We will begin with the upper back, working down to the underarm. Then, we will add the upper front. Next, we will work the lower body in the round. Finally, we will finish all of the edges with a few rounds of single crochet.
Note: I highly recommend using the standing tr stitch at the beginning of each tr row, rather than a ch4. I find that the ch4 produces a small gap, whereas the standing tr does not. But that is, of course, up to you.
Upper Back – Even Rows
With 4mm hook (or hook used to obtain gauge)
- (WS) Ch 51 (57, 61, 69, 69, 73, 73, 77, 83). Sc in back hump of 2nd ch and each ch across. Turn. – 50 (56, 60, 68, 68, 72, 72, 76, 82) st
- (RS) Ch1. Hdc in 1st st and each st across. Turn. – 50 (56, 60, 68, 68, 72, 72, 76, 82) st
- Ch1. Hdc in 1st st. Hdc in 3rd lo of each st until 1 st left. Hdc in last st. Turn. – 50 (56, 60, 68, 68, 72, 72, 76, 82) st
- Ch4 (or standing tr). Tr in each st across. Turn. – 50 (56, 60, 68, 68, 72, 72, 76, 82) st
- Ch1. Sc in next st and each st across. Turn. – 50 (56, 60, 68, 68, 72, 72, 76, 82) st
Repeat rows 2-5 until you have a total of 15 (17, 19, 17, 17, 14, 13, 10, 12) rows.
Measurement Check: Your project should be approximately 9” (10 ¼”, 11”, 12 ½”, 12 ½”, 13 ¼”, 13 ¼”, 14”, 15”) wide. If your measurement is off, I recommend you start again with a different sized hook.
Upper Back – Increase Rows
We will now work increases into the beginning and end of each row. Each increase row will increase your stitch count by 2 sts.
Work only the instructions marked with your size below.
XS: Work rows 4-5. Then repeat rows 2-5 until you have a total of 27 rows. Ch2. – 74 st + ch2
S: Work rows 2-5. Then repeat rows 2-5 until you have a total of 31 rows. Ch4. – 84 st + ch4
M: Work rows 4-5. Then repeat rows 2-5 until you have a total of 35 rows. Ch6. – 92 st + ch6
L: Work rows 2-5. Then repeat rows 2-5 until you have a total of 35 rows. Ch6. – 104 st + ch6
XL: Work rows 2-5. Then repeat rows 2-5 until you have a total of 39 rows. Ch8. – 112 st + ch8
2X: Work rows 3-5. Then repeat rows 2-5 until you have a total of 39 rows. Ch10. – 122 st + ch10
3X: Work rows 2-5. Then repeat rows 2-5 until you have a total of 43 rows. Ch10. – 132 st + ch10
4X Work rows 3-5. Then repeat rows 2-5 until you have a total of 43 rows. Ch12. – 142 st + ch12
5X: Work row 5. Then repeat rows 2-5 until you have a total of 47 rows. Ch12. – 152 st + ch12
- Ch1. 2hdc in 1st st. Hdc in each st until 1 left. 2hdc in last st. Turn.
- (WS) Ch1. 2hdc in 1st st. Hdc in 3rd lo of each st until 1 st left. 2hdc in last st. Turn.
- (RS) (Ch4, tr) in 1st st (or standing tr, tr). Tr in each st until 1 left. 2tr in last st. Turn.
- Ch1. 2sc in 1st st. Sc in each st until 1 left. 2sc in last st. Turn.
Bind off, leaving a 4” tail. Your project should now look like Figure 1 below.
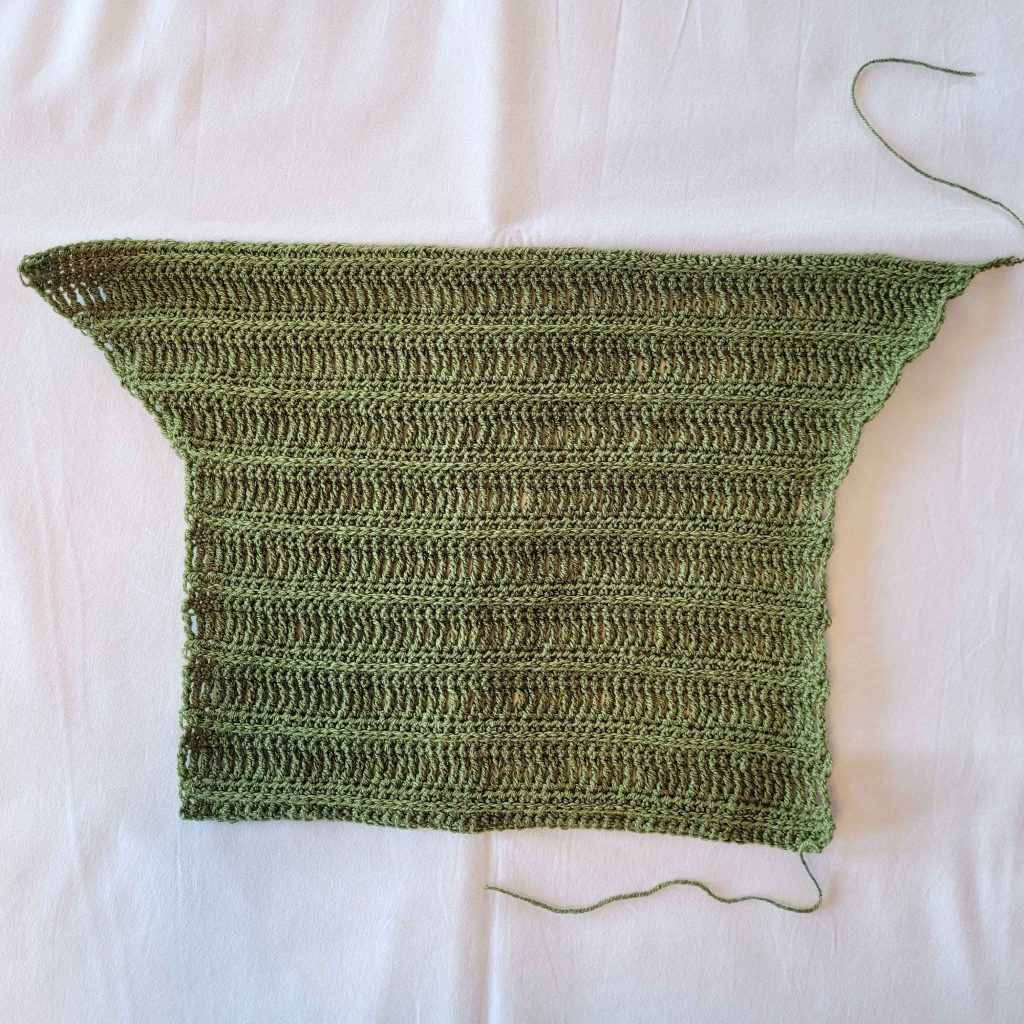
Figure 1
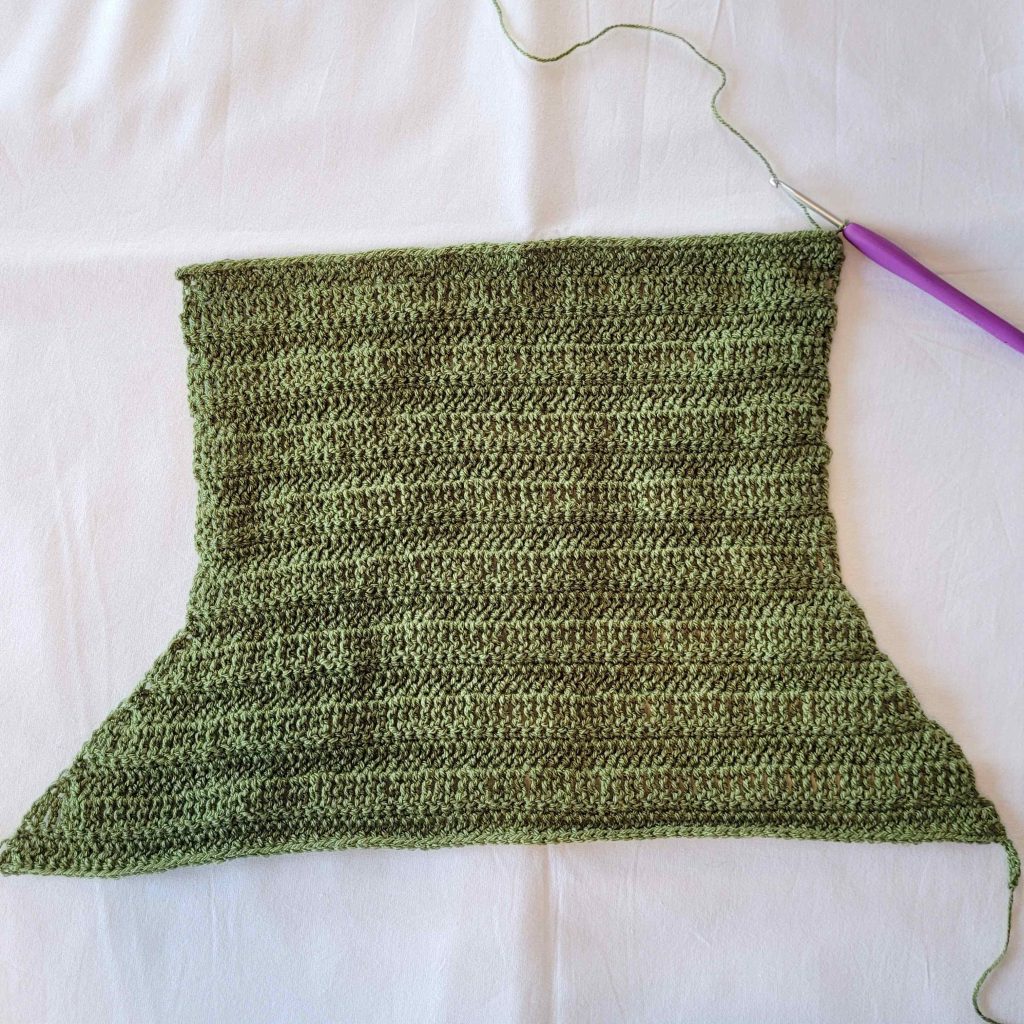
Figure 2
Free Crochet Top Pattern – Double Trouble Tank
Upper Front – Left Panel
Next, we will work the Upper Front Left Panel. Begin by laying your project out with the WS facing you and the starting ch at the top (as seen in Figure 2 above). Join your yarn in the bottom of the 1st ch.
- (WS) Ch1. Sc in 1st 11 (13, 13, 15, 15, 17, 17, 19, 19) sts. Leave all remaining sts unworked. Turn. – 11 (13, 13, 15, 15, 17, 17, 19, 19) st
- (RS) Ch1. Hdc in 1st st and each st across. Turn. – 11 (13, 13, 15, 15, 17, 17, 19, 19) st
- Ch1. Hdc in 1st st. Hdc in 3rd lo of each st until 1 left. Hdc in last st. Turn. – 11 (13, 13, 15, 15, 17, 17, 19, 19) st
- (Ch4, tr) in 1st st (or standing tr, tr). Tr in each st across. Turn. – 12 (14, 14, 16, 16, 18, 18, 20, 20) st
- Ch1. Sc in 1st st and each st until 1 left. 2sc in last st. Turn. – 13 (15, 15, 17, 17, 19, 19, 21, 21) st
- Ch1. 2hdc in 1st st. Hdc in each st across. Turn. – 14 (16, 16, 18, 18, 20, 20, 22, 22) st
- Ch1. Hdc in 1st st. Hdc in 3rd lo of each st until 1 left. 2hdc in last st. Turn. – 15 (17, 17, 19, 19, 21, 21, 23, 23) st
From here, the increases get a little bit complicated. To make the pattern easier for you to read, I have split up the instructions according to size. Only follow the set of instructions marked with your size. Skip the rest and scroll down to the heading marked ‘Upper Front – Right Panel’.
XS
- – 12. Repeat rows 4-7. – 20 st
- Ch1. Sc in 1st st and each st across. Turn. – 20 st
- Ch1. Hdc in 1st st and each st across. Turn. – 20 st.
- Ch1 hdc in 1st st. Hdc in 3rd lo of each st until 1 left. Hdc in last st. Turn. – 20 st
- (Ch4, tr) in 1st st (or standing tr, tr). Tr in each st until 1 left. 2tr in last st. Turn. – 22 st
- Ch1. Sc in 1st st and each st until 1 left. 2sc in last st. Turn. – 23 st
- Ch1. 2hdc in 1st st. Hdc in next st and each st across. Turn. – 24 st
- Ch1. Hdc in 1st st. Hdc in 3rd lo of each st until 1 left. 2hdc in last st. Turn. – 25 st
Repeat rows 16-19 until you have a total of 25 rows. Ch4. Bind off, leaving a 4” tail. Your final st count should be 33 st + ch4.
S
- – 14. Repeat rows 4-7. – 24 st
- Ch1. Hdc in 1st st. Hdc in 3rd lo of each st until 1 left. Hdc in last st. – 24 st
- (Ch4, tr) in 1st st (or standing tr, tr). Tr in each st across. Turn. – 25 st
- Ch1. Sc in 1st st and each st across. Turn. – 25 st.
- Ch1. Hdc in 1st st and each st across. Turn. – 25 st
- Ch1. Hdc in 1st st. Hdc in 3rd lo of each st until 1 left. Hdc in last st. Turn. – 25 st
- (Ch4, tr) in 1st st (or standing tr, tr). Tr in each st until 1 left. 2tr in last st. Turn. – 27 st
- Ch1. 2sc in 1st st. Sc in each st across. Turn. – 28 st
- Ch1. Hdc in 1st st and each st until 1 left. 2hdc in last st. Turn. – 29 st
- Ch1. 2hdc in 1st st. Hdc in 3rd lo of each st until 1 left. Hdc in last st. Turn. – 30 st
Repeat rows 20-23 until you have a total of 29 rows. Ch4. Bind off, leaving a 4” tail. Your final st count should be 38 st + ch4.
M
- – 16. Repeat rows 4-7. – 26 st
- Ch1. Sc in 1st st and each st across. Turn. – 26 st.
- Ch1. Hdc in 1st st and each st across. Turn. – 26 st
- Ch1. Hdc in 1st st. Hdc in 3rd lo of each st until 1 left. Hdc in last st. Turn. – 26 st
- (Ch4, tr) in 1st st (or standing tr, tr). Tr in each st across. Turn. – 27 st.
- Ch1. 2sc in 1st st. Sc in each st across. Turn. – 28 st
- Ch1. Hdc in 1st st and each st until 1 left. 2hdc in last st. Turn. – 29 st
- Ch1. 2hdc in 1st st. Hdc in 3rd lo of each st until 1 left. Hdc in last st. Turn. – 30 st
- (Ch4, tr) in 1st st (or standing tr, tr). Tr in each st until 1 left. 2tr in last st. Turn. – 32 st
Repeat rows 21-24 until you have a total of 31 rows. Ch4. Bind off, leaving a 4” tail. Your final st count should be 40 st + ch4.
L
- – 18. Repeat rows 4-7. – 30 st
- Ch1. 2hdc in 1st st. Hdc in 3rd lo of each st until 1 left. Hdc in last st. Turn. – 31 st
- (Ch4, tr) in 1st st (or standing tr, tr). Tr in each st until 1 left. 2tr in last st. Turn. – 33 st
- Ch1. 2sc in 1st st. Sc in each st across. Turn. – 34 st
- Ch1. Hdc in each st until 1 left. 2hdc in last st. Turn. – 35 st
Repeat rows 19-22 until you have a total of 31 rows. Ch4. Bind off, leaving a 4” tail. Your final st count should be 46 st + ch4.
XL
- – 18. Repeat rows 4-7. – 30 st
- Ch1. Hdc in 1st st. Hdc in 3rd lo of each st until 1 left. Hdc in last st. Turn. – 30 st
- (Ch4, tr) in 1st st (or standing tr, tr). Tr in each st until 1 left. 2tr in last st. Turn. – 32 st
- Ch1. 2sc in 1st st. Sc in each st across. Turn. – 33 st
- Ch1. Hdc in each st until 1 left. 2hdc in last st. Turn. – 34 st
- Ch1. 2hdc in 1st st. Hdc in 3rd lo of each st until 1 left. Hdc in last st. Turn. – 35 st
Repeat rows 20-23 until you have a total of 33 rows. Ch4. Bind off, leaving a 4” tail. Your final st count should be 48 st + ch4.
2X
- – 16. Repeat rows 4-7. – 30 st
- Ch1. 2sc in 1st st. Sc in each st until 1 left. 2sc in last st. Turn. – 32 st
- Ch1. 2hdc in 1st st. Hdc in each st until 1 left. 2hdc in last st. Turn. – 34 st
- Ch1. 2hdc in 1st st. Hdc in 3rd lo of each st until 1 left. Hdc in las st. Turn. – 35 st
- (Ch4, tr) in 1st st (or standing tr, tr). Tr in each st until 1 left. 2tr in last st. Turn. – 37 st
- Ch1. 2sc in 1st st. Sc in each st across. Turn. – 38 st
- Ch1. Hdc in 1st st and each st until 1 left. 2hdc in last st. Turn. – 39 st
Repeat rows 19-22 until you have a total of 33 rows. Ch4. Bind off, leaving a 4” tail. Your final st count should be 53 st + ch4.
3X
- – 16. Repeat rows 4-7. – 30 st
- Ch1. 2sc in 1st st. Sc in each st until 1 left. 2sc in last st. Turn. – 32 st
- Ch1. 2hdc in 1st st. Hdc in each st until 1 left. 2hdc in last st. Turn. – 34 st
- Ch1. 2hdc in 1st st. Hdc in 3rd lo of each st until 1 left. 2hdc in last st. Turn. – 36 st
- (Ch4, tr) in 1st st (or standing tr, tr). Tr in each st until 1 left. 2tr in last st. Turn. – 38 st
- Ch1. 2sc in 1st st. Sc in each st across. Turn. – 39 st
- Ch1. Hdc in 1st st and each st until 1 left. 2hdc in last st. Turn. – 40 st
- Ch1 2hdc in 1 st st. Hdc in 3rd lo of each st until 1 left. Hdc in last st. Turn. – 41 st
- (Ch4, tr) in 1st st (or standing tr, tr). Tr in each st until 1 left. 2tr in last st. Turn. – 43 st
Repeat rows 21-24 until you have a total of 35 rows. Ch4. Bind off, leaving a 4” tail. Your final st count should be 56 st + ch4.
4X
- – 13. Repeat rows 4-7. – 29 st
- Ch1. 2hdc in 1st st. Hdc in each st until 1 left. 2hdc in last st. Turn. – 31 st
- Ch1. 2hdc in 1st st. Hdc in 3rd lo of each st until 1 left. 2hdc in last st. Turn. – 33 st
- (Ch4, tr) in 1st st (or standing tr, tr). Tr in each st until 1 left. 2tr in last st. Turn. – 35 st
- Ch1. 2sc in 1st st. Sc in each st until 1 left. 2sc in last st. Turn. – 37 st
- – 20. Repeat rows 14-16. – 43 st
- Ch1. 2sc in 1st st. Sc in each st across. Turn. – 44 st
- Ch1. Hdc in 1st st and each st until 1 left. 2hdc in last st. Turn. – 45 st
- Ch1. 2hdc in 1st st. Hdc in 3rd lo of each st until 1 left. Hdc in last st. Turn. – 46 st
- (Ch4, tr) in 1st st (or standing tr, tr). Tr in each st until 1 left. 2tr in last st. Turn. – 48 st
Repeat rows 21-24 until you have a total of 35 rows. Ch4. Bind off, leaving a 4” tail. Your final st count should be 61 st + ch4.
5X
- – 15. Repeat rows 4-7. – 31 st
- (Ch4, tr) in 1st st (or standing tr, tr). Tr in each st until 1 left. 2tr in last st. Turn. – 33 st
- Ch1. 2sc in 1st st. Sc in each st until 1 left. 2sc in last st. Turn. – 35 st
- Ch1. 2hdc in 1st st. Hdc in each st until 1 left. 2hdc in last st. Turn. – 37 st
- Ch1. 2hdc in 1st st. Hdc in 3rd lo of each st until 1 left. 2hdc in last st. Turn. – 39 st
- – 22. Repeat rows 16-18. – 45 st
- Ch1. 2hdc in 1st st. Hdc in 3rd lo of each st until 1 left. Hdc in last st. Turn. – 46 st
- (Ch4, tr) in 1st st (or standing tr, tr). Tr in each st until 1 left. 2tr in last st. Turn. – 48 st
- Ch1. 2sc in 1st st. Sc in each st across. Turn. – 49 st
- Ch1. Hdc in 1st st and each st until 1 left. 2hdc in last st. Turn. – 50 st
Repeat rows 23-26 until you have a total of 37 rows. Ch4. Bind off, leaving a 4” tail. Your final st count should be 64 st + ch4. Your project should now look similar to Figure 3 below.

Free Crochet Top Pattern – Double Trouble Tank
Upper Front – Right Panel
Next, we will work on the Right Panel. Lay your project out with the WS facing you and the last row of the Upper Front at the top (as seen in Figure 3). We will join again at the bottom of the starting chain of the Upper Back. Begin by counting 11 (13, 13, 15, 15, 17, 17, 19, 19) chs from the left. Join your yarn in the last ch counted.
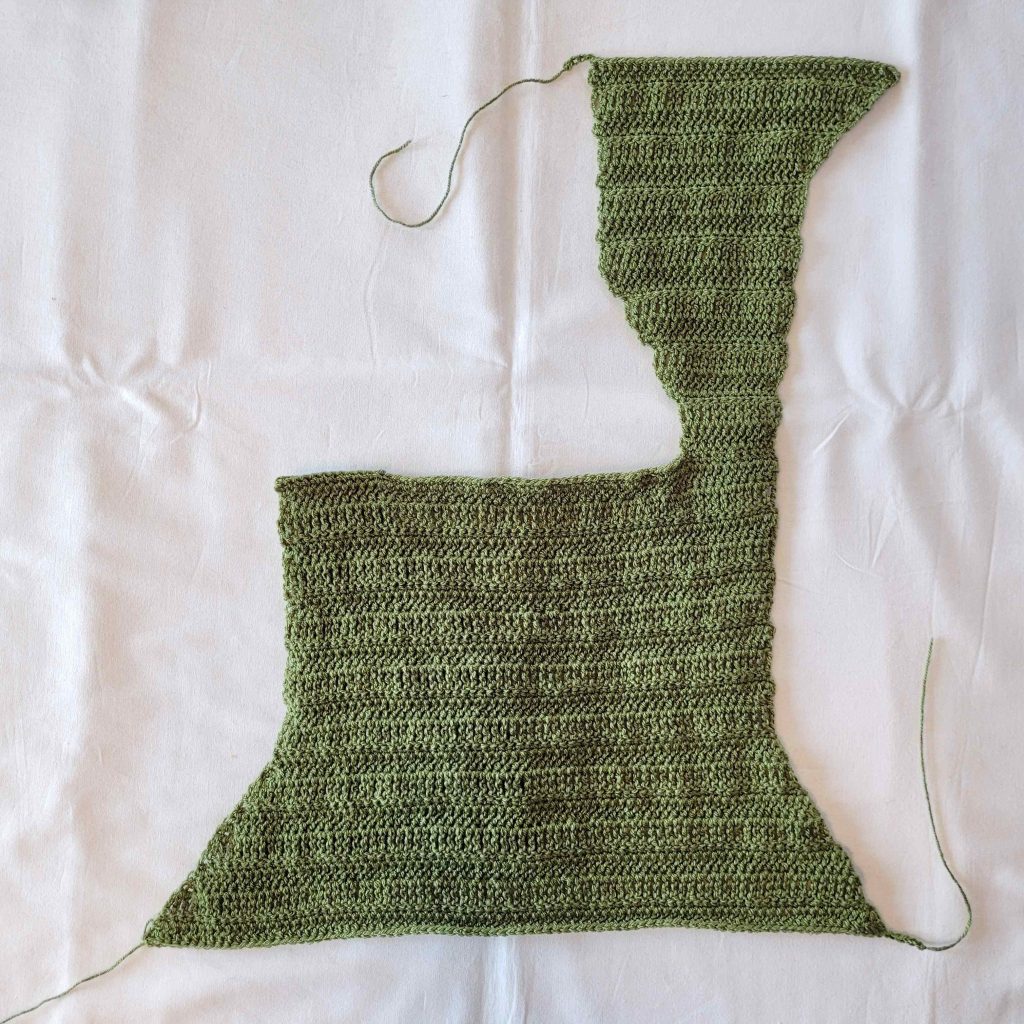
Figure 3
- (WS) Ch1. Sc in 1st 11 (13, 13, 15, 15, 17, 17, 19, 19) sts. Turn. – 11 (13, 13, 15, 15, 17, 17, 19, 19) st
- (RS) Ch1. Hdc in 1st st and each st across. Turn. – 11 (13, 13, 15, 15, 17, 17, 19, 19) st
- Ch1. Hdc in 1st st. Hdc in 3rd lo of each st until 1 left. Hdc in last st. Turn. – 11 (13, 13, 15, 15, 17, 17, 19, 19) st
- Ch4(or standing tr). Tr in each st until 1 left. 2tr in last st. Turn. – 12 (14, 14, 16, 16, 18, 18, 20, 20) st
- Ch1. 2sc in 1st st. Sc in next st and each across. Turn. – 13 (15, 15, 17, 17, 19, 19, 21, 21) st
- Ch1. Hdc in 1st st and each st until 1 left. 2hdc in last st. Turn. – 14 (16, 16, 18, 18, 20, 20, 22, 22) st
- Ch1. 2hdc in 1st st. Hdc in 3rd lo of each st until 1 left. Hdc in last st. Turn. – 15 (17, 17, 19, 19, 21, 21, 23, 23) st
Again, I have split up the instructions according to size. Only follow the set of instructions marked with your size. Then, scroll down to the next heading marked ‘Upper Front – Joining Rows’.
XS
- – 12. Repeat rows 4-7. – 20 st
- Ch1. Sc in 1st st and each st across. Turn. – 20 st
- Ch1. Hdc in 1st st and each st across. Turn. – 20 st.
- Ch1 hdc in 1st st. Hdc in 3rd lo of each st until 1 left. Hdc in last st. Turn. – 20 st
- (Ch4, tr) in 1st st (or standing tr, tr). Tr in each st until 1 left. 2tr in last st. Turn. – 22 st
- Ch1. 2Sc in 1st st. Sc in each st across. Turn. – 23 st
- Ch1. Hdc in 1st st and each st until 1 left. 2hdc in last st. Turn. – 24 st
- Ch1. 2Hdc in 1st st. Hdc in 3rd lo of each st until 1 left. Hdc in last st. Turn. – 25 st
Repeat rows 16-19 until you have a total of 25 rows. Do not bind off. Your final st count should be 33 st.
S
- – 14. Repeat rows 4-7. – 24 st
- Ch1. Hdc in 1st st. Hdc in 3rd lo of each st until 1 left. Hdc in last st. – 24 st
- Ch4 (or standing tr). Tr in each st until 1 left. 2tr in last st. Turn. – 25 st
- Ch1. Sc in 1st st and each st across. Turn. – 25st.
- Ch1. Hdc in 1st st and each st across. Turn. – 25 st
- Ch1. Hdc in 1st st. Hdc in 3rd lo of each st until 1 left. Hdc in last st. Turn. – 25 st
- (Ch4, tr) in 1st st (or standing tr, tr). Tr in each st until 1 left. 2tr in last st. Turn. – 27 st
- Ch1. Sc in 1st st and each st until 1 left. 2sc in last st. Turn. – 28 st
- Ch1. 2hdc in 1st st and each st across. Turn. – 29 st
- Ch1. Hdc in 1st st. Hdc in 3rd lo of each st until 1 left. 2hdc in last st. Turn. – 30 st
Repeat rows 20-23 until you have a total of 29 rows. Do not bind off. Your final st count should be 38 st.
M
- – 16. Repeat rows 4-7. – 26 st
- Ch1. Sc in 1st st and each st across. Turn. – 26 st.
- Ch1. Hdc in 1st st and each st across. Turn. – 26 st
- Ch1. Hdc in 1st st. Hdc in 3rd lo of each st until 1 left. Hdc in last st. Turn. – 26 st
- Ch4 (or standing tr). Tr in each st until 1 left. 2tr in last st. Turn. – 27 st.
- Ch1. Sc in 1st st. Sc in each st until 1 left. 2sc in last st. Turn. – 28 st
- Ch1. 2hdc in 1st st. Hdc in each st across. Turn. – 29 st
- Ch1. Hdc in 1st st. Hdc in 3rd lo of each st until 1 left. 2hdc in last st. Turn. – 30 st
- (Ch4, tr) in 1st st (or standing tr, tr). Tr in each st until 1 left. 2tr in last st. Turn. – 32 st
Repeat rows 21-24 until you have a total of 31 rows. Do not bind off. Your final st count should be 40 st.
L
- – 18. Repeat rows 4-7. – 30 st
- Ch1. Hdc in 1st st. Hdc in 3rd lo of each st until 1 left. 2hdc in last st. Turn. – 31 st
- (Ch4, tr) in 1st st (or standing tr, tr). Tr in each st until 1 left. 2tr in last st. Turn. – 33 st
- Ch1. Sc in 1st st and each st until 1 left. 2sc in last st. Turn. – 34 st
- Ch1. 2hdc in 1st st. Hdc in each st across. Turn. – 35 st
Repeat rows 19-22 until you have a total of 31 rows. Do not bind off. Your final st count should be 46 st.
XL
- – 18. Repeat rows 4-7. – 30 st
- Ch1. Hdc in 1st st. Hdc in 3rd lo of each st until 1 left. Hdc in last st. Turn. – 30 st
- (Ch4, tr) in 1st st (or standing tr, tr). Tr in each st until 1 left. 2tr in last st. Turn. – 32 st
- Ch1. Sc in 1st st and each st until 1 left. 2sc in last st. Turn. – 33 st
- Ch1. 2hdc in 1st st. Hdc each st across. Turn. – 34 st
- Ch1. Hdc in 1st st. Hdc in 3rd lo of each st until 1 left. 2hdc in last st. Turn. – 35 st
Repeat rows 20-23 until you have a total of 33 rows. Do not bind off. Your final st count should be 48 st.
2X
- – 16. Repeat rows 4-7. – 30 st
- Ch1. 2sc in 1st st. Sc in each st until 1 left. 2sc in last st. Turn. – 32 st
- Ch1. 2hdc in 1st st. Hdc in each st until 1 left. 2hdc in last st. Turn. – 34 st
- Ch1. Hdc in 1st st. Hdc in 3rd lo of each st until 1 left. 2hdc in last st. Turn. – 35 st
- (Ch4, tr) in 1st st (or standing tr, tr). Tr in each st until 1 left. 2tr in last st. Turn. – 37 st
- Ch1. Sc in 1st st and each st until 1 left. 2sc in last st. Turn. – 38 st
- Ch1. 2hdc in 1st st. Hdc in each st across. Turn. – 39 st
Repeat rows 19-22 until you have a total of 33 rows. Do not bind off. Your final st count should be 53 st.
3X
- – 16. Repeat rows 4-7. – 30 st
- Ch1. 2sc in 1st st. Sc in each st until 1 left. 2sc in last st. Turn. – 32 st
- Ch1. 2hdc in 1st st. Hdc in each st until 1 left. 2hdc in last st. Turn. – 34 st
- Ch1. 2hdc in 1st st. Hdc in 3rd lo of each st until 1 left. 2hdc in last st. Turn. – 36 st
- (Ch4, tr) in 1st st (or standing tr, tr). Tr in each st until 1 left. 2tr in last st. Turn. – 38 st
- Ch1. Sc in 1st st and each st until 1 left. 2sc in last st. Turn. – 39 st
- Ch1. 2hdc in 1st st. Hdc in each st across. Turn. – 40 st
- Ch1 Hdc in 1 st st. Hdc in 3rd lo of each st until 1 left. 2hdc in last st. Turn. – 41 st
- (Ch4, tr) in 1st st (or standing tr, tr). Tr in each st until 1 left. 2tr in last st. Turn. – 43 st
Repeat rows 21-24 until you have a total of 35 rows. Do not bind off. Your final st count should be 56 st.
4X
- – 13. Repeat rows 4-7. – 29 st
- Ch1. 2hdc in 1st st. Hdc in each st until 1 left. 2hdc in last st. Turn. – 31 st
- Ch1. 2hdc in 1st st. Hdc in 3rd lo of each st until 1 left. 2hdc in last st. Turn. – 33 st
- (Ch4, tr) in 1st st (or standing tr, tr). Tr in each st until 1 left. 2tr in last st. Turn. – 35 st
- Ch1. 2sc in 1st st. Sc in each st until 1 left. 2sc in last st. Turn. – 37 st
- – 20. Repeat rows 14-16. – 43 st
- Ch1. Sc in 1st st and each st until 1 left. 2sc in last st. Turn. – 44 st
- Ch1. 2hdc in 1st st. Hdc in each st across. Turn. – 45 st
- Ch1. Hdc in 1st st. Hdc in 3rd lo of each st until 1 left. 2hdc in last st. Turn. – 46 st
- (Ch4, tr) in 1st st (or standing tr, tr). Tr in each st until 1 left. 2tr in last st. Turn. – 48 st
Repeat rows 21-24 until you have a total of 35 rows. Do not bind off. Your final st count should be 61 st.
5X
- – 15. Repeat rows 4-7. – 31 st
- (Ch4, tr) in 1st st (or standing tr, tr). Tr in each st until 1 left. 2tr in last st. Turn. – 33 st
- Ch1. 2sc in 1st st. Sc in each st until 1 left. 2sc in last st. Turn. – 35 st
- Ch1. 2hdc in 1st st. Hdc in each st until 1 left. 2hdc in last st. Turn. – 37 st
- Ch1. 2hdc in 1st st. Hdc in 3rd lo of each st until 1 left. 2hdc in last st. Turn. – 39 st
- – 22. Repeat rows 16-18. – 45 st
- Ch1. Hdc in 1st st. Hdc in 3rd lo of each st until 1 left. 2hdc in last st. Turn. – 46 st
- (Ch4, tr) in 1st st (or standing tr, tr). Tr in each st until 1 left. 2tr in last st. Turn. – 48 st
- Ch1. Sc in 1st st and each st until 1 left. 2sc in last st. Turn. – 49 st
- Ch1. 2hdc in 1st st. Hdc in each st across. Turn. – 50 st
Repeat rows 23-26 until you have a total of 37 rows. Do not bind off. Your final st count should be 64 st.

Free Crochet Top Pattern – Double Trouble Tank
Upper Front – Joining Rows
Your project should now look similar to Figure 4 below. Making sure you don’t twist it, join the end of the ch4 on your Left Panel to the 1st st of the last row of your Right Panel (as seen in Figures 5 & 6). I just run the end of the yarn through the stitch and make a knot.
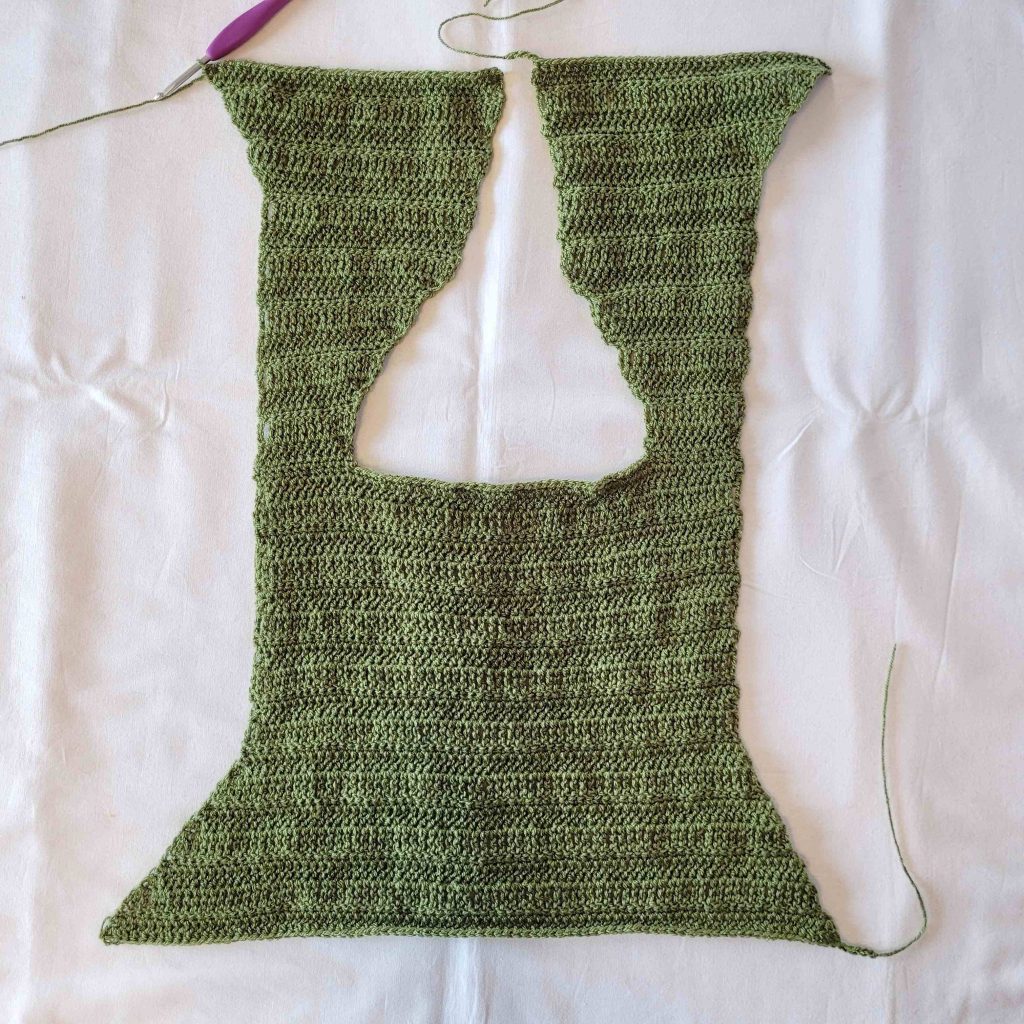
Figure 4
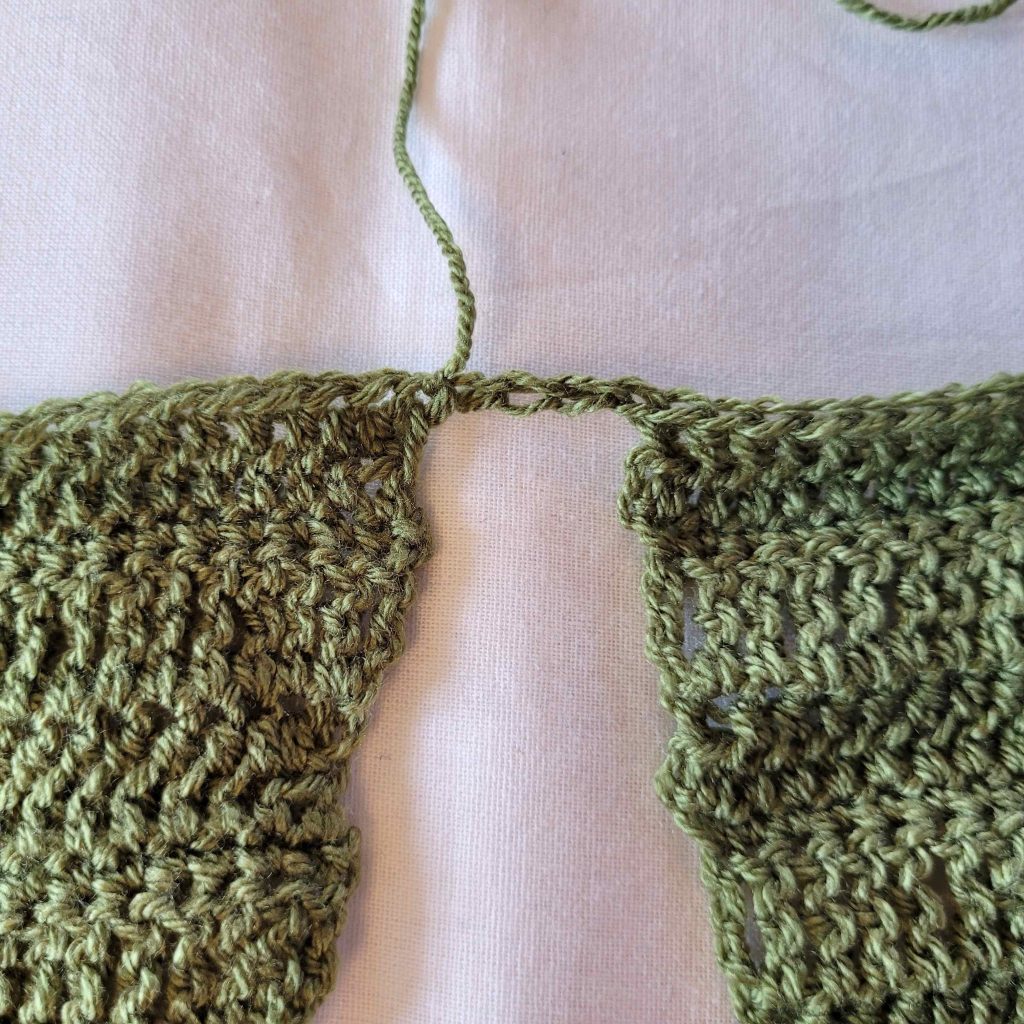
Figure 5
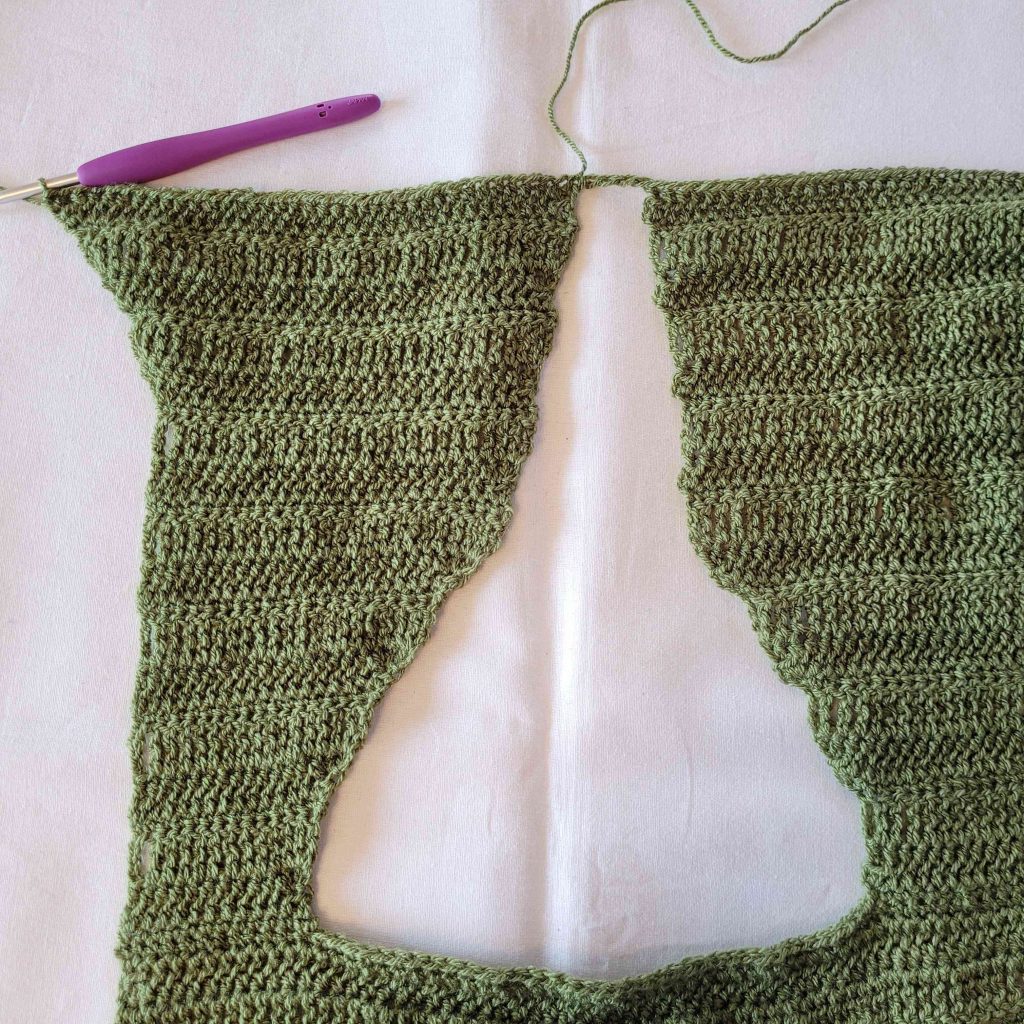
Figure 6
We will now work a number of increase rows to complete the Upper Front. Begin with row 2 (2, 4, 4, 2, 2, 4, 2, 2), and work only 2 (2, 4, 4, 6, 6, 8, 8, 10) rows. (When you finish row 4, you will repeat rows 1-4 until you have worked the proper amount of rows.)
- Ch1. 2sc in 1st st. Sc in each st until 1 left. 2sc in last st. Turn.
- Ch1. 2hdc in 1st st. Hdc in each st until 1 left. 2hdc in last st. Turn.
- Ch1. 2hdc in 1st st. Hdc in 3rd lo of each st until 1 left. 2hdc in last st. Turn.
- (Ch4, tr) in 1st st (or standing tr, tr). Tr in each st until 1 left. 2tr in last st. Turn.
When you have finished your last row, ch 2 (4, 6, 6, 8, 10, 10, 12, 12). Do not bind off. Your final stitch count should be 74 (84, 92, 104, 112, 122, 132, 142, 152) st + Ch 2 (4, 6, 6, 8, 10, 10, 12, 12). Your project will look similar to Figure 7 below.
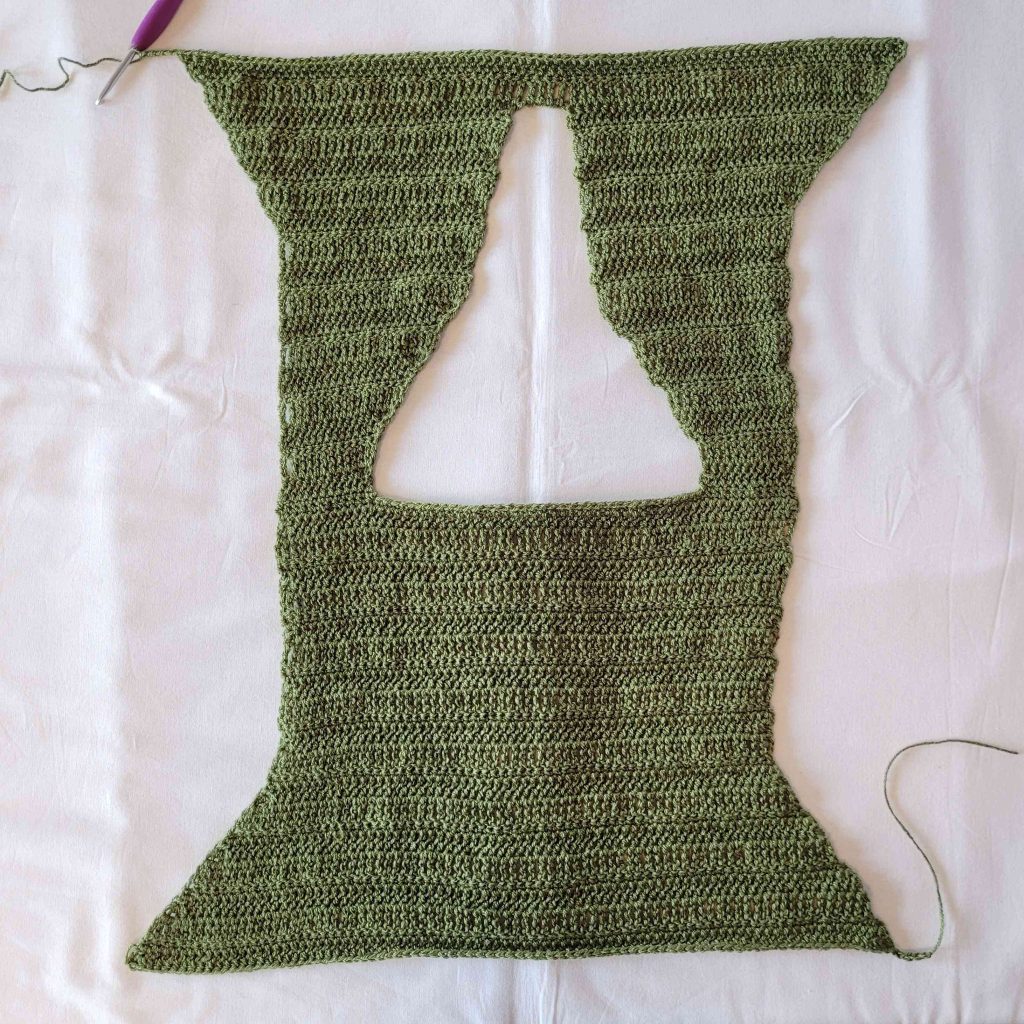
Figure 7
Lower Body
We will soon work the lower body, but first we must join the bottom edges of the front and back panels. With the wrong sides facing each other, fold your project in half like in Figure 8. Join the end of the chain from the upper back to the 1st st of the last row of the upper front (as seen in Figure 9). Make sure your chain isn’t twisted as you do so. Then, slip stitch into the 1st st of the last row of the upper back (as seen in Figure 10). Turn.

Figure 8
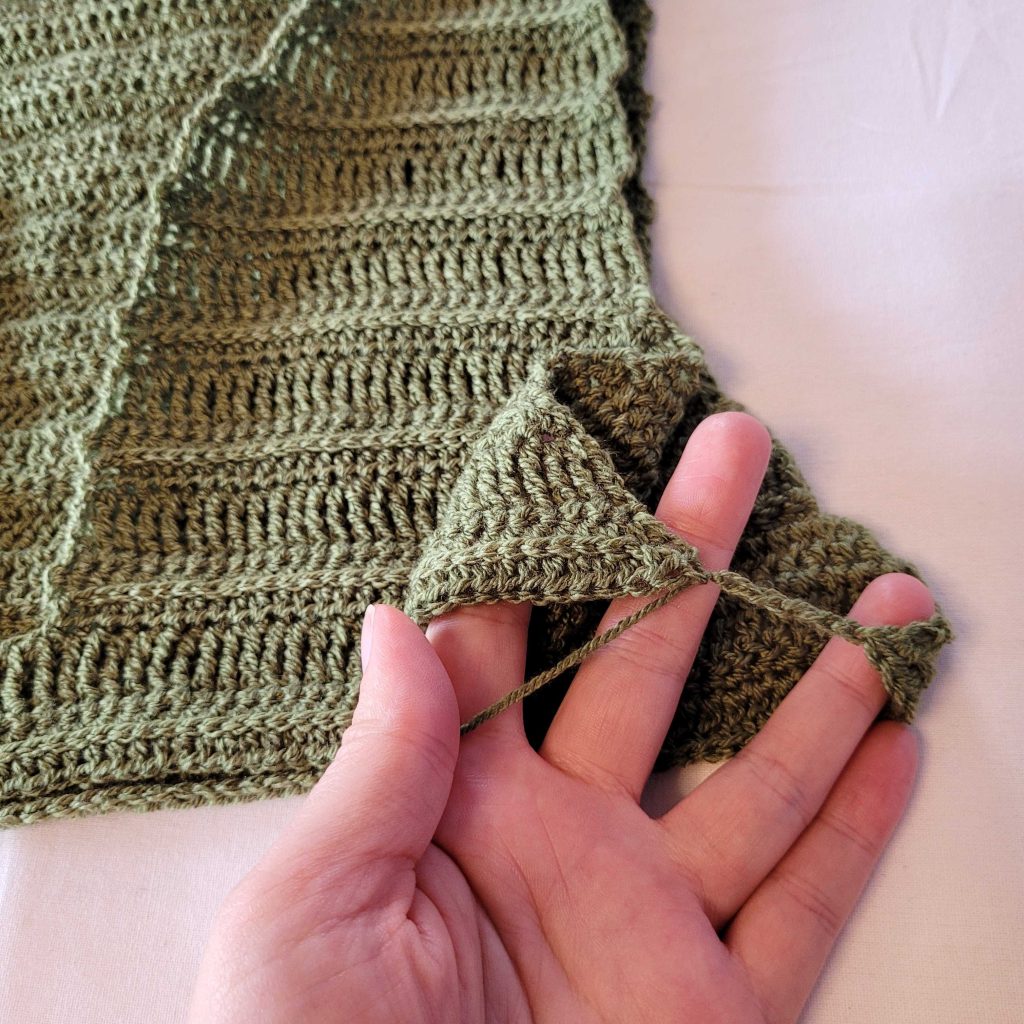
Figure 9

Figure 10
We will now work the lower body in the round, turning at the end of each round. Begin with the round number that comes after the row you finished with for the upper front. For example, if you finished the upper front with a repeat of row 2, you will begin with round 3 below. If you finished with a repeat of row 4, you will begin with round 1 below. Your first round will be worked into the stitches and underarm chains. Each ch counts as a st.
- (WS) Ch1. Sc in 1st st and each st around. Ss to join to 1st st. Turn. – 152 (176, 196, 220, 240, 264, 284, 308, 328) st
- (RS) Ch1. Hdc in 1st st and each st around. Ss to join to 1st st. Turn. – 152 (176, 196, 220, 240, 264, 284, 308, 328) st
- Ch1. Working in 3rd lo: Hdc in 1st st and each st around. Ss to join to 1st st. Turn. – 152 (176, 196, 220, 240, 264, 284, 308, 328) st
- Ch4 (or standing tr). Tr in each st around. Ss to join to 1st st. Turn. – 152 (176, 196, 220, 240, 264, 284, 308, 328) st
Repeat rounds 1-4 until you have achieved your desired length. If you would like to shape your top at the waist, then work the above rounds until your top is just long enough to cover your bust and then proceed to the Waist Shaping rounds below.
If you do not want to add waist shaping, then work until your top is the total desired length minus ½”. Then, skip the Waist Shaping rounds and proceed to the Bottom Edging rounds below. Be sure to end on an odd numbered round.

Free Crochet Top Pattern – Double Trouble Tank
Waist Shaping
If you would like to add waist shaping, you will need to add a number of decrease rounds followed by a number of increase rounds.
Begin by placing a stitch marker on either side of your project. You will want your stitch markers to be in the current working round at the center of each underarm or as close to the center as you can get. This is where we will put the decreases and increases.
Decrease Rounds
The rounds below are numbered to coincide with the lower body rounds. Begin with the round that comes after the last round you worked for the lower body section above. For example, if your last round was a repeat of round 1, begin with round 2 below. If your last round was a repeat of round 4, begin with round 1 below. Each round will decrease your stitch count by 2 sts.
- (WS) Ch1. Sc in 1st st and each st until you reach the 1st st marker. Sc2tog. Move st marker up to st you just worked. Sc in each st until you reach the 2nd st marker. Sc2tog. Move st marker up to st you just worked. Sc in each remaining st. Ss to join to 1st st. Turn.
- (RS) Ch1. Hdc in 1st st and each st until you reach the 1st st marker. Hdc2tog. Move st marker up to st you just worked. Hdc in each st until you reach the 2nd st marker. Hdc2tog. Move st marker up to st you just worked. Hdc in each remaining st. Ss to join to 1st st. Turn.
- Ch1. Working in 3rd lo: Hdc in 1st st and each st until you reach the 1st st marker. Hdc2tog. Move st marker up to st you just worked. Hdc in each st until you reach the 2nd st marker. Hdc2tog. Move st marker up to st you just worked. Hdc in each remaining st. Ss to join to 1st st. Turn.
- Ch4 (or standing tr). Tr in each st until you reach the 1st st marker. Tr2tog. Move st marker up to st you just worked. Tr in each st until you reach the 2nd st marker. Tr2tog. Move st marker up to st you just worked. Tr in each remaining st. Ss to join to 1st st. Turn.
Repeat rounds 1-4 until you have achieved the desired waist measurement. Each 4 rounds will decrease the body circumference by approximately 1 ½”.
Once you have worked the appropriate amount of decrease rounds, you can work a few even rounds (as you did in the Lower Body rounds above) before proceeding to the Increase Rounds below. Be sure to carry your stitch marker into these rounds as you will be using it again in the increase rounds.
Increase Rounds
The rounds below are numbered to coincide with the lower body rounds. Begin with the round that comes after the last round you worked for the lower body section above. Each round will increase your stitch count by 2 sts.
- (WS) Ch1. Sc in 1st st and each st until you reach the 1st st marker. 2sc. Move st marker up to st you just worked. Sc in each st until you reach the 2nd st marker. 2sc. Move st marker up to st you just worked. Sc in each remaining st. Ss to join to 1st st. Turn.
- (RS) Ch1. Hdc in 1st st and each st until you reach the 1st st marker. 2hdc. Move st marker up to st you just worked. Hdc in each st until you reach the 2nd st marker. 2hdc. Move st marker up to st you just worked. Hdc in each remaining st. Ss to join to 1st st. Turn.
- Ch1. Working in 3rd lo: Hdc in 1st st and each st until you reach the 1st st marker. 2hdc. Move st marker up to st you just worked. Hdc in each st until you reach the 2nd st marker. 2hdc. Move st marker up to st you just worked. Hdc in each remaining st. Ss to join to 1st st. Turn.
- Ch4 (or standing tr). Tr in each st until you reach the 1st st marker. 2tr. Move st marker up to st you just worked. Tr in each st until you reach the 2nd st marker. 2tr. Move st marker up to st you just worked. Tr in each remaining st. Ss to join to 1st st. Turn.
Repeat rounds 1-4 until you have worked the same amount of increase rounds as you did decrease rounds or until you have achieved the desired hip measurement. Each 4 rounds will increase the body circumference by approximately 1 ½”. Be sure to end on an odd numbered round.
Once you have worked the appropriate amount of increase rounds, you can work a few even rounds (as you did in the Lower Body rounds above) before proceeding to the Bottom Edging below.
Bottom Edging
Begin with the right side of your work facing you.
- Ch1. Sc in 1st st and each st around. Ss to join to 1st st. Turn.
- – 5. Repeat round 1.
Bind off.
Arm Edging
Begin with the right side of your project facing you. Join in any st at the bottom of the arm hole.
- Ch1. Sc around the opening of the arm hole as follows:
– Place 1sc in each st at the bottom of the arm hole.
– Place 1sc in the side of each sc row.
– Place 1sc in the side of the 1st hdc row.
– Place 2sc in the side of the 2nd hdc row.
– Place 3sc in the side of each tr row.
– Once you have worked around the entire arm hole, ss to join to the 1st st. Turn. - Ch1. Sc in 1st st and each st around. Turn.
- – 5. Repeat round 2.
Bind off. Repeat for other armhole.

Free Crochet Top Pattern – Double Trouble Tank
Neck Edging
Begin with the right side facing you. Join your yarn in the bottom of the last row of the upper front right panel (which will appear on your left as seen in Figure 11 below).

Figure 11
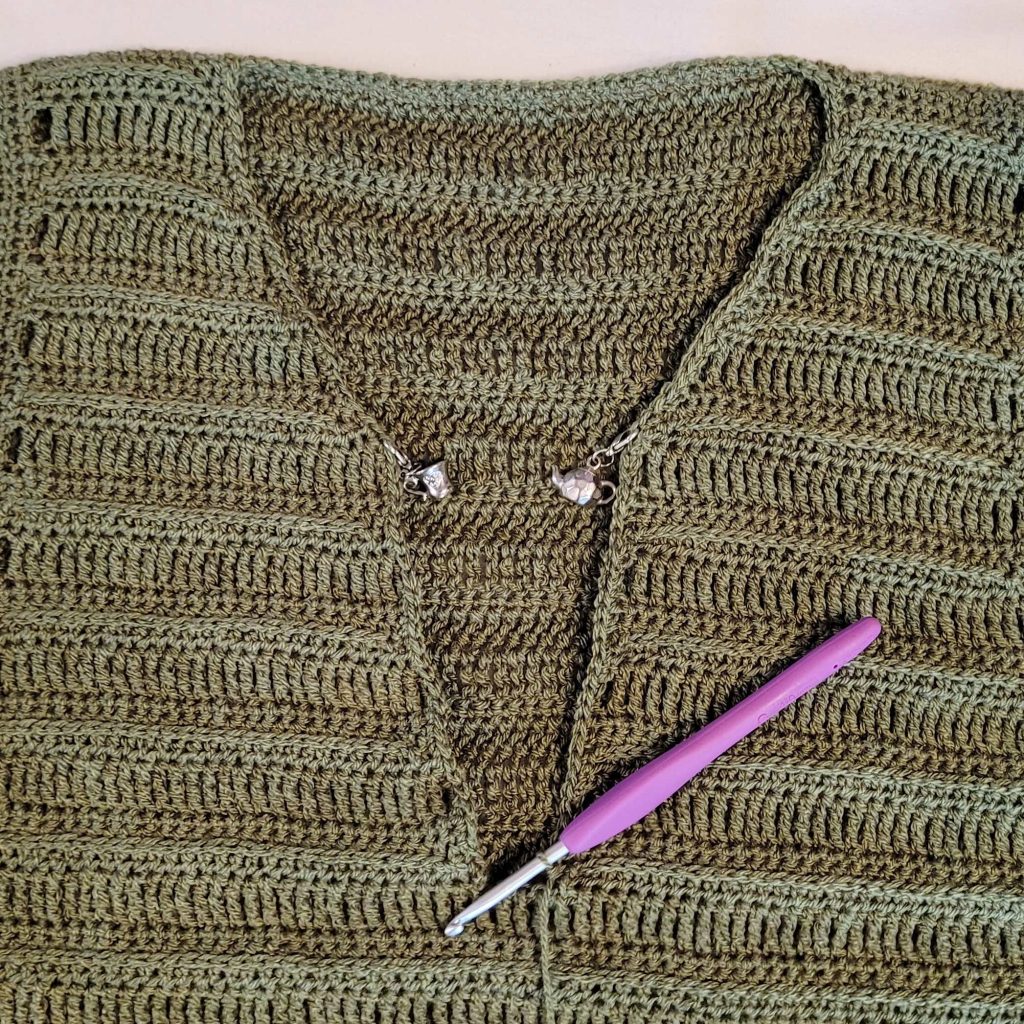
Figure 12
- Ch1. Sc around the neck opening as follows (please read the next 4 lines, then proceed as instructed in the lines below):
– Place 1sc in the side of each sc row.
– Place 1sc in the side of the 1st hdc row.
– Place 2sc in the side of the 2nd hdc row.
– Place 3sc in the side of each tr row.
– Work in this manner for the 1st 13 (15, 15, 13, 15, 15, 15, 15, 15) rows.
– Ch1. Place a stitch marker in the ch1 sp.
– Work in this manner for the last 12 (14, 16, 18, 18, 18, 20, 20, 22) rows.
– Place 1sc in the bottom of each ch along the back of the neck.
– Work in the above manner for the next 12 (14, 16, 18, 18, 18, 20, 20, 22) rows.
– Ch1. Place a stitch marker in the ch1 sp.
– Work in the above manner for the last 13 (15, 15, 13, 15, 15, 15, 15, 15) rows.
– Leave the remaining ch sts unworked. Turn.
Your project should now look similar to Figure 12 above.
- Ch1. Sc in 1st st and each st until you reach the st marker. Sc in ch1 sp. Ch1. Move st marker to ch1 sp just made. Sc in each st until you reach the next st marker. Ch1. Sc in ch1 sp. Move st marker to ch1 sp just made. Sc in each st across. Turn.
- – 5. Repeat round 2.
Bind off, leaving a few inches of a tail for sewing. Your project should now look similar to Figure 13 below with the ends of the neck edging free. Use the yarn tail to sew the ends of the neck edging to the bottoms of the 4 ch sts at the bottom of the neck opening (see Figure 14).

Figure 13
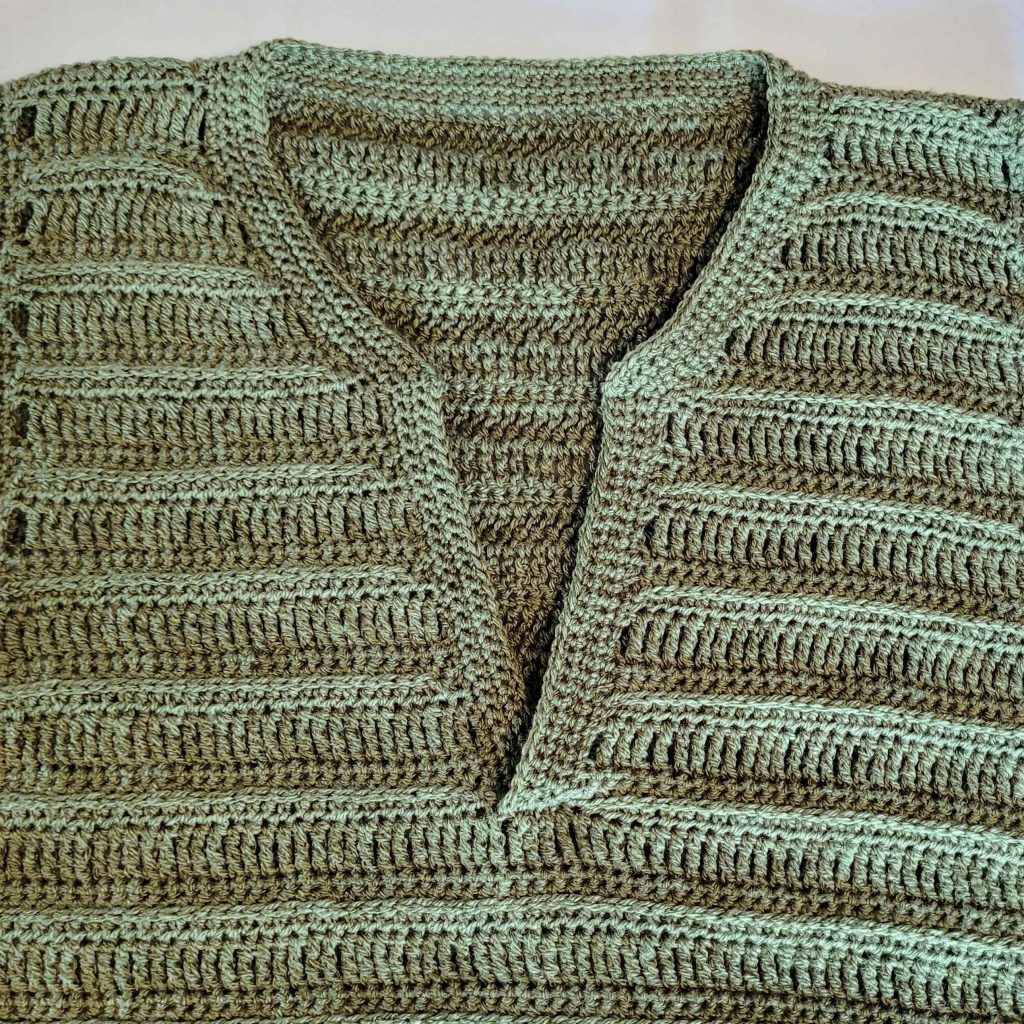
Figure 14
Weave in your ends, and you’re done!
I hope you love your new crochet top, and I look forward to seeing all of your beautiful pictures on Ravelry!
If you’d like to know when I post new patterns and tutorials like the Free Crochet Top Pattern – Double Trouble Tank, head on over to my Facebook and Instagram and give me a like and a follow!
If you enjoyed The Free Crochet Top Pattern – Double Trouble Tank, you may want to check out my other designs!

Free Crochet Top Pattern – Double Trouble Tank
And until next time… Happy Hooking! 😉
Love it. Thank you
You’re very welcome! 🙂
Hi. I love this tank but it was too distracting to follow on my iPhone! Is there an alternative way to access this pattern? I hope so. Thx & looking forward to your response.
Hello Michele!
Yes, this pattern is available in pdf form (for a small fee) in my Ravelry store. You can find it here: https://www.ravelry.com/patterns/library/double-trouble-tank
Hope that helps!
Looks so beautiful. But I have trouble reading patterns, do you have a video for this?
Sorry, I don’t have a video for this pattern yet, but it is on the list for future videos! 🙂