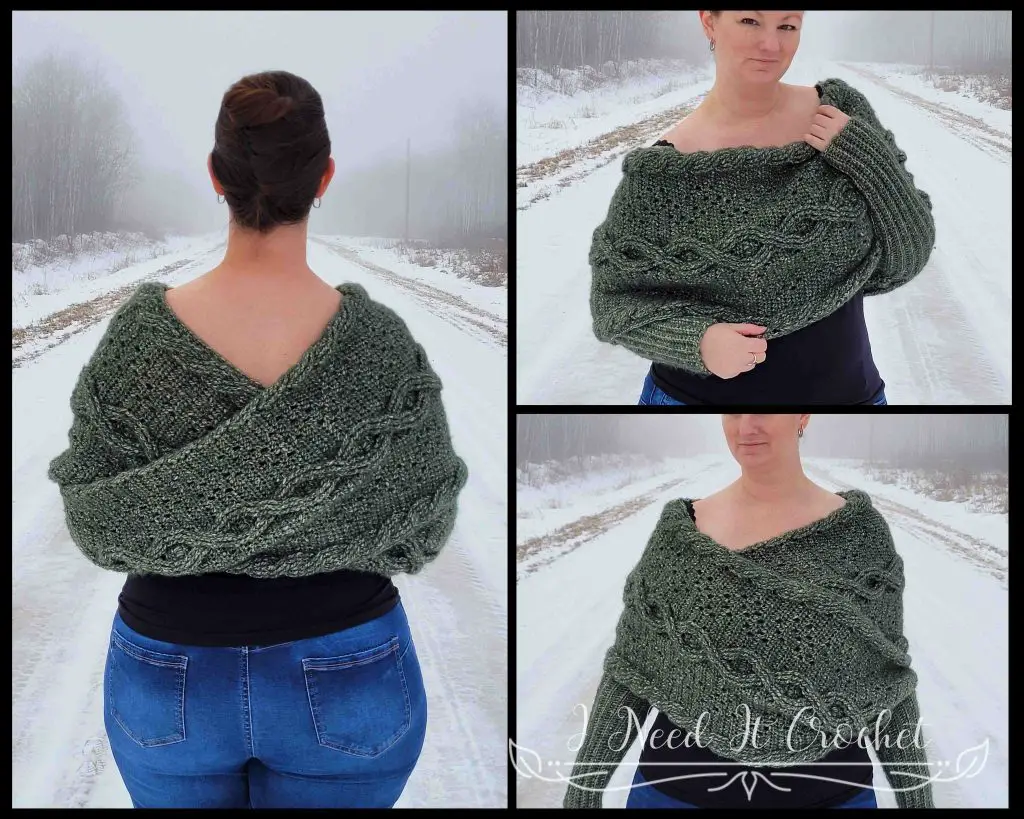
Crochet Scarf With Sleeves – Morgaine Sweater Scarf Free Crochet Pattern
The Scarf With Sleeves – Morgaine Sweater Scarf Free Crochet Pattern is copyrighted by I Need It Crochet. You may not copy, share, change, or sell the pattern itself. Also, you may not claim this pattern as your own. All pictures contained in this pattern fall under the copyright and may not be used.
Finished items made from the Scarf With Sleeves – Morgaine Sweater Scarf Free Crochet Pattern belong to you, and you may do what you wish with them. If you choose to sell them on Etsy, I would very much appreciate it if you credited me as the pattern designer.
Where Can I Buy The Pdf?
The entire pattern is available to view for free on this page (you just have to scroll down to see it). But if you would prefer to have a printable pdf copy of the pattern, you can purchase it for a small fee from my Ravelry and Etsy stores. Just click the graphics below.
This pattern is 9 pages long and contains 33 pictures to help you along the way. a printable pdf will be easier to follow, and you can make notes on it as you go. I find it to be the easier option. But if you like to use the online version, it is here 24/7 for you to view. Enjoy!


Crochet Scarf With Sleeves – Morgaine Sweater Scarf Free Crochet Pattern
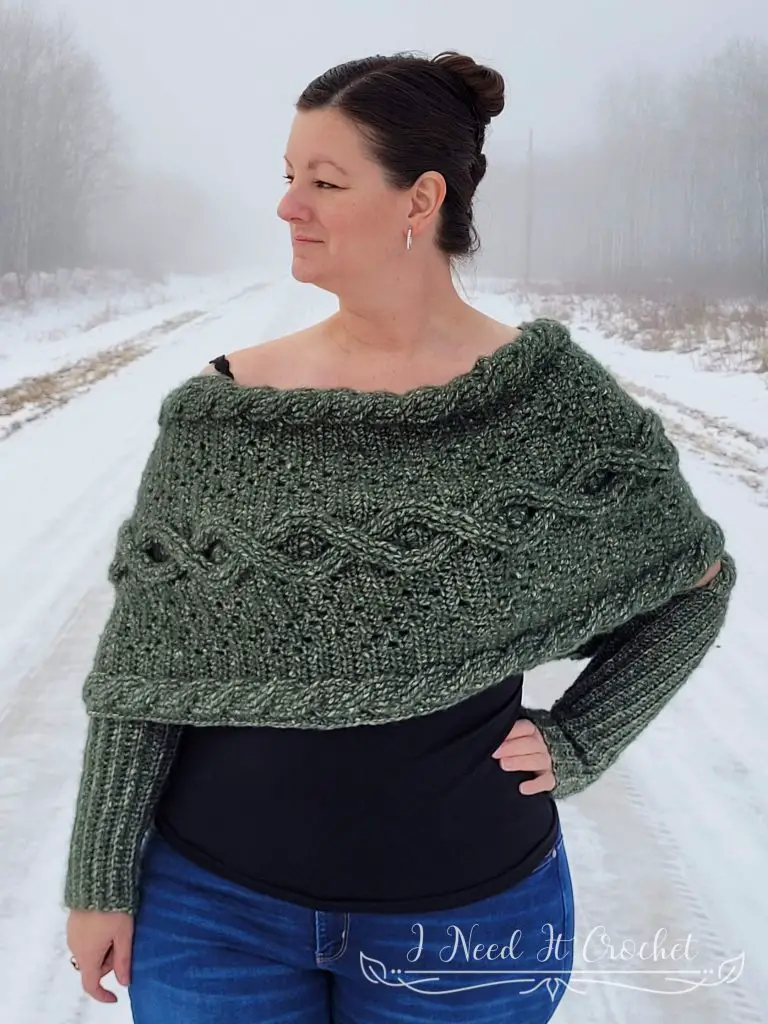
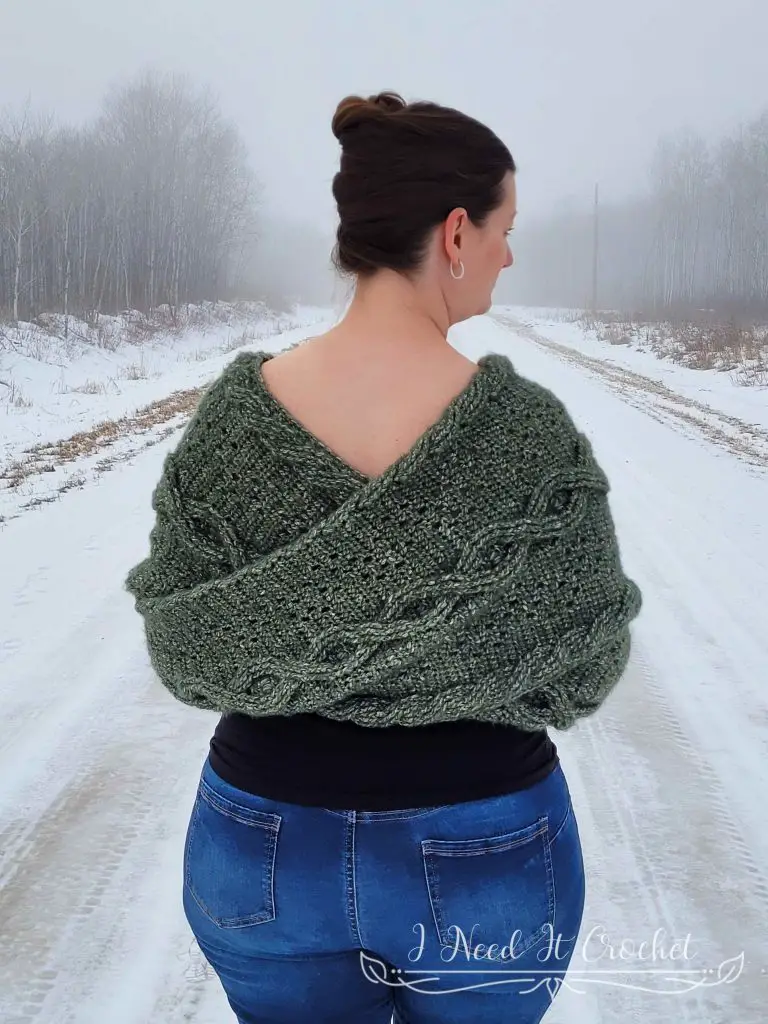
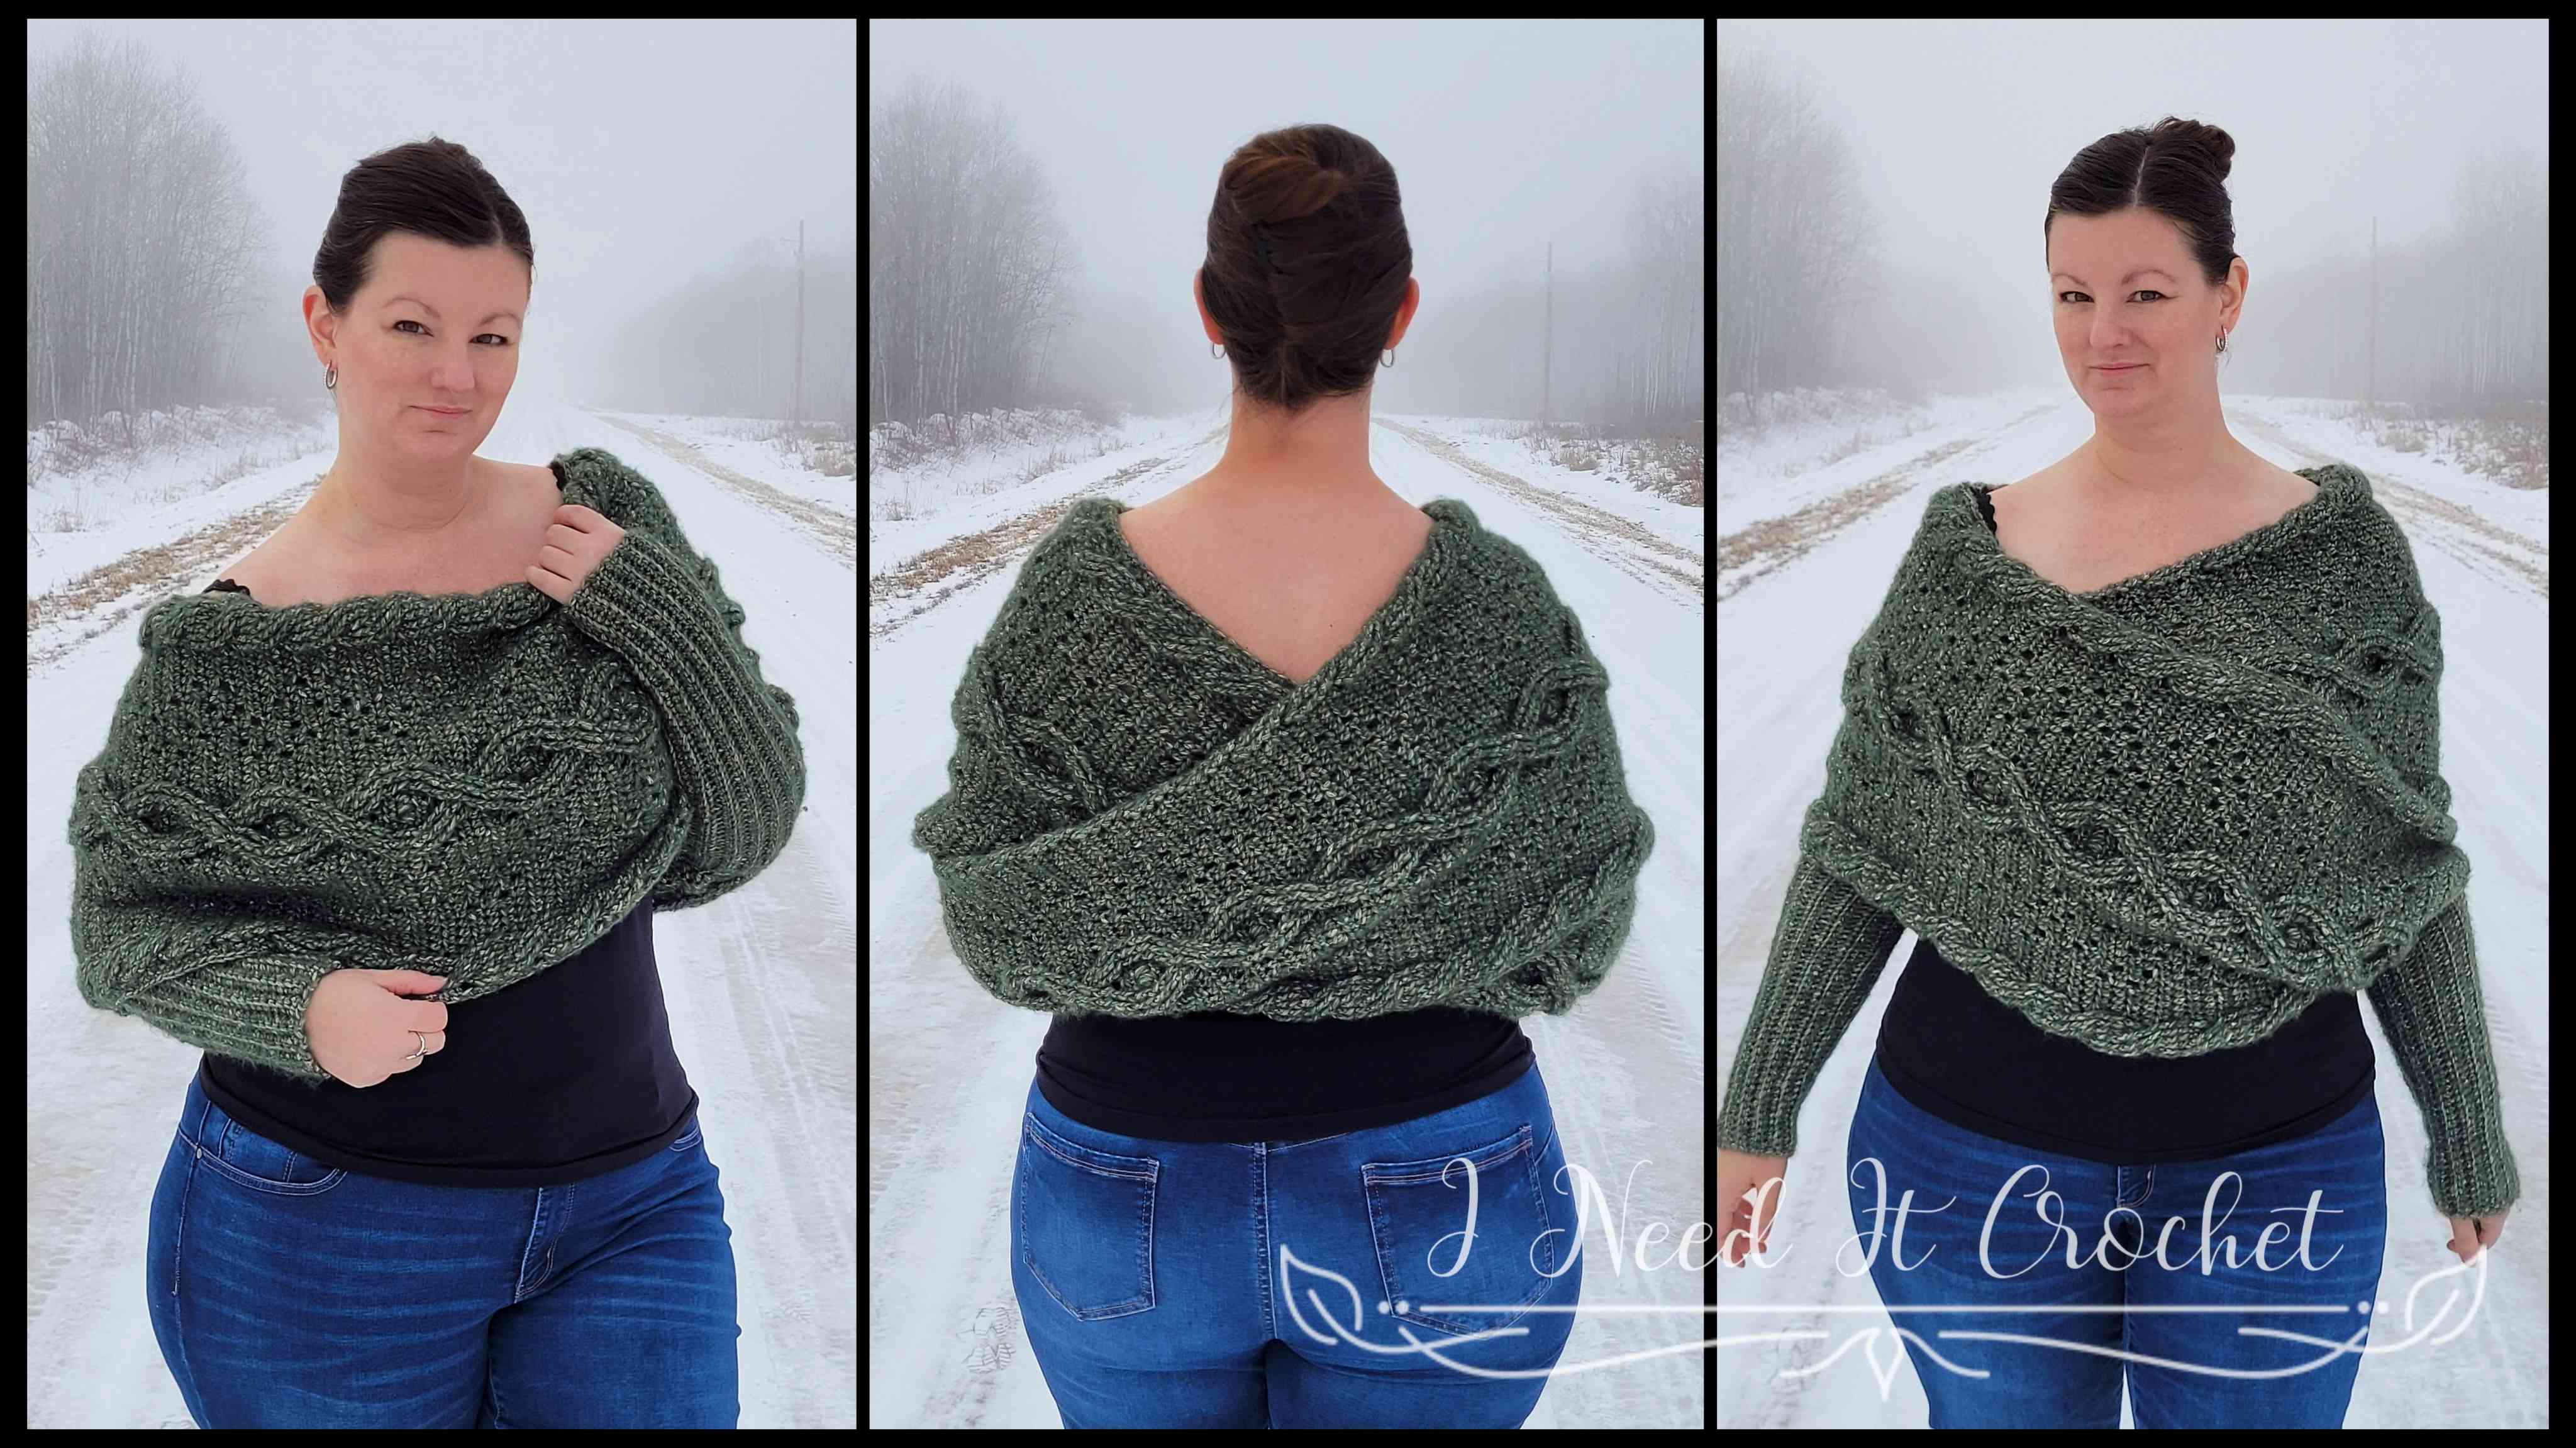
There’s something magical about a sweater scarf with sleeves. You take a long, wide scarf, add a sleeve to each end, and poof! It turns into something different.
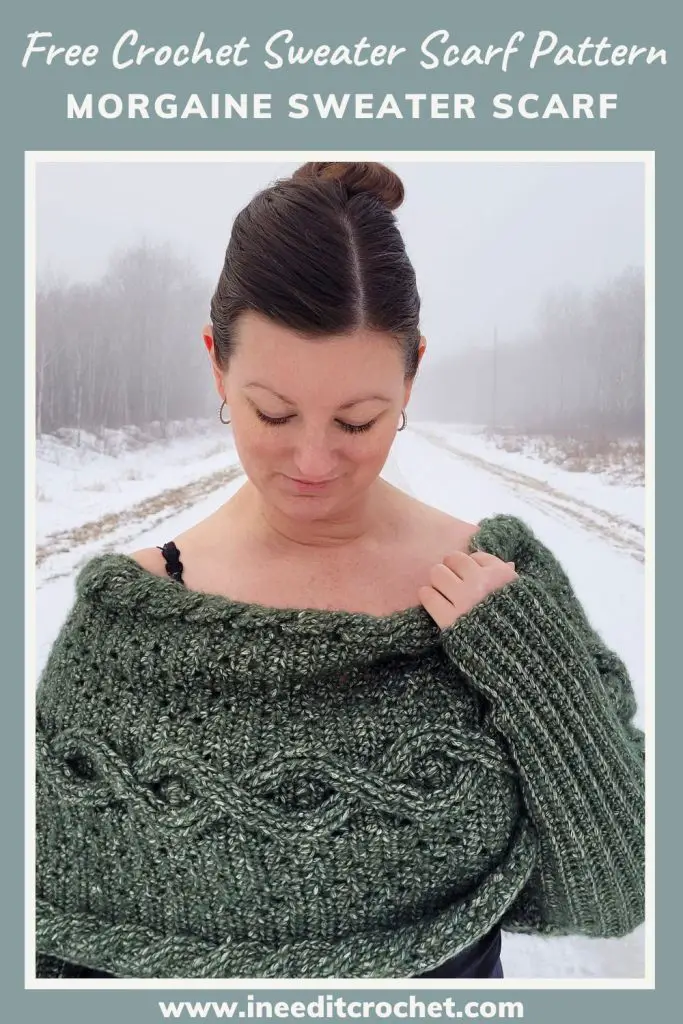
For this design, I chose a chunky twisted cable pattern running down the center, bordered with a wispy filet pattern and twisted rope cables. This idea took a while to dream up, and I got to try my hand at sketching the pattern before even attempting to crochet it. The result was even better than I imagined.
Want to Pin it for later?
Click the image below and save the pin to your favourite crochet pattern boards!
Crochet Scarf With Sleeves – Morgaine Sweater Scarf Free Crochet Pattern
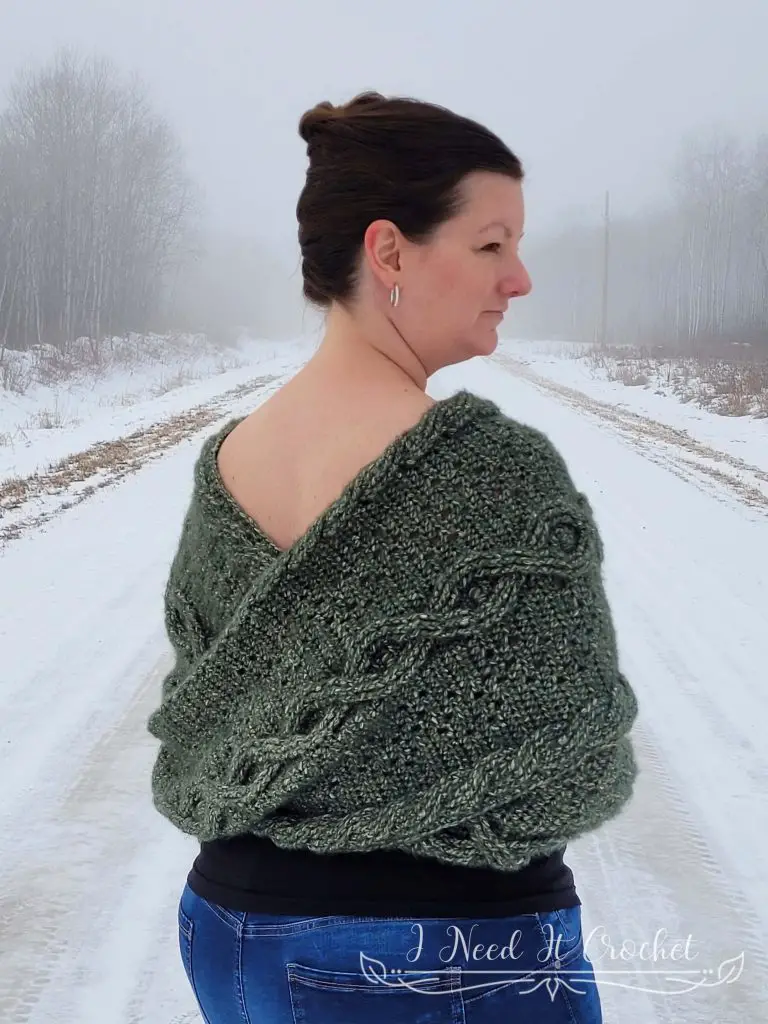
Scarf With Sleeves – Morgaine Sweater Scarf Free Crochet Pattern
Finished Sizes:
Instructions given to fit size X-small; changes for small, medium, large, X-large, 2X-large, 3X-large, 4X-large and 5X-large are in ()
XS (S, M, L, XL, 2XL, 3XL, 4XL, 5XL)
To Fit Bust Circumference: 28” (32”, 36”, 40”, 44”, 48”, 52”, 56”, 60”)
Sleeve Length: 14 ½”
Main Body Length: 51” (54 ½”, 61 ½”, 65”, 72”, 75 ½”, 82 ½”, 86”, 93”)
Total Length: 80” (83 ½”, 90 ½”, 94”, 101”,
104 ½”, 111 ½”, 115”, 122”)
Width: 15” (15”, 15”, 16”, 16”, 16”, 17”, 17”, 17”)
Materials:
I used Loops & Threads Heathered Tweed. It is a 66% Polyester, 30% Acrylic, 4% Wool #3 Dk weight yarn (please read the Notes section below).
Any yarn of similar weight would work.
Approximately 1100 (1200, 1300, 1400, 1500, 1600, 1700, 1800, 1900) yds.
6mm Hook
Stitch Markers
Yarn Needle
Scissors
Measuring Tape
Abbreviations:
RS = Right Side
WS = Wrong Side
Sk = Skip
St = Stitch
Ss = Slip Stitch
Ch = Chain
Sc = Single Crochet
Hdc = Half Double Crochet
Dc = Double Crochet
Tr = Treble Crochet
Fptr = Front Post Treble Crochet
Fpdc = Front Post Double Crochet
Bpdc = Back Post Double Crochet
Blo = Back Loop Only
Gauge:
13 hdc x 10 rows = 4”x 4”
Notes:
Ch1 at the beginning of a row is never considered a stitch.
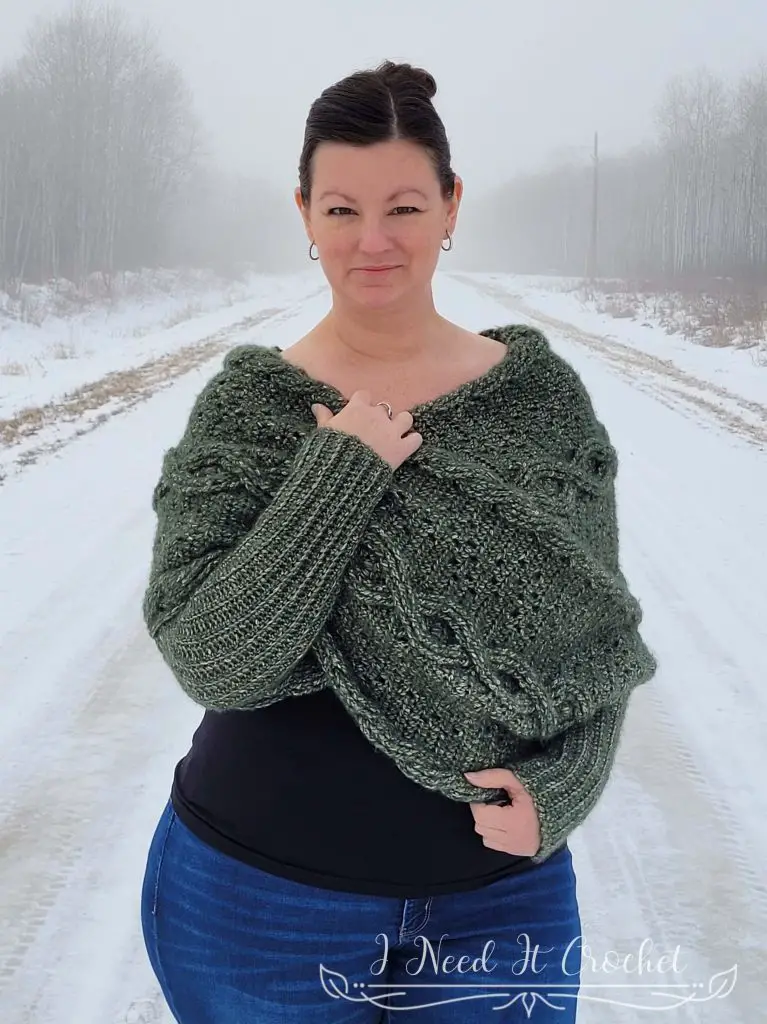
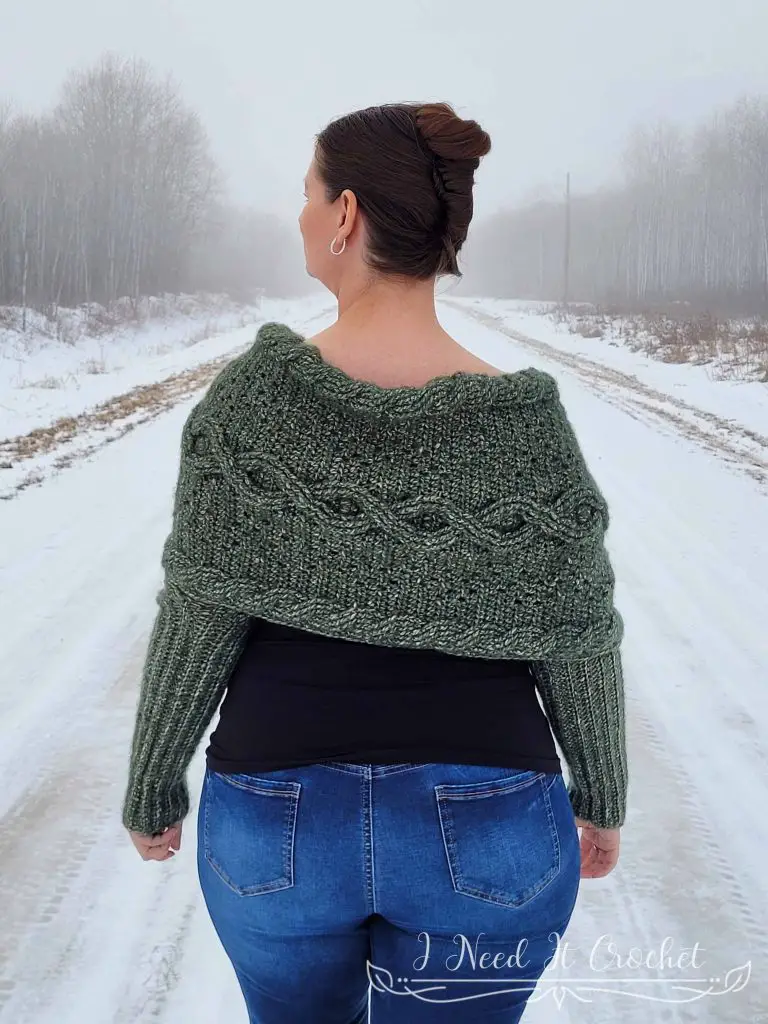
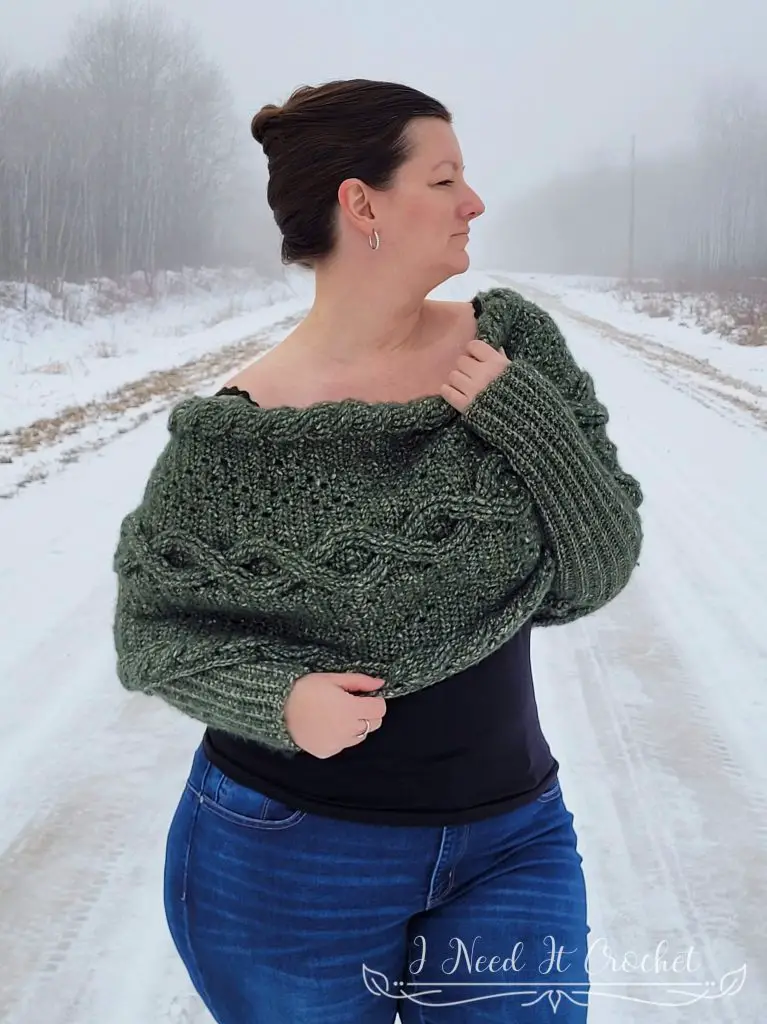
The model above (that’s me) has a 39” bust and is wearing a size L.
Yarn Substitution: The label of this yarn identifies it as a #3 dk. However, it’s thickness is more like a #4 worsted. So a lighter worsted weight yarn would also work quite well. Be sure to make a gauge swatch.
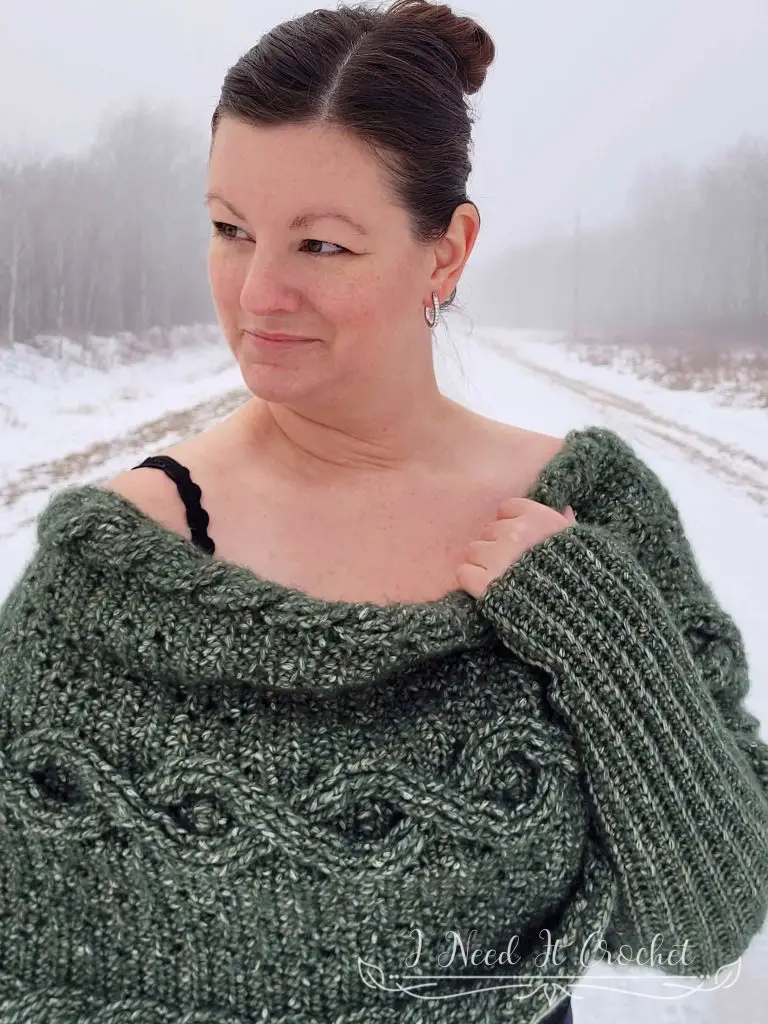
Scarf With Sleeves – Morgaine Sweater Scarf Free Crochet Pattern
How To Crochet A Cabled Sweater Scarf With Sleeves
- Create the first sleeve
Use a sc in blo ribbed stitch to create the first sleeve.
- Work the body of the sweater scarf
Follow the cable and filet pattern outlined to work the body to the length desired.
- Add the second sleeve
Working off of the scarf body, use the same sc in blo stitch as the first sleeve.
- Finish the edges
Sc all the way around the body of the sweater scarf to finish off the edges.
Instructions
We will begin by making one sleeve, then create the body of the sweater scarf followed by the other sleeve. Then, we will finish the edges with a round of single crochet.
With 6mm hook (or hook used to obtain gauge)
First Sleeve
The sleeve is worked flat, then seamed closed using slip stitches.
- Ch 52. Working in back hump of ch: Sc in 2nd ch from hook and each ch across. Turn. – 51 st
- (RS) Ch1. Sc in blo of 1st st and each st until only 1 left. Sc in both loops of last st. Turn. – 51 st
- (WS) Ch1. Sc in 1st st. Sc in blo of next st and each st across. Turn. – 51 st
Measurement Check: Your project should be approximately 14 ½” wide. You may want to work at least 6-8 rows before checking to get an accurate measurement.
Repeat rows 2 & 3 until you have a total of 26 (26, 26, 28, 28, 28, 30, 30, 30) rows, ending with a repeat of row 2. Your project should be 14 ½” wide by 7 ½” (7 ½”, 7 ½”, 8”, 8”, 8”, 8 ½”, 8 ½”, 8 ½”) tall. Do not bind off.
We will now slip stitch the sleeve closed:
- Fold your sleeve in half with the right sides together.
- Working through both loops of your last row and the other side of your starting chain, ss the side of the sleeve closed (see Figures 1 & 2 – these are shortened examples, so yours will be longer).
- Turn your sleeve right side out (see Figure 3). Do not bind off.
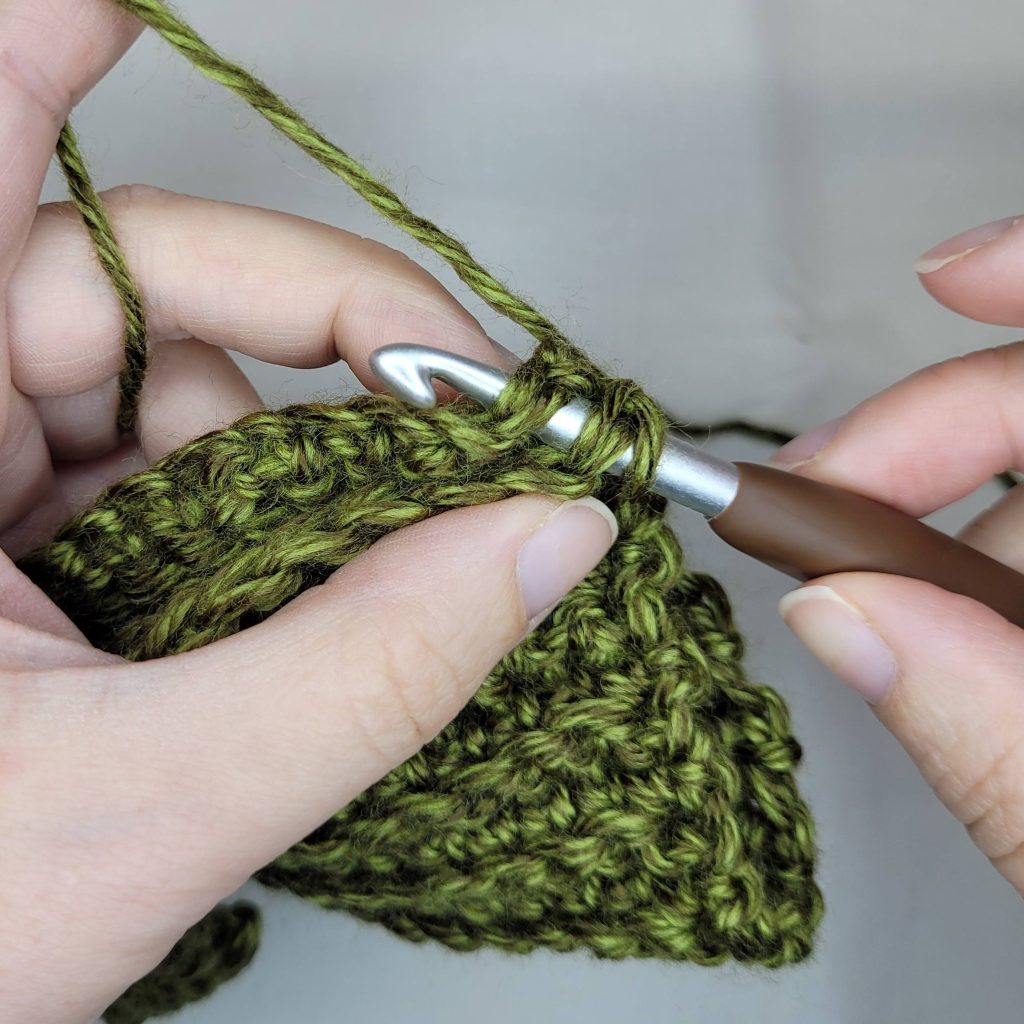
Figure 1
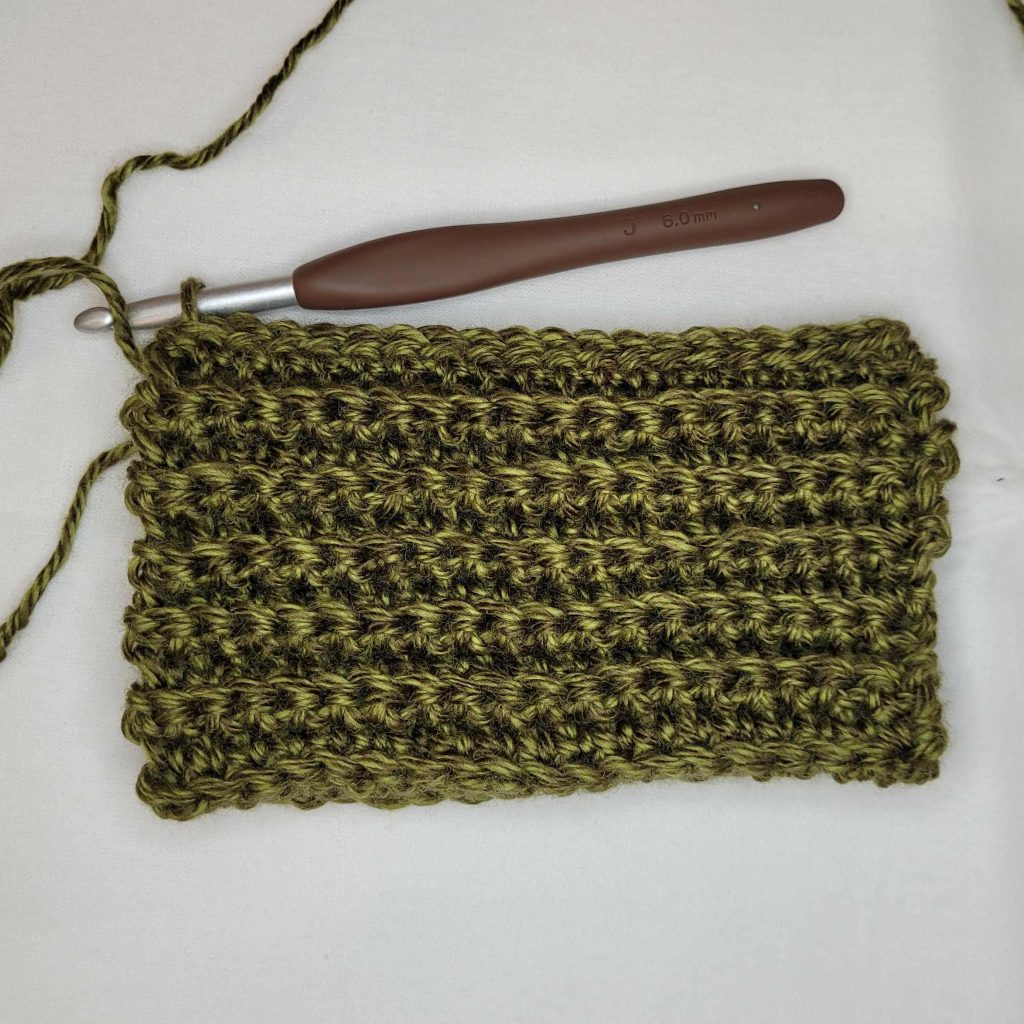
Figure 2
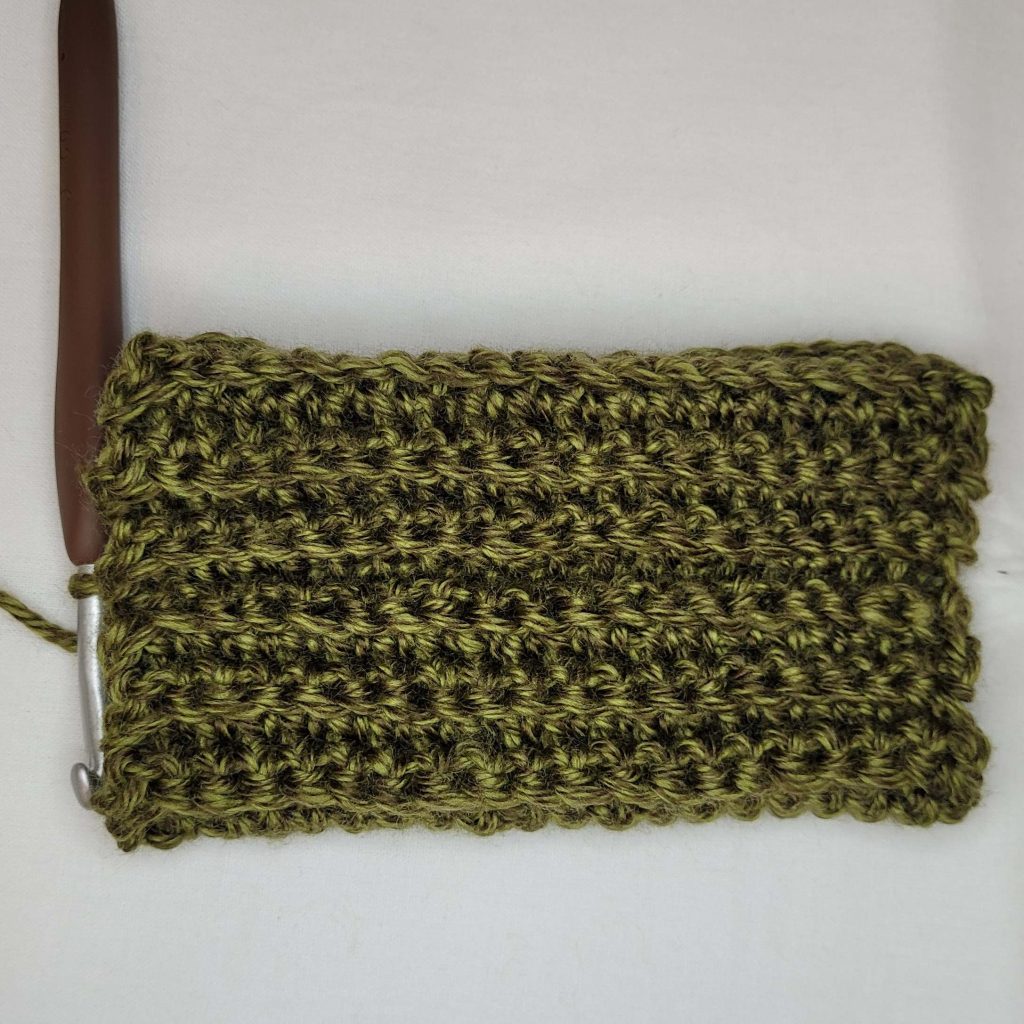
Figure 3
At this point you should try on your sleeve. Slip it over your forearm. It should fit snugly but comfortably. You are welcome to pull out your slip stitches and add or subtract rows to adjust the fit of your sleeve. Just keep in mind that you will need to improvise the first row of the main body so that you have enough stitches for row 1.
Scarf With Sleeves – Morgaine Sweater Scarf Free Crochet Pattern
Main Body
We will now create the main body of the sweater scarf. This part of your project is worked flat. The first row is worked off of the ends of the sleeve (see Figures 4 & 5)
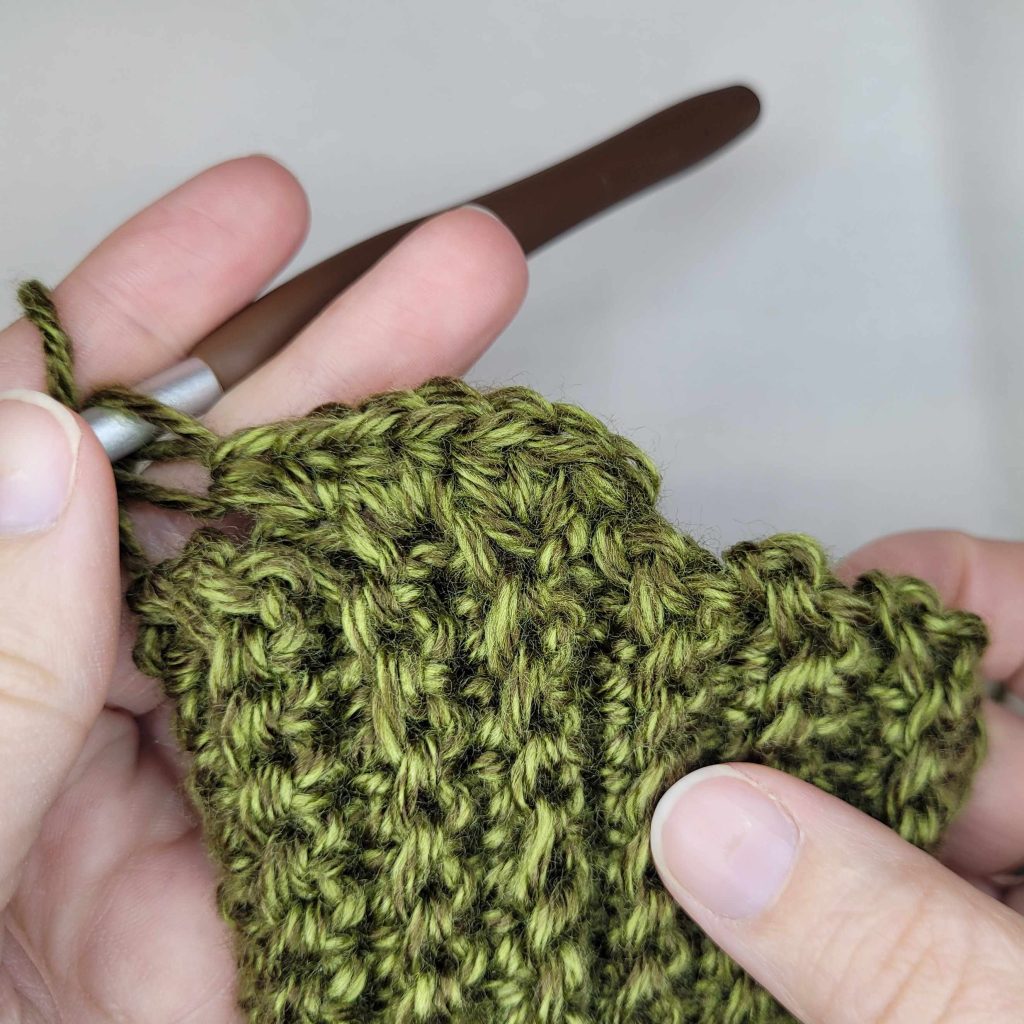
Figure 4
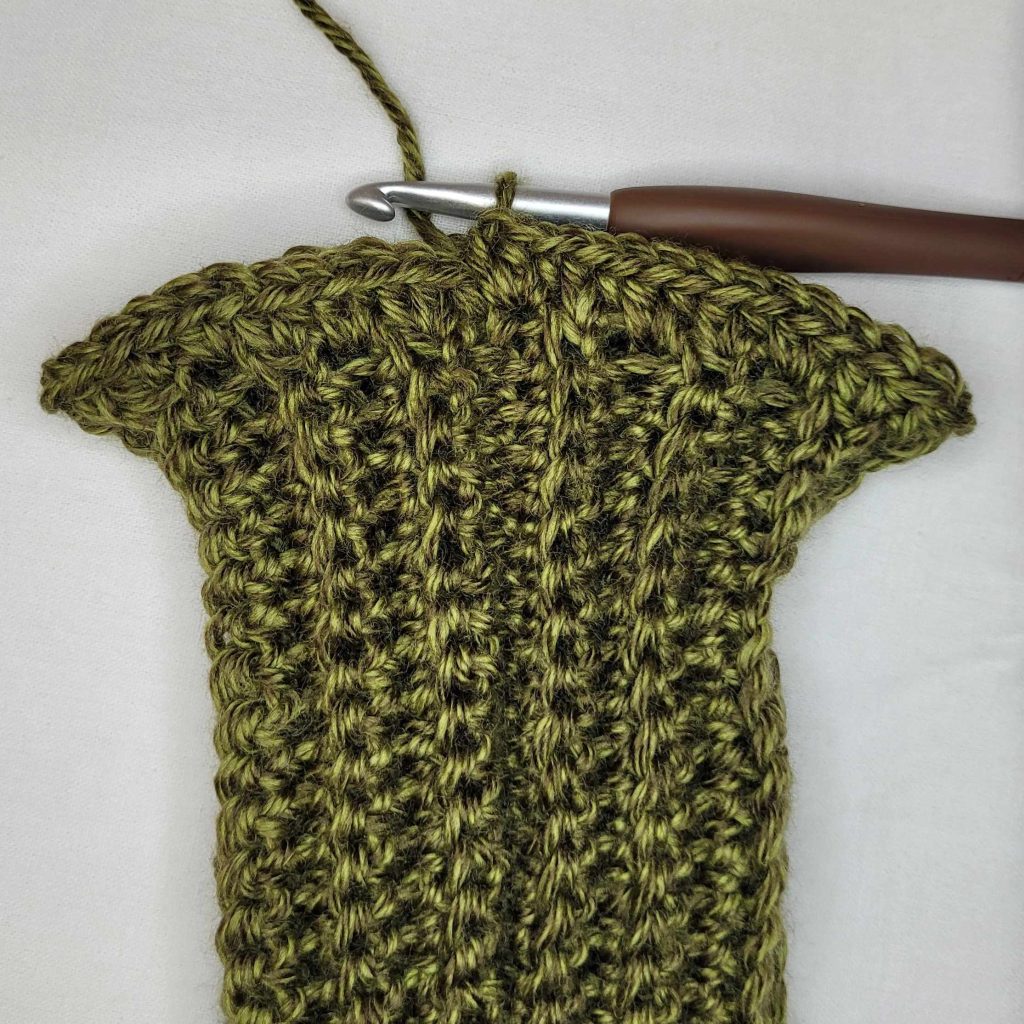
Figure 5
- (RS) Ch1. Work 3 hdc in end of 1st row. Work 2 hdc in the end of each row until there is 1 left. Work 3 hdc into the end of the last row. Turn. – 54 (54, 54, 58, 58, 58, 62, 62, 62) st
- (WS) – Ch1. Hdc in 1st st. Bpdc in next 6 sts.
– Hdc in next 7 (7, 7, 8, 8, 8, 9, 9, 9) sts. Ch1, sk 1 st. Hdc in next 3 sts. Ch1, sk 1 st. Hdc in next 2 (2, 2, 3, 3, 3, 4, 4, 4) sts.
– Bpdc in next 3 sts. Hdc in next 6 sts. Bpdc in next 3 sts.
– Hdc in next 2 (2, 2, 3, 3, 3, 4, 4, 4) sts. Ch1, sk 1 st. Hdc in next 3 sts. Ch1, sk 1 st. Hdc in next 7 (7, 7, 8, 8, 8, 9, 9, 9) sts.
– Bpdc in next 6 sts. Hdc in last st. Turn. – 54 (54, 54, 58, 58, 58, 62, 62, 62) st - – Ch1. Hdc in 1st st. Sk 3 sts, fptr in next 3 sts (see Figure 6). Working in front of sts you just made, fptr in 3 skipped sts (see Figure 7).
– Hdc in next 5 (5, 5, 6, 6, 6, 7, 7, 7) sts. Ch1, sk 1 st. Hdc in next 3 sts. Ch1, sk 1 st. Hdc in next 4 (4, 4, 5, 5, 5, 6, 6, 6) sts.
– Sk 3 sts, tr in next 3 sts (see Figure 8). Working in front of sts you just made, fptr in 3 skipped sts (see Figure 9). Sk 3 sts, fptr in next 3 sts (see Figure 10). Working behind sts you just made, tr in 3 skipped sts (see Figure 11).
– Hdc in next 4 (4, 4, 5, 5, 5, 6, 6, 6) sts. Ch1, sk 1 st. Hdc in next 3 sts. Ch1, sk 1 st. Hdc in next 5 (5, 5, 6, 6, 6, 7, 7, 7) sts.
– Sk 3 sts, fptr in next 3 sts (see Figure 6). Working in front of sts you just made, fptr in 3 skipped sts. Hdc in last st. Turn. – 54 (54, 54, 58, 58, 58, 62, 62, 62) st
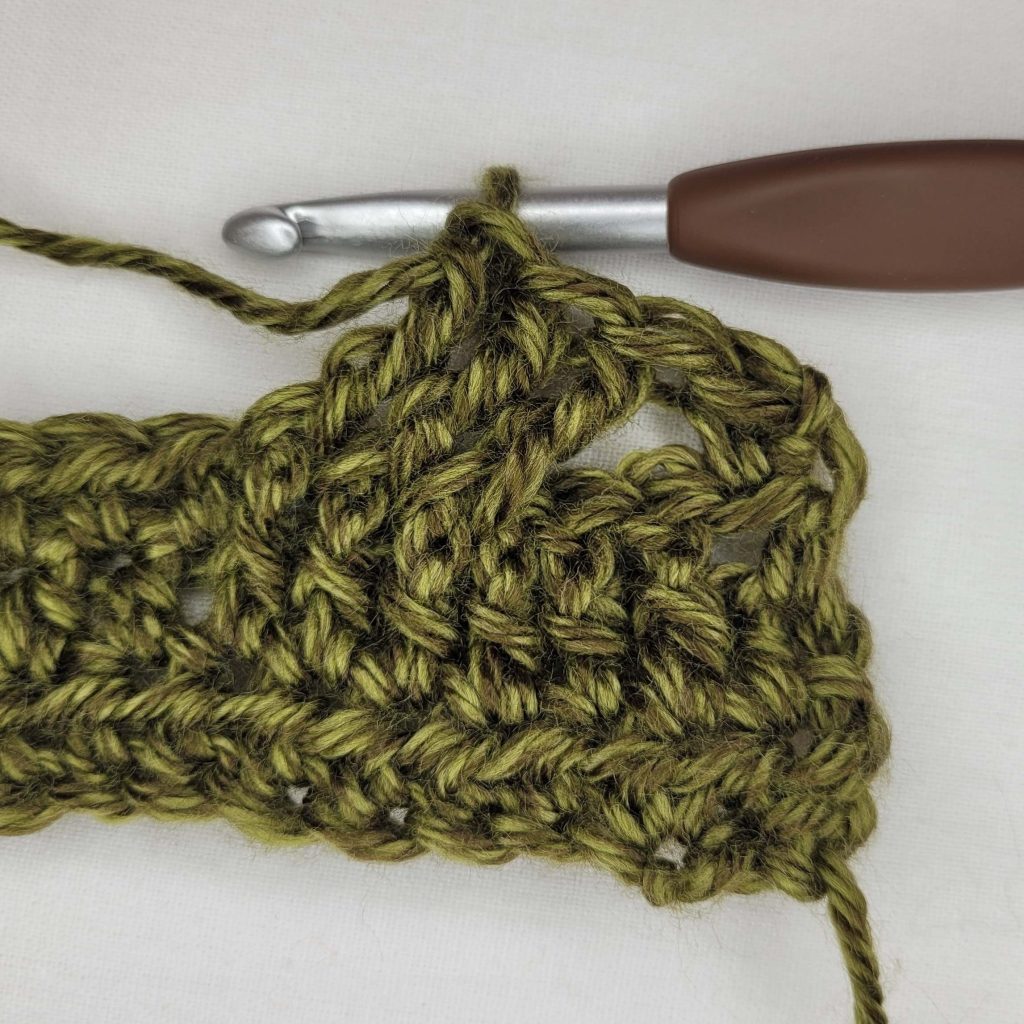
Figure 6
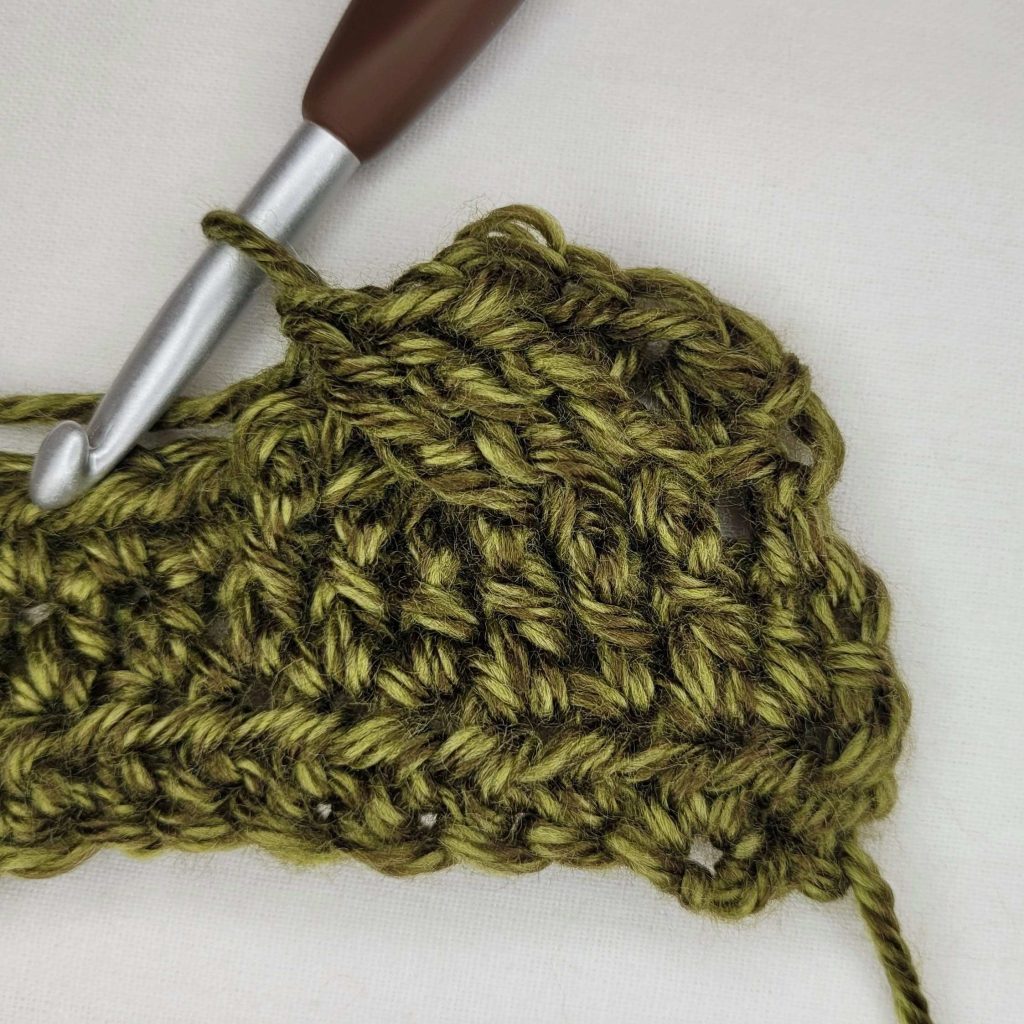
Figure 7
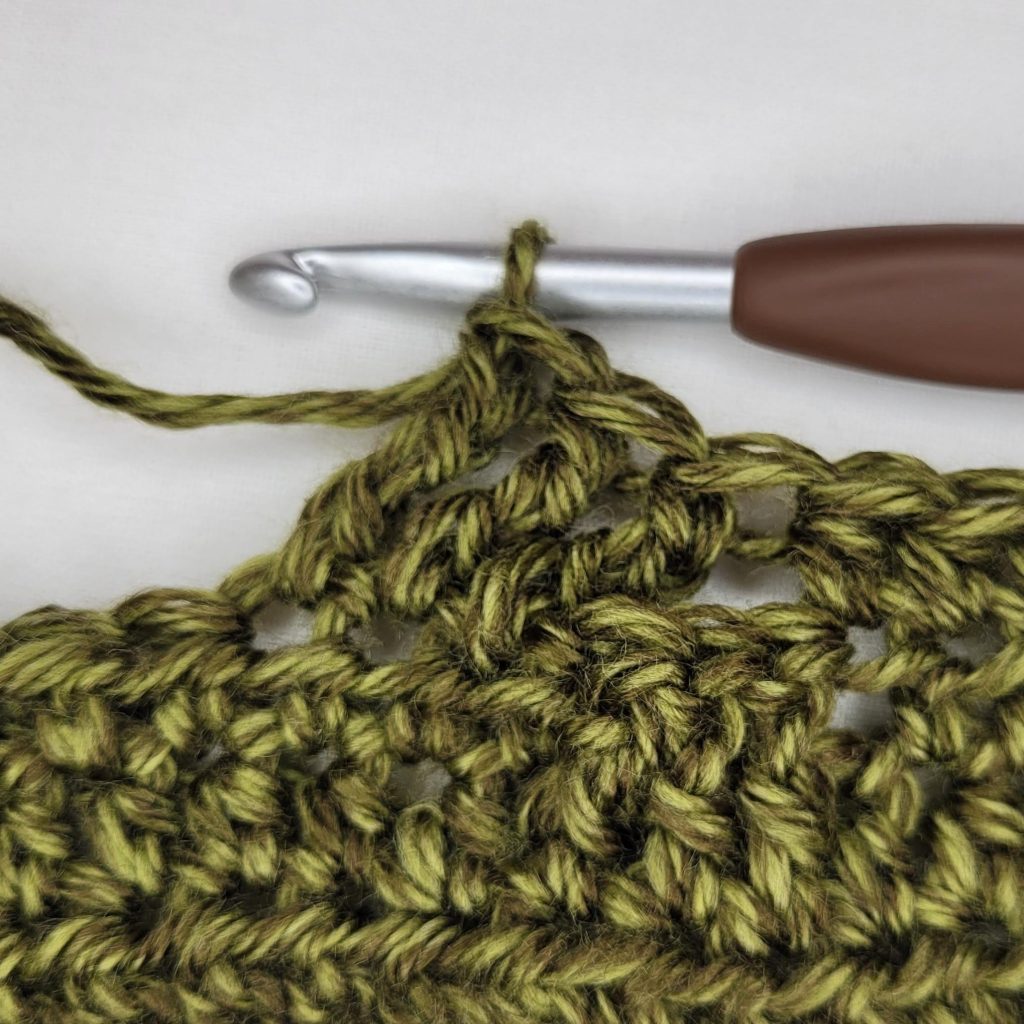
Figure 8
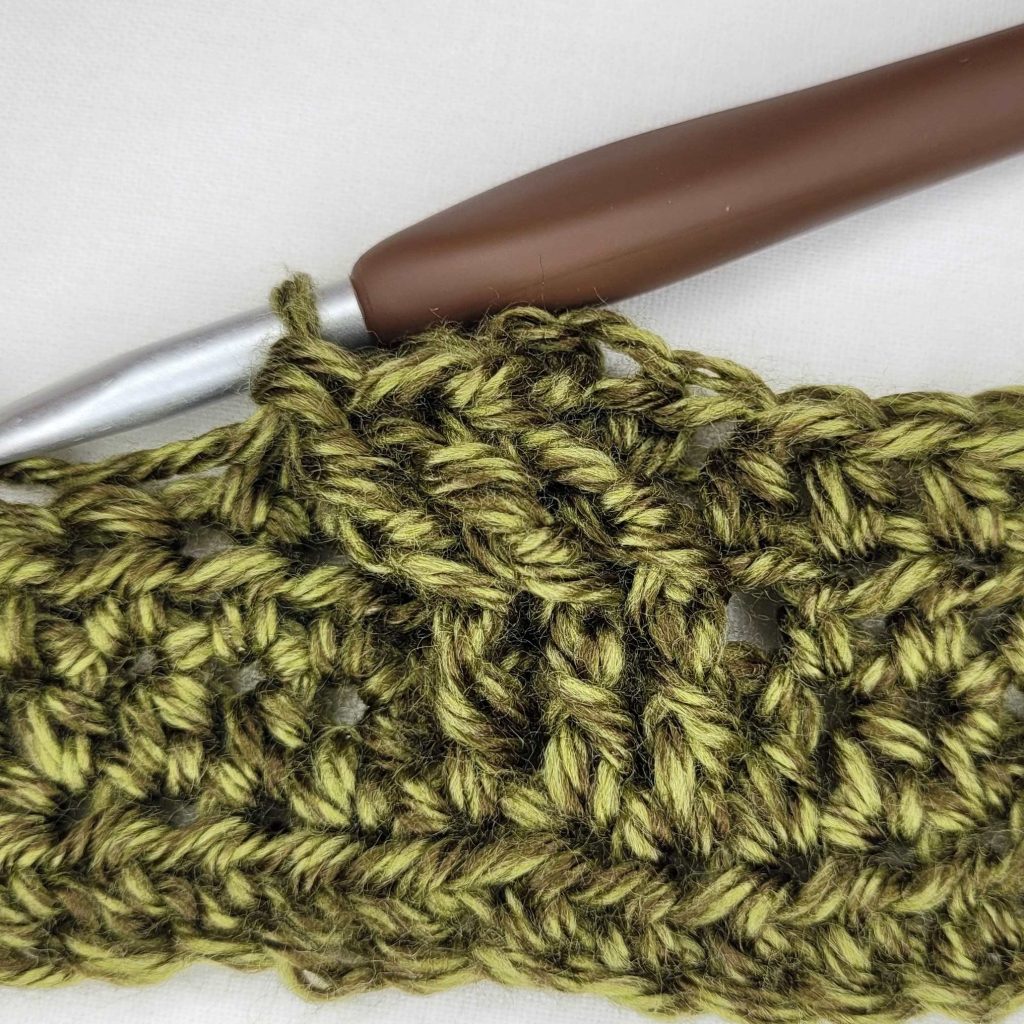
Figure 9
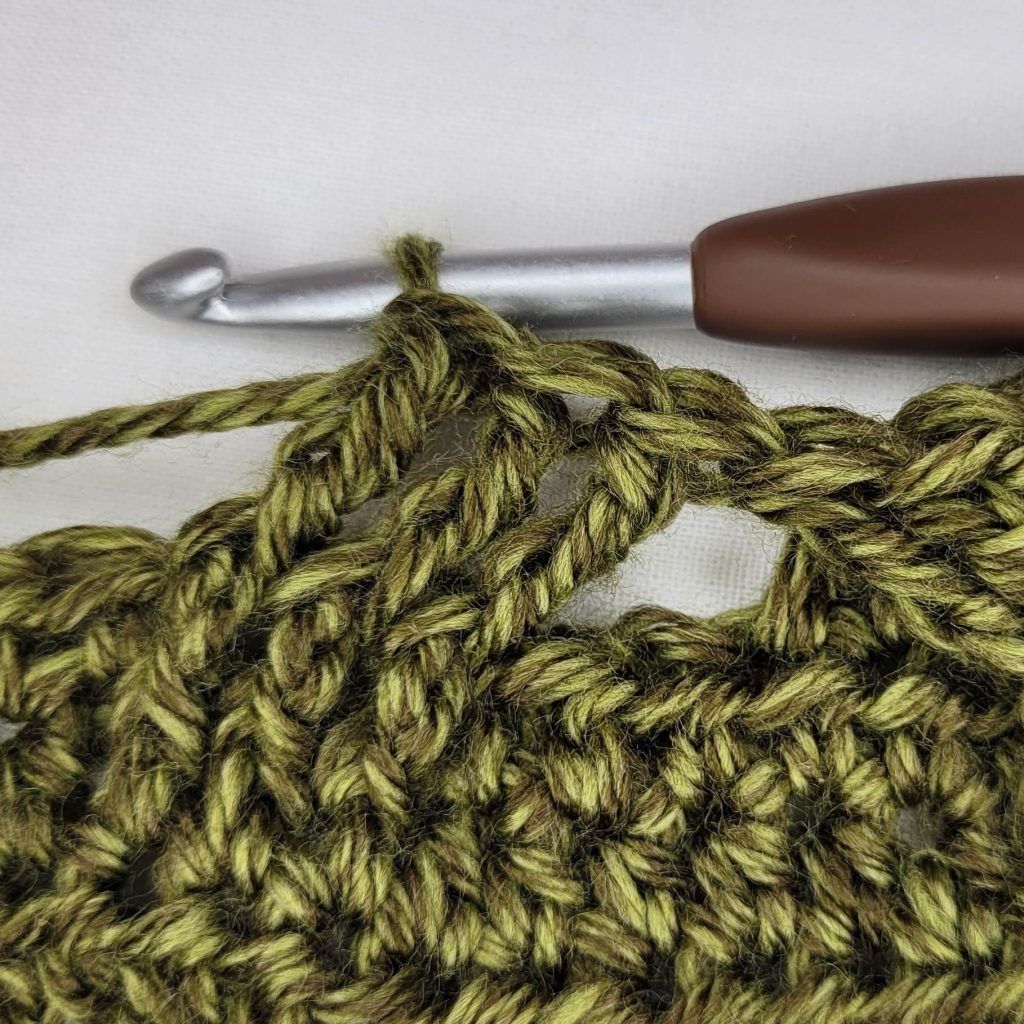
Figure 10
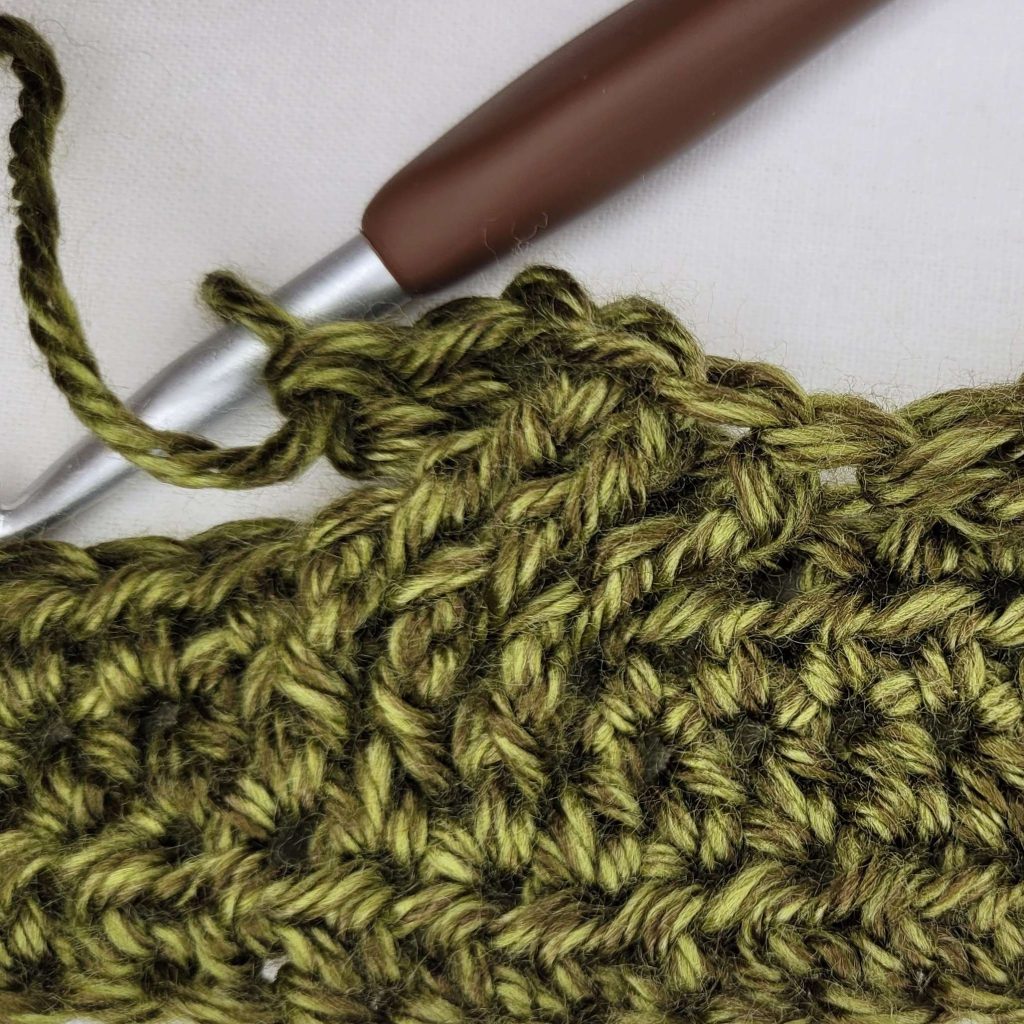
Figure 11
- – Ch1. Hdc in 1st st. Bpdc in next 6 sts.
– Hdc in next 3 (3, 3, 4, 4, 4, 5, 5, 5) sts. Ch1, sk 1 st. Hdc in next 3 sts. Ch1, sk 1 st. Hdc in next 9 (9, 9, 10, 10, 10, 11, 11, 11) sts.
– Bpdc in next 6 sts.
– Hdc in next 9 (9, 9, 10, 10, 10, 11, 11, 11) sts. Ch1, sk 1 st. Hdc in next 3 sts. Ch1, sk 1 st. Hdc in next 3 (3, 3, 4, 4, 4, 5, 5, 5) sts.
– Bpdc in next 6 sts. Hdc in last st. Turn. – 54 (54, 54, 58, 58, 58, 62, 62, 62) st - – Ch1. Hdc in 1st st. Fpdc in next 6 sts (see Figure 12).
– Hdc in next 5 (5, 5, 6, 6, 6, 7, 7, 7) sts. Ch1, sk 1 st. Hdc in next 11 (11, 11, 12, 12, 12, 13, 13, 13) sts.
– Sk 3 sts, fptr in next 3 sts (see Figure 13). Working behind sts you just made, fptr in 3 skipped sts (see Figure 14).
– Hdc in next 11 (11, 11, 12, 12, 12, 13, 13, 13) sts. Ch1, sk 1 st. Hdc in next 5 (5, 5, 6, 6, 6, 7, 7, 7) sts.
– Fpdc in next 6 sts. Hdc in last st. Turn. – 54 (54, 54, 58, 58, 58, 62, 62, 62) st
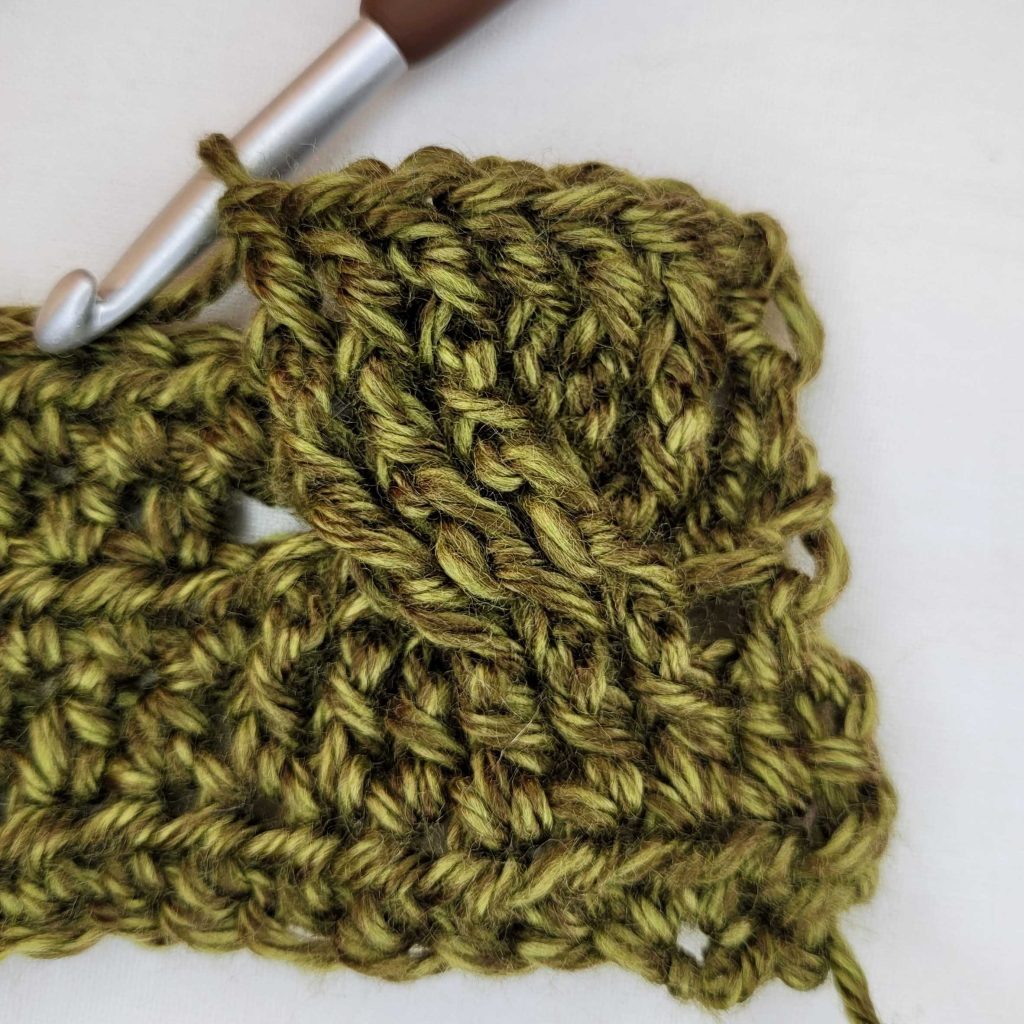
Figure 12
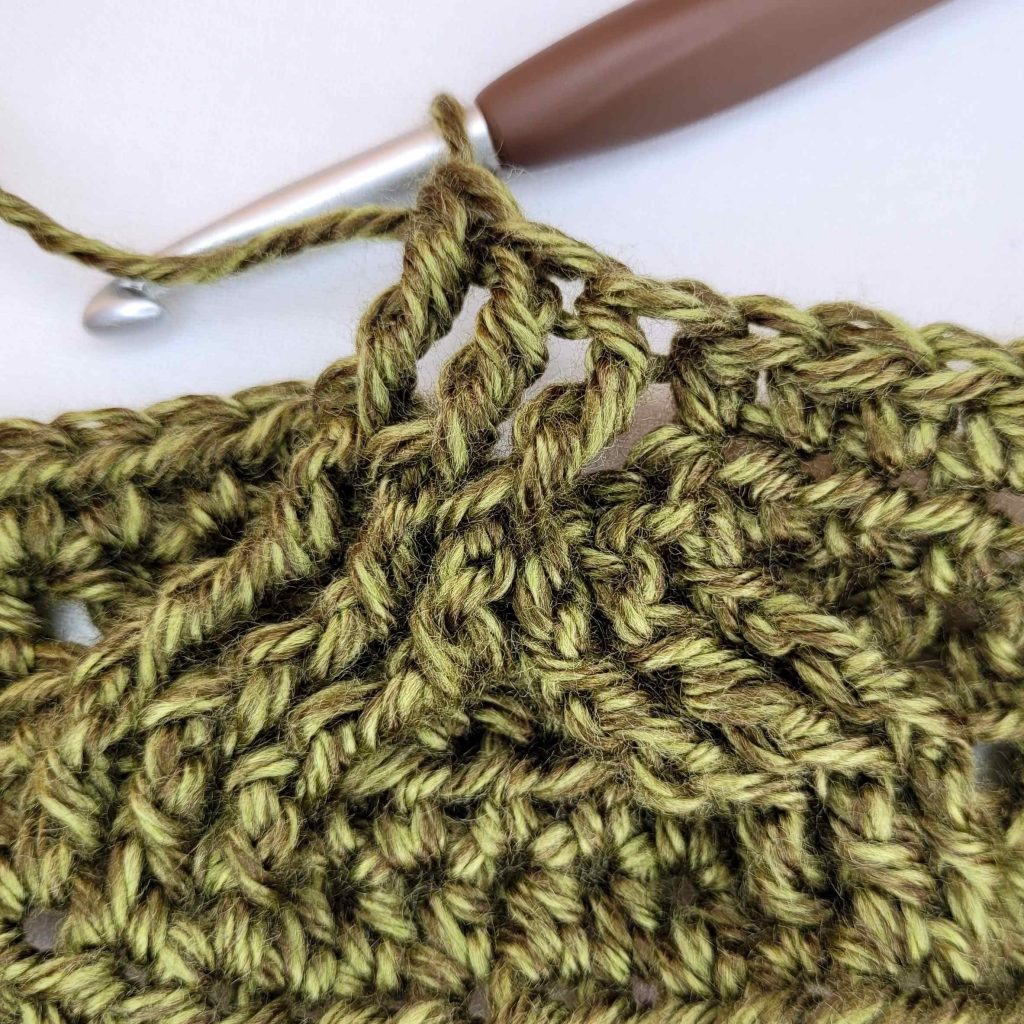
Figure 13
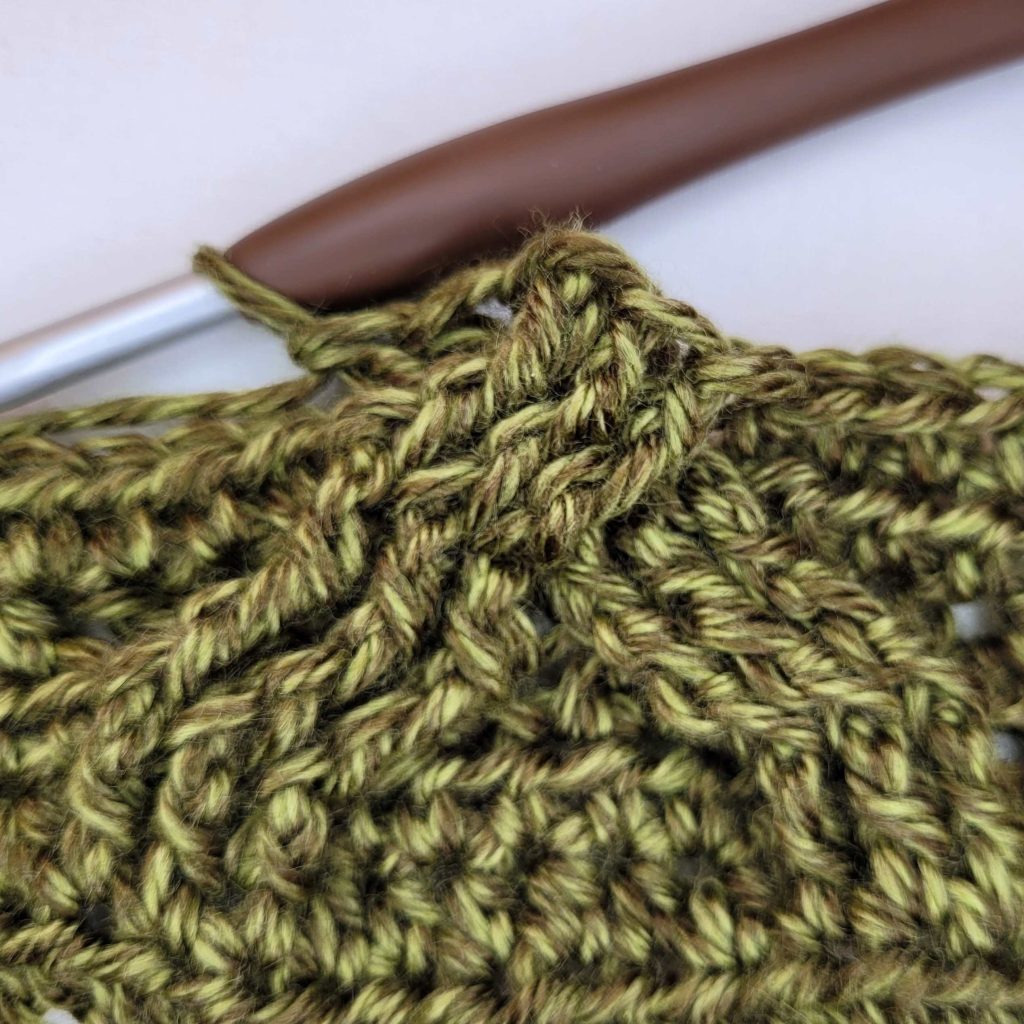
Figure 14
Scarf With Sleeves – Morgaine Sweater Scarf Free Crochet Pattern
- – Ch1. Hdc in 1st st. Bpdc in next 6 sts.
– Hdc in next 3 (3, 3, 4, 4, 4, 5, 5, 5) sts. Ch1, sk 1 st. Hdc in next 5 sts. Ch1, sk 1 st. Hdc in next 7 (7, 7, 8, 8, 8, 9, 9, 9) sts.
– Bpdc in next 6 sts.
– Hdc in next 7 (7, 7, 8, 8, 8, 9, 9, 9) sts. Ch1, sk 1 st. Hdc in next 5 sts. Ch1, sk 1 st. Hdc in next 3 (3, 3, 4, 4, 4, 5, 5, 5) sts.
– Bpdc in next 6 sts. Hdc in last st. Turn. – 54 (54, 54, 58, 58, 58, 62, 62, 62) st - – Ch1. Hdc in 1st st. Sk 3 sts, fptr in next 3 sts. Working in front of sts you just made, fptr in 3 skipped sts.
– Hdc in next 7 (7, 7, 8, 8, 8, 9, 9, 9) sts. Ch1, sk 1 st. Hdc in next 6 (6, 6, 7, 7, 7, 8, 8, 8) sts.
– Sk 3 sts, fptr in next 3 sts (see Figure 15). Working behind sts you just made, tr in 3 skipped sts (see Figure 16). Sk 3 sts, tr in next 3 sts (see Figure 17). Working in front of sts you just made, fptr in 3 skipped sts.
– Hdc in next 6 (6, 6, 7, 7, 7, 8, 8, 8) sts. Ch1, sk 1 st. Hdc in next 7 (7, 7, 8, 8, 8, 9, 9, 9) sts.
– Sk 3 sts, fptr in next 3 sts. Working in front of sts you just made, fptr in 3 skipped sts. Hdc in last st. Turn. – 54 (54, 54, 58, 58, 58, 62, 62, 62) st
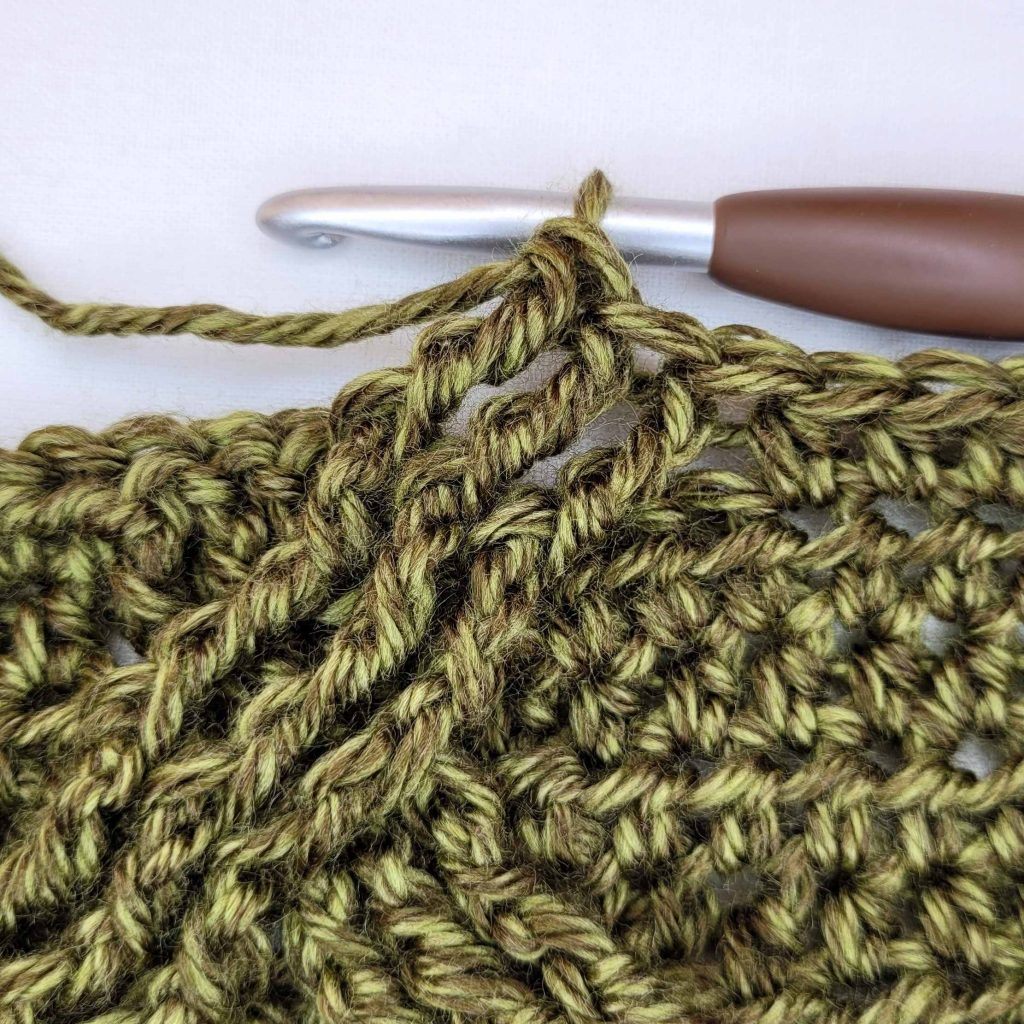
Figure 15
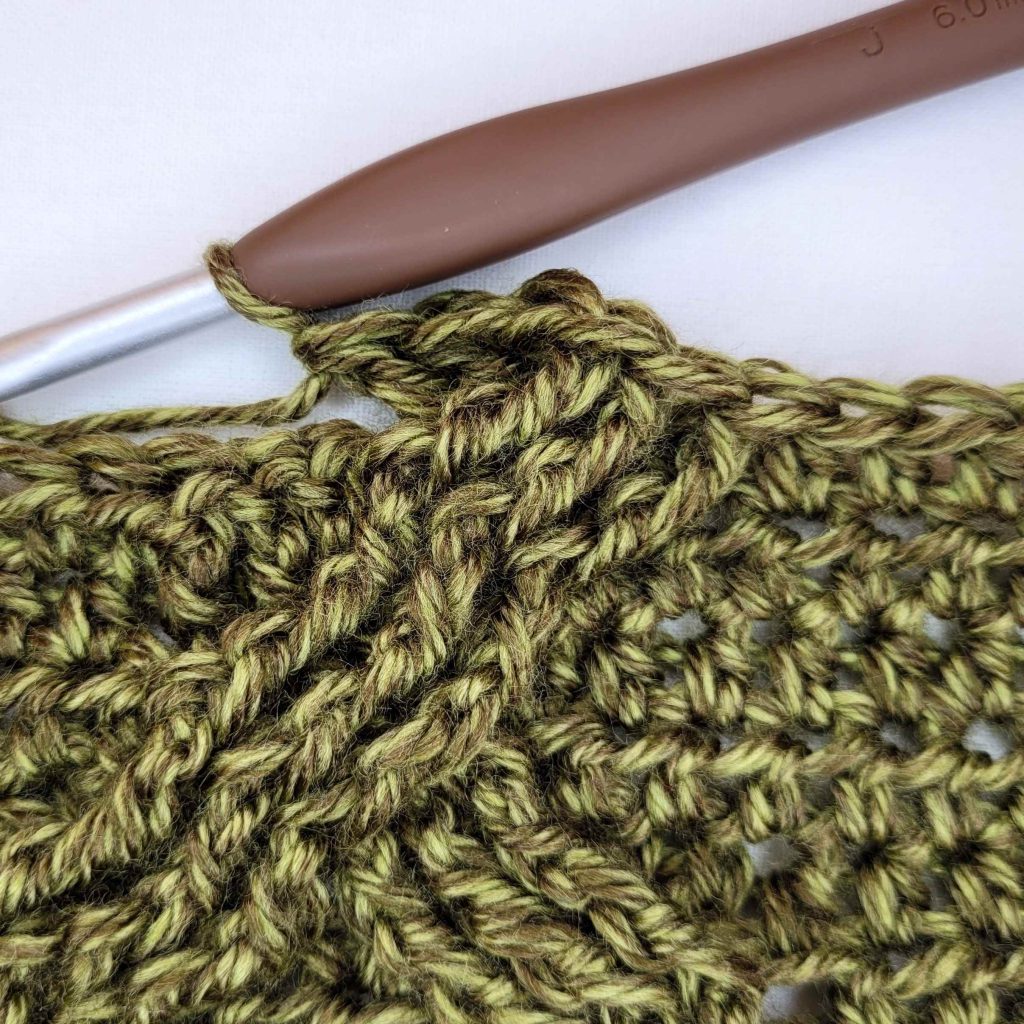
Figure 16
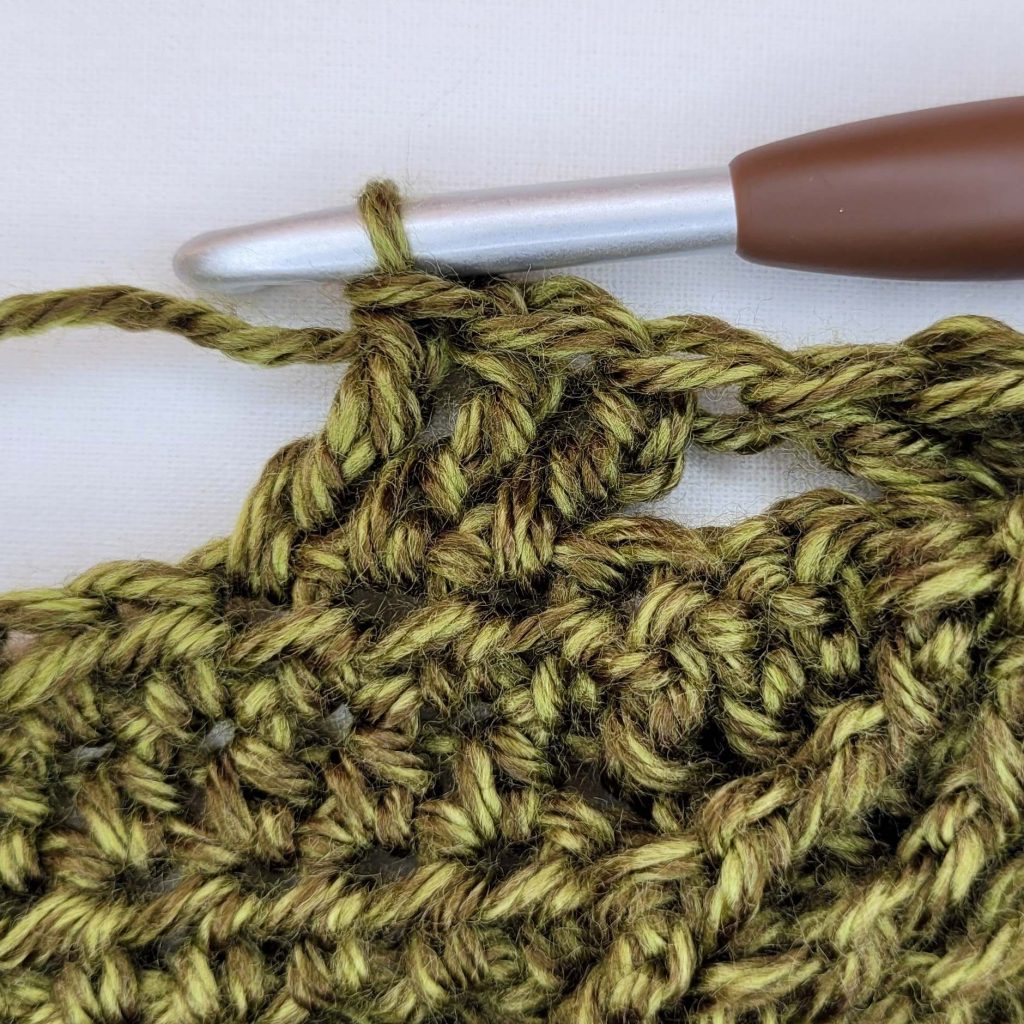
Figure 17
- – Ch1. Hdc in 1st st. Bpdc in next 6 sts.
– Hdc in next 5 (5, 5, 6, 6, 6, 7, 7, 7) sts. Ch1, sk 1 st. Hdc in next 5 sts. Ch1, sk 1 st. Hdc in next 2 (2, 2, 3, 3, 3, 4, 4, 4) sts.
– Bpdc in next 3 sts. Hdc in next 6 sts. Bpdc in next 3 sts.
– Hdc in next 2 (2, 2, 3, 3, 3, 4, 4, 4) sts. Ch1, sk 1 st. Hdc in next 5 sts. Ch1, sk 1 st. Hdc in next 5 (5, 5, 6, 6, 6, 7, 7, 7) sts.
– Bpdc in next 6 sts. Hdc in last st. Turn. – 54 (54, 54, 58, 58, 58, 62, 62, 62) st - – Ch1. Hdc in 1st st. Fpdc in next 6 sts.
– Hdc in next 9 (9, 9, 10, 10, 10, 11, 11, 11) sts. Ch1, sk 1 st. Hdc in next 4 (4, 4, 5, 5, 5, 6, 6, 6) sts.
– Fpdc in next 3 sts (see Figure 18). Hdc in next 2 sts. [*Yo, insert your hook in the next st, yo, and pull up a loop.** Repeat from * to ** 2 more times in the same st (see Figure 19). ] Repeat from [ to ] (see Figure 20). Yo, pull through all 13 loops, ch1 (see Figure 21). Hdc in next 2 sts. Fpdc in next 3 sts (see Figure 22).
– Hdc in next 4 (4, 4, 5, 5, 5, 6, 6, 6) sts. Ch1, sk 1 st. Hdc in next 9 (9, 9, 10, 10, 10, 11, 11, 11) sts.
– Fpdc in next 6 sts. Hdc in last st. Turn. – 54 (54, 54, 58, 58, 58, 62, 62, 62) st
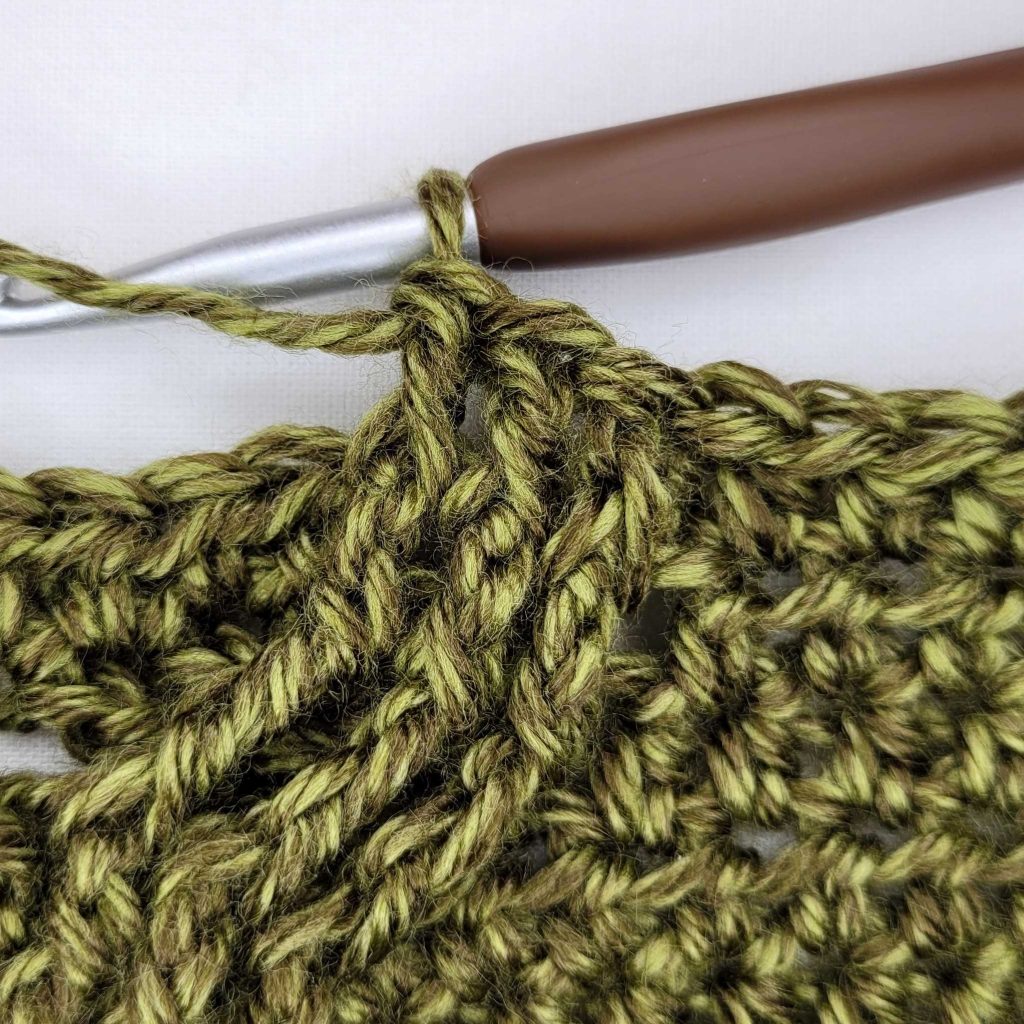
Figure 18
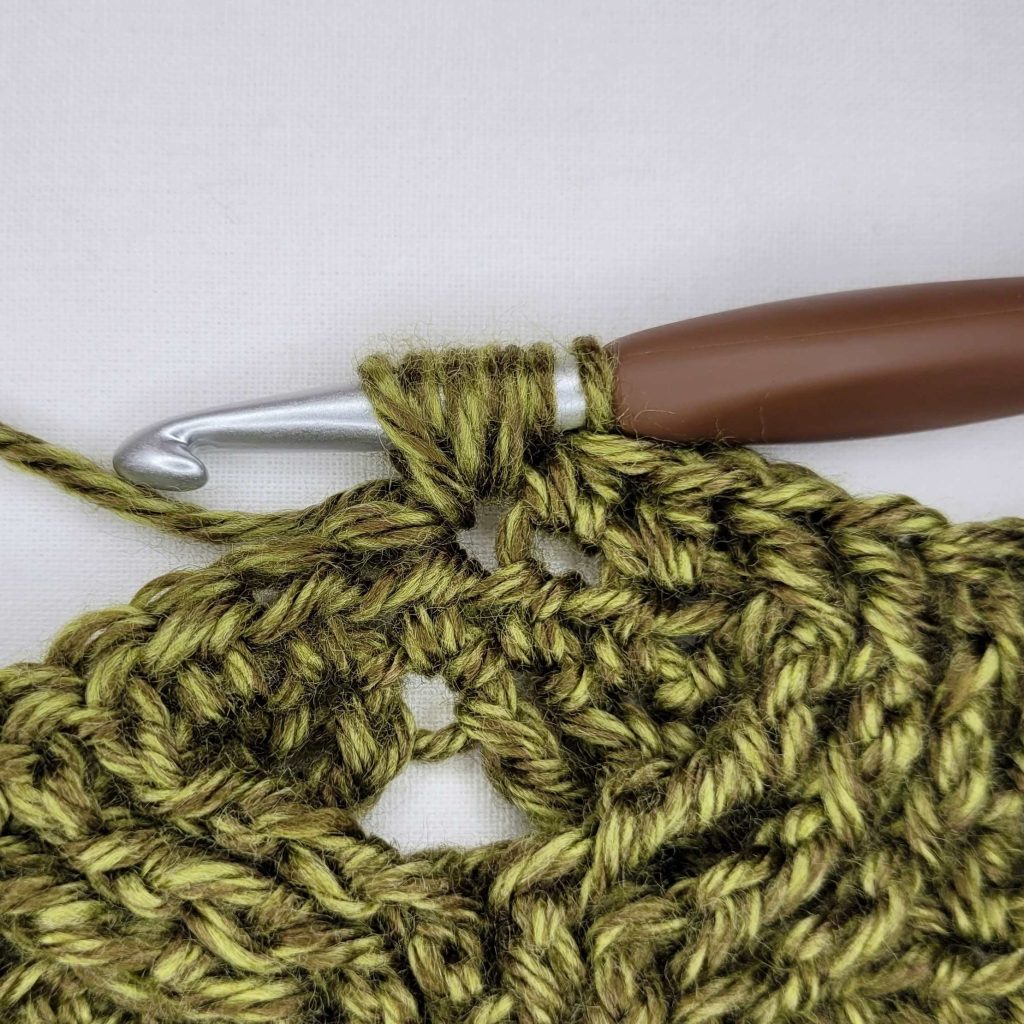
Figure 19
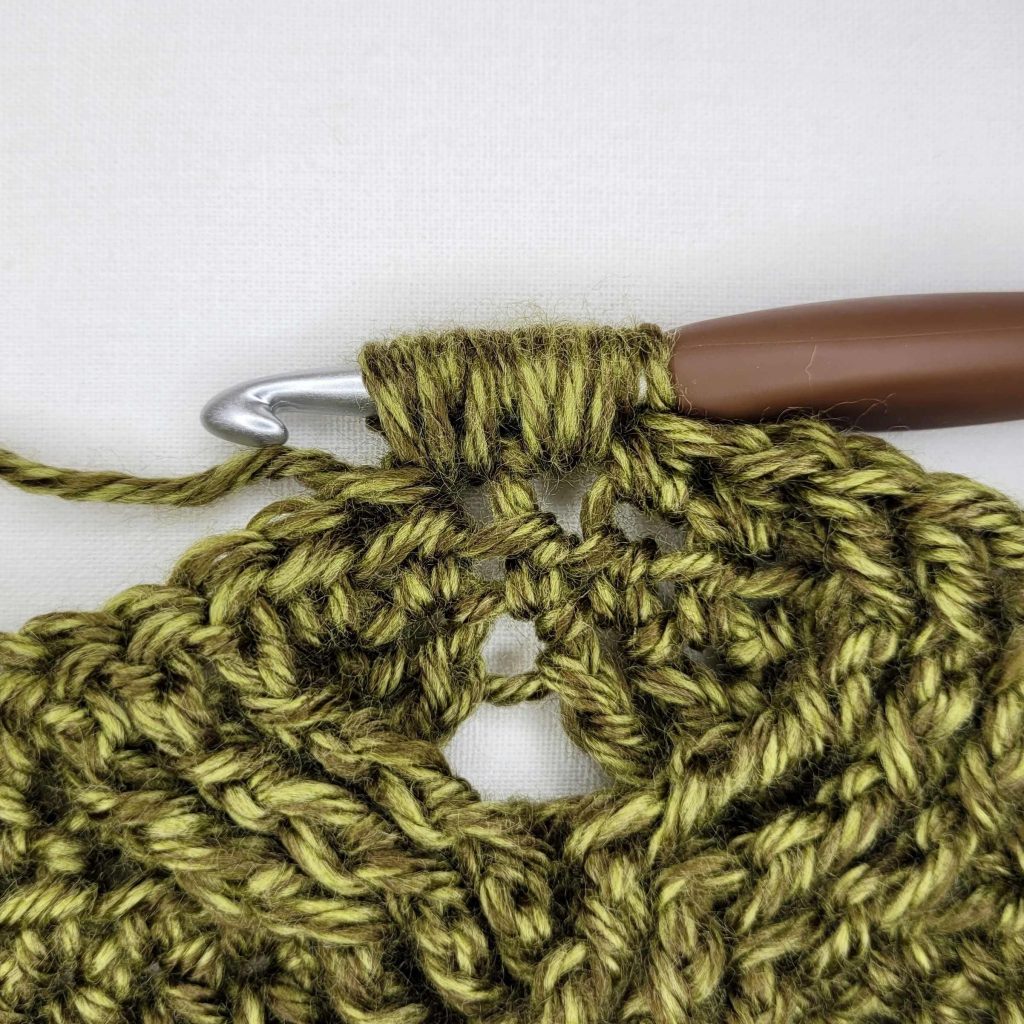
Figure 20
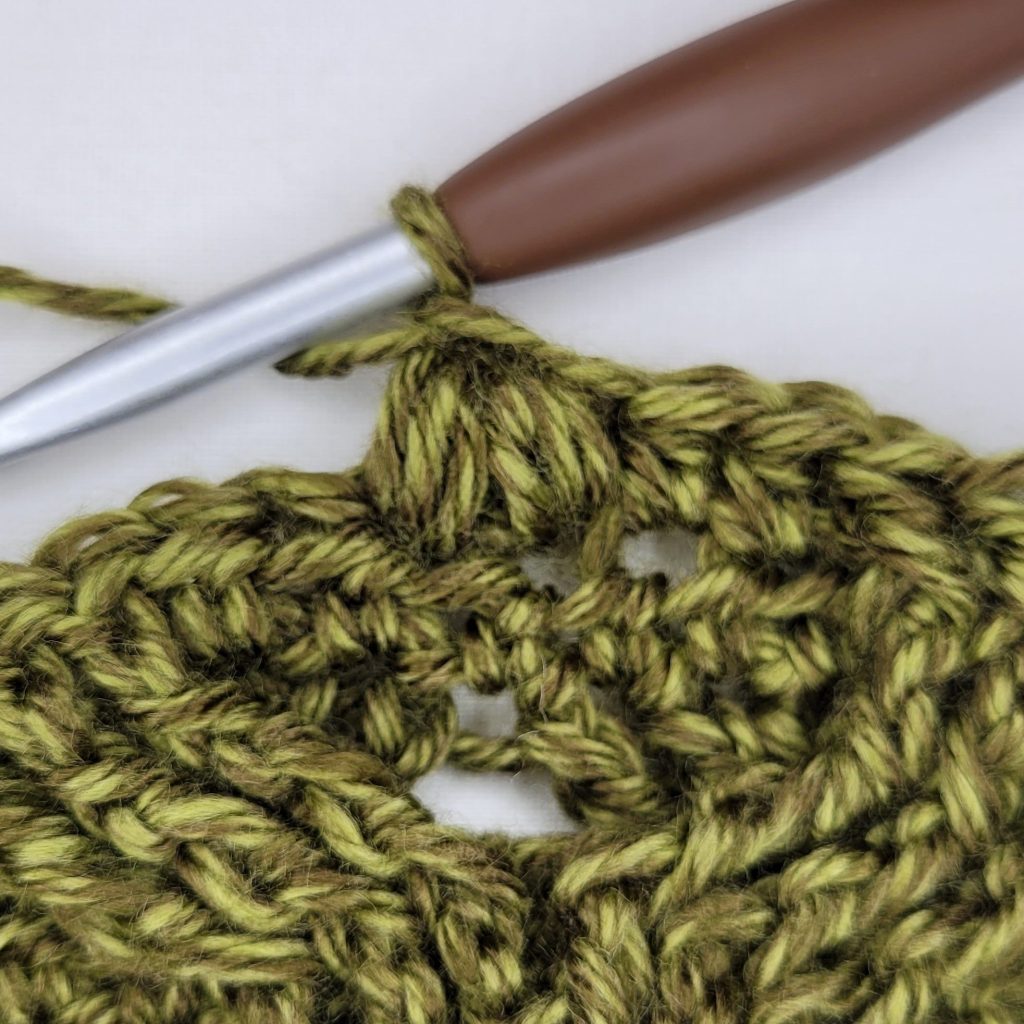
Figure 21
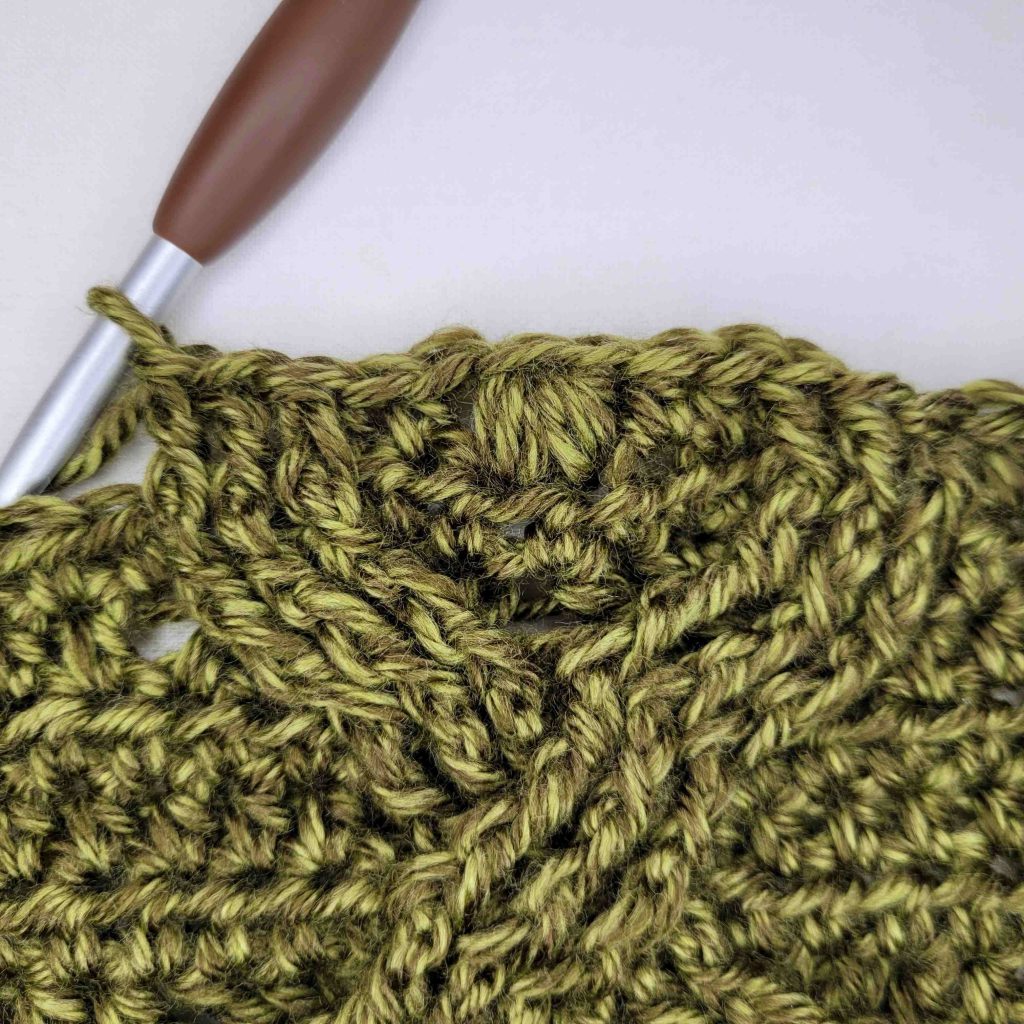
Figure 22
Repeat rows 2-9 until the Main Body of your project (not including the sleeve) is approximately 51” (54 ½”, 61 ½”, 65”, 72”, 75 ½”, 82 ½”, 86”, 93”) long. End with a repeat of row 8. At this point you may want to try your project on to check the fit. Slip the sleeve over one arm. Then wrap the main body around your shoulders. If the working end reaches the elbow of the arm without a sleeve on it, then your sweater scarf is long enough. Next, we will move on to the decrease row.
Scarf With Sleeves – Morgaine Sweater Scarf Free Crochet Pattern
Decrease Row
Note: If you had to adjust the number of rows in your first sleeve, you will need to improvise your decrease row. Work your decreases evenly across, making sure you end up with the same number of stitches as the number of rows in your first sleeve. For example: If you have 36 rows in your first sleeve, decrease until you have 36 stitches.
- Ch1. Hdc3tog. Hdc2tog across until you have 3 sts left. Hdc3tog. Turn. Do not bind off. – 26 (26, 26, 28, 28, 28, 30, 30, 30) st
Second Sleeve
The 2nd sleeve is created by working short rows off of each stitch at the end of the Main Body.
- Ch52 (see Figure 23 – these are shortened examples, so yours will be longer). Working in back hump of ch: Sc in 2nd ch from hook and each ch across (see Figure 24). Ss to st you just chained from on main body. Ss to next st on main body (see Figure 25). Turn. – 51 st + 2 ss
- Sk 2 ss. Sc in blo of 1st st and each st until 1 left. Sc in both loops of last st (see Figure 26). Turn. – 51 st
- Ch1. Sc in 1st st. Sc in blo of next st and each st across (see Figure 27). Ss to next unworked st of main body. Ss to next st (see Figure 28). Turn. – 51 st + 2 ss
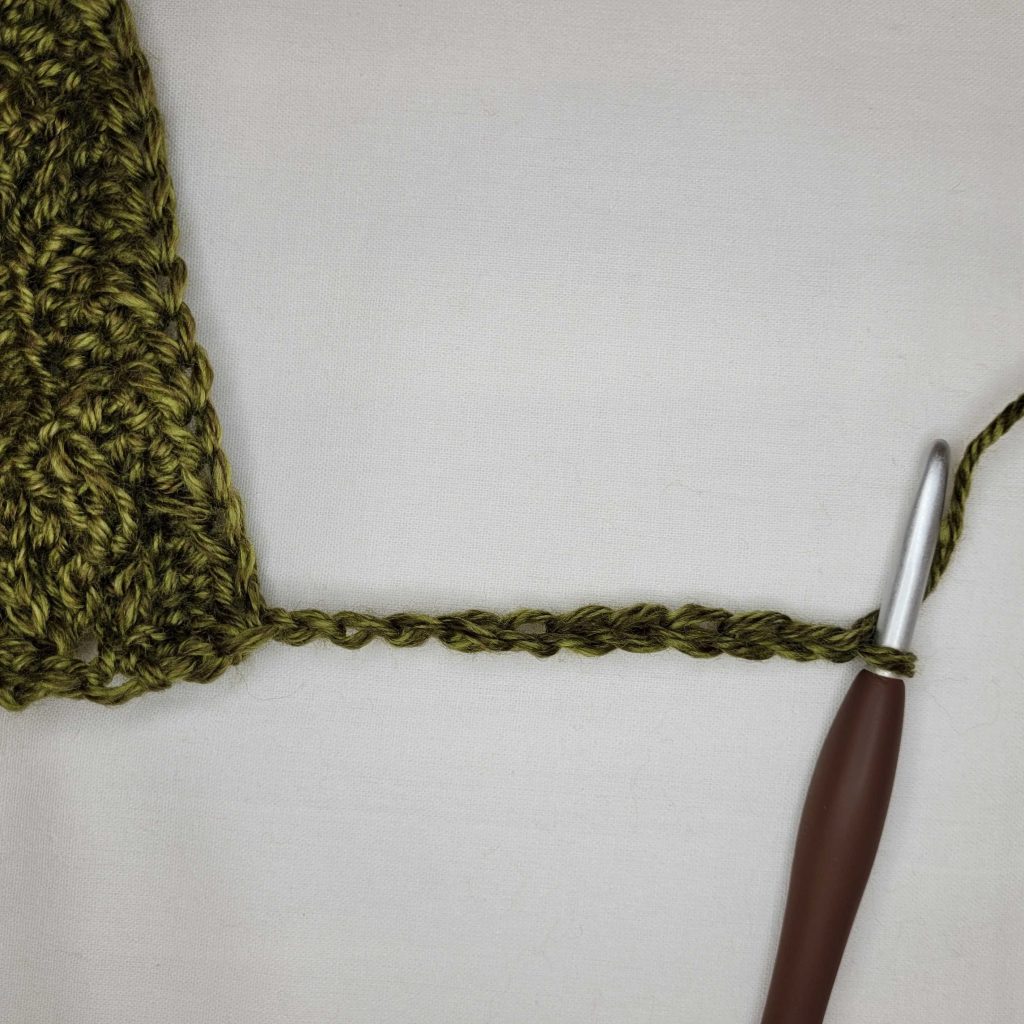
Figure 23
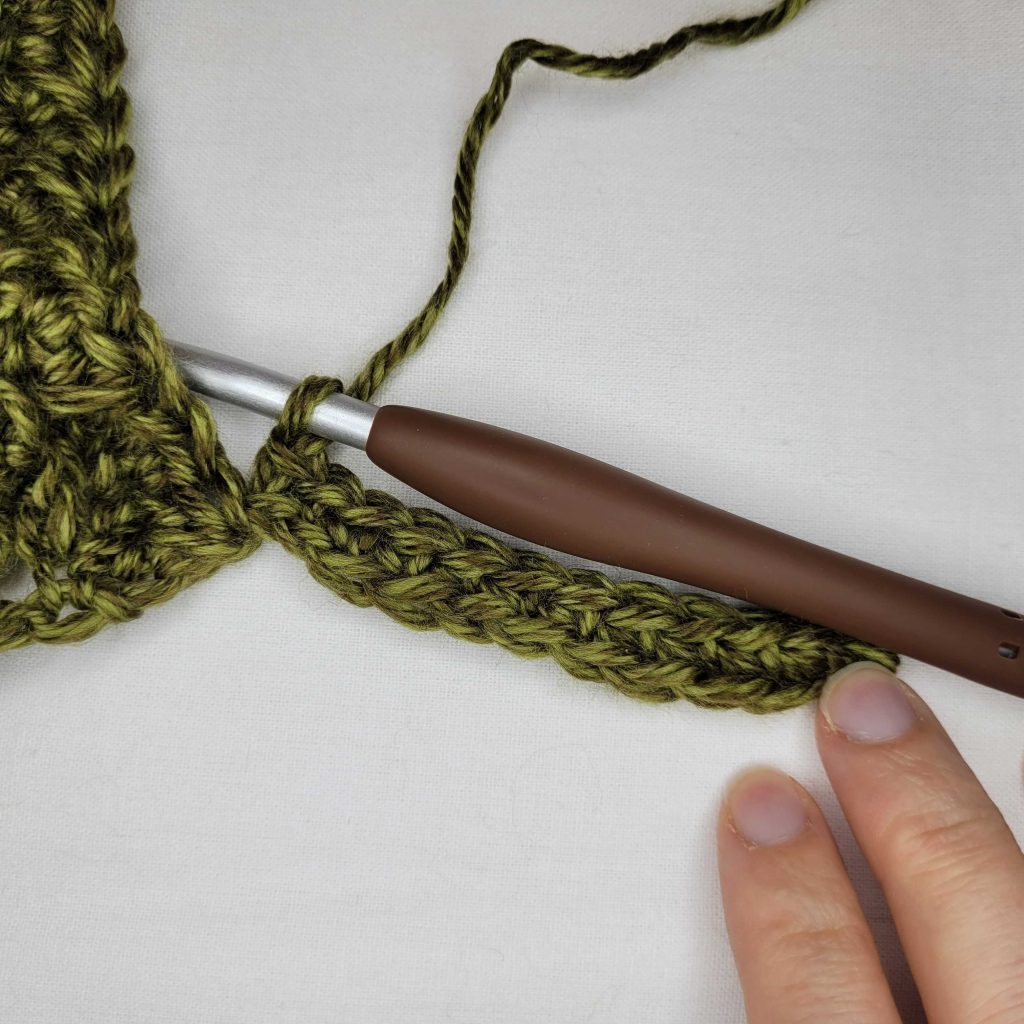
Figure 24
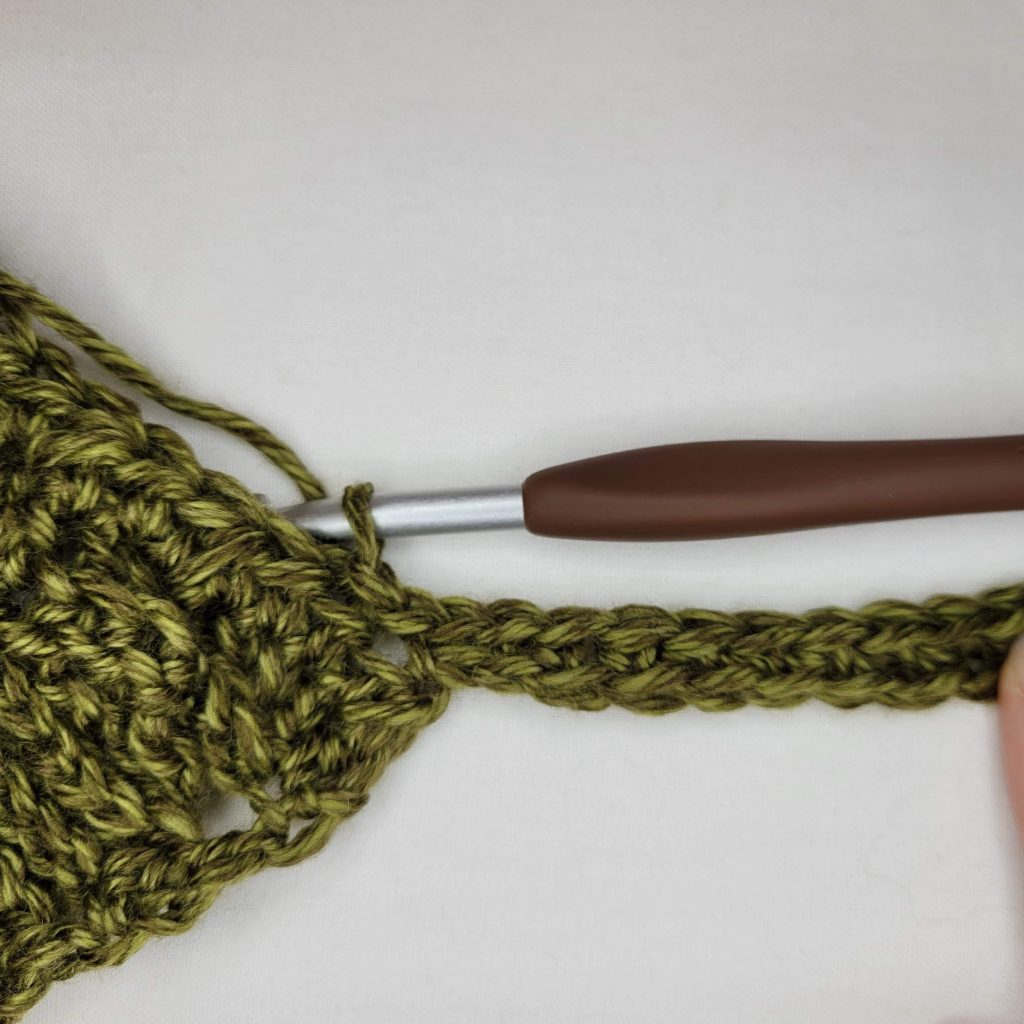
Figure 25
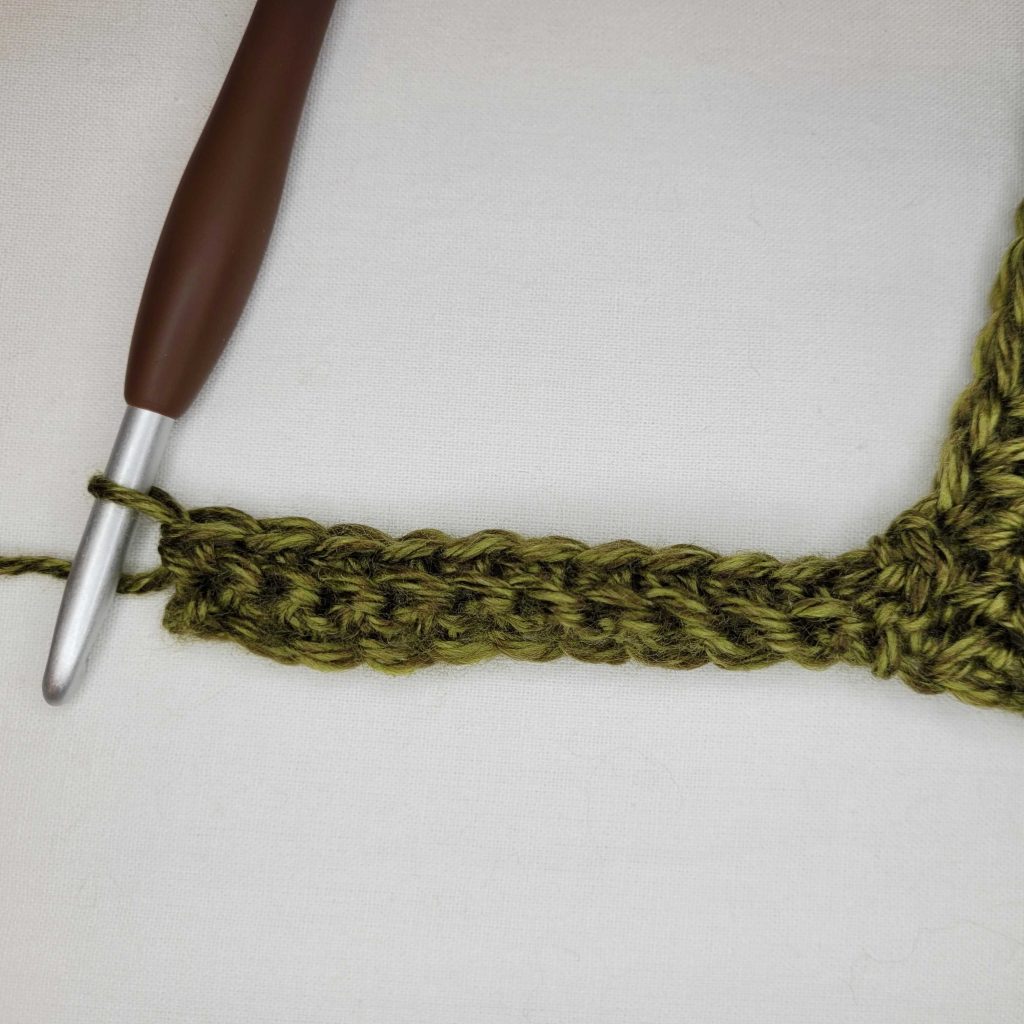
Figure 26
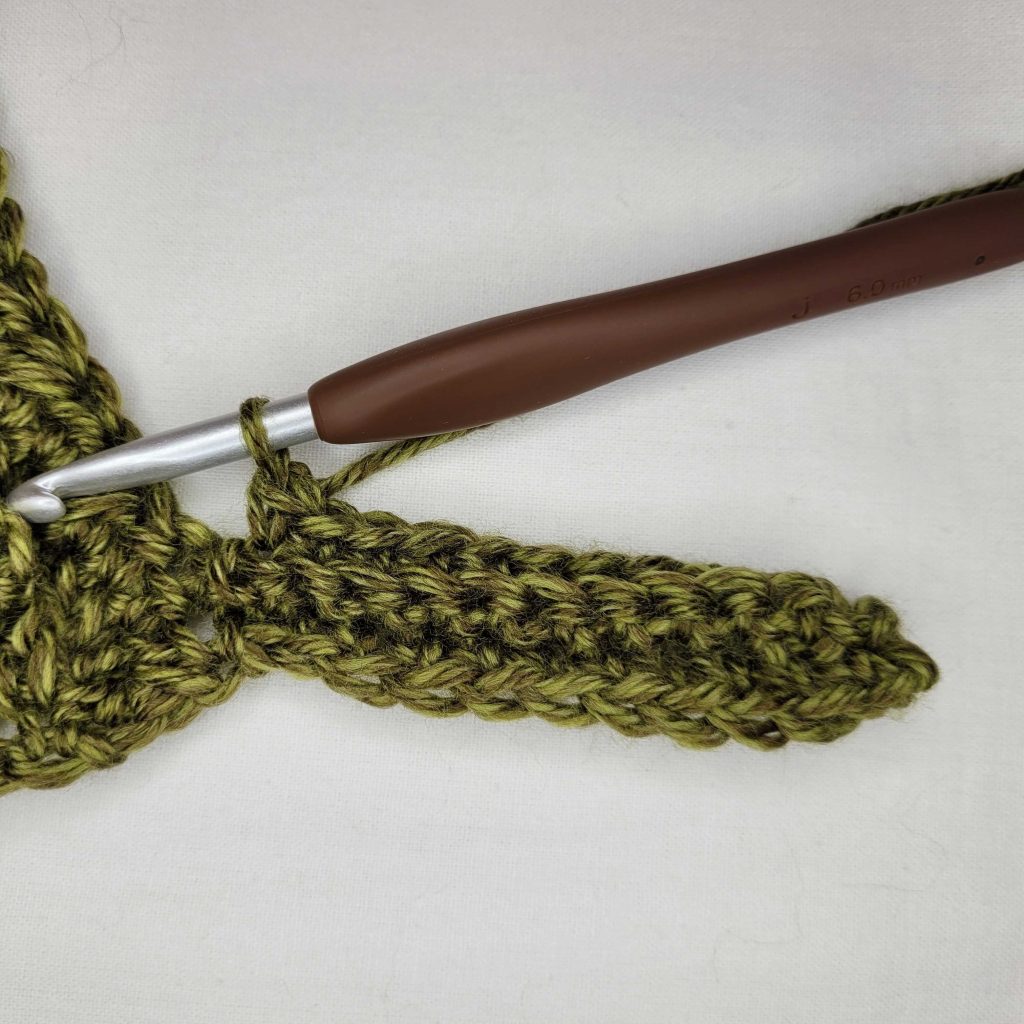
Figure 27
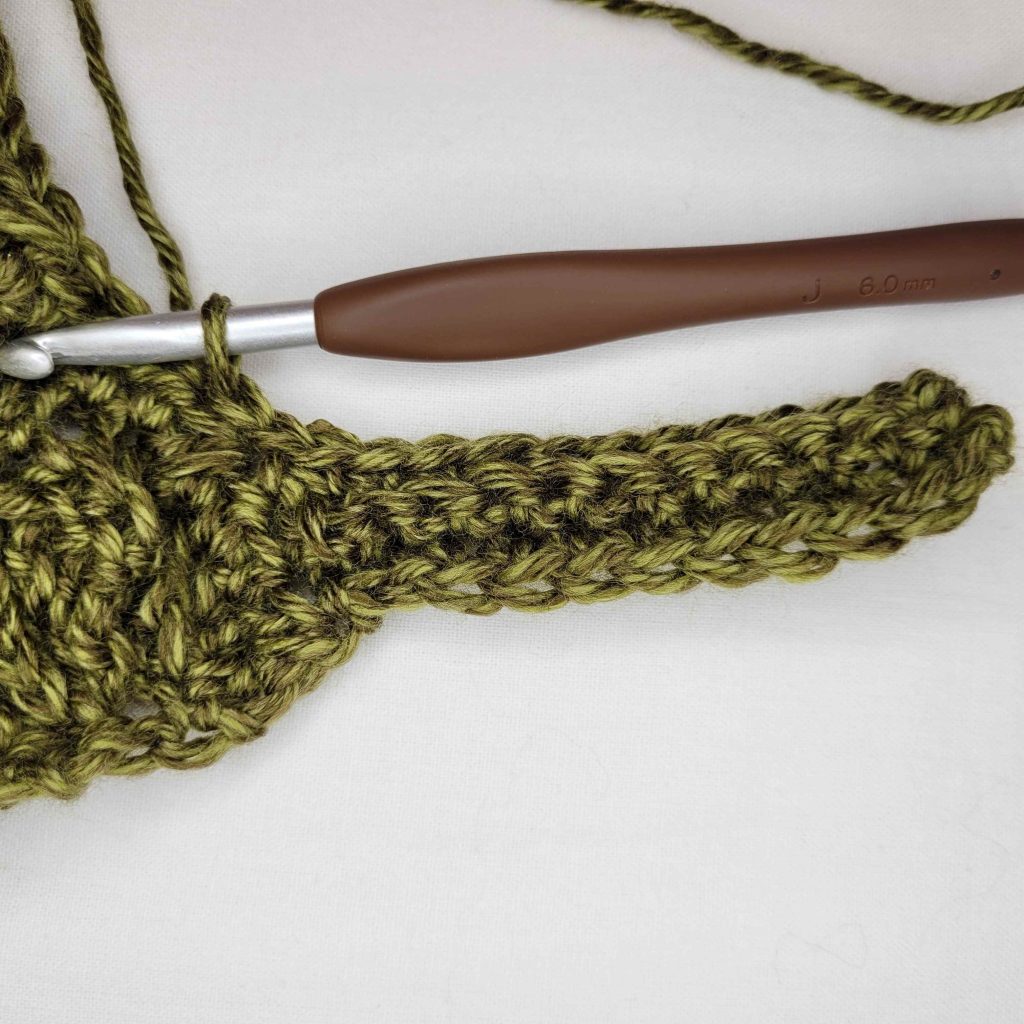
Figure 28
Repeat rows 2 & 3 across the last row of the main body. You should end on a repeat of row 2 (see Figure 29). We will now slip stitch the 2nd sleeve closed:
- Fold your sleeve in half with the right sides together.
- Working through both loops of your last row and the other side of your starting chain, ss the side of the sleeve closed (see Figures 30 & 31).
- Turn your sleeve right side out (see Figure 32). Do not bind off.
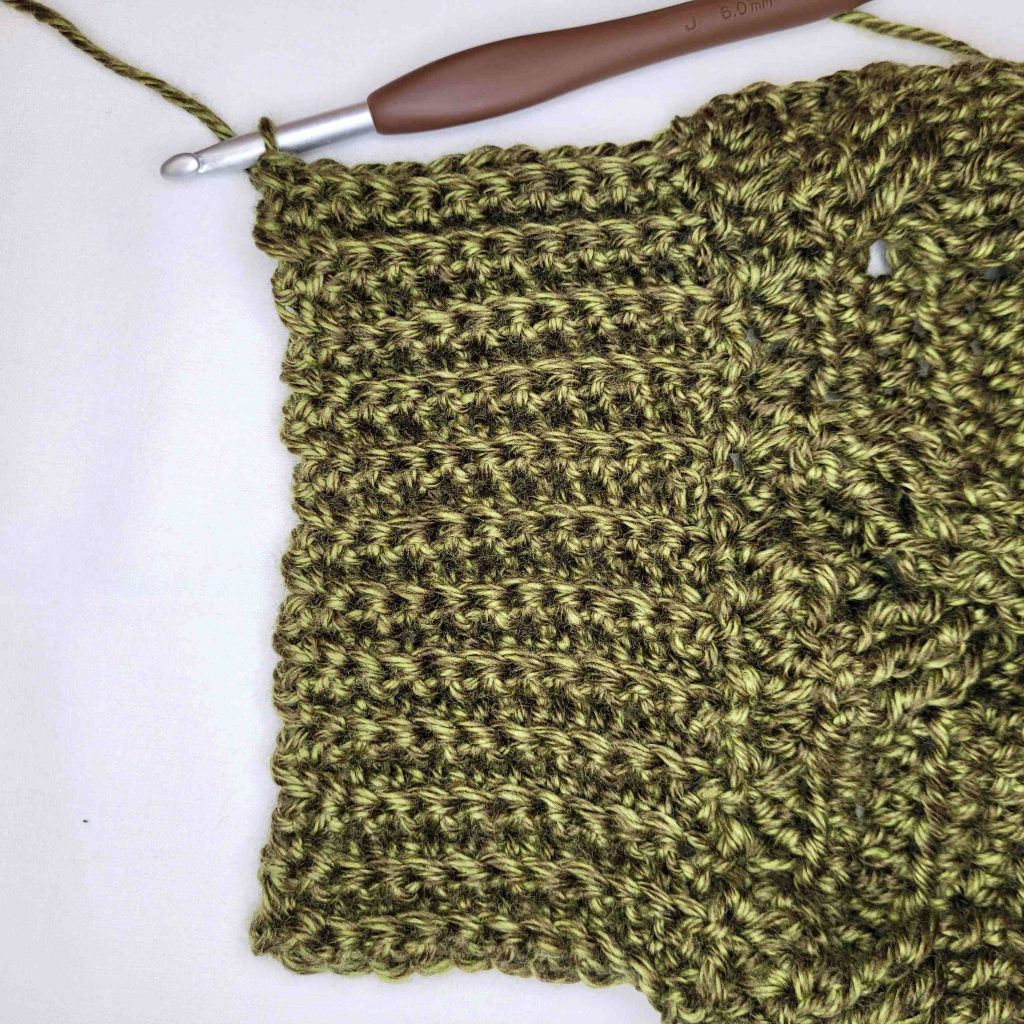
Figure 29
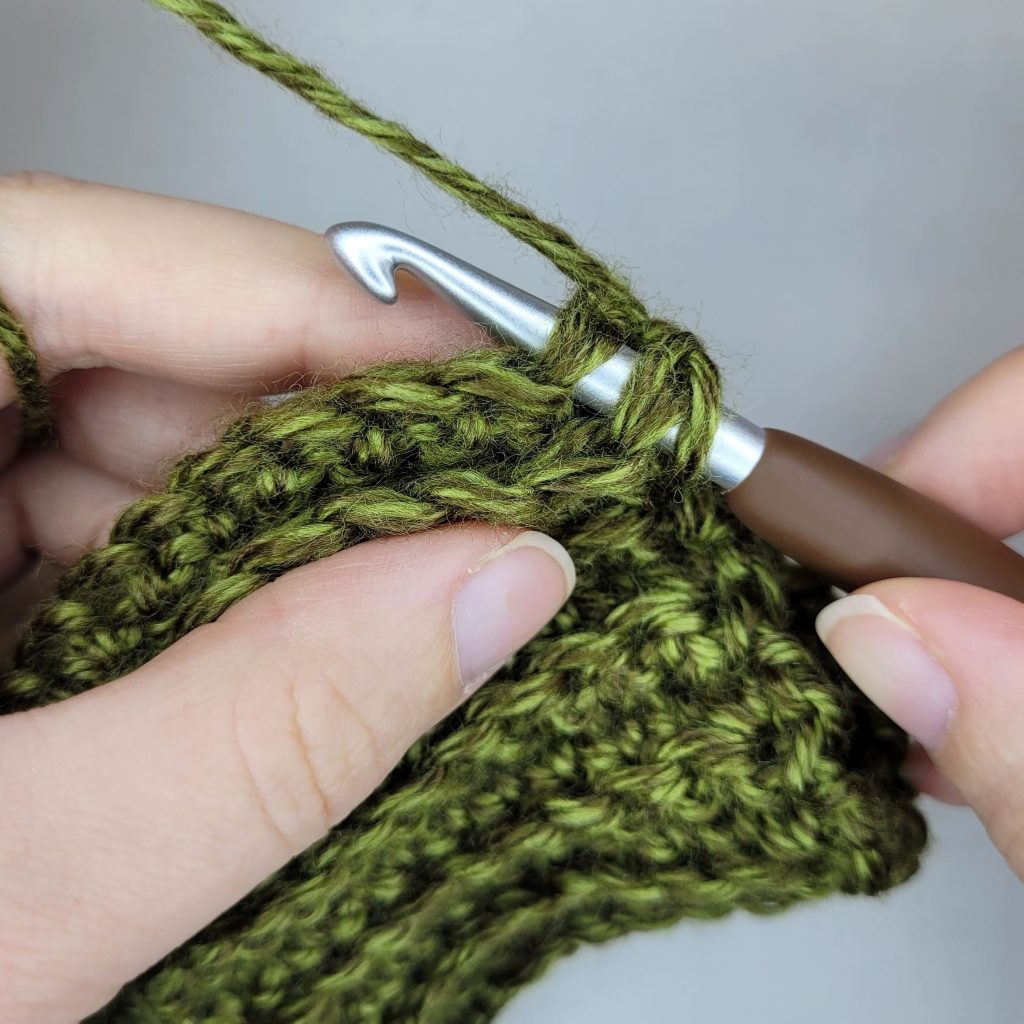
Figure 30
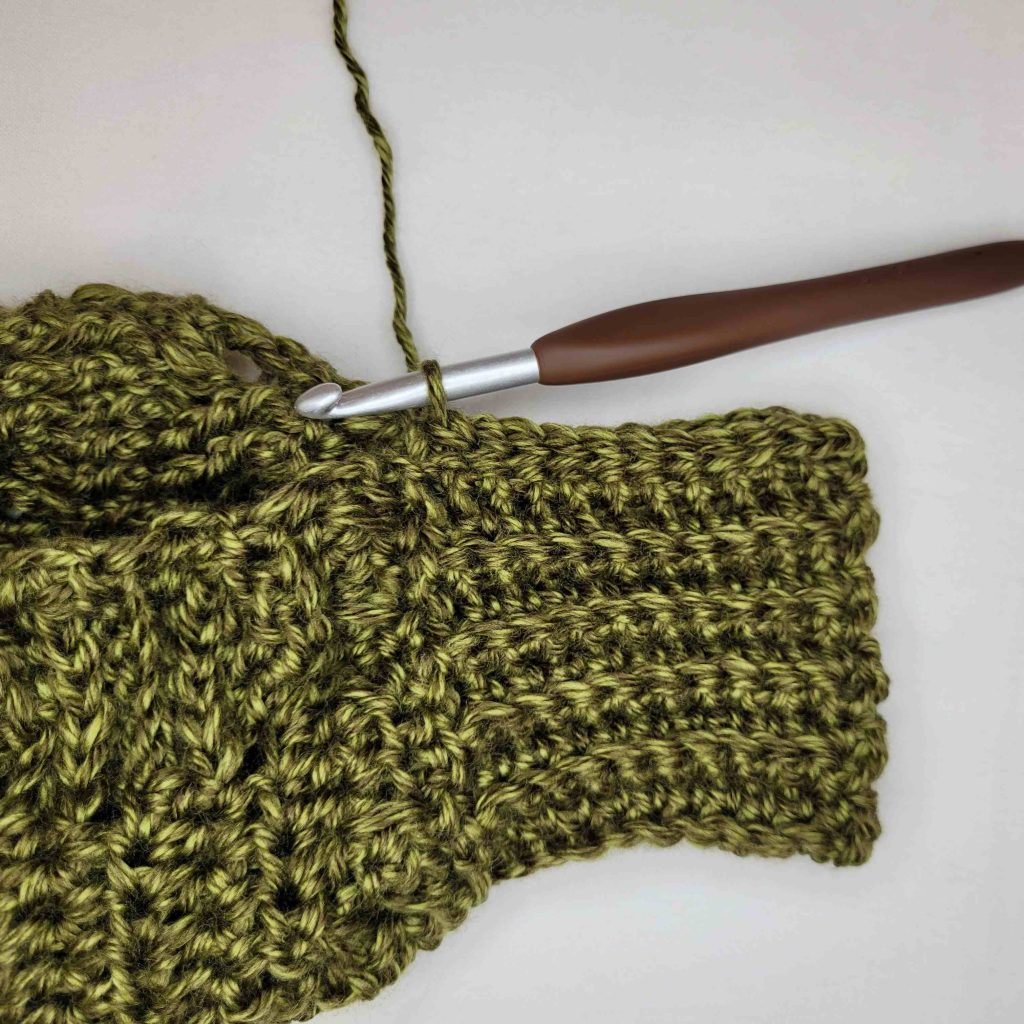
Figure 31
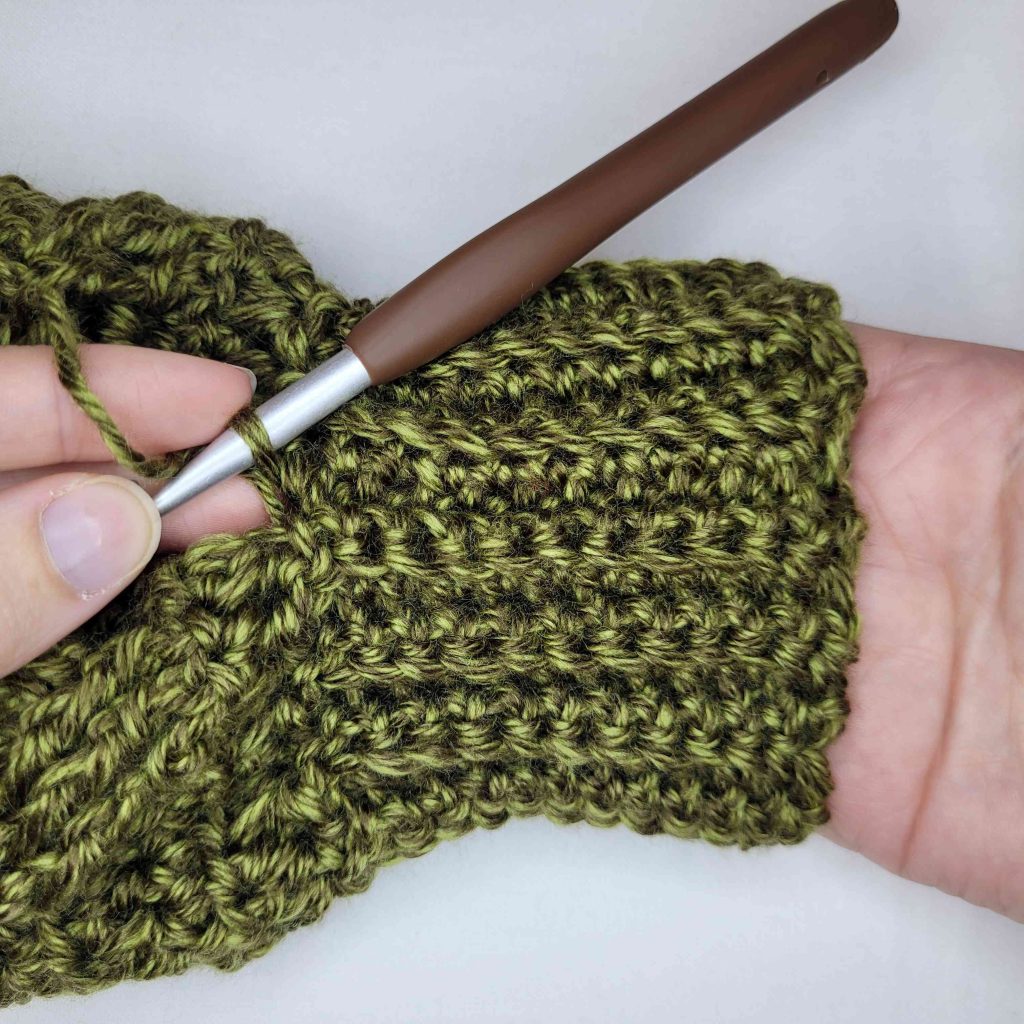
Figure 32
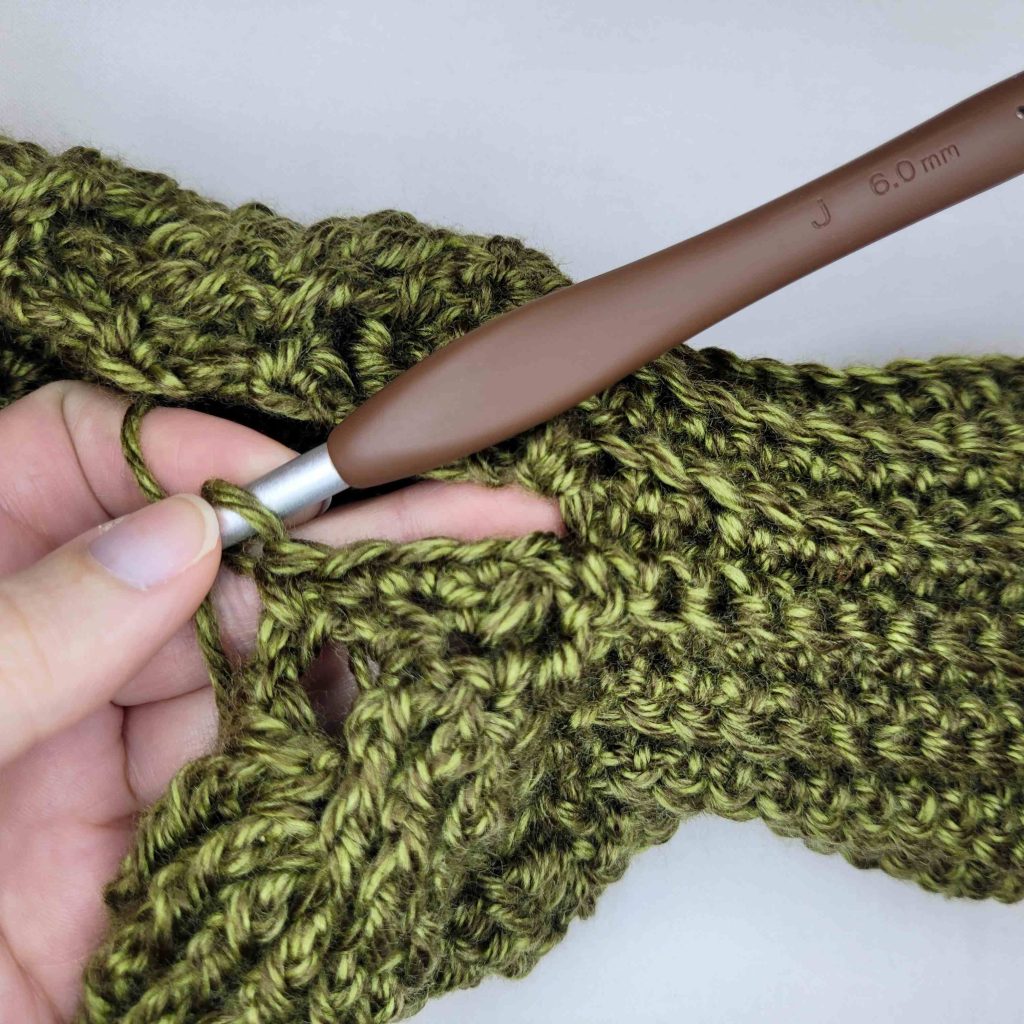
Figure 33
Scarf With Sleeves – Morgaine Sweater Scarf Free Crochet Pattern
Finishing
We will now add a round of sc to the edge of the main body. With the right side facing you.
- Ch1. Sc evenly along the edge, working into the end of each row (see Figure 33). I find it is best to alternate between 1 sc in the 1st row and 2sc in the next row. Work this way all the way around. Ss to join to the 1st st. Bind off.
Weave in your ends, and you’re done!
I hope you love your new crochet sweater scarf with sleeves, and I look forward to seeing all of your beautiful pictures on Ravelry!
If you’d like to know when I post new patterns and tutorials like the Scarf With Sleeves – Morgaine Sweater Scarf Free Crochet Pattern, head on over to my Facebook and Instagram and give me a like and a follow!
If you enjoyed The Scarf With Sleeves – Morgaine Sweater Scarf Free Crochet Pattern, you may want to check out my other designs!
Scarf With Sleeves – Morgaine Sweater Scarf Free Crochet Pattern
And until next time… Happy Hooking! 😉

This is a gorgeous piece that you have created!!! I am definitely going to crochet this for myself!! I love the colour you chose, is it the basil green?
Thanks so much!!!
Trish
Thank you, Trish! Yes, this one was done in the Basil colour.
Hope you enjoy the pattern!