
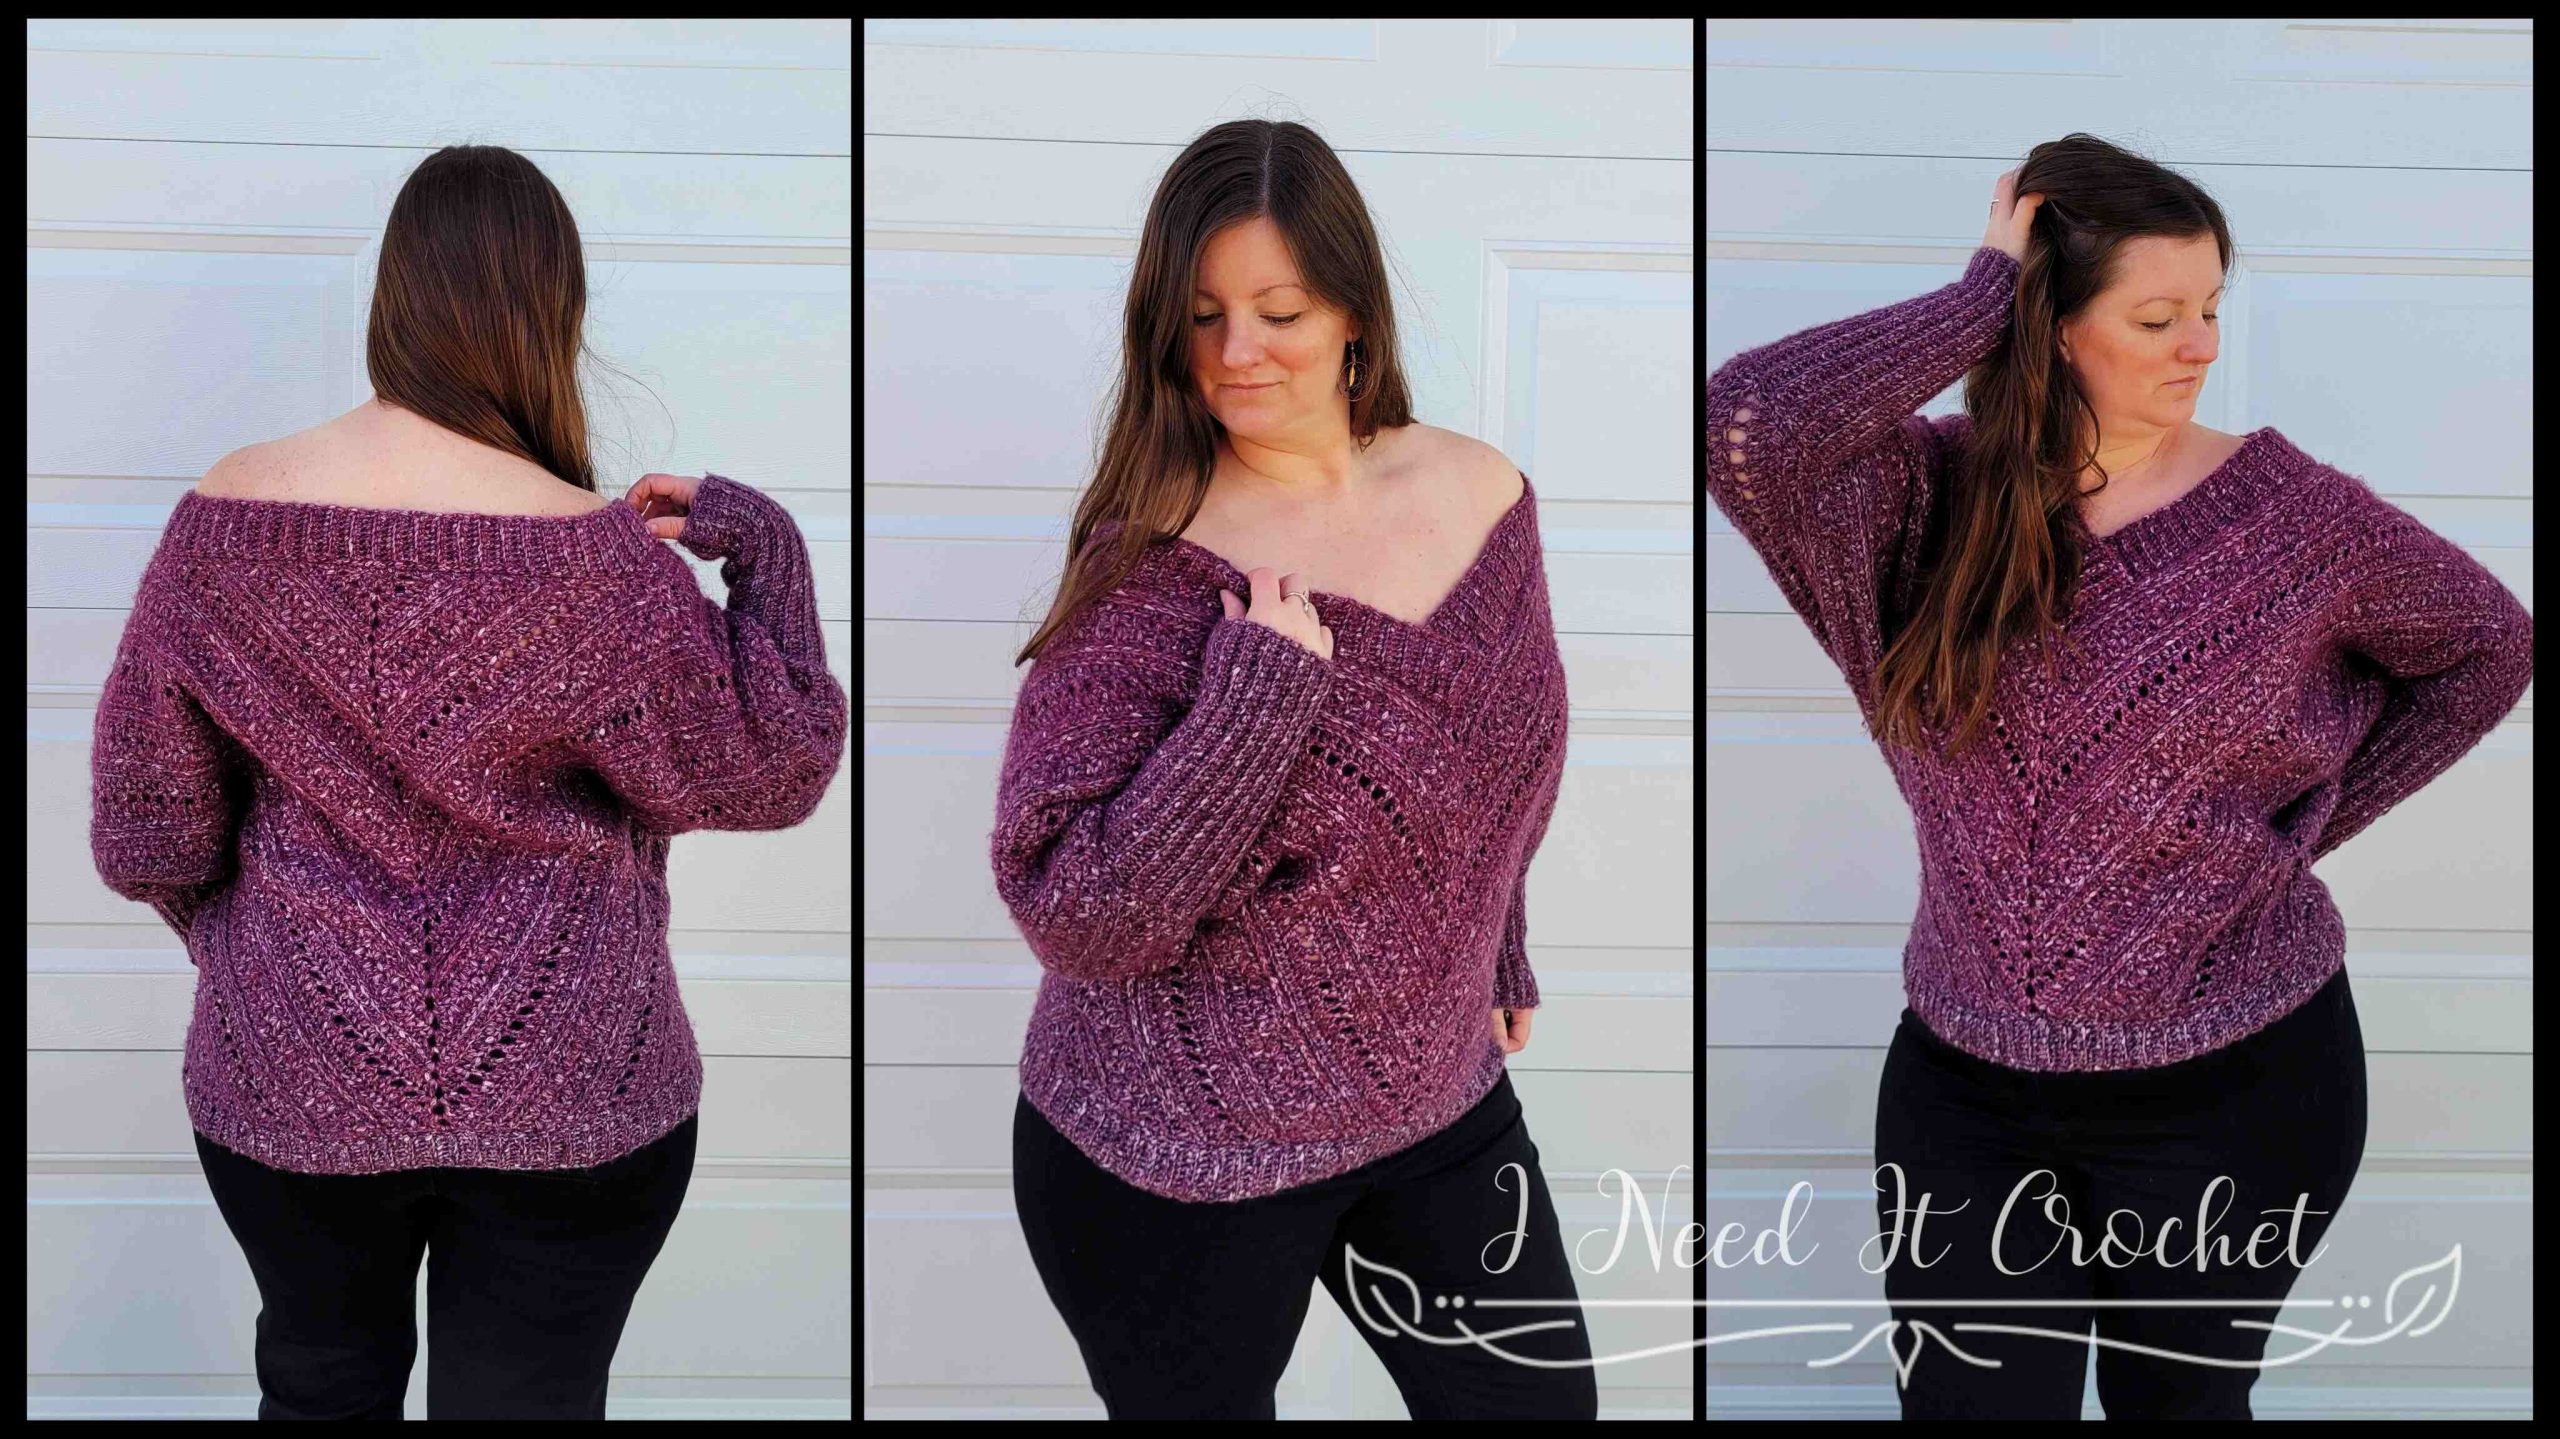
Free Crochet Sweater Pattern – Pinnacle Pullover
The Free Crochet Sweater Pattern – Pinnacle Pullover is copyrighted by I Need It Crochet. You may not copy, share, change, or sell the pattern itself. Also, you may not claim this pattern as your own. All pictures contained in this pattern fall under the copyright and may not be used.
Finished items made from the Free Crochet Sweater Pattern – Pinnacle Pullover belong to you, and you may do what you wish with them. If you choose to sell them on Etsy, I would very much appreciate it if you credited me as the pattern designer.
Where Can I Buy The Pdf?
The entire pattern is available to view for free on this page (you just have to scroll down to see it). But if you would prefer to have a printable pdf copy of the pattern, you can purchase it for a small fee from my Ravelry and Etsy stores. Just click the graphics below.
This pattern is 20 pages long and contains 18 pictures to help you along the way. A printable pdf will be easier to follow, and you can make notes on it as you go. I find it to be the easier option. But if you like to use the online version, it is here 24/7 for you to view. Enjoy!

Free Crochet Sweater Pattern – Pinnacle Pullover

Free Crochet Sweater Pattern – Pinnacle Pullover
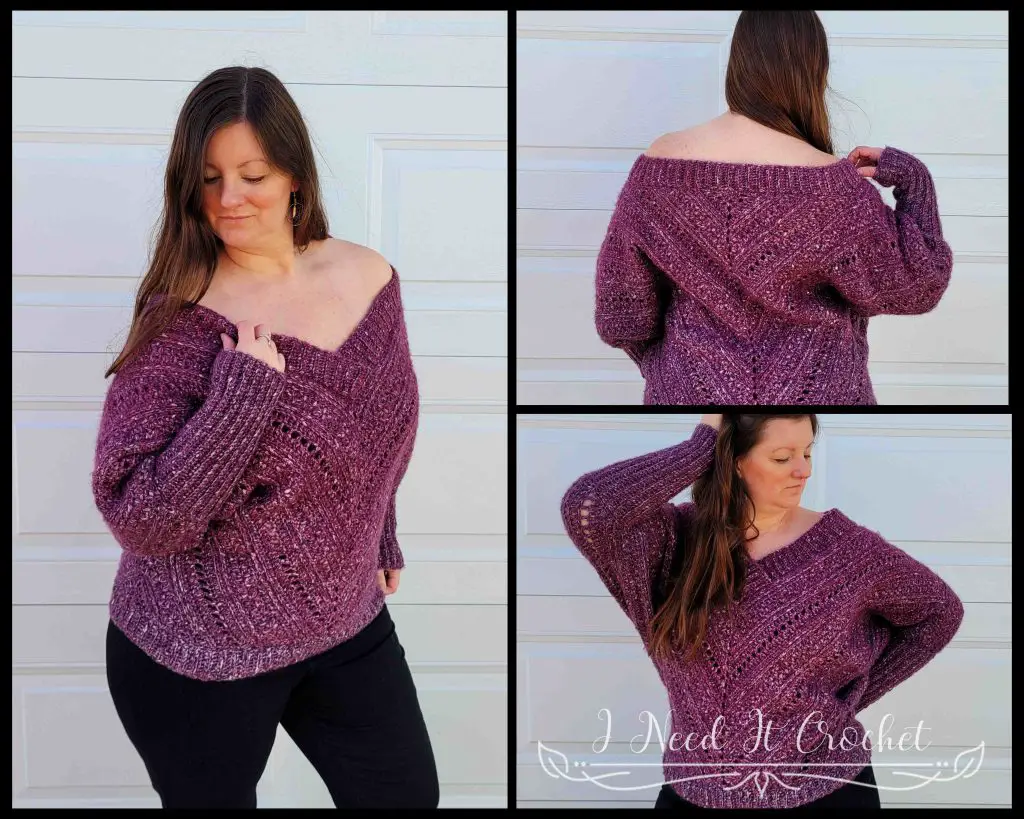
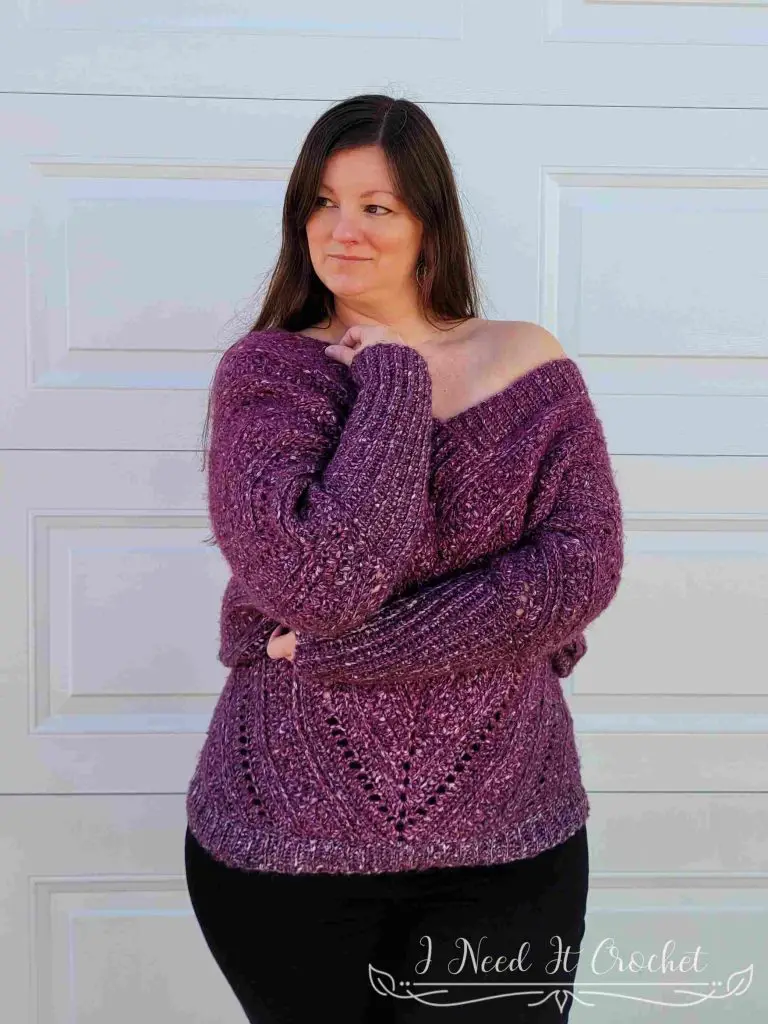
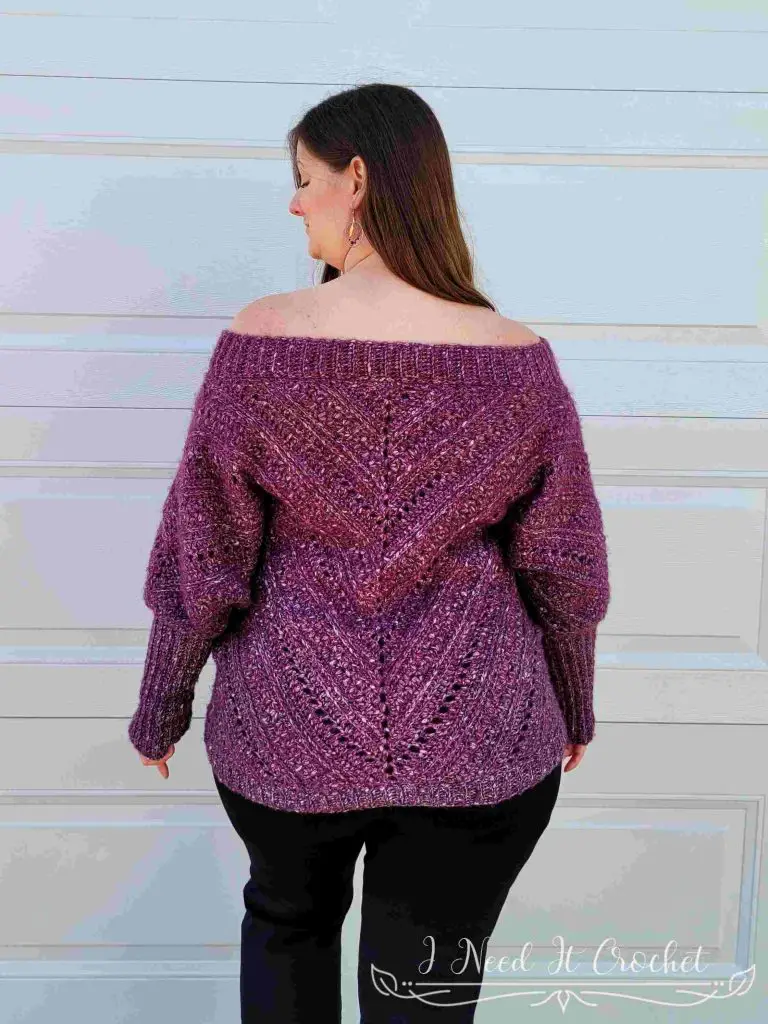
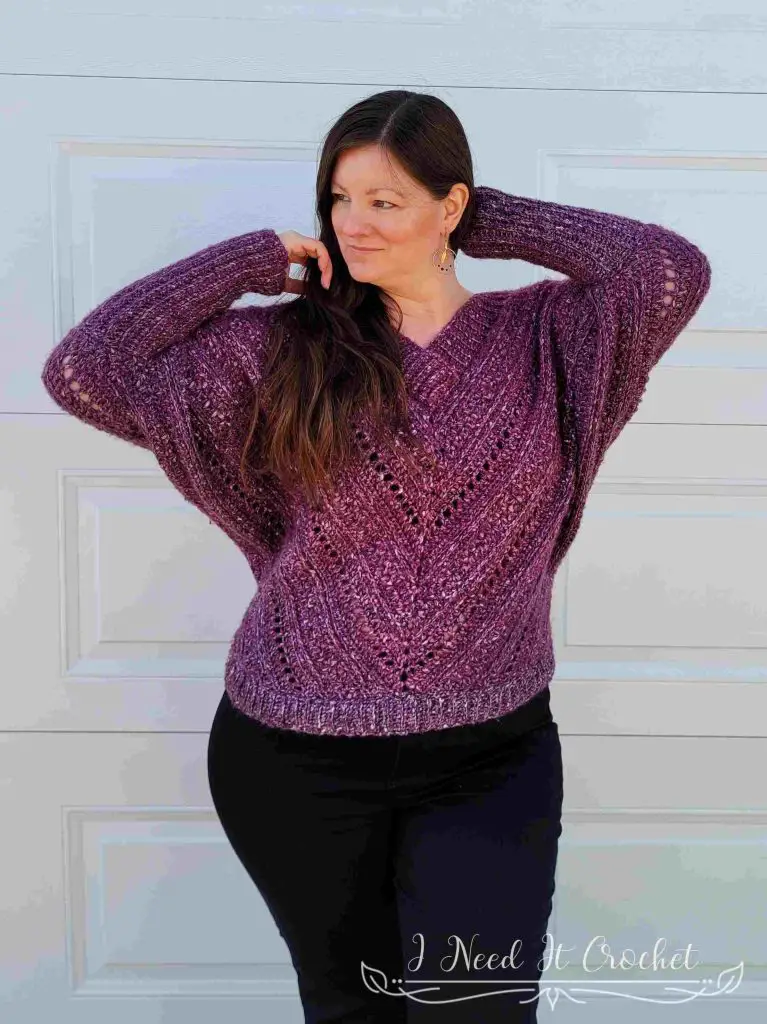
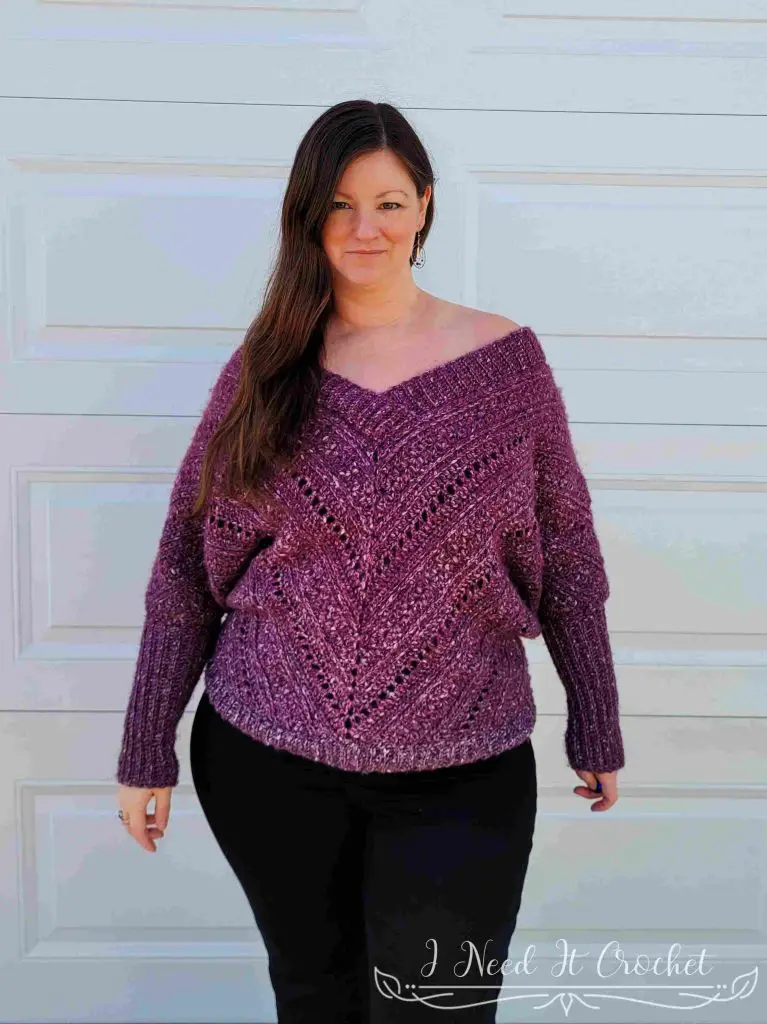
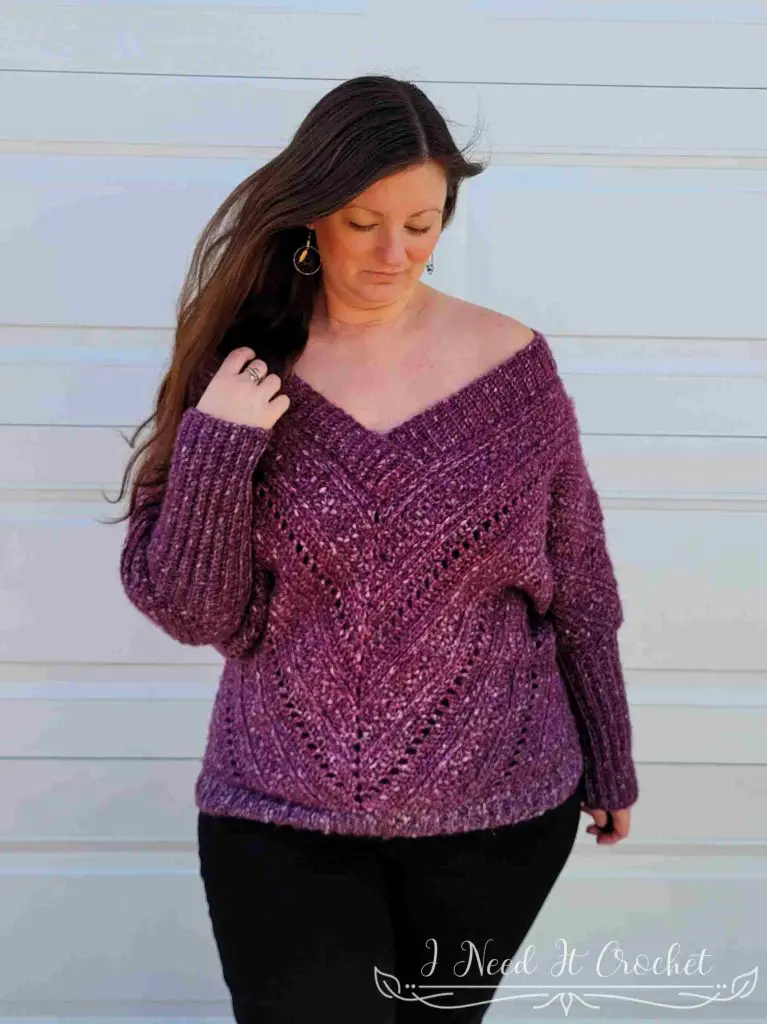
This project has been on my to-do list for a long time. My goal with this design was to make something comfy, classy, and a little sexy. While I often dress a little bit more modestly, I’m not against showing some skin when I want to.
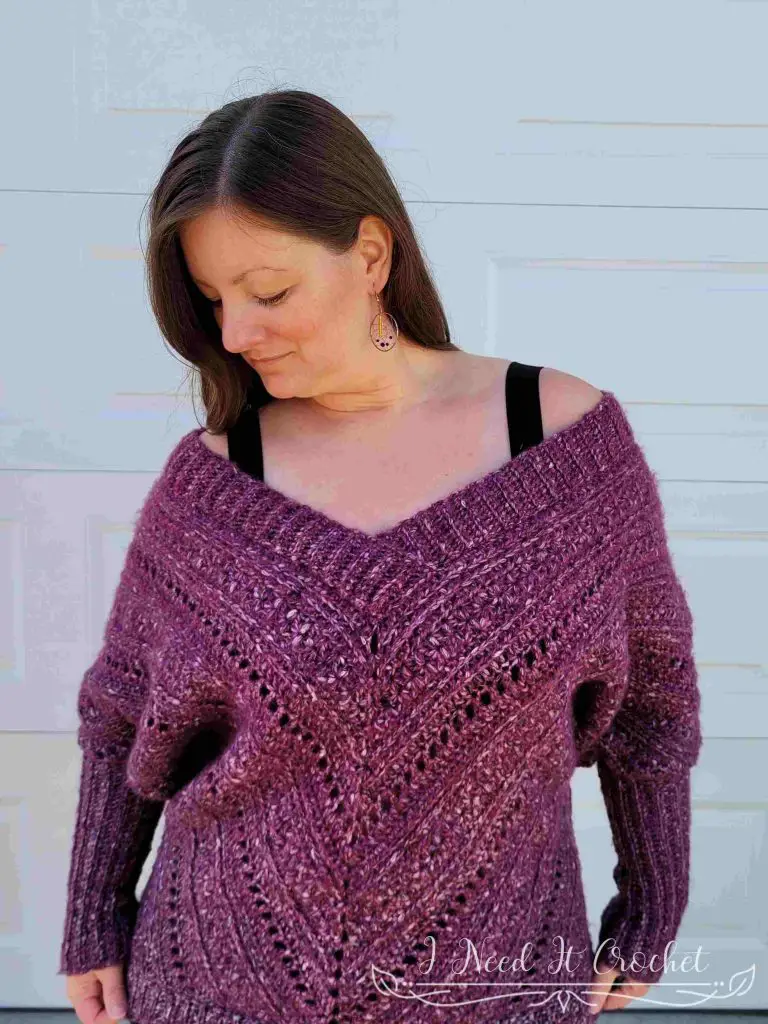
If you’ve ever made my Sum Of Its Parts Pullover, then you’ll be familiar with the workings of this pattern. For this design, I gave three options for the neckline, allowing you to achieve a wide, deep, off-the-shoulder look like mine or a more modest v-neck.
Want to Pin it for later?
Click the image below and save the pin to your favourite crochet pattern boards!

Free Crochet Sweater Pattern – Pinnacle Pullover
Finished Sizes:
Instructions given to fit size X-small; changes for small, medium, large, X-large, 2X-large, 3X-large, 4X-large and 5X-large are in ()
XS (S, M, L, XL, 2XL, 3XL, 4XL, 5XL)
To Fit Bust Size: 28” (32”, 36”, 40”, 44”, 48”, 52”, 56”, 60”)
Bottom Hem Circumference: Customizable
Finished Length: Approximately 24”.
Arm Circumference: Customizable
Materials:
I used Loops & Threads Heathered Tweed. It is a 66% Polyester, 30% Acrylic, 4% Wool #3 Dk weight yarn (please read the Notes section below).
Any yarn of similar weight would work.
Approximately 1400 (1500, 1600, 1700, 1800, 1900, 2000, 2100, 2200) yds.
5.5mm Hook
Stitch Markers
Yarn Needle
Scissors
Measuring Tape
Abbreviations:
RS = Right Side
WS = Wrong Side
Beg = Beginning
Sk = Skip
St = Stitch
Sp = Space
Ss = Slip Stitch
Ch = Chain
Sc = Single Crochet
Hdc = Half Double Crochet
Dc = Double Crochet
Mc = Mixed Cluster (see tutorial here)
Blo = Back Loop Only
3rd Lo = 3rd Loop Only (see tutorial here)
Gauge:
There will be two places within the pattern to measure gauge. Be sure to take the time to measure gauge, as it will save you time in the long run.
Notes:
Ch1 at the beginning of a row is never considered a stitch.
Ch3 at the beginning of a row is considered a dc.
The model above (that’s me) has a 41” bust and is wearing a size L. Yarn Substitution: The label of this yarn identifies it as a #3 dk. However, it’s thickness is more like a #4 worsted. So a lighter worsted weight yarn would also work quite well. Be sure to make a gauge swatch.
Free Crochet Sweater Pattern – Pinnacle Pullover
Instructions
If you have made the Sum Of Its Parts Pullover, then this pattern will be very easy for you as the construction is similar. If you have not made that pattern, please don’t worry. I have added many pictures and illustrations to help you along the way!
Here is a quick rundown of the pattern (see Figure 1 for reference): The body of the sweater is made of one large piece, folded in half. We will begin by creating Part 1, binding off. Then, we will reattach our yarn and add Part 2. This will continue into Part 3, where we will bind off again. Then, we will reattach, work Part 4, and bind off. Parts 5, 6, & 7 are worked the same as 2, 3, & 4. Just on the opposite side.
Once Parts 1-7 are complete, we will fold the project in half, sew the bottoms of the arms, add the bottom hem, neckline ribbing, and finally the sleeves. Note for mc rows/rounds: Beg in same st means beginning in the same st you just worked. Beg in next st means beginning in the st next to the st you just worked.
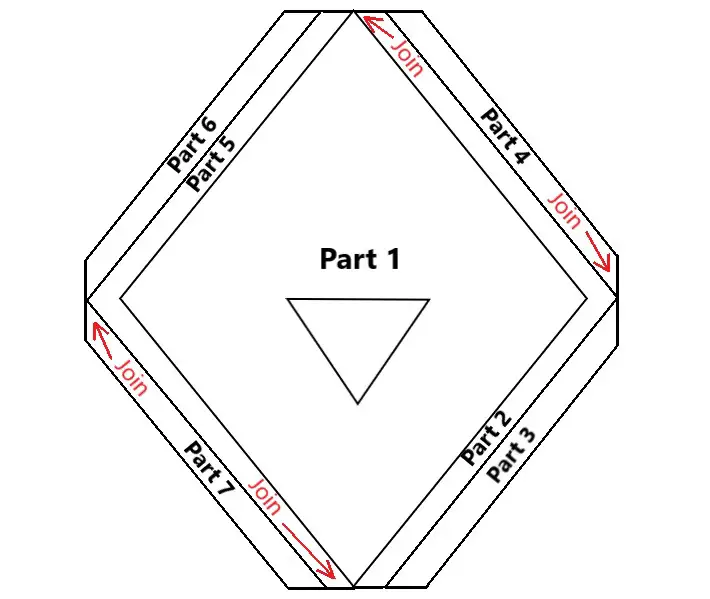
Figure 1
Part 1
For Part 1, we will be creating a large diamond with a triangle shaped hole in the middle (see Figure 2). In Part 1A we will work in rows to create a triangle. Then, in Part 1B we will work in rounds to create the diamond shape.
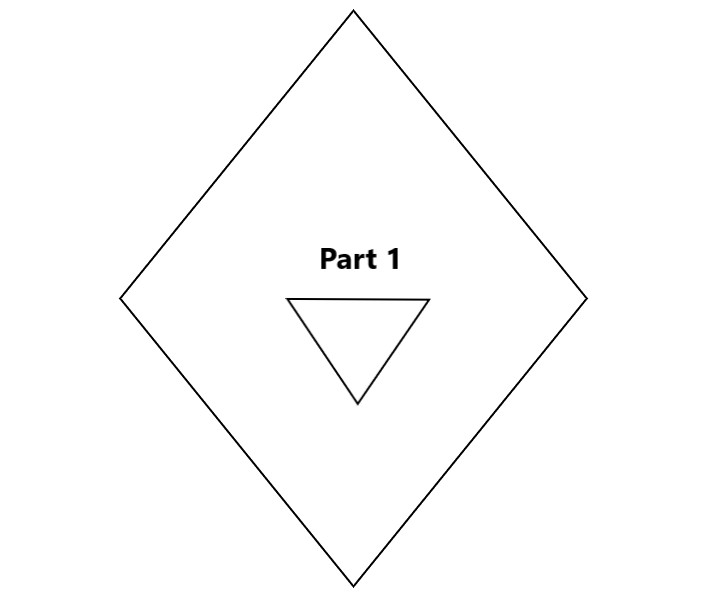
Figure 2
Part 1A
Before you begin, you must choose the size of your neckline. I have written 3 sizes for the neck, and you may choose whichever size you like.
The Small Neck is 8 ½” W x 3 ½” D
The Medium Neck is 10 ½” W x 5 ½” D
The Large Neck is 13” W x 7 ½” D
All measurements include the ribbed trim and may vary slightly depending on the yarn you use, and your tension when making the long chain for your neckline. If in doubt, make the neck size you think works best and try it on after a few rows of 1B are finished. Keep in mind that the ribbed trim will bring the neckline in about 2” on all sides. I made the size L sweater, with a Medium Neck.
With 5.5mm hook, create a magic ring.
- (RS) Ch3. Work 3dc, ch2, 4dc into ring. Turn. – 8 st + ch2 peak
- (WS) Ch4 (counts as dc + ch1). Dc in next st. *Ch1, sk1 st, dc in next st.** Ch1, (dc, ch2, dc) in ch2 sp. Ch1, dc in next st. Repeat from * to **. Ch1, dc in last st. Turn. – 14 st + ch2 peak
- Ch3, dc in 1st st (counts as 2dc in 1st st). Dc in each st and ch sp until the ch2. (2dc, ch2, 2dc) in ch2 sp. Dc in each st and ch sp until 1 left. 2dc in last st. Turn. – 20 st + ch2 peak
- Ch1, 2hdc in 1st st. Hdc in each st until ch2. (2hdc, ch2, 2hdc) in ch2 sp. Hdc in each st until 1 left. 2hdc in last st. Turn. – 26 st + ch2 peak
- Ch1, 2hdc in 1st st. Hdc in blo of each st until ch2. (2hdc, ch2, 2hdc) in ch2 sp. Hdc in blo of each st until 1 left. 2hdc in both loops of last st. Turn. – 32 st + ch2 peak
- Ch1, 2hdc in 1st st. Hdc in 3rd lo of each st until ch2. (2hdc, ch2, 2hdc) in ch2 sp. Hdc in 3rd lo of each st until 1 left. 2hdc in top loops of last st. Turn. – 38 st + ch2 peak
Gauge check: Your triangle should measure 3 ¼” H x 5 ¼” W. If your measurements are not close to correct, try again with a different sized hook.
- Ch1, hdc in 1st st. Ch1, beg in same st, mc until ch2. (2hdc, ch2, 2hdc) in ch2 sp. Ch1, beg in next st, mc to last st. Add 1 more hdc to last st. Turn. – 44 st + ch2 peak
- Ch1, 2hdc in 1st st. Ch1, beg in next st, mc until the ch2. (2hdc, ch2, 2hdc) in ch2 sp. Ch1, beg in next st, mc until 1 st left. 2hdc in last st. Turn. – 50 st + ch2 peak
- Ch1, 2hdc in 1st st. Hdc in each st until ch2. (2hdc, ch2, 2hdc) in ch2 sp. Hdc in each st until 1 left. 2hdc in last st. Turn. – 56 st + ch2 peak
- Ch1, 2hdc in 1st st. Hdc in 3rd lo of each st until ch2. (2hdc, ch2, 2hdc) in ch2 sp. Hdc in 3rd lo of each st until 1 left. 2hdc in top loops of last st. Turn. – 62 st + ch2 peak
Gauge check: Your triangle should measure 6 ¼” H x 9 ¾” W. If your measurements are not close to correct, try again with a different sized hook.
- Work this row according to your size:
Small Neckline: Ch3, dc in 1st st. Dc in blo of each st until ch2. (2dc, ch2, 2dc) in ch2 sp. Dc in blo of each st until 1 left. 2dc in both loops of last st. Ch 72, ss to join to 1st st. SS to next st. Turn. – 68 st + ch2 peak + ch72
Skip rows 12-15 and carry on to Part 1B below.
Medium and Large Necklines: Ch3, dc in 1st st. Dc in blo of each st until ch2. (2dc, ch2, 2dc) in ch2 sp. Dc in blo of each st until 1 left. 2dc in both loops of last st. Turn. – 68 st + ch2 peak - Ch4 (counts as dc + ch1), dc in next st. *Ch1, sk1 st, dc in next st.** Repeat from * to ** until the center ch2. Ch1, (dc, ch2, dc) in ch2 sp. Ch1, dc in next st. Repeat from * to ** until 1 st left. Ch1, dc in last st. Turn. – 74 st + ch2 peak
- Work this row according to your size:
Medium Neckline: Ch3, dc in 1st st (counts as 2dc in 1st st). Dc in each st and ch sp until the ch2. (2dc, ch2, 2dc) in ch2 sp. Dc in each st and ch sp until 1 left. 2dc in last st. Ch84, ss to join to 1st st. Turn. – 80 st + ch2 peak + ch84
Skip rows 14-15 and carry on to Part 1B below.
Large Neckline: Ch3, dc in 1st st (counts as 2dc in 1st st). Dc in each st and ch sp until the ch2. (2dc, ch2, 2dc) in ch2 sp. Dc in each stand ch sp until 1 left. 2dc in last st. Turn. – 80 st + ch2 peak - Ch1, 2hdc in 1st st. Hdc in each st until ch2. (2hdc, ch2, 2hdc) in ch2 sp. Hdc in each st until 1 left. 2hdc in last st. Turn. – 86 st + ch2 peak
- Ch1, 2hdc in 1st st. Hdc in blo of each st until ch2. (2hdc, ch2, 2hdc) in ch2 sp. Hdc in blo of each st until 1 left. 2hdc in both loops of last st. Ch96, ss to join to 1st st. Turn. – 92 st + ch2 peak + ch96
Part 1B
Your project should now look similar to Figure 3 below. We will now be working in rounds, but still turning at the end of each round. For the first round, your project should be WS facing you. Your first stitch will be worked into the stitch you slip stitched into at the end of the last row you just worked. The following stitches will be worked into the long chain.
Begin with the row marked with your size and Start Here. Then, carry on with each subsequent round marked with your size to round 16. Round 17 onward is for all sizes.
Note: When counting your stitches, it’s best to divide the total stitch count by 4 and count each side separately. This will make counting easier and also ensure that each side has the correct amount of stitches.
- Small Neckline Start Here: Ch4 (counts as dc + ch1 in 1st st). Sk next st. (Dc, ch1, dc) in 1st ch. *Ch1, sk1 ch, dc in next ch.** Repeat from * to ** over next 32 chs. Ch1, dc in next ch. Ch2, dc in next ch. Ch1, dc in next ch. Repeat from * to ** until 2 ch left. Ch1, sk1 st, (dc, ch1, dc) in last ch. *Ch1, sk1 st, dc in next st.** Repeat from * to ** until next ch2 peak. Ch1, (dc, ch2, dc) in ch2 sp. Ch1, dc in next st. Repeat from * to ** until 1 st left. Ch1, ss to join to 1st st. Ss to next ch. Ss to next st. Ss into ch1 sp. Turn. – 148 st + 2 ch2 peak + 2 ch1 peak (154 st total)
- Small Neckline: (Ch4, dc) in ch1 sp (counts as (dc, ch1, dc) in ch1 sp). *Dc in each st and ch sp until next ch2 peak. (2dc, ch2, 2dc) in ch2 sp.** Dc in each st and ch sp until next ch1 peak. (Dc, ch1, dc) in ch1 sp. Repeat from * to **. Dc in each st and ch sp to end. Ss to join to 1st st. Ss into ch1 sp. Turn. – 160 st + 2 ch2 peak + 2 ch1 peak (166 st total)
- Small Neckline: Ch1, (hdc, ch1, hdc) in ch1 sp. *Hdc in each st until next ch2 peak. (2hdc, ch2, 2hdc) in ch2 sp.** Hdc in each st until next ch1 peak. (Hdc, ch1, hdc) in ch1 sp. Repeat from * to **. Hdc in each st to end. Ss to join to 1st st. Ss into ch1 sp. Turn. – 172 st + 2 ch2 peak + 2 ch1 peak (178 st total)
Medium Neckline Start Here: Ch1, hdc in 1st st. (Hdc, ch1, hdc) in 1st ch. Hdc in next 40 ch. 2hdc in next ch. Ch2. 2hdc in next ch. Hdc in next 40 ch. (Hdc, ch1, hdc) in last ch. Hdc in each st to next ch2 peak. (2hdc, ch2, 2hdc) in ch2 sp. Hdc in each st to end. Ss to join to 1st st. Ss to next st. Ss into ch1 sp. Turn. – 172 st + 2 ch2 peak + 2 ch1 peak (178 st total) - Small & Medium Neckline: Ch1. *(Hdc, ch1, hdc) in ch1 sp. Hdc in blo of each st to next ch2 peak. (2hdc, ch2, 2hdc) in ch2 sp.** Hdc in blo of each st to next ch1 peak. Repeat from * to **. Hdc in blo of each st to end. Ss to join to 1st st. Ss into ch1 sp. Turn. – 184 st + 2 ch2 peak + 2 ch1 peak (190 st total)
- Small & Medium Neckline: Ch1. *(Hdc, ch1, hdc) in ch1 sp. Hdc in 3rd lo of each st to next ch2 peak. (2hdc, ch2, 2hdc) in ch2 sp.** Hdc in 3rd lo of each st to next ch1 peak. Repeat from * to **. Hdc in 3rd lo of each st to end. Ss to join to 1st st. Ss into ch1 sp. Turn. – 196 st + 2 ch2 peak + 2 ch1 peak (202 st total)
Large Neckline Start Here: Ch1, hdc in 1st st. (Hdc, ch1, hdc) in 1st ch. Hdc in next 46 chs. 2hdc in next ch. Ch2. 2hdc in next ch. Hdc in next 46 chs. (hdc, ch1, hdc) in last ch. Hdc in 3rd lo of each st to next ch2 peak. (2hdc, ch2, 2hdc) in ch2 sp. Hdc in 3rd lo of each st to end. Ss to join to 1st st. Ss into ch1 sp. Turn. – 196 st + 2 ch2 peak + 2 ch1 peak (202 st total)
All Neckline Sizes:
- Ch1. *(Hdc, ch1, hdc) in ch1 sp. Ch1, beg in next st, mc to next ch2 peak. (2hdc, ch2, 2hdc) in ch2 sp.** Ch1, beg in next st, mc to next ch1 peak. Repeat from * to **. Ch1, beg in next st, mc to end. Ss to join to 1st st. Ss into ch1 sp. Turn. – 208 st + 2 ch2 peak + 2 ch1 peak (214 st total)
- Ch1. * (Hdc, ch1, hdc) in ch1 sp. Hdc, in next st. Ch1, beg in next st, mc to next ch2 peak. (2hdc, ch2, 2hdc) ch2 sp.** Ch1, beg in next st, mc until 1 st before next ch1 peak. Hdc in next st. Repeat from * to **. Ch1, beg in next st, mc until 1 st left. Hdc in last st. Ss to join to 1st st. Ss into ch1 sp. Turn. – 220 st + 2 ch2 peak + 2 ch1 peak (226 st total)
- Ch1, (hdc, ch1, hdc) in ch1 sp. *Hdc in each st until next ch2 peak. (2hdc, ch2, 2hdc) in ch2 sp.** Hdc in each st until next ch1 peak. (Hdc, ch1, hdc) in ch1 sp. Repeat from * to **. Hdc in each st to end. Ss to join to 1st st. Ss into ch1 sp. Turn. – 232 st + 2 ch2 peak + 2 ch1 peak (238 st total)
- Ch1. *(Hdc, ch1, hdc) in ch1 sp. Hdc in 3rd lo of each st to next ch2 peak. (2hdc, ch2, 2hdc) in ch2 sp.** Hdc in 3rd lo of each st to next ch1 peak. Repeat from * to **. Hdc in 3rd lo of each st to end. Ss to join to 1st st. Ss into ch1 sp. Turn. – 244 st + 2 ch2 peak + 2 ch1 peak (250 st total)
- (Ch4, dc) in ch1 sp (counts as (dc, ch1, dc) in ch1 sp). Dc in blo of each st to next ch2 peak. (2dc, ch2, 2dc) in ch2 sp.** Dc in blo of each st to next ch1 peak. Repeat from * to **. Dc in blo of each st to end. Ss to join to 1st st. Ss into ch1 sp. Turn. – 256 st + 2 ch2 peak + 2 ch1 peak (262 st total)
- (WS) (Ch4, dc) in ch1 sp (counts as (dc, ch1, dc) in ch1 sp). [*Ch1, sk1 st, dc in next st.** Repeat from * to ** to next ch2 peak. Ch1. (Dc, ch2, dc) in ch2 sp. Ch1, dc in next st. ] Repeat from * to ** until 1 st before next ch1 peak. Ch1, sk1 st, (dc, ch1, dc) in ch1 sp. Repeat from [ to ]. Repeat from * to ** until 1 st left. Ch1, ss to join to 1st st. Ss into ch1 sp. Turn. – 268 st + 2 ch2 peak + 2 ch1 peak (274 st total)
- (RS) (Ch4, dc) in ch1 sp (counts as (dc, ch1, dc) in ch1 sp). *Dc in each st to next ch2 peak. (2dc, ch2, 2dc) in ch2 sp.** Dc in each st to next ch1 peak. (Dc, ch1, dc) in ch1 sp. Repeat from * to **. Dc in each st to end. Ss to join to 1st st. Ss into ch1 sp. Turn. – 280 st + 2 ch2 peak + 2 ch1 peak (286 st total)
- Ch1, (hdc, ch1, hdc) in ch1 sp. *Hdc in each st until next ch2 peak. (2hdc, ch2, 2hdc) in ch2 sp.** Hdc in each st until next ch1 peak. (Hdc, ch1, hdc) in ch1 sp. Repeat from * to **. Hdc in each st to end. Ss to join to 1st st. Ss into ch1 sp. Turn. – 292 st + 2 ch2 peak + 2 ch1 peak (298 st total)
- Ch1. *(Hdc, ch1, hdc) in ch1 sp. Hdc in blo of each st to next ch2 peak. (2hdc, ch2, 2hdc) in ch2 sp.** Hdc in blo of each st to next ch1 peak. Repeat from * to **. Hdc in blo of each st to end. Ss to join to 1st st. Ss into ch1 sp. Turn. – 304 st + 2 ch2 peak + 2 ch1 peak (310 st total)
- Ch1. *(Hdc, ch1, hdc) in ch1 sp. Hdc in 3rd lo of each st to next ch2 peak. (2hdc, ch2, 2hdc) in ch2 sp.** Hdc in 3rd lo of each st to next ch1 peak. Repeat from * to **. Hdc in 3rd lo of each st to end. Ss to join to 1st st. Ss into ch1 sp. Turn. – 316 st + 2 ch2 peak + 2 ch1 peak (322 st total)
Repeat rounds 17-23. You should now have a total of 33 rows & rounds, and your stitch count should now be 400 st + 2 ch2 peak + 2 ch1 peak (406 st total). Bind off.
Free Crochet Sweater Pattern – Pinnacle Pullover
Part 2
In this section, we will add a little bit of length to the sleeves. With the wrong side facing you, join your yarn in the first st just after the ch2 peak at the back of the sweater (indicated in Figure 3 below). Figure 3 is shown with the right side facing you.
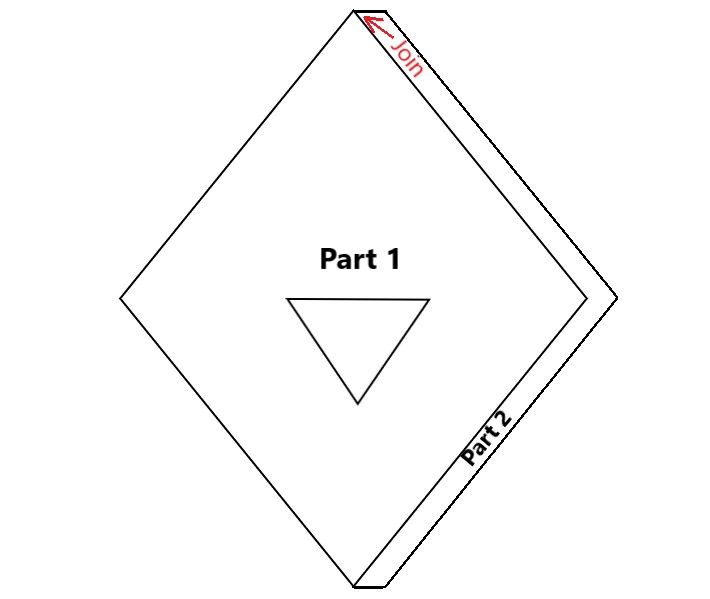
Figure 3
- (WS) Ch1, hdc in next st (counts as hdc2tog). Hdc in each st to next ch1 peak. (Hdc, ch1, hdc) in ch1 sp. Hdc in each st until 2 sts left before the next ch2 peak. Hdc2tog. Turn. – 200 st + ch1 peak
- (RS) Ch1, hdc in next st (counts as hdc2tog). Hdc in blo of each st to next ch1 peak. (Hdc, ch1, hdc) in ch1 sp. Hdc in blo of each st until 2 sts left before the next ch2 peak. Hdc2tog. Turn. – 200 st + ch1 peak
- (WS) Ch1, hdc in next st (counts as hdc2tog). Hdc in 3rd lo of each st to next ch1 peak. (Hdc, ch1, hdc) in ch1 sp. Hdc in 3rd lo of each st until 2 sts left before the next ch2 peak. Hdc2tog. Turn. – 200 st + ch1 peak
- (RS) Ch1, hdc in next st (counts as hdc2tog). Beg in same st, mc to next ch1 peak. (Hdc, ch1, hdc) in ch1 sp. Beg in next st, mc until 1 st left. Hdc2tog over last 2 sts. Turn. – 200 st + ch1 peak
- Repeat row 37. Do not bind off. – 200 st + ch1 peak
Part 3
In this section, we will add height to the front of the sleeve (see Figure 4 below). I have written this section so that you can choose whatever sleeve size you want. To achieve the same look as mine, I recommend you make your sleeves fitted closely to your forearms. To do this, use a soft measuring tape to measure the circumference of the largest part of your forearm. Then divide that number in half. That will be your goal height for Part 3.
For example: My forearm circumference is 10 ½”, so I worked Part 3 until it was approximately 5 ¼” tall (this ended up being 9 rows). When measuring your row height, it’s best to measure the end of the rows where your sleeve will be.
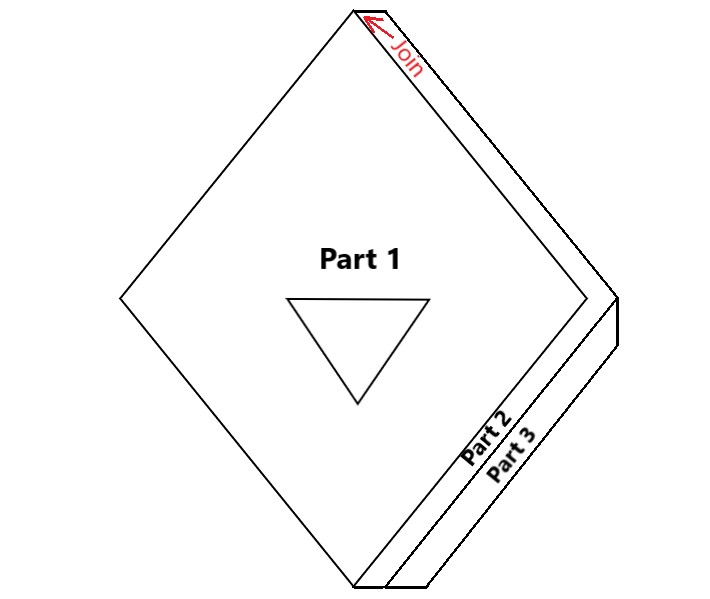
Figure 4
Work the rows below only until you have reached your goal height, being sure to end on an odd numbered row. If you reach your goal height before finishing all of the written rows, then skip the rest. Bind off when you have reached your goal height, leaving a long tail for sewing the bottom of the sleeve.
- (RS) Ch1, hdc in next st (counts as hdc2tog). Hdc in each st until 3 sts left before next ch1 peak. Hdc3tog. Turn. – 97 st
- Ch1, hdc2tog over next 2 sts (counts as hdc3tog). Hdc in 3rd lo of each st until 2 left. Hdc2tog. Turn. – 94 st
- Ch2, dc in next st (counts as dc2tog). Dc in blo of each st until 3 left. Dc3tog. – 91 st
- Ch2, sk 1 st, dc in next st (counts as dc3tog). *Ch1, sk 1 st, dc in next st.** Repeat from * to ** until 2 sts left. Sk 1 st, dc in last st. Turn. – 88 st
- Ch2, dc in next st (counts as dc2tog). Dc in each st and ch sp until 3 left. Dc3tog. – 85 st
- Ch1, hdc2tog over next 2 sts (counts as hdc3tog). Hdc in each st until 2 left. Hdc2tog. Turn. – 82 st
- Ch1, hdc in next st (counts as hdc2tog). Hdc in blo of each st until 3 sts left. Hdc3tog. Turn. – 79 st
- Ch1, hdc2tog over next 2 sts (counts as hdc3tog). Hdc in 3rd lo of each st until 2 left. Hdc2tog. Turn. – 76 st
- Ch1, hdc in next st (counts as hdc2tog). Beg in same st, mc until 4 sts left. Hdc in next st. Hdc3tog. Turn. – 73 st
- Ch1, hdc2tog over next 2 sts (counts as hdc3tog. Beg in same st, mc until 2 left. Hdc2tog. – 70 st
If you have not reached your goal height yet, then repeat rows 39-48 until you have. Be sure to end on an odd numbered row. Then, bind off, leaving a long tail for sewing the bottom of the sleeve.
Part 4
In Part , we will be adding height to the back of the sleeve. With the right side facing you, join your yarn in the first st after the ch1 peak (as indicated in Figure 5 below). Work the same number of rows as you did for Part 3, then bind off.
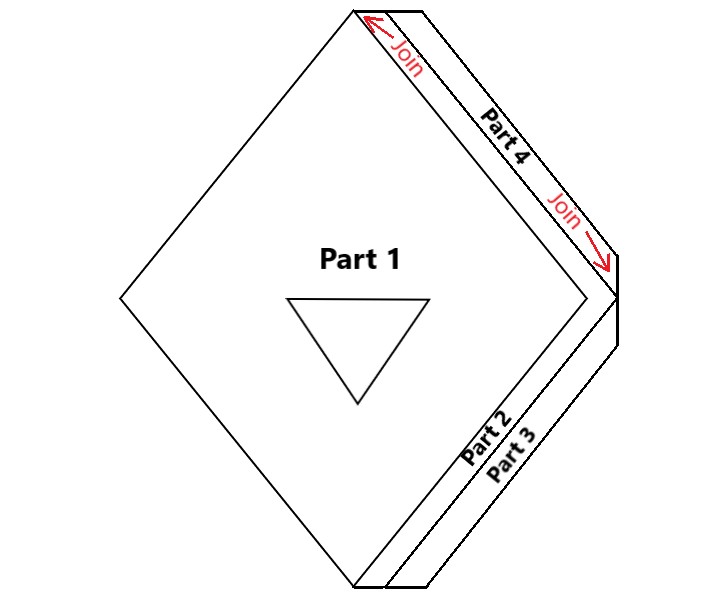
Figure 5
- Ch1, hdc2tog over next 2 sts (counts as hdc3tog). Hdc in each st until 2 sts left before the next ch2 peak. Hdc2tog. Turn. – 97 st
- Ch1, hdc in next st (counts as hdc2tog). Hdc in 3rd lo of each st until 3 left. Hdc3tog. Turn. – 94 st
- Ch2, dc2tog over next 2 sts (counts as dc3tog. Dc in blo of each st until 2 left. Dc2tog. Turn. – 91 st
- Ch3, sk next st, dc in next st (counts as 2 dc in 3 sts). *Ch1, sk 1 st, dc in next st.** Repeat from * to ** until 4 sts left. Ch1, sk 1 st, dc2tog over last 3 sts (see How To below). Turn. – 88 st
How To dc2tog over 3 sts: Yo, insert hook in next st, pull up a loop. Yo, pull through 2 loops. Sk 1 st, yo, insert hook in next st, pull up a loop. Yo, pull through 2 loops. Yo, pull through 3 loops.
- Ch2, dc2tog over next 2 st/ch sp (counts as dc3tog. Dc in each st and ch sp until 2 left. Dc2tog. Turn. – 85 st
- Ch1, hdc in next st (counts as hdc2tog). Hdc in each st until 3 left. Hdc3tog. Turn. – 82 st
- Ch1, hdc2tog over next 2 sts (counts as hdc3tog). Hdc in blo of each st until 2 left. Hdc2tog. Turn. – 79 st
- Ch1, hdc in next st (counts as hdc2tog). Hdc in 3rd lo of each st until 3 left. Hdc3tog. Turn. – 76 st
- Ch1, hdc2tog over next 2 sts (counts as hdc3tog). Hdc in next st. Beg in same st, mc until 2 sts left. Hdc2tog. Turn. – 73 st
- Ch1, hdc in next st (counts as hdc2tog). Beg in same st, Mc until 3 sts left. Hdc3tog. Turn. – 70 st
Free Crochet Sweater Pattern – Pinnacle Pullover
Part 5, 6, and 7
Parts 5, 6, and 7 are the same as Parts 2, 3, and 4, with a few differences:
- At the beginning of Part 5, you will join your yarn in the st just after the ch2 at the front of the sweater (see Figure 6, shown with RS facing you).
- In Part 6, you will be adding height to the back of the sleeve (see Figure 7).
- In Part 7, you will be adding height to the front of the sleeve (see Figure 8).
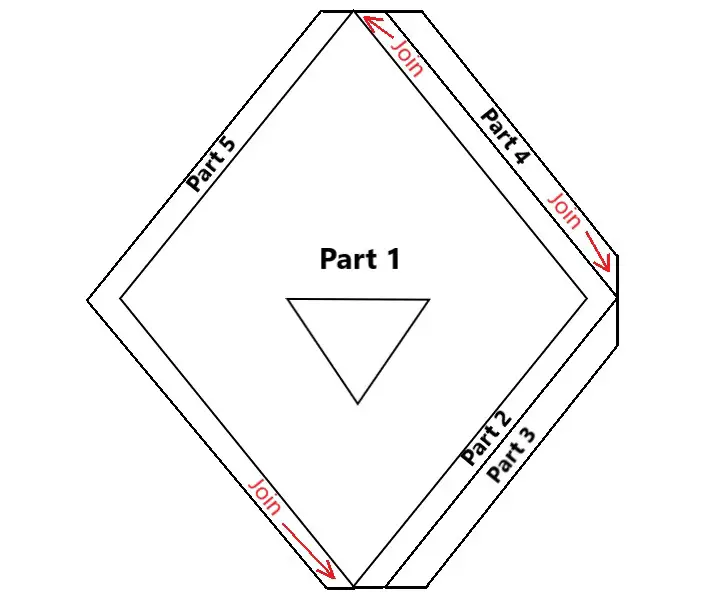
Figure 6
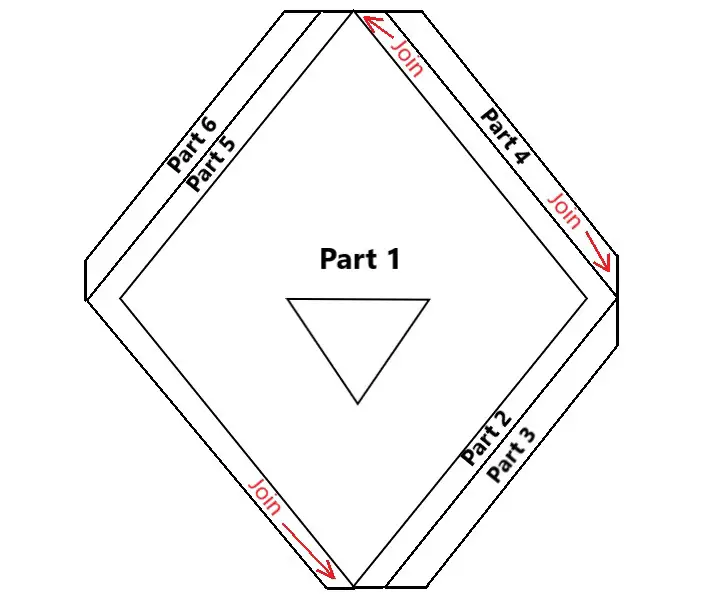
Figure 7
Figure 8
Sleeve Seaming
Next, we will seam the bottoms of the sleeves shut. But before we do that, we have to figure out how far down to seam them. This is where the sizing of your pullover comes into play.

Figure 9
- First, you will fold your pullover in half with the right sides facing each other. Lay it out on a flat surface like in Figure 9. Make sure your front and back are matched up so the bottoms are even with each other.
- Decide on what you want the bottom circumference of your pullover to be. You are welcome to make the bottom circumference any size you wish. To determine what I wanted my bottom circumference to be, I first measured around my waist where the bottom band would sit (this is approximately 23” down from your shoulder). I then decided I wanted the pullover to be fitted in the bottom, so I subtracted a couple of inches from my measurement, settling on 40” (you don’t have to do this if you would rather have a loose fit). Once you know the bottom circumference you are aiming for, divide it in half. That will be your pullover width.
- Take your measuring tape, and place it across your pullover (I couldn’t get a clear picture with my measuring tape, so I drew one onto Figure 9). Move the tape up or down to where your pullover matches the width of the size you are aiming for. I wanted my width to be 20”, so I placed my tape where my pullover measured 20”. Place stitch markers at the ends of your tape.
Note: If the bottom matches your desired width, all you have to do is sew the seams up all the way down. If you do this, you can skip the Sides section and proceed to the Bottom Band section.
- Now you will count how many stitches you have between your stitch marker and the bottom of your pullover. In order for the stitch pattern to work, your stitch counts on both the front and back have to be a multiple of 6, plus 5. To save any confusion I have done the math for you and listed the numbers here: 5, 11, 17, 23, 29, 35, 41, 47, 53, 59, 65, 71, 77, 83, 89, 91, 97.
- You also want to check that you have the front and back half match up, so there are the same number of stitches on the back and front. So for example: I had 17 stitches on my front and 17 stitches on my back. Move your stitch marker up or down to the proper place. If you have one, use a locking stitch marker so that you can hold the front and back together securely. Do the same for both sides of the pullover.
- Once you have placed your stitch markers in the proper place and checked them, you can sew the bottom seams of the sleeves from the stitch markers, all the way up to the sleeve opening. You may use any sewing technique you like. Once both of your sleeves are sewn, turn your pullover right side out.
Sides
We will now build onto the sides so that the bottom matches your desired width. You will do this by working decrease stitches at the beginning of the row, in the corner, and at the end. The process will look similar to Figures 10 & 11. If you end up with a large hole in the corner of your first row as I did (see Figure 12), then just use the yarn end left from seaming to close it up.
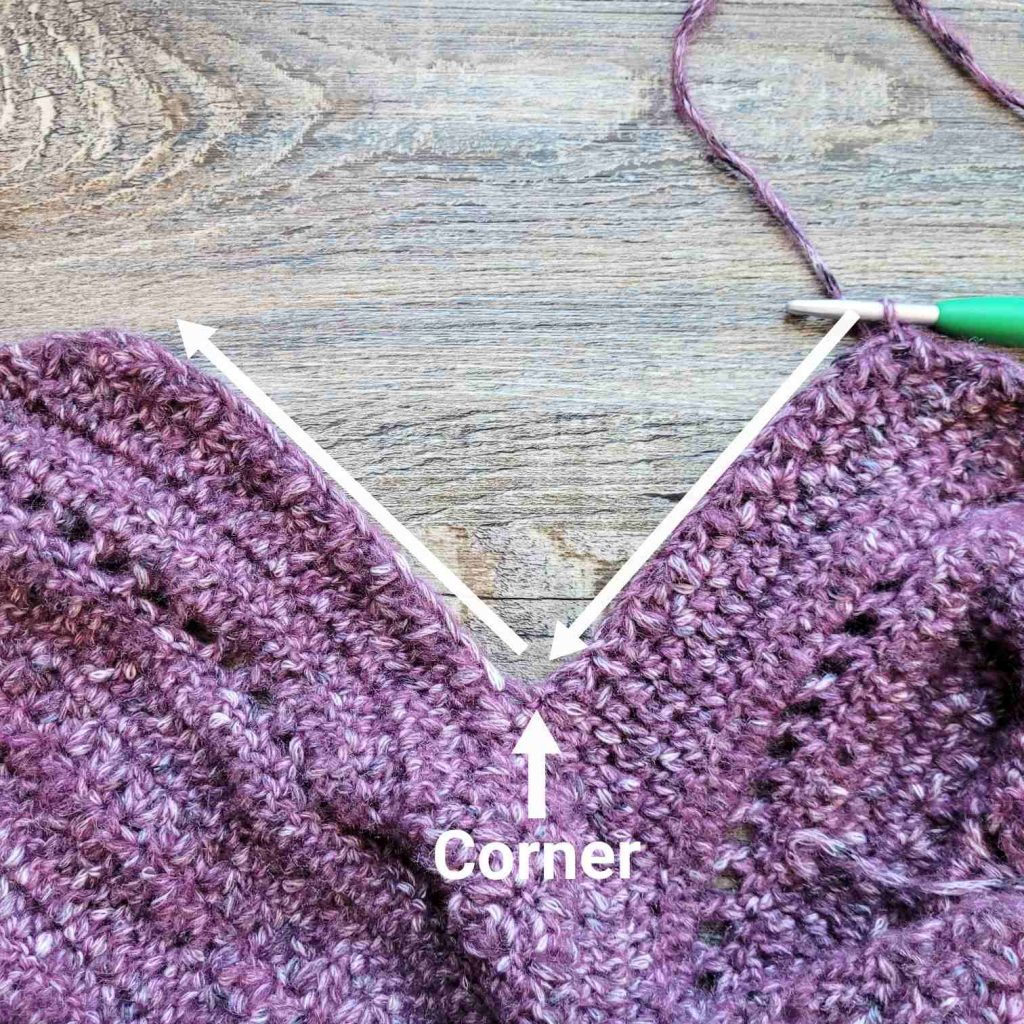
Figure 10
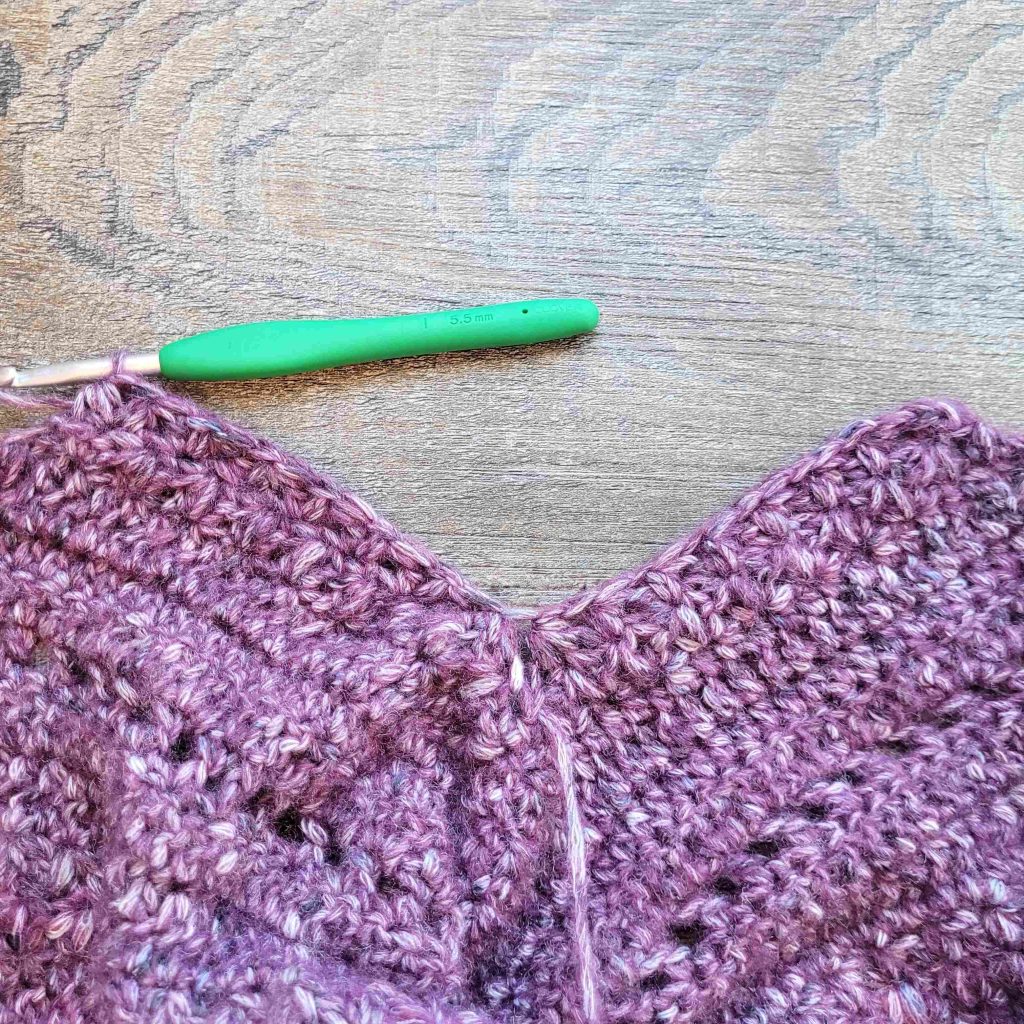
Figure 11
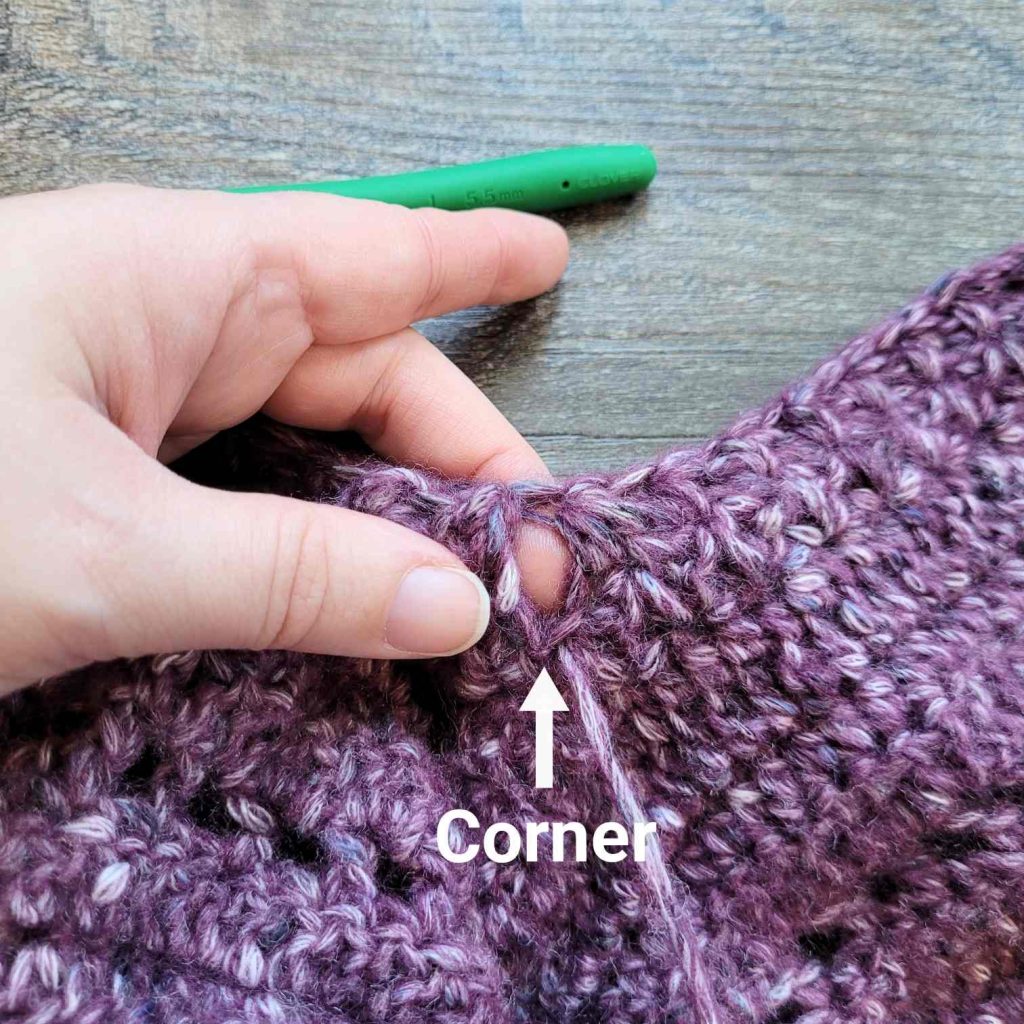
Figure 12
Before you begin, you will need to figure out which row you are starting with. The rows below are numbered to coincide with the rows in Parts 3, 4, 6, & 7. Whichever row you ended with for those parts (it will be the same row number for all four), you will begin with the row after that.
For example: If you finished with a row 39, you will begin with row 40 below. If you finished with row 48, you will begin with row 49 below. You will only follow the instructions until you have a total of 10 stitches left. Then you will work the Final Row as instructed below. If after seaming you only have 10 sts left, then skip this part and continue on to the final row.
Note: You may notice that none of these rows have stitch counts. This is because your stitch count will be different depending on your body and arm size. Each row below will decrease your stitch count by 6. I recommend you write down your starting stitch count so you can keep track.
- Ch1, hdc in next st (counts as hdc2tog). Hdc in the 3rd lo of each st until 3 sts left before the corner. Hdc3tog twice. Hdc in 3rd lo of each st until 2 left. Hdc2tog. Turn.
- Ch2, dc in next st (counts as dc2tog). Dc in blo of each st until 3 sts left before the corner. Dc3tog twice. Dc in blo of each st until 2 left. Dc2tog. Turn.
- Ch3, sk next st (counts as 1 dc in 2 sts), dc in next st. *Ch1, sk 1 st, dc in next st.** Repeat from * to ** until 4 sts left before corner. Ch1, sk 1 st, dc2tog over 3 sts twice. Repeat from * to ** until 2 sts left. Sk 1 st, dc in last st. Turn. To dc2tog over 3 sts: Yo, insert hook in next st, pull up a loop. Yo, pull through 2 loops. Sk 1 st, yo, insert hook in next st, pull up a loop. Yo, pull through 2 loops. Yo, pull through 3 loops.
- Ch2, dc in next st (counts as dc2tog). Dc in each st and ch sp until 3 sts left before corner. Dc3tog twice. Dc in each st until 2 left. Dc2tog. Turn.
- Ch1, hdc in next st (counts as hdc2tog). Hdc in each st until 3 left before corner. Hdc3tog twice. Hdc in each st until 2 left. Hdc2tog. Turn.
- Ch1, hdc in next st. Hdc in blo of each st until 3 left before corner. Hdc3tog twice. Hdc in blo of each st until 2 left. Hdc2tog. Turn.
- Ch1, hdc in next st. Hdc in 3rd lo of each st until 3 left before corner. Hdc3tog twice. Hdc in 3rd lo of each st until 2 left. Hdc2tog. Turn.
- Ch1, hdc in next st (counts as hdc2tog). Hdc in next st. Beg in same st, mc until 3 sts left before the corner. Hdc3tog twice. Beg in next st, mc until 3 sts left. Hdc in next st. Hdc2tog. Turn.
- Ch1, hdc in next st (counts as hdc2tog). Beg in same st, mc until 3 sts left before corner. Hdc3tog twice. Beg in next st, mc until 1 st left. Hdc2tog over last 2 sts (including last st just worked). Turn.
- Ch1, hdc in next st (counts as hdc2tog). Hdc in each st until 3 left before corner. Hdc3tog twice. Hdc in each st until 2 left. Hdc2tog. Turn.
If you complete row 49 and you still have more than 10 sts left, repeat rows 40 – 49 until you have only 10 sts left unworked. Then, work the final row as instructed below.
Final row:
Ch2, dc in next st (counts as dc2tog). Dc3tog twice. Dc2tog. Bind off.
Free Crochet Sweater Pattern – Pinnacle Pullover
Bottom Band
We will now add the bottom band. First, we will add a round of sc all the way around the bottom. Then, we will work short rows to create the ribbed band. With the right side facing you, attach your yarn anywhere along the bottom of the pullover.
- Ch1. Sc all the way around the bottom in the following manner:
- Place 2 sc in the end of each dc row.
- Alternate between 1 and 2 sc in the end of each hdc and mc row.
- Place 2 sc in each ch2 sp.
- Once you have worked all the way around, ss to join to the 1st st. Do not turn or bind off.
The exact stitch number doesn’t matter. What is most important is that the stitches are evenly distributed so that there is not pinching or gaping.
Ribbing
- Ch8 (see Figure 13). Sc in 2nd ch and each ch across. Ss into st you just chained from. Ss into next st (see Figure 14). Turn. – 7 st + 2 ss
- Sk 2 ss, Sc in blo of next 6 sts. Sc in both loops of last st (see Figure 15). Turn. – 7 st
- Ch1, sc in 1st st. Sc in blo of each st across. Ss to next unworked st. Ss to next unworked st. Turn. – 7 st + 2 ss
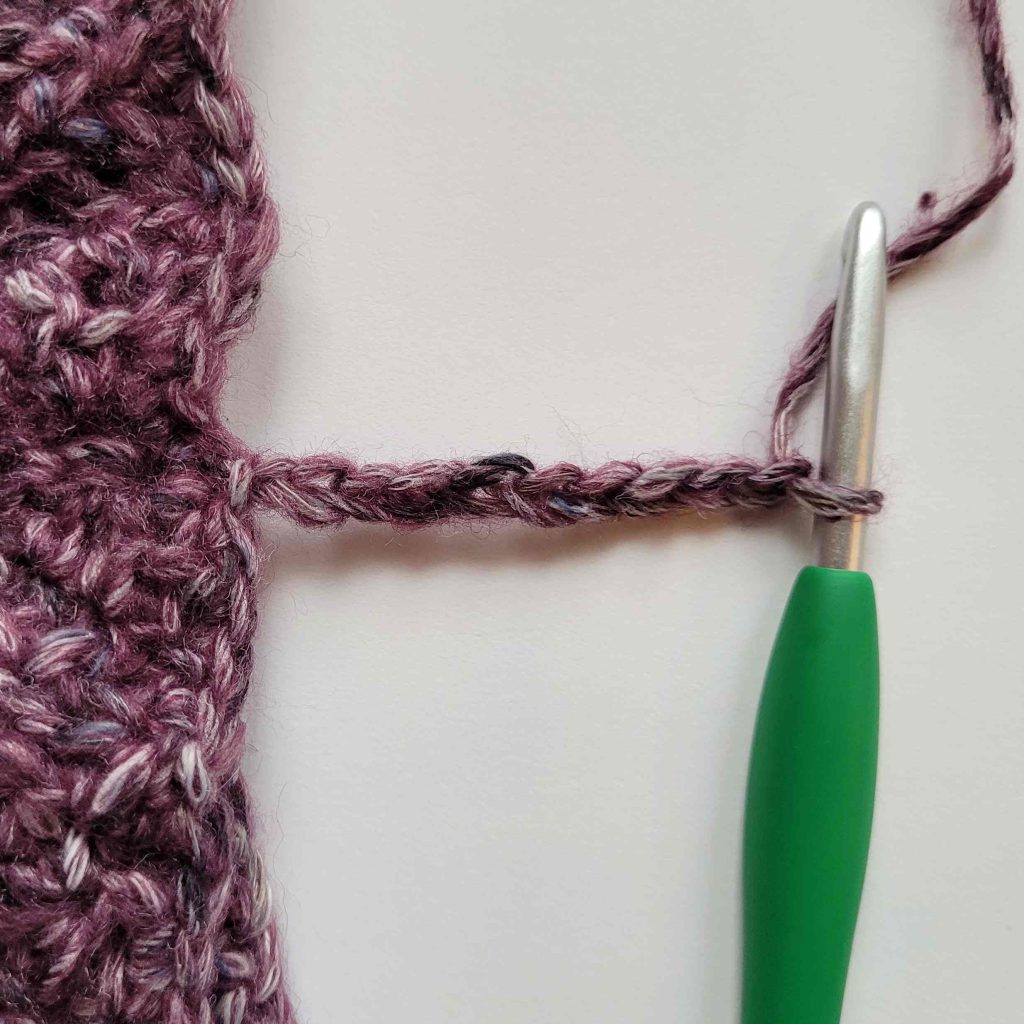
Figure 13
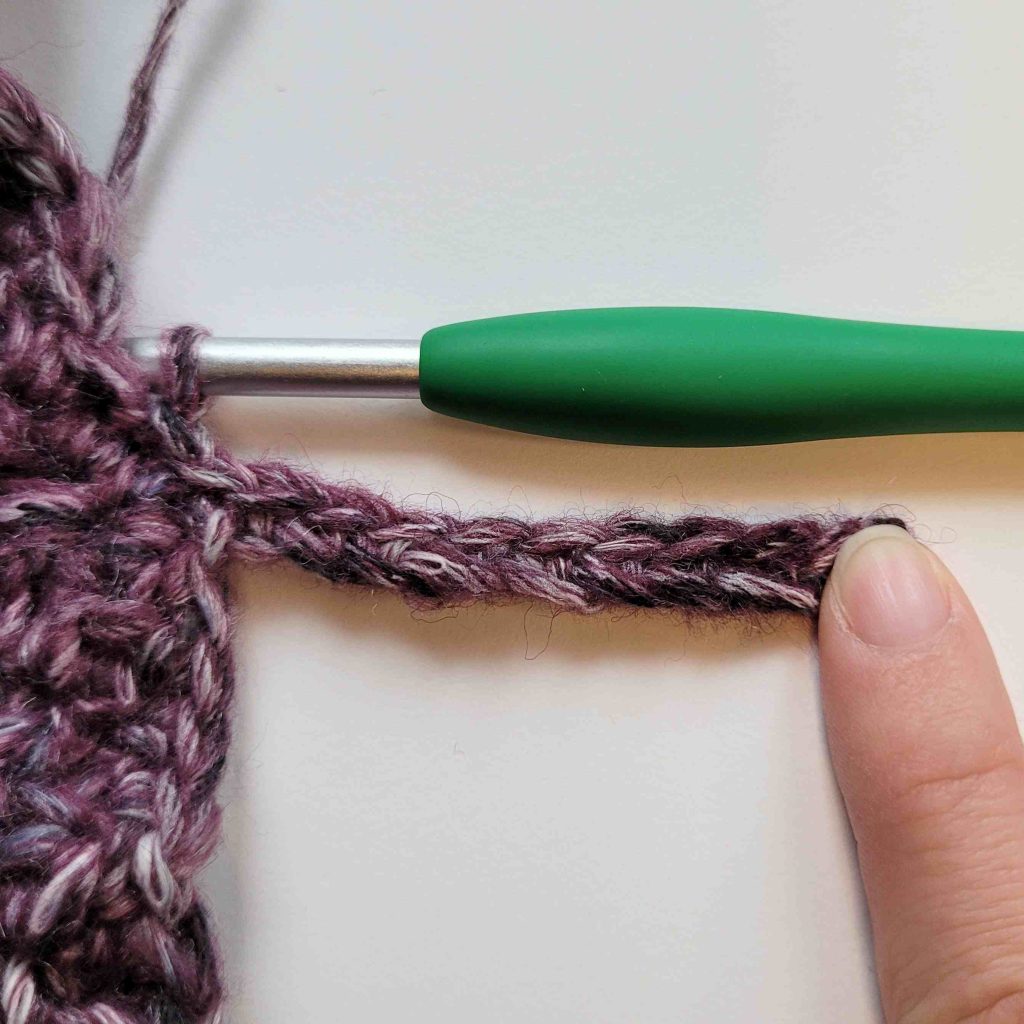
Figure 14
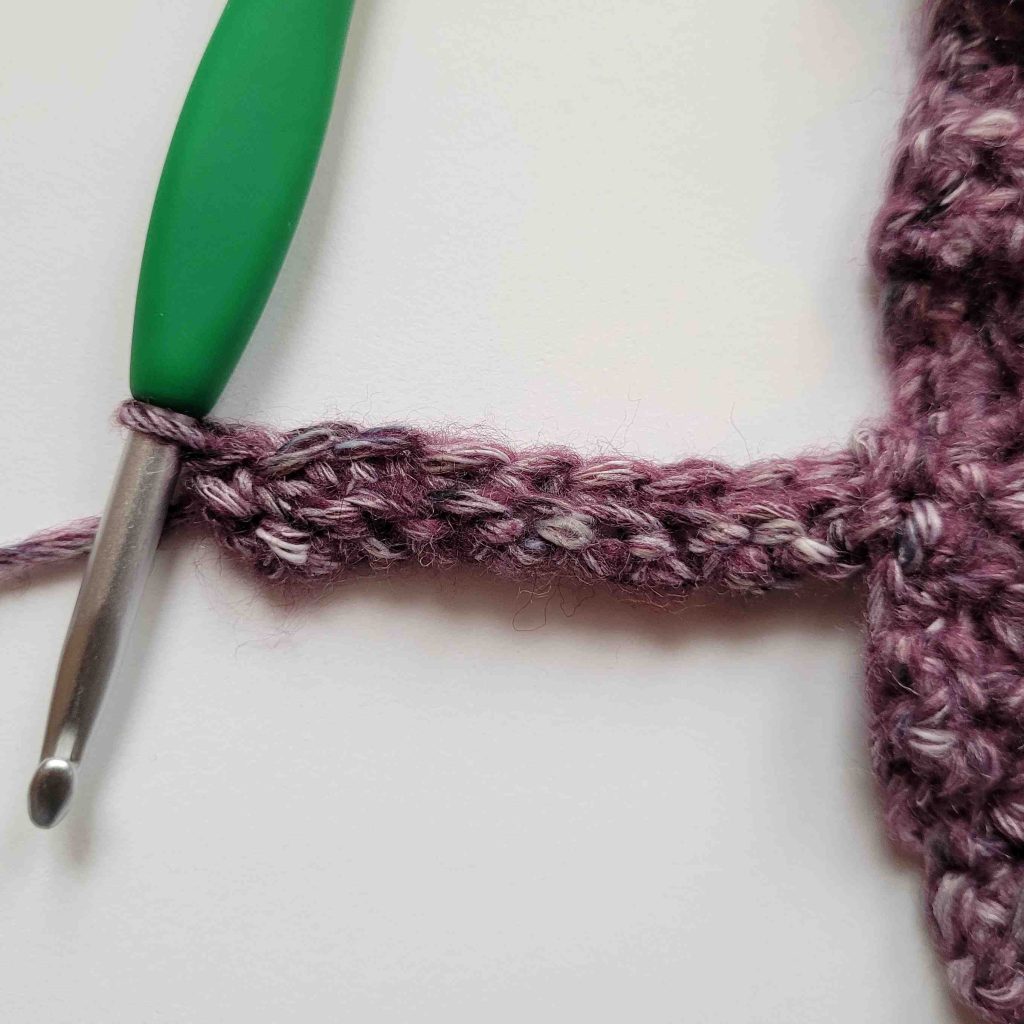
Figure 15
Repeat rows 2 & 3 all the way around the bottom, ending with a repeat of row 2. We will now ss the ends of the band together.
With the wrong side facing you, slip stitch the ends of the band together, working through the bottom of the first row and back loop of the last row. Bind off
Neck Trim
Next we will add a ribbed trim to the neckline. With the right side facing you, join your yarn in the bottom of the V in front.
- Ch1. Sc in the bottom of each ch working up to the back of the neck. Once you get to the back of the neck, work 2 sc into the end of each dc row and alternate between 1 & 2 sc in the end of each hdc and mc row. Once you worked across the back of the neck, sc in the bottom of each ch working down the other side of the neck. Ss to join to the 1st st. Do not turn or bind off.
Ribbing
- Ch10. Sc in 2nd ch and each ch across. Ss into st you just chained from. Ss into next st. Turn. – 9 st + 2 ss
- Sk 2 ss, Sc in blo of next 8 sts. Sc in both loops of last st. Turn. – 9 st
- Ch1, sc in 1st st. Sc in blo of each st across. Ss to next unworked st. Ss to next unworked st. Turn. – 9 st + 2 ss
Repeat rows 2 & 3 until you have worked all sts around the neck edge, finishing with a repeat of row 2. Bind off, leaving a long tail for sewing. Your edging should now look like Figure 16. Whip stitch one end of the edging down to the neck edge as pictured in Figure 17. Then, whip stitch the other end of the edging down to the neck edging as pictured in Figure 18.
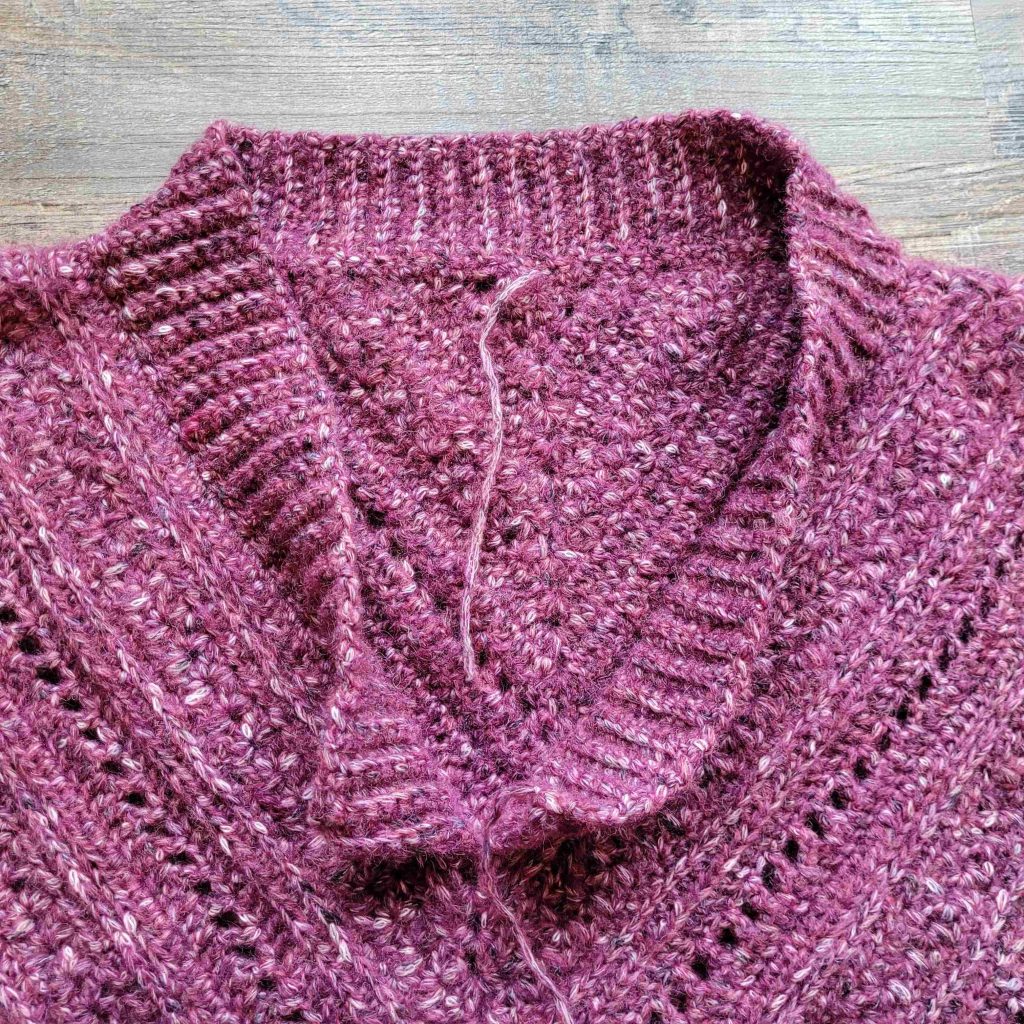
Figure 16
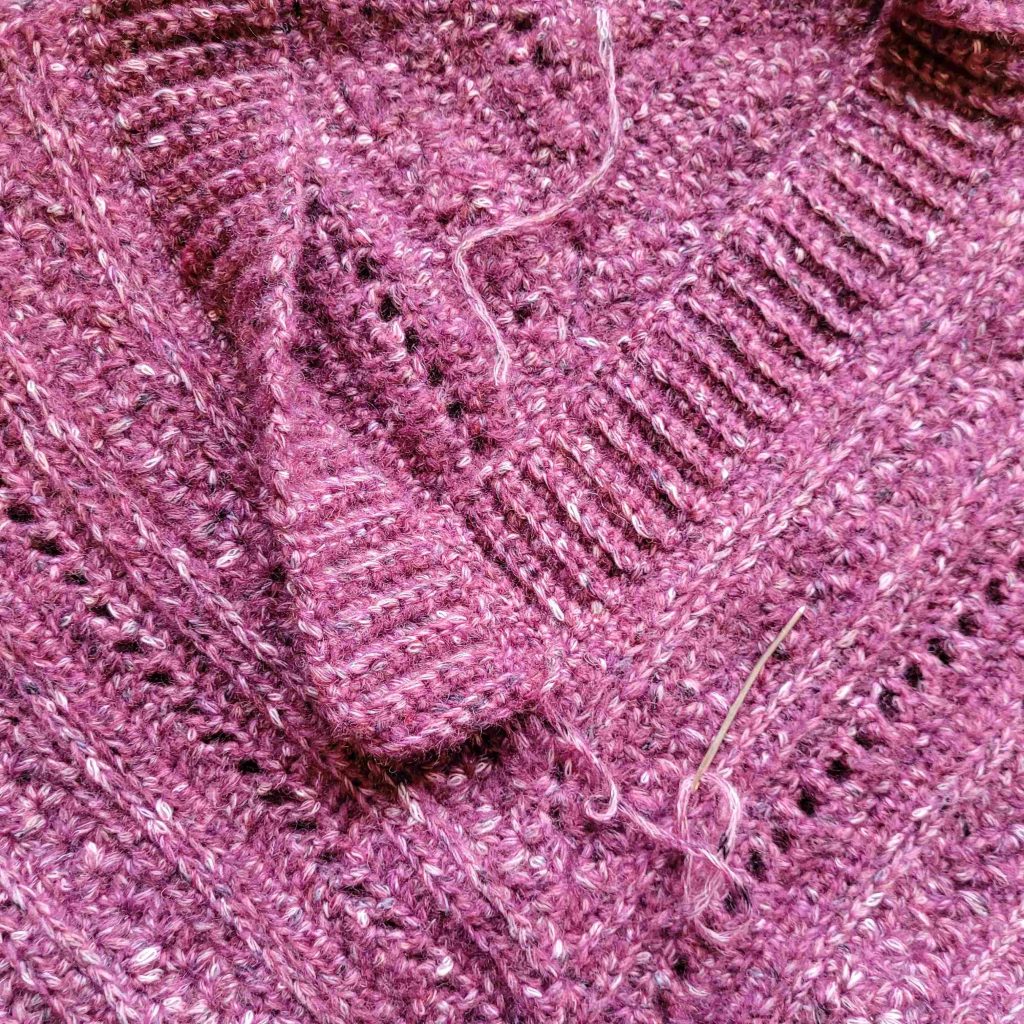
Figure 17
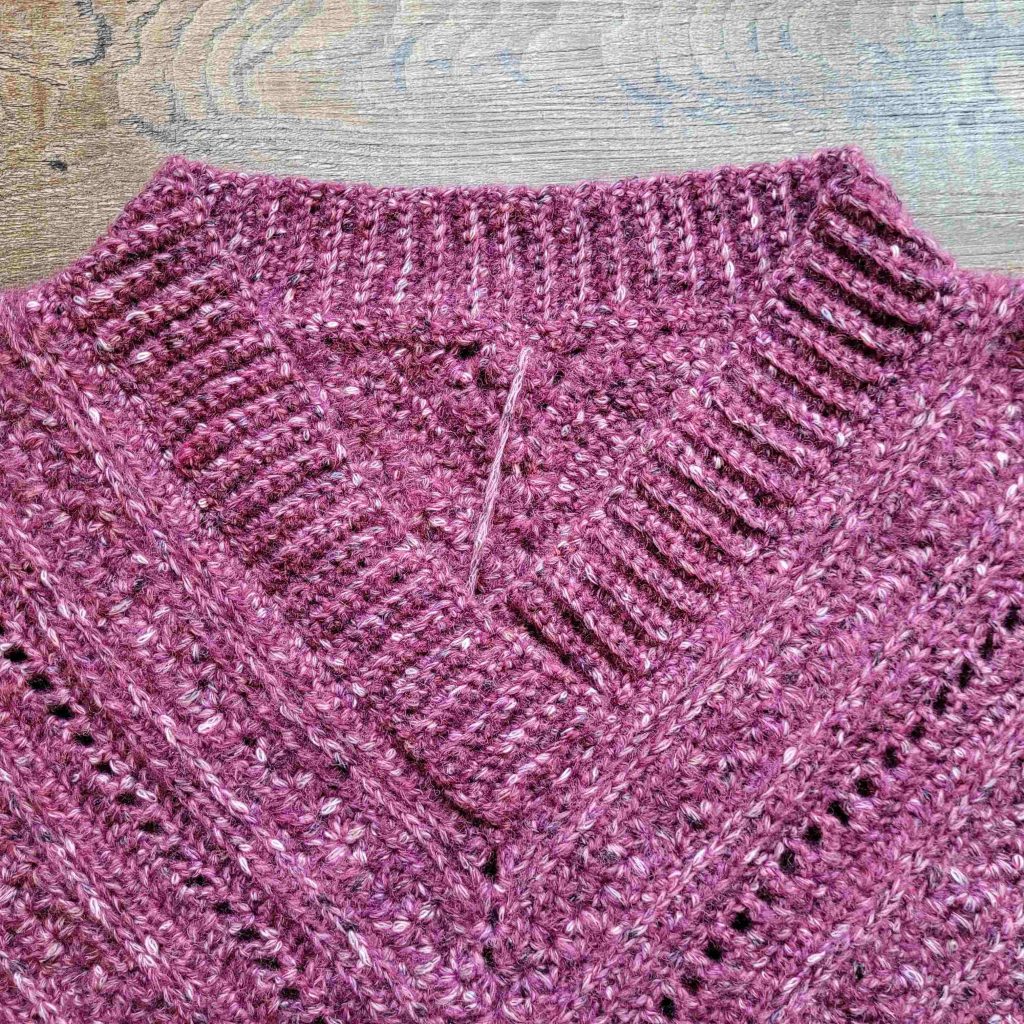
Figure 18
Sleeves
Before we work the sleeves, it’s a good idea to try on your sweater. The lower half of the sleeves are written to be about 9 ¾” long, but you can make them any length you need. Try on your sweater and see how long of a sleeve you need by measuring from the edge of the opening on the sweater to the end of your wrist. Then, adjust the stitch count as needed.
The sleeves are worked the same way as the bottom band. We’ll begin by working a round of sc around the sleeve opening.
- Ch1. Sc all the way around the sleeve opening in the following manner:
- Place 2 sc in the end of each dc row.
- Alternate between 1 and 2 sc in the end of each hdc and mc row.
- Place 2 sc in the ch1 sp.
- Once you have worked all the way around, ss to join to the 1st st. Do not turn or bind off.
Ribbing
- Ch40. Sc in 2nd ch and each ch across. Ss into st you just chained from. Ss into next st. Turn. – 39 st + 2 ss
- Sk 2 ss, Sc in blo of next 38 sts. Sc in both loops of last st. Turn. – 39 st
- Ch1, sc in 1st st. Sc in blo of each st across. Ss to next unworked st. Ss to next unworked st. Turn. – 39 st + 2 ss
Repeat rows 2 & 3 all the way around the sleeve opening, ending with a repeat of row 2. We will now ss the sleeve together.
With the wrong side facing you, slip stitch the sleeve together, working through the bottom of the first row and back loop of the last row. I recommend you try on your sweater again and check your sleeve length before doing the other one. Then, work the other sleeve.
Weave in your ends, and you’re done!
I hope you love your new crochet batwing sweater, and I look forward to seeing all of your beautiful pictures on Ravelry!
If you’d like to know when I post new patterns and tutorials like the Free Crochet Sweater Pattern – Pinnacle Pullover, head on over to my Facebook and Instagram and give me a like and a follow!
If you enjoyed The Free Crochet Sweater Pattern – Pinnacle Pullover, you may want to check out my other designs!
Free Crochet Sweater Pattern – Pinnacle Pullover
And until next time… Happy Hooking! 😉
Your patterns are AWSOME!
Thank you very much! <3