
The Tilted Tunic – Free Crochet Sweater Pattern is copyrighted by I Need It Crochet. You may not copy, share, change, or sell the pattern itself. Also, you may not claim this pattern as your own. All pictures contained in this pattern fall under the copyright and may not be used.
Finished items made from the Tilted Tunic – Free Crochet Sweater Pattern belong to you, and you may do what you wish with them. If you choose to sell them on Etsy, I would very much appreciate it if you credited me as the pattern designer.
In The Mood For A CAL???
I am running a Crochet Along (CAL) for the Tilted Tunic in my Facebook group. We’re going to all work the pattern together in sections. There’s going to be discounts and prizes for everyone who completes their tunic on time!
We have so much fun in the group. So if you would like to participate in the CAL, be sure to join the I Need It Crochet CAL Group!
In celebration of the CAL, I am offering 25% off of any 1 pattern from my Ravelry store. That way, if you already have the Tilted Tunic pdf, you can use the code to get another pattern at 25% off!
Use code TTCAL2023 to get the discount, and click here or on either of the blue buttons below to be taken to my Ravelry store.
Free Crochet Tunic Pattern


Or… Just scroll down to see it for free!
I came up with the concept for this tunic over a year ago, but at the time, I could not figure out how to pull it off. After a while, I moved on to another design, but the image of this tunic stayed with me. One day, I decided to dig into it again. After many (many, many) tries, it finally clicked. This is where I learned that some ideas will only come to the light in their own time. However if you are patient and persistent, you will be rewarded with their beauty.
How To Crochet A Tunic
Finished Sizes:
Instructions given to fit size X-small; changes for small, medium, large, X-large, 2X-large, 3X-large, 4X-large and 5X-large are in ()
XS (S, M, L, XL, 2XL, 3XL, 4XL, 5XL)
To Fit Bust Size: 28” (32”, 36”, 40”, 44”, 48”, 52”, 56”, 60”)
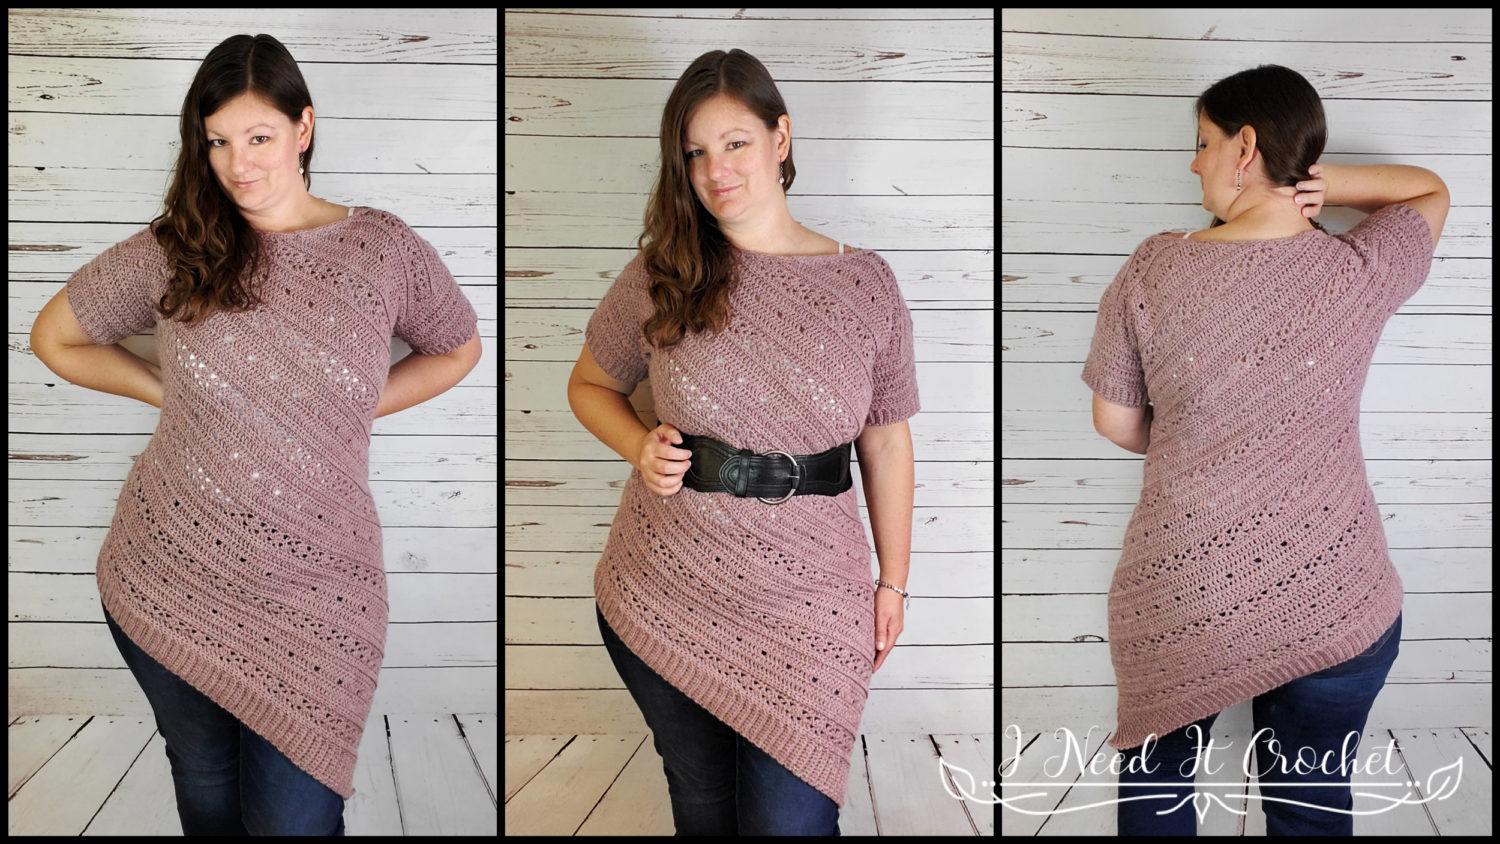
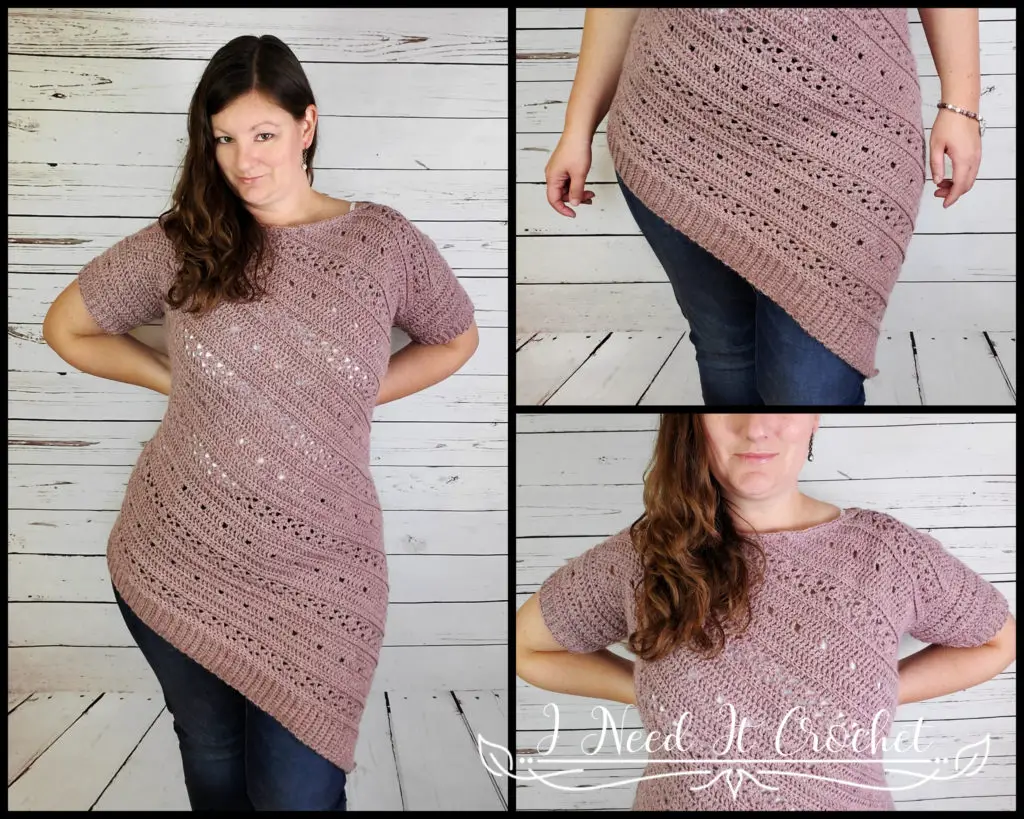
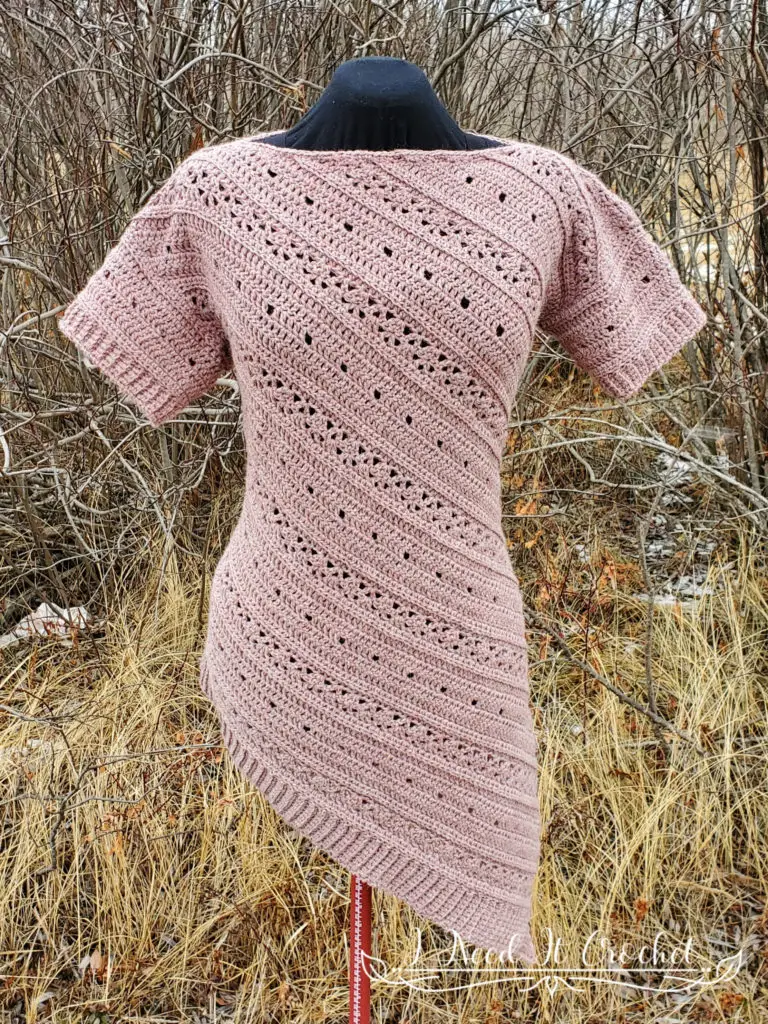
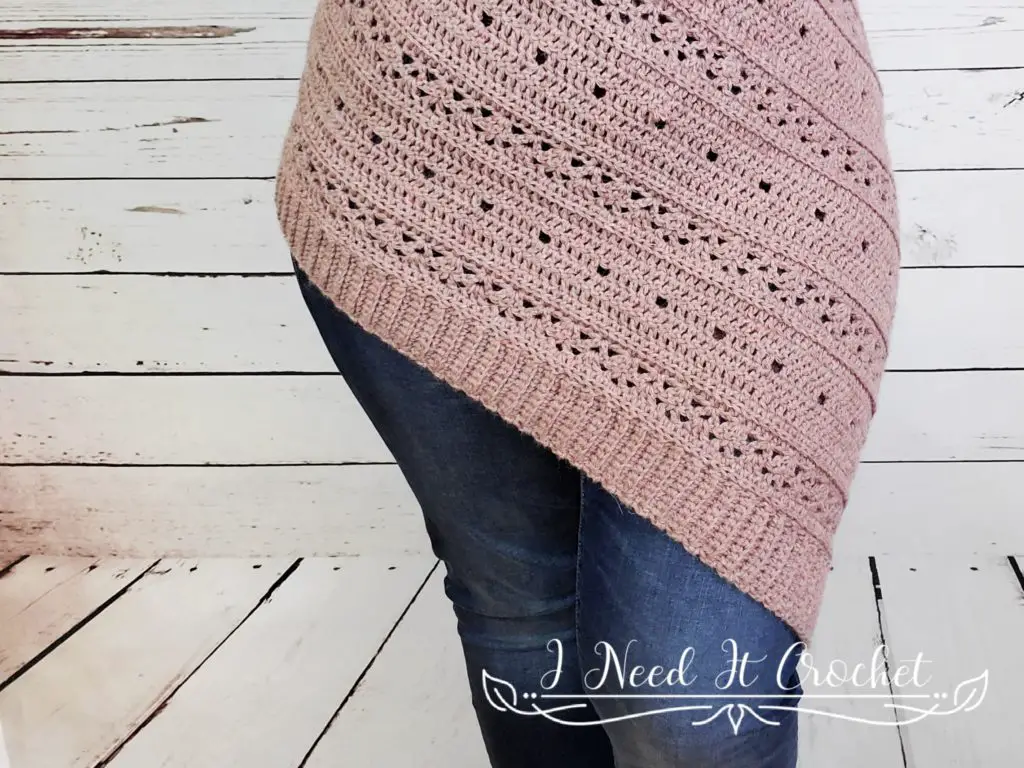
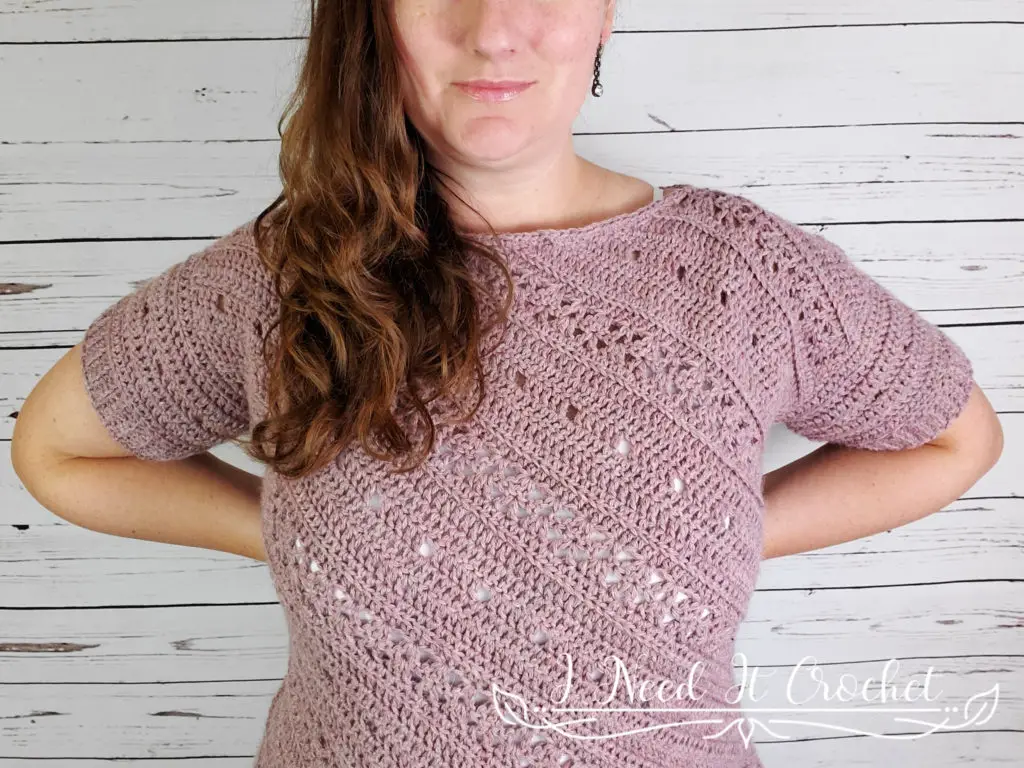
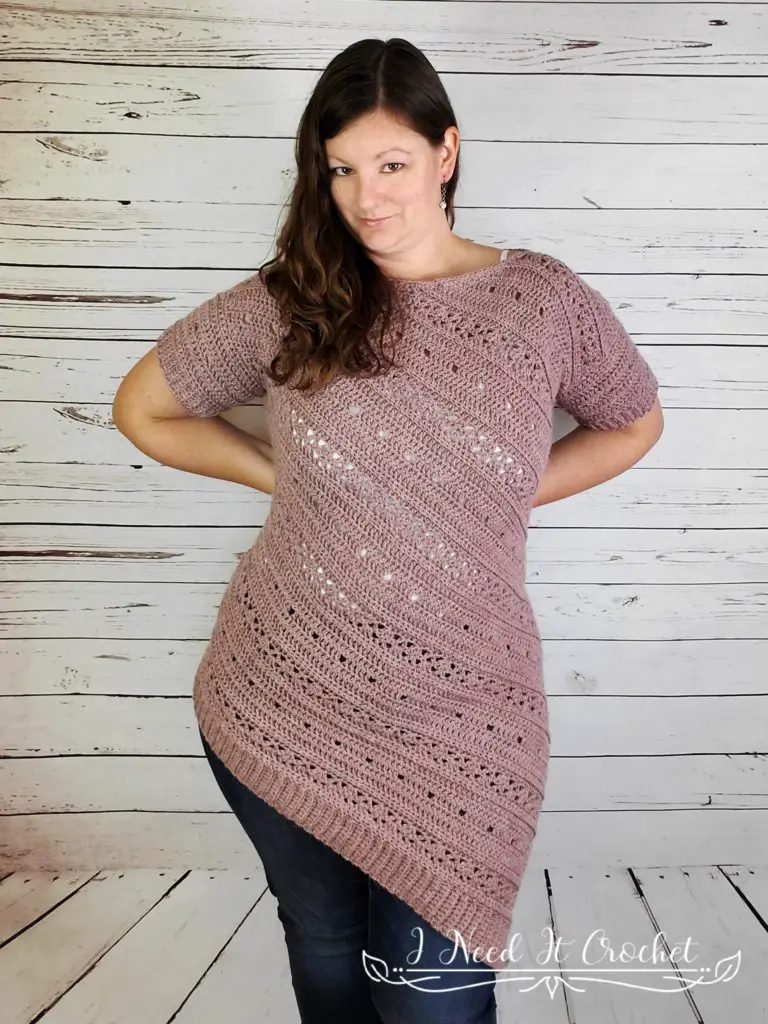
Finished Length: Customizable. Length shown on the model is 24” on the short side, 39” on the long side.
Arm Circumference: Each size may choose whichever arm circumference they like from the following options: 10” (11 ½”, 13 ½”, 15”, 16 ½”, 18 ½”, 20”, 21 ½”, 23 ½”).
Materials:
I used Sugarbush Rapture, which is a 50% Llamasoft/50% Superfine Merino Wool, #4 Worsted weight yarn.
Any yarn of similar weight would work.
Approximately 875 (975, 1075, 1175, 1275, 1375, 1475, 1575, 1675) yds.
5.5mm Hook
Stitch Markers
Yarn Needle
Scissors
Measuring Tape
Abbreviations:
Rs = Right Side
Ws = Wrong Side
Sk = Skip
Sp = Space
St = Stitch
BLO = Back Loop Only
Ss = Slip Stitch
Ch = Chain
Sc = Single Crochet
Hdc = Half Double Crochet
Dc = Double Crochet
Tr = Treble Crochet
Hdc2tog = Half Double Crochet 2 Together
Dc2tog = Double Crochet 2 Together
Vst = V Stitch
Gauge:
There will be points within the pattern where you should measure for gauge. Be sure to check your gauge. It will save you much time and heartache.
Notes:
Ch1 and ch2 at the beginning of a row is never considered a stitch.
Ch3 at the beginning of a row is considered a dc.
Ch4 at the beginning of a row is considered a tr.
A Vst consists of a (Dc, ch1, dc) all in the same st.
A Vst counts as 3 sts.
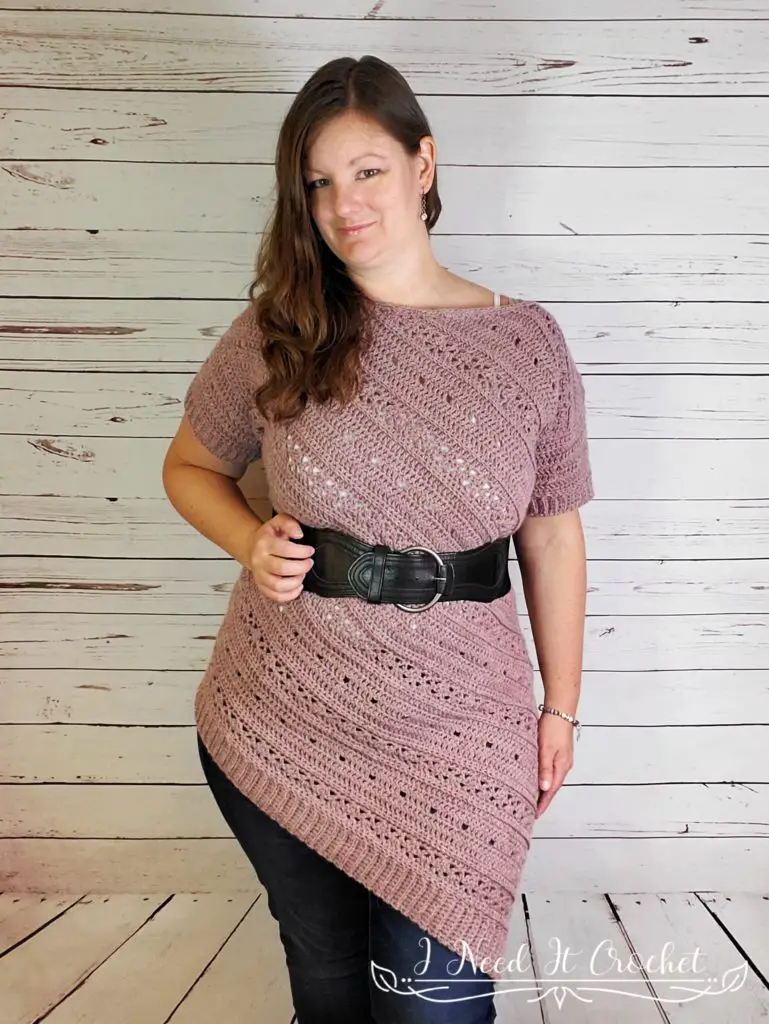
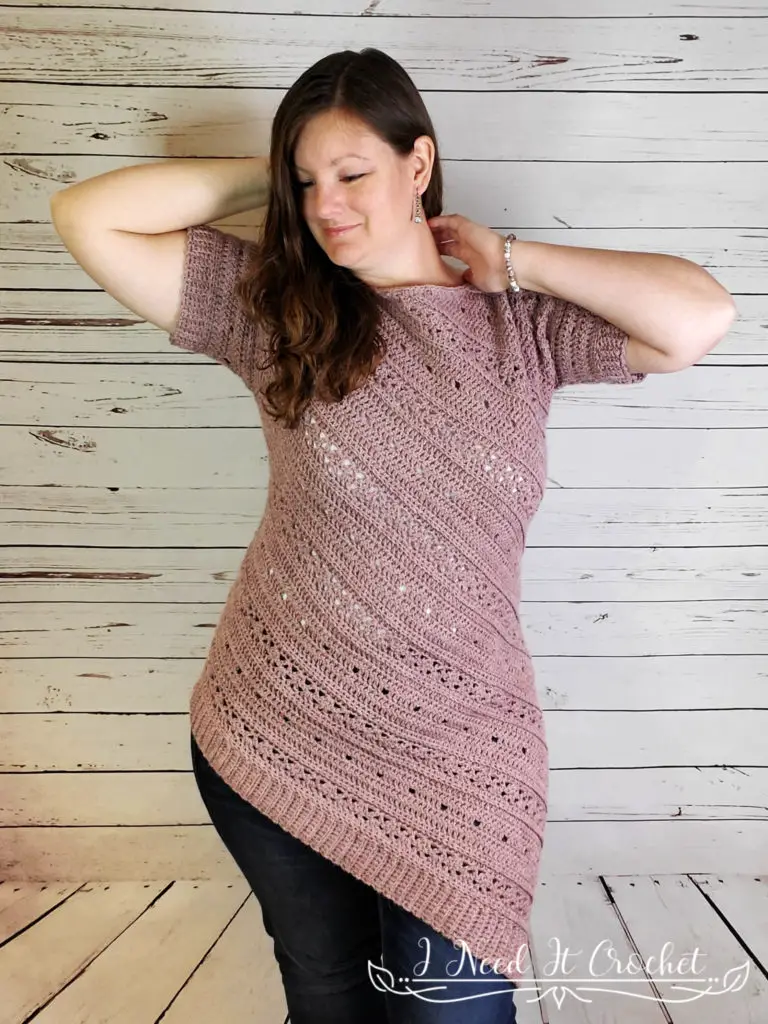
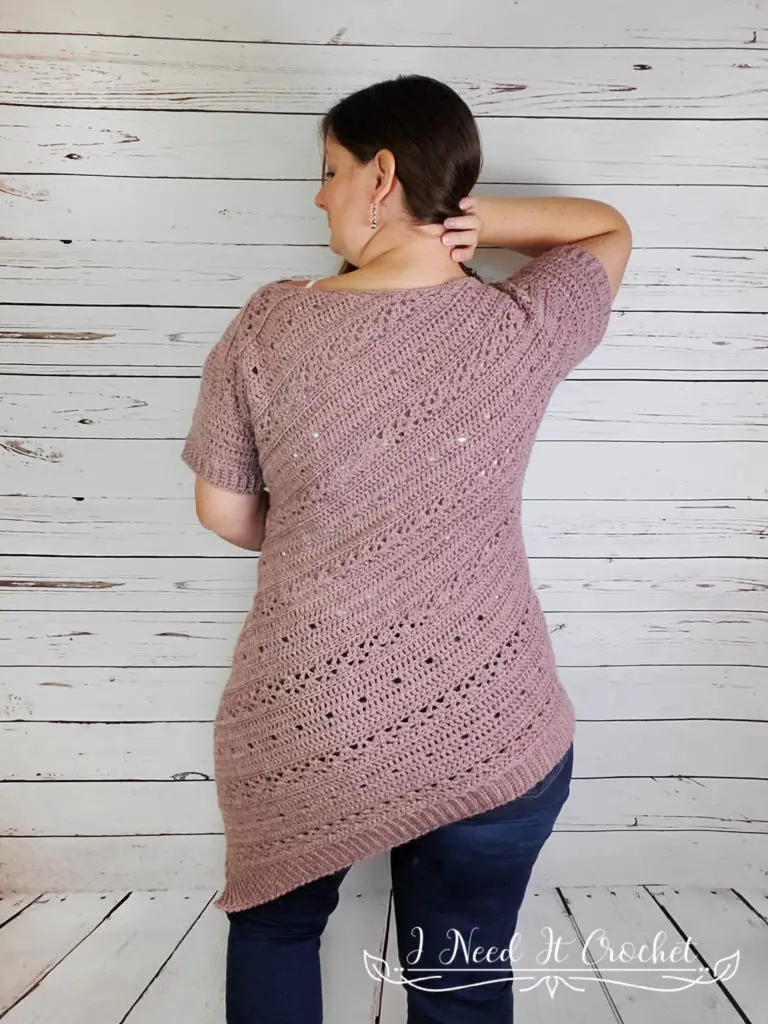
The model above (that’s me) has a 42” bust and is wearing a size XL.
The Tilted Tunic – Free Crochet Sweater Pattern

Instructions
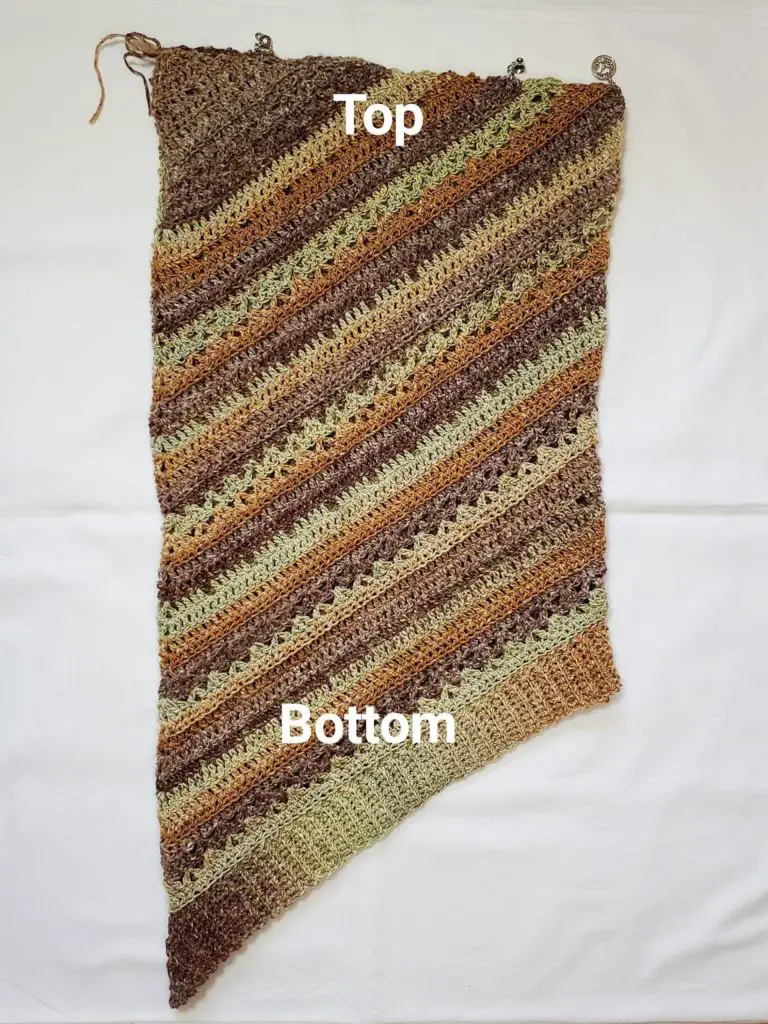
This tunic is designed to be nearly seamless. The only sewing we will have to do is in the shoulders. The design starts out as two triangles, which are then joined together. Then, the tunic continues to grow from there. To make the instructions a bit easier to follow, I have divided them up into sections.
Section 1 – 1st Triangle
The pattern begins at one shoulder. We will begin by making our first triangle. The size of the triangle you make will depend on your desired upper arm circumference. You may choose whichever arm size you want, regardless of body size. Instructions are given for the following sleeve circumferences: 10” (11 ½”, 13 ½”, 15”, 16 ½”, 18 ½”, 20”, 21 ½”, 23 ½”).
Ch4. Ss to 1st ch to form a ring.
1. (Right Side) Working this row into the ring: Ch3, 4dc, 1tr. Turn. – 6 st
2. (Wrong Side) Ch4, 2dc in 1st st. Dc in each st across until there is only 1 st left unworked. 2dc in last st. Turn. – 9 st
3. Ch3, dc in 1st st. Dc in next 3 sts. Ch1, sk 1 st, dc in next 3 sts. (2dc, tr) in last st. Turn. – 12 st
4. Ch4, 2dc in 1st st. Dc in each st and ch sp across until there is only 1 st left. 2dc in last st. Turn. – 15 st
5. Ch3, dc in 1st st. Dc in each st across until there is only 1 st left unworked. (2dc, tr) in last st. Turn. – 18 st
6. Ch3, 2hdc in 1st st. Hdc in each st across until there is only 1 st left unworked. 2hdc in last st. Turn. – 21 st
Gauge Check: Your triangle should measure 3” H x 5 ½” W. Height is measured from the ring to the center of the last row worked. Width is measured across the top of your last row. If your measurements are not close to correct, try again with a different sized hook.
7. Working this row in the BLO: Ch1, 2hdc in 1st st. Hdc in each st across until there is only 1 st left unworked. (2hdc, dc) in last st. Turn. – 24 st
8. Ch4, Vst in 1st st. Sk 2 sts, 3dc in next st. *Sk 2 sts, Vst in next st. Sk 2 sts, 3dc in next st. ** Repeat from * to ** until there are only 2 sts left unworked. Sk 1 st, 2dc in last st. Turn. – 27 st
9. Ch3, dc in 1st st, dc in next st. Sk 1 st, Vst in next st. Sk 2 sts, 3dc in next ch1 sp. *Sk 2 sts, Vst in next st. Sk 2 sts, 3dc in next ch1 sp. ** Repeat from * to ** until there are only 2 sts left unworked. Sk 1 st, (dc, ch1, tr) in last st. Turn. – 30 st
Those who are making a 10” sleeve: Skip rows 10-13 and continue to the instructions below.
Gauge Check: Your triangle should measure 4 ½” H x 8” W. If your measurements are not close to correct, try again with a different sized hook.
10. Ch3, 2hdc in 1st st. Hdc in each st and ch sp across until there is only 1 st left unworked. 2hdc in last st. Turn. – 33 st
Those who are making an 11 ½” sleeve: Skip rows 11-13 and continue to the instructions below.
11. Working this row in the BLO: Ch3, dc in 1st st. Dc in each st across until there is only 1 st left unworked. (2dc, tr) in last st. Turn. – 36 st
12. Ch4, 2dc in 1st st. Dc in each st across until there is only 1 st left unworked. 2dc in last st. Turn. – 39 st
Those who are making a 13 ½” sleeve: Skip row 13 and continue to the instructions below.
13. Ch3, dc in 1st st. Dc in next 3 sts. *Ch1, sk 1 st, dc in next 5 sts. ** Repeat from * to ** until there are only 5 sts left unworked. Ch1, sk 1 st, dc in next 3 sts. (2dc, tr) in last st. Turn. – 42 st
Those who are making a 15” sleeve: Continue to the instructions below.
Gauge Check: Your triangle should measure 6 ¼” H x 11 ¼” W. If your measurements are not close to correct, try again with a different sized hook.
Repeat rows 4 – 13 until you have a total of n/a (n/a, n/a, n/a, 15, 17, 18, 19, 21) rows. (Note: Sizes 10” – 15” do not have to repeat any rows. ) Then, bind off and continue to Section 2.
Section 2 – 2nd Triangle
Your second triangle will be a mirror image of your first triangle. Follow the instructions carefully and be sure to work the same number of rows as you did with your first triangle.
Ch4. Ss to 1st ch to form a ring.
1. (Right Side) Working this row into the ring: Ch4, 5 dc. Turn. – 6 st
2. (Wrong Side) Ch3, dc in 1st st. Dc in each st across until there is only 1 st left unworked. (2dc, tr) in last st. Turn. – 9 st
3. Ch4, 2dc in 1st st. Dc in next 3 sts. Ch1, sk 1 st, dc in next 3 sts. 2dc in last st. Turn. – 12 st
4. Ch3, dc in 1st st. Dc in each st and ch sp across until there is only 1 st left. (2dc, tr) in last st. Turn. – 15 st
5. Ch4, 2dc in 1st st. Dc in each st across until there is only 1 st left unworked. 2dc in last st. Turn. – 18 st
6. Ch1, 2hdc in 1st st. Hdc in each st across until there is only 1 st left unworked. (2hdc, dc) in last st. Turn. – 21 st
Gauge Check: Your triangle should measure 3” H x 5 ½” W. Height is measured from the ring to the center of the last row worked. Width is measured across the top of your last row. If your measurements are not close to correct, try again with a different sized hook.
7. Working this row in the BLO: Ch3, 2hdc in 1st st. Hdc in each st across until there is only 1 st left unworked. 2hdc in last st. Turn. – 24 st
8. Ch3, dc in 1st st. Sk 1 st, 3dc in next st. *Sk 2 sts, Vst in next st. Sk 2 sts, 3dc in next st. ** Repeat from * to ** until there are only 3 sts left unworked. Sk 2 sts, (Vst, tr) in last st. Turn. – 27 st
9. Ch5, dc in 1st st (counts as a (tr, ch1, dc) in same st). Sk 1 st, 3dc in next ch1 sp. Sk 2 sts, Vst in next st. *Sk 2 sts, 3dc in next ch1 sp. Sk 2 sts, Vst in next st. ** Repeat from * to ** until there are only 3 sts left unworked. Sk 1 st, dc in next st, 2dc in last st. Turn. – 30 st
Those who are making a 10” sleeve: Skip rows 10-13 and continue to the instructions below.
Gauge Check: Your triangle should measure 4 ½” H x 8” W. If your measurements are not close to correct, try again with a different sized hook.
10. Ch1, 2hdc in 1st st. Hdc in each st and ch sp across until there is only 1 st left unworked. (2hdc, dc) in last st. Turn. – 33 st
Those who are making an 11 ½” sleeve: Skip rows 11-13 and continue to the instructions below.
11. Working this row in the BLO: Ch4, 2dc in 1st st. Dc in each st across until there is only 1 st left unworked. 2dc in last st. Turn. – 36 st
12. Ch3, dc in 1st st. Dc in each st across until there is only 1 st left unworked. (2dc, tr) in last st. Turn. – 39 st
Those who are making a 13 ½” sleeve: Skip row 13 and continue to the instructions below.
13. Ch4, 2dc in 1st st. Dc in next 3 sts. *Ch1, sk 1 st, dc in next 5 sts. ** Repeat from * to ** until there are only 5 sts left unworked. Ch1, sk 1 st, dc in next 3 sts. 2dc in last st. Turn. – 42 st
Those who are making a 15” sleeve: Continue to the instructions below.
Gauge Check: Your triangle should measure 6 ¼” H x 11 ¼” W. If your measurements are not close to correct, try again with a different sized hook.
Repeat rows 4 – 13 until you have a total of n/a (n/a, n/a, n/a, 15, 17, 18, 19, 21) rows. (Note: Sizes 10” – 15” do not have to repeat any rows. ) Then, bind off and continue to Section 3.
Section 3 – Joining the Triangles and Increasing To Width
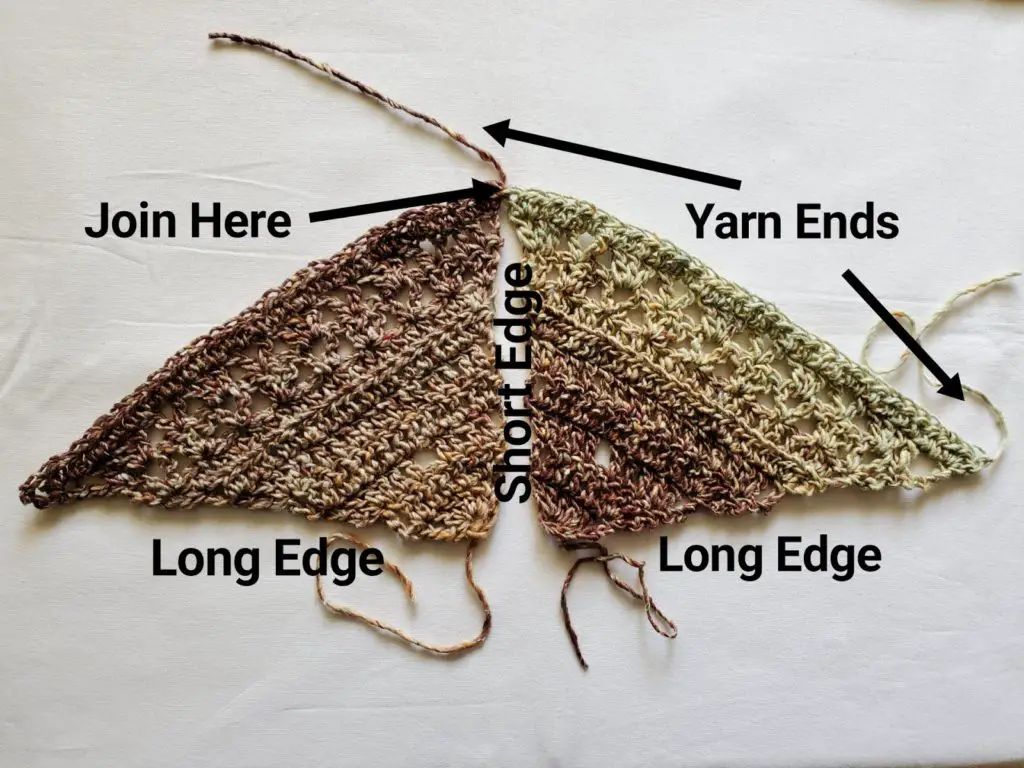
Next, we will join our triangles. Lay out your triangles with the right side facing up and the short edges facing each other as in Figure 1. Use the yarn end at the top of your short edge to join the tops of the triangles. Now, we will rejoin our yarn on the end of your last completed row (where you have another yarn end. This end may be on the left or the right side of your work, depending on what arm size you are making. In Figure 1, it is on the left side, just out of frame.) Note: This section does not have stitch counts listed. Unless you like to live dangerously, I suggest you make note of your stitch count on a scrap piece of paper and keep track at the end of each row.
Joining Row
These instructions are only for the first row after you have joined your triangles. I have numbered the rows to correspond with the rows in Sections 1 & 2. Therefore, if you finished Sections 1 & 2 on row 9 (or a row 9 repeat), you will work row 10 below. If you finished on row 10 (or a row 10 repeat), you will work row 11 below. If you finished on row 13 (or a row 13 repeat) you will work row 4 below. You will only work 1 row from these instructions. Then you will carry on to the next instructions. This row will add 6 sts to your stitch count.
4. Ch4, 2 dc in 1st st. Dc in each st and ch sp across until there is 1 st left before the center join. 2dc in next st, ch1, 2dc in next st. Dc in each st across until there is only 1 st left unworked. (2dc, tr) in last st. Turn.
5. Ch4, 2 dc in 1st st. Dc in each st across until there is 1 st left before the center join. 2dc in next st, ch1, 2dc in next st. Dc in each st across until there is only 1 st left unworked. (2dc, tr) in last st. Turn.
6. Ch3, 2 hdc in 1st st. Hdc in each st across until there is 1 st left before the center join. 2hdc in next st, ch1, 2hdc in next st. Hdc in each st across until there is only 1 st left unworked. (2hdc, dc) in last st. Turn.
7. Working this row in the BLO: Ch3, 2 hdc in 1st st. Hdc in each st across until there is 1 st left before the center join. 2hdc in next st, ch1, 2hdc in next st. Hdc in each st across until there is only 1 st left unworked. (2hdc, dc) in last st. Turn.
8. Ch4, Vst in 1st st. Sk 2 sts, 3dc in next st. *Sk 2 st, Vst in next st. Sk 2 st, 3dc in next st. ** Repeat from * to ** until there are only 2 sts left before the center join. Sk 1 st, 2dc in next st, ch1, 2dc in next st. Sk 1 st, 3dc in next st. Repeat from * to ** again until there are only 3 sts left unworked. Sk 2 st, (Vst, tr) in last st. Turn.
9. Ch5, dc in 1st st (counts as (tr, ch1, dc) in same st). Sk 1 st, 3dc in next ch1 sp. Sk 2 sts, Vst in next st. * Sk 2 sts, 3dc in next ch1 sp. Sk 2 sts, Vst in next st. ** Repeat from * to ** until there are only 3 sts left before the center join. Sk 1 st, dc in next st, 2dc in next st, ch1, 2dc in next st, dc in next st. Sk 1 st, Vst in next st. Sk 2 sts, 3dc in next ch1 sp. *Sk 2 sts, Vst in next st. Sk 2 sts, 3dc in next ch1 sp. ** Repeat from * to ** until there are only 2 sts left unworked. Sk 1 st, (dc, ch1, tr) in last st. Turn.
10. Ch3, 2 hdc in 1st st. Hdc in each st and ch sp across until there is 1 st left before the center join. 2hdc in next st, ch1, 2hdc in next st. Hdc in each st across until there is only 1 st left unworked. (2hdc, dc) in last st. Turn.
11. Working this row in the BLO: Ch4, 2dc in 1st st. Dc in each st across until there is 1 st left before the center join. 2dc in next st, ch1, 2dc in next st. Dc in each st across until there is only 1 st left unworked. (2dc, tr) in last st. Turn.
12. Ch4, 2dc in 1st st. Dc in each st across until there is 1 st left before the center join. 2dc in next st, ch1, 2dc in next st. Dc in each st across until there is only 1 st left unworked. (2dc, tr) in last st. Turn.
13. Ch4, 2dc in 1st st. Dc in next 3 sts. *Ch1, sk 1 st, dc in next 5 sts. ** Repeat from * to ** until there are only 5 sts left before the center join. Ch1, sk1 st, dc in next 3 sts. 2dc in next st, ch1, 2dc in next st. Dc in next 3 sts. Repeat from * to ** again until there are only 5 sts left unworked. Ch1, sk 1 st, dc in next 3 sts. (2dc, tr) in last st. Turn.
Increase Rows
Once you have worked only one of the rows above, carry on to the rows below. Once again, I have numbered the rows to correspond with the Joining Rows. Therefore, if you just finished Joining Row 9, you will now begin at row 10 below. If you just finished Joining Row 10, you will begin at row 11 below. You will work the pattern below until you have a total of 19 (22, 24, 27, 30, 33, 35, 38, 41) rows (counting from one of the starting ch4 rings), for sizes XS (S, M, L, XL, 2X, 3X, 4X, 5X). If you complete row 13 and you still do not have the correct amount of rows, repeat from row 4. Again, each of these rows will add 6 sts to your st count.
4. Ch4, 2 dc in 1st st. Dc in each st and ch sp across to center ch1. (Dc, ch1, dc) in ch1 sp. Dc in each st across until there is only 1 st left unworked. (2dc, tr) in last st. Turn.
5. Ch4, 2 dc in 1st st. Dc in each st across to center ch1. (Dc, ch1, dc) in ch1 sp. Dc in each st across until there is only 1 st left unworked. (2dc, tr) in last st. Turn.
6. Ch3, 2 hdc in 1st st. Hdc in each st across to center ch1. (Hdc, ch1 hdc) in ch1 sp. Hdc in each st across until there is only 1 st left unworked. (2hdc, dc) in last st. Turn.
7. Working this row in the BLO: Ch3, 2 hdc in 1st st. Hdc in each st across to center ch1. (Hdc, ch1 hdc) in ch1 sp. Hdc in each st across until there is only 1 st left unworked. (2hdc, dc) in last st. Turn.
8. Ch4, Vst in 1st st. Sk 2 sts, 3dc in next st. *Sk 2 st, Vst in next st. Sk 2 st, 3dc in next st. ** Repeat from * to ** until there are only 2 sts left before the center ch1. Sk 2 sts, (2dc, ch1, 2dc) in ch1 sp. Sk 2 sts, 3dc in next st. Repeat from * to ** again until there are only 3 sts left unworked. Sk 2 st, (Vst, tr) in last st. Turn.
9. Ch5, dc in 1st st (counts as (tr, ch1, dc) in same st). Sk 1 st, 3dc in next ch1 sp. Sk 2 sts, Vst in next st. * Sk 2 sts, 3dc in next ch1 sp. Sk 2 sts, Vst in next st. ** Repeat from * to ** until there are only 3 sts left before the center ch1. Sk 2 sts, dc in next st, (2dc, ch1, 2dc) in ch1 sp), dc in next st. *Sk 2 sts, Vst in next st. Sk 2 sts, 3dc in next ch1 sp. ** Repeat from * to ** until there are only 2 sts left unworked. Sk 1 st, (dc, ch1, tr) in last st. Turn.
10. Ch3, 2 hdc in 1st st. Hdc in each st and ch sp across to center ch1. (Hdc, ch1 hdc) in ch1 sp. Hdc in each st across until there is only 1 st left unworked. (2hdc, dc) in last st. Turn.
11. Working this row in the BLO: Ch4, 2 dc in 1st st. Dc in each st across to center ch1. (Dc, ch1, dc) in ch1 sp. Dc in each st across until there is only 1 st left unworked. (2dc, tr) in last st. Turn.
12. Ch4, 2 dc in 1st st. Dc in each st across to center ch1. (Dc, ch1, dc) in ch1 sp. Dc in each st across until there is only 1 st left unworked. (2dc, tr) in last st. Turn.
13. Ch4, 2dc in 1st st. Dc in next 3 sts. *Ch1, sk 1 st, dc in next 5 sts. ** Repeat from * to ** until there are only 5 sts left before the center ch1 Ch1, sk1 st, dc in next 4 sts. (dc, ch1, dc) in ch1 sp. Dc in next 4 sts. Repeat from * to ** again until there are only 5 sts left unworked. Ch1, sk 1 st, dc in next 3 sts. (2dc, tr) in last st. Turn.
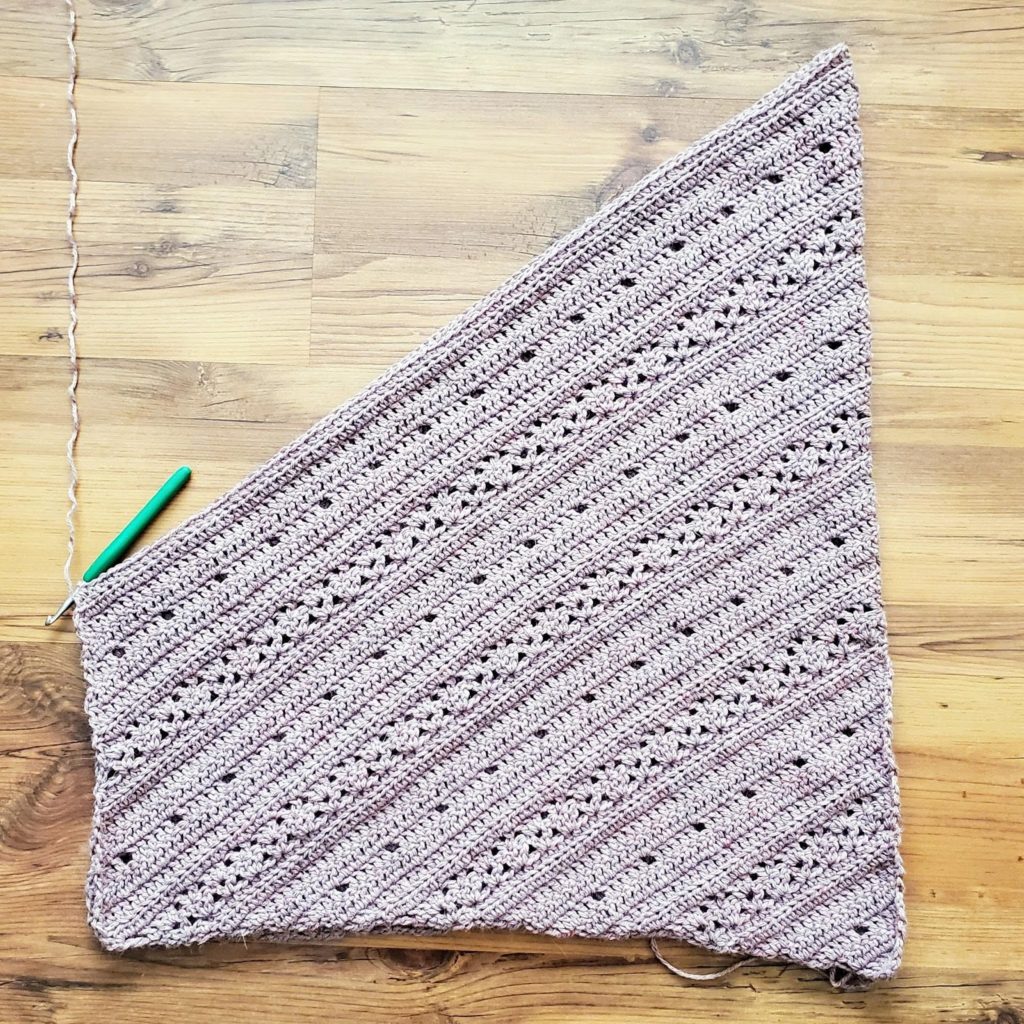
Once you have a total of 19 (22, 24, 27, 30, 33, 35, 38, 41) rows (counting from one of the starting ch4 rings), for sizes XS (S, M, L, XL, 2X, 3X, 4X, 5X), you should have a total stitch count of 120 (138, 150, 168, 186, 204, 216, 234, 252) st + center ch1. The base of your triangle (the side with the slit in it) should be 28” (32”, 36”, 40”, 44”, 48”, 52”, 56”, 60”) wide.
Section 4 – No Increases, Add Rows to Underarm Depth
Now that we have made our sweater the ideal width, we are going to start adding height. We will work the rows below (again, I have numbered them to correspond with the previous sections), until you have worked the same amount of rows as you worked in Section 1. So, if you worked 9 rows in Section 1, you will work 9 of the rows below. If you worked 10 rows in Section 1, you will work 10 rows below. Your stitch count will stay the same as it was when you finished Section 3. Begin with the row after the row you last worked in Section 3. If you just finished Increase Row 9, you will now begin at row 10 below. If you just finished Increase Row 10, you will begin at row 11 below.
4. Ch2, dc in next st (counts as dc2tog). Dc in each st and ch sp across to center ch1. (Dc, ch1, dc) in ch1 sp. Dc in each st and ch sp across until there is only 2 sts left unworked. Dc2tog over last 2 sts. Turn. – 120 (138, 150, 168, 186, 204, 218, 234, 252) st + center ch1
5. Ch2, dc in next st (counts as dc2tog). Dc in each st across to center ch1. (Dc, ch1, dc) in ch1 sp. Dc in each st across until there is only 2 sts left unworked. Dc2tog over last 2 sts. Turn. – 120 (138, 150, 168, 186, 204, 218, 234, 252) st + center ch1
6. Ch1, hdc in next st (counts as hdc2tog). Hdc in each st across to center ch1. (Hdc, ch1 hdc) in ch1 sp. Hdc in each st across until there is only 2 sts left unworked. Hdc2tog over last 2 sts. Turn. – 120 (138, 150, 168, 186, 204, 218, 234, 252) st + center ch1
7. Working this row in the BLO: Ch1, hdc in next st (counts as hdc2tog). Hdc in each st across to center ch1. (Hdc, ch1 hdc) in ch1 sp. Hdc in each st across until there is only 2 sts left unworked. Hdc2tog over last 2 sts. Turn. – 120 (138, 150, 168, 186, 204, 218, 234, 252) st + center ch1
8. Work this row according to your size.
Sizes XS, L, 2X, 3X, & 5X:
Ch3, sk 2 sts, 3dc in next st. *Sk 2 st, Vst in next st. Sk 2 st, 3dc in next st. ** Repeat from * to ** until there are only 2 sts left before the center ch1. Sk 2 sts, (2dc, ch1, 2dc) in ch1 sp. *Sk 2 sts, 3dc in next st. Sk 2 sts, Vst in next st. **Repeat from * to ** until there are only 3 sts left unworked. Sk 2 sts, dc in last st. Turn. – 120 (138, 150, 168, 186, 204, 218, 234, 252) st + center ch1
Sizes S, M, XL, & 4X:
Ch3. *Sk 2 sts, Vst in next st. Sk 2 sts, 3dc in next st. ** Repeat from * to ** until there are only 2 sts left before the center ch1. Sk 2 sts, (2dc, ch1, 2dc) in ch1 sp. *Sk 2 sts, 3dc in next st. Sk 2 sts, Vst in next st. ** Repeat from * to ** until there are only 3 sts left unworked. Sk 2 sts, dc in last st. Turn. – 120 (138, 150, 168, 186, 204, 218, 234, 252) st + center ch1
9. Work this row according to your size.
Sizes XS, L, 2X, 3X, & 5X:
Ch2 (does not count as a st), sk 1 st, Vst in next st. *Sk 2 sts, 3dc in next ch1 sp. Sk 2 sts, Vst in next st. ** Repeat from * to ** until there are 3 sts left before the center ch1. Sk 2 sts, dc in next st, (2dc, ch1, 2dc) in center ch1, dc in next st. *Sk 2 sts, Vst in next st. Sk 2 sts, 3dc in next ch1 sp. ** Repeat from * to ** until there are only 5 sts left unworked. Sk 2 sts, dc in next st, ch1, work dc2tog over same st and last st. Turn. – 120 (139, 150, 168, 186, 204, 218, 234, 252) st + center ch1
Instructions for last st: Yo, insert your hook in the same st you just worked, pull up a loop. Yo, pull through 2 loops. Yo, sk 1 st, insert your hook into last st, pull up a loop. Yo, pull through 2 loops. Yo, pull through last 3 loops.
Sizes S, M, XL, & 4X:
Ch2, sk 1 st, 3dc in next ch1 sp. Sk 2 sts, Vst in next st. *Sk 2 sts, 3dc in next ch1 sp. Sk 2 sts, Vst in next st. ** Repeat from * to ** until there are only 3 sts left before the center ch1. Sk 2 sts, dc in next st. (2dc, ch1, 2dc) in ch1 sp, dc in next st. Sk 2 sts, Vst in next st. Repeat from * to ** again until there are only 5 sts left unworked. Sk 2 sts, 2dc in ch1 sp. Work dc2tog over same ch1 sp and last st. Turn. – 120 (139, 150, 168, 186, 204, 218, 234, 252) st + center ch1
Instructions for last st: Yo, insert your hook in the same ch1 sp you just worked, pull up a loop. Yo, pull through 2 loops. Yo, sk 1 st, insert your hook into last st, pull up a loop. Yo, pull through 2 loops. Yo, pull through last 3 loops.
10. Ch1, hdc in next st (counts as hdc2tog). Hdc in each st and ch sp across to center ch1. (Hdc, ch1 hdc) in ch1 sp. Hdc in each st and ch sp across until there is only 2 sts left unworked. Hdc2tog over last 2 sts. Turn. – 120 (138, 150, 168, 186, 204, 218, 234, 252) st + center ch1
11. Working this row in the BLO: Ch2, dc in next st (counts as dc2tog). Dc in each st across to center ch1. (Dc, ch1, dc) in ch1 sp. Dc in each st across until there is only 2 sts left unworked. Dc2tog over last 2 sts. Turn. – 120 (138, 150, 168, 186, 204, 218, 234, 252) st + center ch1
12. Ch2, dc in next st (counts as dc2tog). Dc in each st across to center ch1. (Dc, ch1, dc) in ch1 sp. Dc in each st across until there is only 2 sts left unworked. Dc2tog over last 2 sts. Turn. – 120 (138, 150, 168, 186, 204, 218, 234, 252) st + center ch1
13. Work this row according to your size.
Sizes XS, L, 2X, 3X, & 5X:
Ch2, dc in next st (counts as dc2tog). Dc in next 5 sts. *Ch1, sk 1 st, dc in next 5 sts. ** Repeat from * to ** until there are only 5 sts left before the center ch1. Ch1, sk 1 st, dc in next 4 sts. (Dc, ch1, dc) in ch1 sp, dc in next 4 sts. Repeat from * to ** again until there are only 2 sts left unworked. Dc2tog over last 2 sts. Turn. – 120 (138, 150, 168, 186, 204, 218, 234, 252) st + center ch1
Sizes S, M, XL, & 4X:
Ch2, dc in next st (counts as dc2tog). Dc in next 2 sts. *Ch1, sk 1 st, dc in next 5 sts. ** Repeat from * to ** until there are only 5 sts left before the center ch1. Ch1, sk 1 st, dc in next 4 sts. (Dc, ch1, dc) in ch1 sp, dc in next 4 sts. Repeat from * to ** again until there are only 5 sts left unworked. Ch1, sk 1 st, dc in next 2 sts, dc2tog over last 2 sts. Turn. – 120 (138, 150, 168, 186, 204, 218, 234, 252) st + center ch1
Once you have finished row 13, you will repeat rows 4 – 13 until you have worked the same amount of rows as you worked in Section 1. For example, if you worked 9 rows in Section 1, you will work 9 of the rows above. If you worked 10 rows in Section 1, you will work 10 rows. Do not bind off. Do not turn after your last row.
Section 5 – Join & Work in the Round
Next we will join to the first stitch of the last row we just worked. Fold your project in half widthwise as in Figure 2. Ss to the first stitch of your last row and pull it tight (I do this to avoid a gap) as in Figure 3. Turn. We will now be working in the round. Begin with the round after the row you last worked in Section 4. If you just finished Section 4, row 9, you will now begin at round 10 below. If you just finished Section 4, row 10, you will begin at round 11 below.
4. Ch2. Beginning in next st, dc2tog. Dc in each st and ch sp around to center ch1. (Dc, ch1, dc) in ch1 sp. Dc in each st and ch sp around until all sts are worked. Ss to join to 1st st. Turn. – 120 (138, 150, 168, 186, 204, 218, 234, 252) st + center ch1
5. Ch2. Beginning in next st, dc2tog. Dc in each st around to center ch1. (Dc, ch1, dc) in ch1 sp. Dc in each st around until all sts are worked. Ss to join to 1st st. Turn. – 120 (138, 150, 168, 186, 204, 218, 234, 252) st + center ch1
6. Ch1. Beginning in next st, hdc2tog. Hdc in each st around to center ch1. (Hdc, ch1 hdc) in ch1 sp. Hdc in each st around until all sts are worked. Ss to join to 1st st. Turn. – 120 (138, 150, 168, 186, 204, 218, 234, 252) st + center ch1
7. Working this row in the BLO: Ch1. Beginning in next st, hdc2tog. Hdc in each st around to center ch1. (Hdc, ch1 hdc) in ch1 sp. Hdc in each st around until all sts are worked. Ss to join to 1st st. Turn. – 120 (138, 150, 168, 186, 204, 218, 234, 252) st + center ch1
8. Work this row according to your size.
Sizes XS, L, 2X, 3X, & 5X:
Ch3, dc in next st. Sk 2 sts, 3dc in next st. *Sk 2 st, Vst in next st. Sk 2 st, 3dc in next st. ** Repeat from * to ** until there are only 2 sts left before the center ch1. Sk 2 sts, (2dc, ch1, 2dc) in ch1 sp. *Sk 2 sts, 3dc in next st. Sk 2 sts, Vst in next st. **Repeat from * to ** until there are only 2 sts left unworked. Sk 2 sts, ss to join to 1st st. Turn. – 120 (138, 150, 168, 186, 204, 218, 234, 252) st + center ch1
Sizes S, M, XL, & 4X:
Ch3, dc in next st. *Sk 2 sts, Vst in next st. Sk 2 sts, 3dc in next st. ** Repeat from * to ** until there are only 2 sts left before the center ch1. Sk 2 sts, (2dc, ch1, 2dc) in ch1 sp. *Sk 2 sts, 3dc in next st. Sk 2 sts, Vst in next st. ** Repeat from * to ** until there are only 2 sts left unworked. Sk 2 sts, ss to join to 1st st. Turn. – 120 (138, 150, 168, 186, 204, 218, 234, 252) st + center ch1
9. Work this row according to your size.
Sizes XS, L, 2X, 3X, & 5X:
Ch2, sk 1 st, Vst in next st. *Sk 2 sts, 3dc in next ch1 sp. Sk 2 sts, Vst in next st. ** Repeat from * to ** until there are 3 sts left before the center ch1. Sk 2 sts, dc in next st, (2dc, ch1, 2dc) in center ch1, dc in next st. *Sk 2 sts, Vst in next st. Sk 2 sts, 3dc in next ch1 sp. ** Repeat from * to ** until there are only 5 sts left unworked. Sk 2 sts, dc in next st, ch1, work dc2tog over same st and last st. Ss to join to 1st st. Turn. – 120 (138, 150, 168, 186, 204, 218, 234, 252) st + center ch1
Instructions for last st: Yo, insert your hook in the same st you just worked, pull up a loop. Yo, pull through 2 loops. Yo, sk 1 st, insert your hook into last st, pull up a loop. Yo, pull through 2 loops. Yo, pull through last 3 loops.
Sizes S, M, XL, & 4X:
Ch2, sk 1 st, 3dc in next ch1 sp. Sk 2 sts, Vst in next st. *Sk 2 sts, 3dc in next ch1 sp. Sk 2 sts, Vst in next st. ** Repeat from * to ** until there are only 3 sts left before the center ch1. Sk 2 sts, dc in next st. (2dc, ch1, 2dc) in ch1 sp, dc in next st. Sk 2 sts, Vst in next st. Repeat from * to ** again until there are only 5 sts left unworked. Sk 2 sts, 2dc in ch1 sp. Work dc2tog over same ch1 sp and last st. Ss to join to 1st st. Turn. – 120 (138, 150, 168, 186, 204, 218, 234, 252) st + center ch1
Instructions for last st: Yo, insert your hook in the same ch1 sp you just worked, pull up a loop. Yo, pull through 2 loops. Yo, sk 1 st, insert your hook into last st, pull up a loop. Yo, pull through 2 loops. Yo, pull through last 3 loops.
10. Ch1. Beginning in next st, hdc2tog. Hdc in each st and ch space around to center ch1. (Hdc, ch1 hdc) in ch1 sp. Hdc in each st and ch space around until all sts are worked. Ss to join to 1st st. Turn. – 120 (138, 150, 168, 186, 204, 218, 234, 252) st + center ch1
11. Working this row in the BLO: Ch2. Beginning in next st, dc2tog. Dc in each st around to center ch1. (Dc, ch1, dc) in ch1 sp. Dc in each st around until all sts are worked. Ss to join to 1st st. Turn. – 120 (138, 150, 168, 186, 204, 218, 234, 252) st + center ch1
12. (Wrong Side) Ch2. Beginning in next st, dc2tog. Dc in each st around to center ch1. (Dc, ch1, dc) in ch1 sp. Dc in each st around until all sts are worked. Ss to join to 1st st. Turn. – 120 (138, 150, 168, 186, 204, 218, 234, 252) st + center ch1
13. (Right Side) Work this row according to your size.
Sizes XS, L, 2X, 3X, & 5X:
Ch2. Beginning in next st, dc2tog. Dc in next 5 sts. *Ch1, sk 1 st, dc in next 5 sts. ** Repeat from * to ** until there are only 5 sts left before the center ch1. Ch1, sk 1 st, dc in next 4 sts. (Dc, ch1, dc) in ch1 sp, dc in next 4 sts. Repeat from * to ** again until there is only 1 st left unworked. Dc in last st. Ss to join to 1st st. Turn. – 120 (138, 150, 168, 186, 204, 218, 234, 252) st + center ch1
Sizes S, M, XL, & 4X:
Ch2. Beginning in next st, dc2tog. Dc in next 2 sts. *Ch1, sk 1 st, dc in next 5 sts. ** Repeat from * to ** until there are only 5 sts left before the center ch1. Ch1, sk 1 st, dc in next 4 sts. (Dc, ch1, dc) in ch1 sp, dc in next 4 sts. Repeat from * to ** around until there are only 4 sts left unworked. Ch1, sk1 st, dc in last 3 sts. Ss to join to 1st st. Turn. – 120 (138, 150, 168, 186, 204, 218, 234, 252) st + center ch1
Once you have finished round 13, you will repeat rounds 4 – 13 until you have achieved your desired length, minus 2”. The edging can be worked from any round, but I find it looks best if you finish the above section with a round 6 or round 10 repeat. Do not bind off.
Section 6 – Bottom Trim
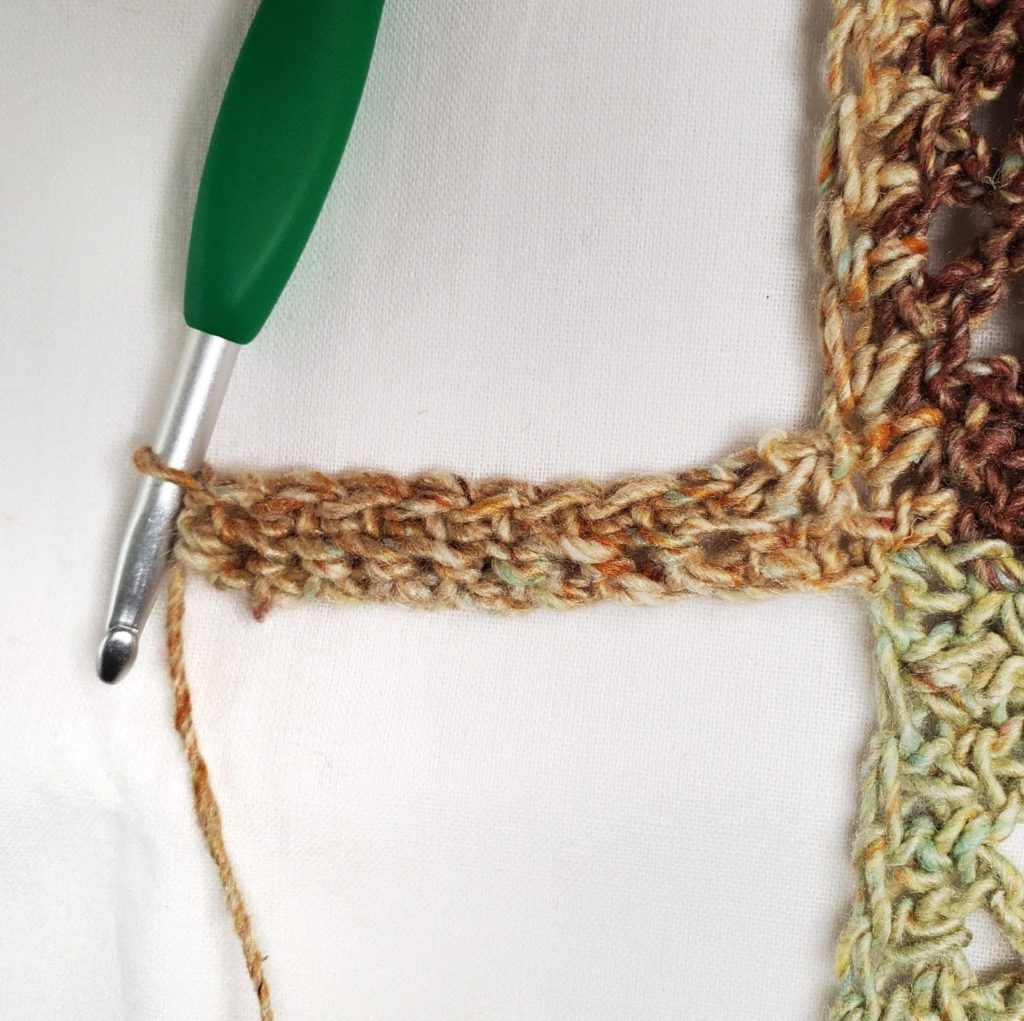
To make the ribbed bottom trim, we will be working short rows off of the last row worked in Section 5. I chose to work my short rows into the BLO of the body, but if you prefer, you can work into both loops. Remember, you will need to work the trim stitches into the BLO in order to get the ribbed effect. Turn your work so that the right side is facing you.
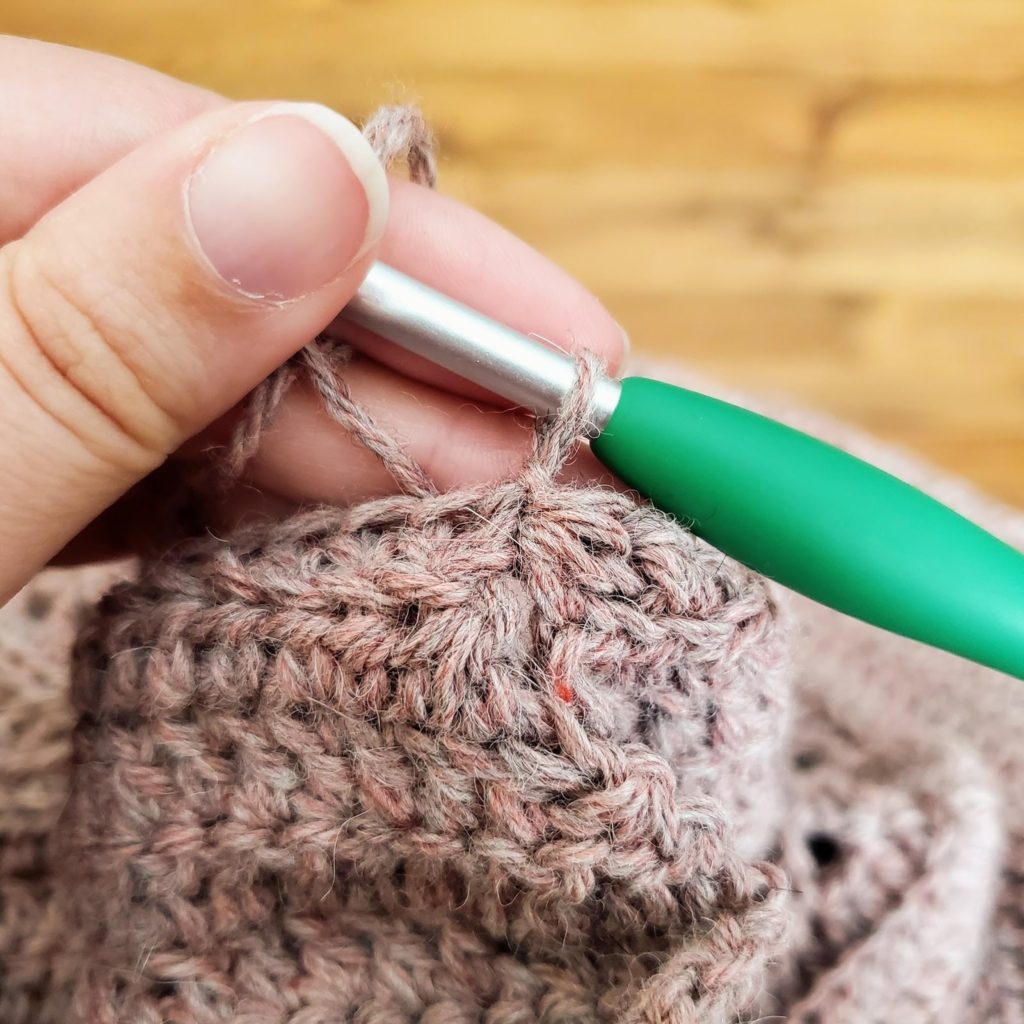
1. Ch10. (See Figure 4) Sc in 2nd ch from hook and each ch across. Ss into the BLO (optional) of next unworked st on body. Ss into the BLO (optional) of next unworked st on body. (See Figure 5) Turn. – 9 st
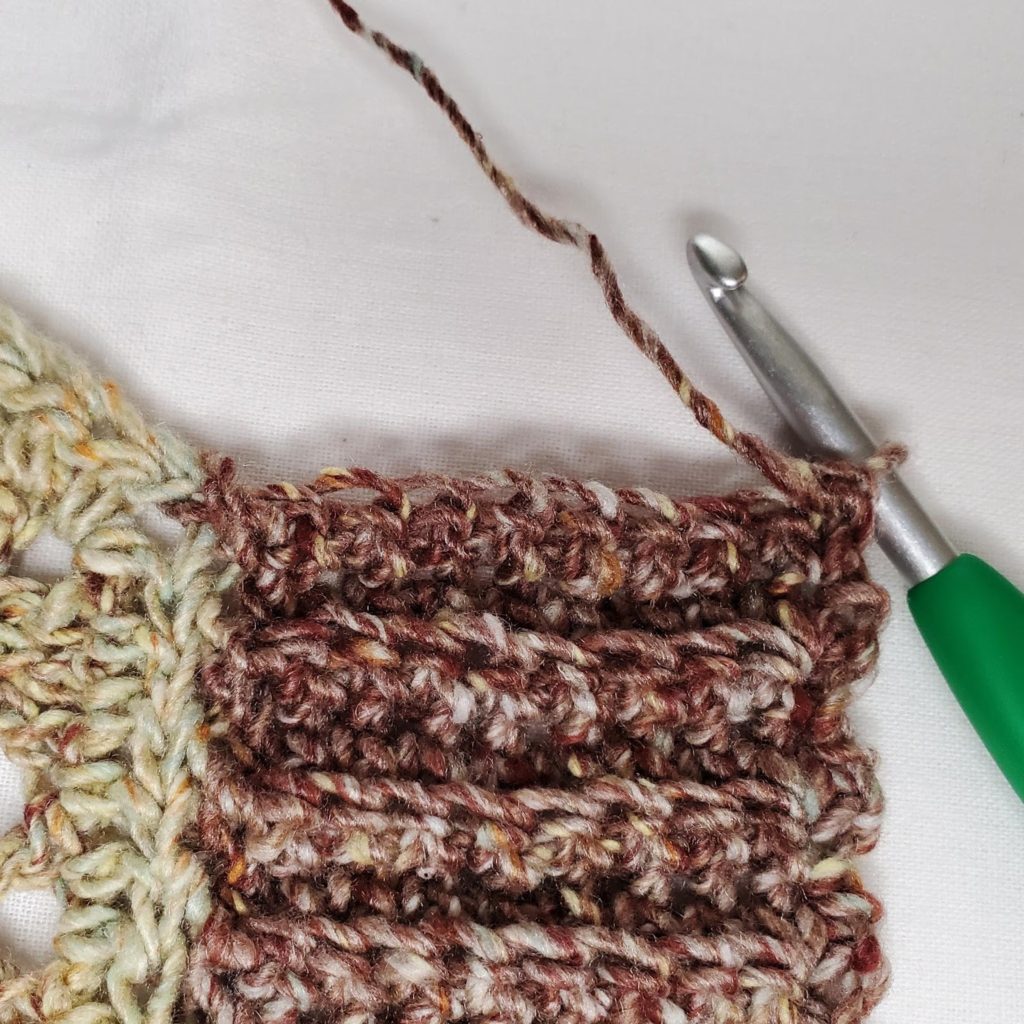
2. Sk 2 ss. Sc in BLO of next 8 sts. Sc in both loops of last st. (See Figure 6) Turn. – 9 st
3. Ch1. Sc in both loops of 1st st. Sc in BLO of next 8 sts. Ss into the BLO (optional) of next unworked st on body. Ss into the BLO (optional) of next unworked st on body. Turn. – 9 st
Repeat rows 2 and 3 until you have worked into every stitch up to the center ch1 and just finished a row 2 repeat. (See Figure 7)
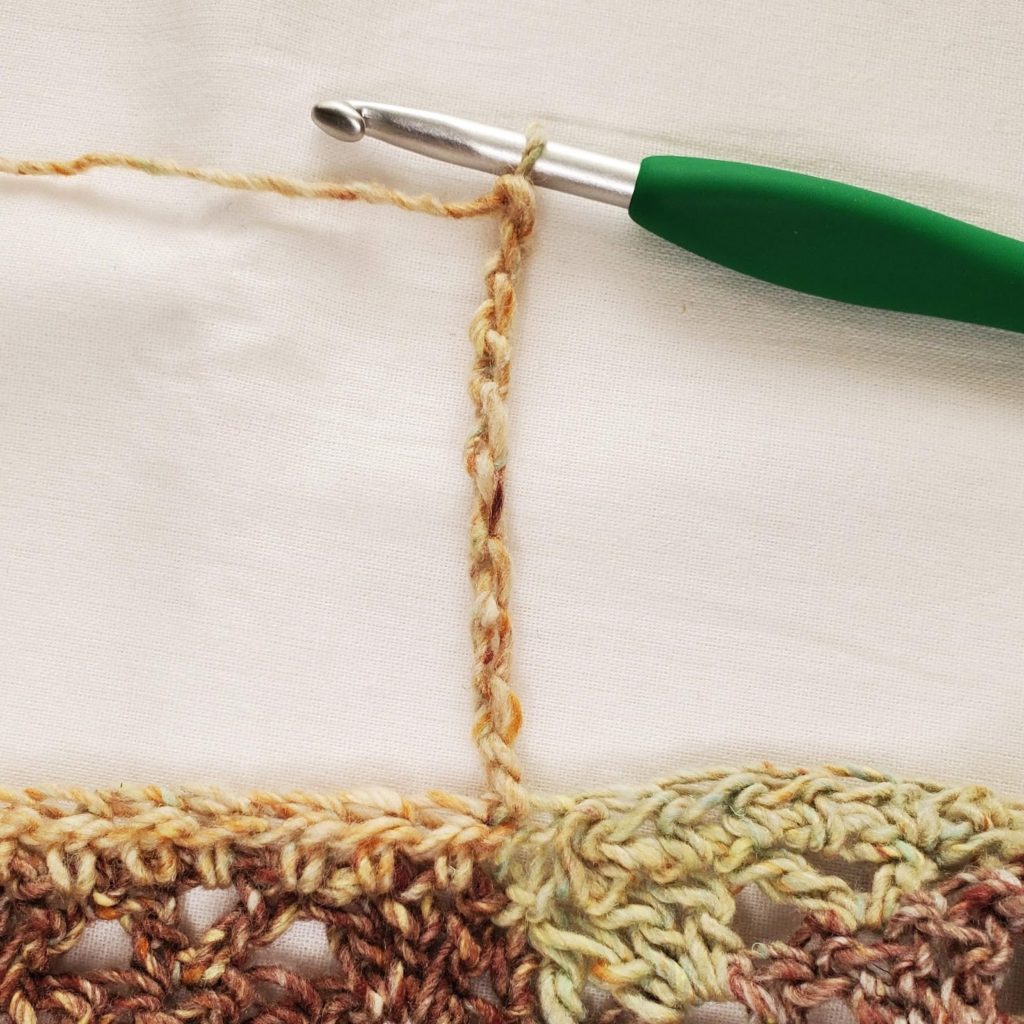
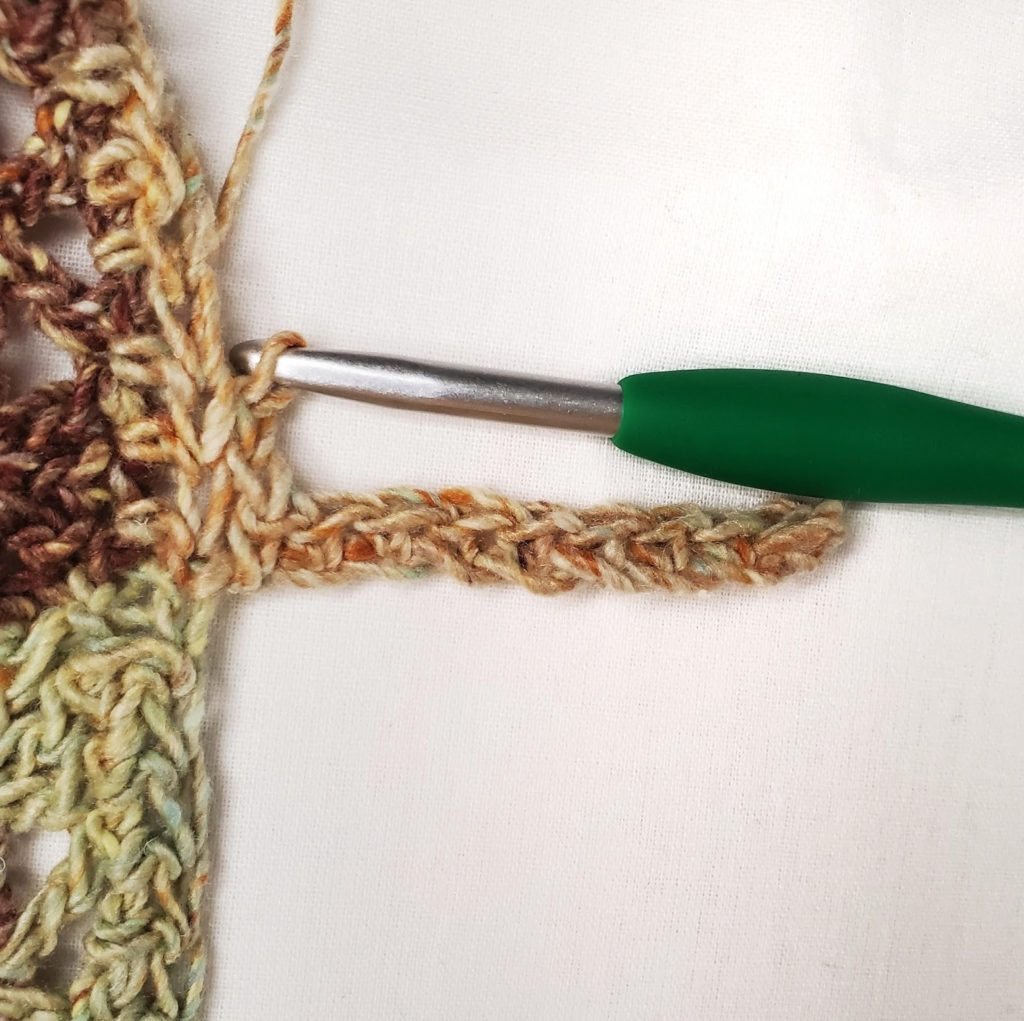
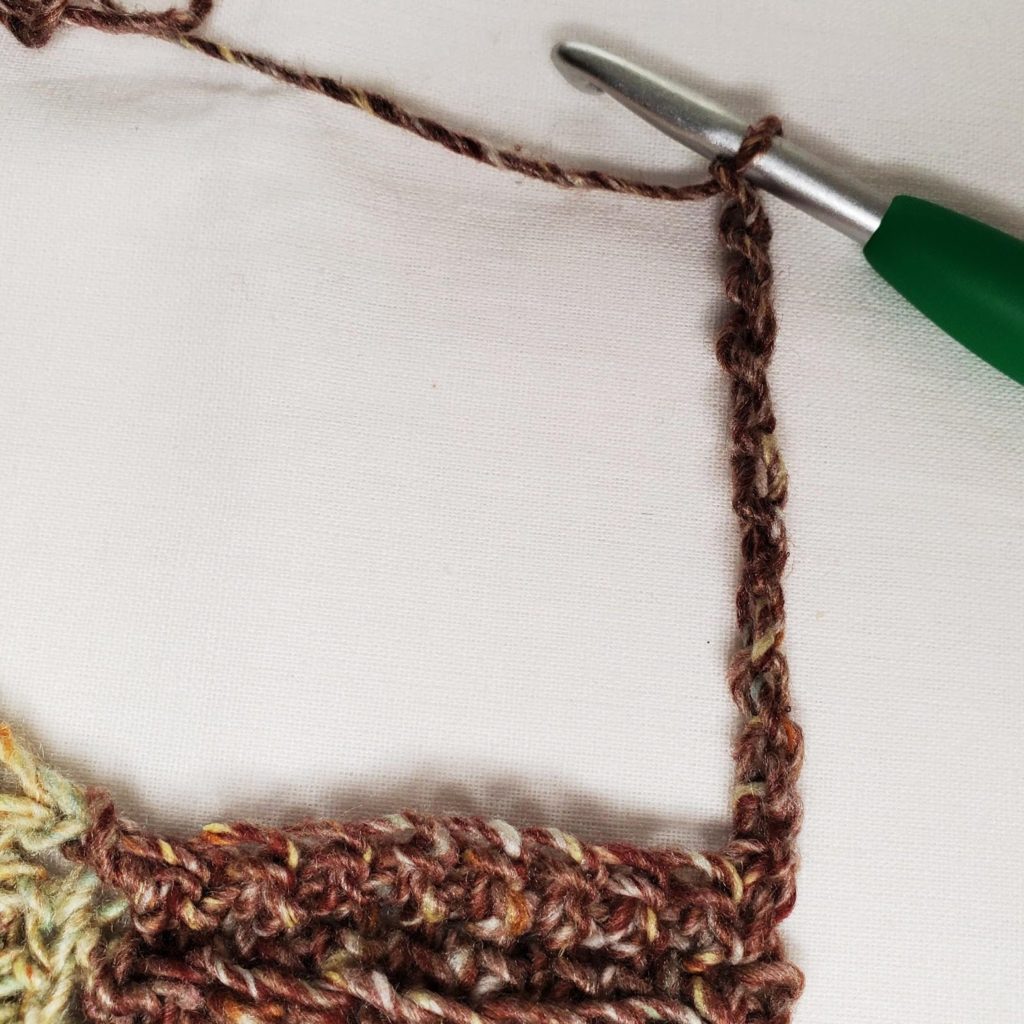
1. Ch10. (See Figure 8) Sc in 2nd ch from hook and each ch across. Ss into the BLO of next st. Ss into the BLO of next st. (See Figure 9) Turn. – 9 st
2. Sk 2 ss. Sc in BLO of next 8 sts. Sc in both loops of last st. Turn. – 9 st
3. Ch1. Sc in both loops of 1st st. Sc in BLO of next 8 sts. Ss into the BLO of next st. Ss into the BLO of next st. Turn. – 9 st
Repeat rows 2 & 3, first working into the side of the bottom edging, then into the ch1 sp, then into the body (see Figure 10 for an example of what your corner should look like), until you have made it all the way around to your first row of edging. You want to finish with a row 3 repeat. If there is an extra stitch, you can skip it. Turn your work so that the wrong side is facing you. Ss the ends of the bottom trim together, working through the BLO of your last row and the bottom bar of your first row. Bind off.


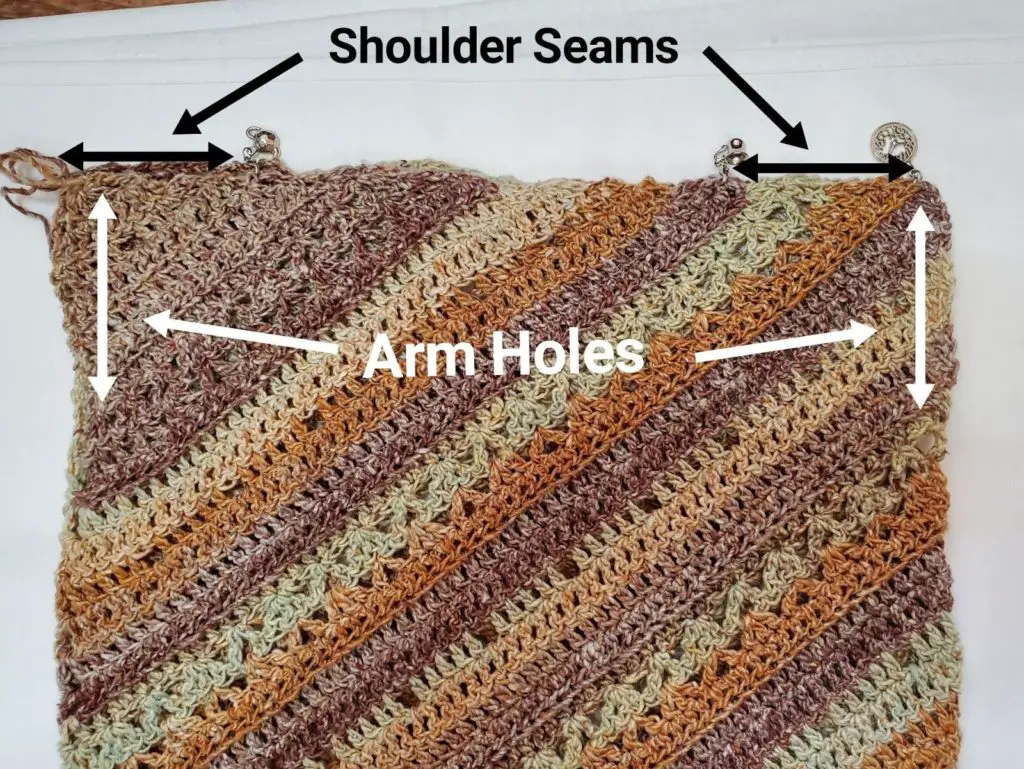
Section 7 – Shoulders & Neckline
The neckline is finished with a simple single crochet edge which means you can make the neck as wide or as narrow as you desire! I recommend that you use locking stitch markers to hold the shoulders closed, mark where you think your neckline should end, and then, try your sweater on to see if you like it. Once you have your neckline the size you want, sew the shoulders closed. When sewing my shoulders, I like to work from the outside in, so that I can easily adjust it if I change my mind. See figures 11 & 12 for reference.
Once you have sewn the shoulders, you can finish off the neckline. Join your yarn anywhere on the neck and work sc stitches into the side of each row around in the following manner:
– 2 sc in the side of each hdc.
– 2 sc in the side of each dc.
– 3 sc in the side of each tr.
Section 8 – Sleeves
I have written this pattern with four different options for sleeves (because you gotta have options!): a short sleeve, a 1/2 sleeve, a 3/4 sleeve, and a long straight sleeve. Instructions are given for the following sleeve circumferences: 10” (11 ½”, 13 ½”, 15”, 16 ½”, 18 ½”, 20”, 21 ½”, 23 ½”).
Sleeve
With the RS facing you, attach your yarn in the underarm.
1. Ch1. Work 36 (42, 48, 54, 60, 66, 72, 78, 84) sc around the arm hole. Ss to join to 1st st. Turn. – 36 (42, 48, 54, 60, 66, 72, 78, 84) st
2. Ch1. Hdc in 1st st and each st around. Ss to join to 1st st. Turn. – 36 (42, 48, 54, 60, 66, 72, 78, 84) st
3. Working this round into the BLO: Ch3. Dc in next st and each st around. Ss to join to 1st st. Turn. – 36 (42, 48, 54, 60, 66, 72, 78, 84) st
4. Ch3. Dc in next st and each st around. Ss to join to 1st st. Turn. – 36 (42, 48, 54, 60, 66, 72, 78, 84) st
5. Ch3. Dc in next 4 sts. *Ch1, sk 1 st, dc in next 5 sts. ** Repeat from * to ** around until only 1 st left unworked. Ch1, sk 1 st, ss to join to 1st st. Turn. – 36 (42, 48, 54, 60, 66, 72, 78, 84) st
6. Ch3. Dc in next ch sp and each st and ch sp around. Ss to join to 1st st. Turn. – 36 (42, 48, 54, 60, 66, 72, 78, 84) st
7. Ch3. Dc in next st and each st around. Ss to join to 1st st. Turn. – 36 (42, 48, 54, 60, 66, 72, 78, 84) st
8. Ch1. Hdc in 1st st and each st around. Ss to join to 1st st. Turn. – 36 (42, 48, 54, 60, 66, 72, 78, 84) st
Short Sleeve: Skip the rest of the rounds and proceed to the Cuff instructions below.
9. Working this round into the BLO: Ch1. Hdc in 1st st and each st around. Ss to join to 1st st. Turn. – 36 (42, 48, 54, 60, 66, 72, 78, 84) st
10. Ch3, 2dc in same st. Sk 2 sts, Vst in next st. *Sk 2 sts, 3dc in next st. Sk 2 sts, Vst in next st. Repeat from * to ** around until there are only 2 sts left unworked. Sk 2 sts, ss to join to 1st st. Ss to next st. Turn. – 36 (42, 48, 54, 60, 66, 72, 78, 84) st
11. Ch4, dc in 1st st (counts as Vst). Sk 2 sts, 3dc in next st. *Sk 2 sts, Vst in next st. Sk 2 sts, 3dc in next st. ** Repeat from * to ** around until there are only 2 sts left unworked. Sk 2 sts, ss to join to 1st st. Ss into next st. Turn. – 36 (42, 48, 54, 60, 66, 72, 78, 84) st
1/2 Sleeve: Repeat rounds 2 – 11 until you have a total of 21 rounds. Then proceed to Cuff instructions below.
3/4 Sleeve: Repeat rounds 2 – 11 until you have a total of 28 rounds. Then proceed to Cuff instructions below.
Long Sleeve: Repeat rows 2 – 11 until you have a total of 41 rounds. Then proceed to Cuff instructions below.
Cuff
The sleeve cuff is worked in the same manner as the Bottom Trim. Make sure the RS of your work is facing you.
1. Ch6. Sc in 2nd ch from hook and each ch across. Ss into the BLO of next st. Ss into the BLO of next st. Turn. – 5 st
2. Sk 2 ss. Sc in BLO of next 4 sts. Sc in both loops of last st. Turn. – 5 st
3. Ch1. Sc in both loops of 1st st. Sc in BLO of next 4 sts. Ss into the BLO of next st. Ss into the BLO of next st. Turn. – 5 st
Repeat rows 2 & 3, until you have made it all the way around the sleeve to your first row of edging. You want to finish with a row 3 repeat. If there is an extra stitch, you can skip it. Turn your work so that the wrong side is facing you. Ss the ends of the bottom trim together, working through the BLO of your last row and the bottom bar of your first row. Bind off.
Weave in your ends, and you’re done!
I hope you love your new sweater, and I look forward to seeing all of your beautiful pictures on Ravelry!
If you’d like to know when I post new patterns and tutorials, head on over to my Facebook and Instagram and give me a like and a follow!
If you enjoyed The Tilted Tunic – Free Crochet Sweater Pattern, you may want to check out my other designs!
And until next time… Happy Hooking! 😉
Sarah, This is another absolutely gorgeous design. I LOVE the style! I LOVE the length! I LOVE the short sleeves (I often get too hot in long ones)! Your designs are so amazing! Thank you so much for sharing them. You are my favorite designer by far.
Emma, I am so flattered and humbled! Thank you so much for taking the time to share your kind words with me! <3
Love this so much I started it tonight. I’m stuck at joining the triangles. The photo on the website pattern shows joining at the middle, but the directions sound like I should join at the out side edge (on the right, I think)
Any help would be appreciated
Hi Nikki!
Ok, first you use the middle yarn end to join (or attach) the two triangles together. Just tie one to the other at the top.
Then, you join your yarn yarn ball to the other free end of yarn on the side edge (it could be on the left or right, depending on the size you chose).
I hope that was helpful.
Sarah
Hi, I really like this sweater pattern and would really like to make it. You have gone to a lot of trouble to make this and you have done an absolutely stunning piece of art work, Congratulations. Having said that. . . .Why am I not able to print out the free pattern?? It would be a little difficult to sit at the computer and either write it out or crochet. Would you be able to put the pattern somewhere so I could print the free copy?? Thank you for your time.. . . . . Cheryl
Hi Cheryl,
The copy/paste function has been disabled on this website. If you would like a detailed explanation for this, check out my FAQ page here: https://ineeditcrochet.com/f-a-q/
WOW WOW WOW WOW WOW ? ??? it has been a long time since a pattern has come along that has made my jaw drop. This is a sweater my husband will CERTAINLY APPRECIATE ??? You have found such a stylish way to enhance a woman’s curves no matter how big and beautiful our curves are. This is a sweater that shouts I’m comfortable with who I am I am beautiful and I will walk with my head high. Size is just a number besides X means extra Special. ?
Omg Rebecca, THANK YOU!! This is exactly how I want every person to feel when they make my designs. We are all worthy of beautiful clothes.
I am so touched by your words, I can’t even express. You have made my day! <3 <3 <3
This is gorgeous! How much yarn will I need for say a size M?
Thank you Anna! If you take a look at the materials list near the top, you’ll see I have an approximate yardage required for each size. I always like to buy a little extra, though. 😉
Enjoy!
– Sarah
Hello! Really enjoying this, but I cannot find where the sleeve circumference for more than 15 inches is.
Hi Maggie.
If you look at the paragraph under the gauge check after row 13, you will see instructions to repeat rows for the other sizes.
– Sarah
I’m in the process of making this and I want the sleeves to be long. However I notice they flare too much to my taste when making them straight. I wonder if you have any guidelines on how to make the sleeves “hug” the arm? Like where to start decreasing and how much? Sorry, I might be asking too much considering it’s a free pattern…
Hi Anna,
Usually when I want to make tapered sleeves, I’ll start my decreases when the sleeve is long enough that the hem sits just above my elbow. Then I’ll add 1 – 2 decreases per row until I have reached the proper length.
However, in order to do this with this pattern, you will have a noticeable seam along the join. This is because the lacy stitch pattern is a multiple of 6 stitches, so it is impossible to decrease in a way that will make the 6 stitch repeat look right. This is why I didn’t write it with long sleeves. But if that doesn’t bother you, you are welcome to give it a go! 😉
I hope that helps,
– Sarah
Thank you! Whilst I was waiting for a reply I actually did more or less what you said to test it out and it doesn’t look too bad! I am using a dark coloured yarn so the seam isn’t really noticeable. I’m just making the tunic a little shorter now as it ended up looking more like a dress…almost done!
Hi!, Such a beautiful tunic!, Are there 1 or 2 triangles for the sleeves?, And Which way is the triangle to form the sleeve? I hope i am wording it right. Do you have a video ?
Hi Annette!
Thank you so much! The 2 triangles combine to form one of the sleeve caps. It’s hard to explain outside of following the instructions, but the two starting rings will be about at the point of the shoulder, the shorter edge (the dc end) will be the armhole, and the longer edge (the tr end) will run along the top of the shoulder. The working edge (tops of the sts) will keep ging to form the rest of the tunic. I hope that helped and didn’t just confuse you more. Lol! I am working on a video to go with the pattern, so hopefully I can release that soon as well. 🙂
-Sarah