
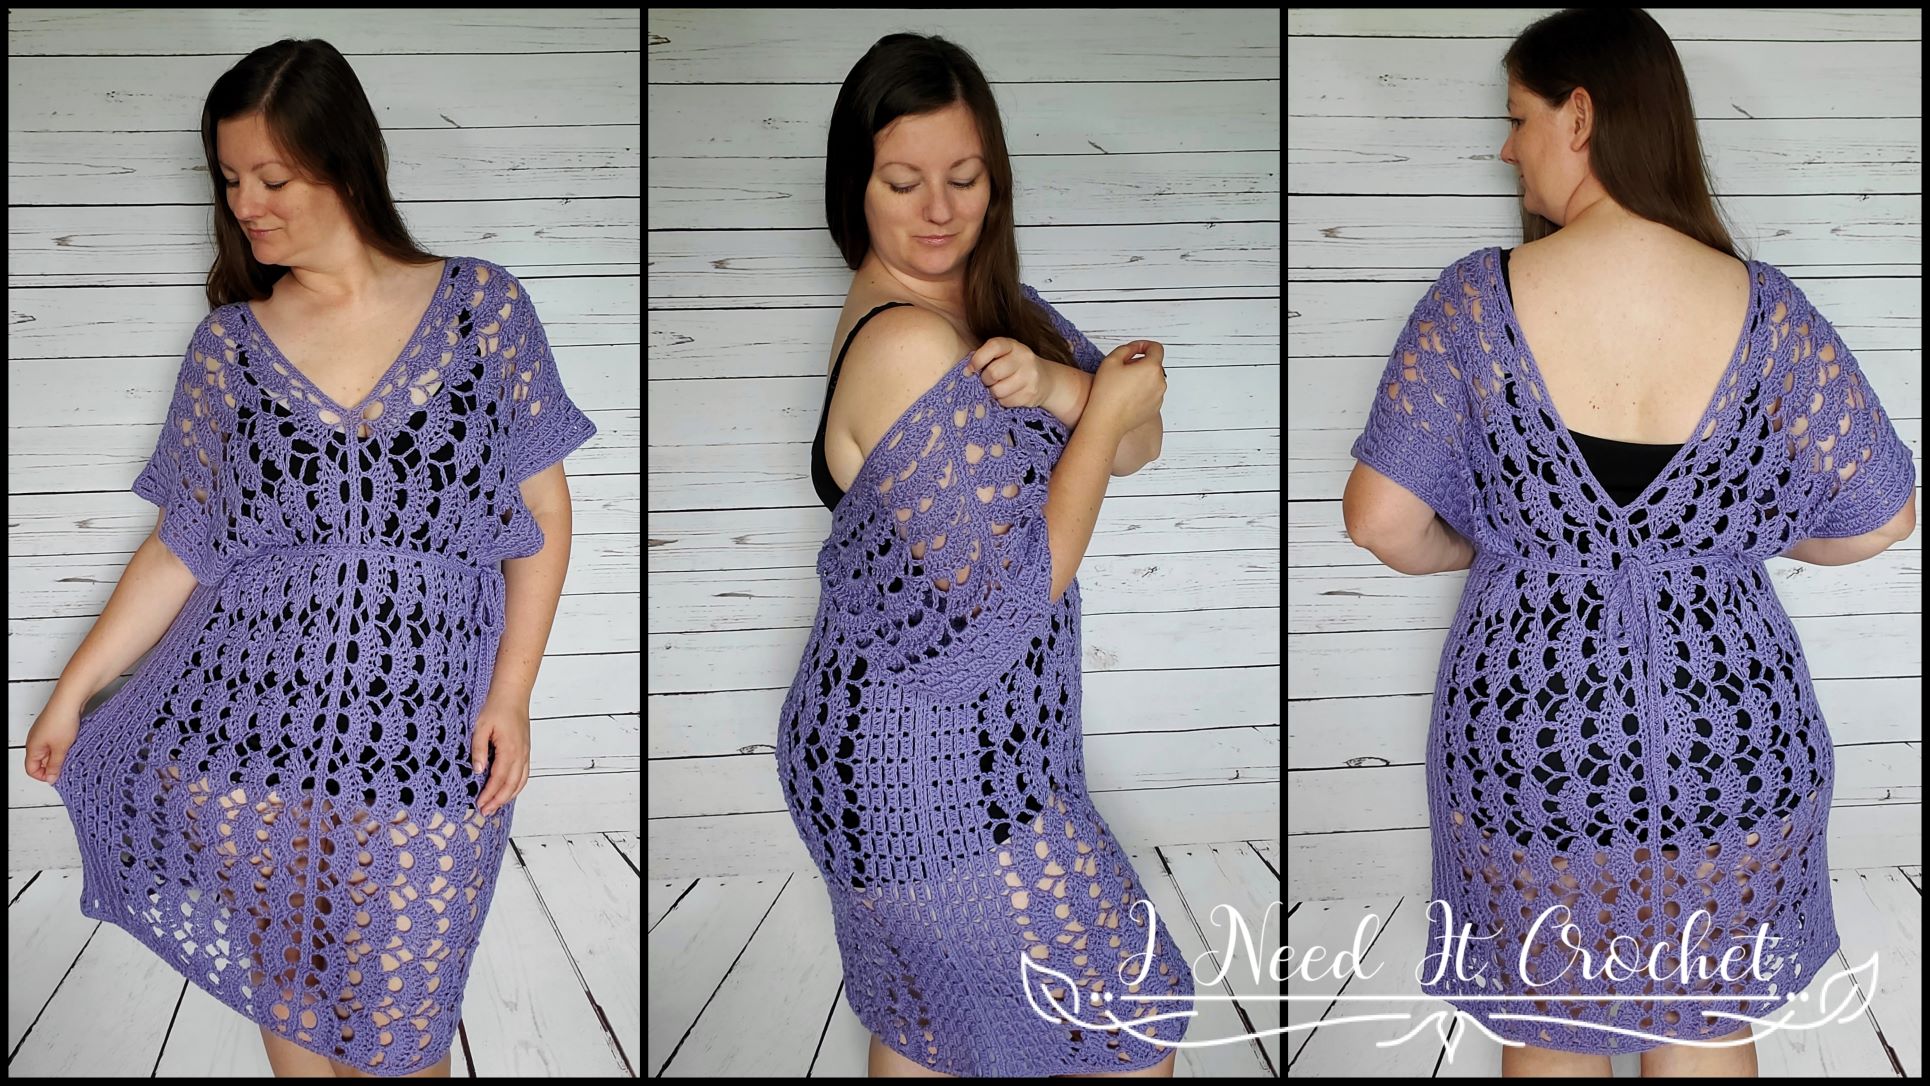
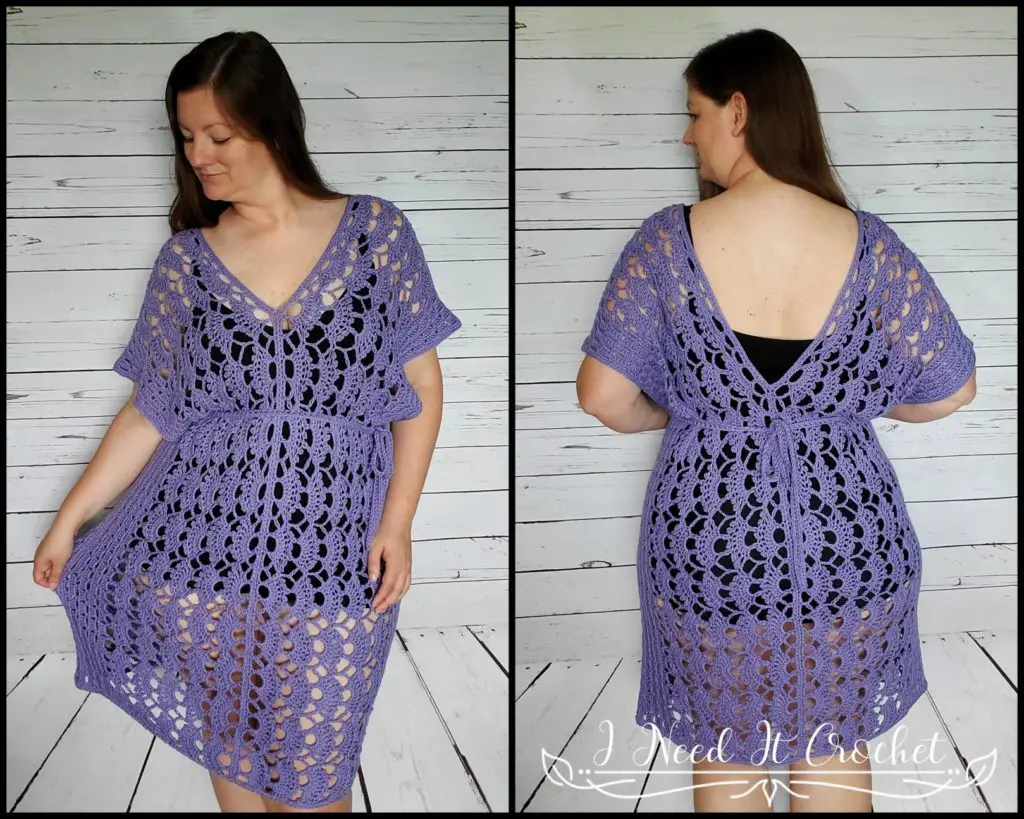
Crochet Beach Cover Up – Water’s Edge
The Crochet Beach Cover Up – Water’s Edge Free Crochet Pattern is copyrighted by I Need It Crochet. You may not copy, share, change, or sell the pattern itself. Also, you may not claim this pattern as your own. All pictures contained in this pattern fall under the copyright and may not be used.
Finished items made from the Crochet Beach Cover Up – Water’s Edge Free Crochet Pattern belong to you, and you may do what you wish with them. If you choose to sell them on Etsy, I would very much appreciate it if you credited me as the pattern designer.


Or… Just scroll down to see it for free!
While you’re here…
Do you love finding beautiful and exciting new crochet patterns? Do you love using the free pattern versions on blogs like mine? Then why not sign up for my newsletter? I promise to only send you an email when I have something new and exciting to tell you. Like when I come up with new tips and tricks, stitch tutorials, roundups… and of course new patterns! Just add your name and email to the form below and hit subscribe. And don’t forget to check your email and verify your subscription!
[rainmaker_form id=”1806″]
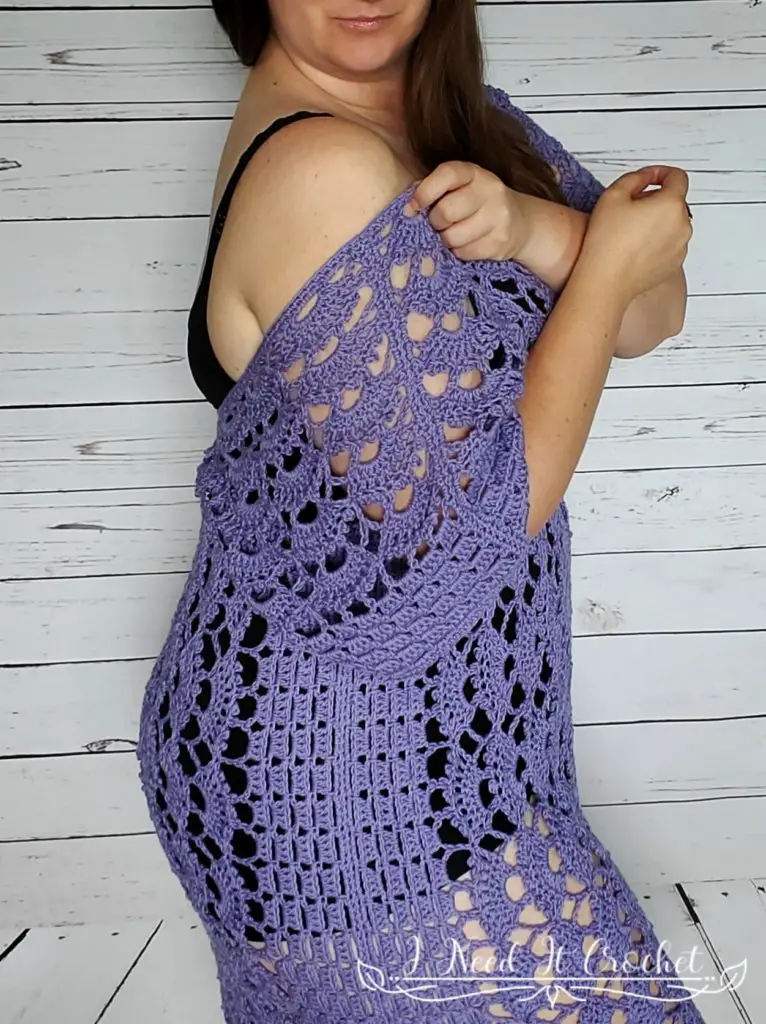
During the summer months, the beach is my favourite place to be. I’ve been a great swimmer since I was a child, but even if I’m not swimming, I’m happy just to be near the water. I would love to live there!
This is why I was eager to design a beautiful coverup to wear over my bathing suit – something delicate and classy but still functional, something I can wear while walking down the beach and listening to the water… perhaps even in slow motion. 😉
How to crochet the Crochet Beach Cover Up – Water’s Edge Free Crochet Pattern
Finished Sizes:
Instructions given to fit size X-small; changes for small, medium, large, X-large, 2X-large, 3X-large, 4X-large and 5X-large are in ()
XS (S, M, L, XL, 2XL, 3XL, 4XL, 5XL)
Body Circumference: 34 ¼”(37 ½”, 42 ½”, 45”, 50”, 52 ½”, 57 ½”, 60 ¼”, 65 ¼”)
Finished Length: 38”, with instructions to adjust the length.
Gauge:
16 dc x 9 rows = 4 ¼” x 4 ¼”.
Be sure to always check your gauge. It will save you much time and heartache.
Materials:
I used Premier Yarns Cotton Fair, which is a 52% Cotton, 48% Acrylic, #2 Fine weight yarn.
Any yarn of similar weight would work.
Approximately 1400 (1400, 1400, 1500, 1500, 1500, 1600, 1600, 1600) yds.
4.5mm Hook
Stitch Markers
Yarn Needle
Scissors
Measuring Tape
Abbreviations:
RS = Right Side
WS = Wrong Side
Sk = Skip
St = Stitch
Ss = Slip Stitch
Ch = Chain
Sc = Single Crochet
Dc = Double Crochet
Tr = Treble Crochet
Pic = Picot
Notes:
Ch1 at the beginning of a row is never considered a stitch.
Ch3 at the beginning of a row is considered a dc.
Ch4 at the beginning of a row is considered a tr.
Choose your size according to your largest measurement (bust/waist/hips) and how you would like the coverup to fit. For a close-fitting top, choose the size closest to your largest measurement. For a loose fit, choose a size 2-3” larger.

Crochet Beach Cover Up – Water’s Edge
Instructions
This coverup is made of 4 identical panels. Once you have finished making the panels, you will sew them together as instructed. The neckline and armholes can be made to any size you please. Finally, we will finish all of the edges with a simple sc border.
Note: The instructions below will give you a coverup that is approximately 38″ long from shoulder to bottom hem. You can adjust the length easily by changing the number on your starting chain. Simply add or subtract a multiple of 12 sts. Each multiple of 12 will change your length by approximately 3 ¼”.
Panels (Make 4)
Using a 4.5mm hook (or the hook used to obtain gauge):
Fan Rows
Ch 146
- Sc in 2nd ch from hook. *Ch5, sk 3 ch, sc in next ch.** Repeat from * to ** across (see Figure 1 for example). Turn. – 36 ch5 + 37 sc st
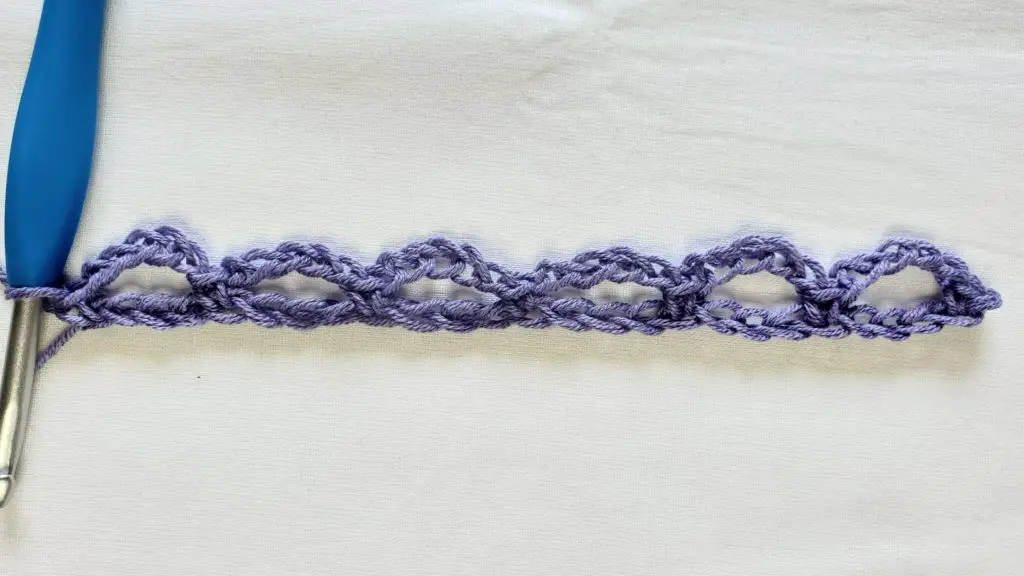
Figure 1
- Ch5 (counts as dc + ch2). Sc in the middle of the 1st ch5 sp. 8dc in next ch5 sp. Sc in middle of next ch5 sp. *Ch5, sc in middle of next ch5 sp. 8dc in next ch5 sp. Sc in middle of next ch5 sp.** Repeat from * to ** across until there are only 3 sts left unworked. Ch2, dc in last sc (see Figure 2 for example). Turn. – 12 8dc groups + 24 sc + 11 ch5 + 2 dc + 2 ch2 st
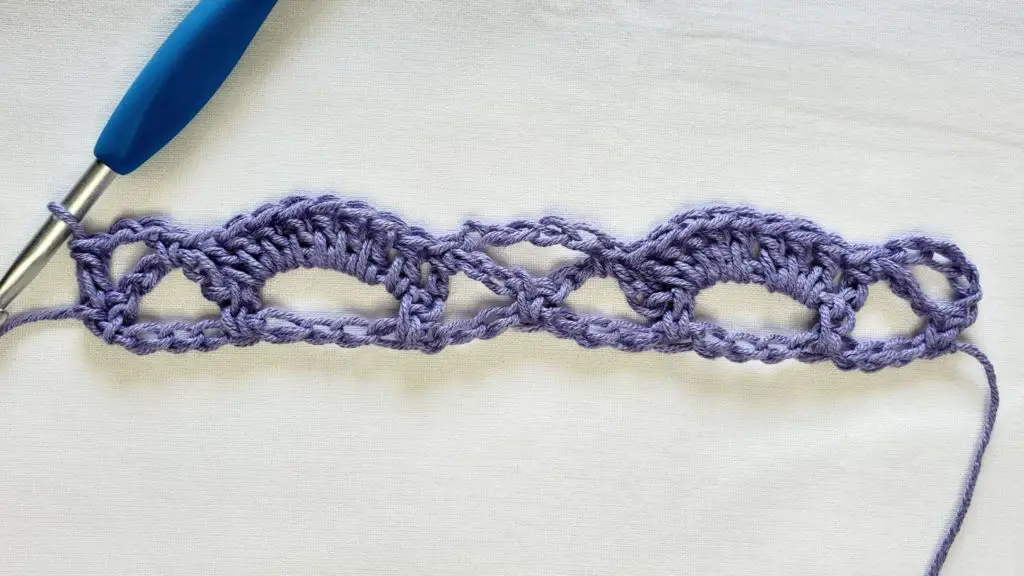
Figure 2
- Ch1. Sc in same st. (Dc, pic) in next 7 dc. Dc in next dc . *Sc in middle of next ch5 sp. (Dc, pic) in next 7 dc. Dc in next dc.** Repeat from * to ** across until there is only a sc and starting ch5 (counts as dc + ch2) left unworked. Sc in 3rd ch of starting ch5 (see Figure 3 for example). Turn. – 12 8dc/7pic groups + 13 sc st
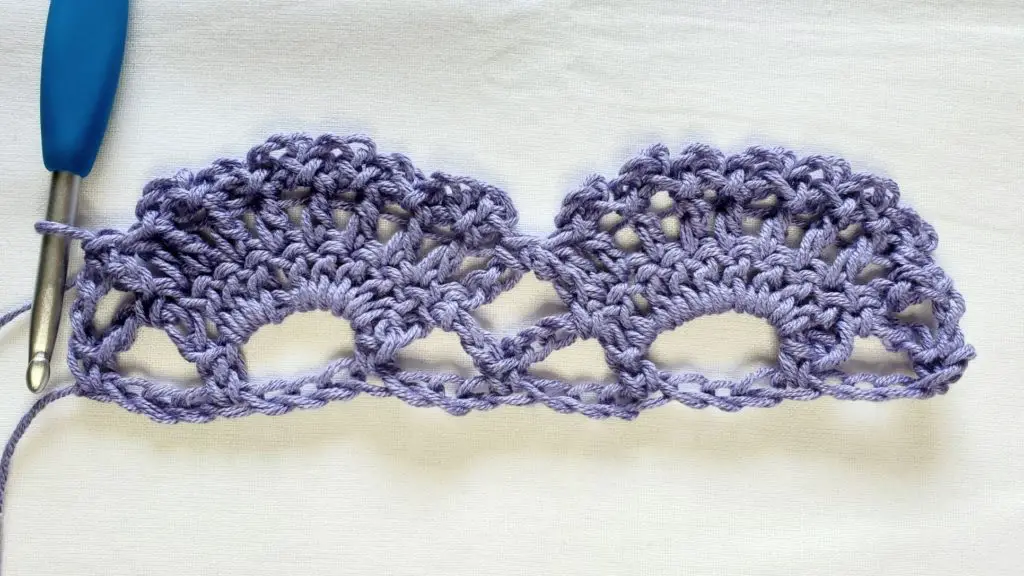
Figure 3
- Ch8 (counts as dc + ch5). Sk 2 pic, sc in next pic. Ch5, sk 1 pic, sc in next pic. Ch5, sk 2 pic, dc in next sc. *Ch5, sk 2 pic, sc in next pic. Ch5, sk 1 pic, sc in next pic. Ch5, sk 2 pic, dc in next sc.** Repeat from * to ** across (see Figure 4 for example). Turn. – 36 ch5 + 24 sc + 13 dc st
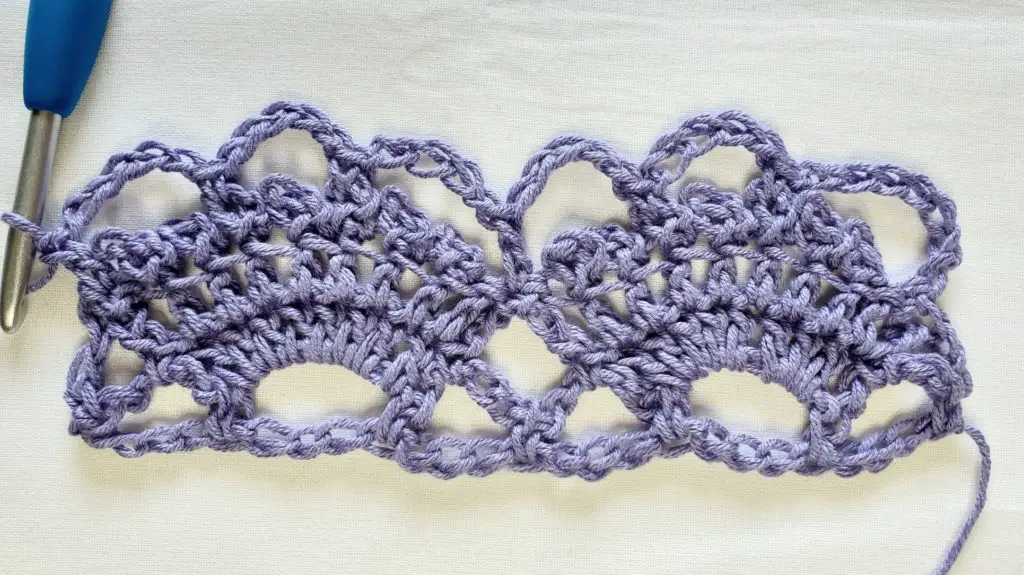
Figure 4
- Ch5 (counts as dc + ch2). Sc in the middle of the 1st ch5 sp. 8dc in next ch5 sp. *Sc in middle of next ch5 sp. Ch5, sc in middle of next ch5 sp. 8dc in next ch5 sp.** Repeat from * to ** across until there is only a sc and starting ch8 (counts as dc + ch5) left unworked. Sc in middle of last ch5. Ch2, dc in 3rd ch of starting ch (see Figure 5 for example). Turn. – 12 8dc groups + 24 sc + 11 ch5 + 2 dc + 2 ch2 st
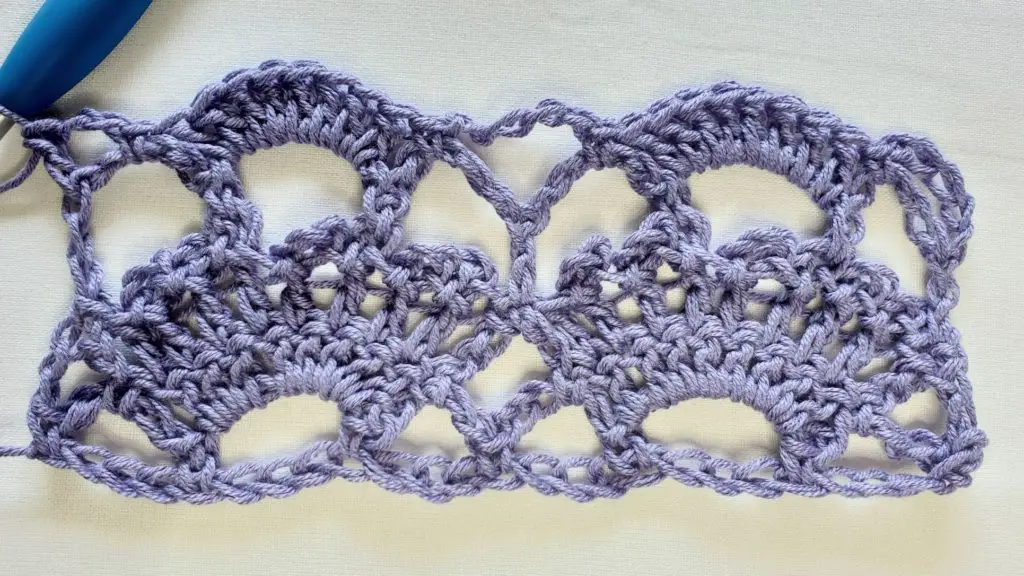
Figure 5
Measurement Check: Your project should now be approximately 37 ½” wide and 2 ½” high.
Repeat rows 3 – 5 1 (2, 2, 3, 3, 4, 4, 5, 5) more times. Then repeat rows 3 & 4 one more time. You should now have 3 (4, 4, 5, 5, 6, 6, 7, 7) completed rows of fans. We will now begin the block stitch rows.

Crochet Beach Cover Up – Water’s Edge
Block Rows
- Ch4. 4dc in next ch5 sp. *Sk 1 st, 4dc in next ch5 sp.** Repeat from * to ** across until there is only a sc and starting ch8 (counts as dc + ch5) left unworked. Sk 1 sc, 4dc in next ch8 sp, Tr in 3rd ch of starting ch8 (see Figure 6 for example). Turn. – 36 4dc groups + 2 tr
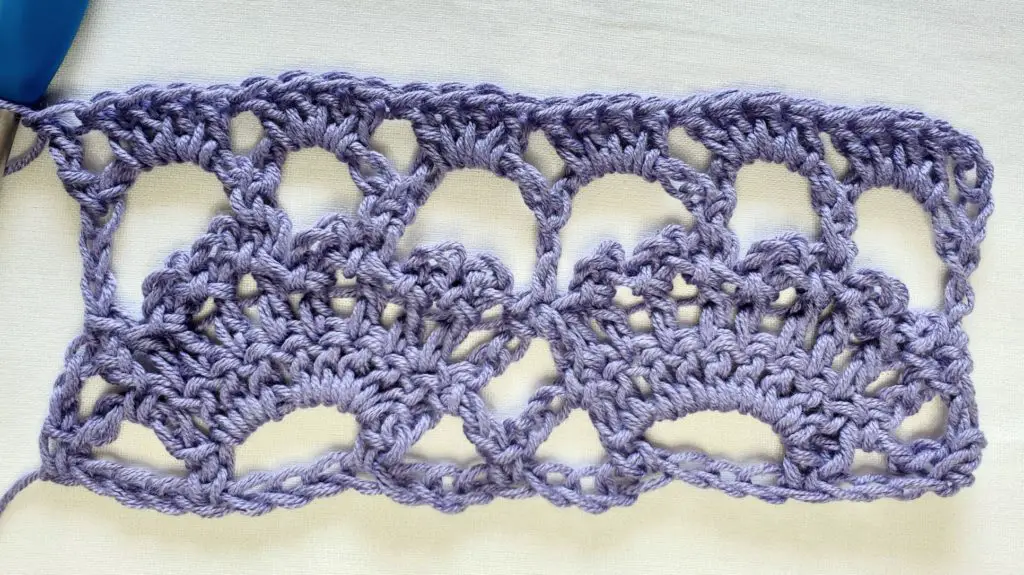
Figure 6
- Ch1. Sc in 1st st. *Ch3, sk 4 sts, sc in sp between 4dc groups.** Repeat from * to ** across until there are only 5 sts left unworked. Ch3, sk 4 sts, sc in top of ch4 (see Figure 7 for example). Turn. – 36 ch3 + 37 sc st
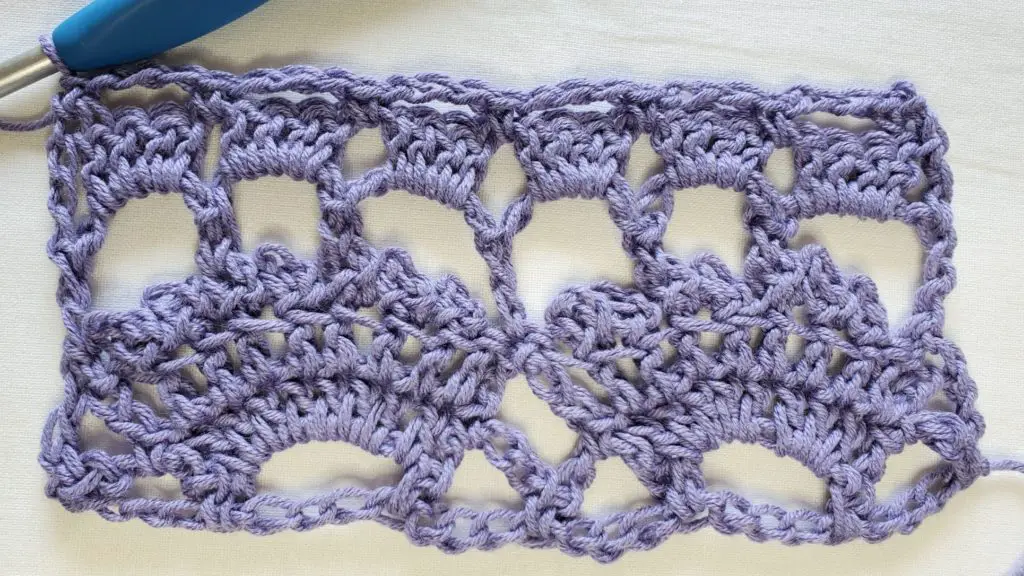
Figure 7
- Ch3. 4dc in next ch3 sp. *Sk 1 sc, 4dc in next ch3 sp.** Repeat from * to ** across until there is only 1 st left unworked. Dc in last st (see Figure 8 for example). Turn. – 36 4dc groups + 2 dc st
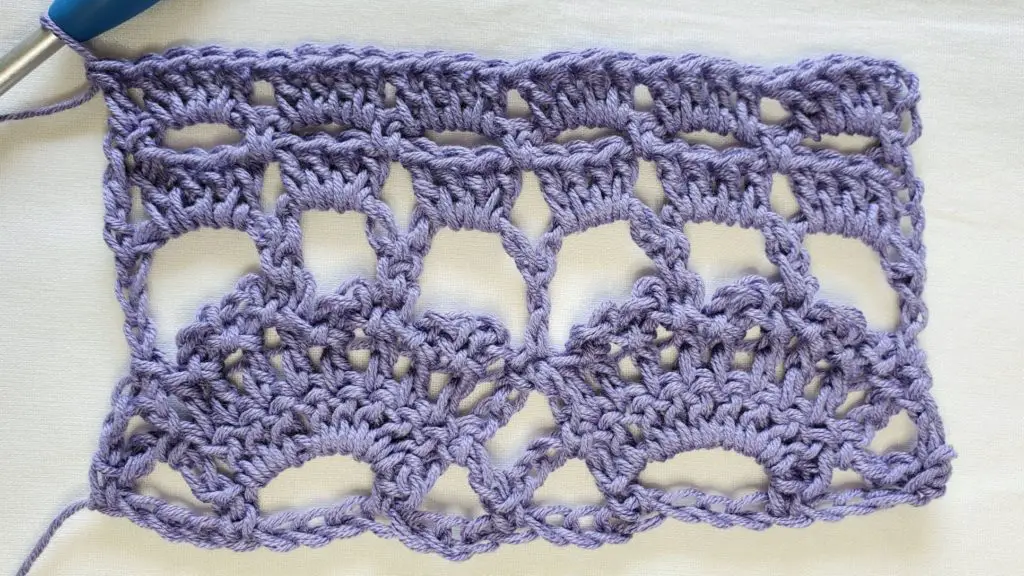
Figure 8
- Ch1. Sc in 1st st. *Ch3, sk 4 sts, sc in sp between 4dc groups.** Repeat from * to ** across until there are only 5 sts left unworked. Ch3, sk 4 sts, sc in last st. Turn. – 36 ch3 + 37 sc st
Sizes XS, M, XL, 3X, & 5X only: Repeat rows 3 & 4 two more times. Then carry on to row 5 below.
Sizes S, L, 2X, & 4X only: Do not repeat any rows. Carry on to row 5 below.
- (Right Side) Ch1. Sc in 1st st. 4sc in next ch3 sp. *Sk 1 sc, 4sc in next ch3 sp.** Repeat from * to ** across until there is only 1 st left unworked. Sc in last st. Do not turn. – 36 4sc groups + 2 sc st
We will now work sc sts around the remaining 3 sides of the panel. First working down the side, then along the bottom, and finally up the other side. Follow the steps below:
- Work 2 sc into the side of the last sc of your last row.
- Continue working down sc sts down the side in the following manner:
- 3sc in the side of each tr.
- 2sc in the side of each dc.
- 1sc in the side of each sc.
- Work this way until you get to the last sc on the bottom row. Work 2sc into this sc, turning the corner to begin working the bottom.
- Working along the bottom, add 1 sc to each ch until all ch sts are worked.
- Turning the corner to work up the side, place 2sc into the side of the 1st sc.
- Continue working up the side, placing sc sts into the side of each row in the following manner:
- 3sc in the side of each tr.
- 2sc in the side of each dc.
- 1sc in the side of each sc.
- Work this way until you get to the last sc on the top row. Work 2sc into this sc. Ss to join to 1st sc. Bind off.
- You should now have a panel that looks similar to Figure 9
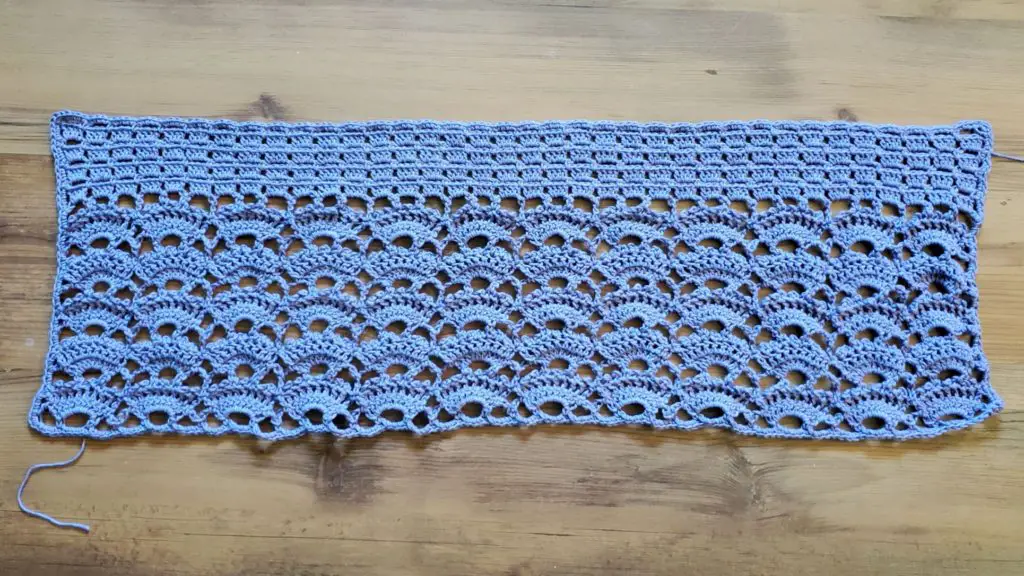
Figure 9
Measurement check: Your panel should be approximately 38” wide and 9” (9 ½”, 10 ½”, 11 ¼”, 12 ½”, 13 ¼”, 14 ½”, 15”, 16 ¼”) high.
Crochet Beach Cover Up – Water’s Edge
Sewing The Panels
Once you have all 4 panels made, it is time to sew them together. We will first seam the shoulders, then the center front and back, and then the sides.
- Begin by laying out two of your panels side-by-side with the right sides facing up and the starting chains facing each other. Then, lay your other two panels on top of the first two with the wrong sides facing up and the starting chains facing each other. They should look similar to Figure 10.
- Sew the shoulders together (as indicated in Figure 10).
- Next, sew the center front and back together leaving space for the neck hole. You can make the neckline as low or as high as you like. To help me decide where I wanted my neckline to fall, I tried my project on and placed stitch markers where I wanted them. I made my back neckline lower than the front, but you can make yours higher or the same as the front. It is all up to you!
- Finally, sew the sides together leaving space for the arm holes. You can make your arm holes any size you like.
- Fun suggestion: Leave a bottom slit on one or both sides when sewing up the side seams.
- Your project should now look similar to Figure 11.
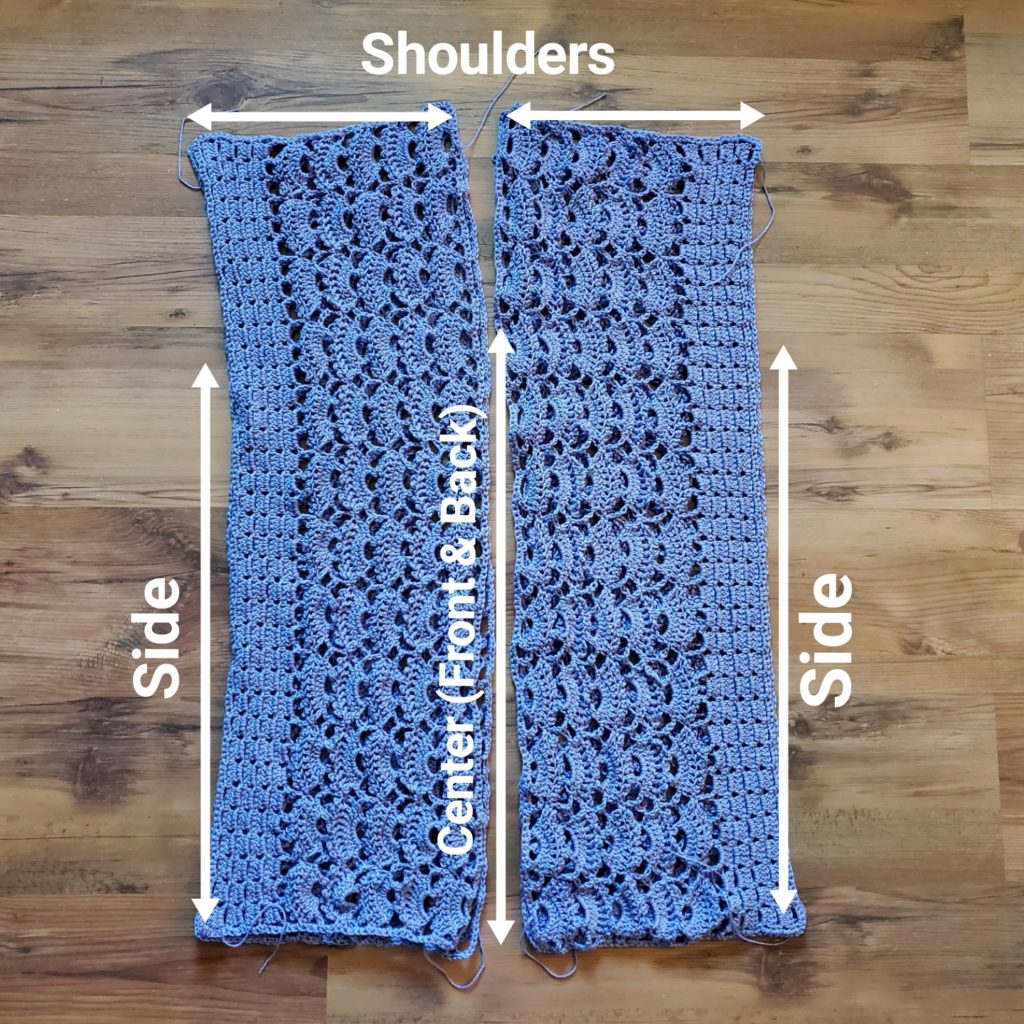
Figure 10
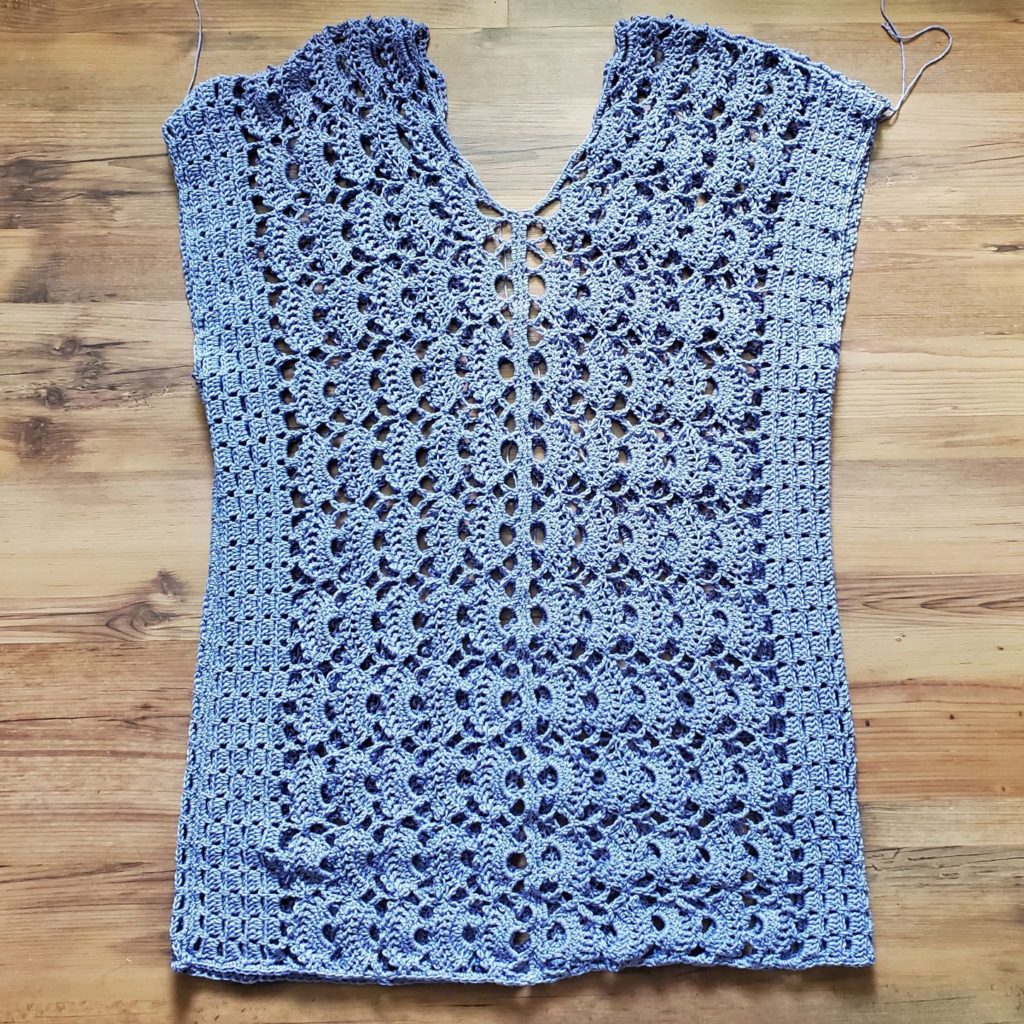
Figure 11
Finishing The Edges
Arm holes
With the right side facing you, join your yarn near the bottom of the armhole.
- Ch1. Sc in 1st st and each st around. Ss to join to 1st st. Bind off.
Bottom Hem
With the right side facing you, join your yarn anywhere on the bottom.
- Ch1. Sc in 1st st and each st around. Ss to join to 1st st. Bind off.
Neckline
With the right side facing you, join your yarn close to one of the shoulder seams.
- Ch1. Sc in 1st st and each st across until you have 2 sts left before the front/back center seam. Sc2tog x 2. Sc in next st and each st across until you have 2 sts left before the next front/back center seam. Sc2tog x 2. Sc in next st and each st across until all sts have been worked. Ss to join to 1st st. Bind off.
Tie
Start with a very long chain. I chained until it was as long as my arm span without stretching. But you can make yours as long or as short as you like.
- Working in back hump of ch: Dc in 4th ch from hook and each ch across. Turn.
- Ss into next st and each st across. Be sure you don’t make your ss too tight. Bind off.
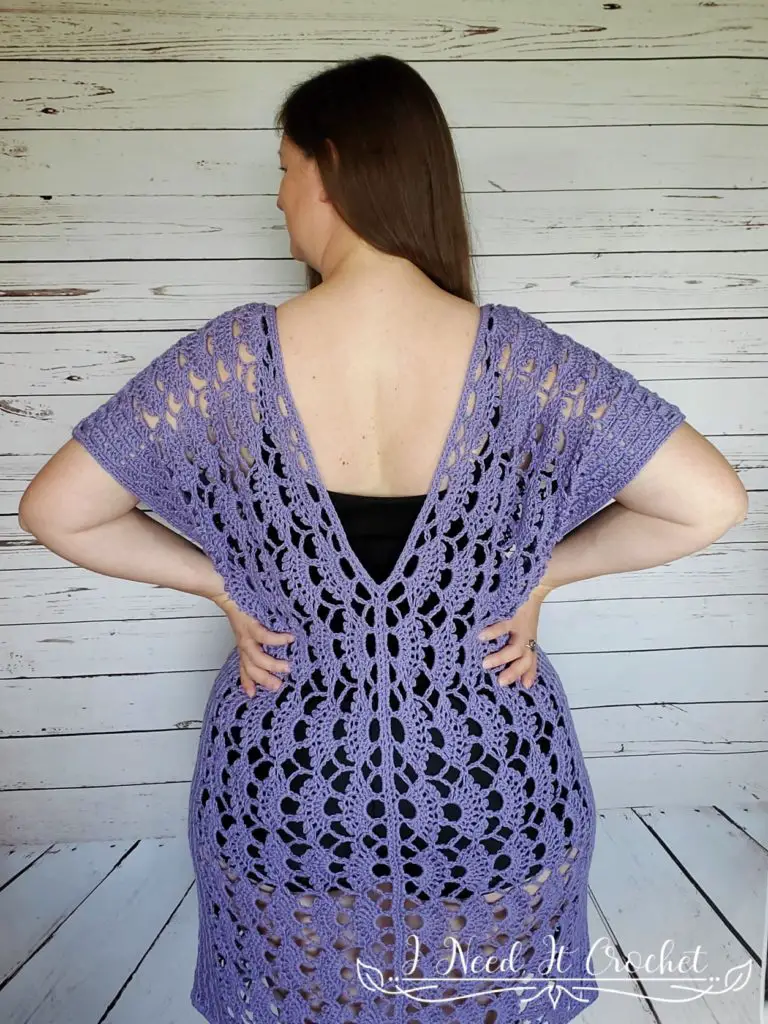
Weave in your ends, and you’re done! I highly recommend wet blocking your finished project, especially if you used a cotton blend yarn. Wet blocking will allow the lace to open up more and lay flat.
I hope you love your new crochet beach cover up, and I look forward to seeing all of your beautiful pictures on Ravelry!
If you’d like to know when I post new patterns and tutorials, head on over to my Facebook and Instagram and give me a like and a follow!
If you enjoyed The Crochet Beach Cover Up – Water’s Edge, you may want to check out my other designs!
And If you haven’t already, don’t forget to subscribe to my newsletter.
[rainmaker_form id=”1806″]
Crochet Beach Cover Up – Water’s Edge
And until next time… Happy Hooking! 😉