
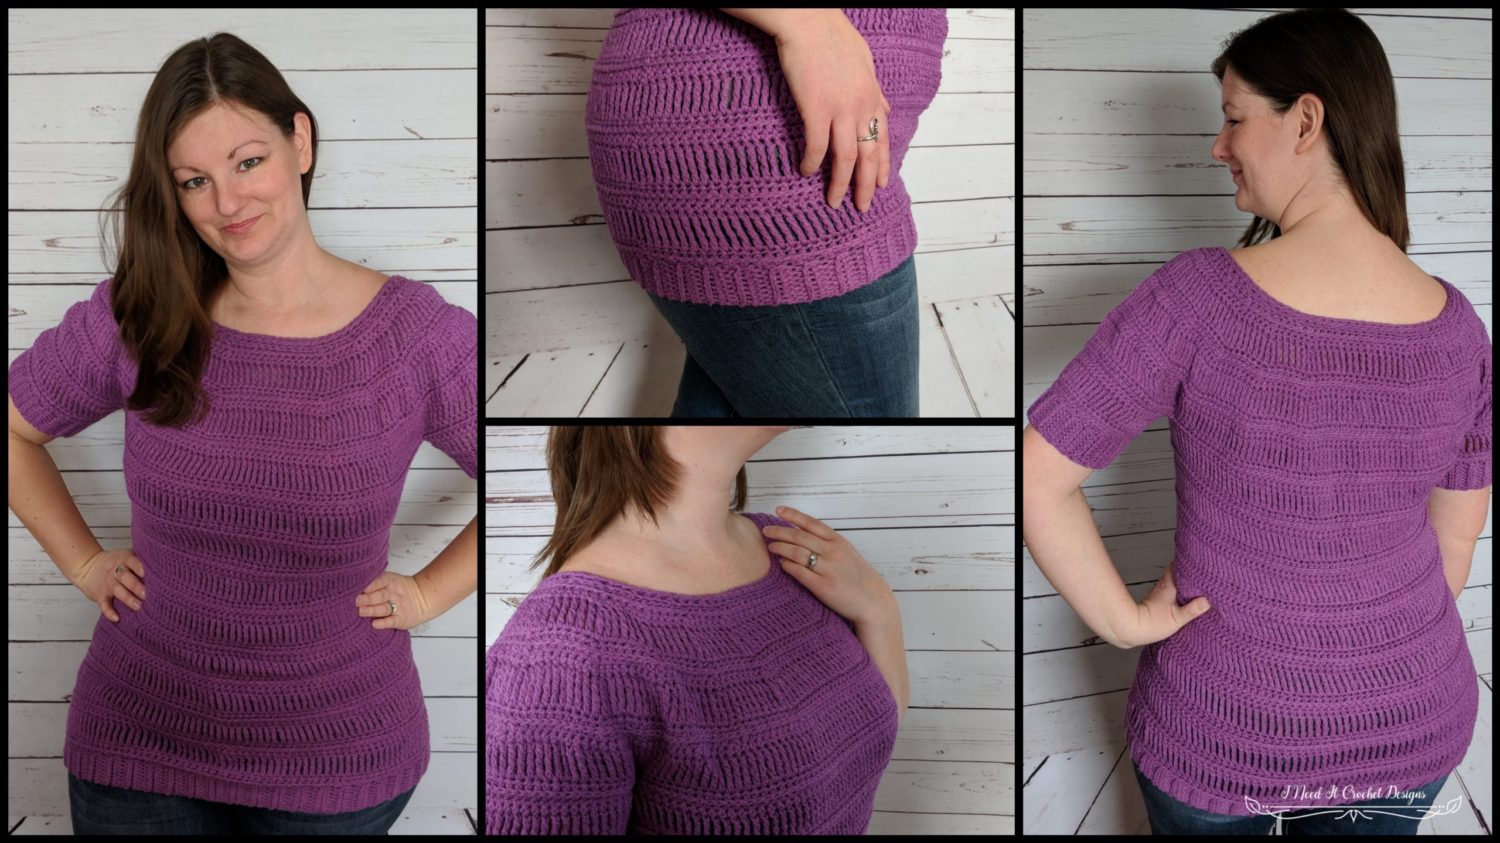
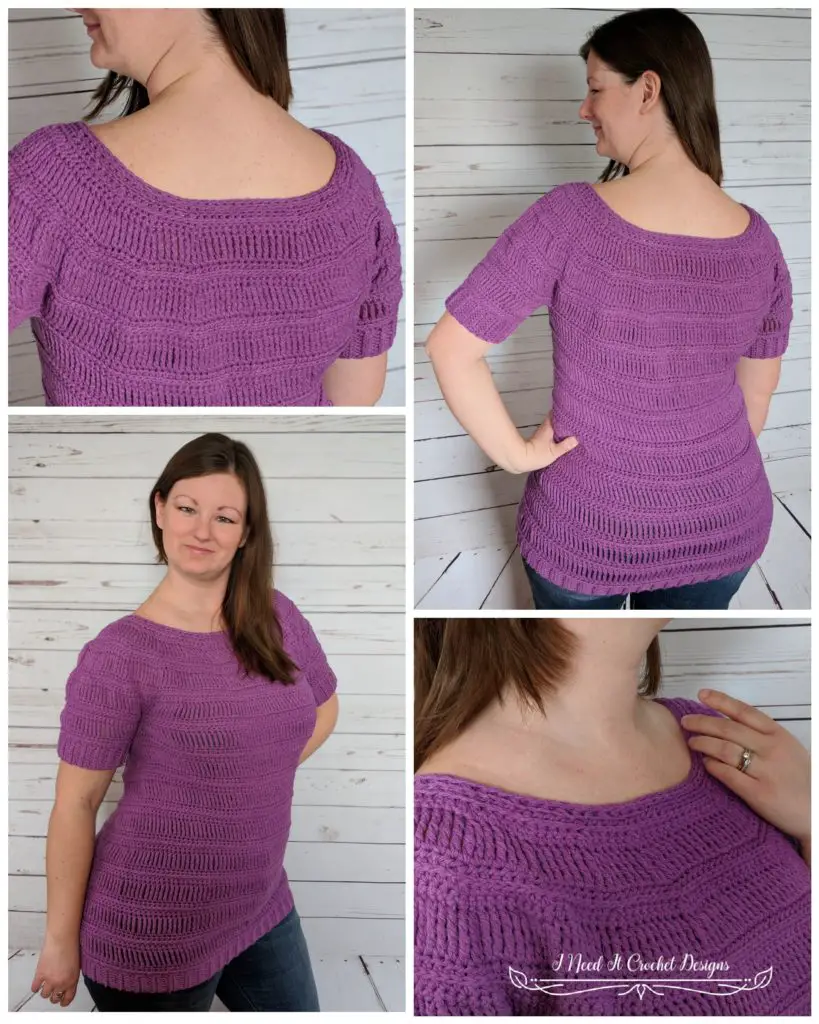
Double Trouble Pullover – Free Crochet Sweater Pattern
The Double Trouble Pullover – Free Crochet Sweater Pattern is copyrighted by I Need It Crochet. You may not copy, share, change, or sell the pattern itself. Also, you may not claim this pattern as your own. All pictures contained in this pattern fall under the copyright and may not be used.
Finished items made from the Double Trouble Pullover – Free Crochet Sweater Pattern belong to you and you may do what you wish with them. If you choose to sell them on Etsy I would very much appreciate it if you credited me as the pattern designer.


Or… Scroll down to find the free crochet pattern!
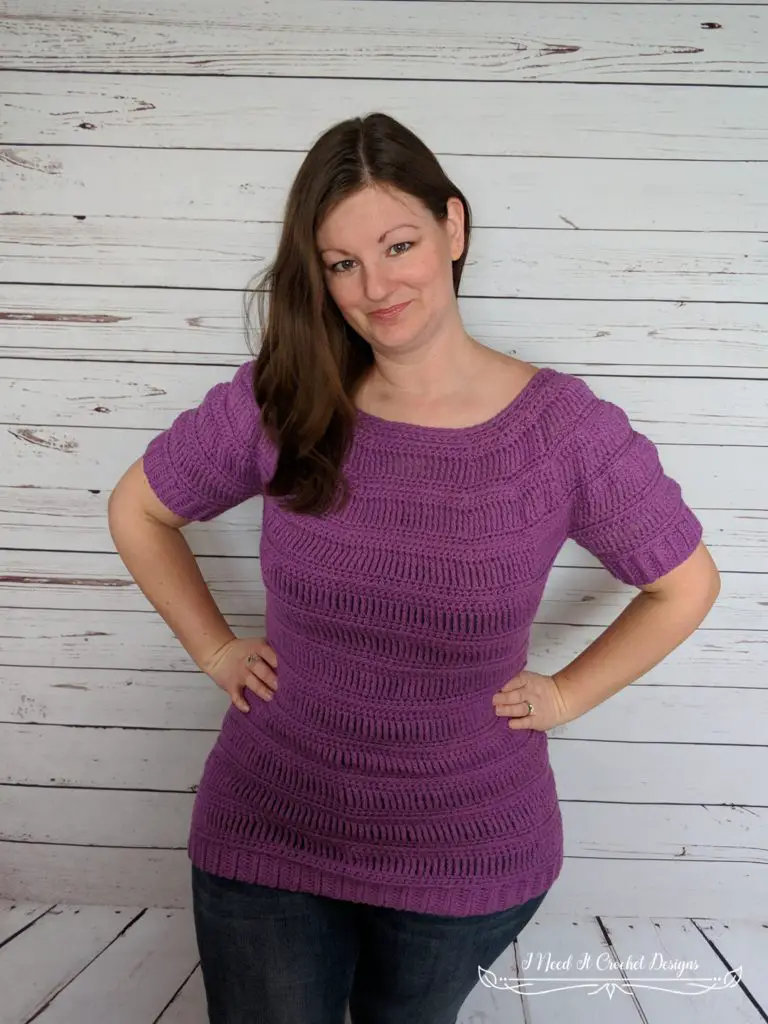
Late Spring and early Fall are odd ducks where I live. Too warm for a jacket or sweater, yet too cold for a t-shirt. So, I created a top just right for this time of transition. The Double Trouble Pullover’s design can be easily adjusted for length, so you can make the perfect piece for your wardrobe. Whether you want a fun crop top or an extra long sweater to go with your favourite pair of leggings.
I made mine with Premier Yarns Premier Home Cotton, which is 85% Cotton, 15% Polyester, so it is breathable with a touch of warmth. Not stifling.
Finished Sizes:
Instructions given to fit size X-small; changes for small, medium, large, X-large and XX-large are in ()
XS (S, M, L, XL, XXL)
To fit bust size: 31-33” (34-35”, 36-37”, 38-40”, 41-43”, 44-45’)
Finished Bust: 34” (36”, 38”, 40”, 44”, 46”)
Finished Length: Customizable. Length on model shown is 29”
Materials:
I used Premier Yarns Premier Home Cotton in Passionfruit. This is an 85% Cotton/15% polyester worsted weight (#4) yarn. Any yarn of similar weight would work.
Approximately 800 (900, 1000, 1100, 1200, 1300) yds for length shown.
H/5mm Hook
Stitch Markers
Yarn Needle
Scissors
Gauge:
See Gauge Swatch instructions below.
Please check your gauge before beginning. It will save you time and heartache!
Abbreviations:
Sk = Skip
St = Stitch
Ss = Slip Stich
Ch = Chain
Sc = Single Crochet
Hdc = Half Double Crochet
Dbtr = Double Treble Crochet
Hdc2tog = Half Double Crochet 2 Together
Dbtr2tog = Double Treble 2 Together
BLO = Back Loop Only
Notes:
Ch1 at the beginning of a row is never considered a stitch.
Ch5 at the beginning of a row is always considered a Dbtr
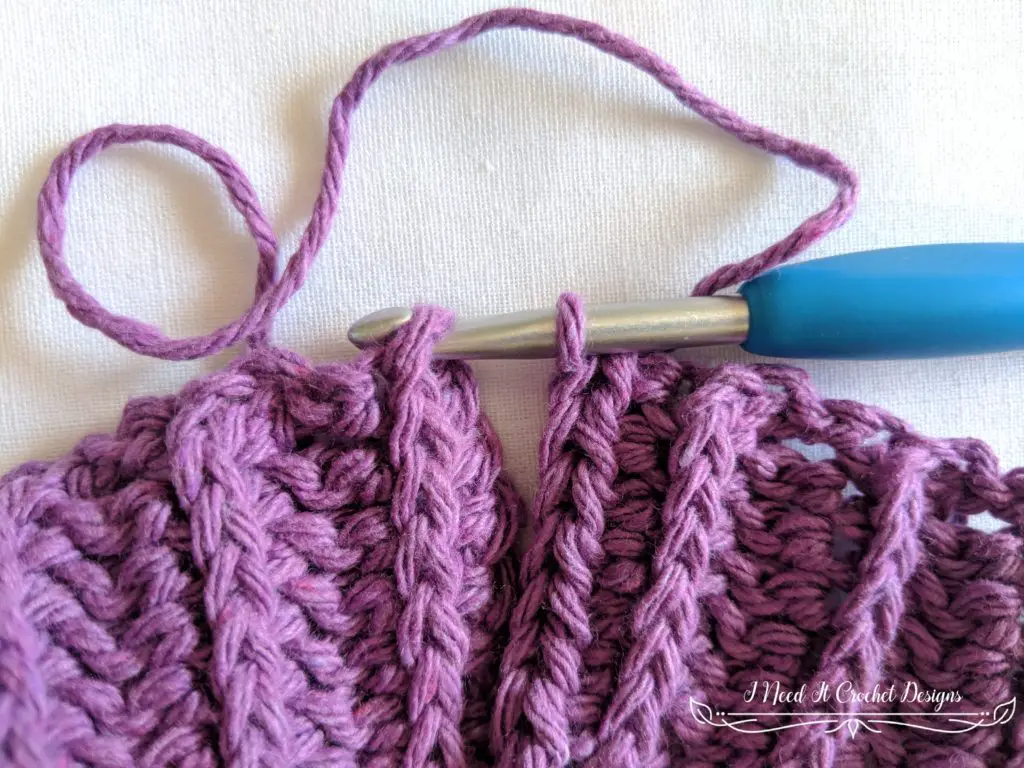
In this pattern I will be asking you to work into the third loop (3rd LO). For those of you who haven’t done this before, I have written a little tutorial that you can find here.
The Double Trouble Pullover is worked from the bottom up. First you will create the bottom band by working short rows back and forth, then you will create the body by alternating sc, hdc and dbtr rows while working in the round. Then you will create the sleeves and sew them on.
Note on sizing: The top will stretch downwards and sideways when worn. The degree of stretch will depend on the yarn you choose. The Double Trouble Pullover shown on the model (made with cotton blend yarn) stretched about 3” lengthwise and 5” widthwise.
I have added many pictures to help you along the way, however these pictures are only of one size (L) and should not be used as reference for stitch and row counts. The model has a 39” bust and is wearing a size Large. Choose your size according to the finished measurements noted above.
Double Trouble Pullover – Free Crochet Sweater Pattern
Gauge Swatch
Ch15
1. Sc in 2nd ch and each remaining ch across. Turn.
- 14 sts
2. Ch1, Hdc in same st as ch1 and each st across. Turn.
- 14 sts
3. Working in the 3rd LO for this row: Ch1, Hdc in same st as ch1 and each st across. Turn.
- 14 sts
4. Ch5, (counts as first dbtr) Dbtr in next st and each st across. Turn.
- 14 sts
5. Ch1, Sc in same st as ch1 and each st across. Turn.
- 14 sts
6. Repeat Row 2.
- 14 sts
7. Repeat Row 3.
- 14 sts
8. Repeat Row 4.
- 14 sts
9. Repeat Row 5.
- 14 sts
Your swatch should measure 4” across and 4 ¾“ high.
Note: For many people the Dbtr row may come out a little looser than the other rows. That is totally fine. The following Sc row tightens it back up and brings your work back to gauge.
Instructions
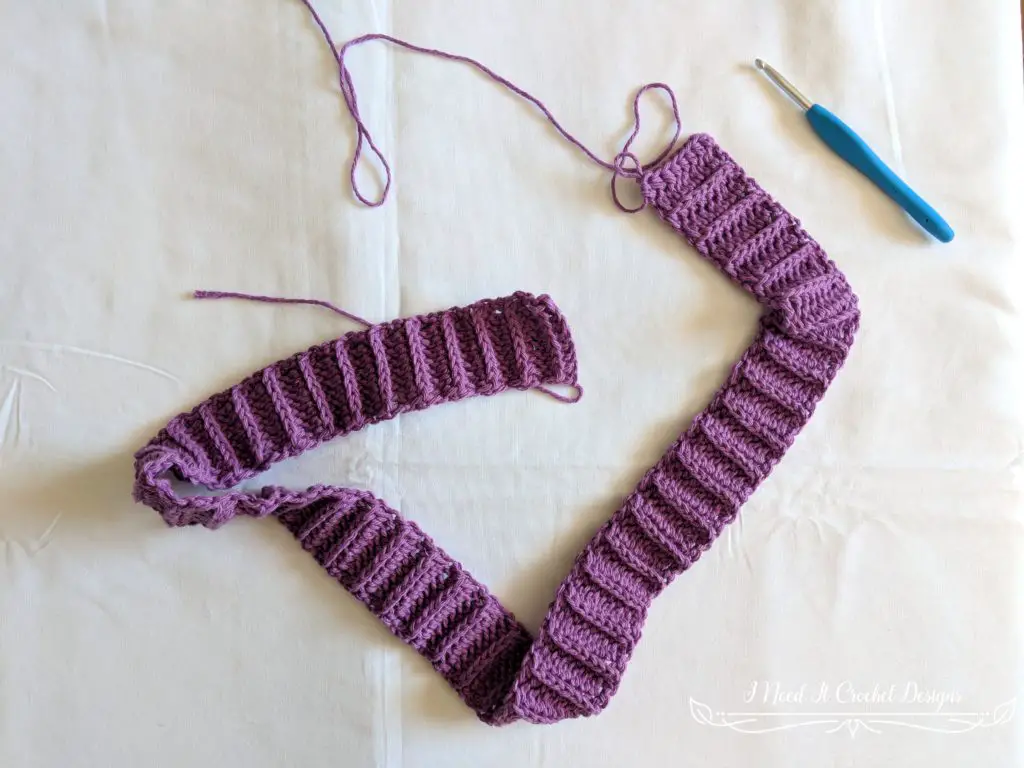
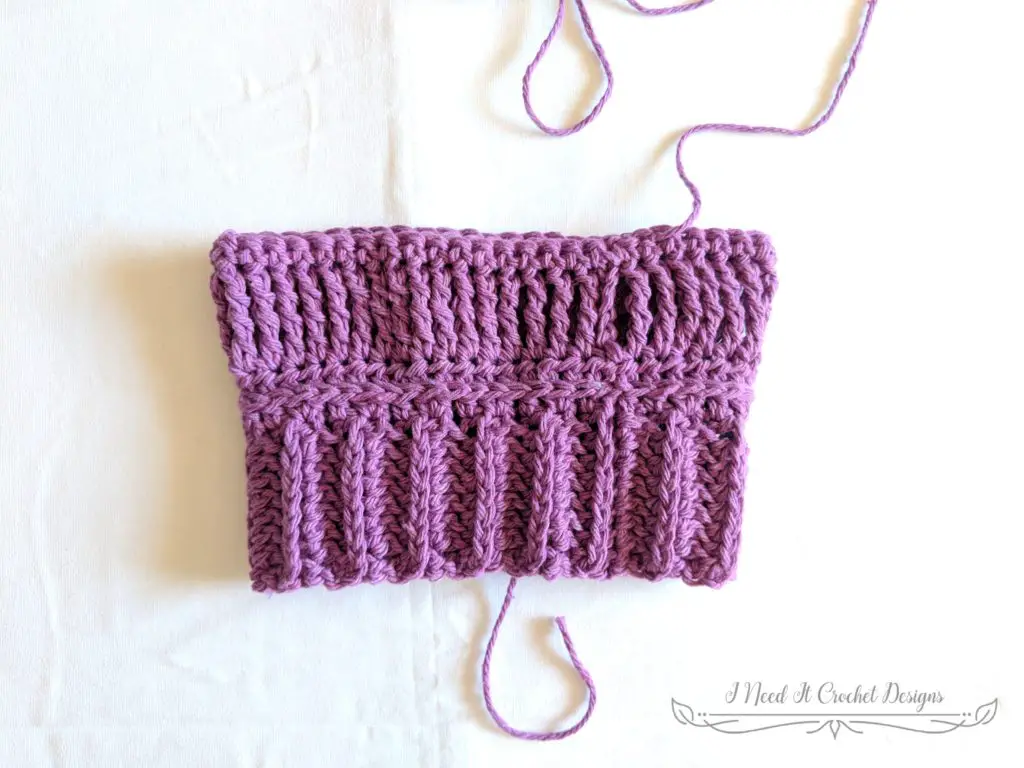
Bottom Ribbing
Leaving an 8” tail, make a slip knot and Ch9.
1. Hdc in 2nd ch. Hdc each ch to end. Turn.
- 8 sts
2. Ch1. Working in 3rd LO for entire row, hdc in each st across.
- 8 sts
Repeat row 2. until you have 80 (84, 88, 94, 102, 108) rows total. Fold your band in half lengthwise with the back of the last row facing you and sl st into the end of your first row. Do not fasten off.
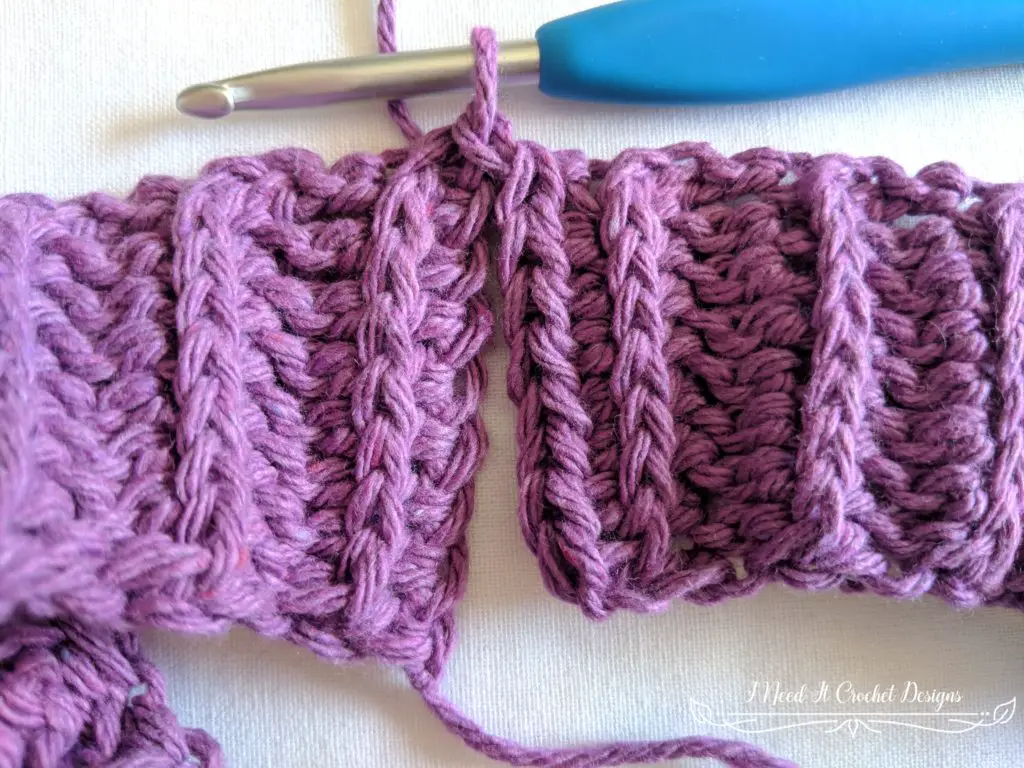
Double Trouble Pullover – Free Crochet Sweater Pattern
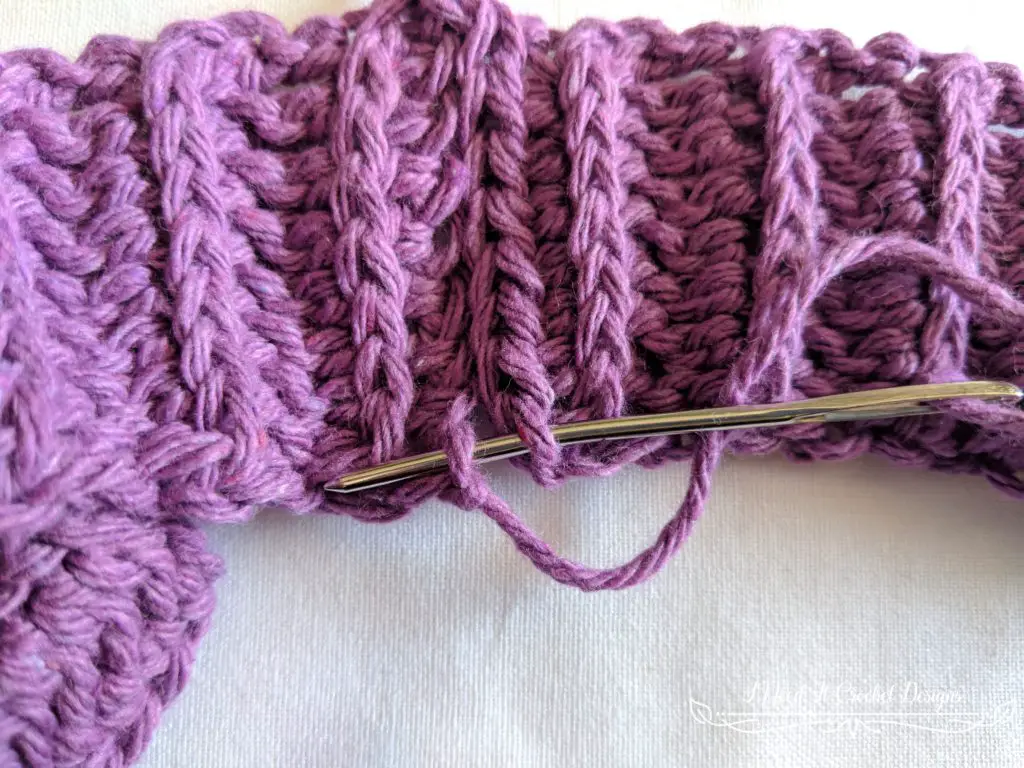
You will now sew the ends of the bottom band together using the tail. Place your whip stitches into the chains of your first row and the 3rd loops of your last row. Make a knot. Turn right side out.
Your yarn loop should now be sticking out of the top of your work. Place your hook into this loop. You will continue on to the body of the top by placing stitches into the ends of each row.
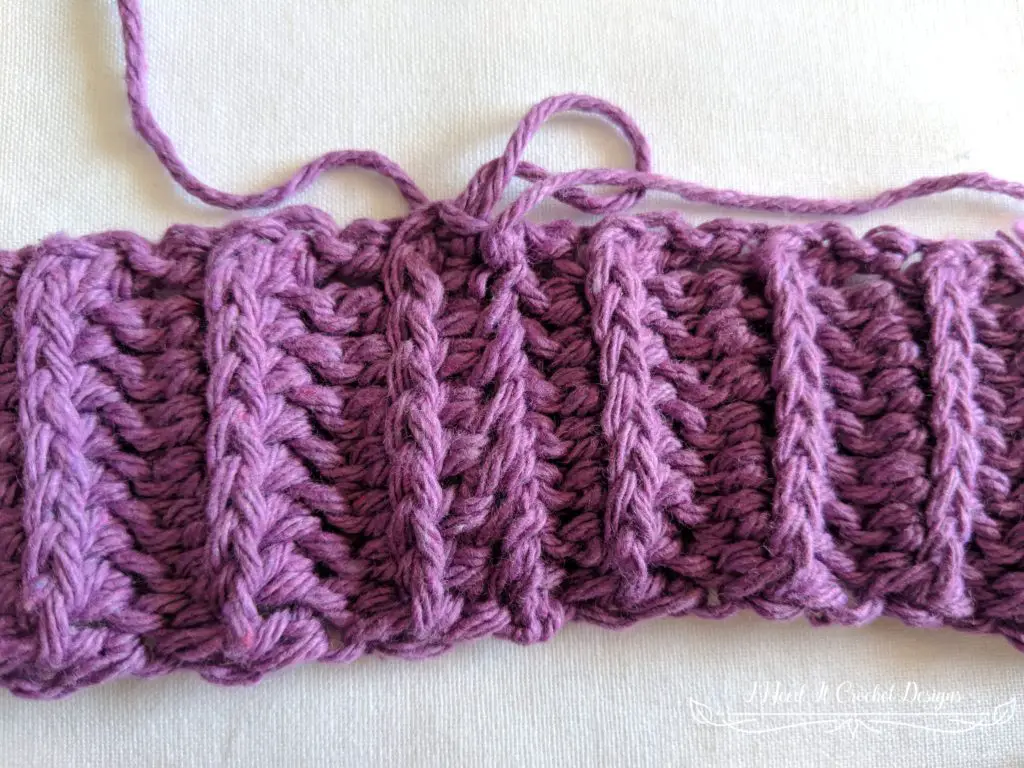
Lower Body
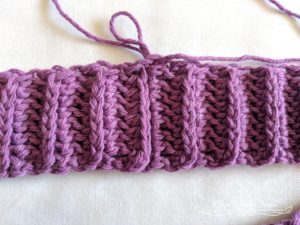
1. Ch1, *hdc in end of first row, 2 hdc in end of next row. ** Repeat until you have 2 row ends left unworked. For last two row ends, follow instructions according to your size:
For XS, L and XXL: work 1 hdc into end of next row, 1 hdc in end of last row.
For M and XL: work 2 hdc into end of next row, 2 hdc into end of last row.
For S: work 1 hdc in end of next row, 2 hdc in end of last row.
Sl st to first hdc. This will be the right side of your work. Turn.
- 119 (126, 133, 140, 154, 161) sts
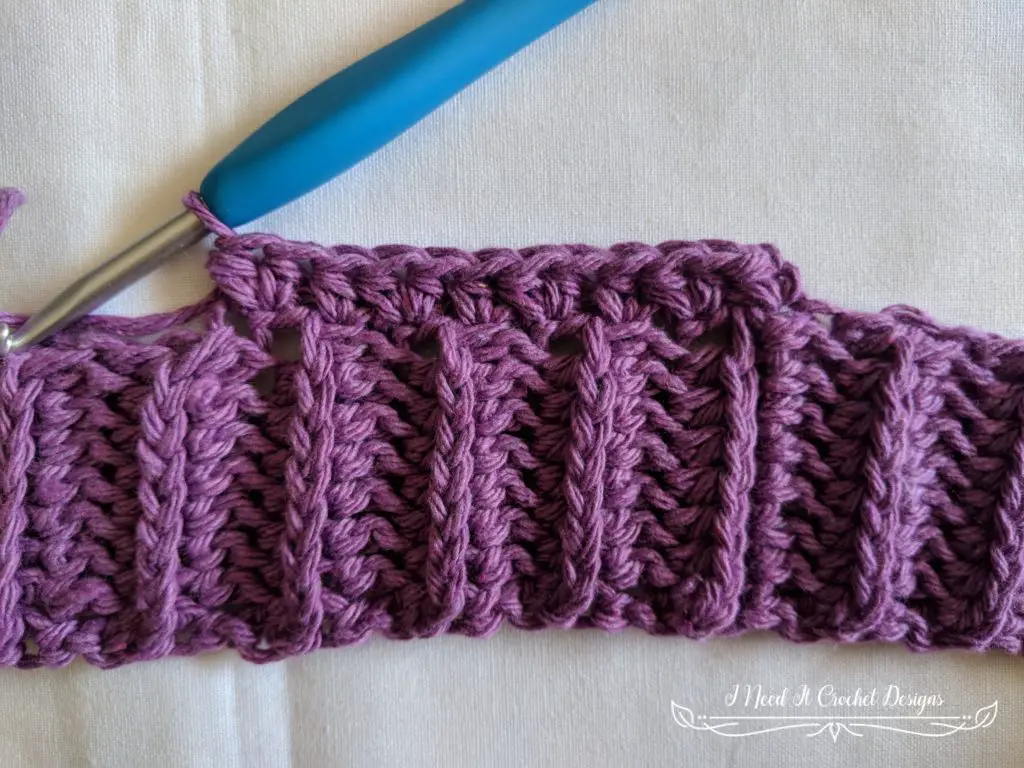
2. Working in the 3rd LO for this row: Ch1, Hdc in same st as ch1 and every st around. Ss to 1st hdc. This will be the wrong side of your work. Turn.
- 119 (126, 133, 140, 154, 161) sts
3. Ch5, (counts as first dbtr) Dbtr in next st and every st around. Ss to top of ch5. Turn.
- 119 (126, 133, 140, 154, 161) sts
4. Ch1, sc in same st as ch1 and each st around. Ss to 1st sc. Turn.
- 119 (126, 133, 140, 154, 161) sts
5. Ch1, hdc in same st as ch1 and each st around. Ss to 1st hdc. Turn.
- 119 (126, 133, 140, 154, 161) sts
6. Working in the 3rd LO for this row: Ch1, hdc in same st as ch1 and each st around. Ss to 1st hdc. Turn.
- 119 (126, 133, 140, 154, 161) sts
7. Ch5, (counts as 1st dbtr) Dbtr in next st and each st around. Ss to top of ch5. Turn.
- 119 (126, 133, 140, 154, 161) sts
Repeat rows 4 – 7 until you have reached your desired length, making sure to end on a row 7 repeat. This will be the length of your top from the armpit down. Do keep in mind that the top will stretch downward as you wear it. The type of yarn you use will play a factor in the amount of stretch. I found that my Double Trouble Pullover (made with cotton/polyester blend yarn) stretched about 3” longer when I wore it.
From here you will continue on to make the armholes and upper body of your Double Trouble Pullover.
Double Trouble Pullover – Free Crochet Sweater Pattern
Upper Body
1. Ch1, Sc in same st and next 29 (31, 33, 35, 38, 40) sts. Ch 42 (42, 45, 45, 49, 49) loosely. Ss into side of sc just made. Sc in next 59 (63, 67, 70, 77, 81) sts. Ch 42 (42, 45, 45, 49, 49) loosely. Ss into side of sc just made. Sc in remaining 30 (32, 33, 35, 39, 40) sts. Ss to 1st sc. Turn.
- 119 (126, 133, 140, 154, 161) Sc. 84 (84, 90, 90, 98, 98) Ch.
2. Ch1, hdc in same st and each sc and ch around. Ss to 1st hdc. Turn.
- 203 (210, 223, 230, 252, 259) sts.
3. Working in the 3rd LO for this row: Ch1, hdc in same st and each st around. Ss to 1st hdc. Turn.
- 203 (210, 223, 230, 252, 259) sts.
4. Ch5, (counts as 1st dbtr) Dbtr in next st and each st around. Ss to top of ch5.
- 203 (210, 223, 230, 252, 259) sts
5. Ch1, Sc in same st and each st around. Ss to 1st sc. Turn.
- 203 (210, 223, 230, 252, 259) sts
From here you will work decrease rows up to the neckline. It is important that you pay attention to the pattern and count your stitches. To make this easier, I have written separate instructions for each size.
XSmall
6. Ch1, Hdc in same st and next 5 st, hdc2tog. (Hdc in next 9 st, hdc2tog) 8X. Hdc in next 11 st, hdc2tog. (Hdc in next 9 st, hdc2tog) 8X. Hdc in last 6 st. Ss to 1st hdc. Turn.
- 185 sts.
7. Working in the 3rd LO for this row: Ch1, hdc in same st and each st around. Ss to 1st hdc. Turn.
- 185 sts.
8. Ch5, (counts as 1st dbtr) Dbtr in next 4 st, dbtr2tog. (Dbtr in next 8 st, dbtr2tog) 8X. Dbtr in next 11 st, dbtr2tog. (Dbtr in next 8 st, dbtr2tog) 8X. Dbtr in last 5 st. Ss to top of ch5. Turn.
- 167 sts.
9. Ch1. Sc in same st and each st around. Ss to 1st sc. Turn.
- 167 sts.
10. Ch1, Hdc in same st and next 4 st, hdc2tog. (Hdc in next 7 st, hdc2tog) 8X. Hdc in next 9 st, hdc2tog. (Hdc in next 7 st, hdc2tog) 8X. Hdc in last 5 st. Ss to 1st hdc. Turn.
- 149 sts.
11. Working in the 3rd LO for this row: Ch1, Hdc in same st and next 3 st, hdc2tog. (Hdc in next 6 st, hdc2tog) 8X. Hdc in next 9 st, hdc2tog. (Hdc in next 6 st, hdc2tog) 8X. Hdc in last 4 st. Ss to 1st hdc. Turn.
- 131 sts.
12. Ch5, (counts as 1st dbtr) Dbtr in next 3 st, dbtr2tog. (Dbtr in next 5 st, dbtr2tog) 8X. Dbtr in next 7 st, dbtr2tog. (Dbtr in next 5 st, dbtr2tog) 8X. Dbtr in last 4 st. Ss to top of ch5. Turn.
- 113 sts.
13. Ch1, Sc in same st and each st around. Ss to 1st sc. Turn.
- 113 sts.
14. Ch1, Hdc in same st and next 2 st, hdc2tog. (Hdc in next 4 st, hdc2tog) 8X. Hdc in next 7 st, hdc2tog. (Hdc in next 4 st, hdc2tog) 8X. Hdc in last 3 st. Ss to 1st hdc. Turn.
- 95 sts.
15. Working in the 3rd LO for this row: Ch1, Hdc in same st and next 2 st, hdc2tog. (Hdc in next 3 st, hdc2tog) 8X. Hdc in next 5 st, hdc2tog. (Hdc in next 3 st, hdc2tog) 8X. Hdc in last 3 st. Ss to 1st hdc. Turn.
- 77 sts.
16. Working in the BLO for this row: Ch1, Hdc in same st and next st, hdc2tog. (Hdc in next 2 st, hdc2tog) 8X. Hdc in next 5 st, hdc2tog. (Hdc in next 2 st, hdc2tog) 8X. Hdc in last 2 st. Ss to 1st hdc. Do Not Turn.
- 59 sts.
17. Working in the 3rd LO for this row: Ch1, Sc in same st and each st around. Ss to 1st sc. Fasten off.
- 59 sts.
The Body of your top is finished. You may now scroll down to the sleeve instructions.
Small
6. Ch1, Hdc in same st and next 6 st, hdc2tog. (Hdc in next 9 st, hdc2tog) 8X. Hdc in next 14 st, hdc2tog. (Hdc in next 9 st, hdc2tog) 8X. Hdc in last 8 st. Ss to 1st hdc. Turn.
- 192 sts.
7. Working in the 3rd LO for this row: Ch1, hdc in same st and each st around. Ss to 1st hdc. Turn.
- 192 sts.
8. Ch5, (counts as 1st dbtr) Dbtr in next 4 st, dbtr2tog. (Dbtr in next 8 st, dbtr2tog) 8X. Dbtr in next 11 st, dbtr2tog. (Dbtr in next 8 st, dbtr2tog) 8X. Dbtr in last 5 st. Ss to top of ch5. Turn.
- 174 sts.
9. Ch1. Sc in same st and each st around. Ss to 1st sc. Turn.
- 174 sts.
10. Ch1, Hdc in same st and next 5 st, hdc2tog. (Hdc in next 7 st, hdc2tog) 8X. Hdc in next 13 st, hdc2tog. (Hdc in next 7 st, hdc2tog) 8X. Hdc in last 7 st. Ss to 1st hdc. Turn.
- 156 sts.
11. Working in the 3rd LO for this row: Ch1, Hdc in same st and next 5 st, hdc2tog. (Hdc in next 6 st, hdc2tog) 8X. Hdc in next 12 st, hdc2tog. (Hdc in next 6 st, hdc2tog) 8X. Hdc in last 6 st. Ss to 1st hdc. Turn.
- 138 sts.
12. Ch5, (counts as 1st dbtr) Dbtr in next 5 st, dbtr2tog. (Dbtr in next 5 st, dbtr2tog) 8X. Dbtr in next 11 st, dbtr2tog. (Dbtr in next 5 st, dbtr2tog) 8X. Dbtr in last 5 st. Ss to top of ch5. Turn.
- 120 sts.
13. Ch1, Sc in same st and each st around. Ss to 1st sc. Turn.
- 120 sts.
14. Ch1, Hdc in same st and next 4 st, hdc2tog. (Hdc in next 4 st, hdc2tog) 8X. Hdc in next 10 st, hdc2tog. (Hdc in next 4 st, hdc2tog) 8X. Hdc in last 5 st. Ss to 1st hdc. Turn.
- 102 sts.
15. Working in the 3rd LO for this row: Ch1, Hdc in same st and next 4 st, hdc2tog. (Hdc in next 3 st, hdc2tog) 8X. Hdc in next 9 st, hdc2tog. (Hdc in next 3 st, hdc2tog) 8X. Hdc in last 4 st. Ss to 1st hdc. Turn.
- 84 sts.
16. Working in the BLO for this row: Ch1, Hdc in same st and next 3 st, hdc2tog. (Hdc in next 2 st, hdc2tog) 8X. Hdc in next 8 st, hdc2tog. (Hdc in next 2 st, hdc2tog) 8X. Hdc in last 4 st. Ss to 1st hdc. Do Not Turn.
- 66 sts.
17. Working in the 3rd LO for this row: Ch1, Sc in same st and each st around. Ss to 1st sc. Fasten off.
- 66 sts.
The Body of your top is finished. You may now scroll down to the sleeve instructions.
Medium
6. Ch1, Hdc in same st and next 7 st, hdc2tog. (Hdc in next 9 st, hdc2tog) 9X. Hdc in next 15 st, hdc2tog. (Hdc in next 9 st, hdc2tog) 8X. Hdc in last 8 st. Ss to 1st hdc. Turn.
- 204 sts.
7. Working in the 3rd LO for this row: Ch1, hdc in same st and each st around. Ss to 1st hdc. Turn.
- 204 sts.
8. Ch5, (counts as 1st dbtr) Dbtr in next 6 st, dbtr2tog. (Dbtr in next 8 st, dbtr2tog) 8X. Dbtr in next 15 st, dbtr2tog. (Dbtr in next 8 st, dbtr2tog) 9X. Dbtr in last 8 st. Ss to top of ch5. Turn.
- 185 sts.
9. Ch1. Sc in same st and each st around. Ss to 1st sc. Turn.
- 185 sts.
10. Ch1, Hdc in same st and next 6 st, hdc2tog. (Hdc in next 7 st, hdc2tog) 9X. Hdc in next 14 st, hdc2tog. (Hdc in next 7 st, hdc2tog) 8X. Hdc in last 7 st. Ss to 1st hdc. Turn.
- 166 sts.
11. Working in the 3rd LO for this row: Ch1, Hdc in same st and next 5 st, hdc2tog. (Hdc in next 6 st, hdc2tog) 9X. Hdc in next 13 st, hdc2tog. (Hdc in next 6 st, hdc2tog) 8X. Hdc in last 7 st. Ss to 1st hdc. Turn.
- 147 sts.
12. Ch5, (counts as 1st dbtr) Dbtr in next 5 st, dbtr2tog. (Dbtr in next 5 st, dbtr2tog) 9X. Dbtr in next 13 st, dbtr2tog. (Dbtr in next 5 st, dbtr2tog) 8X. Dbtr in last 6 st. Ss to top of ch5. Turn.
- 128 sts.
13. Ch1, Sc in same st and each st around. Ss to 1st sc. Turn.
- 109 sts.
14. Ch1, Hdc in same st and next 5 st, hdc2tog. (Hdc in next 4 st, hdc2tog) 8X. Hdc in next 11 st, hdc2tog. (Hdc in next 4 st, hdc2tog) 9X. Hdc in last 5 st. Ss to 1st hdc. Turn.
- 90 sts.
15. Working in the 3rd LO for this row: Ch1, Hdc in same st and next 4 st, hdc2tog. (Hdc in next 3 st, hdc2tog) 8X. Hdc in next 10 st, hdc2tog. (Hdc in next 3 st, hdc2tog) 9X. Hdc in last 5 st. Ss to 1st hdc. Turn.
- 71 sts.
16. Working in the BLO for this row: Ch1, Hdc in same st and next 3 st, hdc2tog. (Hdc in next 2 st, hdc2tog) 8X. Hdc in next 9 st, hdc2tog. (Hdc in next 2 st, hdc2tog) 9X. Hdc in last 5 st. Ss to 1st hdc. Do Not Turn.
- 71 sts.
17. Working in the 3rd LO for this row: Ch1, Sc in same st and each st around. Ss to 1st sc. Fasten off.
- 71 sts.
The Body of your top is finished. You may now scroll down to the sleeve instructions.
Large
6. Ch1, Hdc in same st and next 5 st, hdc2tog. (Hdc in next 10 st, hdc2tog) 9X. Hdc in next 11 st, hdc2tog. (Hdc in next 10 st, hdc2tog) 8X. Hdc in last 5 st. Ss to 1st hdc. Turn.
- 211 sts.
7. Working in the 3rd LO for this row: Ch1, hdc in same st and each st around. Ss to 1st hdc. Turn.
- 211 sts.
8. Ch5, (counts as 1st dbtr) Dbtr in next 4 st, dbtr2tog. (Dbtr in next 9 st, dbtr2tog) 8X. Dbtr in next 10 st, dbtr2tog. (Dbtr in next 9 st, dbtr2tog) 9X. Dbtr in last 5 st. Ss to top of ch5. Turn.
- 192 sts.
9. Ch1. Sc in same st and each st around. Ss to 1st sc. Turn.
- 192 sts.
10. Ch1, Hdc in same st and next 3 st, hdc2tog. (Hdc in next 8 st, hdc2tog) 9X. Hdc in next 9 st, hdc2tog. (Hdc in next 8 st, hdc2tog) 8X. Hdc in last 5 st. Ss to 1st hdc. Turn.
- 173 sts.
11. Working in the 3rd LO for this row: Ch1, Hdc in same st and next 3 st, hdc2tog. (Hdc in next 7 st, hdc2tog) 9X. Hdc in next 8 st, hdc2tog. (Hdc in next 7 st, hdc2tog) 8X. Hdc in last 4 st. Ss to 1st hdc. Turn.
- 154 sts.
12. Ch5, (counts as 1st dbtr) Dbtr in next 2 st, dbtr2tog. (Dbtr in next 6 st, dbtr2tog) 9X. Dbtr in next 7 st, dbtr2tog. (Dbtr in next 6 st, dbtr2tog) 8X. Dbtr in last 4 st. Ss to top of ch5. Turn.
- 135 sts.
13. Ch1, Sc in same st and each st around. Ss to 1st sc. Turn.
- 135 sts.
14. Ch1, Hdc in same st and next 2 st, hdc2tog. (Hdc in next 5 st, hdc2tog) 8X. Hdc in next 6 st, hdc2tog. (Hdc in next 5 st, hdc2tog) 9X. Hdc in last 3 st. Ss to 1st hdc. Turn.
- 116 sts.
15. Working in the 3rd LO for this row: Ch1, Hdc in same st and next st, hdc2tog. (Hdc in next 4 st, hdc2tog) 8X. Hdc in next 5 st, hdc2tog. (Hdc in next 4 st, hdc2tog) 9X. Hdc in last 3 st. Ss to 1st hdc. Turn.
- 97 sts.
16. Working in the BLO for this row: Ch1, Hdc in same st and next st, hdc2tog. (Hdc in next 3 st, hdc2tog) 8X. Hdc in next 4 st, hdc2tog. (Hdc in next 3 st, hdc2tog) 9X. Hdc in last 2 st. Ss to 1st hdc. Do Not Turn.
- 78 sts.
17. Working in the 3rd LO for this row: Ch1, Sc in same st and each st around. Ss to 1st sc. Fasten off.
- 78 sts.
The Body of your top is finished. You may now scroll down to the sleeve instructions.
XLarge
6. Ch1, Hdc in same st and next 7 st, hdc2tog. (Hdc in next 10 st, hdc2tog) 9X. Hdc in next 16 st, hdc2tog. (Hdc in next 10 st, hdc2tog) 9X. Hdc in last 8 st. Ss to 1st hdc. Turn.
- 232 sts.
7. Working in the 3rd LO for this row: Ch1, hdc in same st and each st around. Ss to 1st hdc. Turn.
- 232 sts.
8. Ch5, (counts as 1st dbtr) Dbtr in next 7 st, dbtr2tog. (Dbtr in next 9 st, dbtr2tog) 9X. Dbtr in next 15 st, dbtr2tog. (Dbtr in next 9 st, dbtr2tog) 9X. Dbtr in last 7 st. Ss to top of ch5. Turn.
- 212 sts.
9. Ch1. Sc in same st and each st around. Ss to 1st sc. Turn.
- 212 sts.
10. Ch1, Hdc in same st and next 6 st, hdc2tog. (Hdc in next 8 st, hdc2tog) 9X. Hdc in next 14 st, hdc2tog. (Hdc in next 8 st, hdc2tog) 9X. Hdc in last 7 st. Ss to 1st hdc. Turn.
- 192 sts.
11. Working in the 3rd LO for this row: Ch1, Hdc in same st and next 5 st, hdc2tog. (Hdc in next 7 st, hdc2tog) 9X. Hdc in next 14 st, hdc2tog. (Hdc in next 7 st, hdc2tog) 9X. Hdc in last 7 st. Ss to 1st hdc. Turn.
- 172 sts.
12. Ch5, (counts as 1st dbtr) Dbtr in next 5 st, dbtr2tog. (Dbtr in next 6 st, dbtr2tog) 9X. Dbtr in next 12 st, dbtr2tog. (Dbtr in next 6 st, dbtr2tog) 9X. Dbtr in last 6 st. Ss to top of ch5. Turn.
- 152 sts.
13. Ch1, Sc in same st and each st around. Ss to 1st sc. Turn.
- 152 sts.
14. Ch1, Hdc in same st and next 4 st, hdc2tog. (Hdc in next 5 st, hdc2tog) 9X. Hdc in next 11 st, hdc2tog. (Hdc in next 5 st, hdc2tog) 9X. Hdc in last 6 st. Ss to 1st hdc. Turn.
- 132 sts.
15. Working in the 3rd LO for this row: Ch1, Hdc in same st and next 4 st, hdc2tog. (Hdc in next 4 st, hdc2tog) 9X. Hdc in next 10 st, hdc2tog. (Hdc in next 4 st, hdc2tog) 9X. Hdc in last 5 st. Ss to 1st hdc. Turn.
- 112 sts.
16. Working in the BLO for this row: Ch1, Hdc in same st and next 3 st, hdc2tog. (Hdc in next 3 st, hdc2tog) 9X. Hdc in next 9 st, hdc2tog. (Hdc in next 3 st, hdc2tog) 9X. Hdc in last 5 st. Ss to 1st hdc. Do Not Turn.
- 92 sts.
17. Working in the 3rd LO for this row: Ch1, Sc in same st and each st around. Ss to 1st sc. Fasten off.
- 92 sts.
The Body of your top is finished. You may now scroll down to the sleeve instructions.
XXLarge
6. Ch1, Hdc in same st and next 9 st, hdc2tog. (Hdc in next 10 st, hdc2tog) 9X. Hdc in next 19 st, hdc2tog. (Hdc in next 10 st, hdc2tog) 9X. Hdc in last 10 st. Ss to 1st hdc. Turn.
- 239 sts.
7. Working in the 3rd LO for this row: Ch1, hdc in same st and each st around. Ss to 1st hdc. Turn.
- 239 sts.
8. Ch5, (counts as 1st dbtr) Dbtr in next 8 st, dbtr2tog. (Dbtr in next 9 st, dbtr2tog) 9X. Dbtr in next 19 st, dbtr2tog. (Dbtr in next 9 st, dbtr2tog) 9X. Dbtr in last 9 st. Ss to top of ch5. Turn.
- 219 sts.
9. Ch1. Sc in same st and each st around. Ss to 1st sc. Turn.
- 219 sts.
10. Ch1, Hdc in same st and next 8 st, hdc2tog. (Hdc in next 8 st, hdc2tog) 9X. Hdc in next 17 st, hdc2tog. (Hdc in next 8 st, hdc2tog) 9X. Hdc in last 9 st. Ss to 1st hdc. Turn.
- 199 sts.
11. Working in the 3rd LO for this row: Ch1, Hdc in same st and next 7 st, hdc2tog. (Hdc in next 7 st, hdc2tog) 9X. Hdc in next 17 st, hdc2tog. (Hdc in next 7 st, hdc2tog) 9X. Hdc in last 8 st. Ss to 1st hdc. Turn.
- 179 sts.
12. Ch5, (counts as 1st dbtr) Dbtr in next 7 st, dbtr2tog. (Dbtr in next 6 st, dbtr2tog) 9X. Dbtr in next 15 st, dbtr2tog. (Dbtr in next 6 st, dbtr2tog) 9X. Dbtr in last 8 st. Ss to top of ch5. Turn.
- 159 sts.
13. Ch1, Sc in same st and each st around. Ss to 1st sc. Turn.
- 159 sts.
14. Ch1, Hdc in same st and next 6 st, hdc2tog. (Hdc in next 5 st, hdc2tog) 9X. Hdc in next 15 st, hdc2tog. (Hdc in next 5 st, hdc2tog) 9X. Hdc in last 8 st. Ss to 1st hdc. Turn.
- 139 sts.
15. Working in the 3rd LO for this row: Ch1, Hdc in same st and next 6 st, hdc2tog. (Hdc in next 4 st, hdc2tog) 9X. Hdc in next 13 st, hdc2tog. (Hdc in next 4 st, hdc2tog) 9X. Hdc in last 7 st. Ss to 1st hdc. Turn.
- 119 sts.
16. Working in the BLO for this row: Ch1, Hdc in same st and next 5 st, hdc2tog. (Hdc in next 3 st, hdc2tog) 9X. Hdc in next 13 st, hdc2tog. (Hdc in next 3 st, hdc2tog) 9X. Hdc in last 6 st. Ss to 1st hdc. Do Not Turn.
- 99 sts.
17. Working in the 3rd LO for this row: Ch1, Sc in same st and each st around. Ss to 1st sc. Fasten off.
- 99 sts.
The Body of your top is finished. You may now carry on to the sleeve instructions.
Double Trouble Pullover – Free Crochet Sweater Pattern
Sleeves
Make 2
Bottom Ribbing
Leaving an 8” tail, make a slip knot and Ch9.
1. Hdc in 2nd ch. Hdc each ch to end. Turn.
- 8 sts
2. Ch1. Working in the 3rd LO for entire row, hdc in each st across.
- 8 sts
Repeat row 2. until you have 28 (28, 30, 30, 34, 34) rows total. Fold your band in half lengthwise with the back of the last row facing you and sl st into the end of your first row. Do not fasten off
You will now sew the ends of the bottom band together using the tail. Place your whip stitches into the chains of your first row and the 3rd loops of your last row. Make a knot. Turn right side out.
Your yarn loop should now be sticking out of the top of your work. Place your hook into this loop. You will continue on to the rest of the sleeve by placing stitches into the ends of each row.
Upper Sleeve
1. Ch1, *hdc in end of first row, 2 hdc in end of next row. ** Repeat until you have 2 row ends left unworked. For last two row ends, follow instructions according to your size:
For XS, S, M and L: work 2 hdc into end of next row, 2 hdc into end of last row.
For XL and XXL: work 1 hdc into end of next row, 1 hdc in end of last row.
Sl st to first hdc. This will be the right side of your work. Turn.
- 43 (43, 46, 46, 50, 50) sts
2. Working in the 3rd LO for this row: Ch1, Hdc in same st as ch1 and every st around. Ss to 1st hdc. This will be the wrong side of your work. Turn.
- 43 (43, 46, 46, 50, 50) sts
3. Ch5, (counts as first dbtr) Dbtr in next st and every st around. Ss to top of ch5. Turn.
- 43 (43, 46, 46, 50, 50) sts
4. Ch1, sc in same st as ch1 and each st around. Ss to 1st sc. Fasten off, leaving a long tail.
- 43 (43, 46, 46, 50, 50) sts
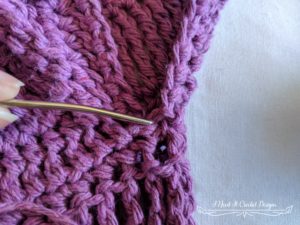
Turn the top body and sleeves inside out. Whip stitch the sleeves onto the top. You’ll notice that I added an extra stitch into the sleeve. This extra stitch should be placed in the armpit where you placed your slip stitch to form the armhole loop. I did this to prevent a hole from forming in the armpit.
Double Trouble Pullover – Free Crochet Sweater Pattern
Weave in all your ends, turn it right side out and you’re done! I would suggest washing and blocking your project as I find the stitches fall into place better when I do that. I also find that it helps cotton yarn to bounce back after being stretched out with wear.
I hope you enjoy wearing your Double Trouble Pullover and I look forward to seeing all your beautiful pictures on Ravelry!
If you’d like to know when I post new patterns and tutorials, head on over to my Facebook and Instagram and give me a like and a follow!
If you enjoyed this free pattern for the Double Trouble Pullover, you may want to check out my other designs!
Double Trouble Pullover – Free Crochet Sweater Pattern
Until next time… Happy Hooking! 😉