

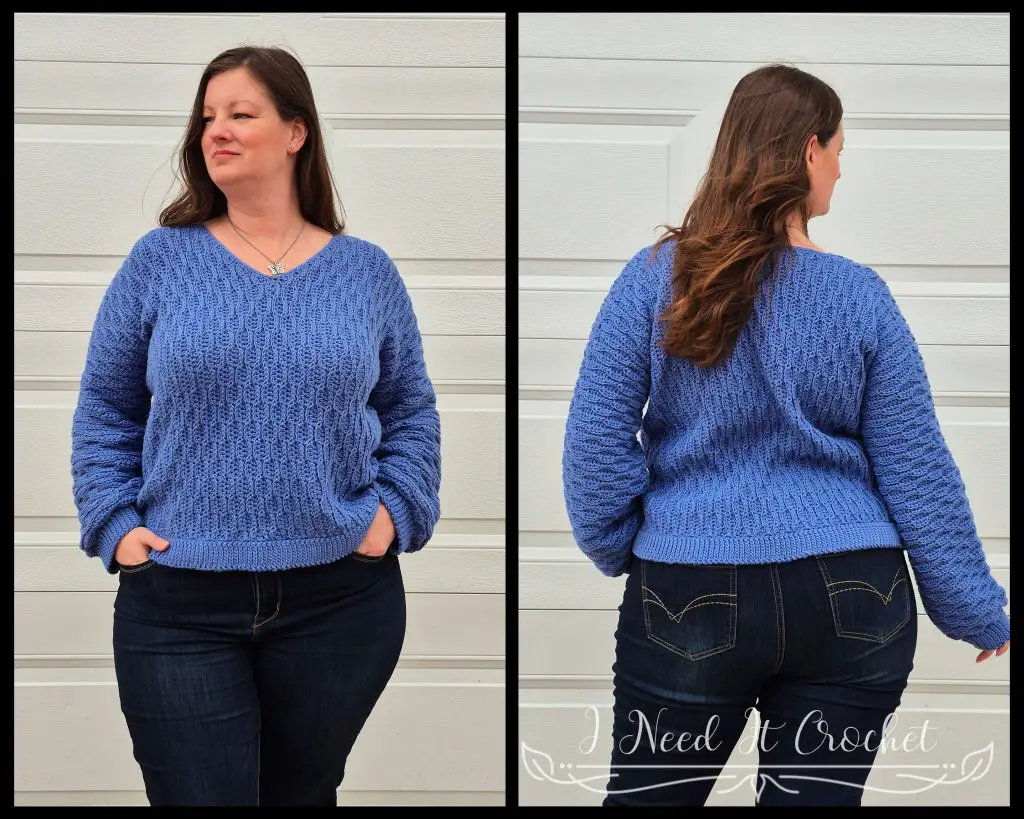
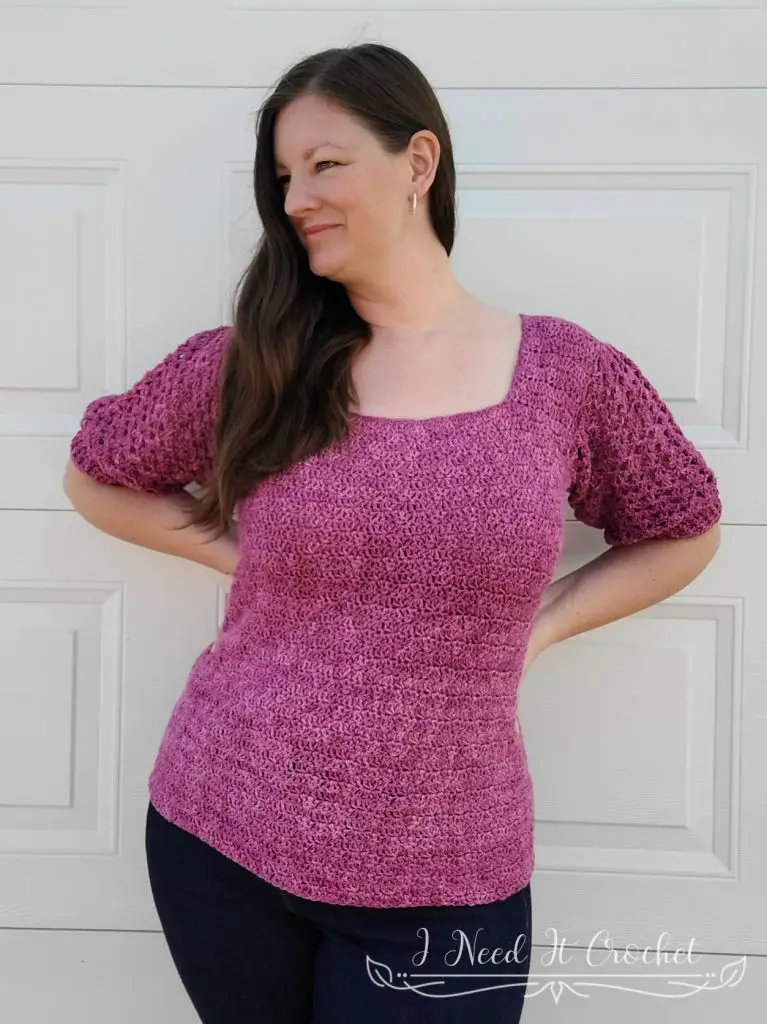
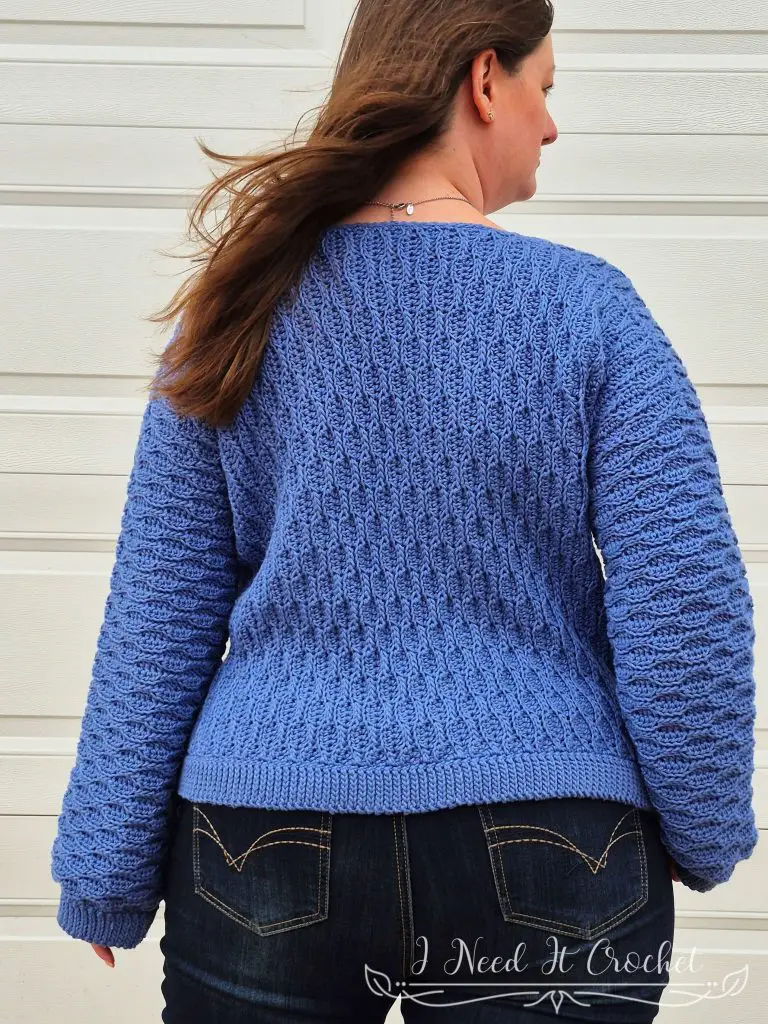
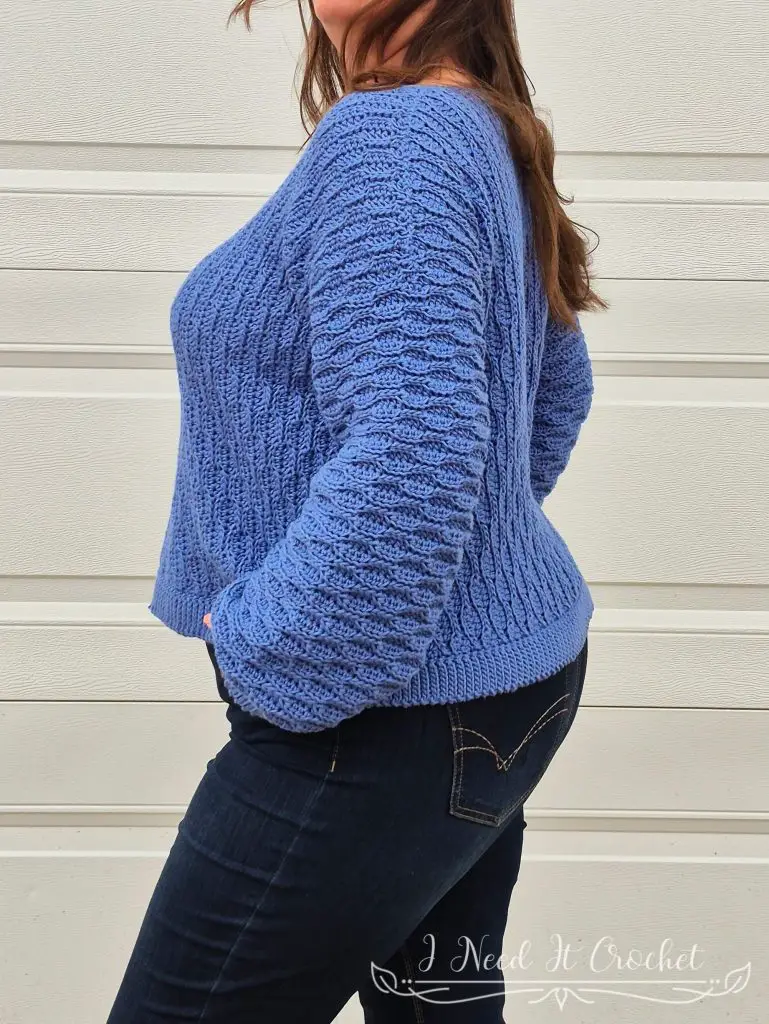
Free Crochet Sweater Pattern: The Dulcis Pullover (Lightweight & Textured)
The Free Crochet Sweater Pattern: Dulcis Pullover is a lightweight crochet sweater pattern designed for those in-between seasons when you need just a little extra warmth. Perfect for spring and summer layering, this long sleeve crochet pullover pairs effortlessly with your favorite jeans for a relaxed, everyday look.
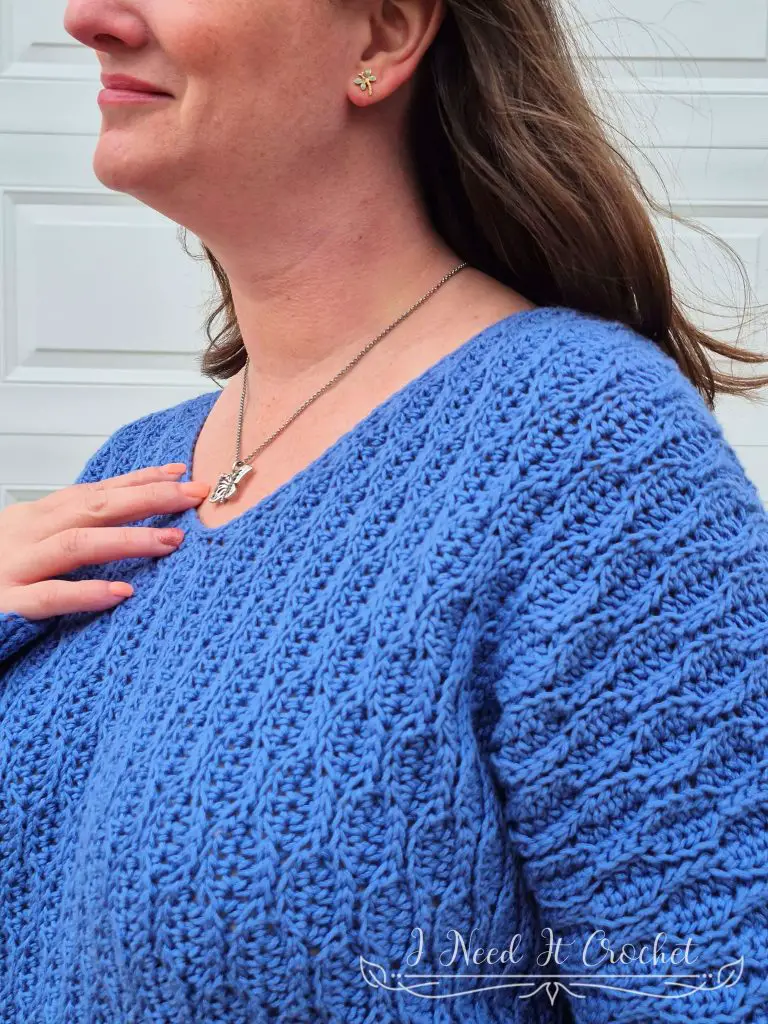
If you’ve been searching for an easy crochet sweater pattern with beautiful texture, this design is a great choice. The almond stitch creates a soft, eye-catching fabric that looks intricate but is surprisingly simple and quick to work up, making it ideal for confident beginners and seasoned crocheters alike.
The name Dulcis comes from Prunus dulcis, the scientific name for the almond tree, a subtle nod to the stitch that brings this design to life. With its natural, organic texture and easy rhythm, this stitch adds just the right amount of interest without slowing you down.
Whether you’re looking for a spring crochet sweater, a lightweight summer pullover, or a cozy layering piece for cooler days, the Dulcis Pullover is designed to be both practical and enjoyable to make.
Because let’s be honest… if it’s going to look this good, it should be fun to make too.
Why You’ll Love This Lightweight Free Crochet Sweater Pattern
- Lightweight and perfect for spring and summer layering
- Easy, beginner-friendly stitch pattern
- Beautiful texture without complicated techniques
- Relaxed, wearable fit for everyday outfits
- Works up faster than it looks (always a win)
The Almond Stitch (and Why You’ll Be Obsessed)
The almond stitch is one of those stitches that instantly catches your eye. It has a soft, organic texture that feels almost nature-inspired, while still being simple enough to fall into a relaxing rhythm.
If you’re new to this stitch, don’t worry, it’s much easier than it looks. Once you get going, it becomes almost meditative.
And of course, it’s the star of the Dulcis Pullover, giving the entire piece its signature look.
Free Crochet Sweater Pattern: The Dulcis Pullover (Lightweight & Textured)
The Perfect Crochet Sweater for Spring and Summer
This design was created with versatility in mind.
It’s warm enough for those cooler spring mornings and breezy summer evenings, but still light and breathable so you won’t feel weighed down.
Pair it with jeans, shorts, or even layered over a dress, it’s one of those pieces you’ll find yourself reaching for again and again.
You Might Also Like
If you love lightweight crochet pieces, you might also enjoy:
- The Longevity Pullover – another easy, wearable sweater
- The Bauble Cardigan – perfect for summer layering
- The Sweet Iris Top – a quick and simple crochet top
If you’re looking for a lightweight free crochet sweater pattern that’s easy to make and perfect for layering, the Dulcis Pullover is a beautiful choice for spring and summer.
Where Can I Buy The Pdf?
The entire pattern is available to view for free on this page (you just have to scroll down to see it). But if you would prefer to have a printable pdf copy of the pattern, you can purchase it for a small fee from my Ravelry and Etsy stores. Just click the graphics below.
This pattern is 12 pages long and contains 15 additional pictures and detailed instructions of how to complete your lightweight crochet sweater. A printable pdf will be easier to follow, and you can make notes on it as you go. I find it to be the easier option. But if you like to use the online version, it is here 24/7 for you to view. Enjoy!
Free Crochet Sweater Pattern: The Dulcis Pullover (Lightweight & Textured)
Free Crochet Sweater Pattern: The Dulcis Pullover (Lightweight & Textured)
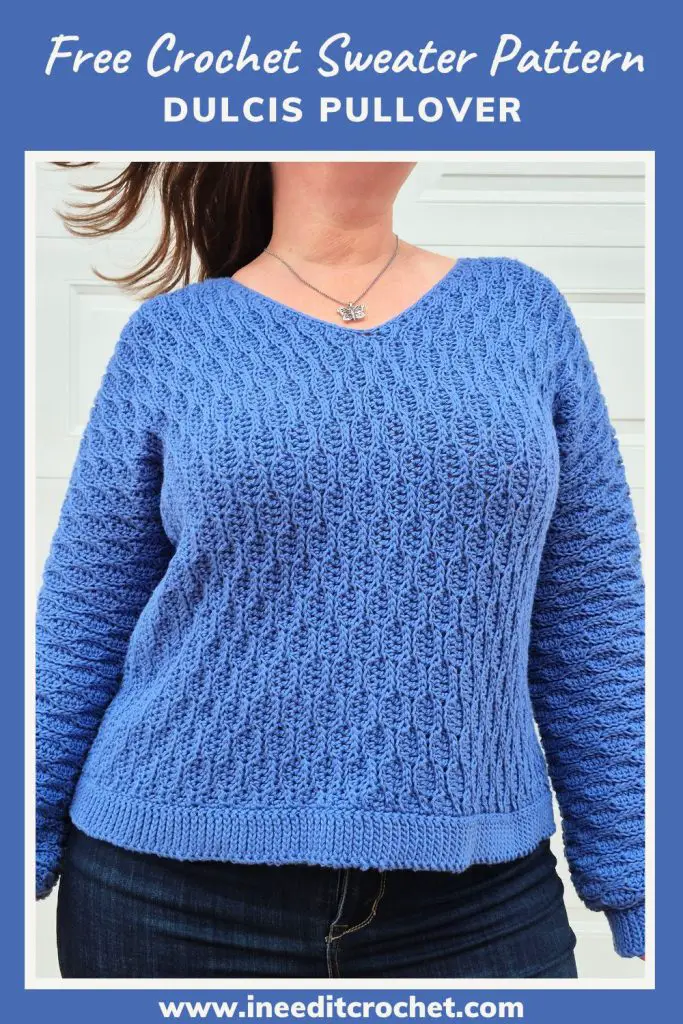
Want to Pin it for later?
Click the image below and save the pin to your favourite crochet pattern boards!
Free Crochet Sweater Pattern: The Dulcis Pullover (Lightweight & Textured)
Finished Sizes:
Instructions given to fit size X-small; changes for small, medium, large, X-large, 2X-large, 3X-large, 4X-large and 5X-large are in ()
XS (S, M, L, XL, 2XL, 3XL, 4XL, 5XL)
To Fit Bust Size: 28” (32”, 36”, 40”, 44”, 48”, 52”, 56”, 60”)
Finished Bust Circumference: 30” (34”, 38”, 42”, 46”, 50”, 54”, 58”, 62”)
Body Length: Customizable. Length shown on model is 23 ½”
Arm Hole Circumference (you may choose from any of these sizes): 9 ½” (11 ½”, 15 ⅓”, 15 ⅓”, 17 ¼”, 19”, 21”, 23”)
Materials:
I used 5th Avenue Coastal Cotton, which is a 51% Cotton/49% Acrylic, #4 Worsted weight yarn.
Any yarn of similar weight would work.
Approximately 1000 (1100, 1200, 1400, 1600, 1800, 2000, 2200, 2400) yds.
5.5mm Hook
Stitch Markers
Yarn Needle
Scissors
Measuring Tape
Gauge:
I have provided gauge for a small swatch and a large swatch. If you are making a larger size and/or you sometimes find your tension is off, I recommend making the larger swatch.
Abbreviations:
RS = Right Side
WS = Wrong Side
Sk = Skip
St = Stitch
Ch = Chain
Ss = Slip Stitch
Sc = Single Crochet
Hdc = Half Double Crochet
Blo = Back Loop Only
Difficulty:
Intermediate
Notes:
This pattern has a difficulty level of Intermediate to Advanced.
Ch1 and ch3 at the beginning of a row/round is never considered a stitch.
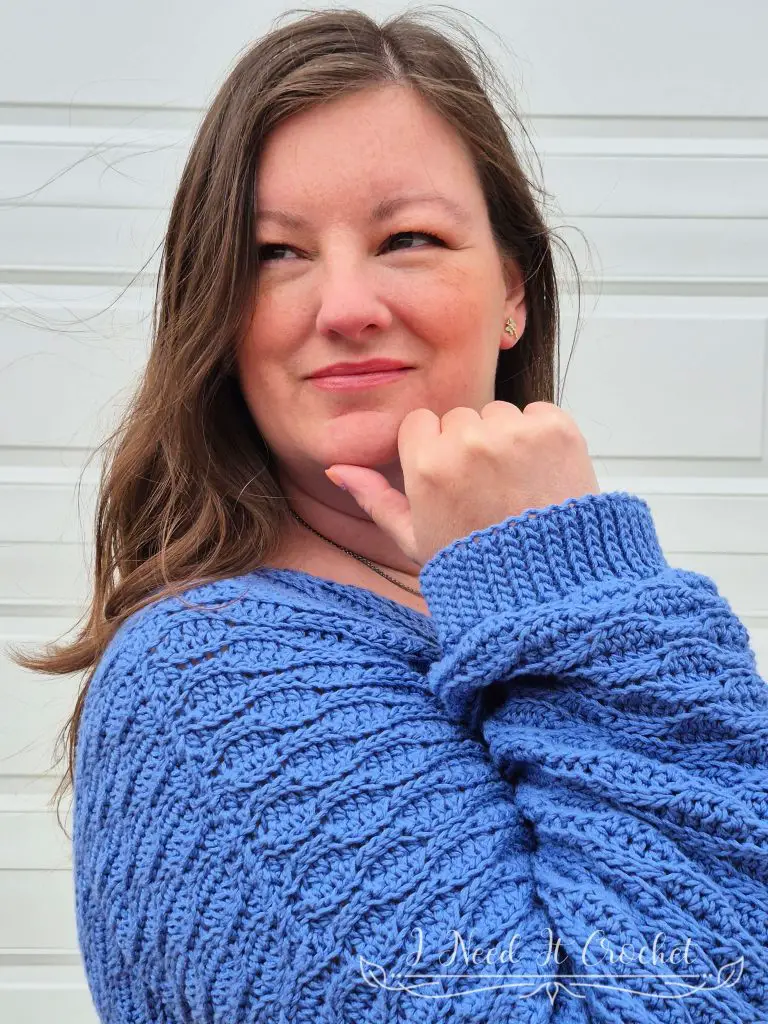
The model above (that’s me) has a 42” bust and is wearing a size XL.
Choose your size according to your bust measurements. For a cozy, oversized look, you can choose to size up like I did.
Free Crochet Sweater Pattern: The Dulcis Pullover (Lightweight & Textured)
Gauge Swatch
The instructions below will create a gauge swatch that is 4” (8”) wide by 4” (8”) high. If you are making a larger size and/or you sometimes find your tension is off, I recommend making the larger swatch. But, of course, that is completely up to you. Also, the width of your swatch is much more important than the overall height. So if your width is on point, but your height is off, I recommend using the hook that gives you the correct width.
With 5.5mm hook
- (WS) Ch 17 (33). Sk 1st ch, hdc in next 2 ch. Ss in next 4 ch. *Hdc in next 4 ch. Ss in next 4 ch.** Repeat from * to ** until 2 ch left. Hdc in last 2 ch. Turn. – 16 (32) st
- (RS) Ch1. Working this row in blo: Ss in 1st 2 sts. Hdc in next 4 sts. *Ss in next 4 sts. Hdc in next 4 sts.** Repeat from * to ** until 2 sts left. Ss in last 2 sts. Turn. – 16 (32) st
- Ch1. Ss in 1st 2 sts. Hdc in next 4 sts. *Ss in next 4 sts. Hdc in next 4 sts.** Repeat from * to ** until 2 sts left. Ss in last 2 sts. Turn. – 16 (32) st
- Ch1. Working this row in blo: Hdc in 1 st 2 sts. Ss in next 4 sts. *Hdc in next 4 sts. Ss in next 4 sts.** Repeat from * to ** until 2 sts left. Hdc in last 2 sts. Turn. – 16 (32) st
- Ch1. Hdc in 1st 2 sts. Ss in next 4 sts. *Hdc in next 4 sts. Ss in next 4 sts.** Repeat from * to ** until 2 sts left. Hdc in last 2 sts. Turn. – 16 (32) st
Repeat rows 2-5 until you have a total of 16 (32) rows. Your swatch should measure 4” (8”) wide by 4” (8”) high. Gauge width and height are both important in this pattern.
Instructions
The body of this pullover is worked sideways. We’ll begin by making the back panel. Next, we will make the front panel, working decreases and increases to create the V shaped neckline. Then, we will seam the front and back panels together, leaving space for the arm holes. The bottom edging will then be added, followed by the sleeves. Finally, the neckline will be finished with a simple single crochet and slip stitch edge.
Back Panel
Note: The length of this sweater is customizable. I made my sweater 23 ½” long, but you are welcome to make yours shorter or longer if you wish. To do this, you will need to add or subtract a multiple of 8 stitches from your starting chain. Each 8 stitches will change your finished length by approximately 2”.
Begin with a long tail (about 18” should be enough). This tail will be at the top of your sweater, so you may want to add a stitch marker or some kind of reminder of this for later.
With 5.5mm hook (or hook used to obtain gauge).
- (WS) Ch 89 (unless you are changing the length, in which case you should refer to the note in the above paragraph). Working in back hump of chain: Sk 1st ch, hdc in next 2 ch. Ss in next 4 ch. *Hdc in next 4 ch. Ss in next 4 ch.** Repeat from * to ** until 2 ch left. Hdc in last 2 ch. Turn. – 88 st
- (RS) Ch1. Working this row in blo: Ss in 1st 2 sts. Hdc in next 4 sts. *Ss in next 4 sts. Hdc in next 4 sts.** Repeat from * to ** until 2 sts left. Ss in last 2 sts. Turn. – 88 st
- Ch1. Ss in 1st 2 sts. Hdc in next 4 sts. *Ss in next 4 sts. Hdc in next 4 sts.** Repeat from * to ** until 2 sts left. Ss in last 2 sts. Turn. – 88 st
- Ch1. Working this row in blo: Hdc in 1st 2 sts. Ss in next 4 sts. *Hdc in next 4 sts. Ss in next 4 sts.** Repeat from * to ** until 2 sts left. Hdc in last 2 sts. Turn. – 88 st
- Ch1. Hdc in 1st 2 sts. Ss in next 4 sts. *Hdc in next 4 sts. Ss in next 4 sts.** Repeat from * to ** until 2 sts left. Hdc in last 2 sts. Turn. – 88 st
Measurement Check: Your project should now be approximately 22” wide and 1 ½” high.
Repeat rows 2-5 until you have a total of 56 (64, 72, 80, 88, 96, 104, 112, 120) rows. Bind off, leaving a tail about 36” long. This tail will be used to seam the side of the sweater together. Your back panel should look similar to Figure 1 below.
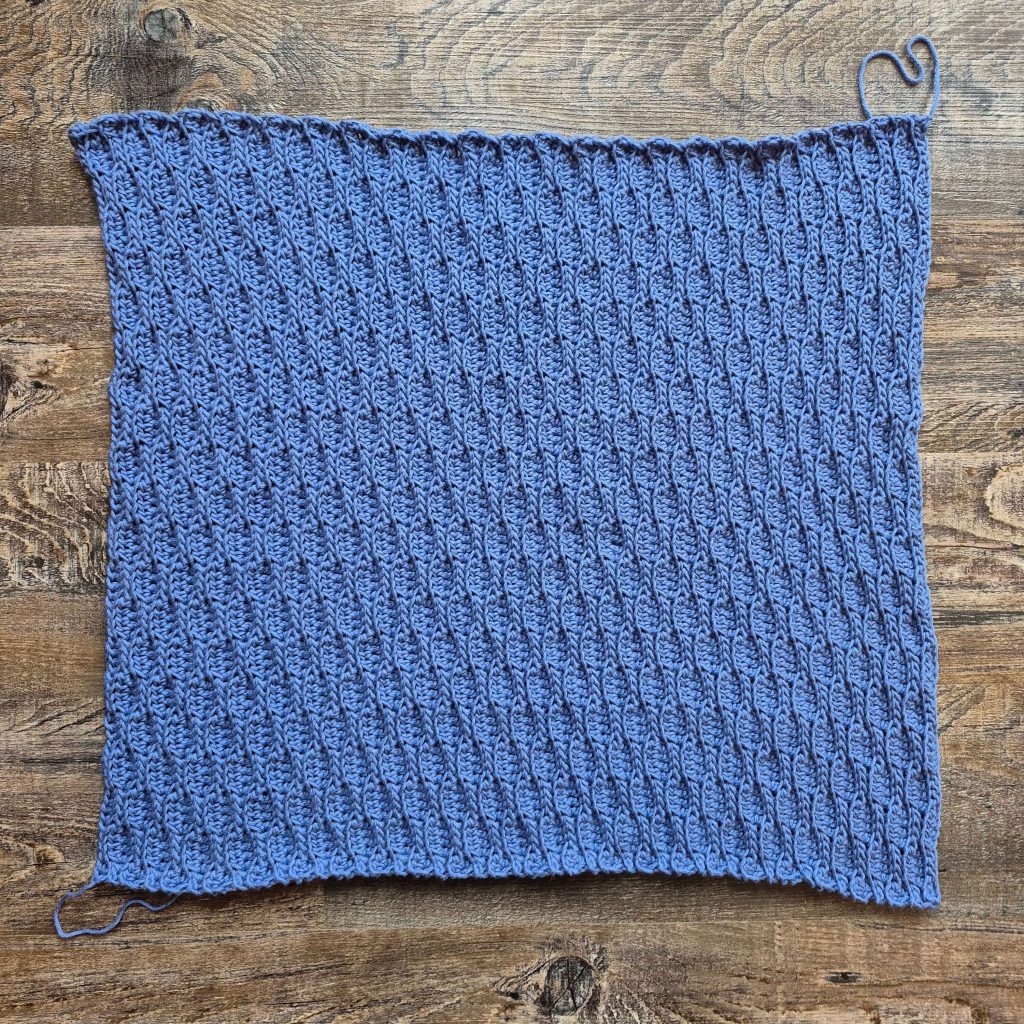
Figure 1
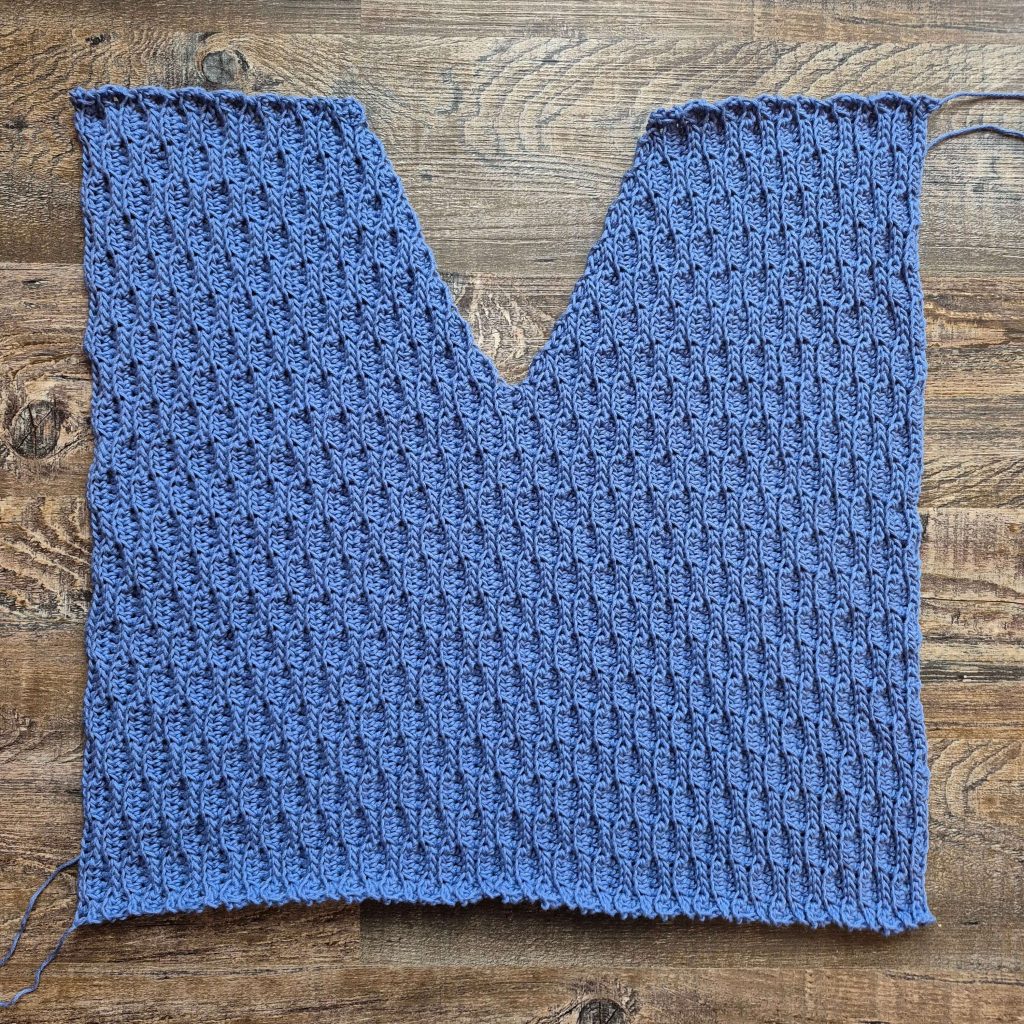
Figure 2
Front Panel
The front panel is made the same way as the back, but we will work decreases and increases to shape the neck. Your finished front panel will look similar to Figure 2 above. Note: If you adjusted the length of your back panel, you will have to make the same adjustment for the front panel.
Left Shoulder
Begin with a long tail (about 36” should be enough). This tail will be used to seam the other side of the sweater together.
- (WS) Ch 89. Working in back hump of chain: Sk 1st ch, hdc in next 2 ch. Ss in next 4 ch. *Hdc in next 4 ch. Ss in next 4 ch.** Repeat from * to ** until 2 ch left. Hdc in last 2 ch. Turn. – 88 st
- (RS) Ch1. Working this row in blo: Ss in 1st 2 sts. Hdc in next 4 sts. *Ss in next 4 sts. Hdc in next 4 sts.** Repeat from * to ** until 2 sts left. Ss in last 2 sts. Turn. – 88 st
- Ch1. Ss in 1st 2 sts. Hdc in next 4 sts. *Ss in next 4 sts. Hdc in next 4 sts.** Repeat from * to ** until 2 sts left. Ss in last 2 sts. Turn. – 88 st
- Ch1. Working this row in blo: Hdc in 1 st 2 sts. Ss in next 4 sts. *Hdc in next 4 sts. Ss in next 4 sts.** Repeat from * to ** until 2 sts left. Hdc in last 2 sts. Turn. – 88 st
- Ch1. Hdc in 1st 2 sts. Ss in next 4 sts. *Hdc in next 4 sts. Ss in next 4 sts.** Repeat from * to ** until 2 sts left. Hdc in last 2 sts. Turn. – 88 st
Measurement Check: Your project should now be approximately 22” wide and 1 ½” high.
Repeat rows 2-5 until you have a total of 12 (16, 20, 24, 28, 32, 36, 40, 44) rows, ending with a repeat of row 4.
V Neck Decreases
We will now begin working decreases to create one side of the V neck.
- (WS) Ch1. Hdc in 1st 2 sts. Ss in next 4 sts. *Hdc in next 4 sts. Ss in next 4 sts.** Repeat from * to ** until 2 sts left. Leave last 2 sts unworked. Turn. – 86 st
- (RS) Ch1. Working this row in blo: Hdc3tog over 1st 3 sts. Hdc in next st. *Ss in next 4 sts. Hdc in next 4 sts.** Repeat from * to ** until 2 sts left. Ss in last 2 sts. Turn. – 84 st
- Ch1. Ss in 1st 2 sts. Hdc in next 4 sts. *Ss in next 4 sts. Hdc in next 4 sts.** Repeat from * to ** until 2 sts left. Leave last 2 sts unworked. Turn. – 82 st
- Ch1. Working this row in blo: Hdc3tog over 1st 3 sts. Hdc in next st. Ss in next 4 sts. *Hdc in next 4 sts. Ss in next 4 sts.** Repeat from * to ** until 2 sts left. Hdc in last 2 sts. Turn. – 80 st
Repeat rows 1-4 until your front panel has a total of 28 (32, 36, 40, 44, 48, 52, 56, 60) rows. You should now have a stitch count of 56 sts. (If you changed the length of your sweater at the beginning, this count will be different.)
V Neck Increases
We will now work increases to create the other side of the V neck.
- (WS) Ch1. Hdc in 1st 2 sts. Ss in next 4 sts. *Hdc in next 4 sts. Ss in next 4 sts.** Repeat from * to ** until 2 sts left. Hdc in next st. 3hdc in last st. Turn. – 58 st
- (RS) Ch3. Working this row in blo: Sk 1 ch, hdc in next 2 ch. *Ss in next 4 sts. Hdc in next 4 sts.** Repeat from * to ** until 2 sts left. Ss in last 2 sts. Turn. – 60 st
- Ch1. Ss in 1st 2 sts. *Hdc in next 4 sts. Ss in next 4 sts.** Repeat from * to ** until 2 sts left. Hdc in next st. 3hdc in last st. Turn. – 62 st
- Ch3. Working this row in blo: Sk 1 ch, hdc in next 2 ch. Ss in next 4 sts. *Hdc in next 4 sts. Ss in next 4 sts.** Repeat from * to ** until 2 sts left. Hdc in last 2 sts. Turn. – 64 st
Repeat rows 1-4 until your front panel has a total of 44 (48, 52, 56, 60, 64, 68, 72, 76) rows. You should now have a stitch count of 88 sts.
Right Shoulder
- (WS) Ch1. Hdc in 1st 2 sts. Ss in next 4 sts. *Hdc in next 4 sts. Ss in next 4 sts.** Repeat from * to ** until 2 sts left. Hdc in last 2 sts. Turn. – 88 st
- (RS) Ch1. Working this row in blo: Ss in 1st 2 sts. Hdc in next 4 sts. *Ss in next 4 sts. Hdc in next 4 sts.** Repeat from * to ** until 2 sts left. Ss in last 2 sts. Turn. – 88 st
- Ch1. Ss in 1st 2 sts. Hdc in next 4 sts. *Ss in next 4 sts. Hdc in next 4 sts.** Repeat from * to ** until 2 sts left. Ss in last 2 sts. Turn. – 88 st
- Ch1. Working this row in blo: Hdc in 1 st 2 sts. Ss in next 4 sts. *Hdc in next 4 sts. Ss in next 4 sts.** Repeat from * to ** until 2 sts left. Hdc in last 2 sts. Turn. – 88 st
Repeat rows 1-4 until your front panel has a total of 56 (64, 72, 80, 88, 96, 104, 112, 120) rows. Bind off, leaving a tail about 18” long.
Free Crochet Sweater Pattern: The Dulcis Pullover (Lightweight & Textured)
Sewing Front & Back
With right sides facing each other, lay the front panel over the back panel (see Figure 3). Make sure that the side with the shorter yarn end on the back panel is at the top. Whip stitch the front and back panels together, using the shorter yarn ends to sew the shoulders and the longer yarn ends to sew the sides (see Figure 4). Be sure to leave a number of stitches open at the top of the sides for the sleeves (choose from the options below – the number of stitches will differ according to your sleeve size). As you sew, make sure your stitches line up. Then, you can turn your project right side out.
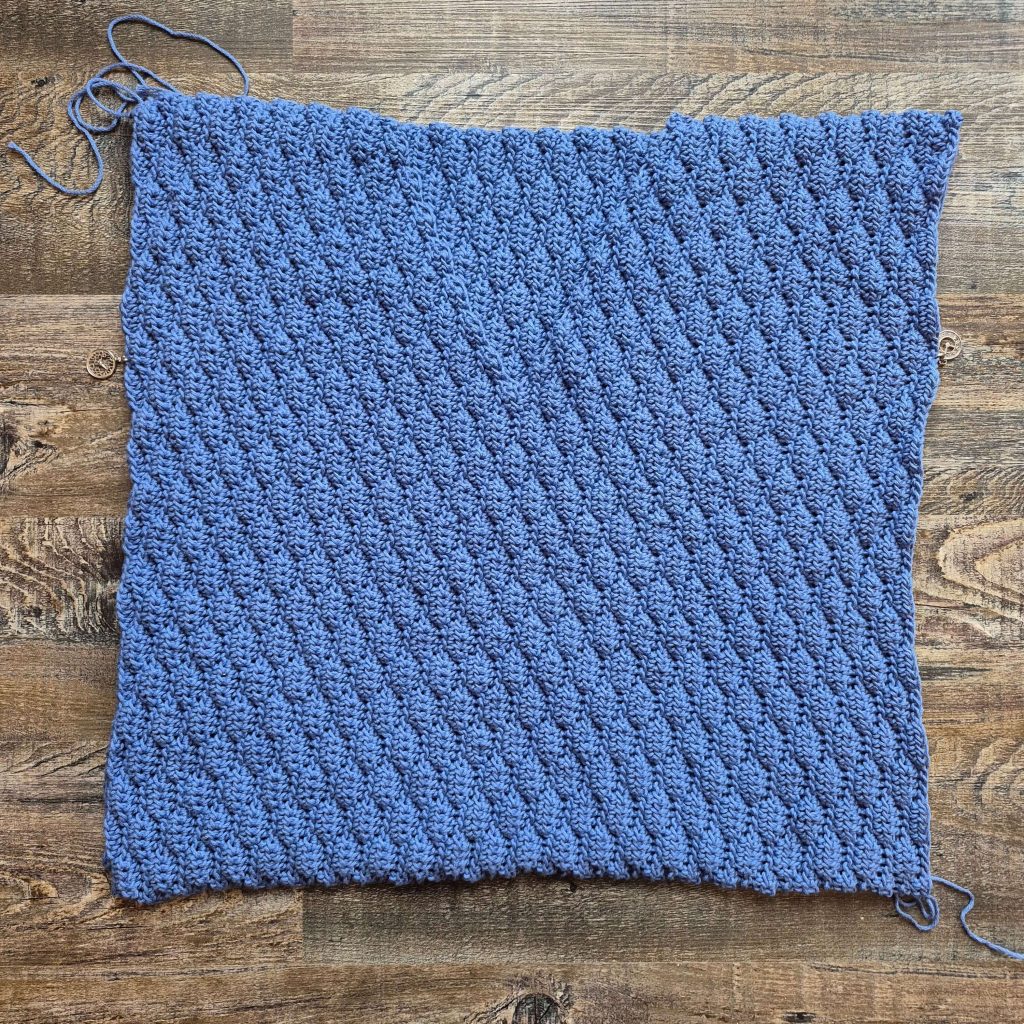
Figure 3
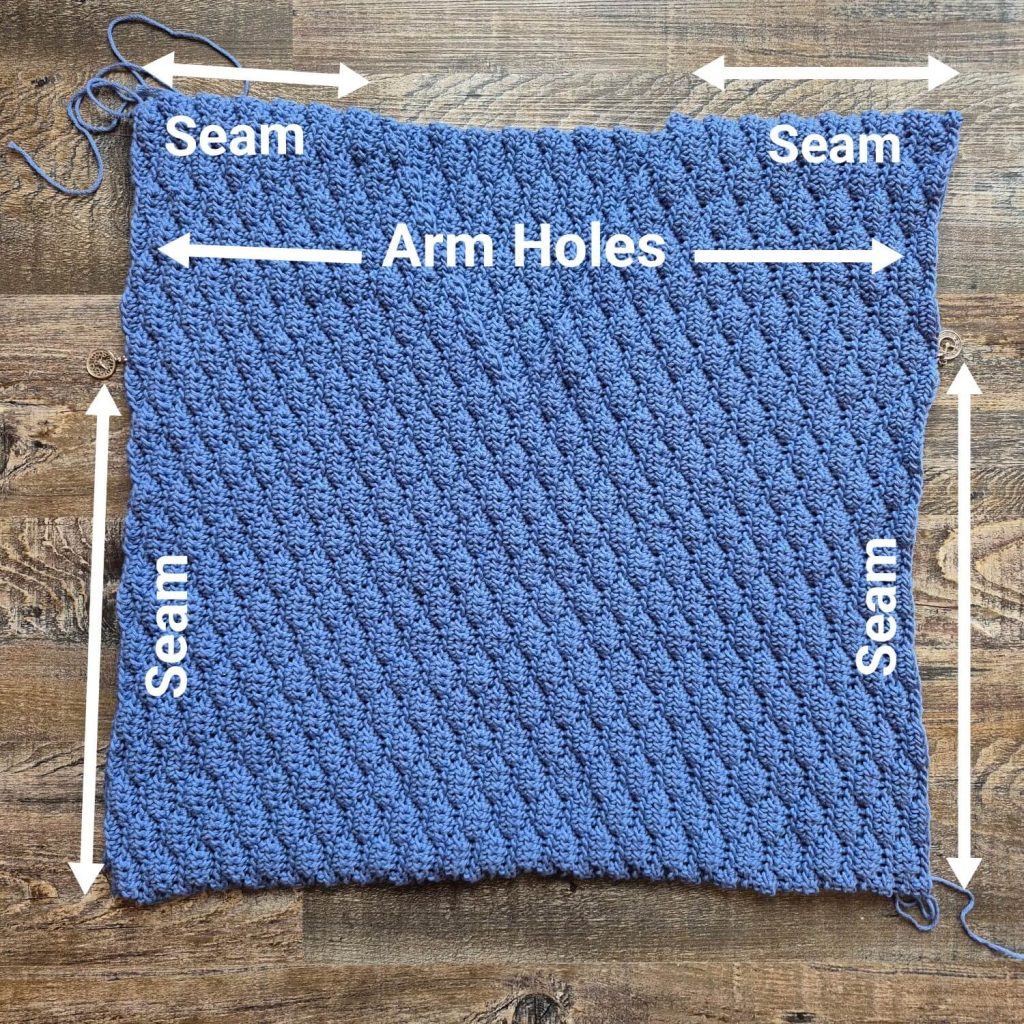
Figure 4
Arm Hole Options
When you sew the sides of your sweater together, you’ll need to leave a number of stitches open at the top for the sleeves. Your sleeve size options are: 9 ½” (11 ½”, 13 ⅓”, 15 ⅓”, 17 ¼”, 19”, 21”, 23”). You may choose whichever sleeve size you prefer, no matter what body size you are making.
- For 9 ½” sleeves: Leave 20 sts open, to give a total of 40 sts front and back.
- For11 ½” sleeves: Leave 24 sts open, to give a total of 48 sts front and back.
- For 13 ⅓” sleeves: Leave 28 sts open, to give a total of 56 sts front and back.
- For 15 ⅓” sleeves: Leave 32 sts open, to give a total of 64 sts front and back.
- For 17 ¼” sleeves: Leave 36 sts open, to give a total of 72 sts front and back.
- For 19” sleeves: Leave 40 sts open, to give a total of 80 sts front and back.
- For 21” sleeves: Leave 44 sts open, to give a total of 88 sts front and back.
- For 23” sleeves: Leave 48 sts open, to give a total of 96 sts front and back.
Bottom Trim
We will now create the ribbed bottom trim. First, we add a single crochet border to the bottom edge. Then, we will work slip stitch short rows off of the single crochet border. Begin by joining your yarn in the end of any row along the bottom edge.
Sc Border
- (RS) Ch1. Sc around the bottom edge, working 1 sc in the end of every 2 ss rows, and 3 sc in the end of every 2 hdc rows. When you have worked into every row, ss to joining to 1st st. Do not turn. – 112 (128, 144, 160, 176, 192, 208, 224, 240) st
Ribbed Edge
- (RS) Ch10 (see Figure 5). Sk 1st ch, ss in back hump of next 9 ch (see Figure 6). Ss into next unworked sc of bottom trim (see Figure 7). Turn. – 10 ss
- (WS) Sk 1st ss. Ss in blo of next 9 ss (see Figure 8). Turn. – 9 ss
- (RS) Ch1. Ss in blo of 1st 9 ss. Ss to next unworked st of bottom trim (see Figure 9). Turn. – 10 ss
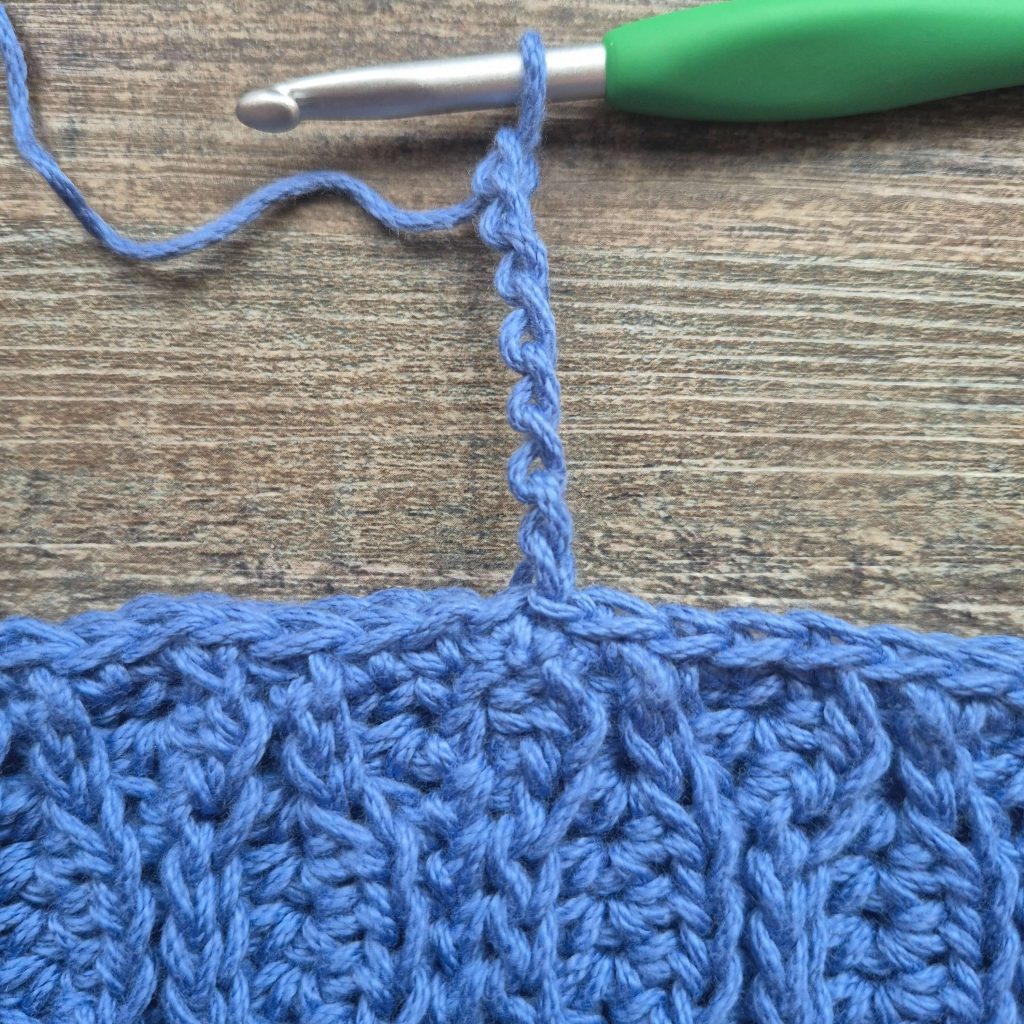
Figure 5
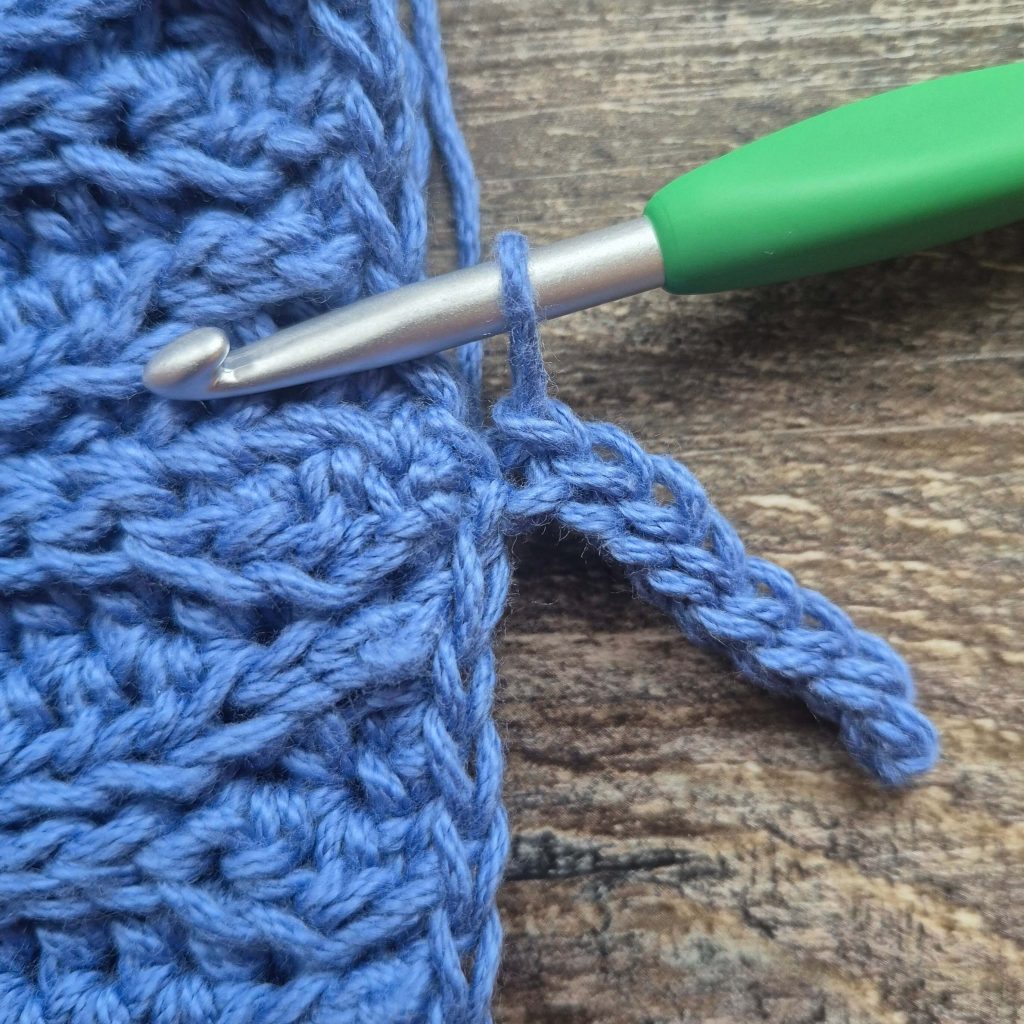
Figure 6
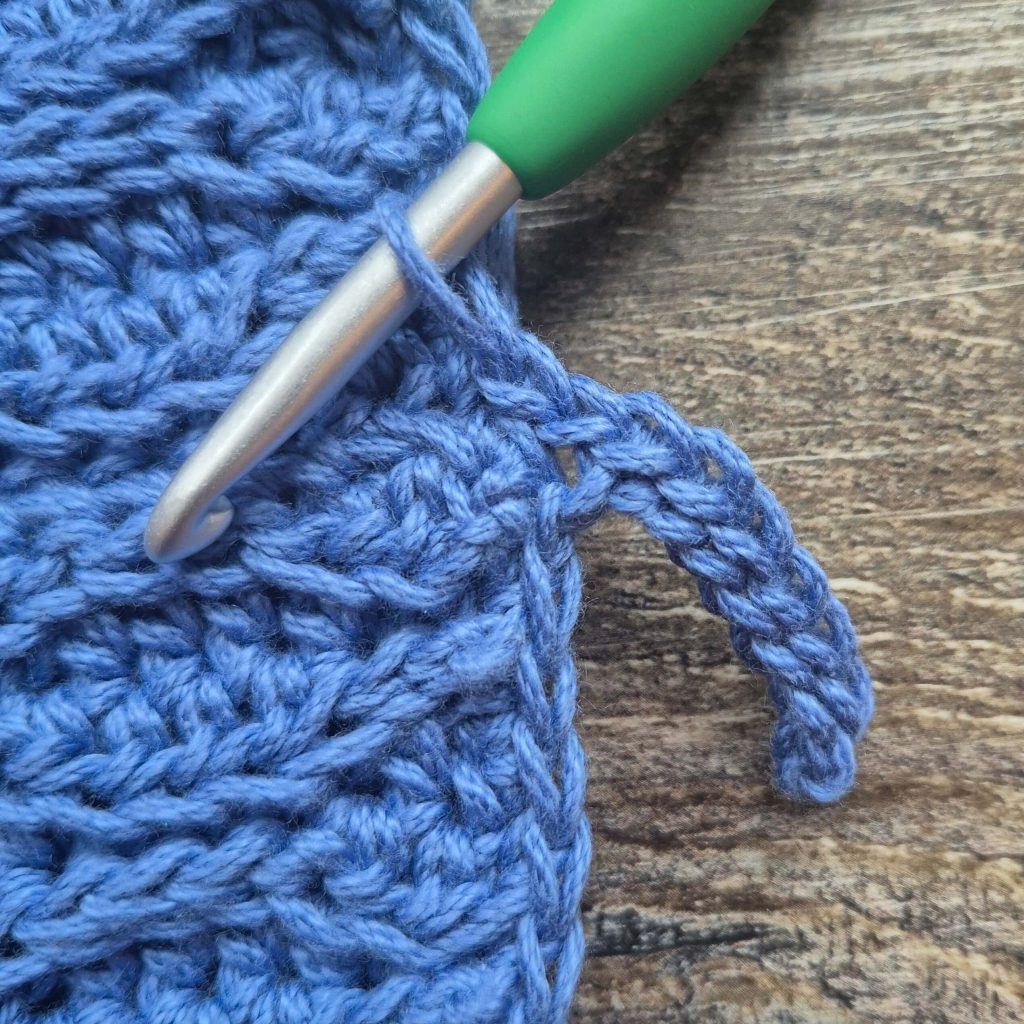
Figure 7
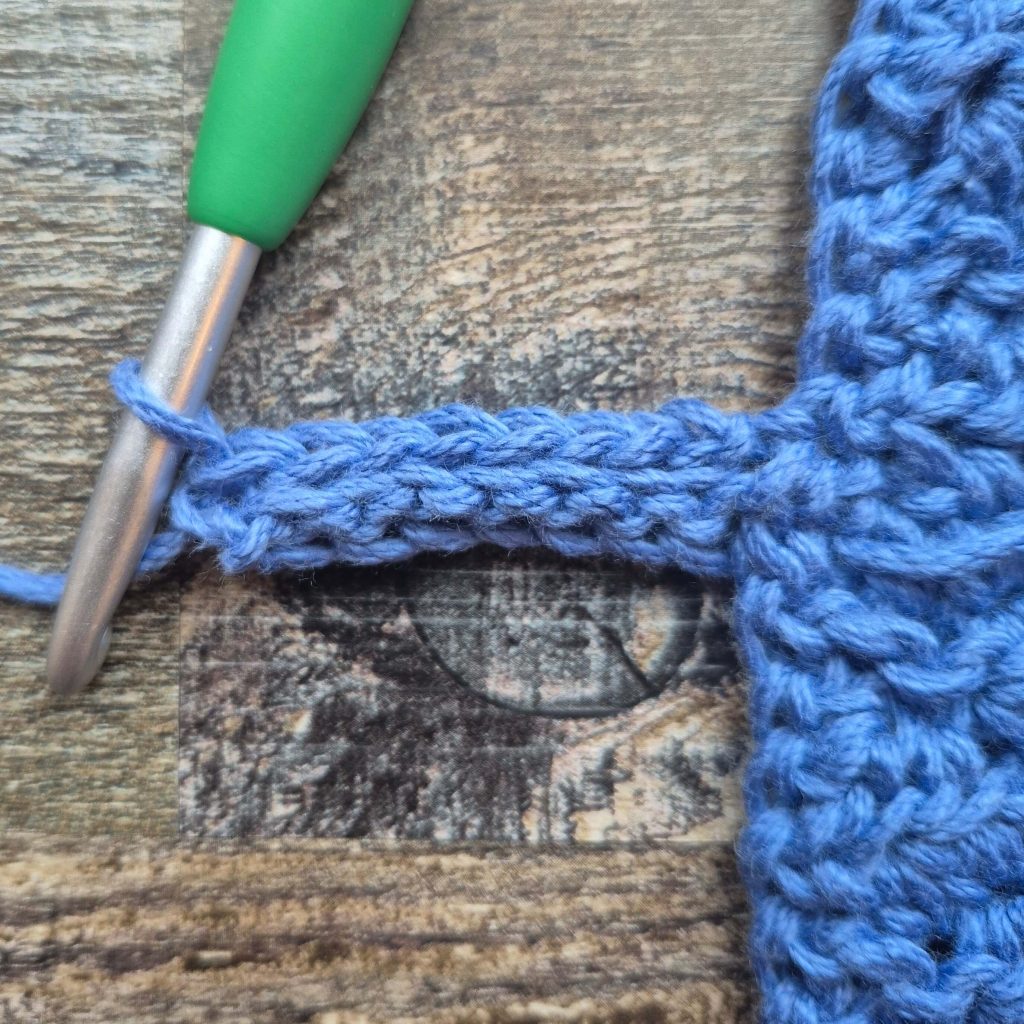
Figure 8
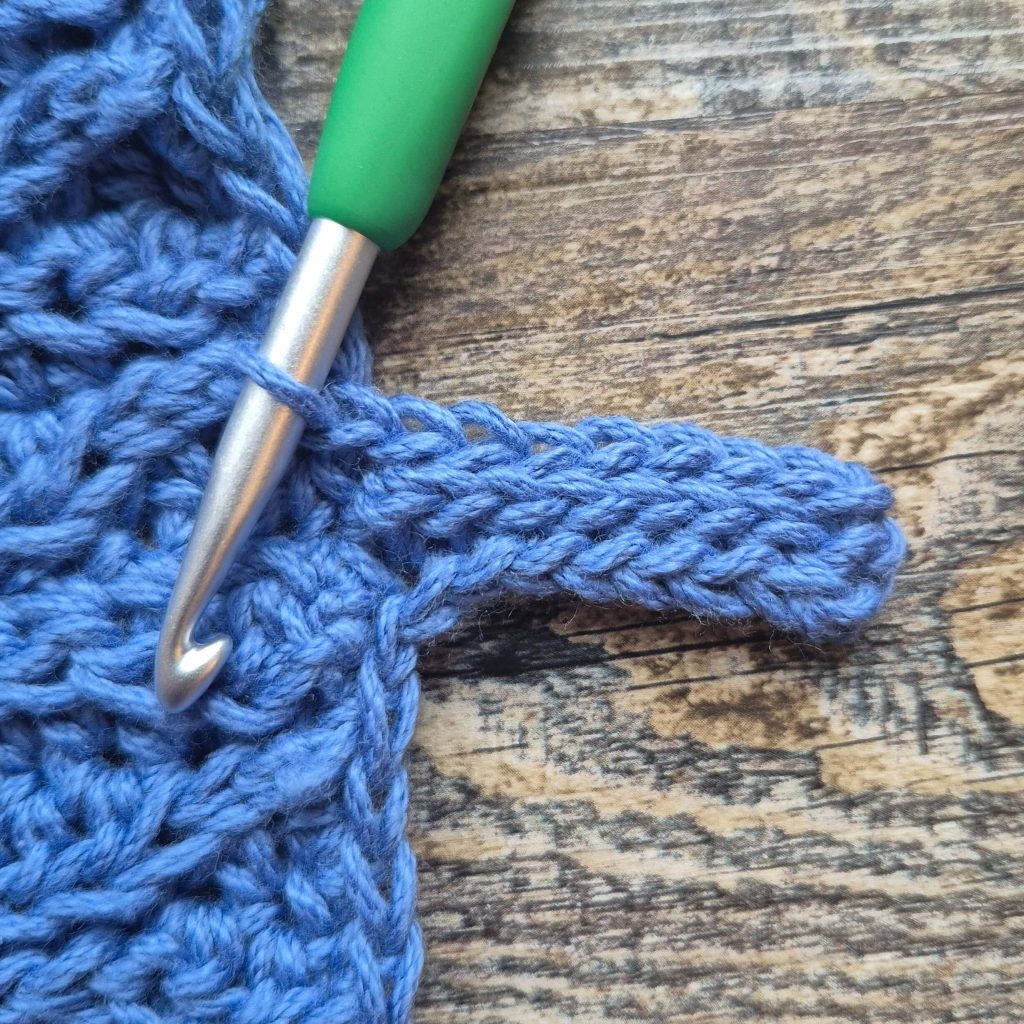
Figure 9
Repeat rows 2-3 around the bottom until all sc sts on bottom trim are worked, ending with a repeat of row 3 (see Figure 10). With RS facing you, ss the ends of the trim together through the flo of the 1st row and the blo of the last row (see Figures 11 & 12). Bind off.
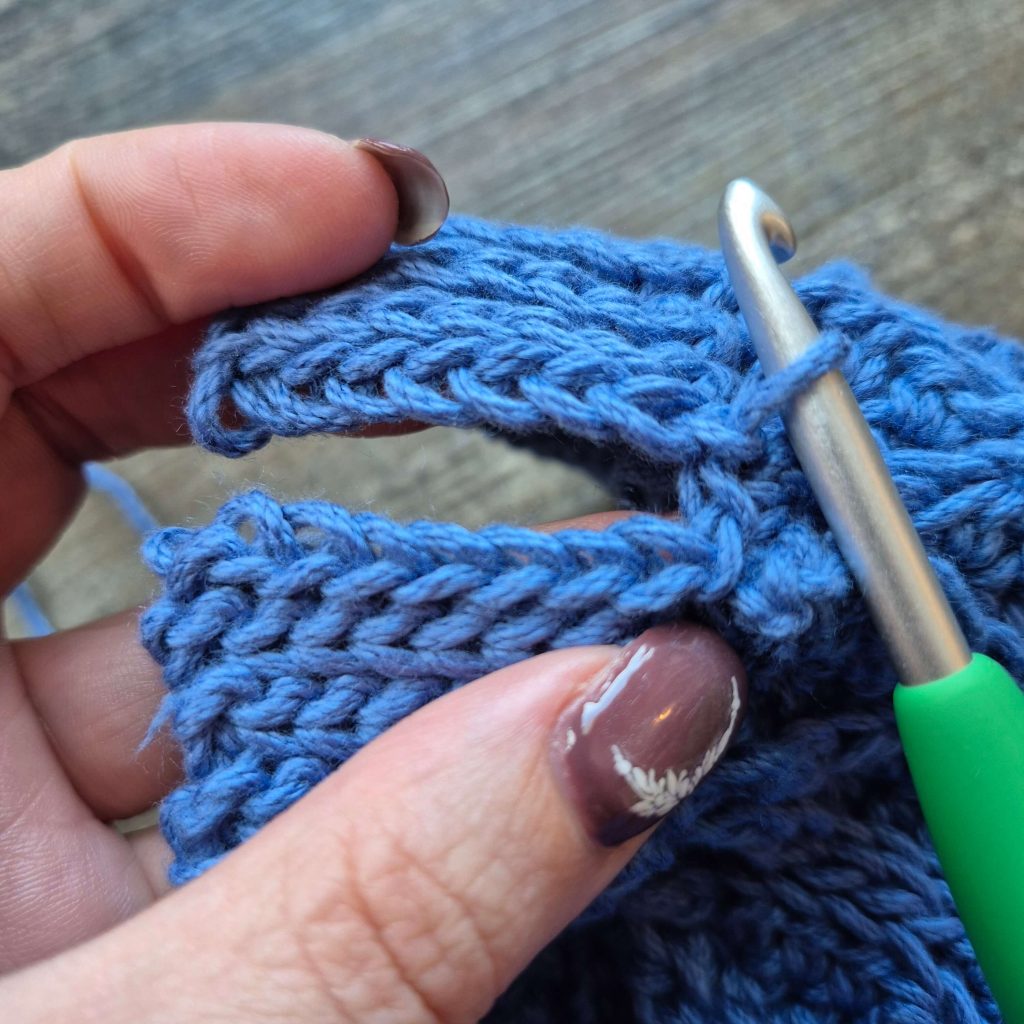
Figure 10
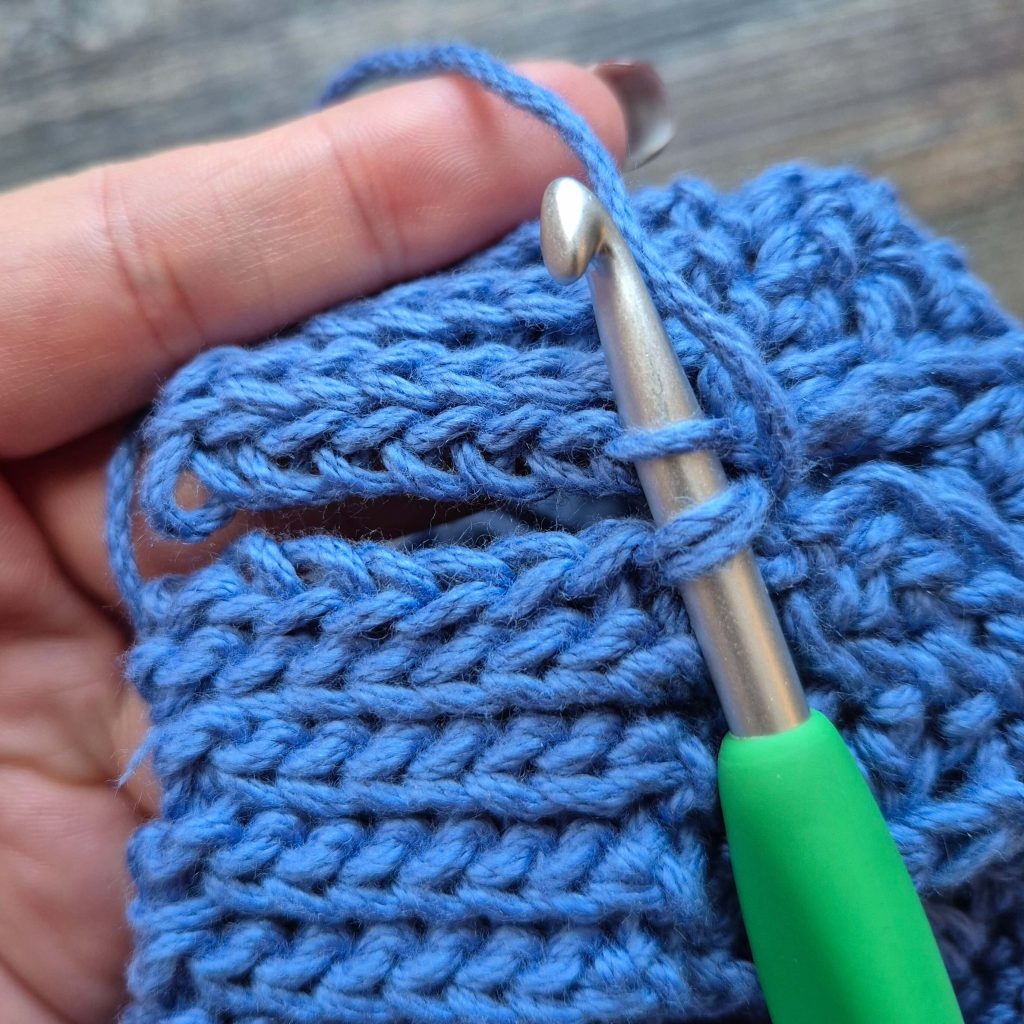
Figure 11
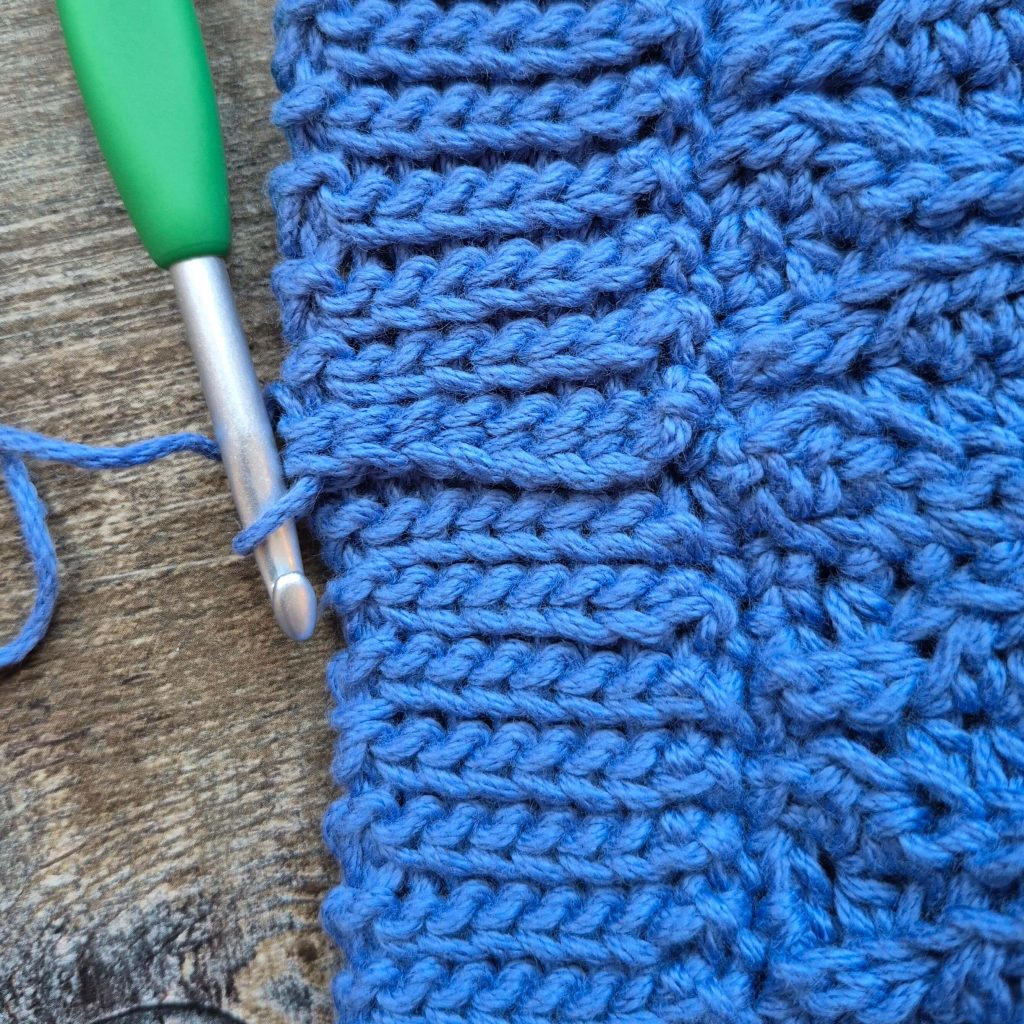
Figure 12
Sleeves
The sleeves are worked in the round off of the body of the sweater, so there is no seaming. Begin with the WS of your project facing you. Join your yarn in the first stitch at the bottom of the armhole to the left of your seam (see Figures 13 & 14). Note: As you work the first round of the sleeve, your stitches should line up in the pattern like they do in Figure 15. If yours don’t, then you began in the wrong stitch.
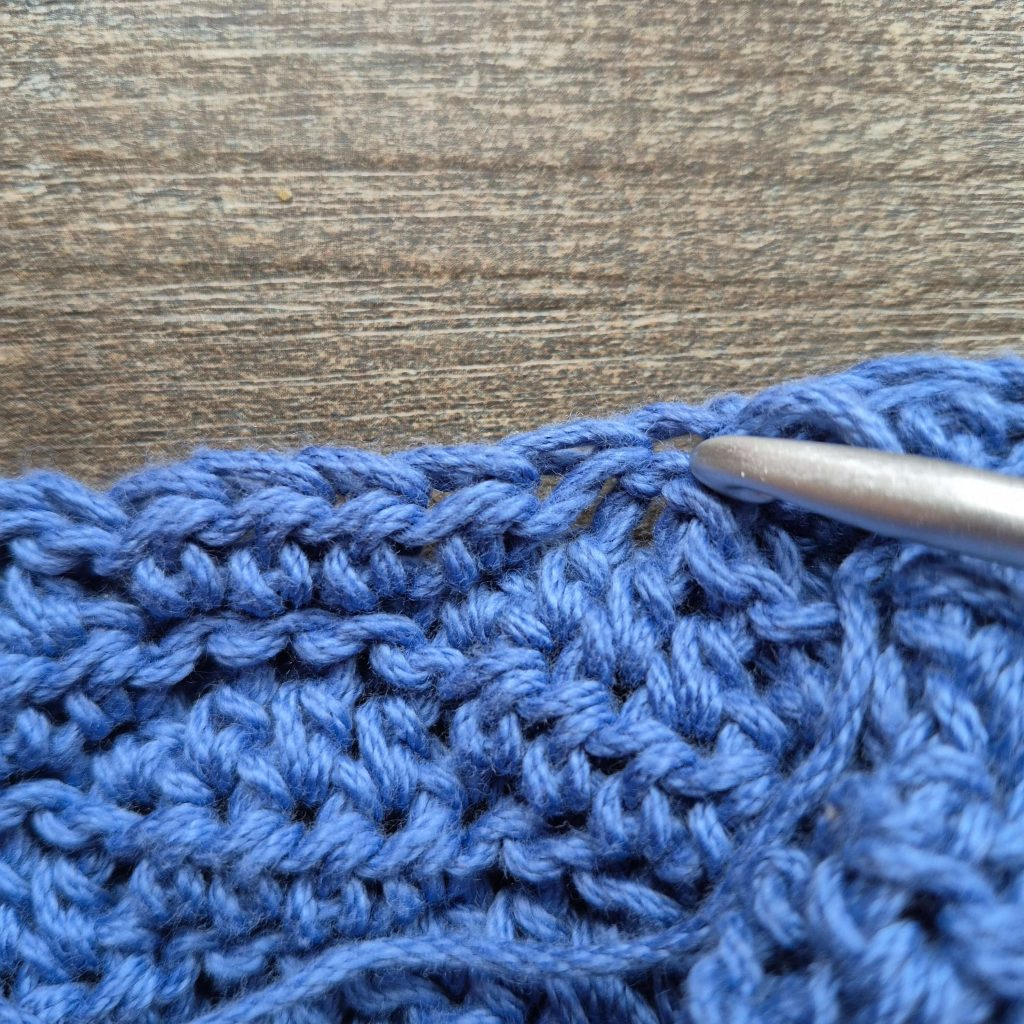
Figure 13
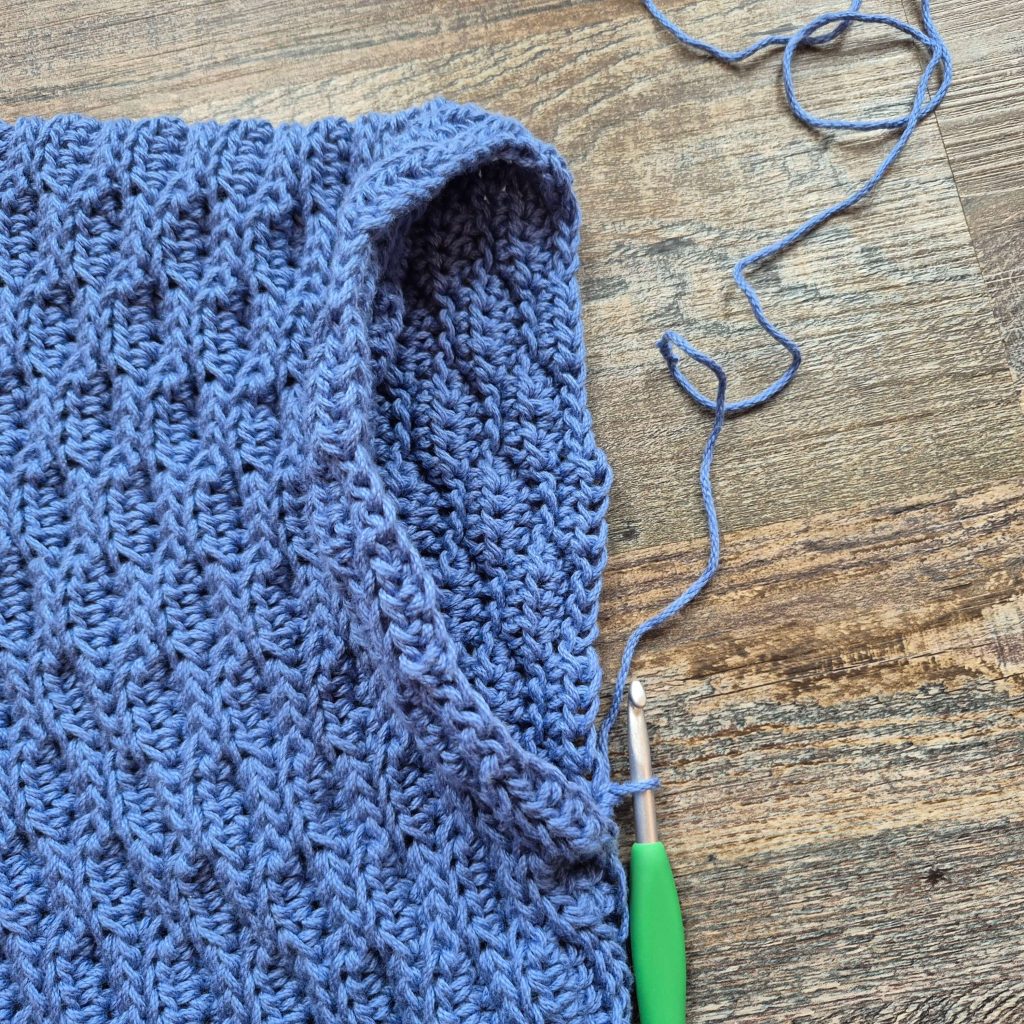
Figure 14
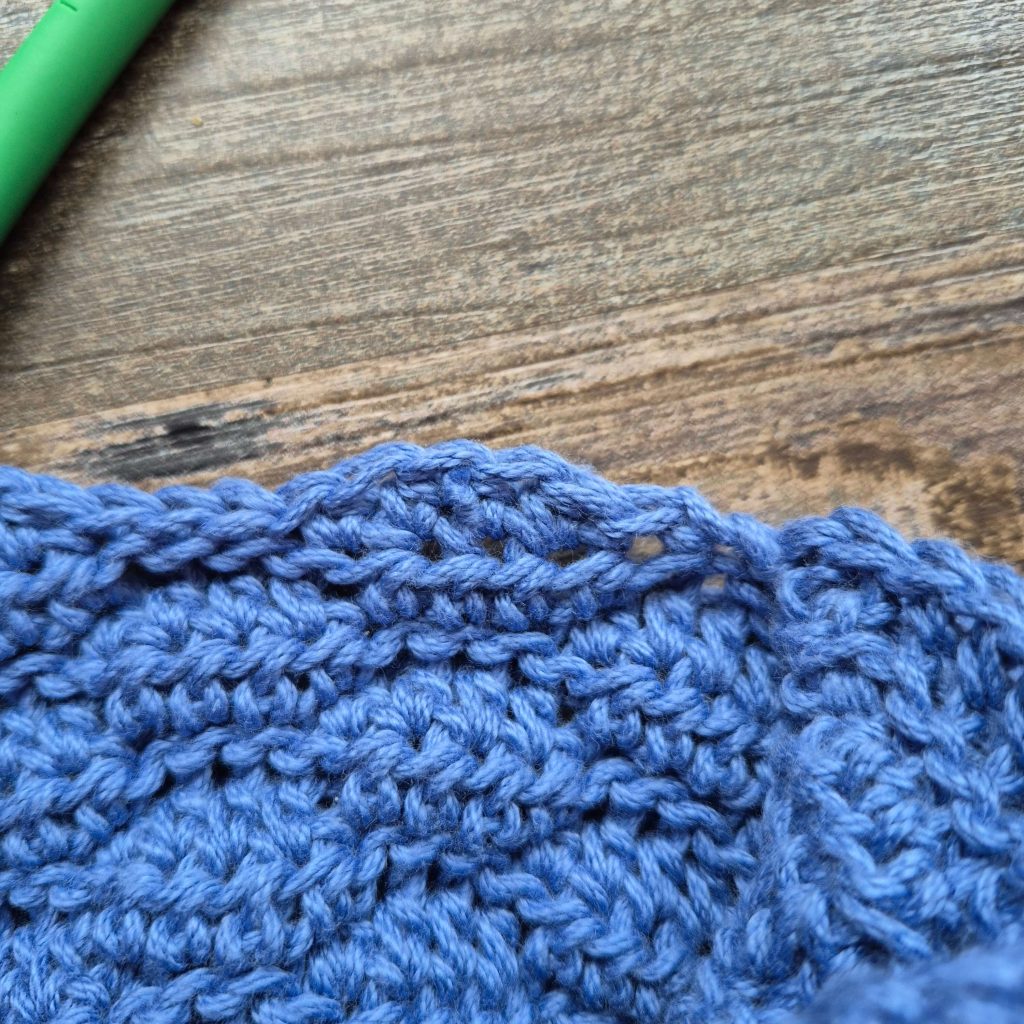
Figure 15
The instructions for this section are given for your chosen sleeve size. Not the body size.
Sleeve sizes: 9 ½” (11 ½”, 13 ⅓”, 15 ⅓”, 17 ¼”, 19”, 21”, 23”). Be sure to only follow the instructions marked with your sleeve size.
For sizes 9 ½”, 13 ⅓”, 17 ¼”, & 21”
- (WS) Ch1. Hdc in 1st 2 sts. Ss in next 4 sts. *Hdc in next 4 sts. Ss in next 4 sts.** Repeat from * to ** until 2 sts left. Hdc in last 2 sts. Ss to join to 1st st. Turn. – 40 (n/a, 56, n/a, 72, n/a, 88, n/a) st
- (RS) Ch1. Sk 1st st for now. Working in blo: Ss in next 2 sts. Hdc in next 4 sts. *Ss in next 4 sts. Hdc in next 4 sts.** Repeat from * to ** until 2 sts left (including your 1st skipped st). Ss in last 2 sts. Ss to join to 1st st. Turn. – 40 (n/a, 56, n/a, 72, n/a, 88, n/a) st
- Ch1. Sk 1st st for now. Ss in next 2 sts. Hdc in next 4 sts. *Ss in next 4 sts. Hdc in next 4 sts.** Repeat from * to ** until 2 sts leftt (including your 1st skipped st). Ss in last 2 sts. Ss to join to 1st st. Turn. – 40 (n/a, 56, n/a, 72, n/a, 88, n/a) st
- Ch1. Sk 1st st for now. Working in blo: Hdc in next 2 sts. Ss in next 4 sts. *Hdc in next 4 sts. Ss in next 4 sts.** Repeat from * to ** until 2 sts left (including your 1st skipped st). Hdc in last 2 sts. Ss to join to 1st st. Turn. – 40 (n/a, 56, n/a, 72, n/a, 88, n/a) st
- Ch1. Sk 1st st for now. Hdc in next 2 sts. Ss in next 4 sts. *Hdc in next 4 sts. Ss in next 4 sts.** Repeat from * to ** until 2 sts left (including your 1st skipped st). Hdc in last 2 sts. Ss to join to 1st st. Turn. – 40 (n/a, 56, n/a, 72, n/a, 88, n/a) st
Repeat rounds 2-5 until you have achieved the desired sleeve length minus 1 ½” (for the cuff). I wanted my sleeves to be 17 ½” long, so I worked a total of 64 sleeve rounds. Be sure to end on an even numbered round, and don’t turn at the end of the last round. Do not bind off. Skip to Cuff instructions below.
For sizes 11 ½”, 15 ⅓”, 19”, & 23”
- (WS) Ch1. Ss in 1st 2 sts. Hdc in next 4 sts. *Ss in next 4 sts. Hdc in next 4 sts.** Repeat from * to ** until 2 sts left. Ss in last 2 sts. Ss to join to 1st st. Turn. – n/a (48, n/a, 64, n/a, 80, n/a, 96) st
- (RS) Ch1. Sk 1st st for now. Working in blo: Hdc in next 2 sts. Ss in next 4 sts. *Hdc in next 4 sts. Ss in next 4 sts.** Repeat from * to ** until 2 sts left (including your 1st skipped st). Hdc in last 2 sts. Ss to join to 1st st. Turn. – n/a (48, n/a, 64, n/a, 80, n/a, 96) st
- Ch1. Sk 1st st for now. Hdc in next 2 sts. Ss in next 4 sts. *Hdc in next 4 sts. Ss in next 4 sts.** Repeat from * to ** until 2 sts left (including your 1st skipped st). Hdc in last 2 sts. Ss to join to 1st st. Turn. – n/a (48, n/a, 64, n/a, 80, n/a, 96) st
- Ch1. Sk 1st st for now. Working in blo: Ss in next 2 sts. Hdc in next 4 sts. *Ss in next 4 sts. Hdc in next 4 sts.** Repeat from * to ** until 2 sts left (including your 1st skipped st). Ss in last 2 sts. Ss to join to 1st st. Turn. – n/a (48, n/a, 64, n/a, 80, n/a, 96) st
- Ch1. Sk 1st st for now. Ss in next 2 sts. Hdc in next 4 sts. *Ss in next 4 sts. Hdc in next 4 sts.** Repeat from * to ** until 2 sts left (including your 1st skipped st). Ss in last 2 sts. Ss to join to 1st st. Turn. – n/a (48, n/a, 64, n/a, 80, n/a, 96) st
Repeat rounds 2-5 until you have achieved the desired sleeve length minus 1 ½” (for the cuff). I wanted my sleeves to be 17 ½” long, so I worked a total of 64 sleeve rounds. Be sure to end on an even numbered round, and don’t turn at the end of the last round. Do not bind off. Work Cuff instructions below.
Cuff
We will now create the ribbed cuff in the same manner that we made the bottom trim. First, we add a single crochet border to the sleeve, decreasing to make the cuff a bit smaller. Then, we will work slip stitch short rows off of the single crochet border. Begin with the right side facing you.
Sc Border
- (RS) Ch1. Sc2tog around. Ss to join to 1st st. – 20 (24, 28, 32, 36, 40, 44, 48)) st
Ribbed Edge
- (RS) Ch10. Sk 1st ch, ss in back hump of 2nd and each ch across. Ss into next unworked sc of bottom trim. Turn. – 10 ss
- (WS) Sk 1st ss. Ss in blo of next 9 ss. Turn. – 9 ss
- (RS) Ch1. Ss in blo of 1st 9 ss. Ss to next unworked st of bottom trim. Turn. – 10 ss
Repeat rows 2-3 around the sleeve until all sc sts on sleeve are worked, ending with a repeat of row 3. With RS facing you, ss the ends of the trim together through the flo of the 1st row and the blo of the last row. Bind off.
Neck Trim
The neck is finished with a simple single crochet and slip stitch border. I have given you instructions below to help you work the neck, but what really matters is that the neckline lays flat with no puckering or waviness. If you need to space your stitches differently, that is ok. Do whatever works for you. Begin with the RS facing you. Join your yarn anywhere along the back of the neck.
- Ch1. Sc around the neck in the following manner:
- Sc along the back of the neck, working 1 sc for every 2 ss rows, and 3sc for every 2 hdc rows.
- Sc down the front of the V working 1 sc into the top of each st and 1 sc into the area between each set of 2 sts (I worked mine into the beginning ch1 of each row).
- Sc up the other side of the V in the same manner.
- Once you have worked all the way around the neckline, ss to join to 1st st.
- Ch1. Ss in blo of each st around. Ss to join to 1st st. Bind off.
Weave in your ends, and you’re done!
I can’t wait to see your take on the Dulcis Pullover. Be sure to share your finished photos over on Ravelry so we can all admire your beautiful makes, colour choices, and cozy new sweaters.
If you’d like a little heads-up whenever I release new crochet patterns and tutorials, come hang out with me on Facebook and Instagram. I share sneak peeks, behind-the-scenes design moments, and all the cozy crochet goodness over there.
And if you enjoyed making this Free Crochet Sweater Pattern: The Dulcis Pullover, be sure to explore my other crochet patterns for more textured, wearable designs you’ll love stitching up next.
Free Crochet Sweater Pattern: The Dulcis Pullover (Lightweight & Textured)
And until next time… Happy Hooking! 😉