
Something Beautiful – Free Crochet Top Pattern
The Something Beautiful – Free Crochet Top Pattern is copyrighted by I Need It Crochet. You may not copy, share, change, or sell the pattern itself. Also, you may not claim this pattern as your own. All pictures contained in this pattern fall under the copyright and may not be used.
Finished items made from the Something Beautiful – Free Crochet Top Pattern belong to you, and you may do what you wish with them. If you choose to sell them on Etsy, I would very much appreciate it if you credited me as the pattern designer.


Or… Just scroll down to see it for free!
From the moment I first laid my eyes on Malabrigo Yarns Mechita, I have been in awe of this yarn. I knew that someday I would make something beautiful with it. But what? At the time, I had no idea and inspiration was not forthcoming. And so it sat for a long time.
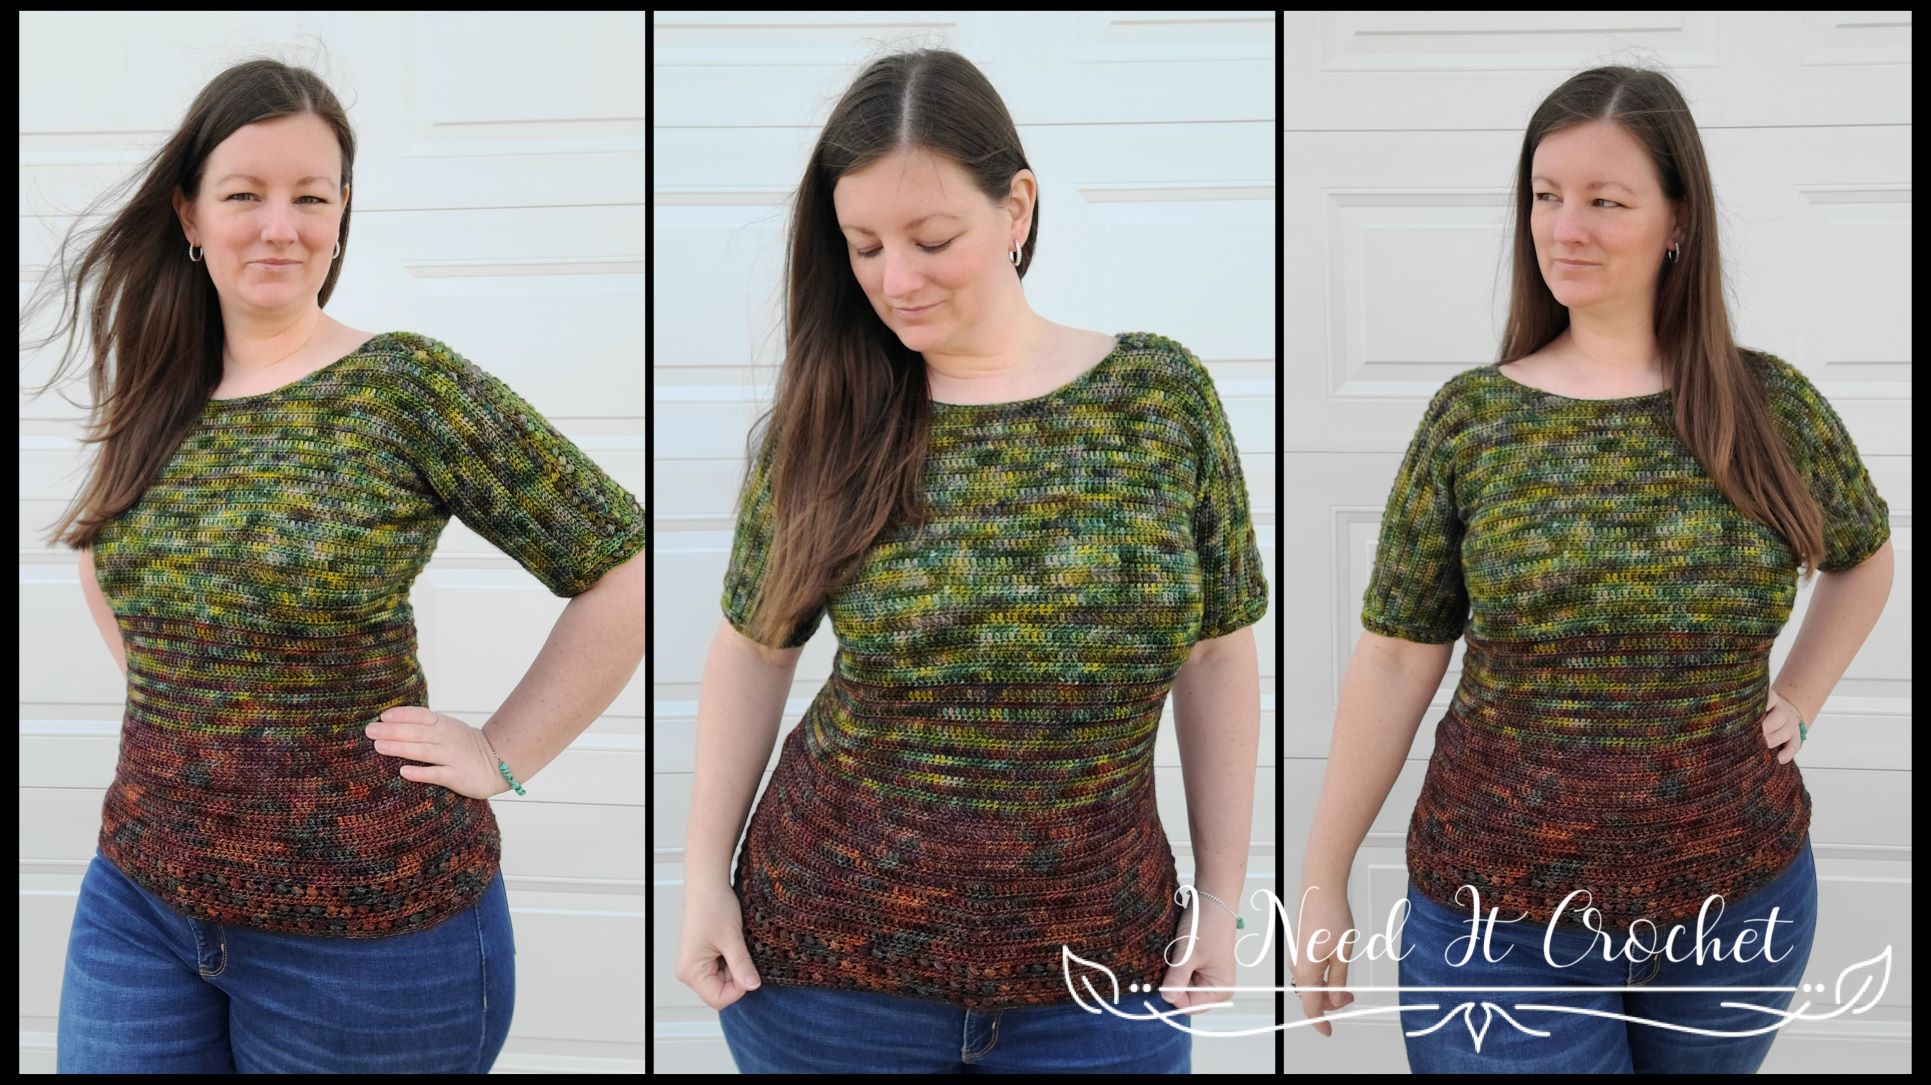
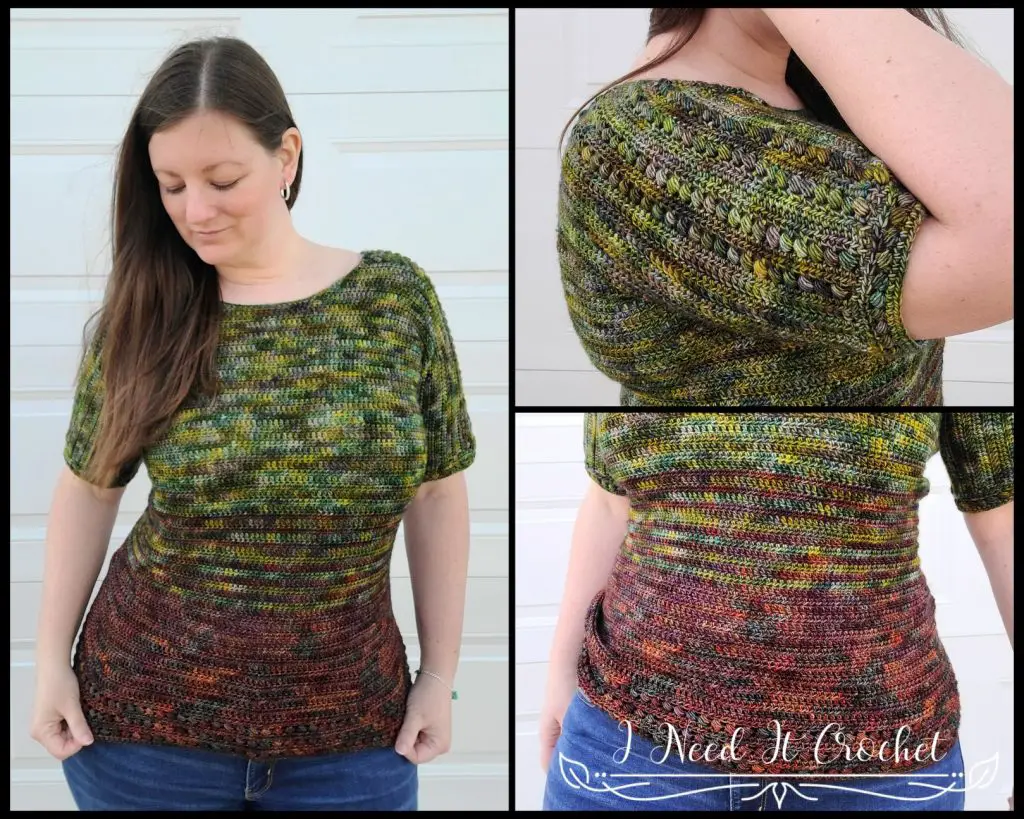
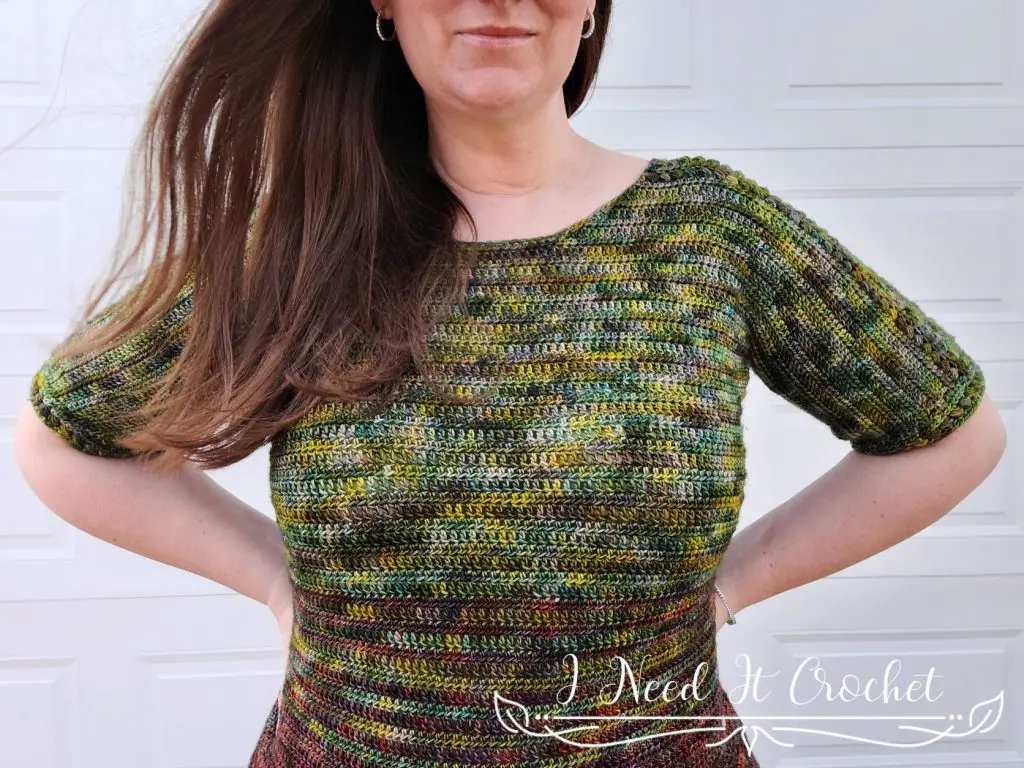
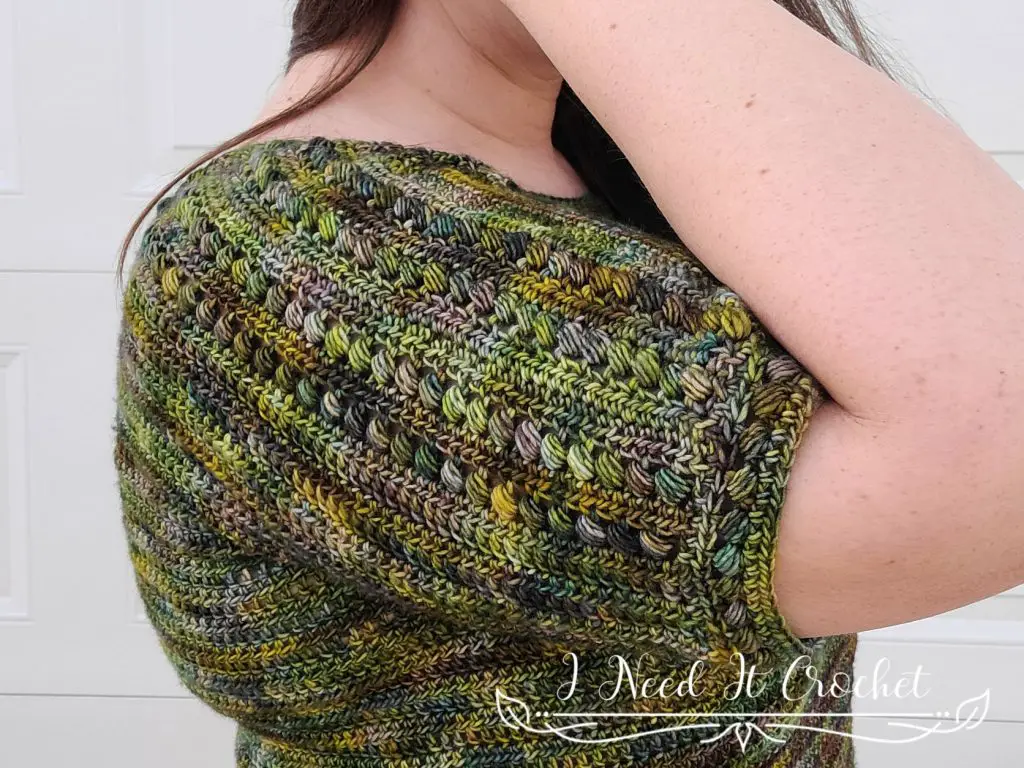
I finally decided on a simple design with a pretty bead stitch detail. The alternating double crochet and half double crochet rows really show off the colours of the yarn while the bead stitch detailing adds a touch of elegance. This tee looks beautiful dressed up or down, making it a wardrobe staple you’ll come back to again and again.
How to crochet the Something Beautiful – Free Crochet Top Pattern
Finished Sizes:
Instructions given to fit size X-small; changes for small, medium, large, X-large, 2X-large, 3X-large, 4X-large and 5X-large are in ()
XS (S, M, L, XL, 2XL, 3XL, 4XL, 5XL)
Bust Circumference: 28” (32”, 36”, 40”, 44”, 48”, 52”, 56”, 60”)
Finished Length: Customizable.Arm Circumference: Customizable.
Abbreviations:
RS = Right Side
WS = Wrong Side
Sk = Skip
St = Stitch
Ss = Slip Stitch
Ch = Chain
Sc = Single Crochet
Hdc = Half Double Crochet
Dc = Double Crochet
Tr = Treble Crochet
Materials:
I used Malabrigo Yarns Mechita, which is a 100% Superwash Merino, #1 Superfine weight yarn.
Any yarn of similar weight would work.
Approximately 1000 (1100, 1200, 1300, 1400, 1500, 1600, 1700, 1800) yds.
4mm Hook
Stitch Markers
Yarn Needle
Scissors
Measuring Tape
Gauge:
See gauge swatch instructions below. Be sure to always check your gauge. It will save you much time and heartache.
Notes:
Ch1 and ch2 at the beginning of a row is never considered a stitch.
Ch3 at the beginning of a row is considered a dc.
Ch4 at the beginning of a row is considered a tr.
A bead stitch counts as 2 stitches. You can find a tutorial for this stitch here.
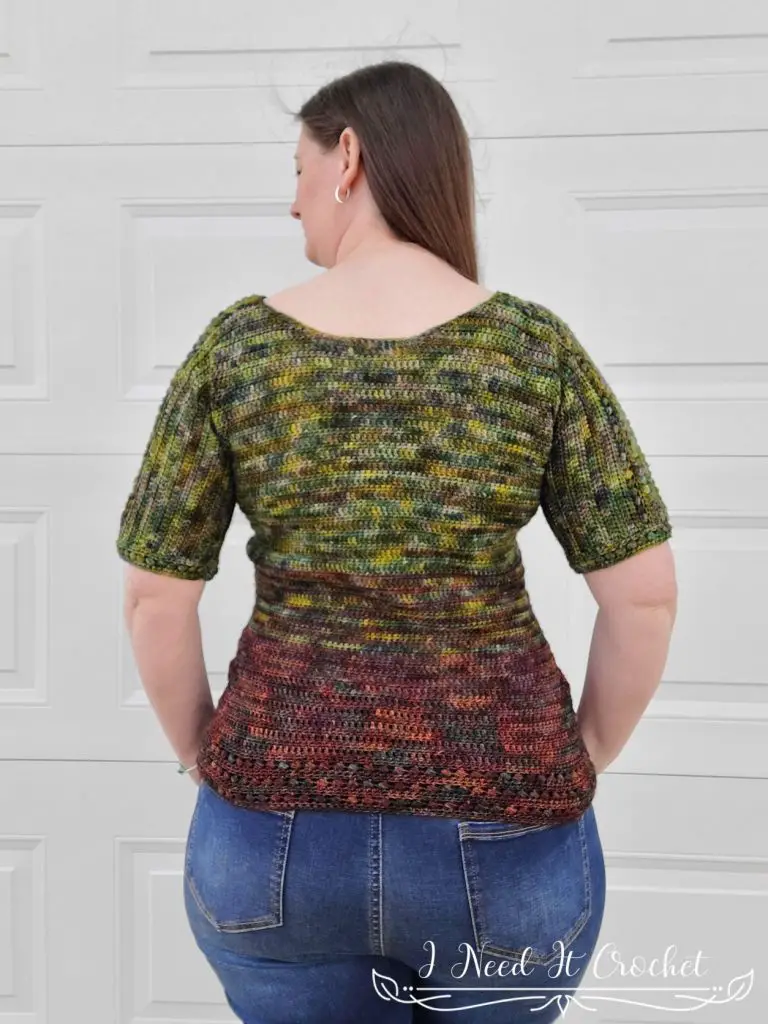
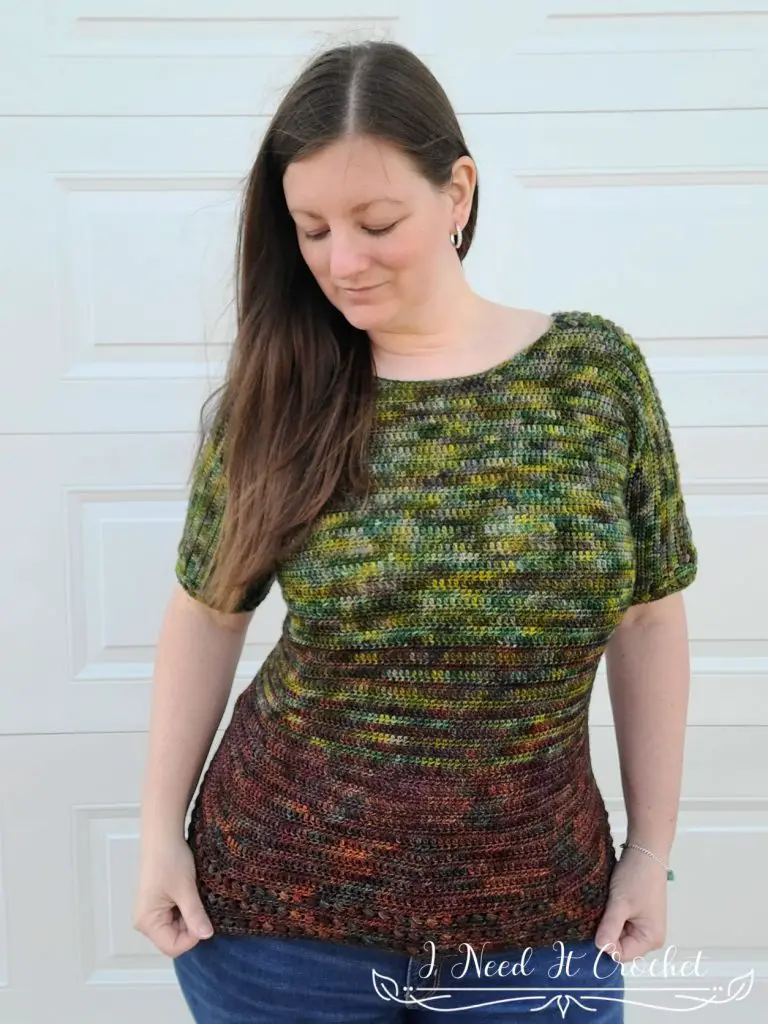
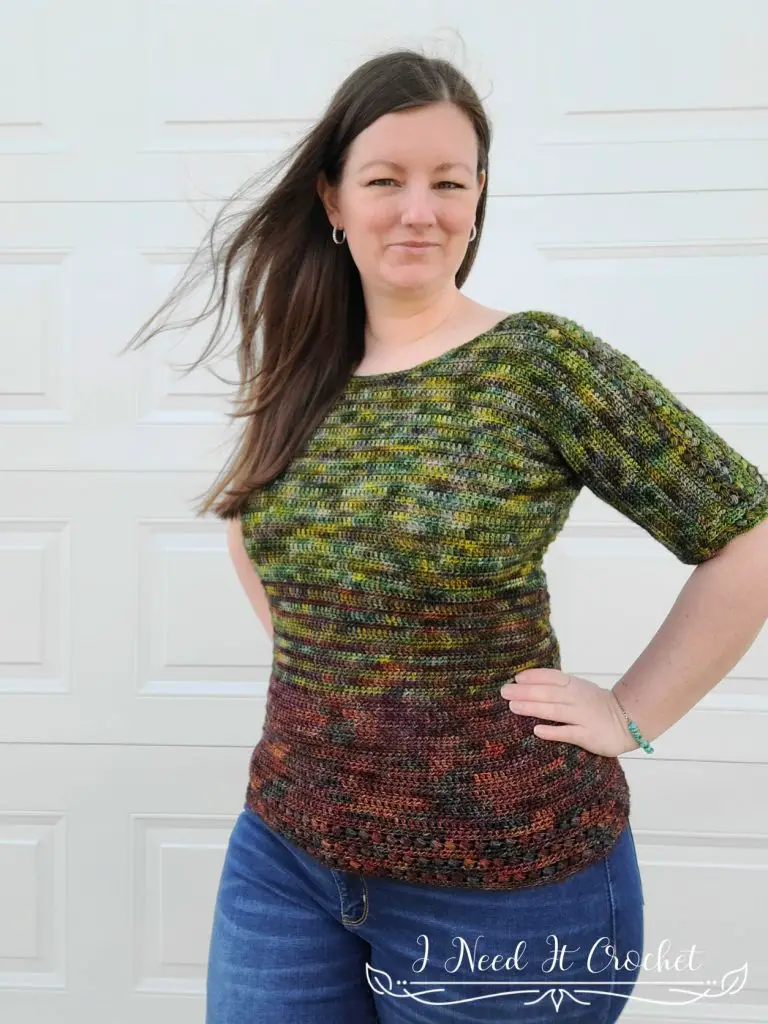
The model above (that’s me) has a 40” bust and is wearing a size L.
Choose your size according to your largest measurement (bust/waist) and how you would like the top to fit. For a close-fitting top, choose the size closest to your largest measurement. For a loose top, choose a size 2-3” larger.
Something Beautiful – Free Crochet Top Pattern
Gauge Swatch
I have provided instructions for two different size gauge swatches. A standard 4” swatch and an 8” swatch. If you are making a plus size top or if you have a tendency to loosen your tension when making larger projects, I recommend you make the larger swatch.
With 4mm hook
- Ch 19 (37). Hdc in 2nd ch from hook and each ch across. Turn. – 18 (36) sts
- Ch3. Dc in next st and each st across. Turn. – 18 (36) sts
- Ch1. Hdc in 1st st and each st across. Turn. – 18 (36) sts
Repeat rows 2 & 3 until you have a total of 14 (28) rows. Your swatch should measure 4” (8”) wide by 4” (8”) tall. If your swatch does not meet gauge, try again with a different size hook. Width is important for this pattern but height is less so. If your width meets gauge but height is a little off, that is fine.
Instructions
This pattern is written to be mostly seamless. There will be only a small amount of sewing at the underarms.
We will begin by creating the right and left front shoulders, working downward until we have achieved the proper arm depth. Then, we will rejoin at the bottom of the first row and work the left and right back shoulders, working again to arm depth. From there, we will sew the underarms and finish off the sleeve cuffs and neckline. Finally, we will work the lower body in the round.
Since I made my top with 2 colours, I will also give instructions on when to switch colours within the pattern. MC = Main Colour. CC = Contrast Colour.
Upper Front (MC)
First we will create the top of the right front shoulder and sleeve.
With 4mm hook (or hook used to obtain gauge)
- (WS) Ch 47 (53, 57, 61, 65, 69, 73, 79, 83). Hdc in bottom bar of 2nd ch from hook and each ch across. Turn. – 46 (52, 56, 60, 64, 68, 72, 78, 82) st
- (RS) Ch3. *Bd in next st. Sk1 st.** Repeat from * to ** until there is only 1 st left unworked. Dc in last st. Turn. – 46 (52, 56, 60, 64, 68, 72, 78, 82) st
- Ch1. Hdc in 1st st and each st across. Turn. – 46 (52, 56, 60, 64, 68, 72, 78, 82) st
- Repeat row 2. – 46 (52, 56, 60, 64, 68, 72, 78, 82) st
- Repeat row 3. – 46 (52, 56, 60, 64, 68, 72, 78, 82) st
Measurement Check: Your project should now be approximately 10” (11 ¼”, 12”, 13”, 14”, 14 ¾”, 15 ½”, 17”, 17 ¾”) wide. If your gauge is off, you may want to try again with a different sized hook.
- Ch3. Dc in each st until there is only 1 left unworked. (2dc, tr) in last st. Turn. – 48 (54, 58, 62, 66, 70, 74, 80, 84) st
- (Ch3, 2hdc) in 1st st. Hdc in next st and each st across. Turn. – 50 (56, 60, 64, 68, 72, 76, 82, 86) st
- Repeat row 6. – 52 (58, 62, 66, 70, 74, 78, 84, 88) st
- Repeat row 7. – 54 (60, 64, 68, 72, 76, 80, 86, 90) st
- Ch3. Dc in next st and each st across until there is only 1 st left unworked. (2dc, tr) in last st. Ch 11 (10, 11, 14, 16, 19, 20, 19, 20). Bind off. – 56 (62, 66, 70, 74, 78, 82, 88, 92) + 11 (10, 11, 14, 16, 19, 20, 19, 20) ch st
Note: At this point, you may notice that the straight side of your project may be leaning a bit to one side. This is a result of the alternating rows of dc and hdc and is normal. I found that mine straightened out once I added the cuffs. Wet blocking your project will help, but I wouldn’t do any blocking until we are finished the Upper Body. I will prompt you further on in the pattern where I think it would be best to do any wet blocking.
Your right front shoulder piece should now look similar to Figure 1 below.

Figure 1
Now we will create the top of the left front shoulder and sleeve.
- (WS) Ch 47 (53, 57, 61, 65, 69, 73, 79, 83). Hdc in bottom bar of 2nd ch from hook and each ch across. Turn. – 46 (52, 56, 60, 64, 68, 72, 78, 82) st
- (RS) Ch3. *Bd in next st. Sk1 st.** Repeat from * to ** until there is only 1 st left unworked. Dc in last st. Turn. – 46 (52, 56, 60, 64, 68, 72, 78, 82) st
- Ch1. Hdc in 1st st and each st across. Turn. – 46 (52, 56, 60, 64, 68, 72, 78, 82) st
- Repeat row 2. – 46 (52, 56, 60, 64, 68, 72, 78, 82) st
- Repeat row 3. – 46 (52, 56, 60, 64, 68, 72, 78, 82) st
- (Ch4, 2dc) in 1st st. Dc in next st and each st across. Turn. – 48 (54, 58, 62, 66, 70, 74, 80, 84) st
- Ch1. Hdc in 1st st and each st across until there is only 1 st left unworked. (2hdc, dc) in last st. Turn. – 50 (56, 60, 64, 68, 72, 76, 82, 86) st
- Repeat row 6. – 52 (58, 62, 66, 70, 74, 78, 84, 88) st
- Repeat row 7. – 54 (60, 64, 68, 72, 76, 80, 86, 90) st
- Repeat row 6. Do not bind off. – 56 (62, 66, 70, 74, 78, 82, 88, 92) st
Your left front shoulder piece should now look like Figure 2. We will now attach the right shoulder piece to the left shoulder piece.
On the right shoulder piece, use the yarn at the end of your last chain to attach to the first st of the last row of your left shoulder piece, as pictured in Figures 3 & 4. Your project should now look like Figure 5.
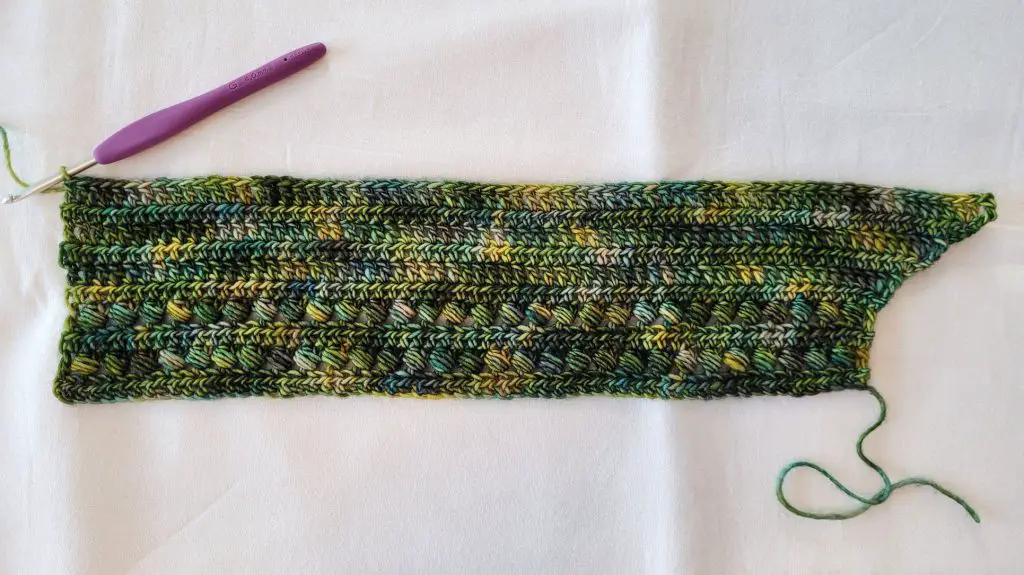
Figure 2
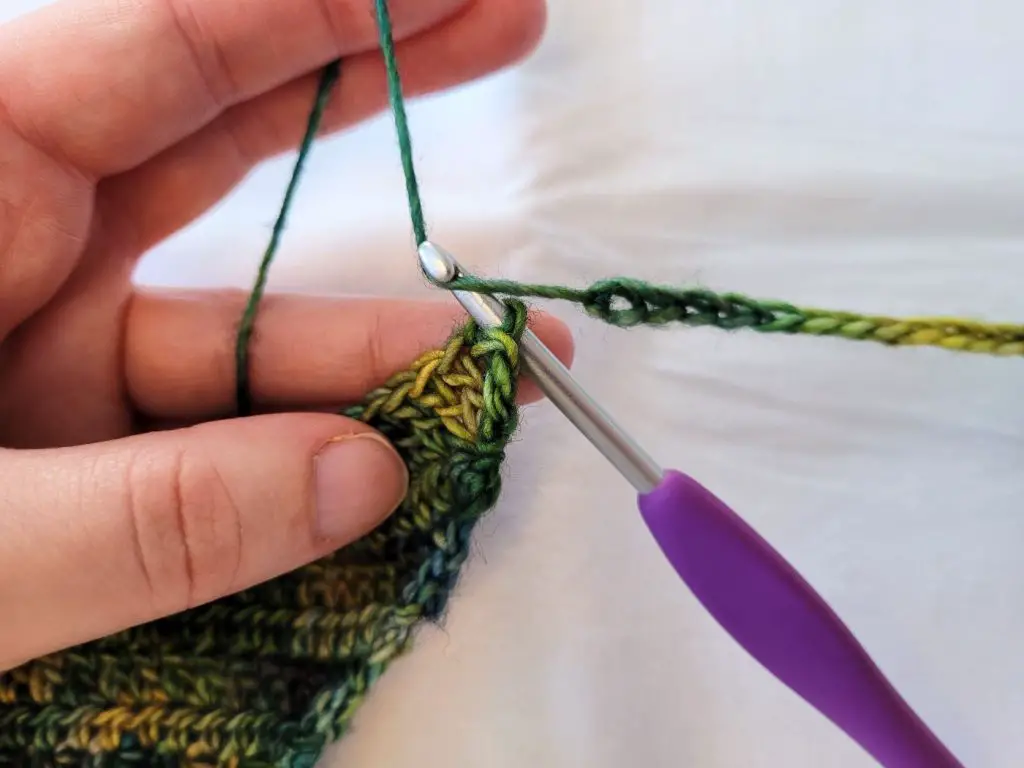
Figure 3

Figure 4
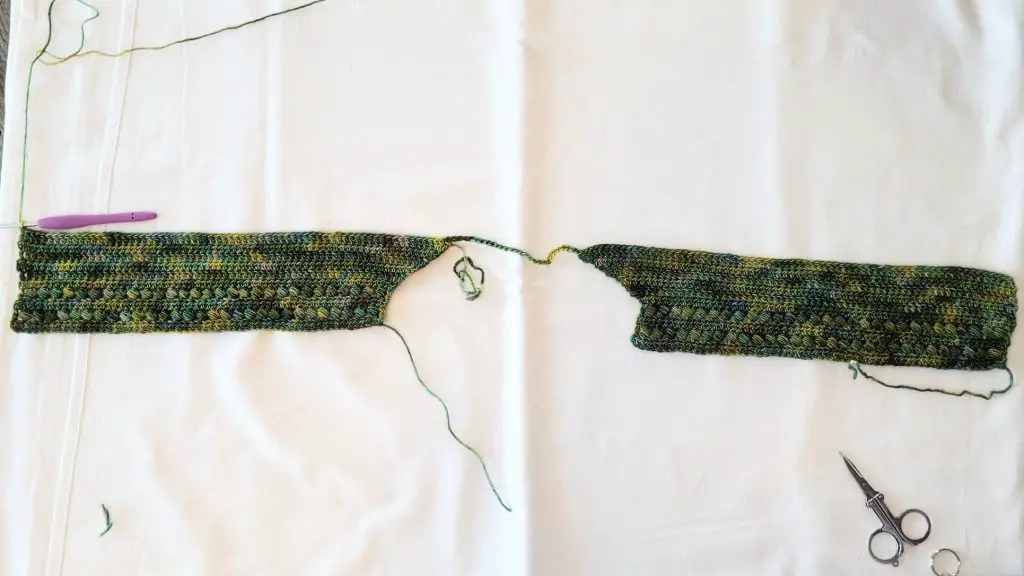
Figure 5
We will now add some height to the upper front. Place your hook back into the loop of the last stitch you left off on when completing your left front shoulder piece (where you see the hook in Figures 2 & 5). Turn so that the wrong side is facing you.
- Ch1. Hdc in 1st st and each st and ch across. Turn. – 123 (134, 143, 154, 164, 175, 184, 195, 204) st
- Ch3. Dc in next st and each st across. Turn. – 123 (134, 143, 154, 164, 175, 184, 195, 204) st
- Ch1. Hdc in 1st st and each st across. Turn. – 123 (134, 143, 154, 164, 175, 184, 195, 204) st
Repeat rows 12 & 13 until the height of your project equals half the circumference of your desired sleeve size. For example, if you want your top to have 12” sleeves, you would repeat rows 12 & 13 until your project is 6” high. Be sure to end on a repeat of row 13. Bind off, leaving an extra long tail for sewing the underarm seam. Your project should now look like Figure 6 and be approximately 26 ¾” (29”, 31”, 33 ½”, 35 ½”, 38”, 40”, 42 ½”, 44 ½”) wide.
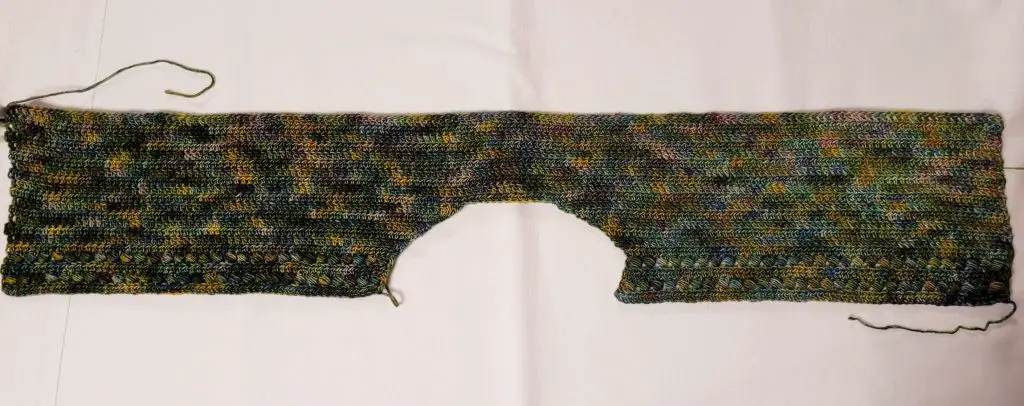
Figure 6
Something Beautiful – Free Crochet Top Pattern
Upper Back (MC)
We will now build the upper back, working off of the upper front so we don’t have to seam the shoulders. Lay out your project with the wrong side facing you and the first row facing up. Join your yarn in the first ch of the left shoulder as pictured in Figure 7.
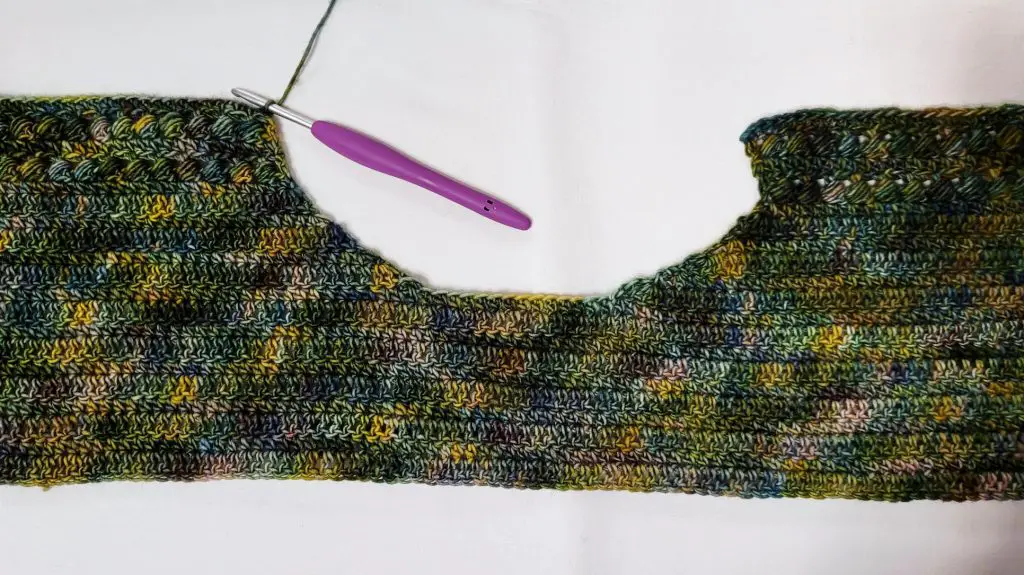
Figure 7
- (WS) Ch1. Hdc in 1st ch and each ch across. Turn. – 46 (52, 56, 60, 64, 68, 72, 78, 82) st
- (RS) Ch3. *Bd in next st. Sk1 st.** Repeat from * to ** until there is only 1 st left unworked. Dc in last st. Turn. – 46 (52, 56, 60, 64, 68, 72, 78, 82) st
- Ch1. Hdc in 1st st and each st across. Turn. – 46 (52, 56, 60, 64, 68, 72, 78, 82) st
- Repeat row 2. – 46 (52, 56, 60, 64, 68, 72, 78, 82) st
- Repeat row 3. – 46 (52, 56, 60, 64, 68, 72, 78, 82) st
- Ch3. Dc in each st until there is only 1 left unworked. (2dc, tr) in last st. Turn. – 48 (54, 58, 62, 66, 70, 74, 80, 84) st
- (Ch3, 2hdc) in 1st st. Hdc in next st and each st across. Turn. – 50 (56, 60, 64, 68, 72, 76, 82, 86) st
- Repeat row 6. – 52 (58, 62, 66, 70, 74, 78, 84, 88) st
- Repeat row 7. – 54 (60, 64, 68, 72, 76, 80, 86, 90) st
- Ch3. Dc in next st and each st across until there is only 1 st left unworked. (2dc, tr) in last st. Ch 11 (10, 11, 14, 16, 19, 20, 19, 20). Bind off. – 56 (62, 66, 70, 74, 78, 82, 88, 92) + 11 (10, 11, 14, 16, 19, 20, 19, 20) ch st
Your project should now look like Figure 8. Lay out your project with the wrong side facing you. Join your yarn in the 1st ch of the right shoulder as pictured in Figure 9.
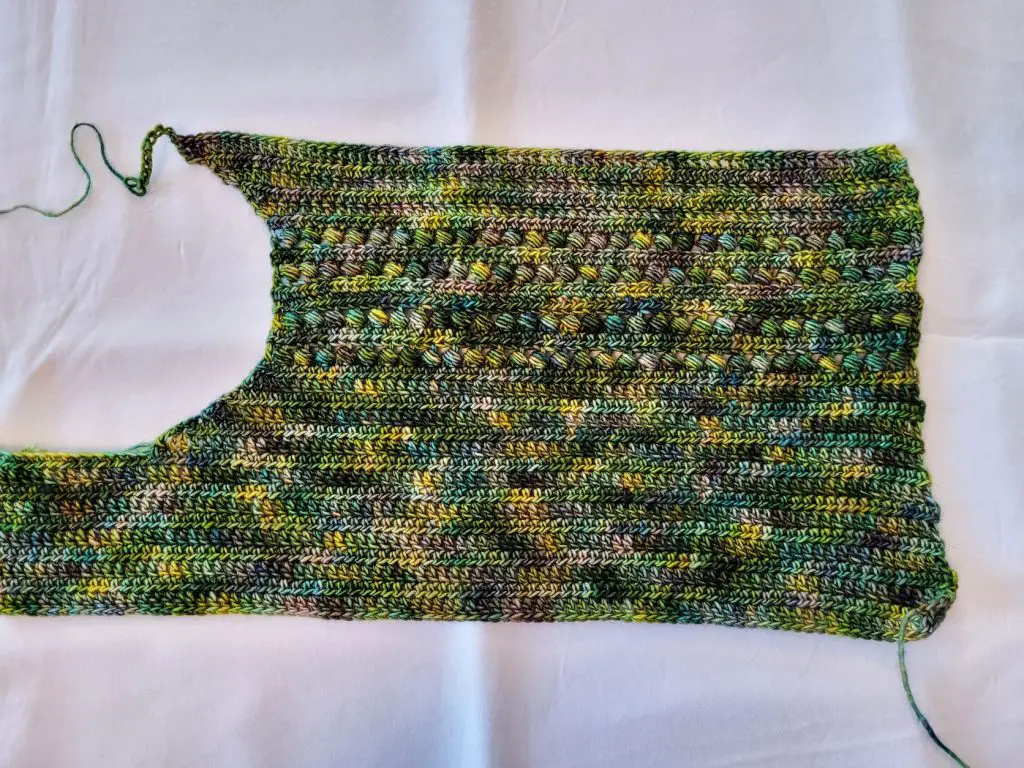
Figure 8
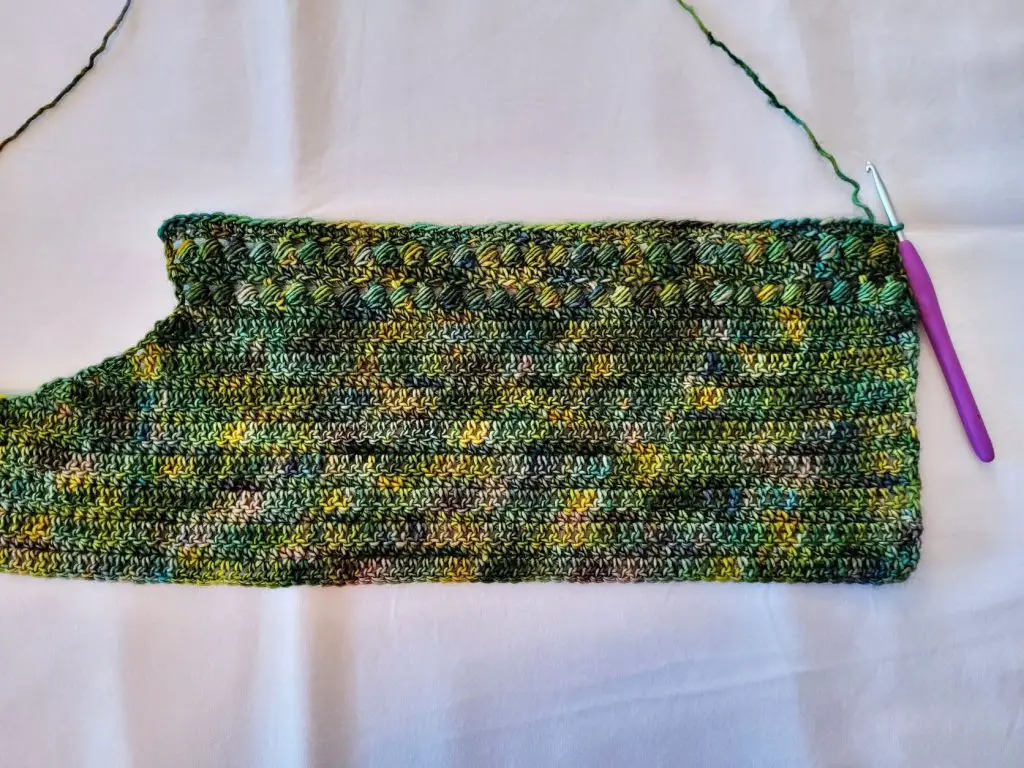
Figure 9
- (WS) Ch1. Hdc in 1st ch and each ch across. Turn. – 46 (52, 56, 60, 64, 68, 72, 78, 82) st
- (RS) Ch3. *Bd in next st. Sk1 st.** Repeat from * to ** until there is only 1 st left unworked. Dc in last st. Turn. – 46 (52, 56, 60, 64, 68, 72, 78, 82) st
- Ch1. Hdc in 1st st and each st across. Turn. – 46 (52, 56, 60, 64, 68, 72, 78, 82) st
- Repeat row 2. – 46 (52, 56, 60, 64, 68, 72, 78, 82) st
- Repeat row 3. – 46 (52, 56, 60, 64, 68, 72, 78, 82) st
- (Ch4, 2dc) in 1st st. Dc in next st and each st across. Turn. – 48 (54, 58, 62, 66, 70, 74, 80, 84) st
- Ch1. Hdc in 1st st and each st across until there is only 1 st left unworked. (2hdc, dc) in last st. Turn. – 50 (56, 60, 64, 68, 72, 76, 82, 86) st
- Repeat row 6. – 52 (58, 62, 66, 70, 74, 78, 84, 88) st
- Repeat row 7. – 54 (60, 64, 68, 72, 76, 80, 86, 90) st
- Repeat row 6. Do not bind off. – 56 (62, 66, 70, 74, 78, 82, 88, 92) st
Join the chain from the left shoulder to the 1st st of the last row of the right shoulder, just as you did when working the Upper Front. Your project should now look like Figure 10.
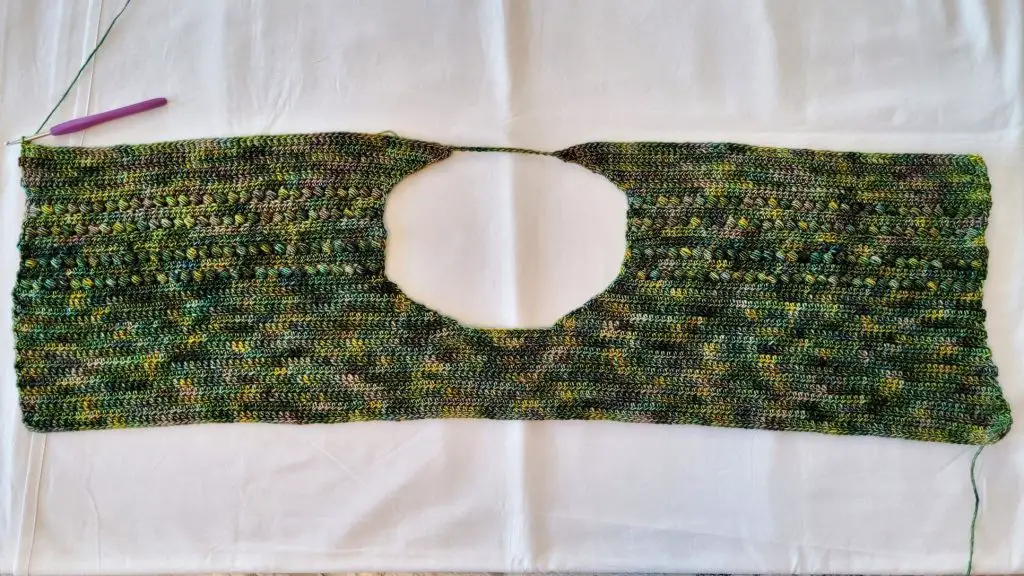
Figure 10
Place your hook back into the loop from the last st you worked and turn so that the wrong side is facing you.
- Ch1. Hdc in 1st st and each st and ch across. Turn. – 123 (134, 143, 154, 164, 175, 184, 195, 204) st
- Ch3. Dc in next st and each st across. Turn. – 123 (134, 143, 154, 164, 175, 184, 195, 204) st
- Ch1. Hdc in 1st st and each st across. Turn. – 123 (134, 143, 154, 164, 175, 184, 195, 204) st
Repeat rows 12 & 13 until you have worked the same amount of rows as you did for the Upper front. Bind off, leaving a long tail to seam the underarm. Your project should now look like Figure 11.
If you would like to wet block your project, this would be a good time to do that. Be careful that you don’t tangle your ends or felt your stitches.
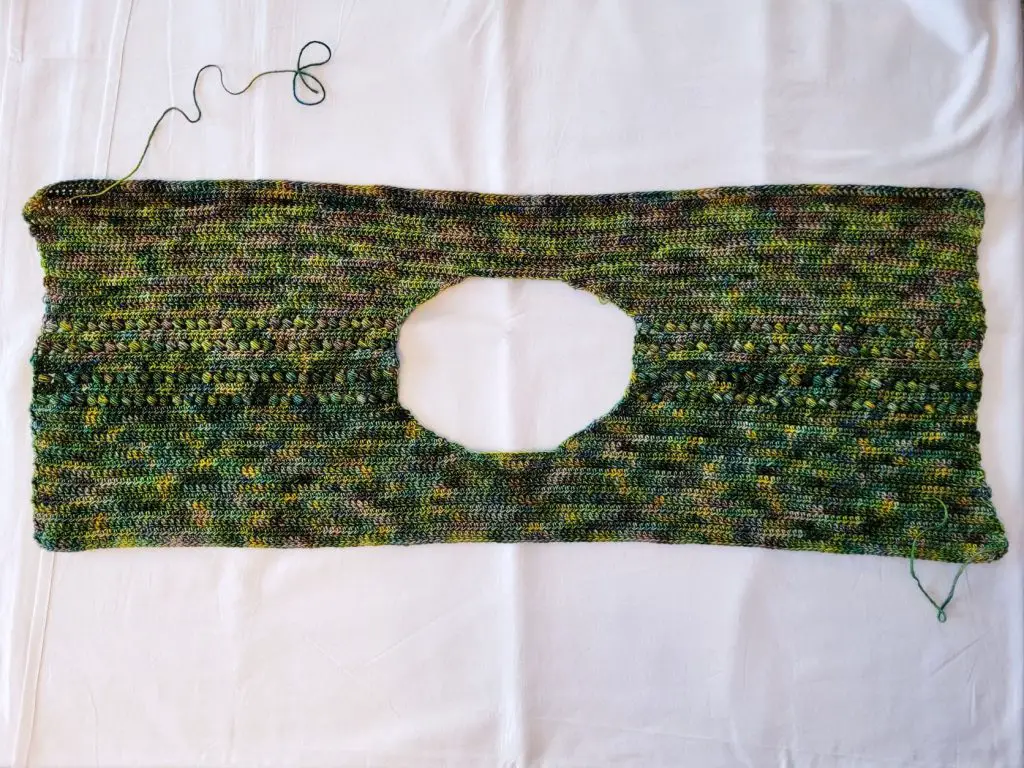
Figure 11
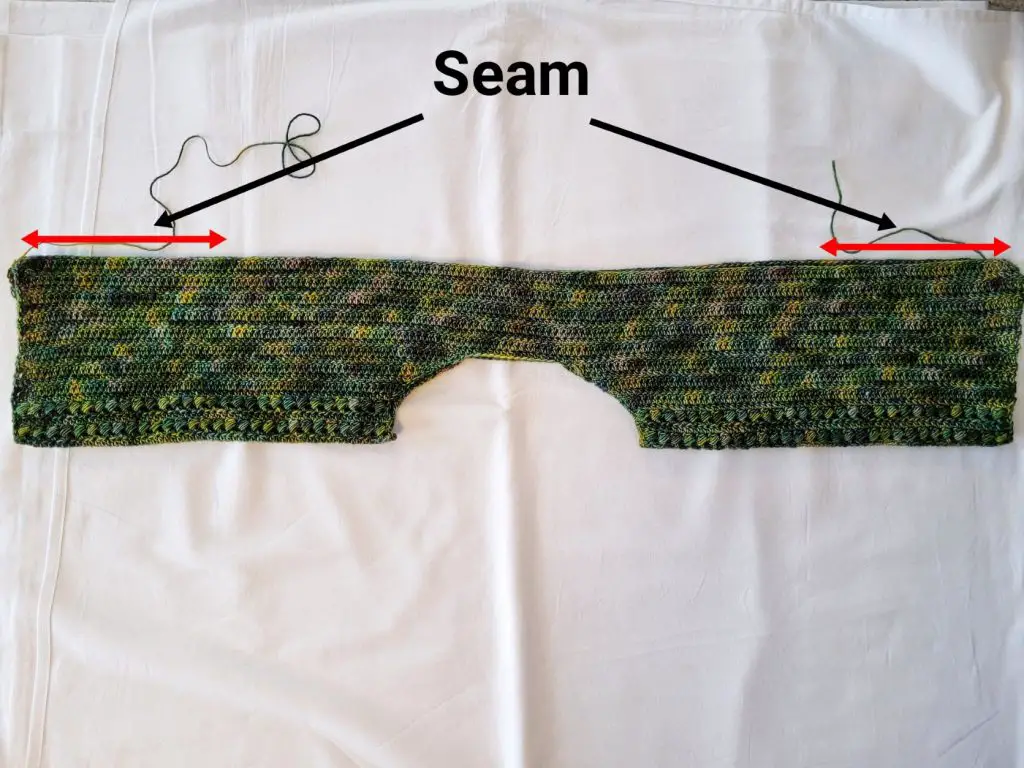
Figure 12
Something Beautiful – Free Crochet Top Pattern
Underarm Seaming (MC)
We will now seam the underarms. Begin by folding your project in half with the wrong side out as pictured in Figure 12 (above). Whip stitch the underarms closed using 29 (30, 30, 31, 31, 32, 32, 33, 33) sts from each end. To make this easier, you can use locking stitch markers to hold the 2 layers together. You should have 130 (148, 166, 184, 204, 222, 240, 258, 276) sts open in the middle.
Cuffs (MC)
Since I used two different colours to make my top, I wanted to finish off the cuffs and neckline before moving on to the lower body. The sleeves are worked in the round, but we will still turn at the end of each round.
With the wrong side of your project facing you, join your yarn near the bottom of the sleeve.
- Ch1. Hdc evenly around the sleeve opening. To do this, I placed 1 hdc in the end of each hdc row and 2 hdc in the end of each dc row. If you notice that this is making the sleeve edge look pinched, then pull it out and try again placing *1 hdc in the 1st hdc row, 2 hdc in the next dc row, 2 hdc in the next hdc row, then 2 hdc in the next dc row. ** Repeating from * to ** around. You want to end up with an even number of sts, and you want the row to look straight and even. Ss to join to 1st st. Turn.
- Ch2. Bd in next st. *Sk1 st. Bd in next st.** Repeat from * to ** around. Ss to join to 1st st. Turn.
- Ch1. Hdc in 1st st and each st around. Ss to join to 1st st. Bind off.
Neckline (MC)
With the right side of your project facing you, join near one shoulder.
- Ch1. Sc around the neck opening in the following manner:
- Place 1 sc in the end of each hdc.
- Place 2 sc in the end of each dc.
- Place 3sc in the end of each tr.
- Place 1 sc in each ch.
- 102 (100, 102, 108, 112, 118, 120, 118, 120) st
Lower Body (MC + CC)
The lower body is worked in the round, and we will still turn at the end of each round. I have provided instructions for changing colours to make your top look like the one pictured. Of course, following my colour changes is optional! You can make your top all one colour, or lots of different colours. Have fun with it!
With the RS facing you, join your yarn (MC) near one of the underarm seams.
- (RS) Ch3. Dc in next st and each st around. Ss to join to 1st st. Turn. – 130 (148, 166, 184, 204, 222, 240, 258, 276) st
- (WS) Ch1. Hdc in 1st st and each st around. Ss to join to 1st st. Turn. – 130 (148, 166, 184, 204, 222, 240, 258, 276) st
If you are planning to add waist shaping: Repeat rounds 1 and 2 until your top is long enough to reach the bottom of your bustline, ending with a repeat of round 1. This can be different for many different people. To make my size large, I worked until my top was 12” long from shoulder to bottom. Once you have reached the bottom of your bustline, skip the instructions below and proceed to the Waist Shaping section.
If you are not doing any waist shaping: Repeat rounds 1 and 2 until your top has reached approximately 12” in length, ending with a repeat of round 1. This is where I began changing colours for my top. If you are not following my colour changes, just keep repeating rounds 1 & 2 until your top is the desired length, minus 2”. If you are following my colour changes, I have outlined them below.
- (CC) Ch1. Hdc in 1st st and each st around. Ss to join to 1st st. Turn. – 130 (148, 166, 184, 204, 222, 240, 258, 276) st
- (MC) Ch3. dc in next st and each st around. Ss to join to 1st st. Turn. – 130 (148, 166, 184, 204, 222, 240, 258, 276) st
- (CC) Repeat row 1.
- (MC) Repeat row 2.
- (CC) Repeat row 1.
- (MC) Repeat row 2.
- (MC) Repeat row 1.
- (CC) Repeat row 2.
- (MC) Repeat row 1.
- (CC) Repeat row 2.
- (MC) Repeat row 1.
- (CC) Repeat row 2.
- (MC) Repeat row 1.
- (CC) Repeat row 2.
Bind off your MC and keep repeating rounds 1 & 2 in your CC until you have achieved the desired length, minus 2”. Be sure to finish on a repeat of round 1. Then skip the Waist Shaping section and proceed to the Bottom Trim section. Do not bind off your CC.
Something Beautiful – Free Crochet Top Pattern
Waist Shaping (MC & CC)
Here I have some very simple instructions for decreasing to give the waist a little bit of shape. How much waist shaping you want to do, depends on how much difference there is between your bust and your waist. Each 4 rounds of decreases will decrease the width of your top by about 1”. I did 12 rounds of decreases, so that is what I have written below. I have also marked where I changed colours for my top.
Begin by counting 65 (74, 83, 92, 102, 111, 120, 129, 138) sts and placing a st marker in the last st. This will help be a guide for your 2nd decrease in each round. Switch to your CC.
- (CC) Ch1. Hdc2tog. Hdc in each st until you come to your st marker. Hdc2tog. (Remember to move your st marker up to your current round.) Hdc in each st to the end. Ss to join to 1st st. Turn. – 128 (146, 164, 182, 202, 220, 238, 256, 274) st
- (MC) Ch2, dc in next st (counts as dc2tog). Dc in each st until you come to your st marker. Dc2tog. (Remember to move your st marker up to your current round.) Dc in each st to the end. Ss to join to 1st st. Turn. – 126 (144, 162, 180, 200, 218, 236, 254, 272) st
- (CC) Repeat round 1. – 124 (142, 160, 178, 198, 216, 234, 252, 270) st
- (MC) Repeat round 2. – 122 (140, 158, 176, 196, 214, 232, 250, 268) st
- (CC) Repeat round 1. – 120 (138, 156, 174, 194, 212, 230, 248, 266) st
- (MC) Repeat round 2. – 118 (136, 154, 172, 192, 210, 228, 246, 264) st
- (MC) Repeat round 1. – 116 (134, 152, 170, 190, 208, 226, 244, 262) st
- (CC) Repeat round 2. – 114 (132, 150, 168, 188, 206, 224, 242, 260) st
- (MC) Repeat round 1. – 112 (130, 148, 166, 186, 204, 222, 240, 258) st
- (CC) Repeat round 2. – 110 (128, 146, 164, 184, 202, 220, 238, 256) st
- (MC) Repeat round 1. – 108 (126, 144, 162, 182, 200, 218, 236, 254) st
- (CC) Repeat round 2. – 106 (124, 142, 160, 180, 198, 216, 234, 252) st
- (MC) Ch1. Hdc in 1st st and each st around. Remember to move your st marker up to your current round as you work. Ss to join to 1st st. Turn. – 106 (124, 142, 160, 180, 198, 216, 234, 252) st
- (CC) Ch3. Dc in next st and each st around. Remember to move your st marker up to your current round as you work. Ss to join to 1st st. Turn. – 106 (124, 142, 160, 180, 198, 216, 234, 252) st
Bind off your MC and keep repeating rounds 13 & 14 in your CC until you have a total of 18 rounds.
- Ch1. Hdc in 1st st and each st until you come to your st marker. 2hdc in next st. (Remember to move your st marker up to your current round.) Hdc in next st and each st around. Ss to join to 1st st. Turn. – 108 (126, 144, 162, 182, 200, 218, 236, 254) st
- Ch3. Dc in next st and each st until you come to your s marker. 2dc in next st. (Remember to move your st marker up to your current round.) Dc in next st and each st around. Ss to join to 1st st. Turn. – 110 (128, 146, 164, 184, 202, 220, 238, 256) st
- Repeat Round 19. – 112 (130, 148, 166, 186, 204, 222, 240, 258) st
- Repeat Round 20. – 114 (132, 150, 168, 188, 206, 224, 242, 260) st
- Repeat Round 19. – 116 (134, 152, 170, 190, 208, 226, 244, 262) st
- Repeat Round 20. – 118 (136, 154, 172, 192, 210, 228, 246, 264) st
- Repeat Round 19. – 120 (138, 156, 174, 194, 212, 230, 248, 266) st
- Repeat Round 20. – 122 (140, 158, 176, 196, 214, 232, 250, 268) st
- Repeat Round 19. – 124 (142, 160, 178, 198, 216, 234, 252, 270) st
- Repeat Round 20. – 126 (144, 162, 180, 200, 218, 236, 254, 272) st
- Repeat Round 19. – 128 (146, 164, 182, 202, 220, 238, 256, 274) st
- Repeat Round 20. – 130 (148, 166, 184, 204, 222, 240, 258, 276) st
- Ch1. Hdc in 1st st and each st around. Ss to join to 1st st. Turn. – 130 (148, 166, 184, 204, 222, 240, 258, 276) st
- Ch3. Dc in next st and each st around. Ss to join to 1st st. Turn. – 130 (148, 166, 184, 204, 222, 240, 258, 276) st
Repeat rounds 31 & 32 until you have achieved the desired total length minus 2”. Then, proceed to the Bottom Trim. Be sure to finish with a repeat of round 31. Do not bind off.
Bottom Trim (CC)
- Ch2. Bd in next st *Sk1 st. Bd in next st.** Repeat from * to ** around. Ss to join to 1st st. Turn. – 130 (148, 166, 184, 204, 222, 240, 258, 276) st
- Ch1. Hdc in 1st st and each st around. Ss to join to 1st st. Turn. – 130 (148, 166, 184, 204, 222, 240, 258, 276) st
- Repeat round 1.
- Repeat round 2.
- Repeat round 1.
- Ch1. Sc in 1st st and each st around. Ss to join to 1st st. Turn. – 130 (148, 166, 184, 204, 222, 240, 258, 276) st
- Repeat row 6. Bind off.
Weave in your ends, and you’re done!
I hope you love your new crochet top, and I look forward to seeing all of your beautiful pictures on Ravelry!
If you’d like to know when I post new patterns and tutorials like the Something Beautiful – Free Crochet Top Pattern, head on over to my Facebook and Instagram and give me a like and a follow!
If you enjoyed The Something Beautiful – Free Crochet Top Pattern, you may want to check out my other designs!
Something Beautiful – Free Crochet Top Pattern
And until next time… Happy Hooking! 😉
This looks beautiful. Is that 1 colour of yarn, or did you mix 2 and if so, where did you start the transition?
Thank you, Lotte!
This is 2 colours. I used 2 hanks of Arequita and 1 hank of Marte. I specify in the pattern where I changed colours as well. 🙂
Again WOW WOW WOW !!!!! I’m so impressed with your surprises. I get so excited when you have something new. What a gorgeous color it enhances the beauty of each interesting stitch. I purchased some beautiful special yarn that has been waiting for the most striking pattern I could find. I’ve looked at a lot of patterns over the past couple of years and guess what? I HAVE FOUND IT. THANK YOU 😊 THANK YOU 🙏 THANK YOU ☺️ WE ARE SO BLESSED TO HAVE A WONDERFUL WOMAN AS YOURSELF BE SO FREE WITH YOUR TIME AND TALENTS. Just know someone in the cold north where the snow was over 4 ft this winter 🥶 appreciates you as now I have something exciting to do!
Oh my goodness, Rebecca! I am so honored by your kind words! Thank you so much!
I hope the snow melts soon so you can enjoy your Spring. And I hope you love your new top! <3