
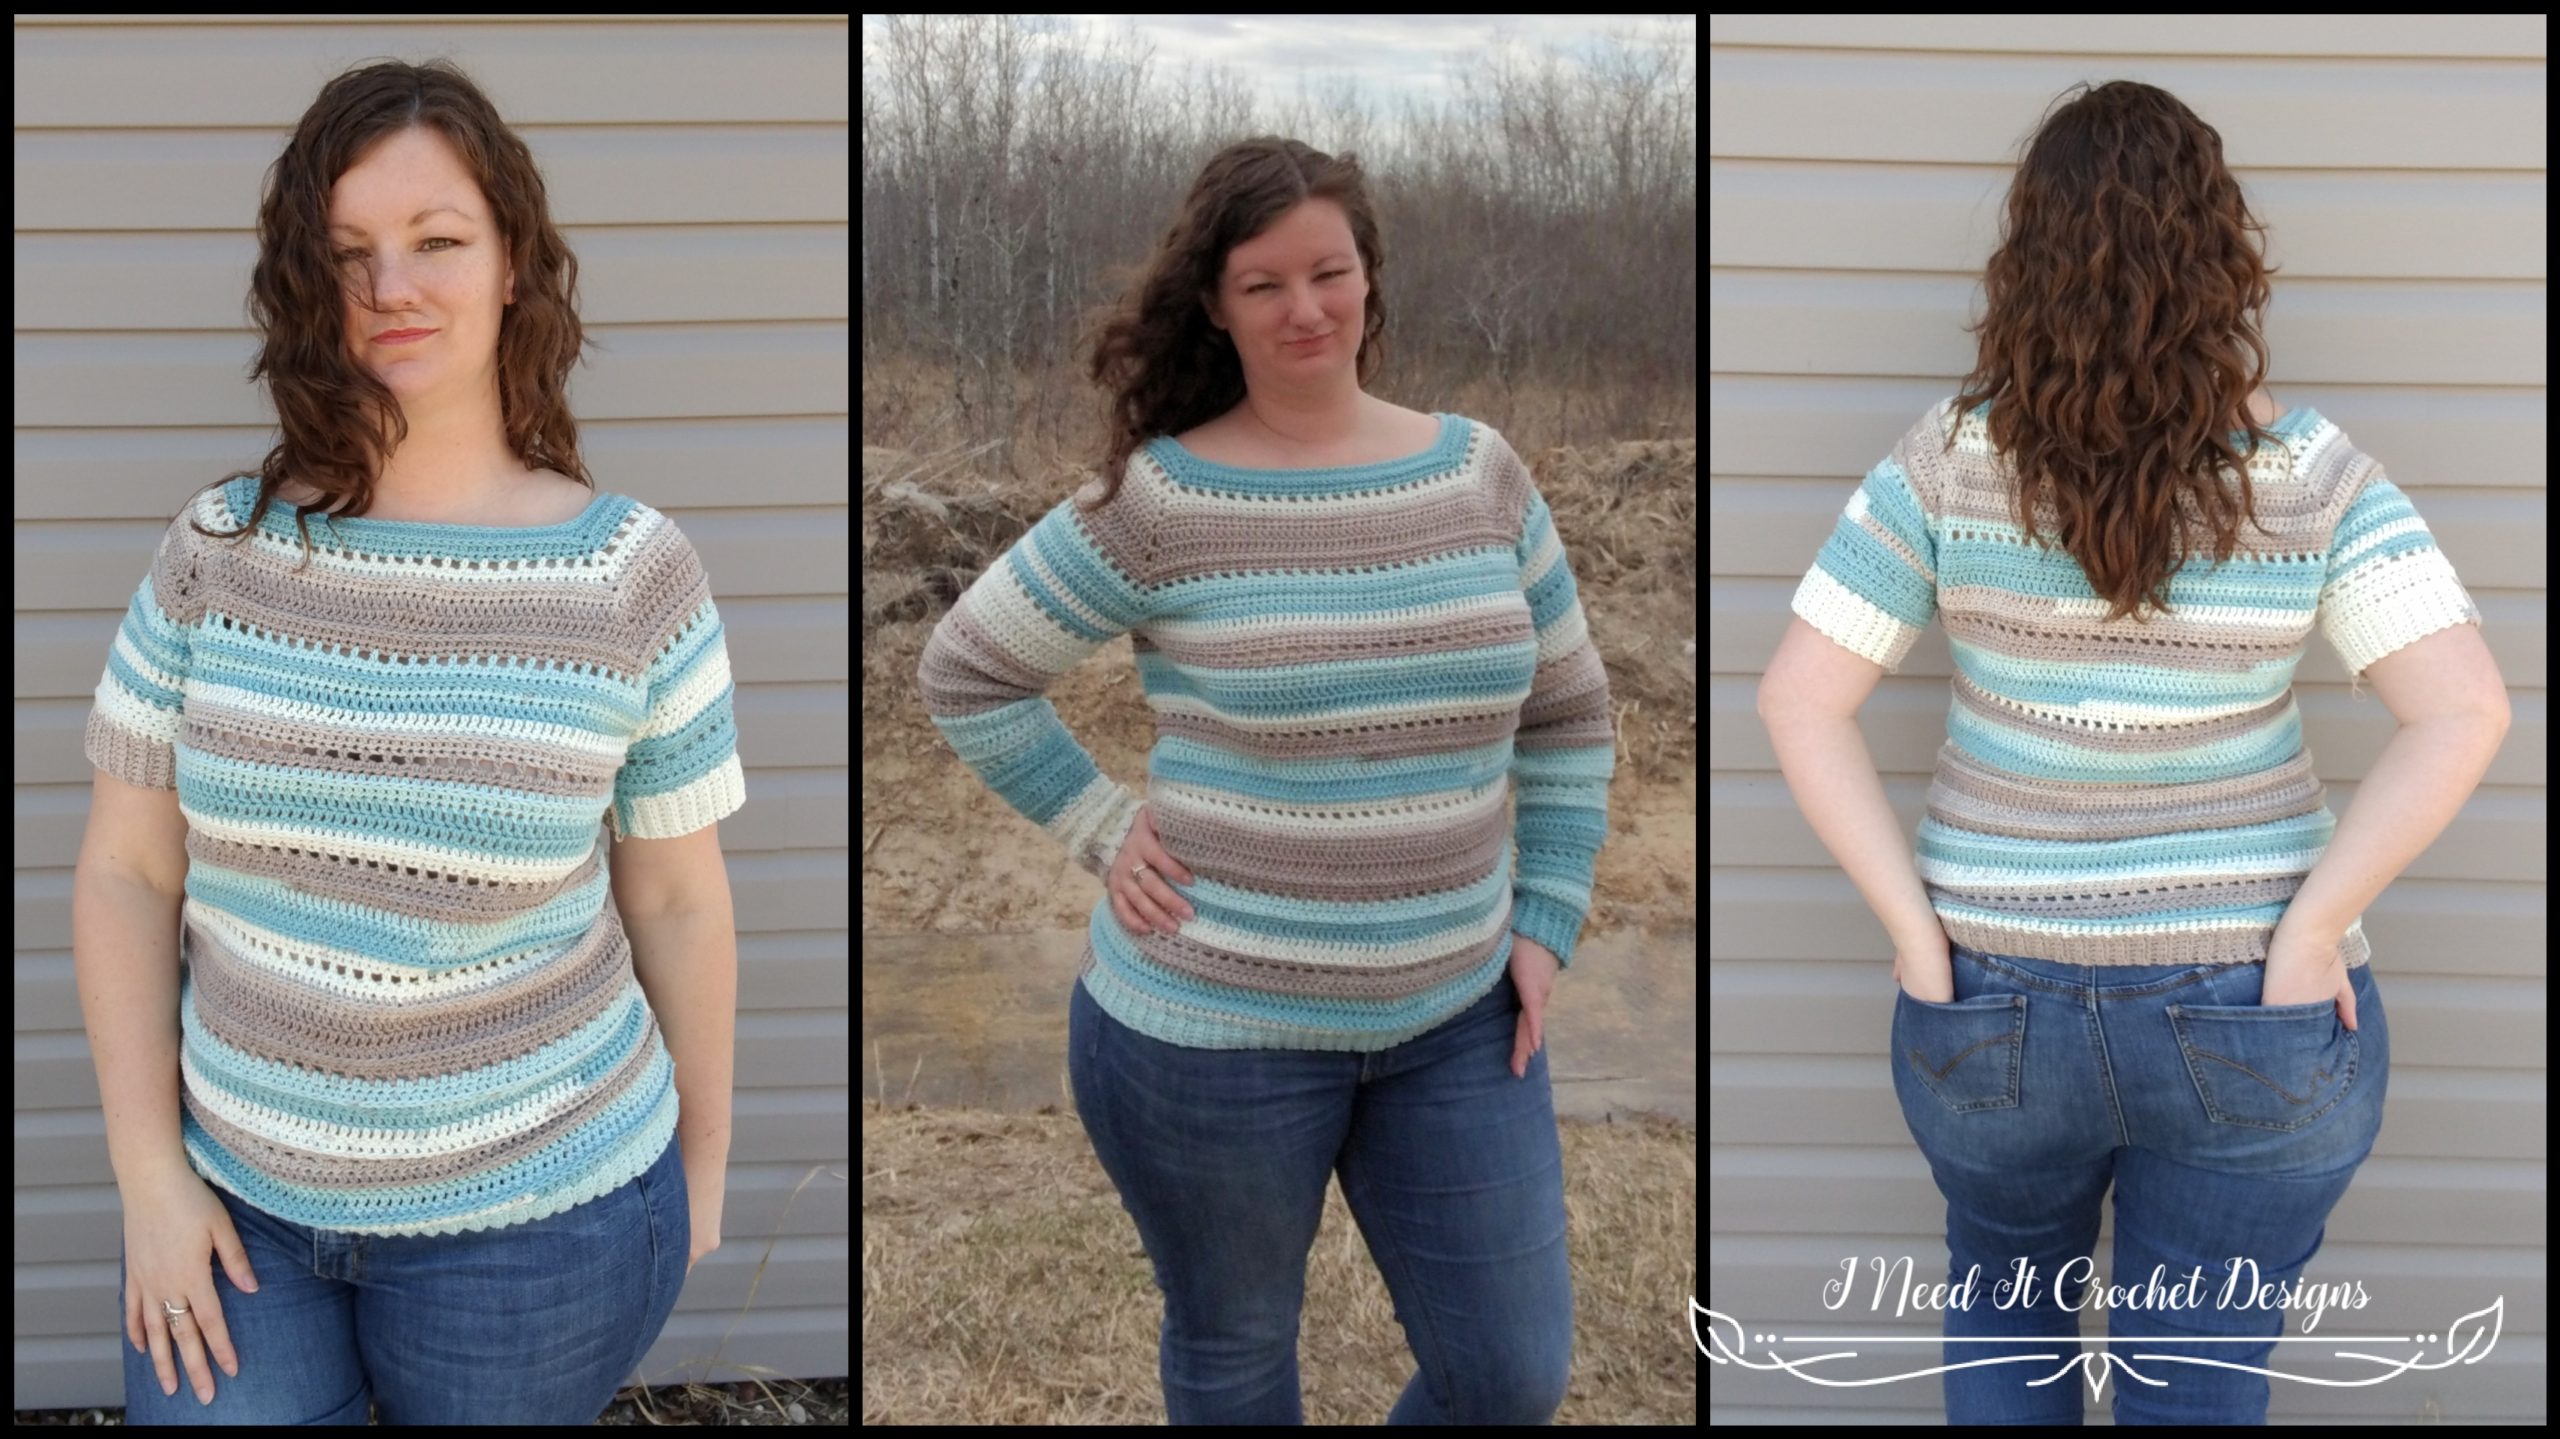
Spring Stripes Raglan – Free Crochet Pattern
The Spring Stripes Raglan free crochet pattern is copyrighted by I Need It Crochet. You may not copy, share, change, or sell the pattern itself. Also, you may not claim this pattern as your own. All pictures contained in this pattern fall under the copyright and may not be used.
Finished items made from this pattern belong to you and you may do what you wish with them. If you choose to sell them on Etsy I would very much appreciate it if you credited me as the pattern designer.


Or… Scroll Down to find the free crochet pattern!
This pattern began with a trip to my local Michael’s craft store. I love that place. The sounds, the smells, the colours… It all just makes me so happy.
Anyhow, I was browsing the aisles one day last spring when I saw a display of Caron Cotton Cakes. I instantly fell in love with this yarn! The feeling must have been mutual because 6 balls jumped right into my cart and begged me to take them home! I promised them I would take care of them and turn them into something beautiful. I finally got the chance to fulfill that promise.
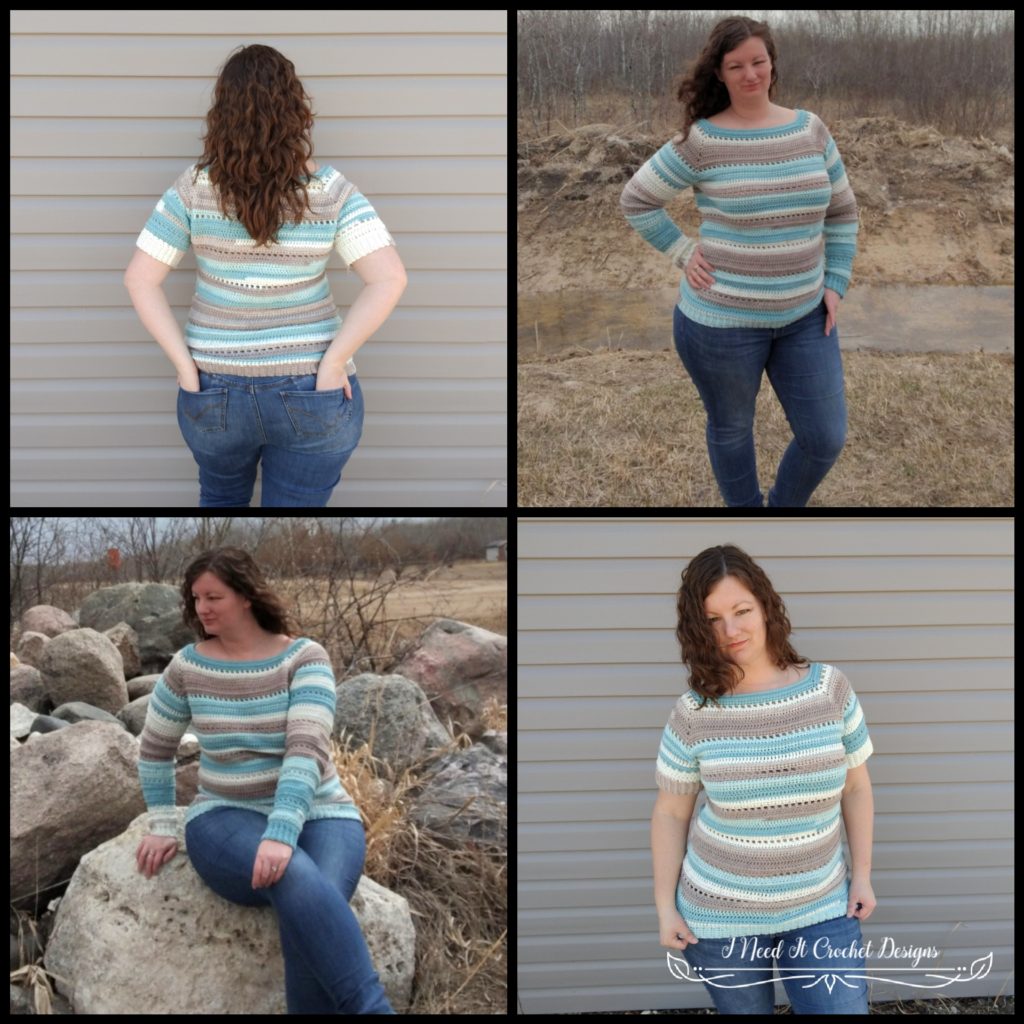
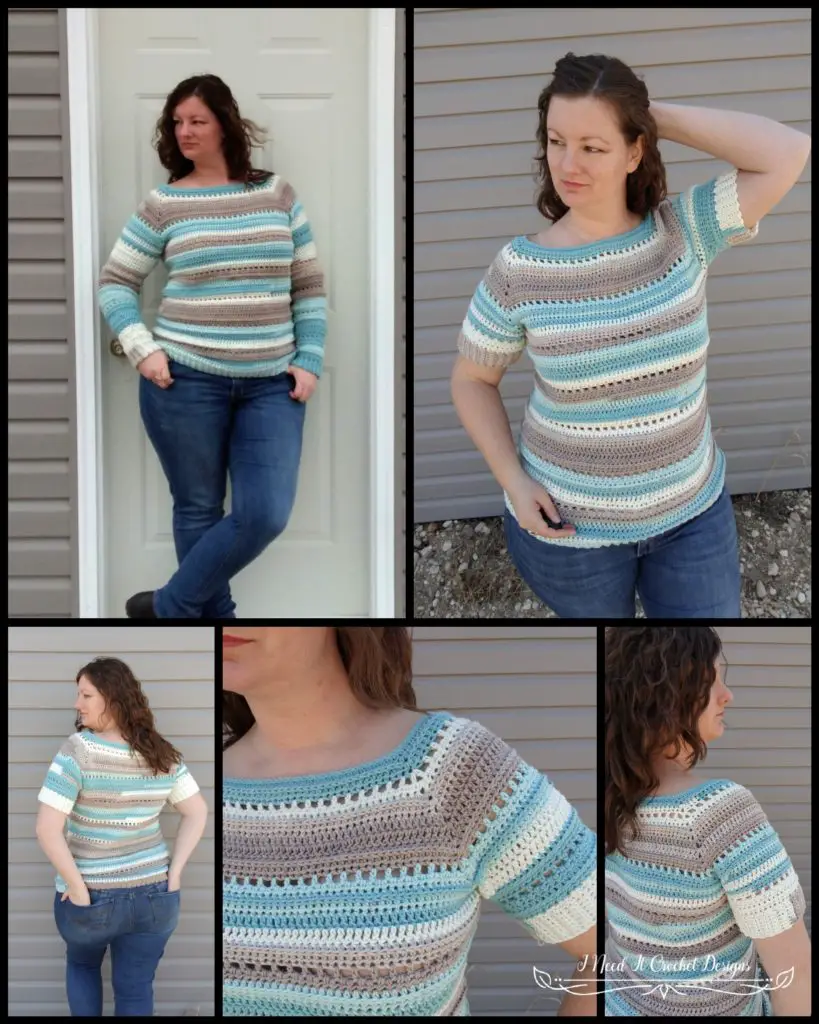
I’ve been wanting to write a top down raglan pattern for a while now. I love patterns that are easily customizable. This one can be made in any length you please and has options for short sleeves or long sleeves. I love the way mine looks with the self striping yarn, but it also looks fabulous in a solid colour!
Finished Sizes:
Instructions given to fit size X-small; changes for small, medium, large, X-large, 2X-large, 3X-large, 4X-large and 5X-large are in ()
XS (S, M, L, XL, 2XL, 3XL, 4XL, 5XL)
Finished Bust: 34” (36”, 38”, 40”, 44”, 48”, 52”, 56”, 60”) Finished Length: Customizable. Length on model shown is 26”.
Materials:
I used Caron Cotton Cakes, which is 60% Cotton/40% Acrylic, #4 Worsted weight yarn.
Any yarn of similar weight would work.
Approximately 700 (850, 1000, 1250, 1400, 1500, 1650, 1800) yds.
I/5.5mm Hook
Stitch Markers
Yarn Needle
Scissors
Do you have a favourite brand of hook? My favourite crochet hooks are definitely Clover Amour! As soon as I started using them, I noticed a huge decrease in the strain in my hands, giving me a lot more time to crochet! And if you use this link to buy a set, I’ll get a small commission. 😉
Subscribe to get acces
Read more of this content when you subscribe today.
Gauge:
See gauge swatch pattern below.
Always be sure to start with a gauge swatch. It will save you a lot of time and heartache!
Abbreviations:
Sk = Skip
Sp = Space
St = Stitch
Ss = Slip Stitch
Ch = Chain
Sc = Single Crochet
Hdc = Half Double Crochet
Dc= Double Crochet
Hdc2tog = Half Double Crochet 2 together
Dc2tog = Double Crochet 2 together
BLO = Back Loop Only
Notes:
Ch1 at the beginning of a row is never considered a stitch.
Ch1 between Hdc is always considered a stitch.
Ch3 at the beginning of a row is always considered a Dc.
In this pattern I will be asking you to work into the third loop (3rd LO). For those of you who haven’t done this before, I have written a little tutorial that you can find here.
I have added many pictures to help you along the way.
The model above has a 40” bust and is wearing a size Large.
Choose your size according to the finished measurements noted above and your preferences.
How To Make A Crochet Sweater Top
Gauge Swatch Pattern
With 5.5mm Hook
Ch 15
1. Hdc in 2nd ch from hook and each ch across. Turn – 14 sts
2. Working the row in 3rd LO: Ch 1. Hdc in 1st st and each sr across. Turn. – 14 sts
3. Ch 3. Dc in next st and each st across. Turn. – 14 sts
4. Ch 1. Hdc in 1st st and each st across. Turn. – 14 sts
Repeat rows 1-4. Then repeat row 1 again. You should have a total of 9 rows. Your swatch should measure 4” x 4”.
Instructions
The Spring Stripes Raglan is worked from the top down. Starting at the neck, working down to finish the body. Then adding the sleeves. There is no sewing! (Yay!)
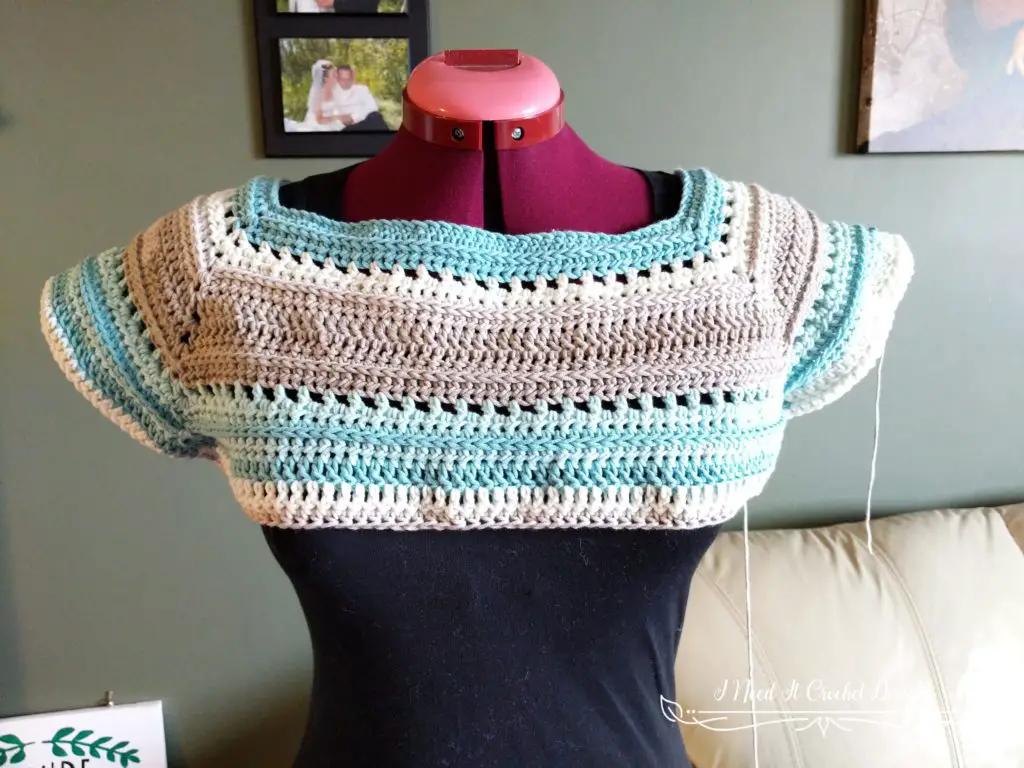
Upper Body Of Crochet Sweater
Spring Stripes Raglan – Free Crochet Pattern
With 5.5mm Hook
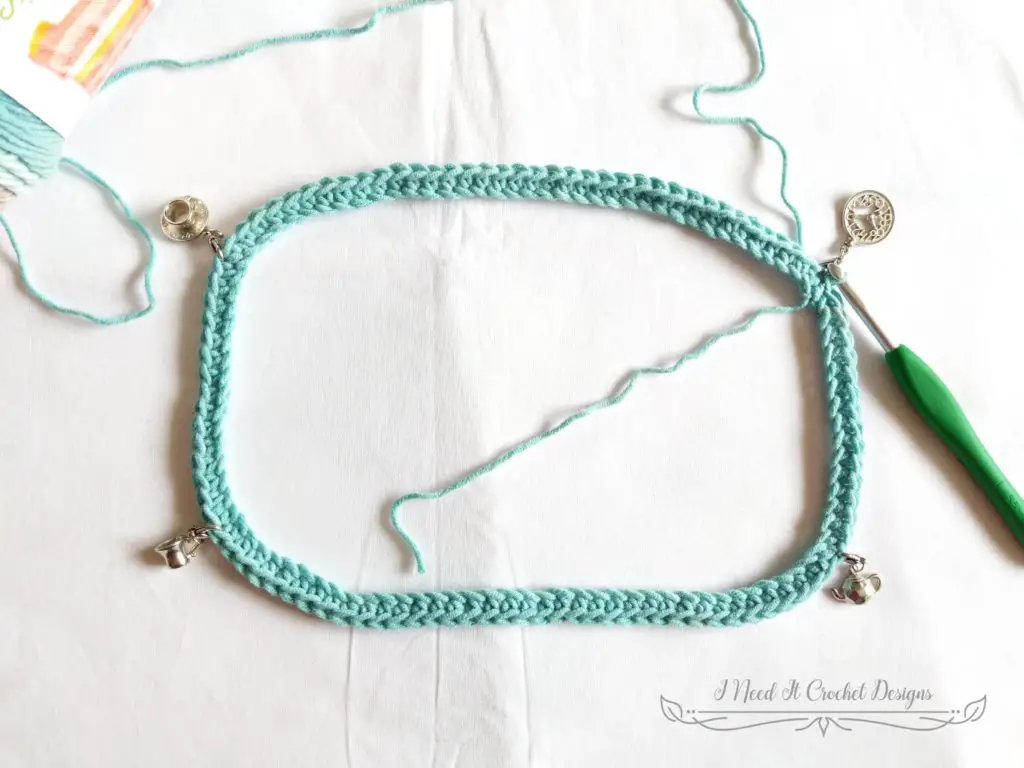
Ch 88 (100, 104, 108, 108, 112, 112, 116, 124) and Ss to the 1st ch to form a ring. Be careful not to twist your chain before joining.
1. Working in the back hump of your chain: Ch1. Sc in 1st ch and each ch around. Ss to the 1st St. Do not turn.
- 88 (100, 104, 108, 108, 112, 112, 116, 124)
Next I added stitch markers to remind me where to put my increases in the next round. I’ll refer to these increases as “Corner Ch” in the pattern to make it a bit easier to follow.
– Place 1st st marker in your 1st stitch.
– Count 30 (34, 36, 38, 40, 44, 46, 50, 54) more stitches and place your 2nd stitch marker in last st counted.
– Count 14 (16, 16, 16, 13, 11, 9, 7, 7) more stitches and place your 3rd stitch marker in last st counted.
– Count 30 (34, 36, 38, 40, 44, 46, 50, 54) more stitches and place your 4th stitch marker in last st counted.
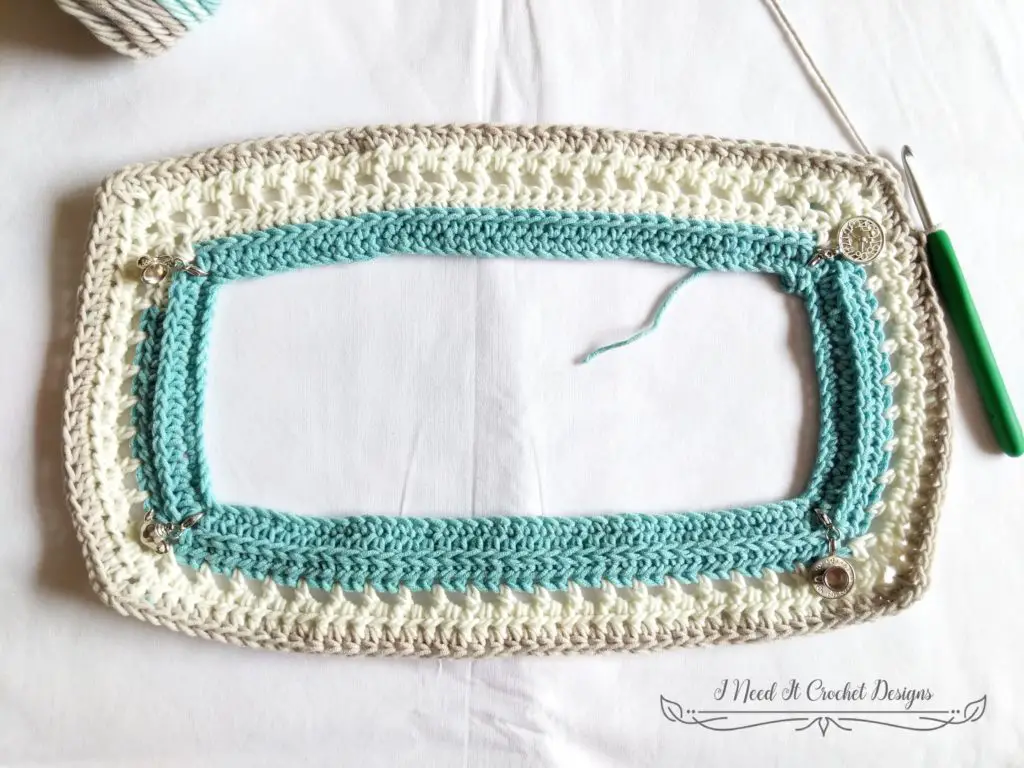
Your piece should look something like this.
2. (This will be the right side of your garment.) Ch1, *(Hdc, Ch1, Hdc) in st with st marker. Hdc in each st up to st marker. ** Repeat from * to ** to end. Ss to 1st st. Turn. You will now be turning after each row.
- 92 (104, 108, 112, 112, 116, 116, 120, 128) st + 4 Corner Ch
3. (This will be the wrong side of your garment.) Working this round in 3rd LO: Ch 1. Hdc in each st up to Corner Ch. (Hdc, ch 1, Hdc) in Corner Ch. *Hdc in each st up to Corner Ch, (Hdc, ch 1, Hdc) in Corner Ch. ** Repeat from * to ** around. Ss to 1st st. Turn. Note: Be sure your working into the 3rd loop that is facing you. That way the rib will be on the right side of the garment.
- 100 (112, 116, 120, 120, 124, 124, 128, 136) st + 4 Corner Ch
4. Ch 1. Hdc in 1st st, Ch1. Sk 1 st, [ (Hdc, Ch1, Hdc) in Corner Ch. Ch1, Sk 1 st, *Hdc in next st, Ch1, Sk 1 st ** Repeat from * to ** until you come to next Corner Ch. ] Repeat from [ to ] around. Ss to 1st st. Turn.
- 108 (120, 124, 128, 128, 132, 132, 136, 144) st + 4 Corner Ch
5. Ch 1. Hdc in each st up to Corner Ch. *(Hdc, Ch1, Hdc) in Corner Ch. Hdc in each st up to Corner Ch. ** Repeat from * to ** around. Ss to 1st st. Turn.
- 116 (128, 132, 136, 136, 140, 140, 144, 152) st + 4 Corner Ch
At this point in the pattern, many of my testers had a hard time getting their stitch counts right. So if you’re having this issue, the good news is you’re not alone! 😉
One reason they were having trouble getting the right stitch counts is because when you work half double crochets and chains together and then turn the work around, it can be hard to decipher which is which. Especially at those corners!
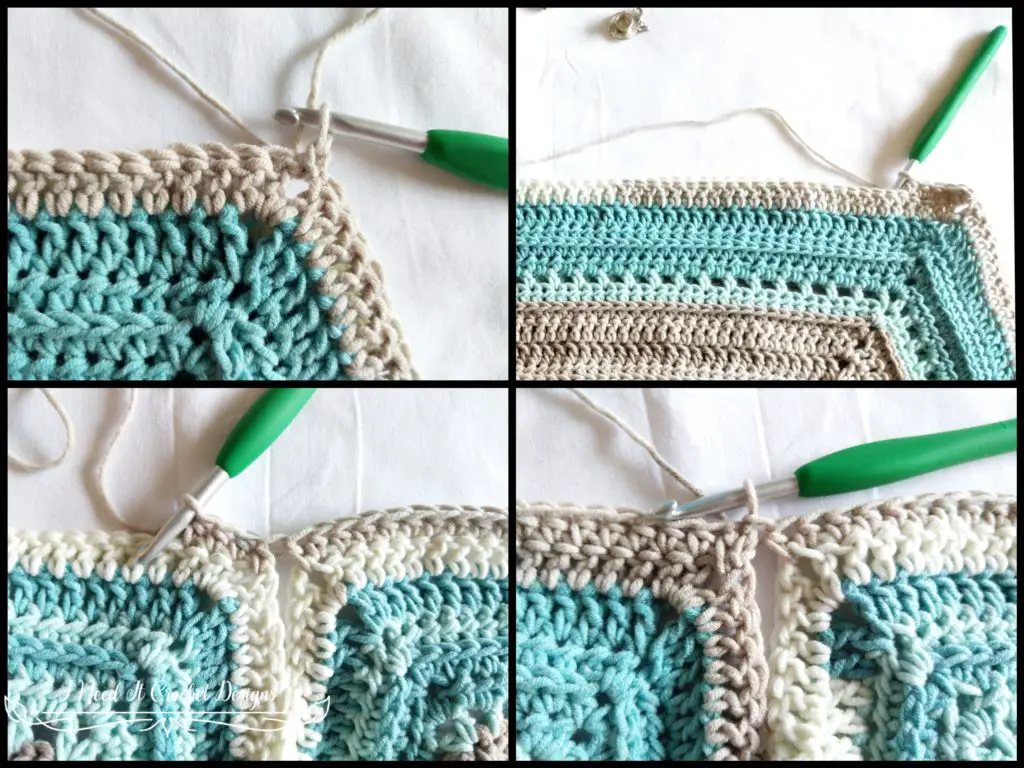
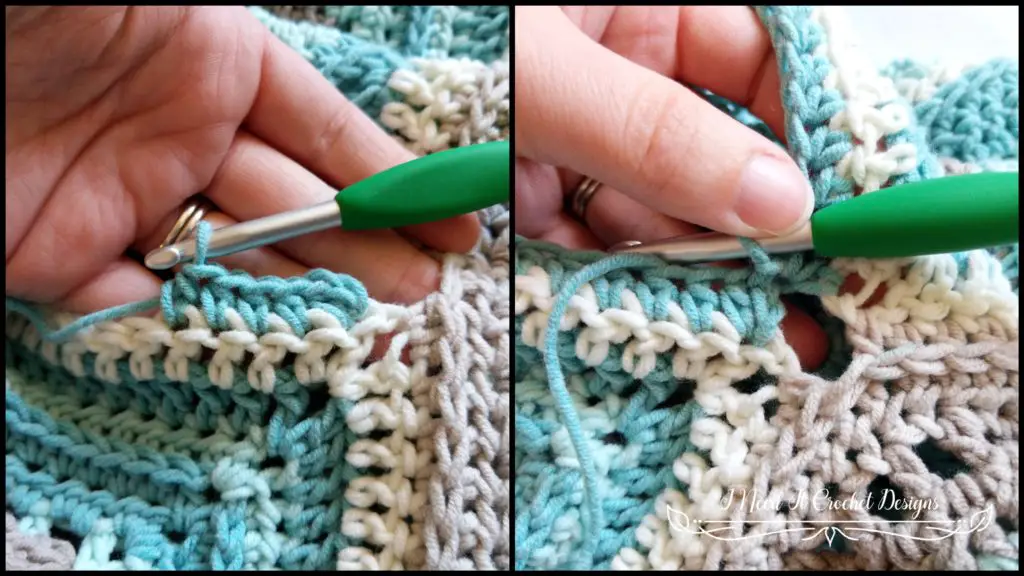
To help with this, I took some good close up shots to show you what you’re looking at.
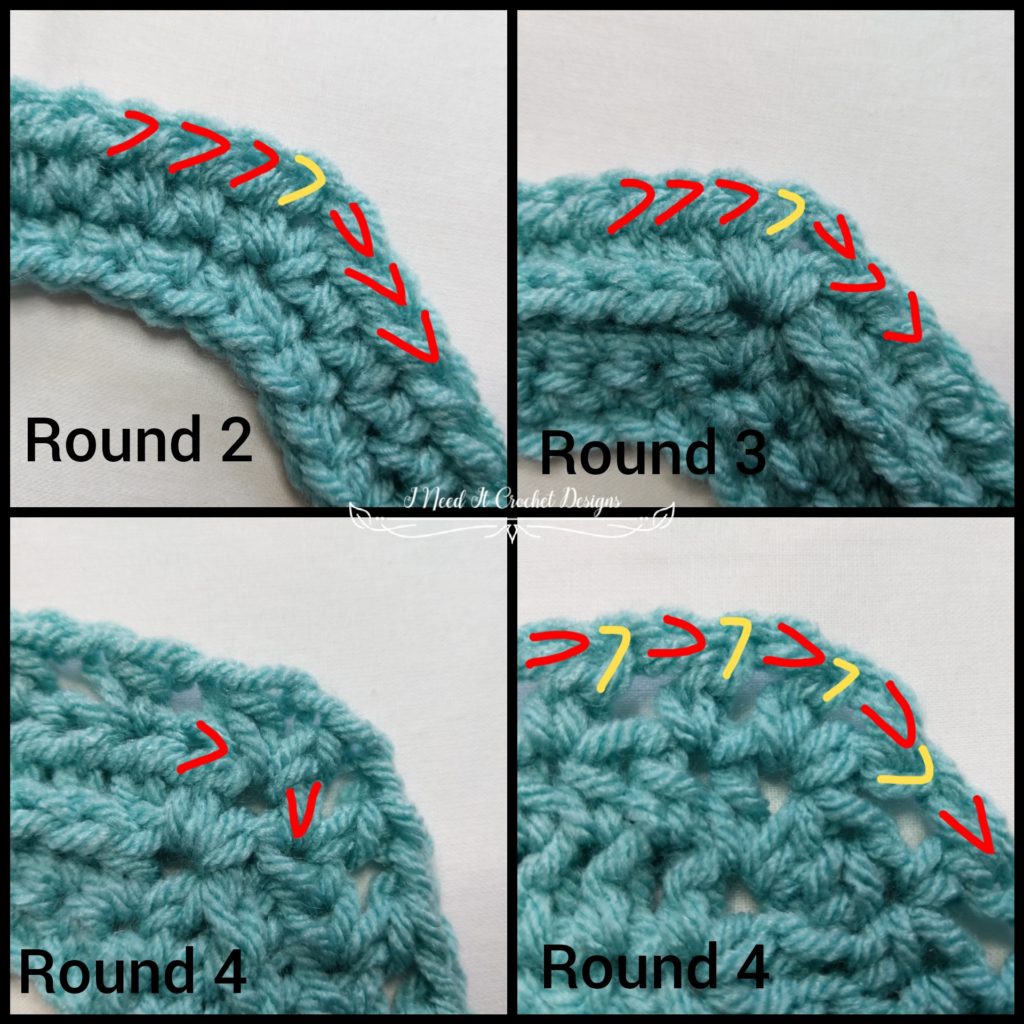
– The first pic is of round 2 after you have turned, so you’re looking at the back of the Hdcs. The stitches marked in red are the Hdcs. The stitch marked in yellow is the Corner Ch. You’ll notice that the V of the loops that belong to the Hdcs are sitting just over the vertical bars. So if you’re ever confused in which loops belong to the Hdcs, look for the V sitting over the 2 vertical bars.
– The second pic is of round 3 after you have turned. Again, the Hdcs are red, The Corner Ch is yellow. I find the last Hdc just before the Corner Ch in this round can be tricky because the loops float off the stitch and might look like a Ch. But you’ll notice that the Ch st also has a different shape. It looks like a 7, while the Hdc loops look more like a V.
– The 3rd pic is Round 4 completed, but you haven’t turned. You can see the V s from round 3’s Hdc sts marked in red.
– The 4th pic is round 4 after you have turned. Again, the loops of the Hdcs float a bit because of the ch sts you create after them. But if you look for the vertical bars, you can tell the difference between the Hdcs and the Ch sts.
Let’s continue. If you start having trouble getting your counts right, refer back to these pics.
6. Ch 1. Hdc in each st up to Corner Ch. *(Hdc, Ch1, Hdc) in Corner Ch. Hdc in each st up to Corner Ch. ** Repeat from * to ** around. Ss to 1st st. Turn.
- 124 (136, 140, 144, 144, 148, 148, 152, 160) st + 4 Corner Ch
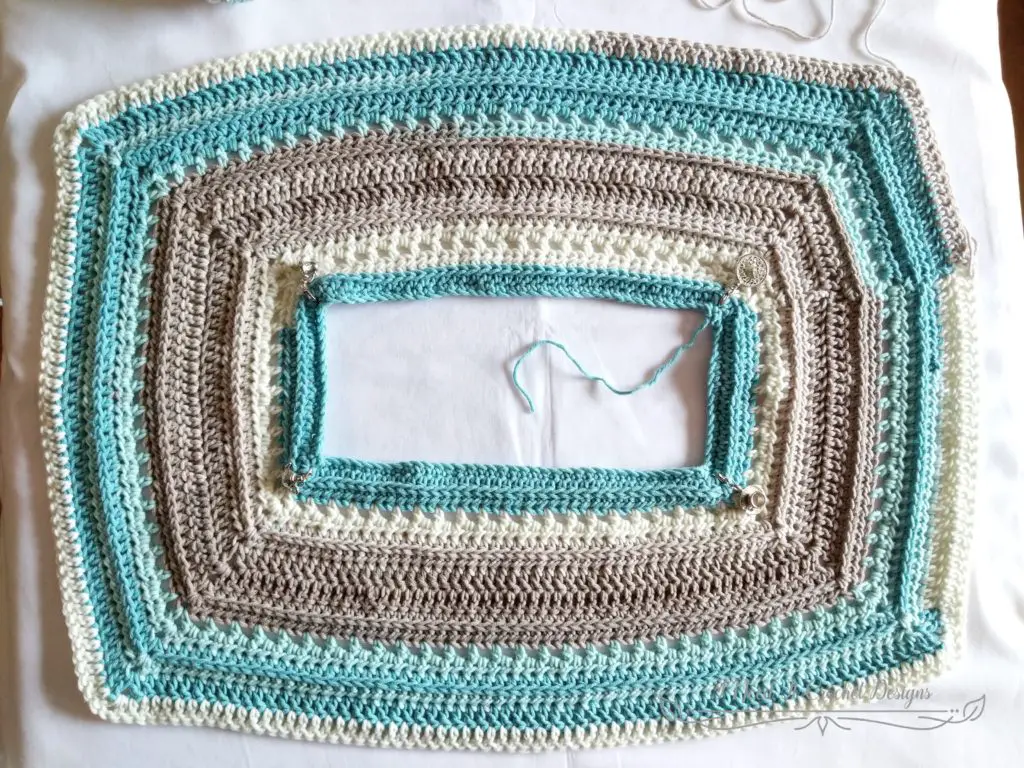
Your piece should be starting to look like a rectangle.
Spring Stripes Raglan – Free Crochet Pattern
7. Working this round in 3rd LO: Ch 1. Hdc in each st up to Corner Ch. *(Hdc, ch 1, Hdc) in Corner Ch. Hdc in each st up to Corner Ch. ** Repeat from * to ** around. Ss to 1st st. Turn. Note: Be sure your working into the 3rd loop that is facing you. That way the rib will be on the right side of the garment.
- 132 (144, 148, 152, 152, 156, 156, 160, 168) st + 4 Corner Ch
8. Ch 3. Dc in next st and each st up to Corner Ch. *(Dc, ch1, Dc) in Corner Ch. Dc in next st and each st up to Corner Ch. ** Repeat from * to ** around. Ss to 1st St. Turn.
- 140 (152, 156, 160, 160, 164, 164, 168, 176) st + 4 Corner Ch
9. Ch 3. Dc in next st and each st up to Corner Ch. *(Dc, ch1, Dc) in Corner Ch. Dc in next st and each st up to Corner Ch. ** Repeat from * to ** around. Ss to 1st St. Turn.
- 148 (160, 164, 168, 168, 172, 172, 176, 184) st + 4 Corner Ch
10. Ch 1. Hdc in each st up to Corner Ch. *(Hdc, Ch1, Hdc) in Corner Ch. Hdc in each st up to Corner Ch. ** Repeat from * to ** around. Ss to 1st st. Turn.
- 156 (168, 172, 176, 176, 180, 180, 184, 192) st + 4 Corner Ch
11. Working this round in 3rd LO: Ch 1. Hdc in 1st st and each st up to Corner Ch. *(Hdc, ch 1, Hdc) in Corner Ch. Hdc in 1st st and each st up to Corner Ch. ** Repeat from * to ** around. Ss to 1st st. Turn. Note: Be sure your working into the 3rd loop that is facing you. That way the rib will be on the right side of the garment.
- 164 (176, 180, 184, 184, 188, 188, 192, 200) st + 4 Corner Ch
12. Ch 1. Hdc in 1st st. Ch1, Sk 1 st, *Hdc in next st, Ch1, Sk 1 st. ** Repeat from * to ** until you come to next Corner Ch. [(Hdc, Ch1, Hdc) in Corner Ch. Ch1, Sk 1 st, *Hdc in next st, Ch1, Sk 1 st. ** Repeat from * to ** until you come to next Corner Ch. ] Repeat from [ to ] around. Ss to 1st st. Turn.
- 172 (184, 188, 192, 192, 196, 196, 200, 208) st + 4 Corner Ch
13. Ch 1. Hdc in each st up to Corner Ch. *(Hdc, Ch1, Hdc) in Corner Ch. Hdc in each st up to Corner Ch. ** Repeat from * to ** around. Ss to 1st st. Turn.
- 180 (192, 196, 200, 200, 204, 204, 208, 216) st + 4 Corner Ch
14. Ch 1. Hdc in each st up to Corner Ch. *(Hdc, Ch1, Hdc) in Corner Ch. Hdc in each st up to Corner Ch. ** Repeat from * to ** around. Ss to 1st st. Turn.
- 188 (200, 204, 208, 208, 212, 212, 216, 224) st + 4 Corner Ch
15. Working this round in 3rd LO: Ch 1. Hdc in 1st st and each st up to Corner Ch. *(Hdc, ch 1, Hdc) in Corner Ch. Hdc in 1st st and each st up to Corner Ch. ** Repeat from * to ** around. Ss to 1st st. Turn. Note: Be sure your working into the 3rd loop that is facing you. That way the rib will be on the right side of the garment.
Sizes XS and S: Skip Rounds 16 – 26, bind off, and move on to Lower Body.
- 196 (208, 212, 216, 216, 220, 220, 224, 232) st + 4 Corner Ch
16. Ch 3. Dc in next st and each st up to Corner Ch. *(Dc, ch1, Dc) in Corner Ch. Dc in next st and each st up to Corner Ch. ** Repeat from * to ** around. Ss to 1st St. Turn.
Size M: Skip Rounds 17 – 26, bind off, and move on to Lower Body.
- N/A (N/A, 220, 224, 224, 228, 228, 232, 240) st + 4 Corner Ch
17. Ch 3. Dc in next st and each st up to Corner Ch. *(Dc, ch1, Dc) in Corner Ch. Dc in next st and each st up to Corner Ch. ** Repeat from * to ** around. Ss to 1st St. Turn.
Size L: Skip Rounds 18 – 26, bind off, and move on to Lower Body.
- N/A (N/A, N/A, 232, 232, 236, 236, 240, 248) st + 4 Corner Ch
18. Ch 1. Hdc in each st up to Corner Ch. *(Hdc, Ch1, Hdc) in Corner Ch. Hdc in each st up to Corner Ch. ** Repeat from * to ** around. Ss to 1st st. Turn.
- N/A (N/A, N/A, N/A, 240, 244, 244, 248, 256) st + 4 Corner Ch
19. Working this round in 3rd LO: Ch 1. Hdc in 1st st and each st up to Corner Ch.* (Hdc, ch 1, Hdc) in Corner Ch. Hdc in 1st st and each st up to Corner Ch. ** Repeat from * to ** around. Ss to 1st st. Turn. Note: Be sure your working into the 3rd loop that is facing you. That way the rib will be on the right side of the garment.
Size XL: Skip Rounds 20 – 26, bind off and move on to Lower Body.
- N/A (N/A, N/A, N/A, 248, 252, 252, 256, 264) st + 4 Corner Ch
20. Ch 1. Hdc in 1st st. Ch1, Sk 1 st, *Hdc in next st, Ch1, Sk 1 st. ** Repeat from * to ** until you come to next Corner Ch. [(Hdc, Ch1, Hdc) in Corner Ch. Ch1, Sk 1 st, *Hdc in next st, Ch1, Sk 1 st. ** Repeat from * to ** until you come to next Corner Ch. ] Repeat from [ to ] around. Ss to 1st st. Turn.
- N/A (N/A, N/A, N/A, N/A, 260, 260, 264, 272) st + 4 Corner Ch
21. Ch 1. Hdc in each st up to Corner Ch. *(Hdc, Ch1, Hdc) in Corner Ch. Hdc in each st up to Corner Ch. ** Repeat from * to ** around. Ss to 1st st. Turn.
Size 2XL: Skip Rounds 22 – 26, bind off, and move on to Lower Body.
- N/A (N/A, N/A, N/A, N/A, 268, 268, 272, 280) st + 4 Corner Ch
22. Ch 1. Hdc in each st up to Corner Ch. *(Hdc, Ch1, Hdc) in Corner Ch. Hdc in each st up to Corner Ch. ** Repeat from * to ** around. Ss to 1st st. Turn.
- N/A (N/A, N/A, N/A, N/A, N/A, 276, 280, 288) st + 4 Corner Ch
23. Working this round in 3rd LO: Ch 1. Hdc in 1st st and each st up to Corner Ch. *(Hdc, ch 1, Hdc) in Corner Ch. Hdc in 1st st and each st up to Corner Ch. ** Repeat from * to ** around. Ss to 1st st. Turn. Note: Be sure your working into the 3rd loop that is facing you. That way the rib will be on the right side of the garment.
Size 3X: Skip Rounds 24 – 26, bind off, and move on to Lower Body.
- N/A (N/A, N/A, N/A, N/A, N/A, 284, 288, 296) st + 4 Corner Ch
24. Ch 3. Dc in next st and each st up to Corner Ch. *(Dc, ch1, Dc) in Corner Ch. Dc in next st and each st up to Corner Ch. ** Repeat from * to ** around. Ss to 1st St. Turn.
- N/A (N/A, N/A, N/A, N/A, N/A, N/A, 296, 304) st + 4 Corner Ch
25. Ch 3. Dc in next st and each st up to Corner Ch. *(Dc, ch1, Dc) in Corner Ch. Dc in next st and each st up to Corner Ch. ** Repeat from * to ** around. Ss to 1st St. Turn.
Size 4X: Skip Round 26, bind off, and move on to Lower Body.
- N/A (N/A, N/A, N/A, N/A, N/A, N/A, 304, 312) st + 4 Corner Ch
26. Ch 1. Hdc in each st up to Corner Ch. *(Hdc, Ch1, Hdc) in Corner Ch. Hdc in each st up to Corner Ch. ** Repeat from * to ** around. Ss to 1st st. Bind off. Move on to Lower Body.
- N/A (N/A, N/A, N/A, N/A, N/A, N/A, N/A, 320) st + 4 Corner Ch
Spring Stripes Raglan – Free Crochet Pattern
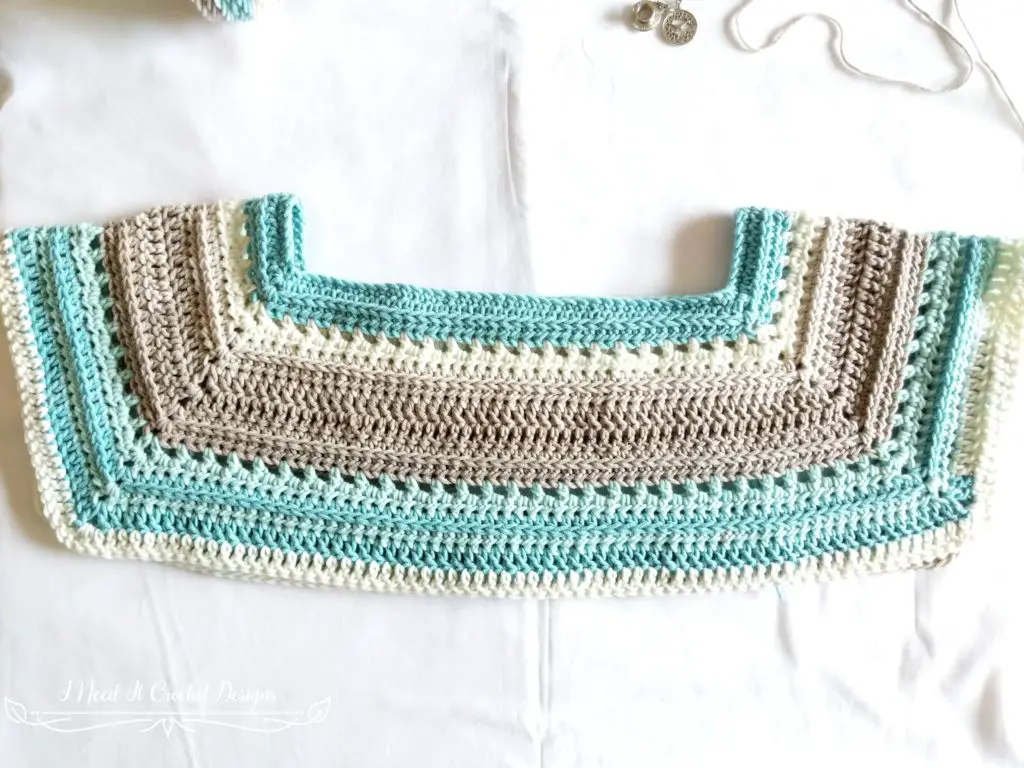
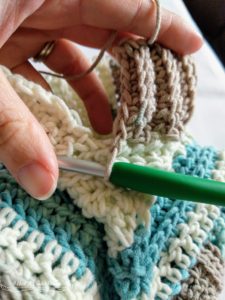
Flip your piece over so the wrong side is facing up. Then fold the top long edge down to meet the bottom long edge. This is the top portion of your raglan down to the armpits. Where the Corner Chs join together is where your armpits will be. I like to place locking stitch markers through these Corner Chs to hold them together and make this next part easier. We’re going to continue working the body from the armpits down. Turn your piece over so your working row is facing up.
Spring Stripes Raglan – Free Crochet Pattern
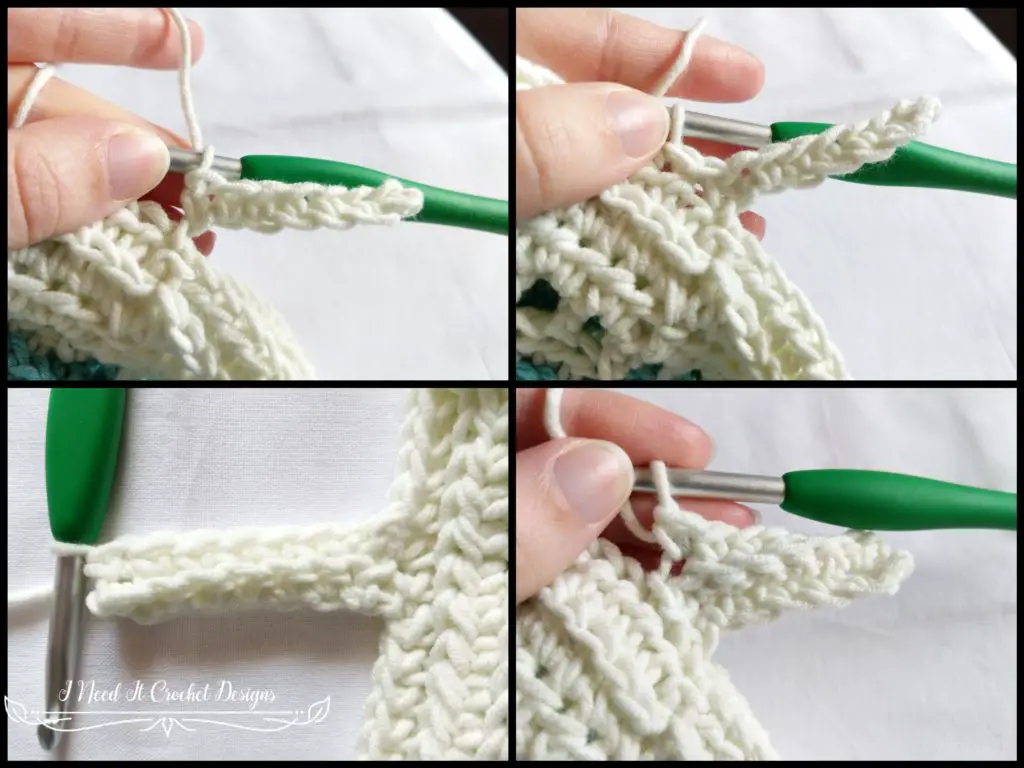
Lower Body Of Crochet Top
The first round brings the top together at the armpits. Then we will be working even rounds in the established stitch pattern. I have provided pictures below to show you how this first round comes together. This is an example of only one size and just for reference. Your stitches may look different than pictured.
Follow the instructions according to your size.
Sizes XS and S:
With right side facing you, join your yarn in any Corner Ch.
1. Ch 3. Dc in next st and each st up to Corner Ch. Dc in Corner Ch. Dc in next Corner Ch. Dc in next st and each st up to Corner Ch. Dc in Corner Ch. Ss to 1st st. Turn.
- 118 (126, N/A, N/A, N/A, N/A, N/A, N/A, N/A) st
Size M:
With wrong side facing you, join your yarn in any Corner Ch.
1. Ch 3. Dc in next st and each st up to Corner Ch. Dc in Corner Ch. Dc in next Corner Ch. Dc in next st and each st up to Corner Ch. Dc in Corner Ch. Ss to 1st st. Turn.
- N/A (N/A, 134, N/A, N/A, N/A, N/A, N/A, N/A) st
Sizes L & XL:
With right side facing you, join your yarn in any Corner Ch.
1. Ch 1. Hdc in 1st st and each st up to Corner Ch. Hdc in Corner Ch. Hdc in next Corner Ch. Hdc in next st and each st up to Corner Ch. Hdc in Corner Ch. Ss to 1st st. Turn.
- N/A (N/A, N/A, 142, 154, N/A, N/A, N/A, N/A) st
Size 2XL:
With wrong side facing you, join your yarn in any Corner Ch.
1. Working this round in 3rd LO: Ch 1. Hdc in 1st st and each st up to Corner Ch. Hdc in Corner Ch. Hdc in next Corner Ch. Hdc in next st and each st up to Corner Ch. Hdc in Corner Ch. Ss to 1st st. Turn.
- N/A (N/A, N/A, N/A, N/A, 170, N/A, N/A, N/A) st
Size 3XL:
With right side facing you, join your yarn in any Corner Ch.
1. Ch 1. Hdc in 1st st, Ch1, sk 1 st. *Hdc in next st, ch1, sk 1 st. ** Repeat from * to ** to next Corner Ch. Sk Corner ch, Hdc in next Corner Ch, ch1, sk 1 st. *Hdc in next st, ch1, sk 1 st. ** Repeat from * to ** to next Corner Ch. Sk last Corner Ch, Ss to 1st st. Turn.
- N/A (N/A, N/A, N/A, N/A, N/A, 182, N/A, N/A) st
Sizes 4XL & 5XL:
With wrong side facing you, join your yarn in any Corner Ch.
1. Ch 1. Hdc in 1st st and each st up to Corner Ch. Hdc in Corner Ch. Hdc in next Corner Ch. Hdc in next st and each st up to Corner Ch. Hdc in Corner Ch. Ss to 1st st. Turn.
- N/A (N/A, N/A, N/A, N/A, N/A, N/A, 198, 210) st
You may want to take this opportunity to try on the upper body to see if the bust and arms fit.
Now you will continue in the established stitch pattern.
Sizes XS & S: Begin with Round 1.
Size M: Begin with Round 2.
Size L & XL: Begin with Round 3.
Size 2XL: Begin with Round 4.
Size 3XL: Begin with Round 5.
Size 4XL & 5XL: Begin with Round 6.
1. Ch 3. Dc in next st and each st around. Ss to 1st st. Turn.
- 118 (126, 134, 142, 154, 170, 182, 198, 210) st
2. Ch 1. Hdc in 1st st and each st around. Ss to 1st st. Turn.
- 118 (126, 134, 142, 154, 170, 182, 198, 210) st
3. Working in the 3rd LO: Ch 1. Hdc in 1st st and each st around. Ss to 1st st. Turn.
- 118 (126, 134, 142, 154, 170, 182, 198, 210) st
4. Ch 1. Hdc in 1st st, Ch1, sk 1 st. *Hdc in next st, ch1, sk 1 st. ** Repeat from * to ** around. Ss to 1st st. Turn.
- 118 (126, 134, 142, 154, 170, 182, 198, 210) st
5. Ch 1. Hdc in 1st st and each st around. Ss to 1st st. Turn.
- 118 (126, 134, 142, 154, 170, 182, 198, 210) st
6. Ch 1. Hdc in 1st st and each st around. Ss to 1st st. Turn.
- 118 (126, 134, 142, 154, 170, 182, 198, 210) st
7. Working in the 3rd LO: Ch 1. Hdc in 1st st and each st around. Ss to 1st st. Turn.
- 118 (126, 134, 142, 154, 170, 182, 198, 210) st
8. Ch 3. Dc in next st and each st around. Ss to 1st st. Turn.
- 118 (126, 134, 142, 154, 170, 182, 198, 210) st
All Sizes: Repeat rounds 1. – 8. until you have achieved the length you want minus 1 ½ “. Then proceed to instructions for bottom hem.
Bottom Hem
The bottom hem is made by turning your sweater sideways, chaining, then working short rows of Sc in the BLO off the bottom. It sounds tricky, but it’s super easy. It does not matter if your looking at the wrong side or right side of your work for this part. Just position your work so that the sweater lays sideways with the bottom pointing to the right.
1. Ch 6. Sc in 2nd ch from hook and next 4 chs. Ss into next 2 unworked stitches (be sure you’re not going into the st you just chained from). Turn.
- 5 sc, 2ss
2. Do not chain. Working this row in BLO: Sk 2 Ss. Sc in 1st sc and each sc across. Turn.
- 5 sc
3. Working this row in BLO: Ch 1. Sc in 1st sc and each sc across. Ss into next 2 unworked sts. Turn.
- 5 sc, 2ss
Repeat rows 2. and 3. around the bottom of the sweater. Your last st should be a Ss into the last unworked St.
Now we’ll slip stitch the two ends together. You want to work your slip stitches through the bottom loop of your first row and the back loop only of your last row. You’ll see if you do it like this the finished seam is practically invisible. Even on the other side. Bind off.
Sleeves
To make the short sleeves shown in my pictures, I worked the first 6 rounds of the sleeve pattern, then proceeded to the sleeve cuff instructions. To make the full length sleeves, follow all sleeve instructions. Just as we did with the lower body, we’ll start with a setup round and then continue in the established stitch pattern.
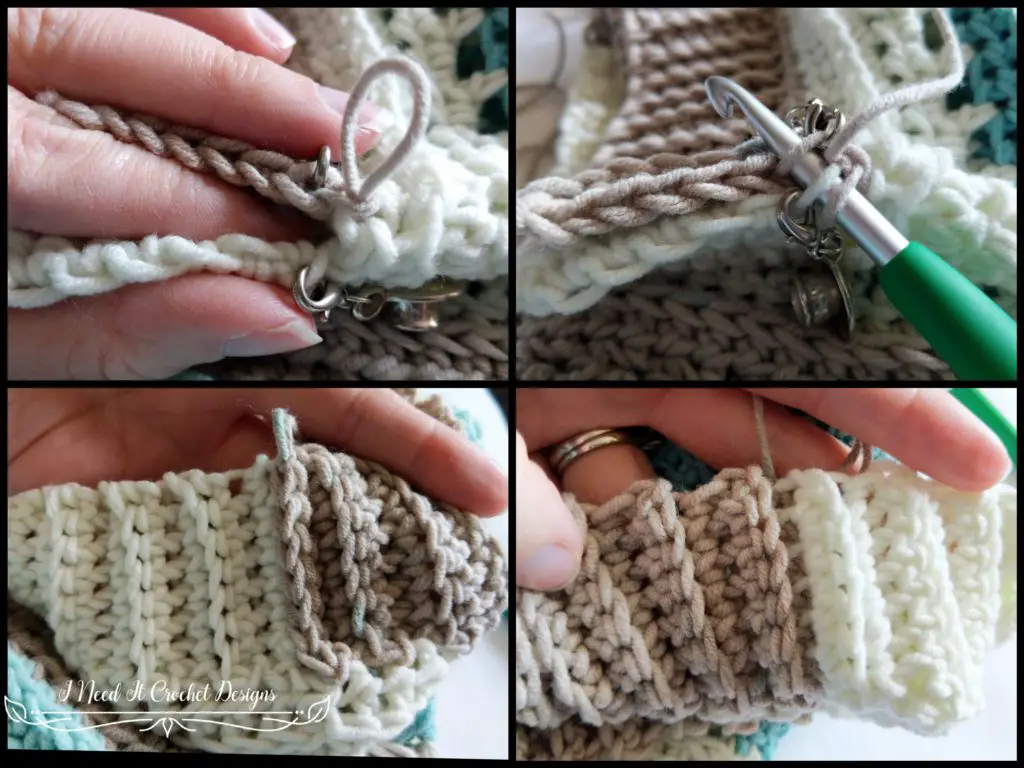
Note: You’ll see from the pictures below that there is a hole in the armpit. I just fixed that by using the beginning end of my yarn to throw a few whip stitches in there to close it up. Then I wove in the rest of that end.
Also note that these pictures are only an example of one size. Your stitches may not look the same.
Work each sleeve according to your size.
Sizes XS and S:
With right side facing you, join your yarn in the first St to the left of the armpit Corner Ch.
1. Ch 3. Dc in next st and each st until there are 2 sts left unworked, not including Corner Ch. Dc2tog in last 2 sts. Ss to 1st St.
- 40 (42, N/A, N/A, N/A, N/A, N/A, N/A, N/A) st
Size M:
With wrong side facing you, join your yarn in the first St to the left of the armpit Corner Ch.
1. Ch 3. Dc in next st and each st until there are 2 sts left unworked, not including Corner Ch. Dc2tog in last 2 sts. Ss to 1st St. Turn.
- N/A (N/A, 44, N/A, N/A, N/A, N/A, N/A, N/A) st
Sizes L & XL:
With right side facing you, join your yarn in the first St to the left of the armpit Corner Ch.
1. Ch 1. Hdc in 1st st and each st until there are 2 sts left unworked, not including Corner Ch. Hdc2tog in last 2 sts. Ss to 1st St. Turn.
- N/A (N/A, N/A, 46, 48, N/A, N/A, N/A, N/A) st
Size 2XL:
With wrong side facing you, join your yarn in the first St to the left of the armpit Corner Ch.
1. Working this round in 3rd LO: Ch 1. Hdc in 1st st and each st until there are 2 sts left unworked, not including Corner Ch. Hdc2tog in last 2 sts. Ss to 1st St. Turn.
- N/A (N/A, N/A, N/A, N/A, 50, N/A, N/A, N/A) st
Size 3XL:
With right side facing you, join your yarn in the first St to the left of the armpit Corner Ch.
1. Ch 1. Hdc in 1st st. Ch1, Sk 1 st, *Hdc in next st, Ch1, Sk 1 st. ** Repeat from * to ** around until there are 2 sts left unworked, not including Corner Ch. Hdc2tog in last 2 sts. Ss to 1st St. Turn.
- N/A (N/A, N/A, N/A, N/A, N/A, 52, N/A, N/A) st
Sizes 4XL & 5XL:
With wrong side facing you, join your yarn in the first St to the left of the armpit Corner Ch.
1. Ch 1. Hdc in 1st st and each st until there are 2 sts left unworked, not including Corner Ch. Hdc2tog in last 2 sts. Ss to 1st St. Turn.
- N/A (N/A, N/A, N/A, N/A, N/A, N/A, 54, 56) st
Now you will continue in the established stitch pattern.
Sizes XS & S: Begin with Round 1.
Size M: Begin with Round 2.
Size L & XL: Begin with Round 3.
Size 2XL: Begin with Round 4.
Size 3XL: Begin with Round 5.
Size 4XL & 5XL: Begin with Round 6.
1. Ch 3. Dc in next st and each st around. Ss to 1st St. Turn.
- 40 (42, 44, 46, 48, 50, 52, 54, 56) st
2. Ch 1. Hdc in 1st st and each st around. Ss to 1st st. Turn.
- 40 (42, 44, 46, 48, 50, 52, 54, 56) st
3. Working this round in 3rd LO: Ch 1. Hdc in 1st st and each st around. Ss to 1st st. Turn.
Note: Be sure your working into the 3rd loop that is facing you. That way the rib will be on the right side of the garment.
- 40 (42, 44, 46, 48, 50, 52, 54, 56) st
4. Ch 1. Hdc in 1st st. Ch1, Sk 1 st, *Hdc in next st, Ch1, Sk 1 st. ** Repeat from * to ** around. Ss to 1st st. Turn.
- 40 (42, 44, 46, 48, 50, 52, 54, 56) st
5. Ch 1. Hdc in 1st st and each st around. Ss to 1st st. Turn.
- 40 (42, 44, 46, 48, 50, 52, 54, 56) st
6. Ch 1. Hdc in 1st st and each st around. Ss to 1st st. Turn.
- 40 (42, 44, 46, 48, 50, 52, 54, 56) st
7. Working this round in 3rd LO: Ch 1. Hdc in 1st st and each st around. Ss to 1st st. Turn.
Note: Be sure your working into the 3rd loop that is facing you. That way the rib will be on the right side of the garment.
- 40 (42, 44, 46, 48, 50, 52, 54, 56) st
8. Ch 3. Dc in next st and each st around. Ss to 1st St. Turn.
- 40 (42, 44, 46, 48, 50, 52, 54, 56) st
Repeat rounds 1. – 8. until you have a total of 21 (21, 20, 23, 23, 23, 25, 25, 25) rows.
Now we will make steady decreases for a tapered sleeve.
Sizes XS & S: Begin with round 1.
Size M: Begin with round 2.
Sizes L & XL: Begin with round 4.
Size 2XL: Begin with round 5.
Size 3XL: Begin with round 9.
Sizes 4XL & 5XL: Begin with round 10.
1. Ch 1. Hdc in 1st st and next 17 (18, N/A, N/A, N/A, N/A, N/A, N/A, N/A) sts. Hdc2tog in next 2 sts. Hdc in next 18 (19, N/A, N/A, N/A, N/A, N/A, N/A, N/A) sts. Hdc2tog in last 2 sts. Ss to 1st st. Turn.
- 38 (40, N/A, N/A, N/A, N/A, N/A, N/A, N/A) sts
2. Ch 1. Hdc in 1st st and each st around. Ss to 1st st. Turn.
- 38 (40, 44, N/A, N/A, N/A, N/A, N/A, N/A) sts
3. Working this round in 3rd LO: Ch 1. Hdc in 1st st and next 16 (17, 19, N/A, N/A, N/A, N/A, N/A, N/A) sts. Hdc2tog in next 2 sts. Hdc in next 17 (18, 20, N/A, N/A, N/A, N/A, N/A, N/A) sts. Hdc2tog in last 2 sts. Ss to 1st st. Turn.
- 36 (38, 42, N/A, N/A, N/A, N/A, N/A, N/A) sts
4. Ch 3. Dc in next st and each st around. Ss to 1st st. Turn.
- 36 (38, 42, 46, 48, N/A, N/A, N/A, N/A) sts
5. Ch 3. Dc in next 15 (16, 18, 20, 21, 22, N/A, N/A, N/A) sts. Dc2tog in next 2 sts. Dc in next 16 (17, 19, 21, 22, 23, N/A, N/A, N/A) sts. Dc2tog in last 2 sts. Ss to 1st st. Turn.
- 34 (36, 40, 44, 46, 48, N/A, N/A, N/A) sts
6. Ch 1. Hdc in 1st st and each st around. Ss to 1st st. Turn.
- 34 (36, 40, 44, 46, 48, N/A, N/A, N/A) sts
7. Working this round in the 3rd LO: Ch 1. Hdc in 1st st and next 14 (15, 17, 19, 20, 21, N/A, N/A, N/A) sts. Hdc2tog in next 2 sts. Hdc in next 15 (16, 18, 20, 21, 22, N/A, N/A, N/A) sts. Hdc2tog in last 2 sts. Ss to 1st st. Turn.
- 32 (34, 38, 42, 44, 46, N/A, N/A, N/A) sts
8. Ch 1. Hdc in 1st st, ch1, sk 1 st. *Hdc in next st, ch1, sk 1 st. ** Repeat from * to ** around. Ss to 1st st. Turn.
- 32 (34, 38, 42, 44, 46, N/A, N/A, N/A) sts
9. Ch 1. Hdc in 1st st and next 13 (14, 16, 18, 19, 20, 23, N/A, N/A) sts. Hdc2tog in next 2 sts. Hdc in next 14 (15, 17, 19, 20, 21, 24, N/A, N/A) sts. Hdc2tog in last 2 sts. Ss to 1st st. Turn.
- 30 (32, 36, 40, 42, 44, 50, N/A, N/A) sts
10. Ch 1. Hdc in 1st st and each st around. Ss to 1st st. Turn.
- 30 (32, 36, 40, 42, 44, 50, 54, 56) sts
11. Working this round in the 3rd LO: Ch 1. Hdc in 1st st and next 12 (13, 15, 17, 18, 19, 22, 24, 25) sts. Hdc2tog in next 2 sts. Hdc in next 13 (14, 16, 18, 19, 20, 23, 25, 26) sts. Hdc2tog in last 2 sts. Ss to 1st st. Turn.
- 28 (30, 34, 38, 40, 42, 48, 52, 54) sts
12. Ch 3. Dc in next st and each st around. Ss to 1st st. Turn.
- 28 (30, 34, 38, 40, 42, 48, 50, 54) sts
13. Ch 3. Dc in next 11 (12, 14, 16, 17, 18, 21, 23, 24) sts. Dc2tog in next 2 sts. Dc in next 12 (13, 15, 17, 18, 19, 22, 24, 25) sts. Dc2tog in last 2 sts. Ss to 1st st. Turn.
- 26 (28, 32, 36, 38, 40, 46, 48, 52) sts
14. Ch 1. Hdc in 1st st and each st around. Ss to 1st st. Turn.
- 26 (28, 32, 36, 38, 40, 46, 48, 52) sts
15. Working this round in the 3rd LO: Ch 1. Hdc in 1st st and next 10 (11, 13, 15, 16, 17, 20, 22, 23) sts. Hdc2tog in next 2 sts. Hdc in next 11 (12, 14, 16, 17, 18, 21, 23, 24) sts. Hdc2tog in last 2 sts. Ss to 1st st. Turn.
- 24 (26, 30, 34, 36, 38, 44, 46, 50) sts
16. Ch 1. Hdc in 1st st, ch1, sk 1 st. *Hdc in next st, ch1, sk 1 st. ** Repeat from * to ** around. Ss to 1st st. Turn.
- 24 (26, 30, 34, 36, 38, 44, 46, 50) sts
17. Ch 1. Hdc in 1st st and next 9 (10, 12, 14, 15, 16, 19, 21, 22) sts. Hdc2tog in next 2 sts. Hdc in next 10 (11, 13, 15, 16, 17, 20, 22, 23) sts. Hdc2tog in last 2 sts. Ss to 1st st. Turn.
- 22 (24, 28, 32, 34, 36, 42, 44, 48) sts
18. Ch 1. Hdc in 1st st and each st around. Ss to 1st st. Turn.
- 22 (24, 28, 32, 34, 36, 42, 44, 48) sts
19. Working this round in the 3rd LO: Ch 1. Hdc in 1st st and next 8 (9, 11, 13, 14, 15, 18, 20, 21) sts. Hdc2tog in next 2 sts. Hdc in next 9 (10, 12, 14, 15, 16, 19, 21, 22) sts. Hdc2tog in last 2 sts. Ss to 1st st. Turn.
Size XS: Skip rounds 20-27 and proceed with Sleeve Cuff.
- 20 (22, 26, 30, 32, 34, 40, 42, 46) sts
20. Ch 3. Dc in next st and each st around. Ss to 1st st. Turn.
Sizes S & M: Skip rounds 21-27 and proceed with Sleeve Cuff.
- N/A (22, 26, 30, 32, 34, 40, 42, 46) sts
21. Ch 3. Dc in next N/A (N/A, N/A, 12, 13, 14, 17, 19, 20) sts. Dc2tog in next 2 sts. Dc in next N/A (N/A, N/A, 13, 14, 15, 18, 20, 21) sts. Dc2tog in last 2 sts. Ss to 1st st. Turn.
Sizes L & XL: Skip rounds 22-27 and proceed with Sleeve Cuff.
- N/A (N/A, N/A, 28, 30, 32, 38, 40, 44) sts
22. Ch 1. Hdc in 1st st and each st around. Ss to 1st st. Turn.
- N/A (N/A, N/A, N/A, N/A, 32, 38, 40, 44) sts
23. Working this round in the 3rd LO: Ch . Hdc in 1st st and next N/A (N/A, N/A, N/A, N/A, 13, 16, 18, 19) sts. Hdc2tog in next 2 sts.Hdc in next N/A (N/A, N/A, N/A, N/A, 14, 17, 19, 20) sts. Hdc2tog in last 2 sts. Ss to 1st st. Turn.
Size 2XL: Skip rounds 24-27 and proceed with Sleeve Cuff
- N/A (N/A, N/A, N/A, N/A, 30, 36, 38, 42) sts
24. Ch 1. Hdc in 1st st, ch1, sk 1 st. *Hdc in next st, ch1, sk 1 st. ** Repeat from * to ** around. Ss to 1st st. Turn.
- N/A (N/A, N/A, N/A, N/A, N/A, 36, 38, 42) sts
25. Ch 1. Hdc in 1st st and next N/A (N/A, N/A, N/A, N/A, N/A, 15, 17, 18) sts. Hdc2tog in next 2 sts. Hdc in next N/A (N/A, N/A, N/A, N/A, N/A, 16, 18, 19) sts. Hdc2tog in last 2 sts. Ss to 1st st. Turn.
Size 3XL: Skip rounds 26-27 and proceed with Sleeve Cuff
- N/A (N/A, N/A, N/A, N/A, N/A, 34, 36, 40) sts
26. Ch 1. Hdc in 1st st and each st around. Ss to 1st st. Turn.
- N/A (N/A, N/A, N/A, N/A, N/A, N/A, 36, 40) sts
27. Working this round in the 3rd LO: Ch 1. Hdc in 1st st and next N/A (N/A, N/A, N/A, N/A, N/A, N/A, 16, 17) sts. Hdc2tog in next 2 sts. Hdc in next N/A (N/A, N/A, N/A, N/A, N/A, N/A, 17, 18) sts. Hdc2tog in last 2 sts. Ss to 1st st. Turn.
- N/A (N/A, N/A, N/A, N/A, N/A, N/A, 34, 38) sts
Sleeve Cuff
The sleeve cuffs are made using the same method as the bottom hem. It does not matter if your looking at the wrong side or right side of your work for this part. Just position your work so that the sleeve lays sideways with the bottom pointing to the right.
1. Ch 8. Sc in 2nd ch from hook and next 6 chs. Ss into next 2 unworked stitches (be sure you’re not going into the st you just chained from). Turn.
- 7 sc, 2ss
2. Do not chain. Working this row in BLO: Sk 2 Ss. Sc in 1st sc and each sc across. Turn.
- 7 sc
3. Working this row in BLO: Ch 1. Sc in 1st sc and each sc across. Ss into next 2 unworked sts. Turn.
- 7 sc, 2ss
Repeat rows 2. and 3. around the bottom of the sleeve. Your last st should be a Ss into the last unworked St.
Now we’ll slip stitch the two ends together. You want to work your slip stitches through the bottom loop of your first row and the back loop only of your last row. You’ll see if you do it like this the finished seam is practically invisible. Even on the other side. Bind off.
This next part is entirely optional and depends on how your neck opening has turned out. I tend to chain a bit loose and I made my Spring Stripes Raglan out of a cotton blend that tends to stretch. Because of this, my neck opening was a bit on the saggy side, making the shoulders slip off.
To fix this, with the right side of my work facing me, I joined my yarn in the neck near the back and slip stitched around the entire neck. I made my slip stitches a bit tighter than I normally would. This gave the neck a bit more stability, so it didn’t stretch out so much.
Now you just have to weave in all your ends and you’re done! Don’t forget to whip stitch those holes in the armpits closed while you’re at it.
I hope you enjoyed making your Spring Stripes Raglan. I have to tell you, I agonized over the sleeves on this one. I just couldn’t decide if I should keep them short or long! I guess I’m just going to have to make another so I can have both! Oh Well! Lol!
I look forward to seeing all your beautiful pictures on Ravelry!
If you’d like to know when I post new patterns and tutorials, head on over to my Facebook and Instagram and give me a like and a follow!
If you enjoyed this free pattern for the Spring Stripes Raglan, you may want to check out my other designs!
Spring Stripes Raglan – Free Crochet Pattern
Until next time… Happy Hooking! 😉