
The Sum Of Its Parts Pullover – Free Crochet Pattern is copyrighted by I Need It Crochet. You may not copy, share, change, or sell the pattern itself. Also, you may not claim this pattern as your own. All pictures contained in this pattern fall under the copyright and may not be used.
Finished items made from the Sum Of Its Parts Pullover – Free Crochet Pattern belong to you, and you may do what you wish with them. If you choose to sell them on Etsy, I would very much appreciate it if you credited me as the pattern designer.


Or… Just scroll down to see it for free!
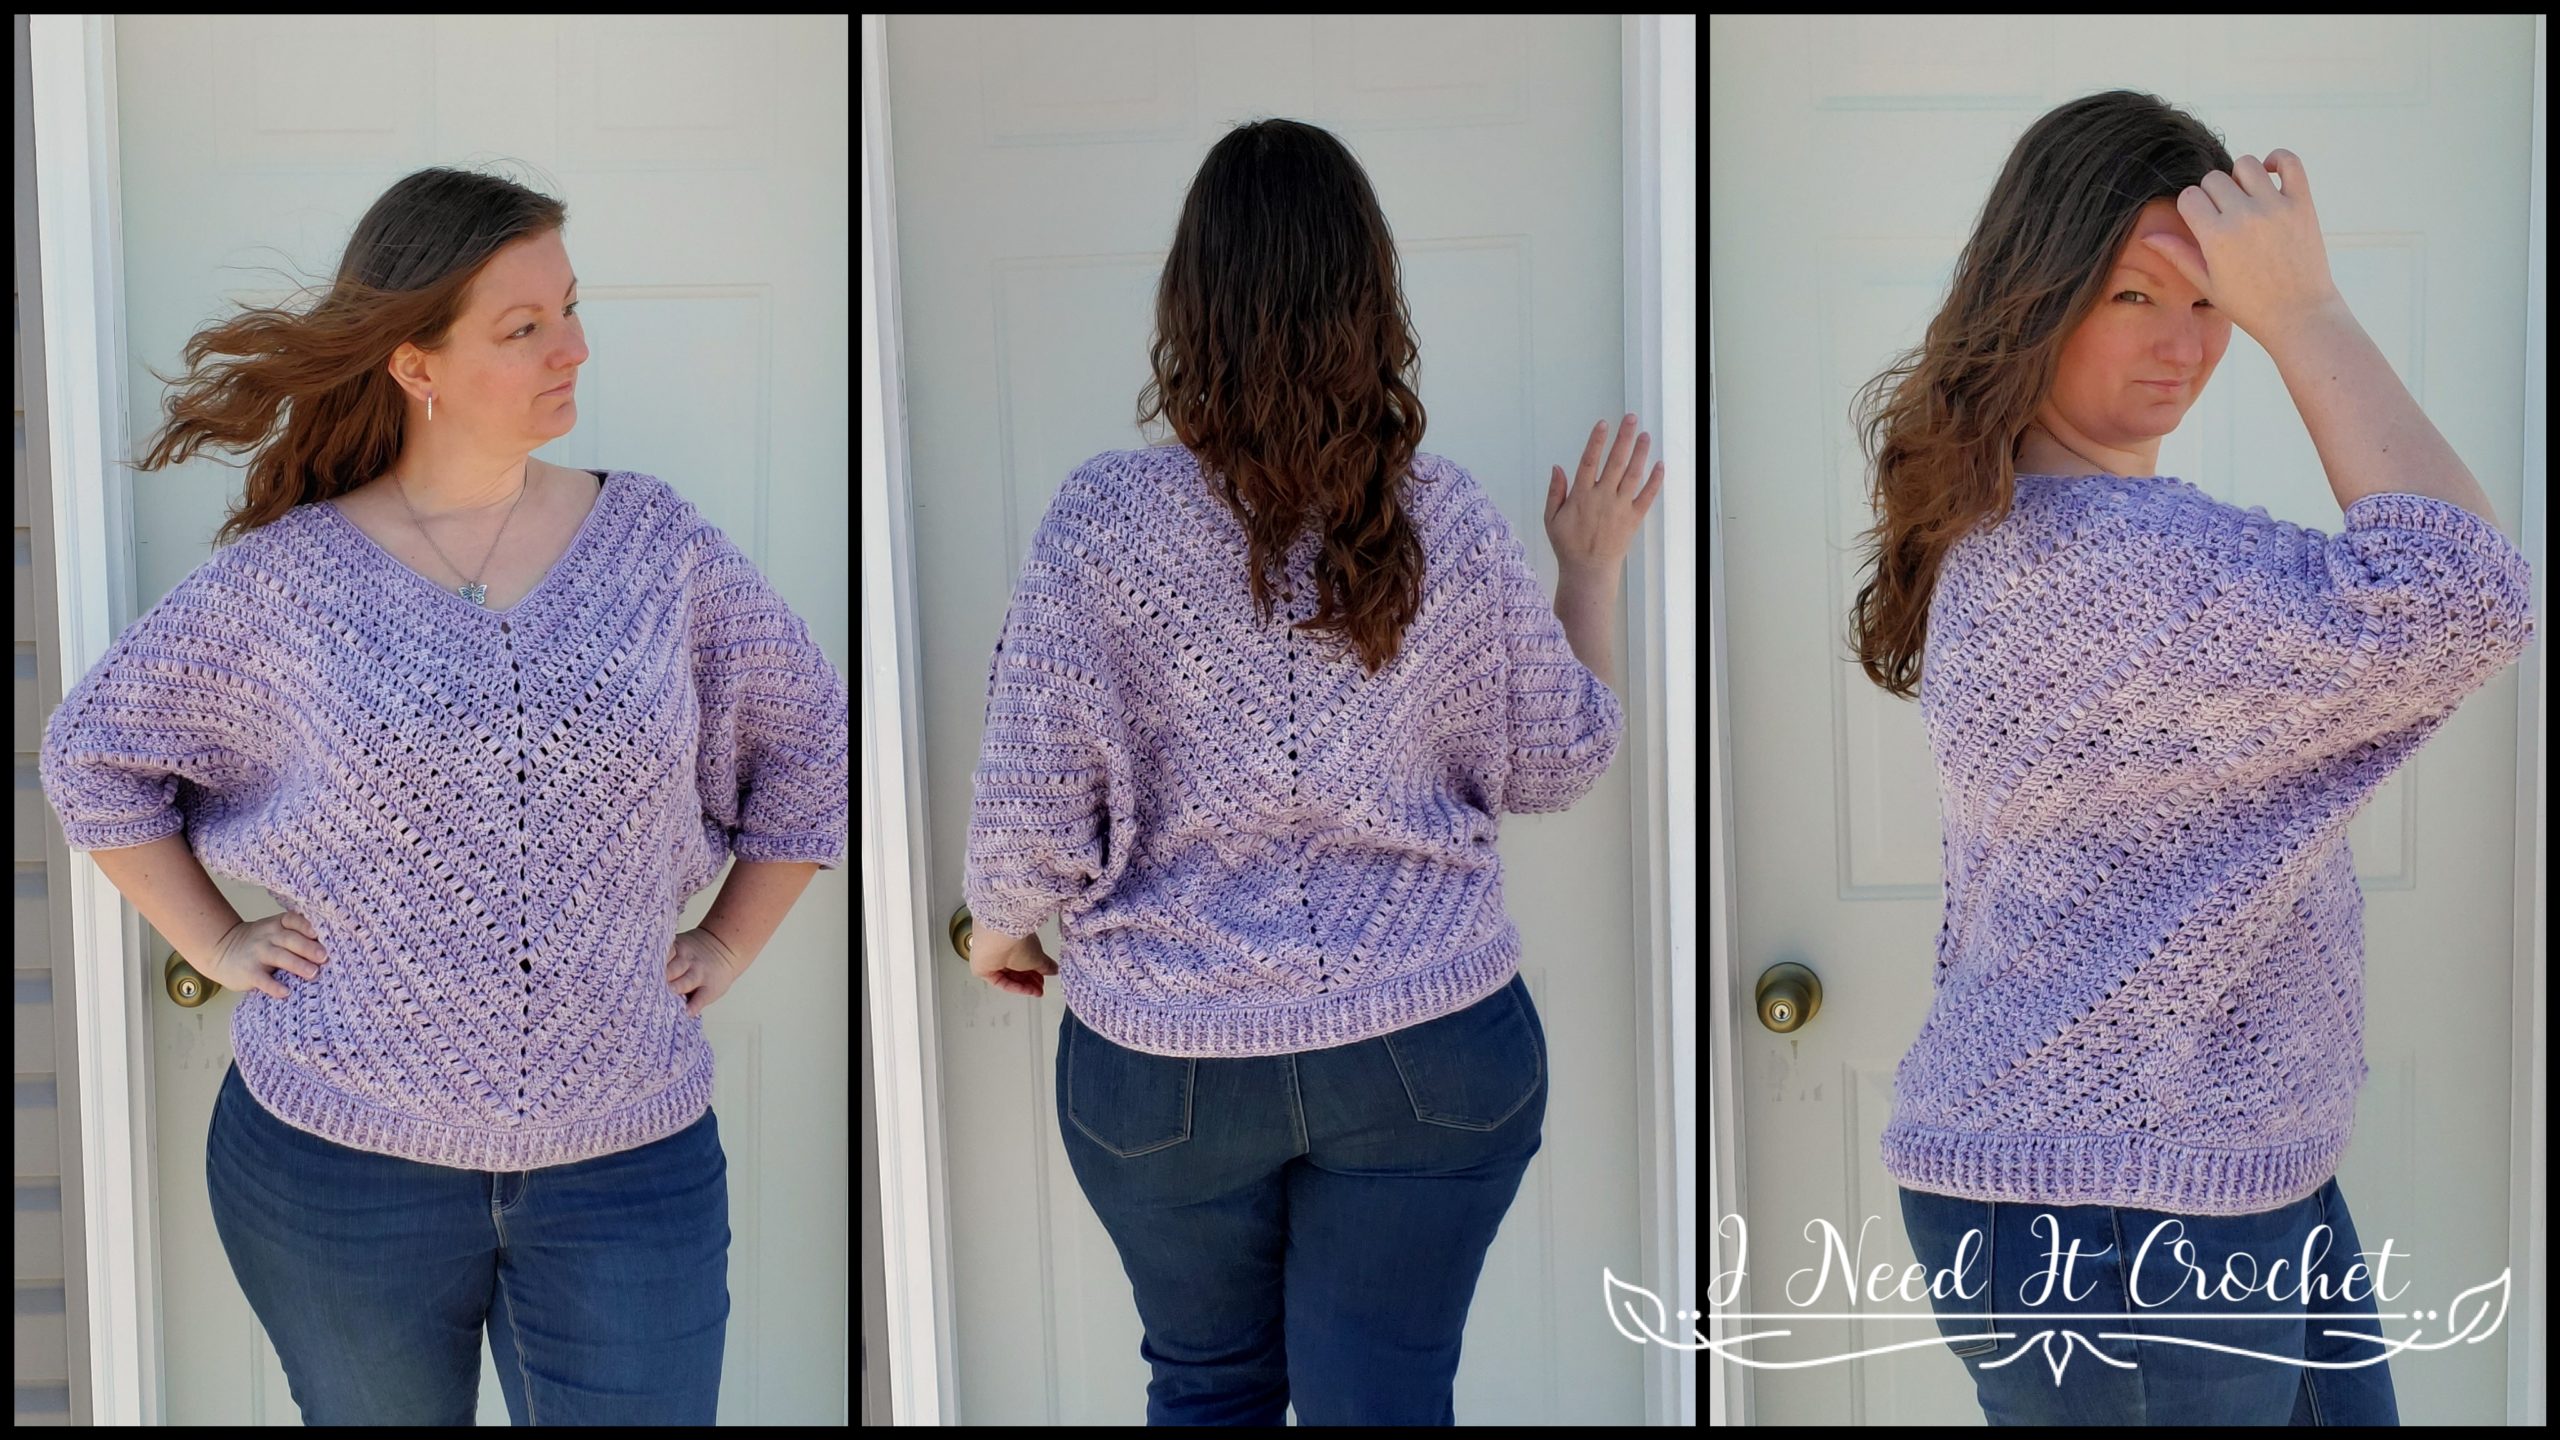
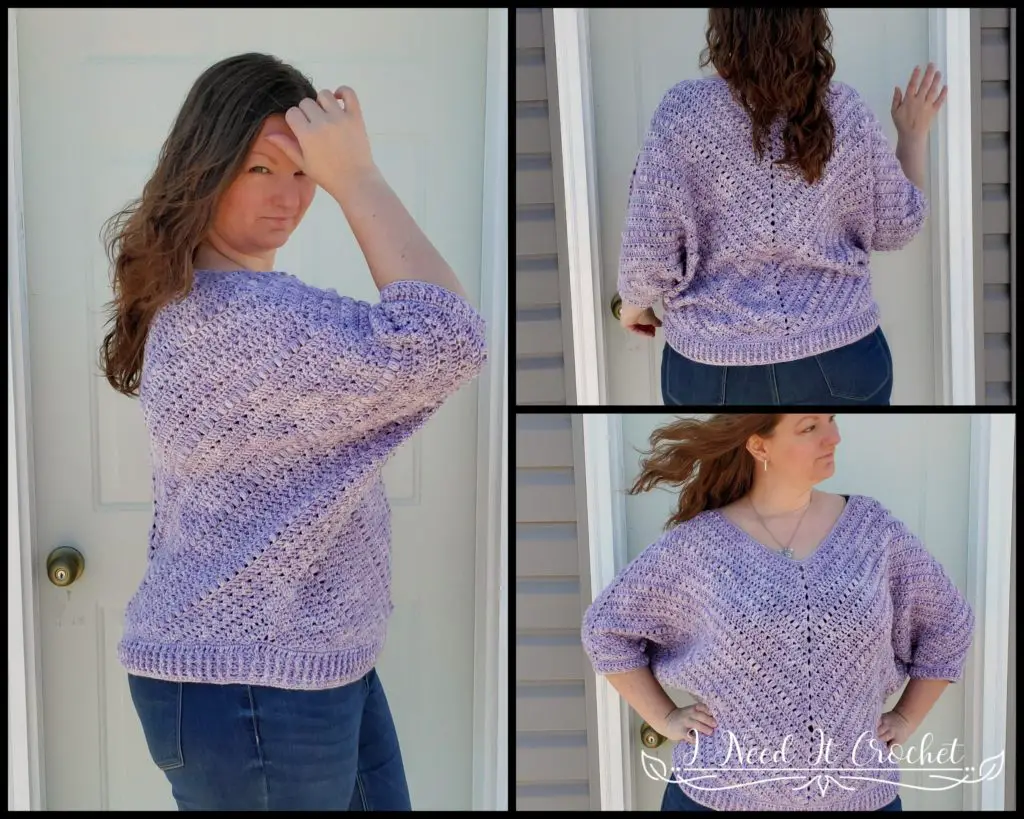
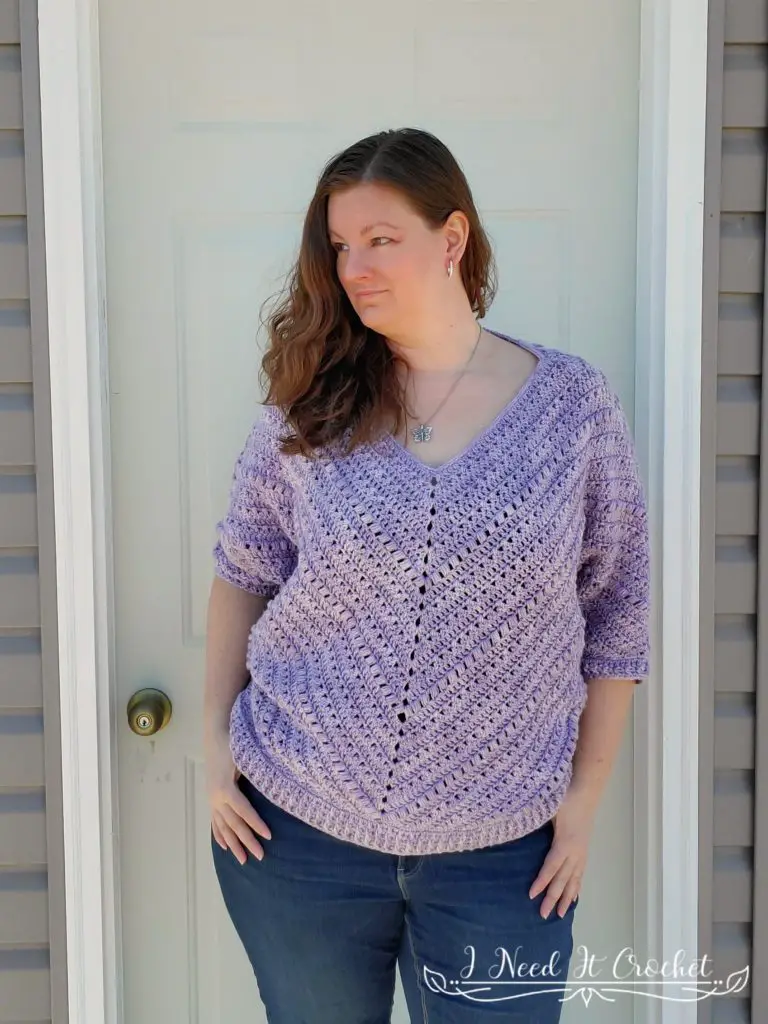
I’ve always wanted to design a batwing pullover. Not only does the batwing resemble my favourite shape (the triangle), but the style is so fun and flattering on all shapes and sizes.
To write this pattern, I had to break the design down into parts and take you through them step-by-step. This will help you navigate through the construction process to achieve a pullover perfectly made for you. I’ve never written a pattern like this one before, but I’m glad I did. This pattern is definitely greater than the sum of its parts.
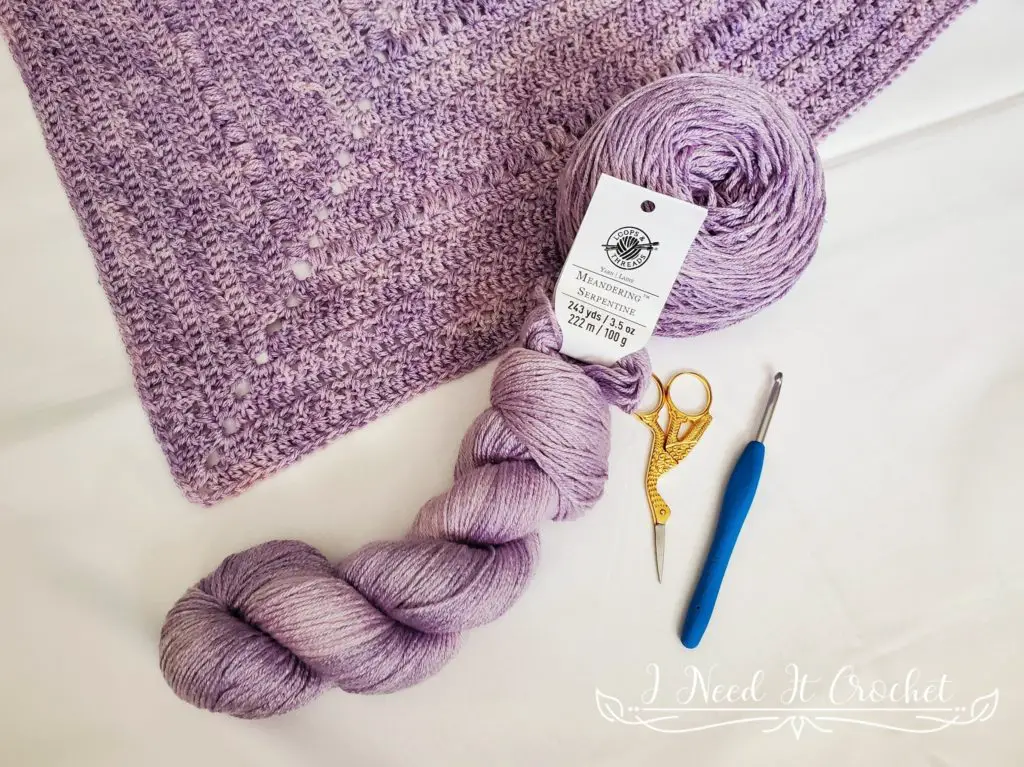
The Yarn
I designed this pullover using Loops & Threads Meandering Serpentine. I picked up this yarn while on a shopping trip to
Michael’s last fall. I had already filled my basket with all of my needs (and a few wants) and was cruising past the clearance bins when the beautiful pale lilac colour caught my eye. I was instantly smitten. I quickly checked the price sticker and saw that it had been marked down considerably. I was definitely sold. I put 6 hanks in my basket and took them home to decide their fate.
I was a bit perplexed at first as to why Loops & Threads would release this yarn in hanks instead of skeins. But once I wound the first one into a cake, I saw that the soft variations of colour really stand out better in hank form.
As I started to work with the yarn, I quickly realized that it is not a typical #4 worsted weight as it is labelled. I did a quick measurement and found it t be 12 WPI, which is actually in the #3 DK weight range. This is why I recommend using a #3 DK weight yarn with this project. A couple of my testers did use #4 worsted for their projects and were successful, but they did remark that it made the pullover a bit heavier.
Finished Sizes:
Instructions given to fit size X-small; changes for small, medium, large, X-large, 2X-large, 3X-large, 4X-large and 5X-large are in ()
XS (S, M, L, XL, 2XL, 3XL, 4XL, 5XL)
To Fit Bust Size: 28” (32”, 36”, 40”, 44”, 48”, 52”, 56”, 60”)
Note: I have written this pattern so that the bottom band matches the above bust measurements. It is easy to choose a different size later in the pattern.
Finished Length: Approximately 23”.
Materials:
I used Loops & Threads Meandering Serpentine, which is 90% Acrylic, 10% Nylon yarn. This yarn is labelled as a #4 worsted, but at 12 wpi, it is closer to a #3 dk weight.
Any yarn of similar weight would work.
Approximately 1350 (1350, 1450, 1450, 1450, 1550, 1550, 1650, 1650) yds.
5mm Hook
Stitch Markers
Yarn Needle
Scissors
Measuring Tape
Abbreviations:
Rs = Right Side
Ws = Wrong Side
Sk = Skip
Sp = Space
St = Stitch
Ss = Slip Stitch
Ch = Chain
Sc = Single Crochet
Dc = Double Crochet
Hdc4tog = Half Double Crochet 4 Together
Dc2tog = Double Crochet 2 Together
Dc3tog = Double Crochet 3 Together
Tr2tog = Triple Crochet 2 Together
Tr3tog = Triple Crochet 3 Together
Fpdc = Front Post Double Crochet
Bpdc = Back Post Double Crochet
Gauge:
There will be two places within the pattern to measure gauge. Be sure to take the time to measure gauge, as it will save you time in the long run.
Notes:
Ch1 and ch2 at the beginning of a row is never considered a stitch.
Ch3 at the beginning of a row is considered a dc.
Each ch in neck opening counts as a stitch.
Ps is counted as 2 sts. Cdc is also counted as 2 sts.
Check out these links to see tutorials fr how to work the Puff Stitch and Crossed Double Crochet.
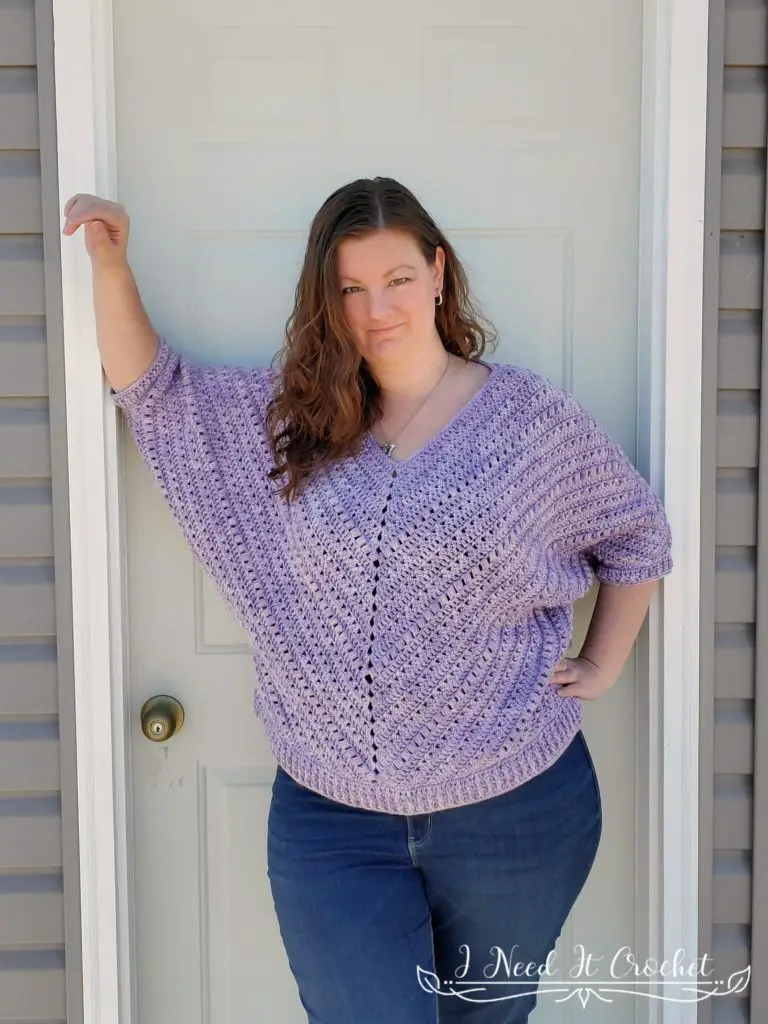
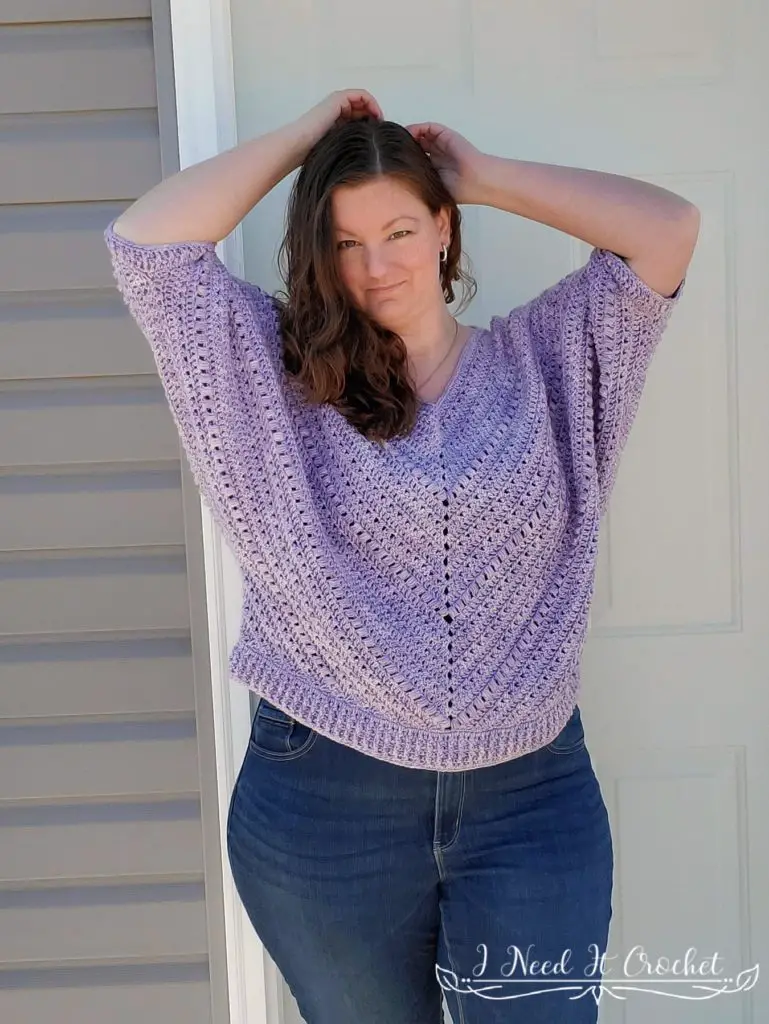
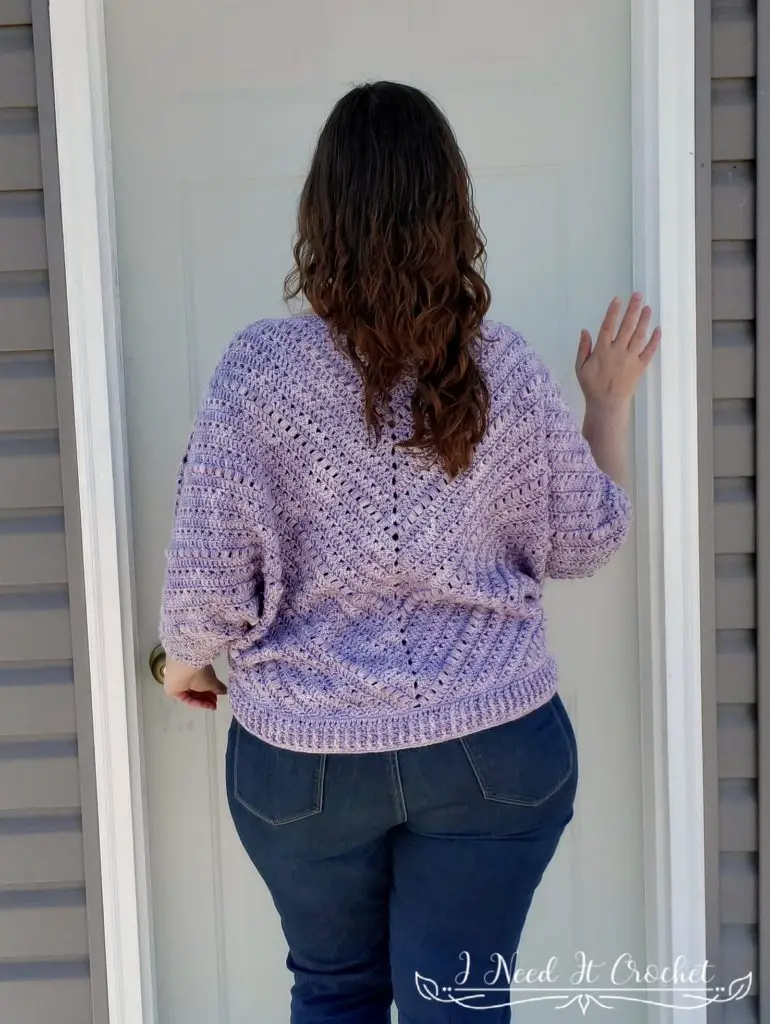
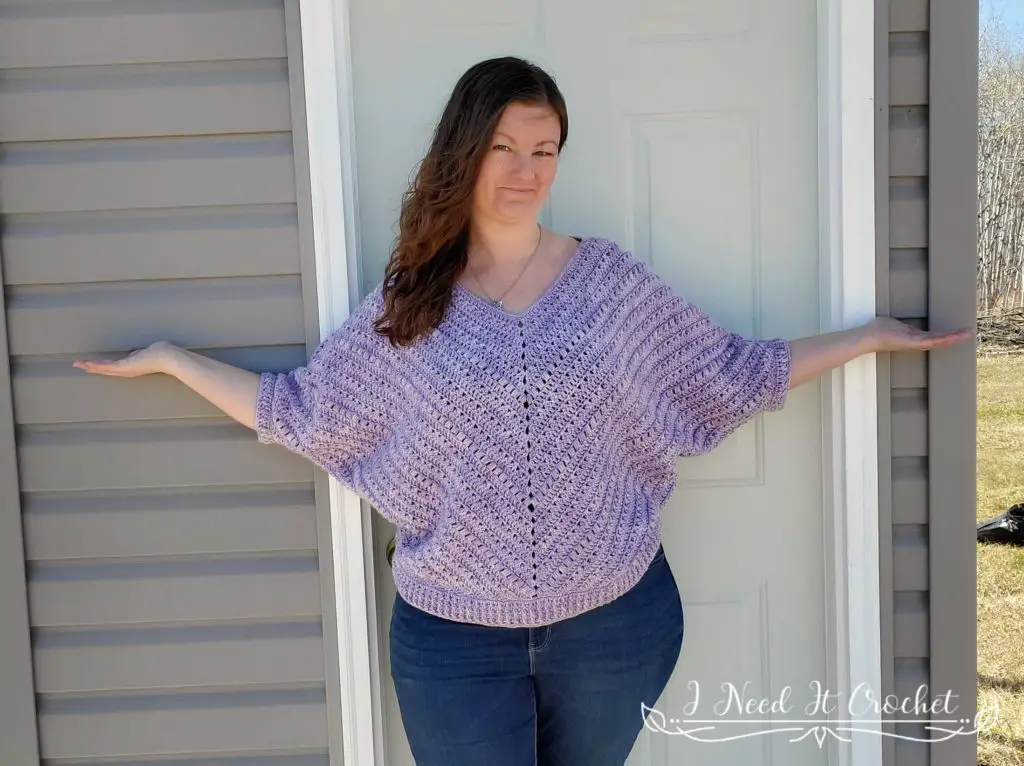
The model above (that’s me) has a 42” bust and is wearing a size XL.
Sum Of Its Parts Pullover – Free Crochet Pattern
Instructions
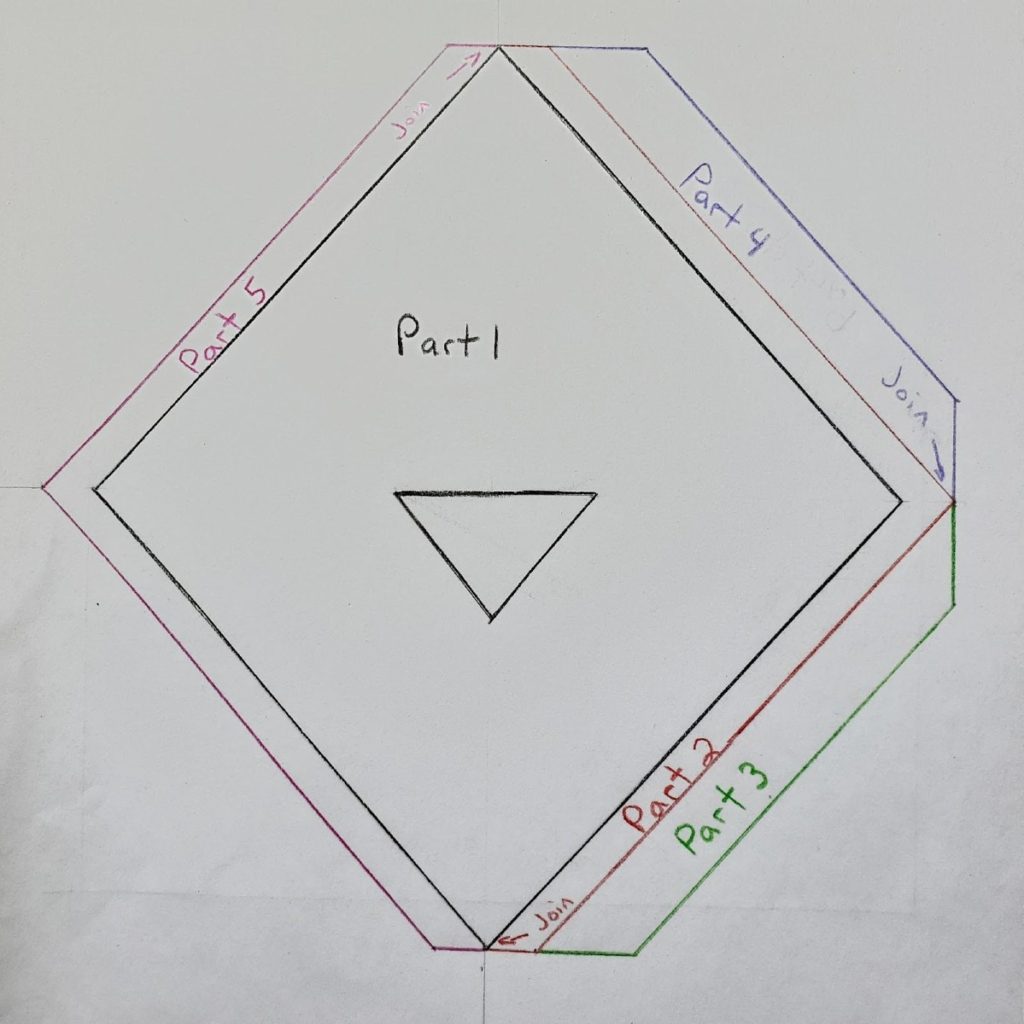
Before we jump in, I would like to go over the construction of this pullover. We will be creating a large flat piece. This piece consists of many parts, which we will be adding in a join-as-you-go method. Once the flat piece is complete, we will then fold it in half. Then, we will sew the bottoms of the sleeves, add the sides, cuffs, bottom hem, and finish off the neckline. It sounds like a lot, but I have broken it down into a series of steps and drawn some illustrations to help you along the way.
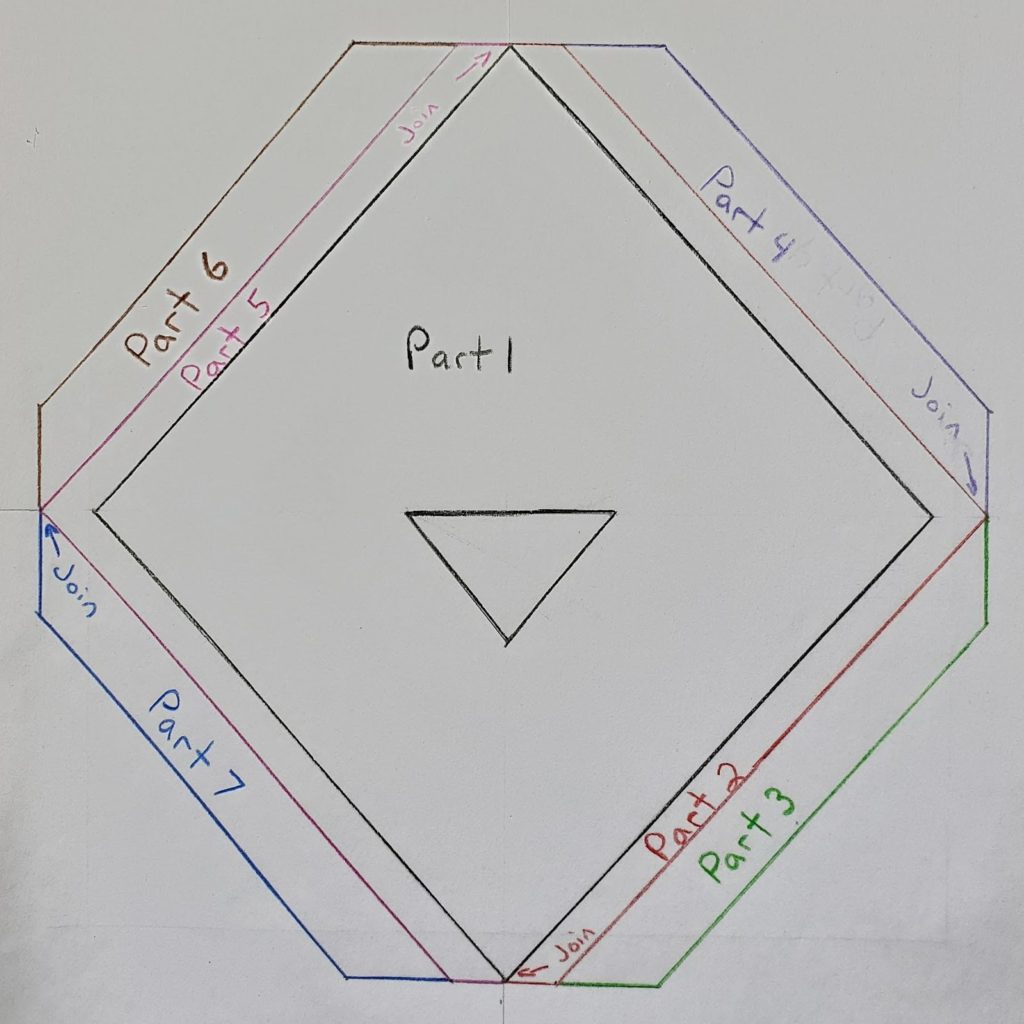
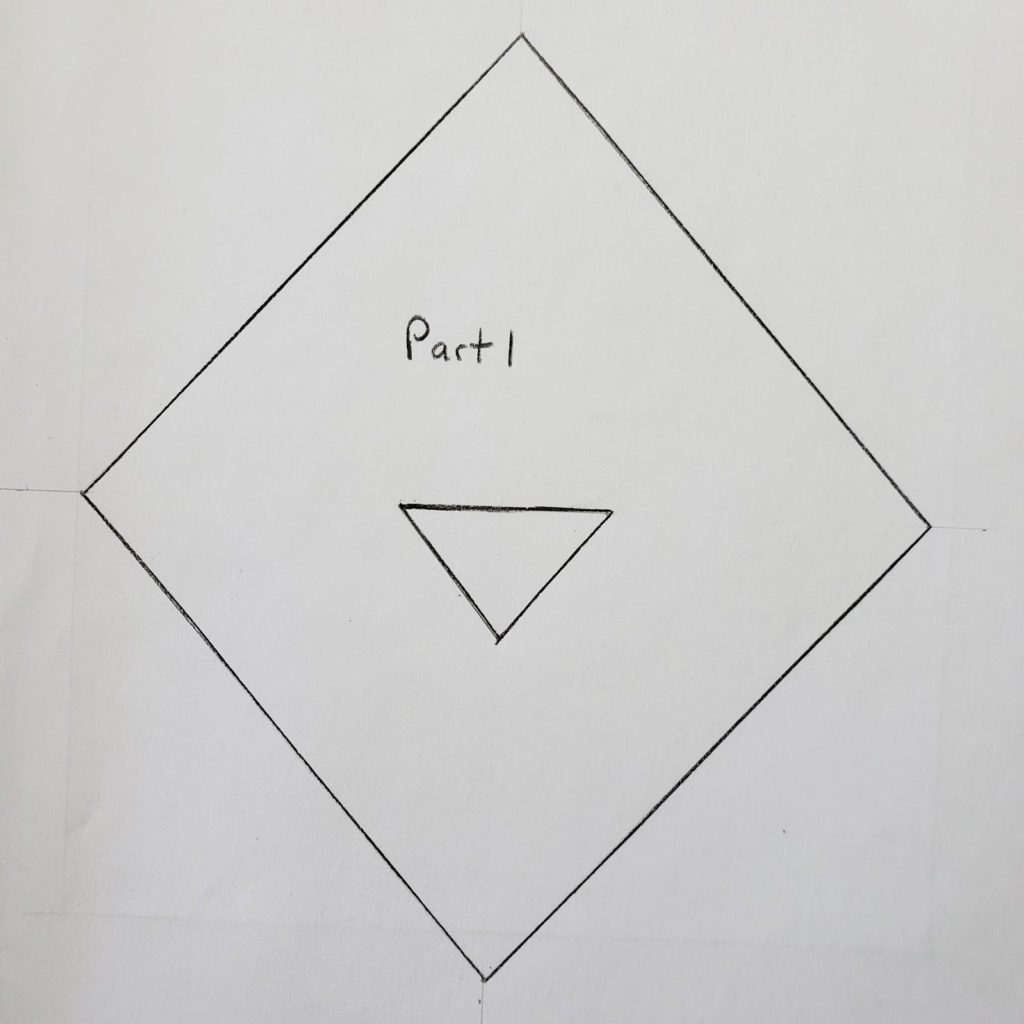
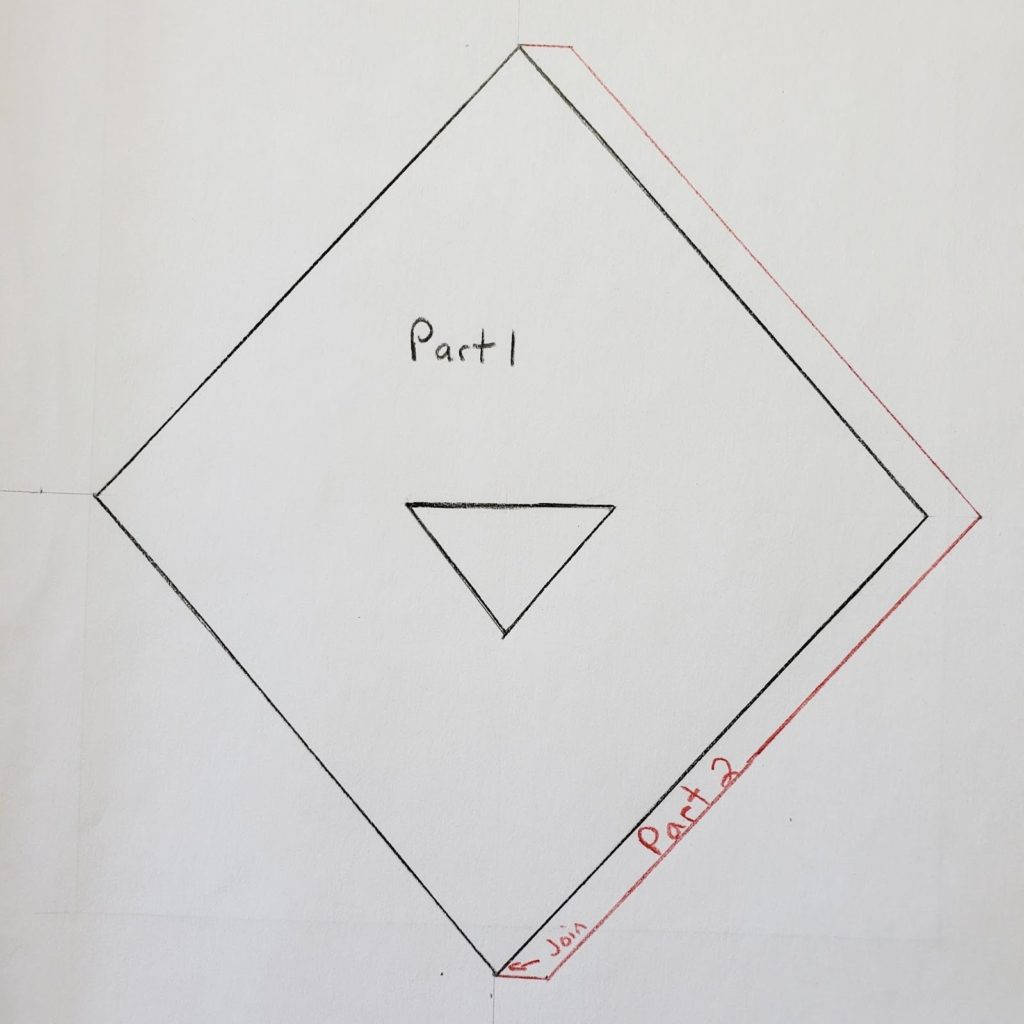
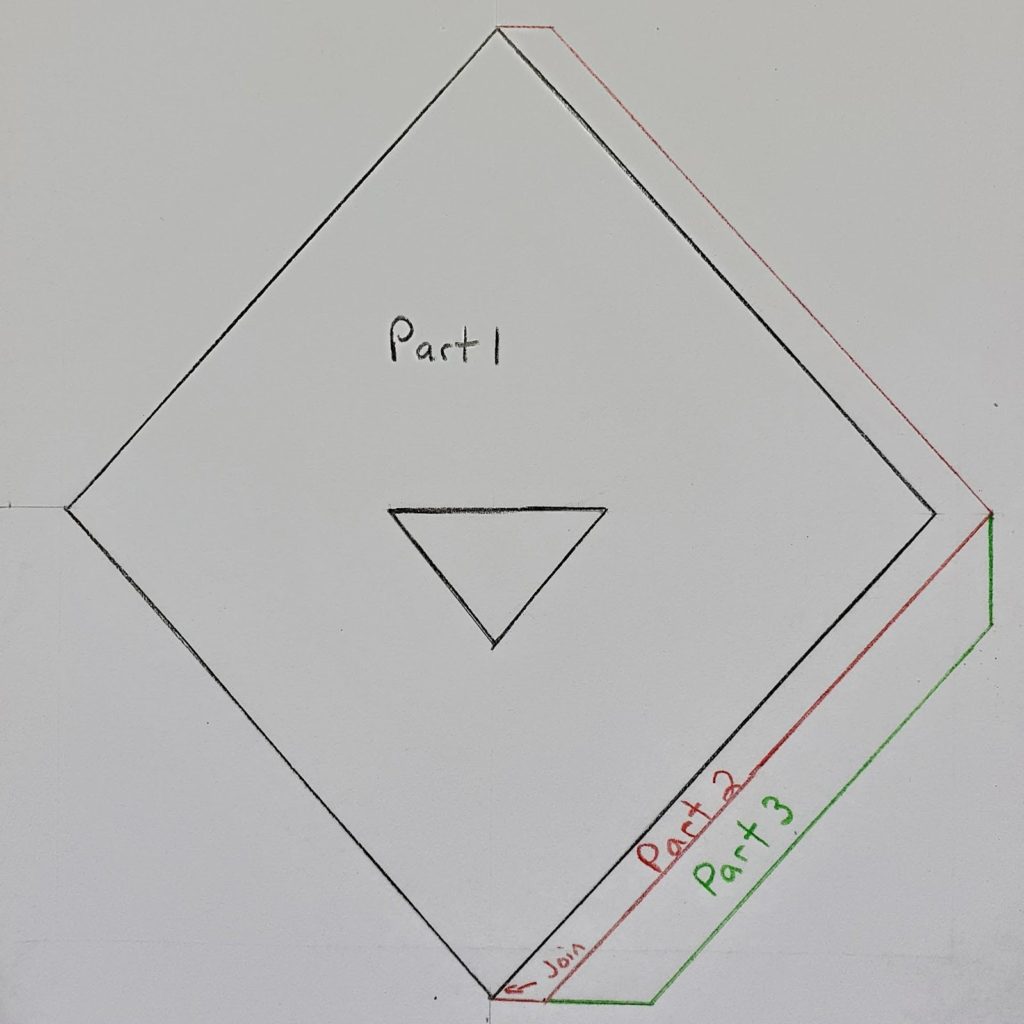
Part 1
Part 1 (see Figure 2) is the largest part of this pattern. It is basically a big diamond with a triangle shaped neck hole in the middle.
With 5mm Hook
Ch4. Ss to 1st ch to form a ring.
1. Ch3. Work 3dc, ch2, then 4dc into the ring. Turn. – 8 st + ch2
2. Ch3, dc in 1st st. Dc in next st and each st across until you come to the ch2. (2dc, ch2, 2dc) in ch2 sp. Dc in each st until you have only 1 st left unworked. 2dc in last st. Turn. – 14 st + ch2.
3. Ch3, dc in 1st st. Cdc in next 2 sts and each st across until you come to the ch2. (2dc, ch2, 2dc) in ch2 sp. Cdc in next 2 sts and each st across until you have only 1 st left unworked. 2dc in last st. Turn. – 20 st + ch2
4. Repeat row 2. – 26 st + ch2
5. Repeat row 3. – 32 st + ch2
Gauge Check: Your triangle should measure 3 ½” H x 5 ¾” W. If your measurements are not close to correct, try again with a different sized hook.
6. Repeat row 2. – 38 st + ch2
7. Repeat row 3. – 44 st + ch2
8. Repeat row 2. – 50 st + ch2
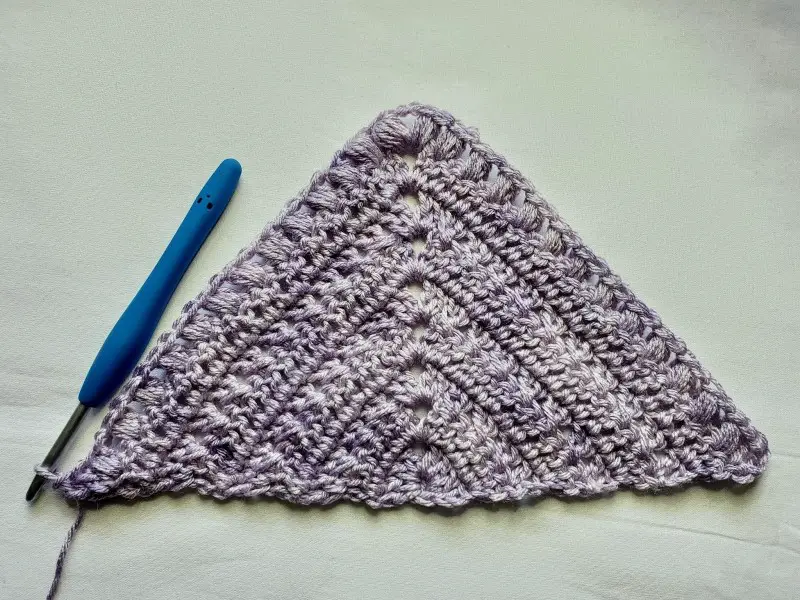
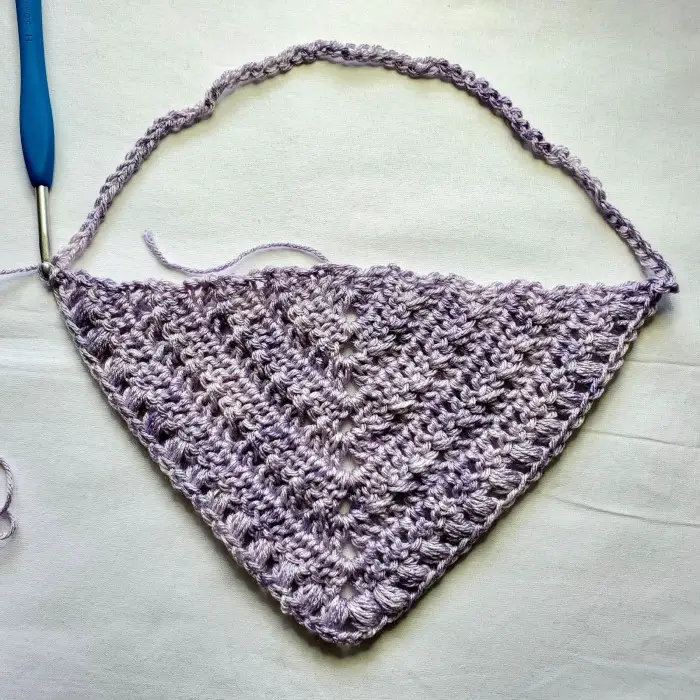
9. Ch3, dc in 1st st. *Ps in next st, sk1 st. ** Repeat from * to ** across until you come to the ch2. (Ps, ch2, ps) in ch2 sp. *Sk1 st, ps in next st.** Repeat from * to ** across until there is only 1 st left unworked. 2dc in last st. Your project should now look like Figure 3. Ch60. Ss to join to top of ch3 (see Figure 4). Turn. – 56 st + ch2 + ch60
Gauge Check: The triangle portion of your project should measure 5 ¾” H x 9 ¾” W.
10. Ch3, (dc, ch1, dc) in 1st ch. Dc in next 28 ch. 2dc in next ch, ch2, 2dc in next ch. Dc in next 28 ch, (dc, ch1, dc) in last ch. Dc in next st and each st across until you come to the ch2. (2Dc, ch2, 2dc) in ch2 sp. Dc in each st to end. Ss to join to top of ch3. Ss in next st, ss into ch1 sp. Turn. – 124 st + 2 ch2 + 2 ch1
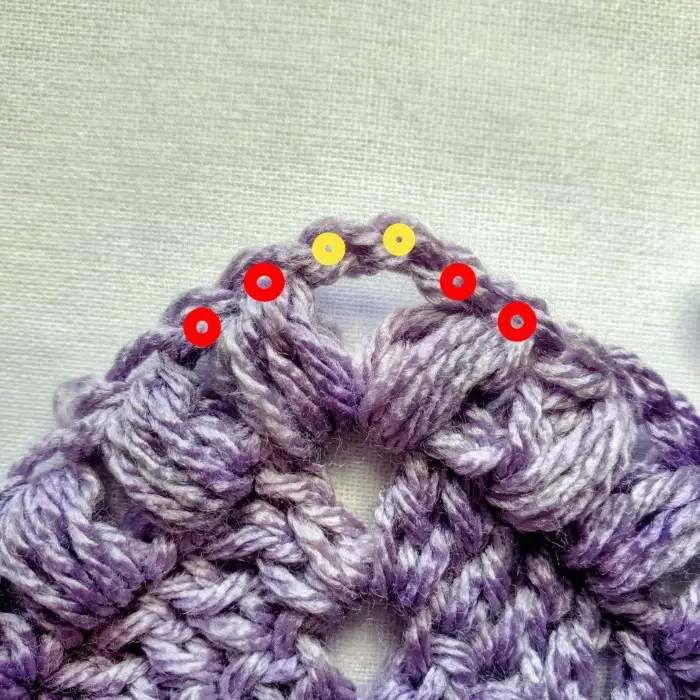
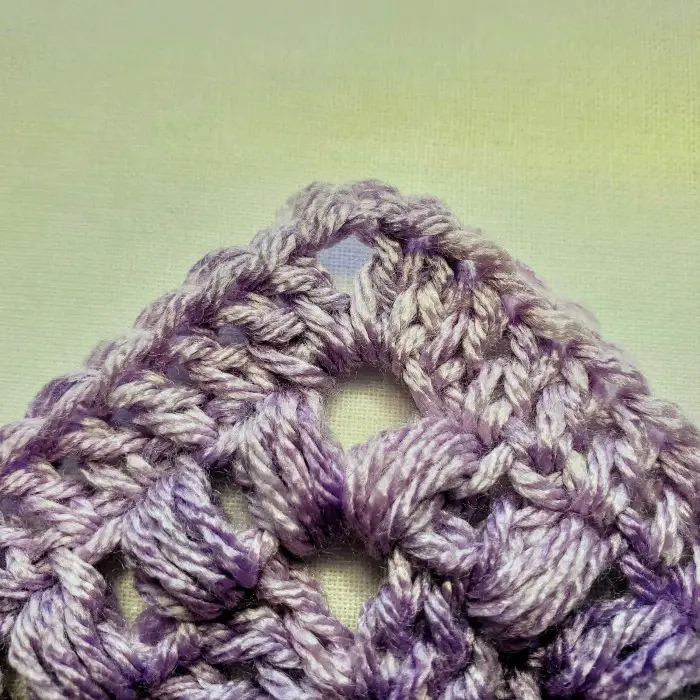
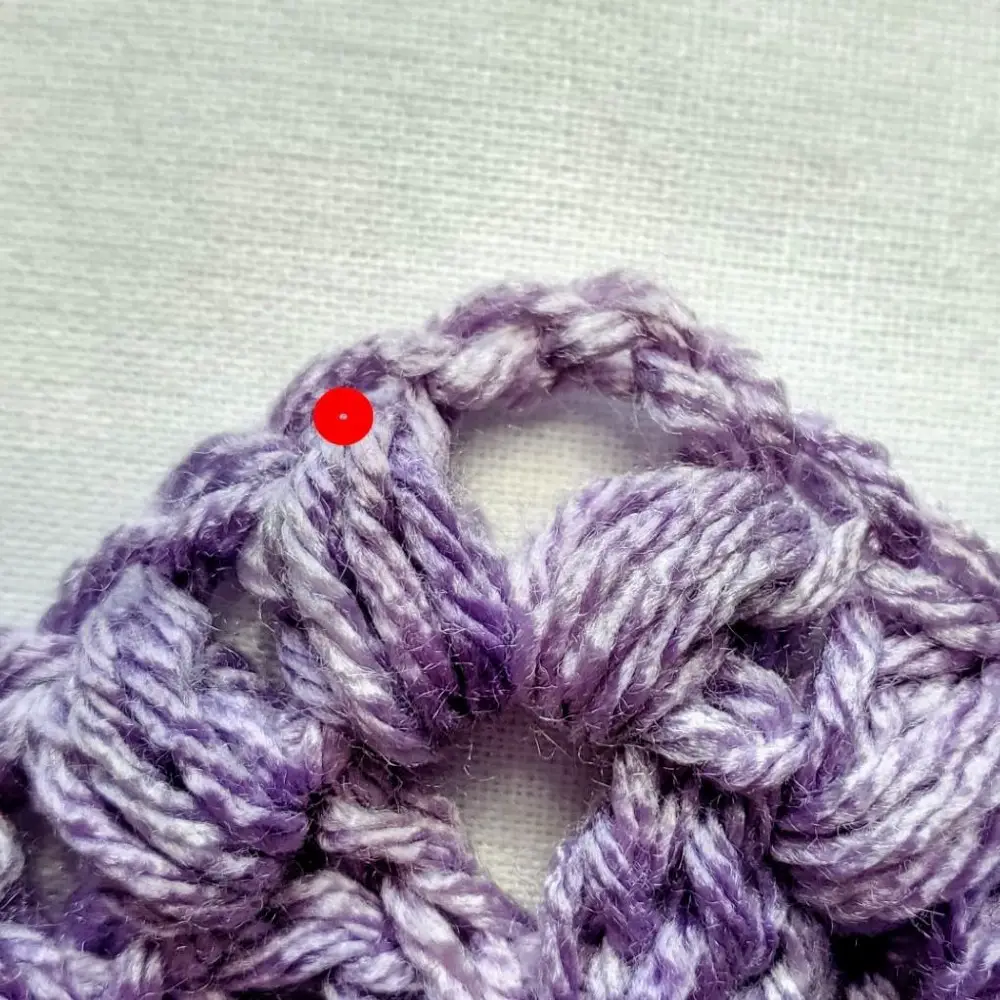
Note: Some may find it difficult to tell the difference between the tops of the puff stitches and the chain stitches, so I have illustrated some pictures to help. In Figure 5, the tops of the ps are marked in red. The ch sts are marked in yellow. Figure 6 shows what the same corner looks like once round 10 is completed.
11. Ch4, dc in ch1 sp (counts as dc, ch1, dc). * Dc in next st. Cdc in next 2 sts and each st across to ch2. (2dc, ch2, 2dc) in ch2 sp. Cdc in next 2 sts and each st across until there is only 1 st left unworked before the ch1 sp. ** Dc in next st, (dc, ch1, dc) in ch1 sp. Repeat from * to **. Dc in last st. Ss to 3rd ch of beginning ch4. Ss into ch1 sp. Turn. – 136 st + 2 ch2 + 2 ch1
12. Ch4, dc in ch1 sp (counts as dc, ch1, dc). * Dc in next st and each st across to ch2 sp. (2dc, ch2, 2dc) in ch2 sp. Dc in next st and each st across to ch1 sp. ** (Dc, ch1, dc) in ch1 sp. Repeat from * to **. Ss to 3rd ch of beginning ch4. Ss into ch1 sp. Turn. – 148 st + 2 ch2 + 2 ch1
13. Repeat round 11. – 160 st + 2 ch2 + 2 ch1
14. Repeat round 12. – 172 st + 2 ch2 + 2 ch1
15. Repeat round 11. – 184 st + 2 ch2 + 2 ch1
16. Repeat round 12. – 196 st + 2 ch2 + 2 ch1
17. Ch4, dc in ch1 sp (counts as dc, ch1, dc). Dc in next st. [*Ps in next st, sk1 st. ** Repeat from * to ** across until you come to the ch2. (Ps, ch2, ps) in ch2 sp. *Sk1 st, ps in next st.** Repeat from * to ** across until there is only 1 st left before ch1 sp. Dc in next st], (dc, ch1, dc) in ch1 sp. Dc in next st. Repeat from [ to ]. Ss to 3rd ch of beginning ch4. Ss into ch1 sp. Turn. – 208 st + 2 ch2 + 2 ch1
18. Repeat round 12. – 220 st + 2 ch2 + 2 ch1
19. Repeat round 11. – 232 st + 2 ch2 + 2 ch1
20. Repeat round 12. – 244 st + 2 ch2 + 2 ch1
21. Repeat round 11. – 256 st + 2 ch2 + 2 ch1
22. Repeat round 12. – 268 st + 2 ch2 + 2 ch1
23. Repeat round 11. – 280 st + 2 ch2 + 2 ch1
24. Repeat round 12. – 292 st + 2 ch2 + 2 ch1
25. Repeat round 17. – 304 st + 2 ch2 + 2 ch2
26. Repeat round 12. – 316 st + 2 ch2 + 2 ch1
27. Repeat round 11. – 328 st + 2 ch2 + 2 ch1
28. Repeat round 12. – 340 st + 2 ch2 + 2 ch1
29. Repeat round 11. – 352 st + 2 ch2 + 2 ch1
30. Repeat round 12. – 364 st + 2 ch2 + 2 ch1
31. Repeat round 11. – 376 st + 2 ch2 + 2 ch1
32. (Right Side) Repeat round 12. Place a st marker to remind you that this is the rs. – 388 st + 2 ch2 + 2 ch1
33. (Wrong side) Repeat round 17. – 400 st + 2 ch2 + 2 ch1
Bind off. Part 1 is complete.
Part 2
In Part 2 we will be adding a little bit of length to the sleeves. With the right side of your project facing you, join your yarn in the front in the st just after the ch2 (noted in Figure 7 and marked in red in Figure 8).
1. Ch2, dc2tog (counts as a dc3tog). Dc in next st and each st across to ch1 sp. (Dc, ch1, dc) in ch1 sp. Dc in next st and each st across until you have only 3 sts left before the ch2sp. Dc3tog over the last 3 sts. Turn. (Note: If you’ve forgotten how to tell the difference between the ps and ch sts, take another look at Figure 5 above.) – 198 st + ch1
2. Ch2, dc2tog (counts as a dc3tog). Dc in next st. Cdc in next 2 sts and each st across until there is only 1 st left before the ch1 sp. Dc in next st, (dc, ch1, dc) in ch1 sp, dc in next st. Cdc in next 2 sts and each st across until there are only 4 sts left unworked. Dc in next st, dc3tog over last 3 sts. Turn. – 196 st + ch1
3. Repeat row 1. – 194 st + ch1
4. Repeat row 2. – 192 st + ch1
Part 2 is complete, but do not bind off. We will continue from here on to Part 3.
Part 3
Part 3 is where we add width to the front of the sleeve. I have written this pattern so that you can choose a sleeve width from the options I have provided. We all have different arms, so the best way to choose a sleeve size is to measure the circumference of your arm at the bend in your elbow. If your forearm is much bigger than your elbow, then use your forearm measurement. Then choose from the options below, whichever size is closest to your measurement.
Instructions written to fit sleeve circumference: 9 ½” (11, 12 ½”, 14”, 15”, 16 ½”, 18”, 19”, 20 ½”, 21 ½”)
1. Ch2, dc2tog (counts as a dc3tog). Dc in next st and each st across until there are only 3 sts left before the ch1. Dc3tog over last 3 sts. Turn. – 92 st
2. Ch2, dc2tog (counts as a dc3tog). Dc in next st, cdc in next 2 sts and each st across until there are only 4 sts left unworked. Dc in next st, dc3tog over last 3 sts. Turn. – 88 st
3. Repeat row 1. – 84 st
4. Ch2, dc2tog (counts as a dc3tog). Dc in next st. *Ps in next st, sk1 st. ** Repeat from * to ** across until there are only 4 sts left unworked. Dc in next st, dc3tog over last 3 sts. Turn. – 80 st
5. Repeat row 1. – 76 st
6. Repeat row 2. – 72 st
7. (Right side) Repeat row 1. – 68 st
For a 9 ½” sleeve, stop here. Skip past row 16 and follow the directions below.
8. (Wrong side) Repeat row 2. – 64 st
For an 11” sleeve, stop here. Skip past row 16 and follow the directions below.
9. (Right side) Repeat row 1. – 60 st
For a 12 ½” sleeve, stop here. Skip past row 16 and follow the directions below.
10. (Wrong side) Repeat row 2. – 56 st
For a 14” sleeve, stop here. Skip past row 16 and follow the directions below.
11. (Right side) Repeat row 1. – 52 st
For a 15” sleeve, stop here. Skip past row 16 and follow the directions below.
12. (Wrong side) Repeat row 4. – 48 st
For a 16 ½” sleeve, stop here. Skip past row 16 and follow the directions below.
13. (Right side) Repeat row 1. – 44 st
For a 18” sleeve, stop here. Skip past row 16 and follow the directions below.
14. (Wrong side) Repeat row 2. – 40 st
For a 19” sleeve, stop here. Skip past row 16 and follow the directions below.
15. (Right side) Repeat row 1. – 36 st
For a 20 ½” sleeve, stop here. Skip past row 16 and follow the directions below.
16. (Wrong side) Repeat row 2. – 32 st
Bind off. Part 3 is complete.
Part 4
For Part 4, we will add width to the back of the sleeve. Join your yarn in the top of the 1st dc after the ch1 (see Figure 10).
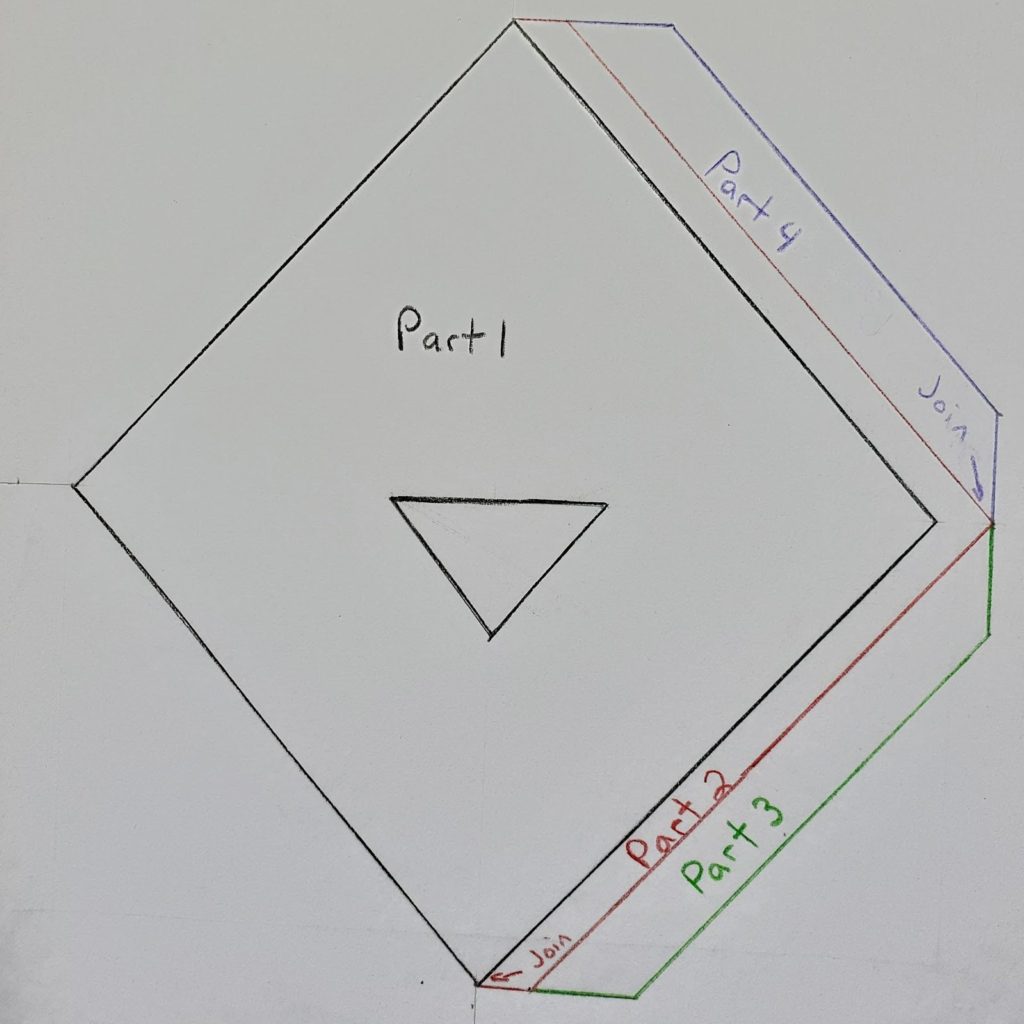
Repeat Part 3 starting with row 1. Work the same number of rows as you did in Part 3. At the end of Part 4, you will bind off. If you worked an even amount of rows in part 4 (ending on row 8, 10, 12, etc), you can bind off with a long enough tail to seam your sleeve later on. If you worked an odd number of rows, you can bind off as normal.
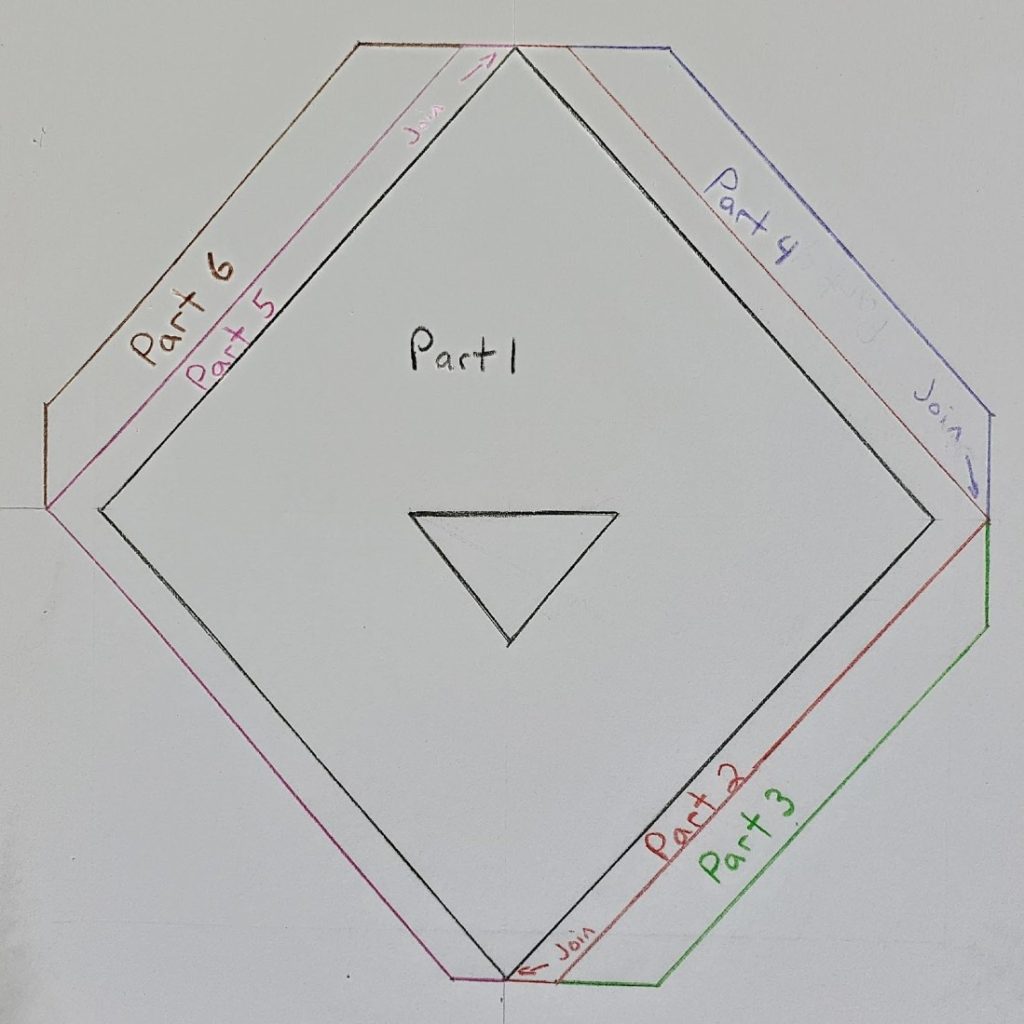
Part 5, 6, and 7
Parts 5, 6, and 7 are the same as Parts 2, 3, and 4, with a few differences:
– At the beginning of Part 5, you will join your yarn in the st just after the ch2 at the back of the sweater (see Figure 11).
– In Part 6, you will be adding width to the back of the sleeve (see Figure 12).
– In Part 7, you will be adding width to the front of the sleeve (see Figure 13).

From here, you may notice that the rest of the pattern does not contain stitch counts. This is because there are many possibilities of what your stitch counts could be, depending on the combination of body size and sleeve size you choose. But not to worry! The rest is pretty easy.
Sleeve Seaming
Next, we will seam the bottoms of the sleeves shut. But before we do that, we have to figure out how far down to seam them. This is where the sizing of your pullover comes into play.
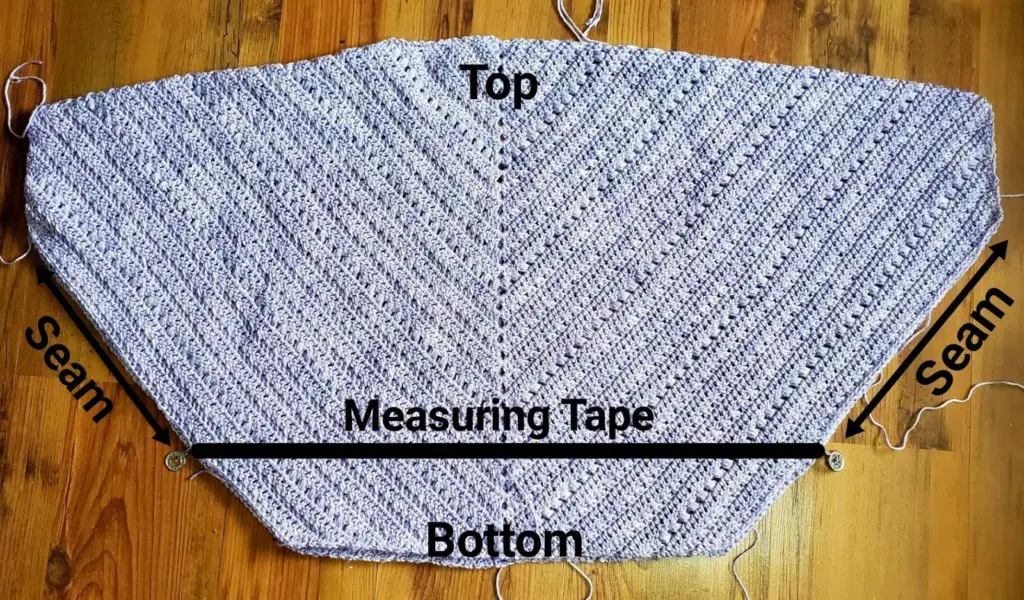
– First, you will fold your pullover in half with the right sides facing each other. Lay it out on a flat surface like in Figure 14. Make sure your front and back are matched up so the bottoms are even with each other.
– Decide on what you want the bottom circumference of your pullover to be. Under the sizing above, I have listed the standard bust measurements for each size, but you are welcome to make the bottom circumference any size you wish. Once you know the bottom circumference you are aiming for, divide it in half. That will be your pullover width.
– Take your measuring tape, and place it across your pullover. (I couldn’t get a clear picture with my measuring tape, so I drew one onto Figure 14. ) Move the tape up or down to where your pullover matches the width of the size you are aiming for. I wanted my width to be 22”, so I placed my tape where my pullover measured 22”. Place stitch markers at the ends of your tape (you can also see these in Figure 14).
Note: If the bottom matches your desired width, all you have to do is sew the seams up all the way down.
– Now you will count how many stitches you have between your stitch marker and the bottom of your pullover. You want there to be an even number of stitches. You also want to check that you have the front and back half matched up, so there are the same number of stitches on the back and front. Move your stitch marker up or down to the proper place. If you have one, use a locking stitch marker so that you can hold the front and back together securely. Do the same for both sides of the pullover.
– Once you have placed your stitch markers in the proper place and checked them, you can sew the bottom seams of the sleeves from the stitch markers, all the way up to the sleeve opening. You may use any sewing technique you like. Once both of your sleeves are sewn, turn your pullover right side out.
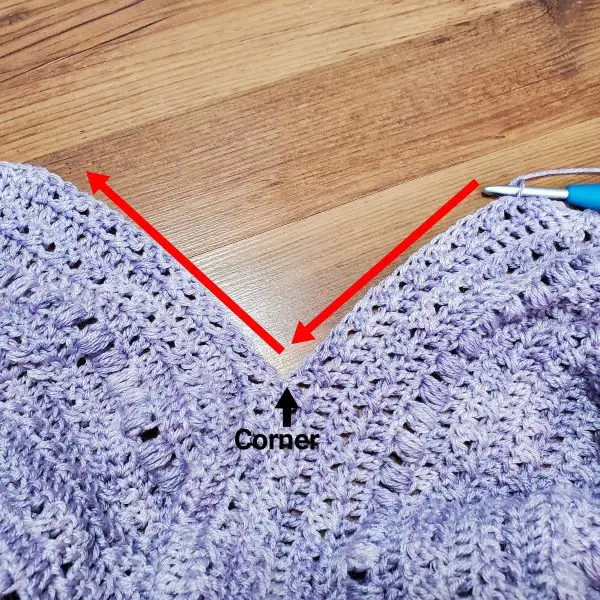
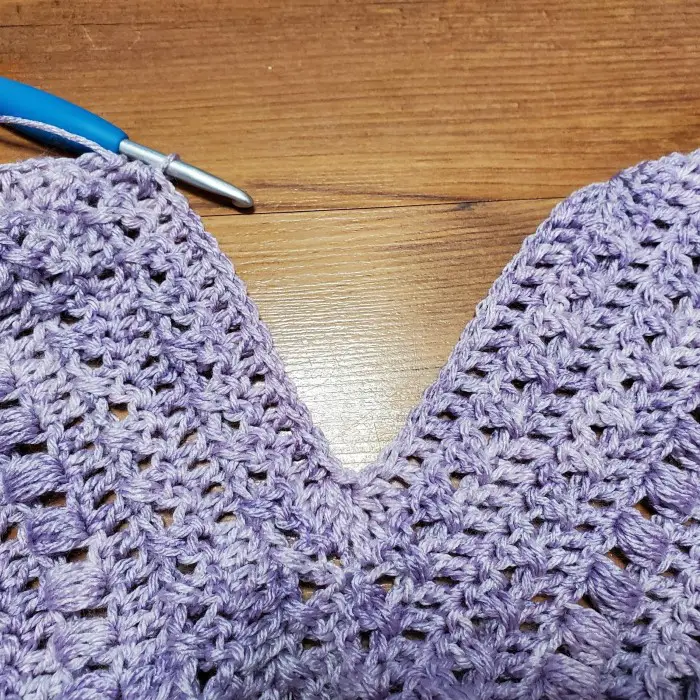
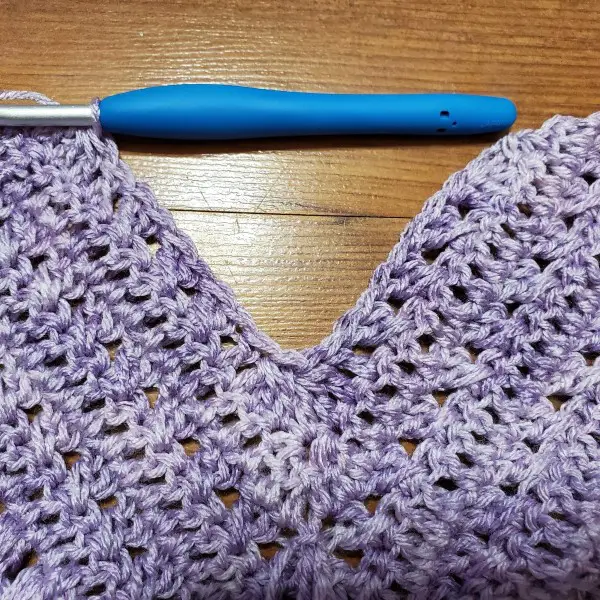
Sides
We will now build onto the sides so that the bottom matches your desired width. You will do this by working decrease stitches at the beginning of the row, in the corner, and at the end. The process will look similar to Figures 15, 16, and 17.
First, you will figure out if you’re starting with the right or wrong side facing you. Take a look at which row you finished on in Step 3. If it says (Right side), then join your yarn in the 1st stitch with the wrong side of your work facing you. If it says (Wrong side), then join your yarn in the 1st stitch with the right side facing you.
Now you will follow the directions below according to what row you ended on in Part 3. Begin with the proper row below and continue on to the subsequent rows. (Example: If you finished Step 6 with row 7, begin at row 1 below and continue on to rows 2, 3, 4, etc.) You will only follow the instructions until you have a total of 8 or 12 stitches left. Then you will work the final row as instructed below. If after seaming you only have 8 or 12 sts left, then skip this part and continue on to the final row.
If you finished on row 7, begin here:
1. Ch2, dc2tog (counts as a dc3tog), dc in next st. Cdc in next 2 sts and each st across until there are only 4 sts left before the corner. Dc in next st, dc3tog over next 3 sts. Dc3tog over next 3 sts, dc in next st. Cdc in next 2 sts and each st until there are only 4 sts left unworked. Dc in next st, dc3tog over last 3 sts. Turn.
If you finished on row 8, begin here:
2. Ch2, dc2tog (counts as a dc3tog). Dc in next st and each st across until there are only 3 sts left before the corner. Dc3tog over next 3 sts, dc3tog over next 3 sts. Dc in each st across until there are only 3 sts left unworked. Dc3tog over last 3 sts. Turn.
If you finished on row 9, begin here:
3. Ch2, dc2tog (counts as a dc3tog), dc in next st. Cdc in next 2 sts and each st across until there are only 4 sts left before the corner. Dc in next st, dc3tog over next 3 sts. Dc3tog over next 3 sts, dc in next st. Cdc in next 2 sts and each st until there are only 4 sts left unworked. Dc in next st, dc3tog over last 3 sts. Turn.
If you finished on row 10, begin here:
4. Ch2, dc2tog (counts as a dc3tog). Dc in next st and each st across until there are only 3 sts left before the corner. Dc3tog over next 3 sts, dc3tog over next 3 sts. Dc in each st across until there are only 3 sts left unworked. Dc3tog over last 3 sts. Turn.
If you finished on row 11, begin here:
5. Ch2, dc2tog (counts as a dc3tog), dc in next st. *Ps in next st, sk 1 st. ** Repeat from * to ** until there are only 4 sts left before the corner. Dc in next st, dc3tog over next 3 sts. Dc3tog over next 3 sts, dc in next st. *Sk 1 st, ps in next st. ** Repeat from * to ** until there are only 4 sts left unworked. Dc in next st, dc3tog over last 3 sts. Turn.
If you finished on row 12, begin here:
6. Ch2, dc2tog (counts as a dc3tog). Dc in next st and each st across until there are only 3 sts left before the corner. Dc3tog over next 3 sts, dc3tog over next 3 sts. Dc in each st across until there are only 3 sts left unworked. Dc3tog over last 3 sts. Turn.
If you finished on row 13, begin here:
7. Ch2, dc2tog (counts as a dc3tog), dc in next st. Cdc in next 2 sts and each st across until there are only 4 sts left before the corner. Dc in next st, dc3tog over next 3 sts. Dc3tog over next 3 sts, dc in next st. Cdc in next 2 sts and each st until there are only 4 sts left unworked. Dc in next st, dc3tog over last 3 sts. Turn.
If you finished on row 14, begin here:
8. Ch2, dc2tog (counts as a dc3tog). Dc in next st and each st across until there are only 3 sts left before the corner. Dc3tog over next 3 sts, dc3tog over next 3 sts. Dc in each st across until there are only 3 sts left unworked. Dc3tog over last 3 sts. Turn.
If you finished on row 15, begin here:
9. Ch2, dc2tog (counts as a dc3tog), dc in next st. Cdc in next 2 sts and each st across until there are only 4 sts left before the corner. Dc in next st, dc3tog over next 3 sts. Dc3tog over next 3 sts, dc in next st. Cdc in next 2 sts and each st until there are only 4 sts left unworked. Dc in next st, dc3tog over last 3 sts. Turn.
If you finished on row 16, begin here:
10. Ch2, dc2tog (counts as a dc3tog). Dc in next st and each st across until there are only 3 sts left before the corner. Dc3tog over next 3 sts, dc3tog over next 3 sts. Dc in each st across until there are only 3 sts left unworked. Dc3tog over last 3 sts. Turn.
If you complete row 10 and you still have more than 8 or 12 sts left, repeat rows 3 – 10 until you have only 8 or 12 sts left unworked. Then work the final row as instructed below.
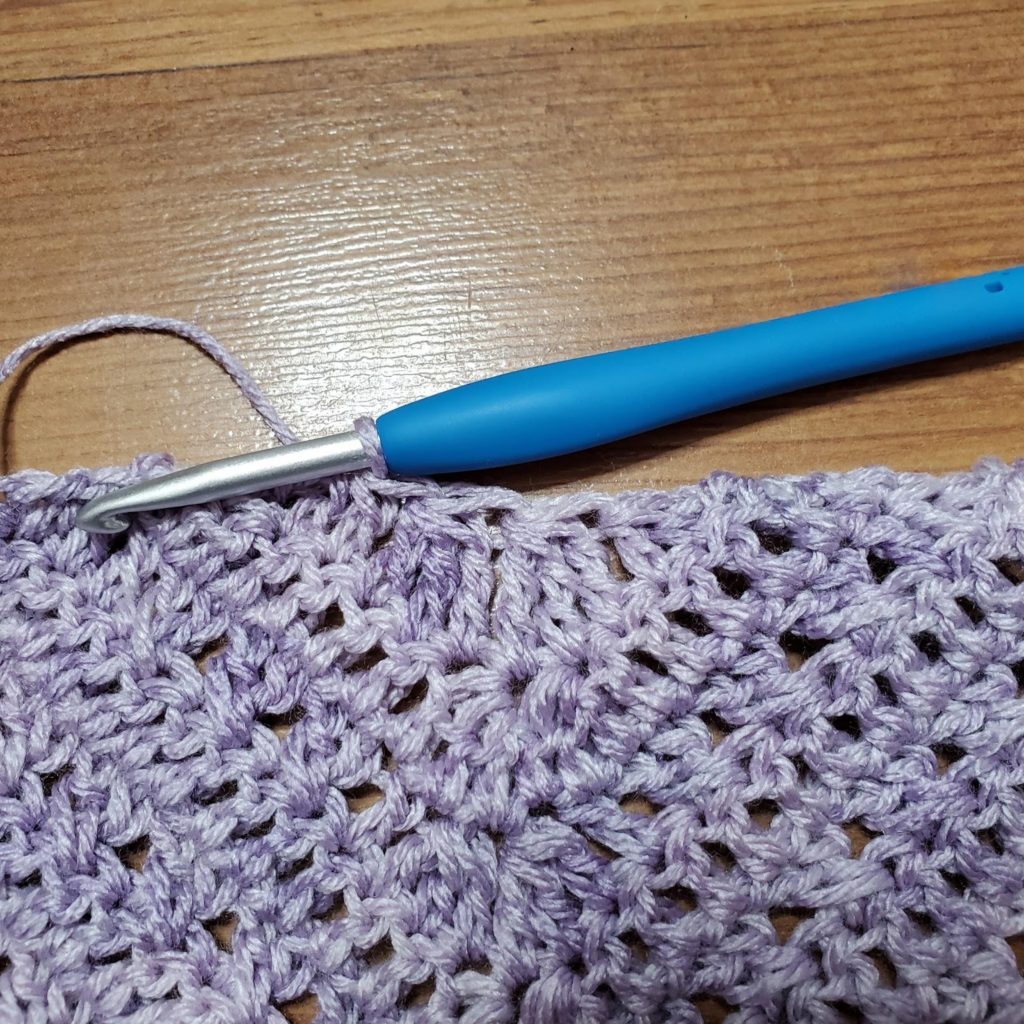
Final row:
For those with 8 sts left: Ch2, dc in next st (counts as a dc2tog), tr2tog over next 2 sts, tr2tog over next 2 sts, dc2tog over last 2 sts. Bind off.
For those with 12 sts left: Ch2, dc2tog (counts as a dc3tog), tr3tog over next 3 sts, tr3tog over next 3 sts, dc3tog over last 3 sts. Bind off.
Your work should now look similar to Figure 18.
Bottom Band
We will now add the bottom band. With the right side facing you, attach your yarn anywhere along the bottom of the pullover.
1. Ch1. Sc evenly around the bottom of the sweater in the following manner:
– 3 sc in the side of each dc, cdc, or ps row.
– 1 sc in the tops of each tr3tog or tr2tog (at the sides).
– 2 sc in each ch2 sp (at the front and back)
– Work in the above manner around the entire bottom of the sweater, then count how many stitches you have. You want an even number, so if your number is odd, then add or subtract 1 st to make it even.
– Ss to join to 1st sc. Turn.
2. Ch3, Dc in next st and each st around. Ss to join to 1st dc. Turn.
3. Ch2, fpdc around 1st st, bpdc around next st. *Fpdc around next st, bpdc around next st. ** Repeat from * to ** around. Ss to join to 1st fpdc. Turn.
4. Ch2, bpdc around 1st st, fpdc around next st. *Bpdc around next st, fpdc around next st. ** Repeat from * to ** around. Ss to join to 1st bpdc. Turn.
5. Ch2, fpdc around 1st st, bpdc around next st. *Fpdc around next st, bpdc around next st. ** Repeat from * to ** around. Ss to join to 1st fpdc. Turn.
6. Ch2, bpdc around 1st st, fpdc around next st. *Bpdc around next st, fpdc around next st. ** Repeat from * to ** around. Ss to join to 1st bpdc. Turn.
7. Ch1. Sc in 1st st and each st around. Ss to join to 1st sc. Bind off.
Sleeve Cuffs
Now we will add cuffs to the sleeves. With the right side facing you, attach your yarn near the underarm of the sleeve.
1. Ch1. Sc evenly around the edge of the sleeve in the following manner:
– 1 sc in the bottom of the sleeve.
– 3 sc in the side of each dc, cdc, or ps row.
– 1 sc in the ch1 sp (at the top of the sleeve)
– Work in the above manner around the entire edge of the sleeve, then count how many stitches you have. You want an even number, so if your number is odd, then add or subtract 1 st to make it even.
– Ss to join to 1st sc. Turn.
2. Ch3, Dc in next st and each st around. Ss to join to 1st dc. Turn.
3. Ch2, fpdc around 1st st, bpdc around next st. *Fpdc around next st, bpdc around next st. ** Repeat from * to ** around. Ss to join to 1st fpdc. Bind off.
Neckline
With the right side facing you, attach your yarn anywhere on the neckline (it would look best at the back or close to the shoulder).
1. Ch1. Sc evenly around the neckline in the following manner:
– 3 sc in the side of each dc, cdc, and ps row along the back of the neckline.
– 1 sc in the ring at the center back.
– 1 sc in each ch st along the front of the neckline.
– Sc in this manner around the entire neckline.
– Ss to join to 1st sc. Bind off.
Weave in your ends, and you’re done!
I hope you love your new pullover, and I look forward to seeing all of your beautiful pictures on Ravelry!
If you’d like to know when I post new patterns and tutorials, head on over to my Facebook and Instagram and give me a like and a follow!
If you enjoyed The Sum Of Its Parts Pullover – Free Crochet Pattern, you may want to check out my other designs!
And until next time… Happy Hooking! 😉
Dear Sarah,
I love how detailed your instructions are! I usually limit patterns to those with a chart, as I find the usual written pattern confusing. I also appreciate that you explain how to fudge when the count is slightly off and have pictures to clarify tricky parts. I plan to try this for fall and hope you will continue to design and write patterns in this way.
Many thanks,
Holly
Holly,
Thank you so much for your kind words!It is always wonderful to hear that people appreciate my work! I hope you enjoy this pattern and I would love to see how your pullover turns out!
Happy Hooking!
Sarah