
The Aspirations Pullover – Free Crochet Pattern is copyrighted by I Need It Crochet. You may not copy, share, change, or sell the pattern itself. Also you may not claim this pattern as your own. All pictures contained in this pattern fall under the copyright and may not be used.
Finished items made from The Aspirations Pullover – Free Crochet Pattern belong to you, and you may do what you wish with them. If you choose to sell them on Etsy, I would very much appreciate it if you credited me as the pattern designer.


Or… Just scroll down to see it for free!
I get excited about every single pattern I release. They are all my babies, and I love them dearly. But I have an extra reason to be excited about this one… because I was able to do it with the support of Lion Brand Yarns! So going forward, I want to be up front and let you know, that Lion Brand did send me this yarn for free, but everything I say about the quality is 100% my honest opinion.
This pattern is a definite milestone for me. A few months ago, I never would have thought that a large yarn company would accept or endorse one of my designs. Compared to some of the other designers I follow in my everyday work, I am a small fish. And to tell you the truth, at the time that I contacted them, I still wasn’t completely confident that they would be interested. Designing a pattern with the support of a major yarn company has been a huge aspiration of mine, and I’m so glad I decided to give it a go. Because you never know until you try! 😉
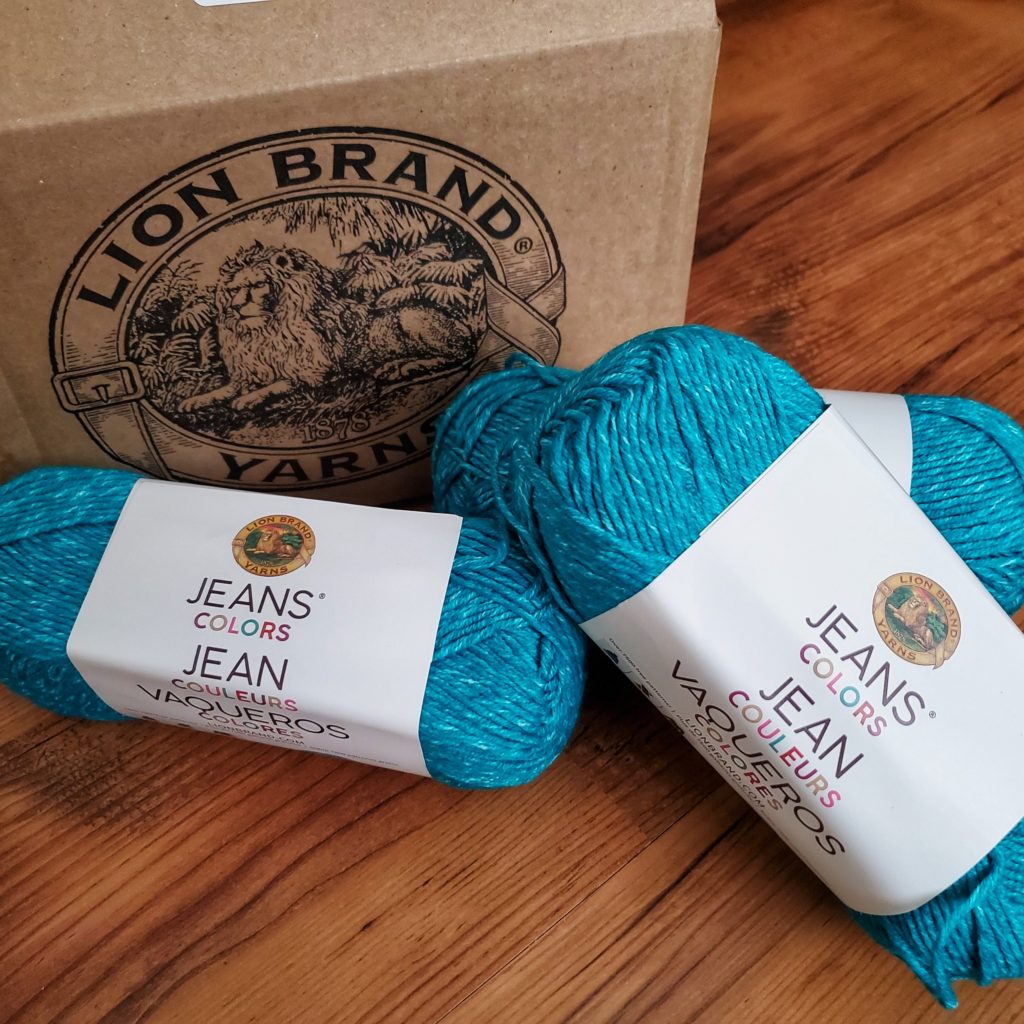
Lion Brand Jeans® Colors Yarn
Let me tell you a little about this yarn. Lion Brand Jeans Colors yarn is 100% acrylic, but you would never believe it from the texture! I was completely surprised by how soft it is! And the drape once the yarn is worked up is just so supple. I often forget that my new favourite pullover is made of acrylic!
Another thing to note about this yarn is the colouring. It has just the slightest bit of sheen. Just enough to really set off the colour. And the colouring itself is beautifully heathered. For those not familiar with the term, heathered yarn has bits of white throughout. It creates a really stunning effect. For my pullover I chose the colour Capri.
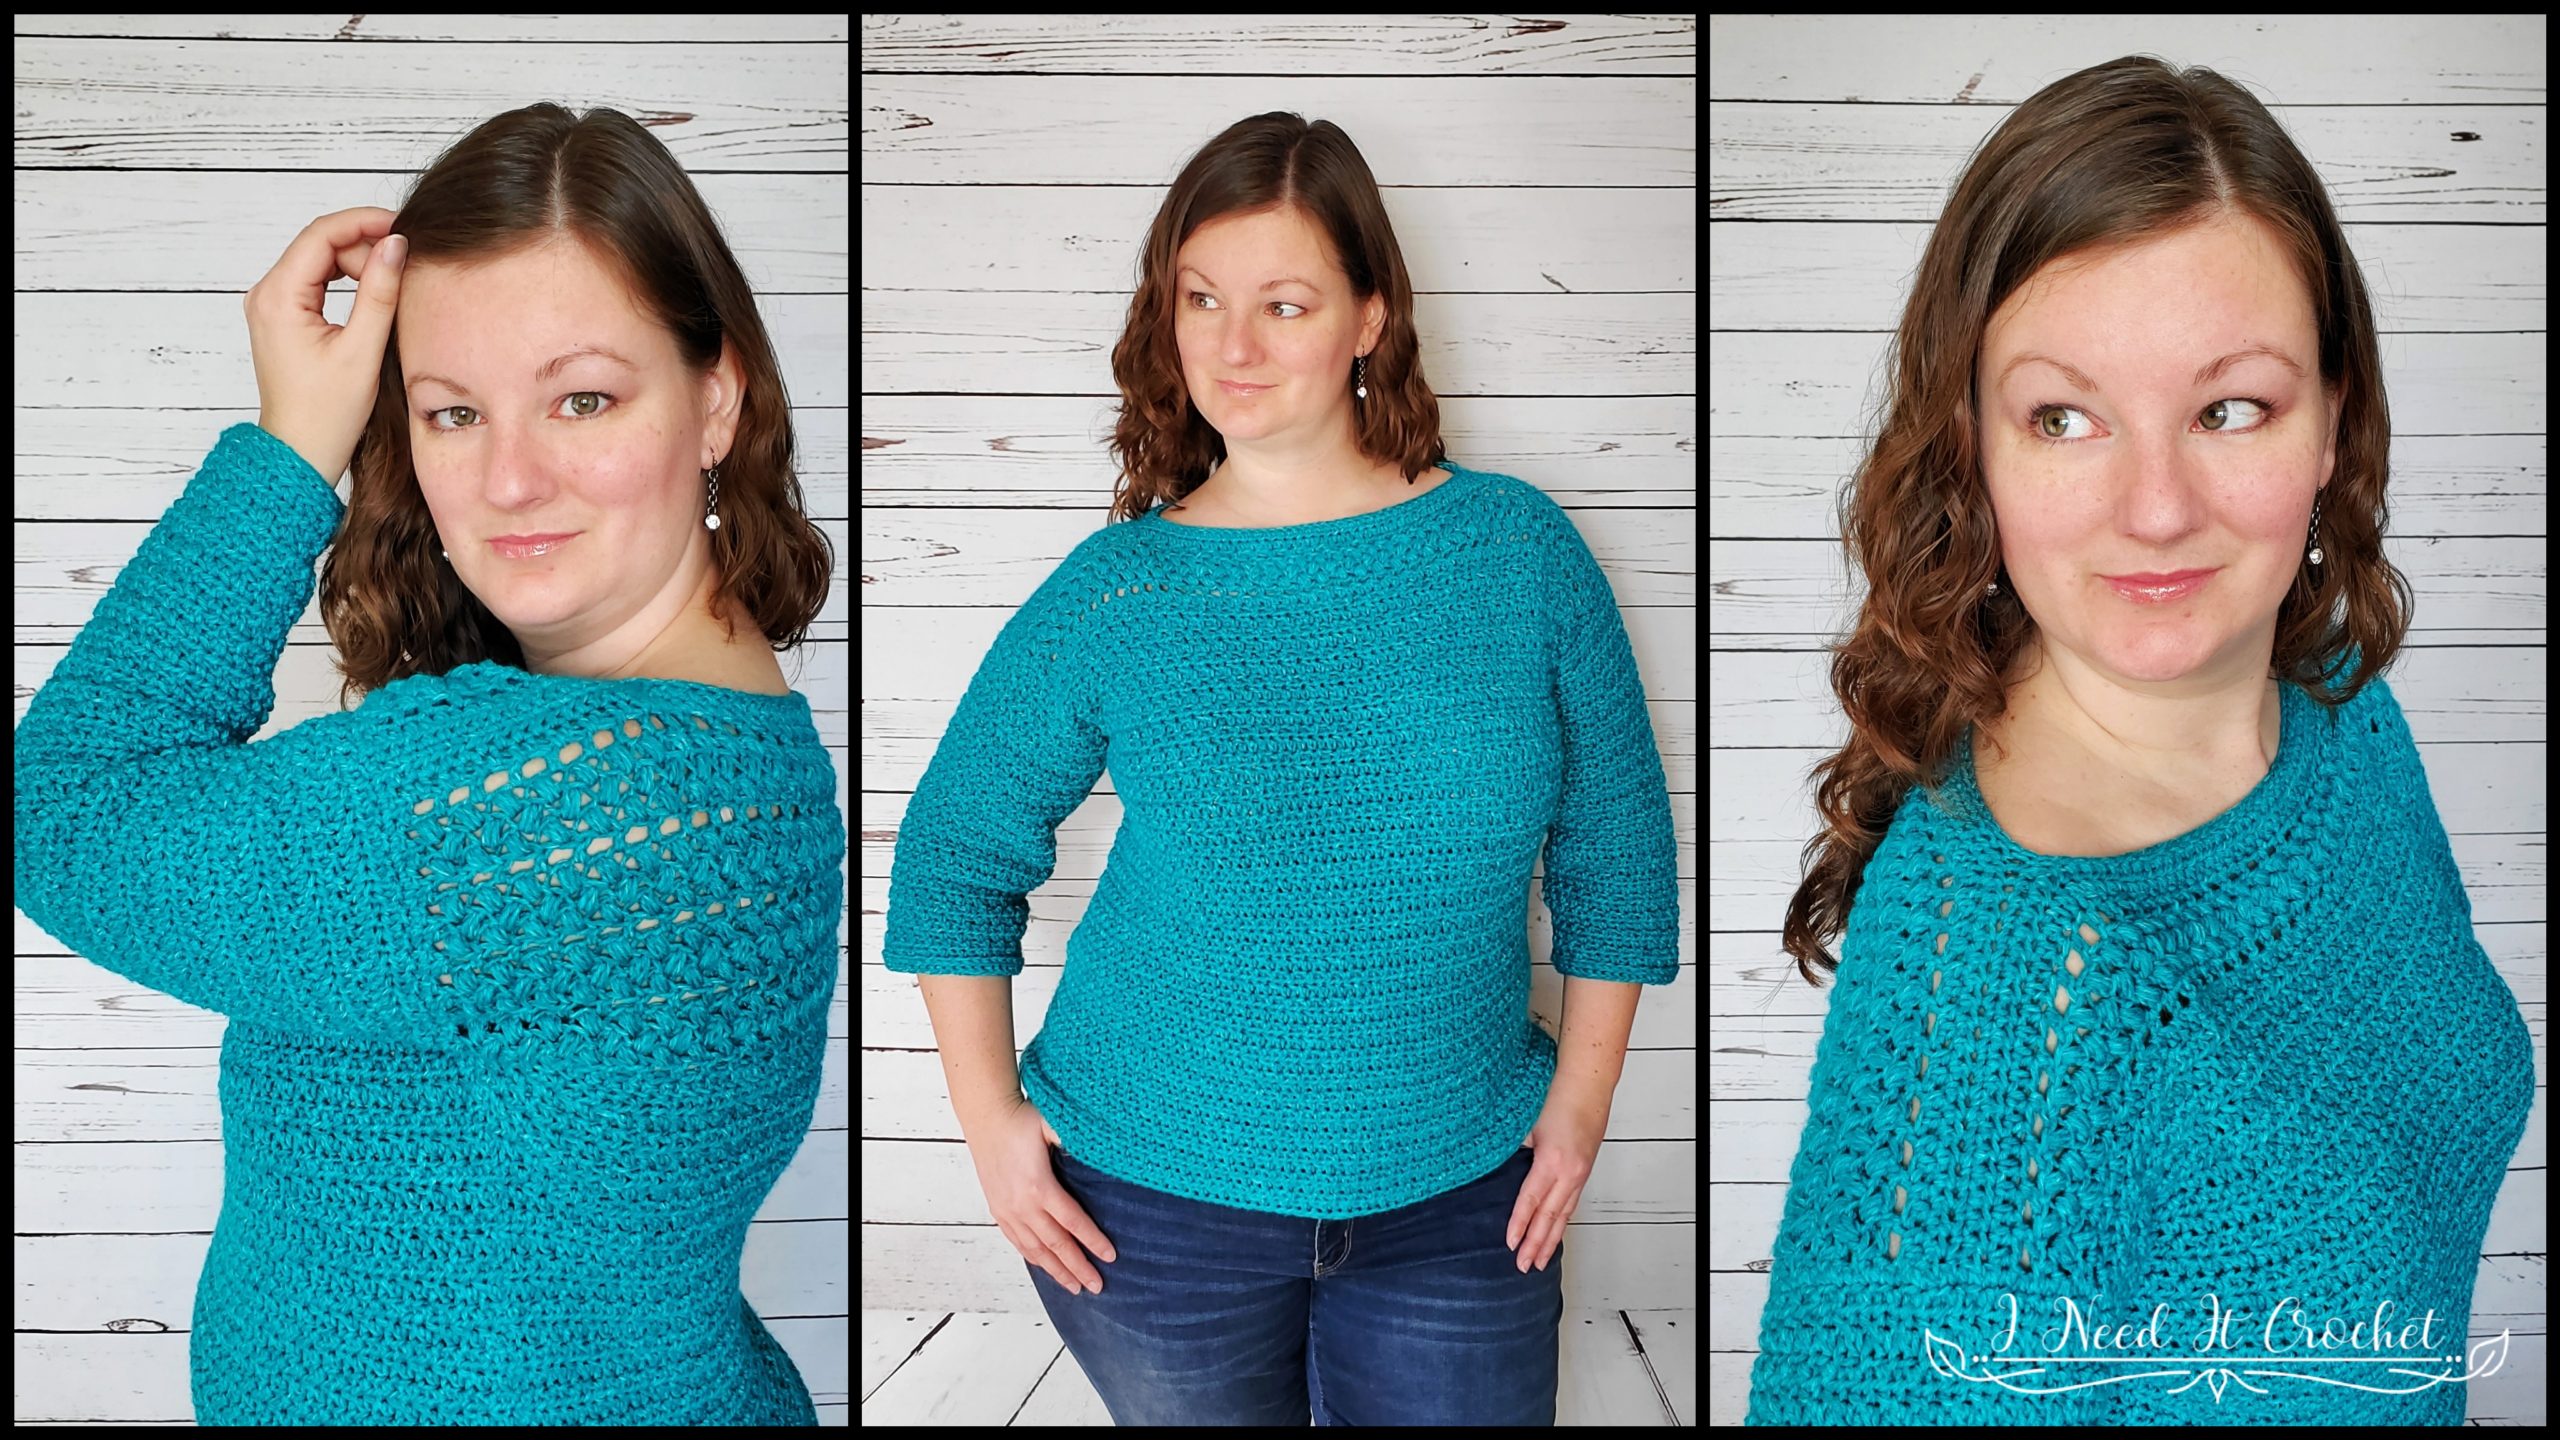
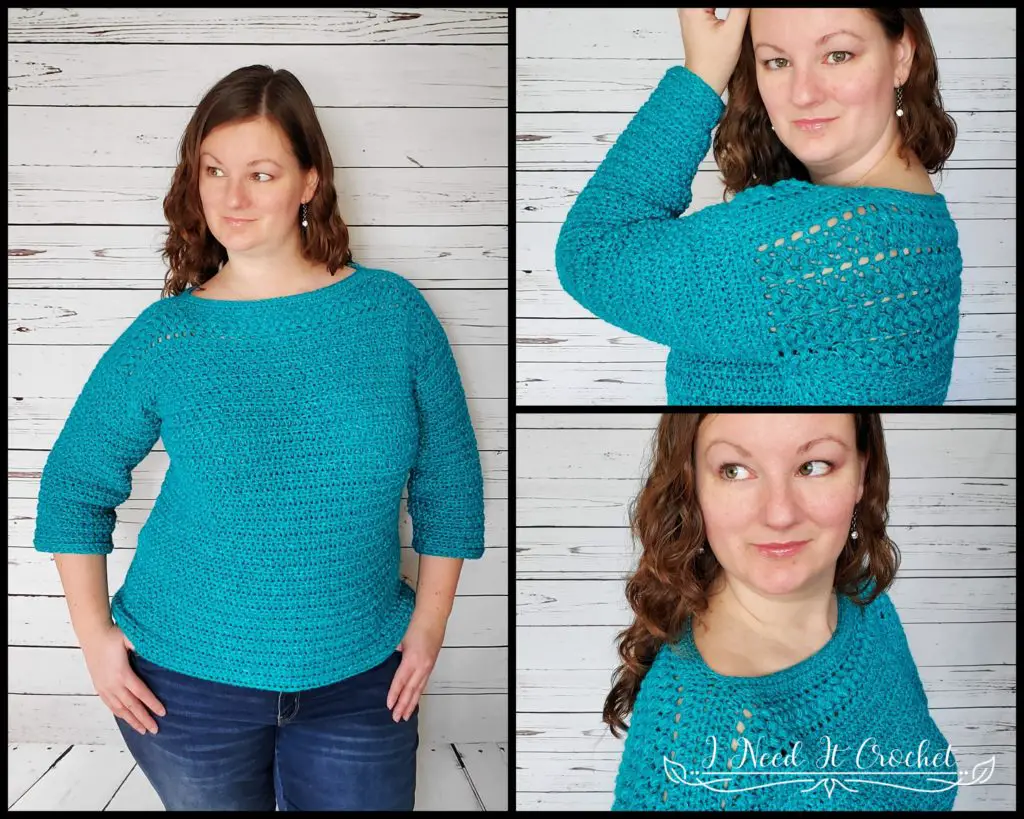
The Aspirations Pullover – Free Crochet Pattern
Finished Sizes:
Instructions given to fit size X-small; changes for small, medium, large, X-large, 2X-large, 3X-large, 4X-large and 5X-large are in ()
XS (S, M, L, XL, 2XL, 3XL, 4XL, 5XL)
To Fit Bust: 28” (32”, 36”, 40”, 44”, 48”, 52”, 56”, 60”)
Finished Bust: 28” (32”, 36”, 40”, 44”, 48”, 52”, 56”, 60”)
Finished Length: Customizable.
Materials:
I used Lion Brand Yarns Jeans® Colours, which is 100% Acrylic, #4 Aran weight yarn.
Any yarn of similar weight would work.
Approximately 1075 (1175, 1275,1375, 1475, 1575,1675, 1775, 1875) yds.
5.5mm Hook
Stitch Markers
Yarn Needle
Scissors
Measuring Tape
Abbreviations:
Sk = Skip
Sp = Space
St = Stitch
Yo = Yarn Over
Ss = Slip Stitch
Ch = Chain
Sc = Single Crochet
Hdc = Half Double Crochet
Bn = Bean Stitch (See tutorial here)
Dss = Double Slip Stitch (See tutorial here)
BLO = Back Loop Only
FHdc = Foundation Half Double Crochet
Gauge:
Gauge swatch instructions are below. Always begin by making a gauge swatch. It will save you a lot of time and heartache!
Notes:
Ch1 at the beginning of a row is never considered a stitch.
Ch1 between sts is considered a stitch.
Each ch in neck opening counts as a stitch.
For those who have never done the Bean Stitch, I have written a tutorial. You can find it here.
A Bn is counted as 2 sts.
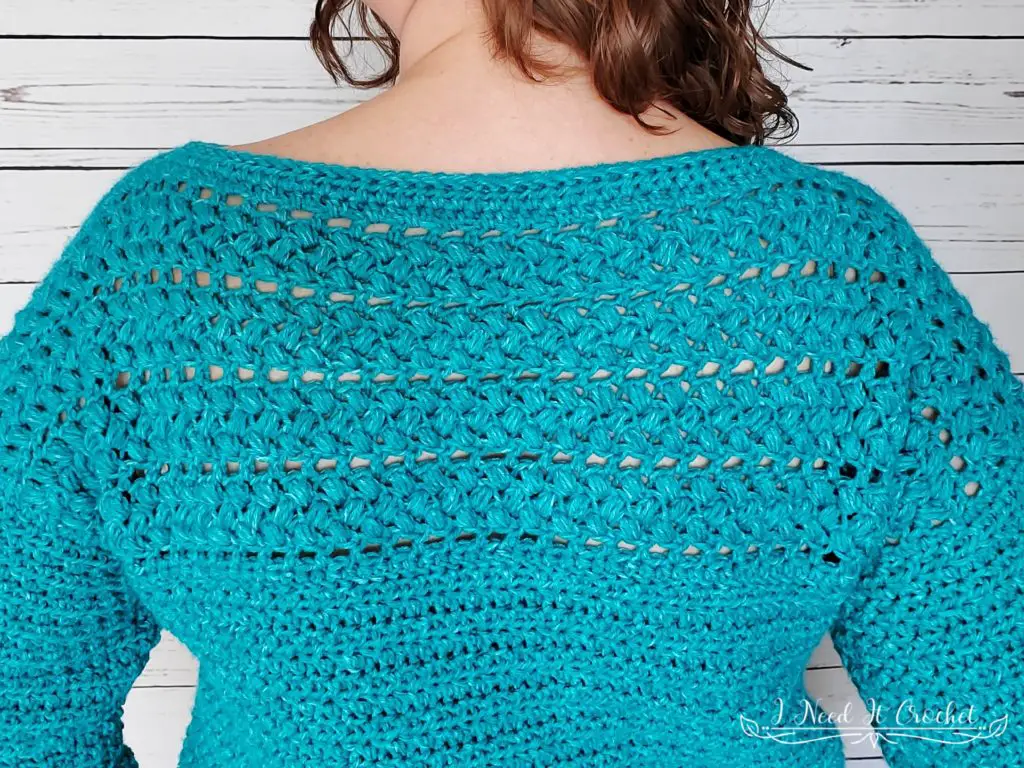
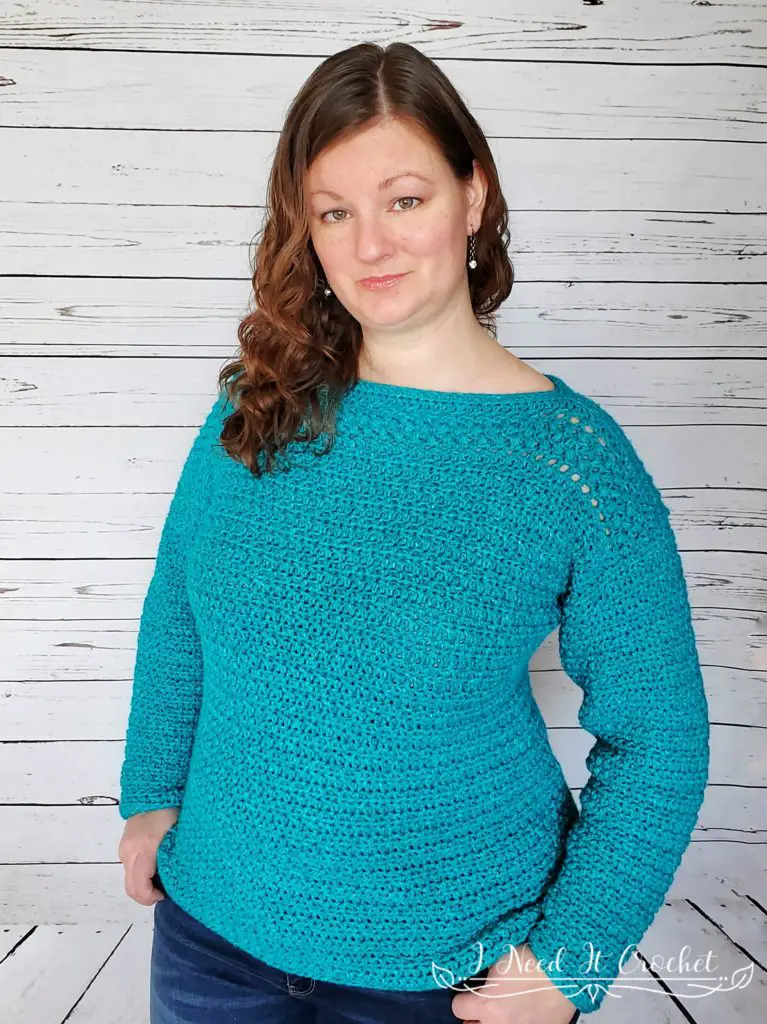
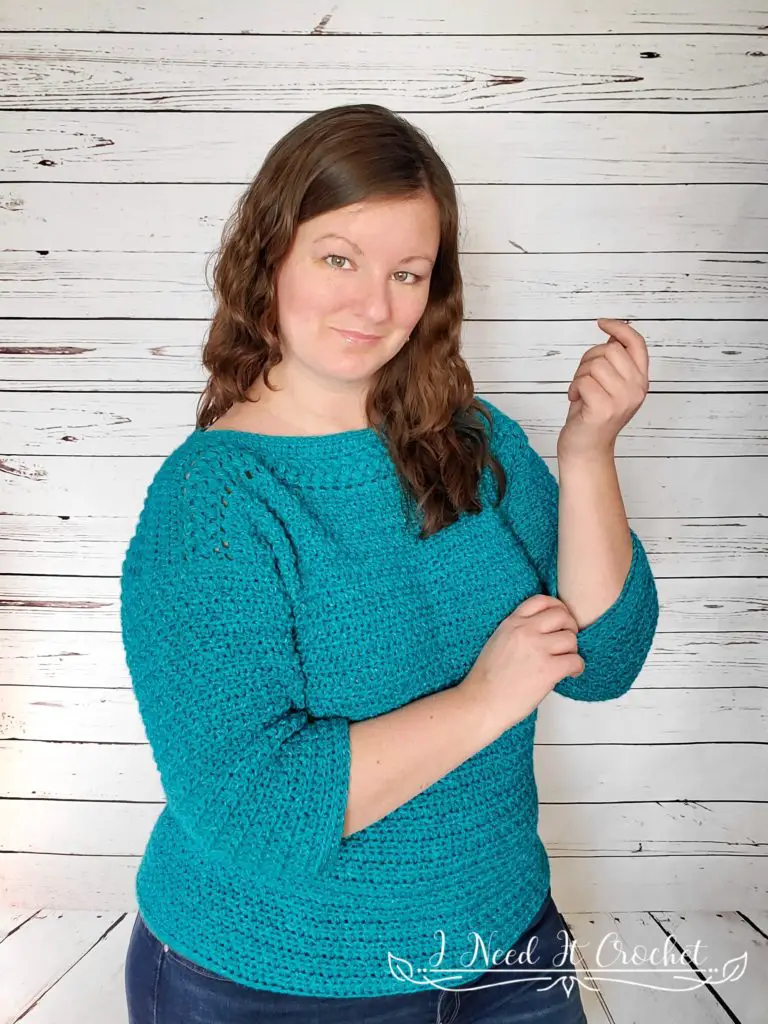
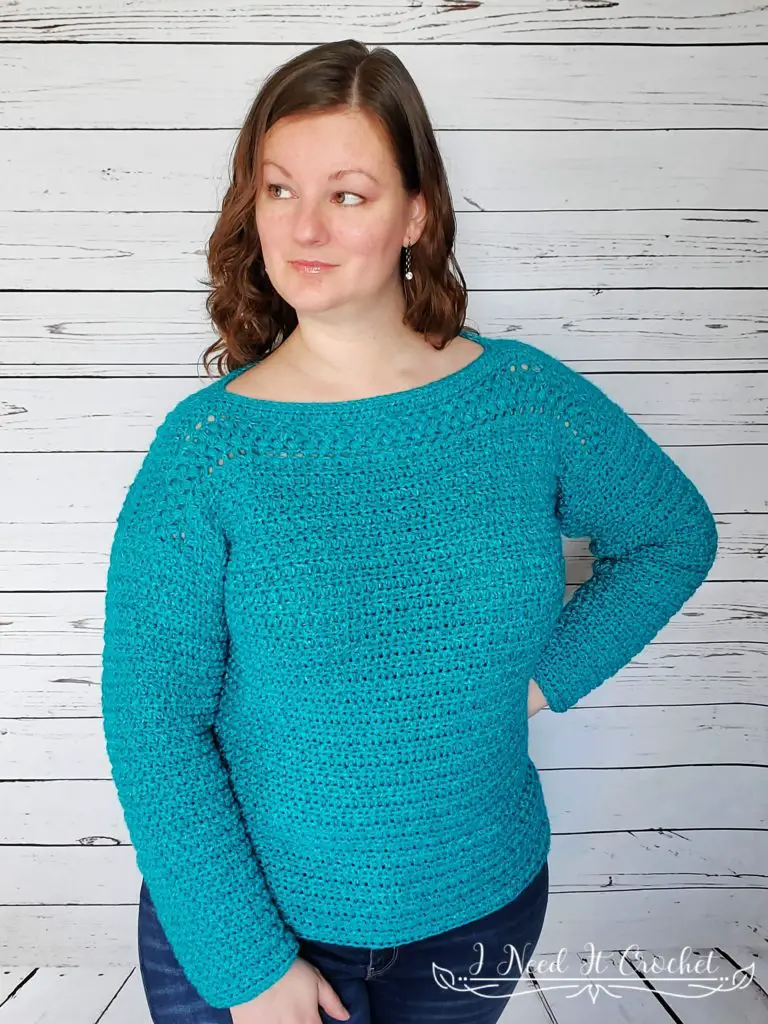
The model above (that’s me) has a 42” bust, and is wearing a size XL.
Gauge Swatch
Using 5.5mm hook
Ch16.
1. Hdc in 2nd ch and each ch across. Turn. – 15 st
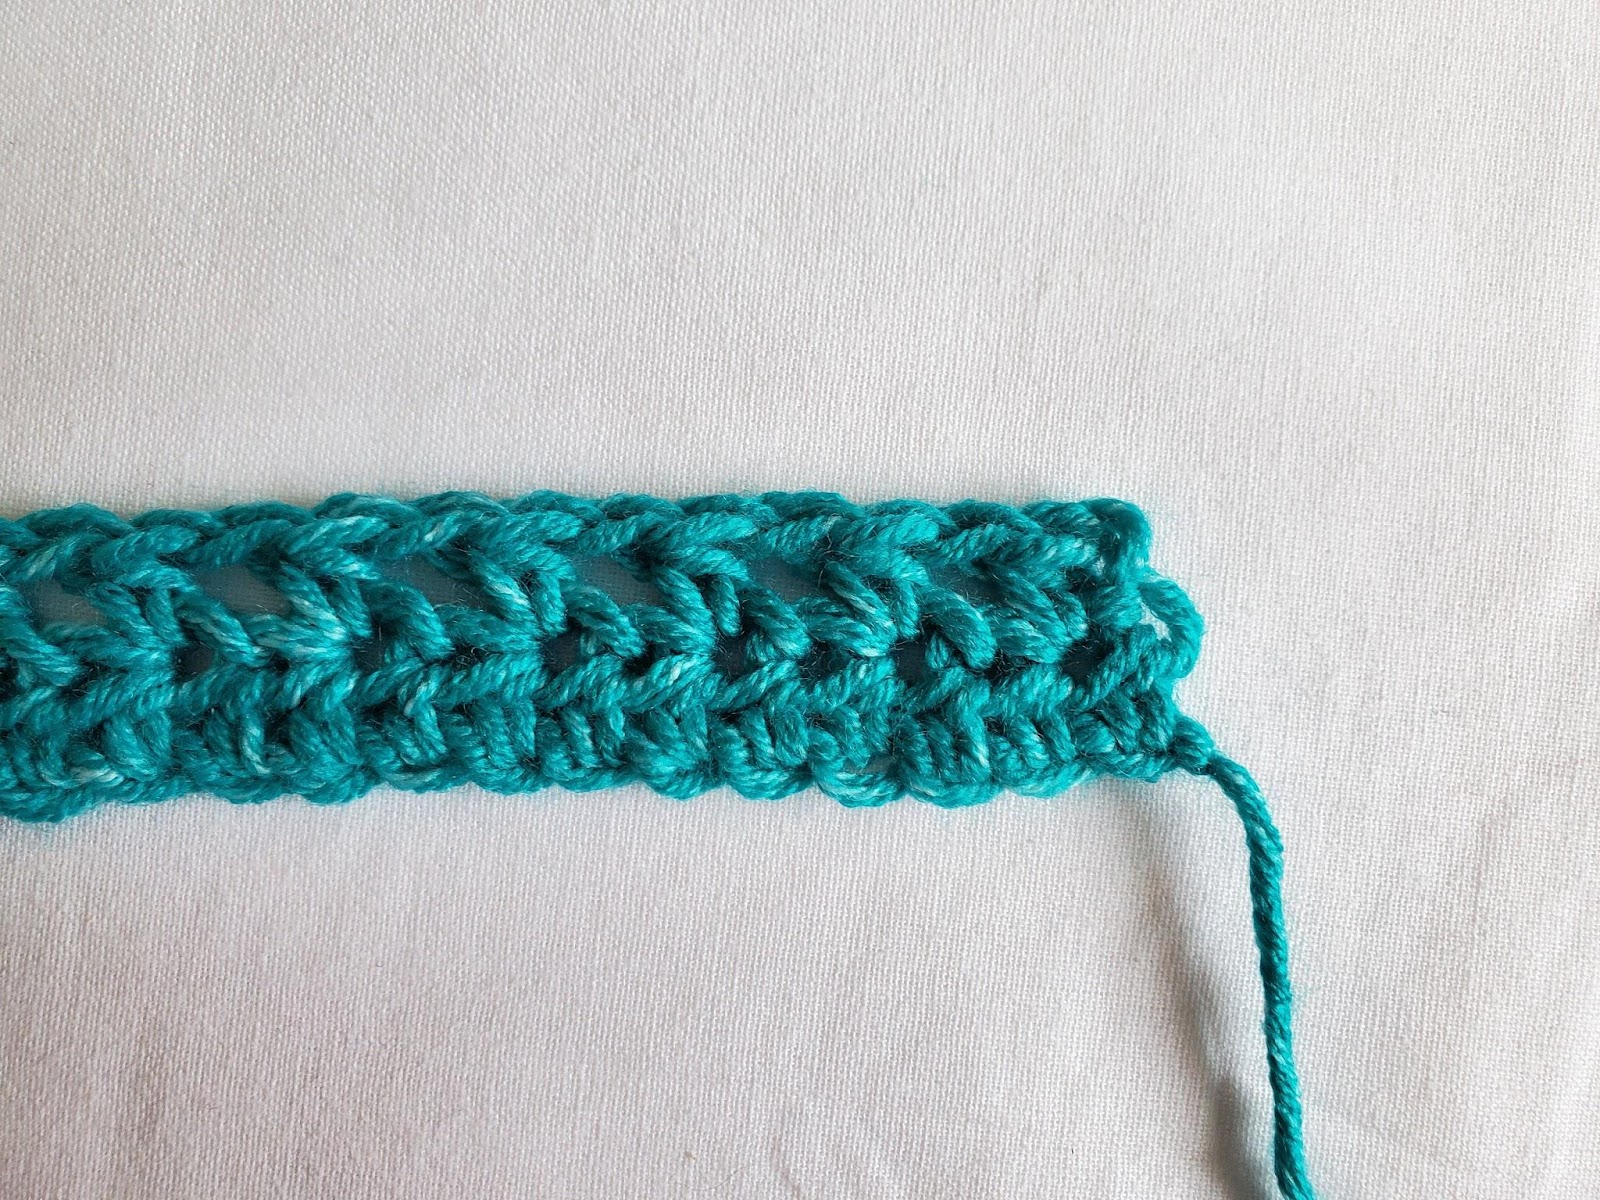
2. Ch1, hdc in 1st st. *Ch1, sk1 st, hdc in next st. ** Repeat from * to ** across. Turn (see figure 1). – 15 st
3. Ch1, hdc in 1st st, ch1, sk1 st. *Bn in next st, sk 1 st.** Repeat from * to ** across until there are only 2 sts left unworked. Sk 1 st, hdc in last st. Turn. See figure 2 below for an example of what this should look like. – 15 st
4. Repeat row 3.
5. Repeat row 3.
6. Ch1, hdc in 1st st. *Ch1, sk1 st, hdc in next st. ** Repeat from * to ** across. Turn. – 15 st
7. Ch1. Hdc in 1st st and each st across. Turn. – 15 st
8. Ch1, hdc in 1st st. Hdc in next st in BLO. *Hdc in next st in FLO. Hdc in next st in BLO.** Repeat from * to ** across until there is only 1 st left unworked. Hdc in both loops of last st. Turn. – 15 st
9. Repeat row 8.
10. Repeat row 8.
Measure your swatch. It should measure 4” tall x 4” wide. If it is not the right size, try again using a different hook.

Instructions
The main body of the pullover is worked in one piece without seaming. This is achieved by starting at the back armpit, working upward to the neck. Then we chain to form the neckline and begin working down the front. When the front is the same length as the back, we will join them at the armpit and work in the round for the lower body until we have achieved the desired length.
I highly recommend starting with a chainless foundation hdc row, as this stitch has more give than a chained foundation and will look better in the long run. However, if you prefer to use a chained foundation, it isn’t the end of the world.
Upper Body
With 5.5mm Hook (or hook used to obtain gauge)
Begin with a yarn tail about 1” longer than you normally would. This tail may be used later to tie part of the sweater together.
Ch 52 (58, 66, 74, 80, 88, 94, 102, 110) or FHdc 51 (57, 65, 73, 79, 87, 93, 101, 109) and skip to row 2.
1. Working into the back hump of the chain: Hdc in 2nd ch from hook and each ch across. Turn. – 51 (57, 65, 73, 79, 87, 93, 101, 109) st
Your first row is the right side of your work. Place a marker here so that you know going forward which side is the “right side.”
2. Ch1, hdc in 1st st. *Ch1, sk1 st, hdc in next st. ** Repeat from * to ** across. Turn. – 51 (57, 65, 73, 79, 87, 93, 101, 109) st
Important Note about sleeve circumference: The following instructions will create sleeves with an upper arm circumference of 14” (15”, 16”, 17”, 18”, 19”, 20”, 21”, 22”). If the sweater size you are currently making does not match up with your ideal upper arm circumference, you can easily adjust. From here, just follow the instructions according to your ideal upper arm size, but keep your stitch count the same. For example: If you have chosen a size large sweater, but your upper arm is closer to 20”, follow the instructions below for size 3X, but keep your stitch count at 73 sts. Once you get through the upper body and move on to the lower body, you can switch back to following your original size selection.
Rows 3 & 4 are for sizes S, M, XL, 2X, and 5X only. All other sizes skip rows 3 & 4 and go to row 5.
3. Ch1, hdc in 1st st, ch1, sk1 st. *Bn in next st, sk 1 st.** Repeat from * to ** across until there are only 2 sts left unworked. Sk 1 st, hdc in last st. Turn. If you’re unsure about whether you’re putting your stitches in the right place, check figure 2 under the Gauge Swatch heading. – 51 (57, 65, 73, 79, 87, 93, 101, 109) st
4. Ch1, hdc in 1st st. *Ch1, sk1 st, hdc in next st. ** Repeat from * to ** across. Turn. – 51 (57, 65, 73, 79, 87, 93, 101, 109) st
5. Ch1, hdc in 1st st, ch1, sk1 st. *Bn in next st, sk 1 st.** Repeat from * to ** across until there are only 2 sts left unworked. Sk 1 st, hdc in last st. Turn. If you’re unsure about whether you’re putting your stitches in the right place, check figure 2 under the Gauge Swatch heading. – 51 (57, 65, 73, 79, 87, 93, 101, 109) st
6. Repeat row 5.
7. Repeat row 5.
8. Ch1, hdc in 1st st. *Ch1, sk1 st, hdc in next st. ** Repeat from * to ** across. Turn. – 51 (57, 65, 73, 79, 87, 93, 101, 109) st
Repeat rows 5 – 8 until you have a total of 14 (16, 16, 18, 20, 20, 22, 22, 24) rows.
These instructions are for sizes XS, M, L, 2X, 4X, and 5X only. All other sizes skip these 6 rows.
1. Ch1. Hdc in 1st st and each st across. Turn. – 51 (57, 65, 73, 79, 87, 93, 101, 109) st
2. Repeat row 1.
You should now have a total of 16 (N/A, 18, 20, N/A, 22, N/A, 24, 26) rows.
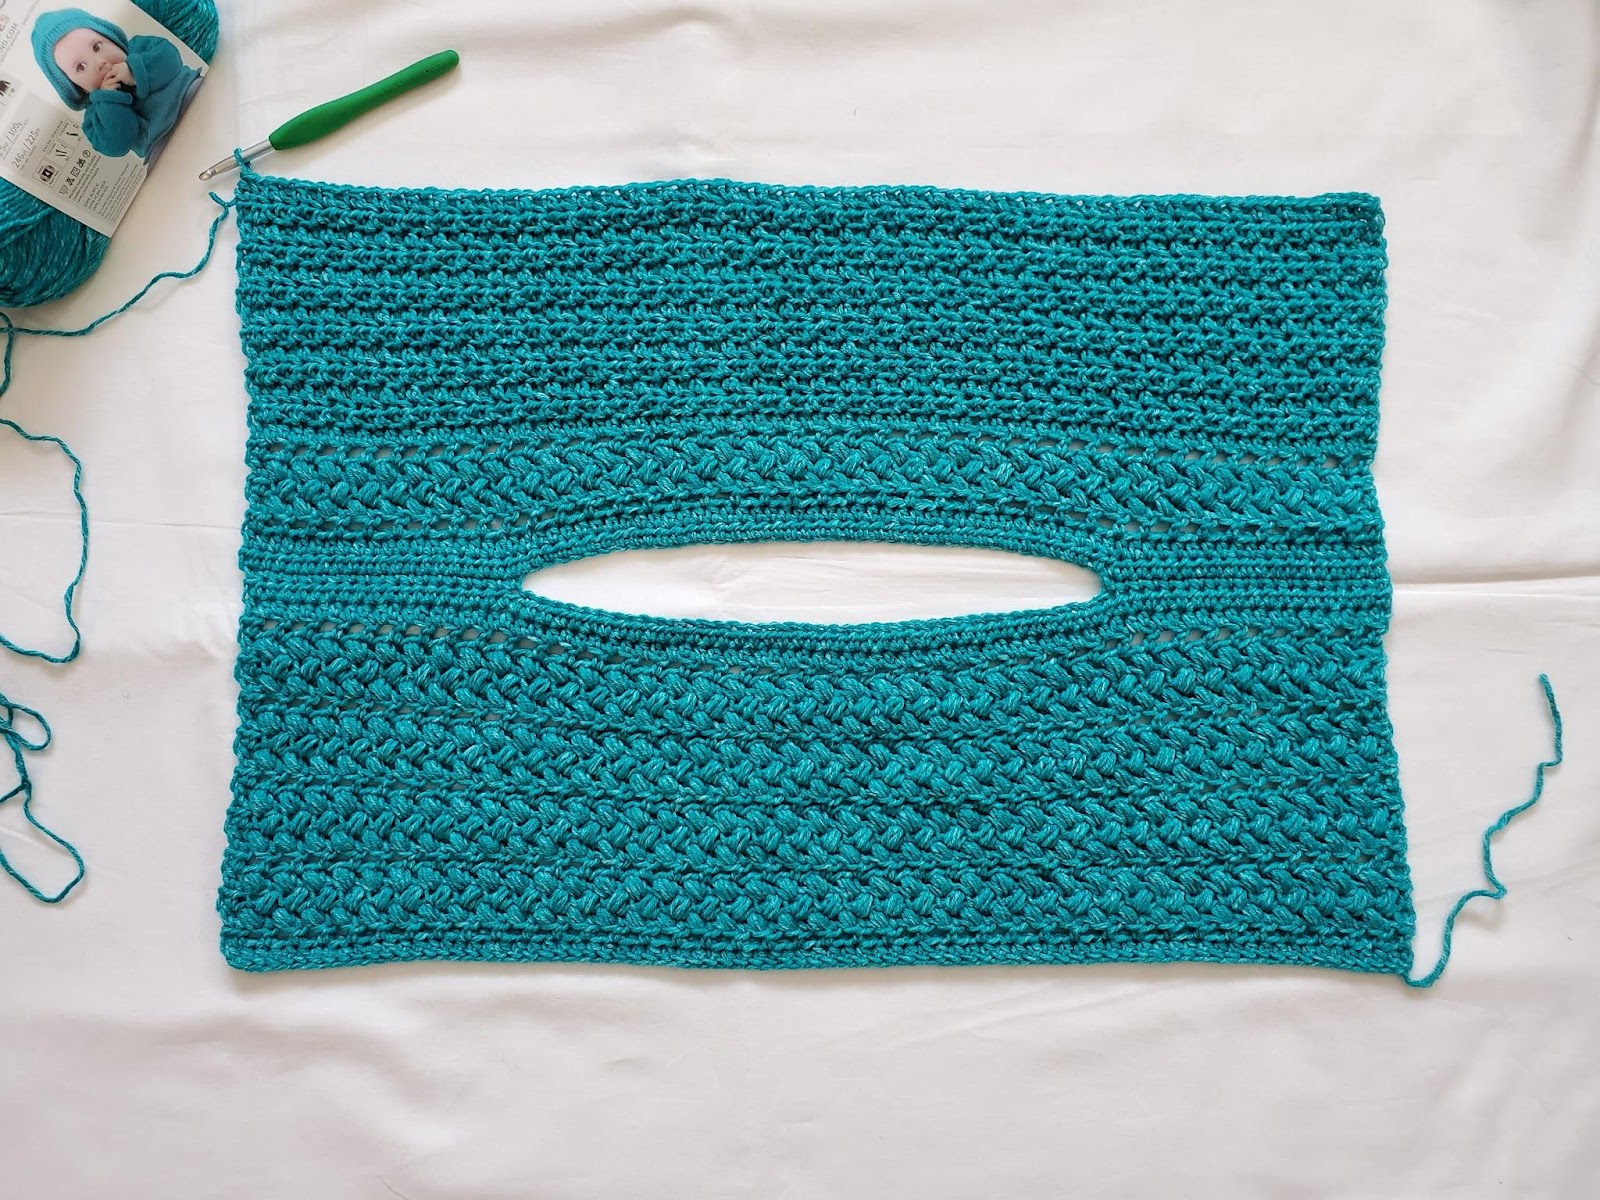
3. Ch1. Sc in 1st st and next 10 (12, 14, 16, 18, 21, 23, 27, 31) sts. Ch 29 (31, 35, 39, 41, 43, 45, 45, 45). Sk next 29 (31, 35, 39, 41, 43, 45, 45, 45) sts. Sc in next st and each remaining st across (neck opening made). Turn. Figure 1 below shows what your work should look like at this point. – 51 (57, 65, 73, 79, 87, 93, 101, 109) st
4. Ch1. Hdc in 1st st and each st and ch across. Turn. – 51 (57, 65, 73, 79, 87, 93, 101, 109) st
5. Ch1. Hdc in 1st st and each st across. Turn. – 51 (57, 65, 73, 79, 87, 93, 101, 109) st
6. Ch1, hdc in 1st st. *Ch1, sk1 st, hdc in next st. ** Repeat from * to ** across. Turn. – 51 (57, 65, 73, 79, 87, 93, 101, 109) st
These instructions are for sizes S, XL, and 3X only. All other sizes skip these 4 rows.
1. Ch1. Hdc in 1st st and each st across. Turn. – 51 (57, 65, 73, 79, 87, 93, 101, 109) st
You should now have a total of N/A (17, N/A, N/A, 21, N/A, 23, N/A, N/A) rows.
2. Ch1. Sc in 1st st and next 10 (12, 14, 16, 18, 21, 23, 27, 31) sts. Ch 29 (31, 35, 39, 41, 43, 45, 45, 45). Sk next 29 (31, 35, 39, 41, 43, 45, 45, 45) sts. Sc in next st and each remaining st across (neck opening made). Turn. Figure 1 below shows what your work should look like at this point. – 51 (57, 65, 73, 79, 87, 93, 101, 109) st
3. Ch1. Hdc in 1st st and each st and ch across. Turn. – 51 (57, 65, 73, 79, 87, 93, 101, 109) st
4. Ch1, hdc in 1st st. *Ch1, sk1 st, hdc in next st. ** Repeat from * to ** across. Turn. – 51 (57, 65, 73, 79, 87, 93, 101, 109) st

All sizes will now continue following these instructions.
1. Ch1, hdc in 1st st, ch1, sk1 st. *Bn in next st, sk 1 st.** Repeat from * to ** across until there are only 2 sts left unworked. Sk 1 st, hdc in last st. Turn. – 51 (57, 65, 73, 79, 87, 93, 101, 109) st
2. Repeat row 1.
3. Repeat row 1.
4. Ch1, hdc in 1st st. *Ch1, sk1 st, hdc in next st. ** Repeat from * to ** across. Turn. – 51 (57, 65, 73, 79, 87, 93, 101, 109) st
5. Ch1. Hdc in 1st st and each st across. Turn. Figure 8 shows what your work should look like at this point. – 51 (57, 65, 73, 79, 87, 93, 101, 109) st
6. Ch1, hdc in 1st st. Hdc in next st in BLO. *Hdc in next st in FLO. Hdc in next st in BLO.** Repeat from * to ** across until there is only 1 st left unworked. Hdc in both loops of last st. Turn. – 51 (57, 65, 73, 79, 87, 93, 101, 109) st
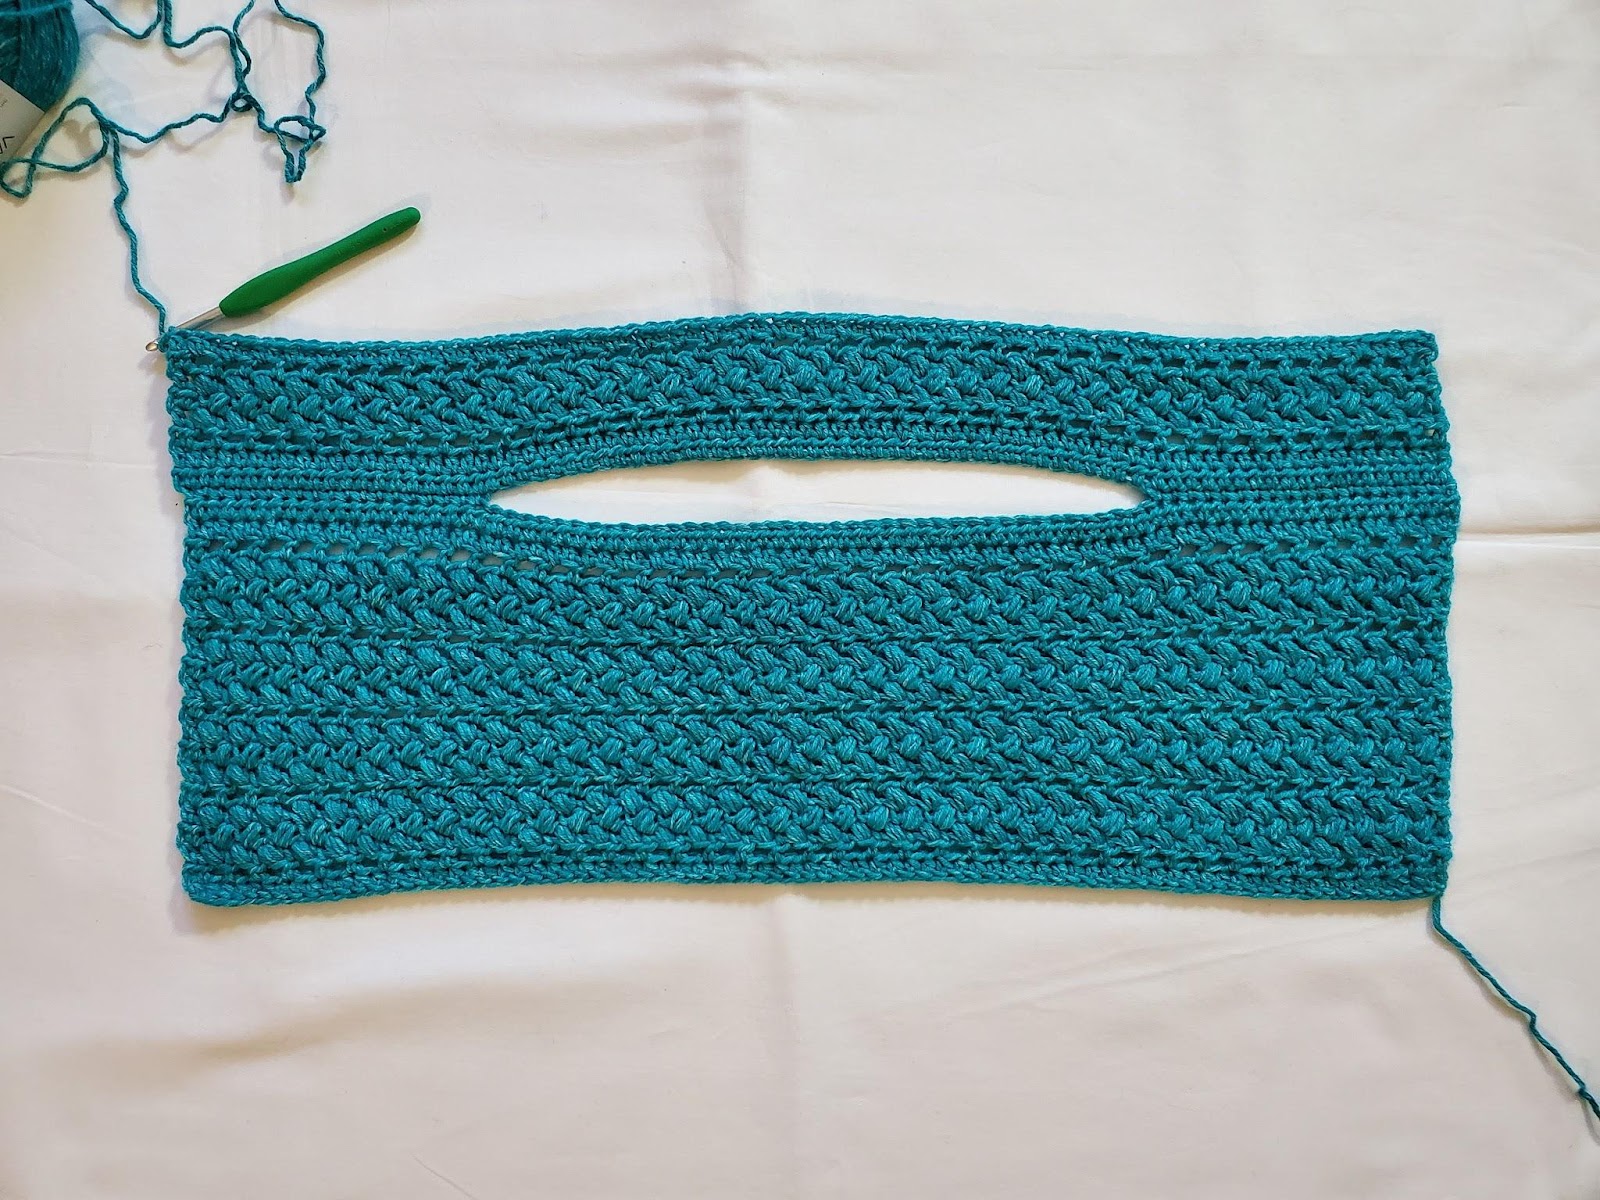
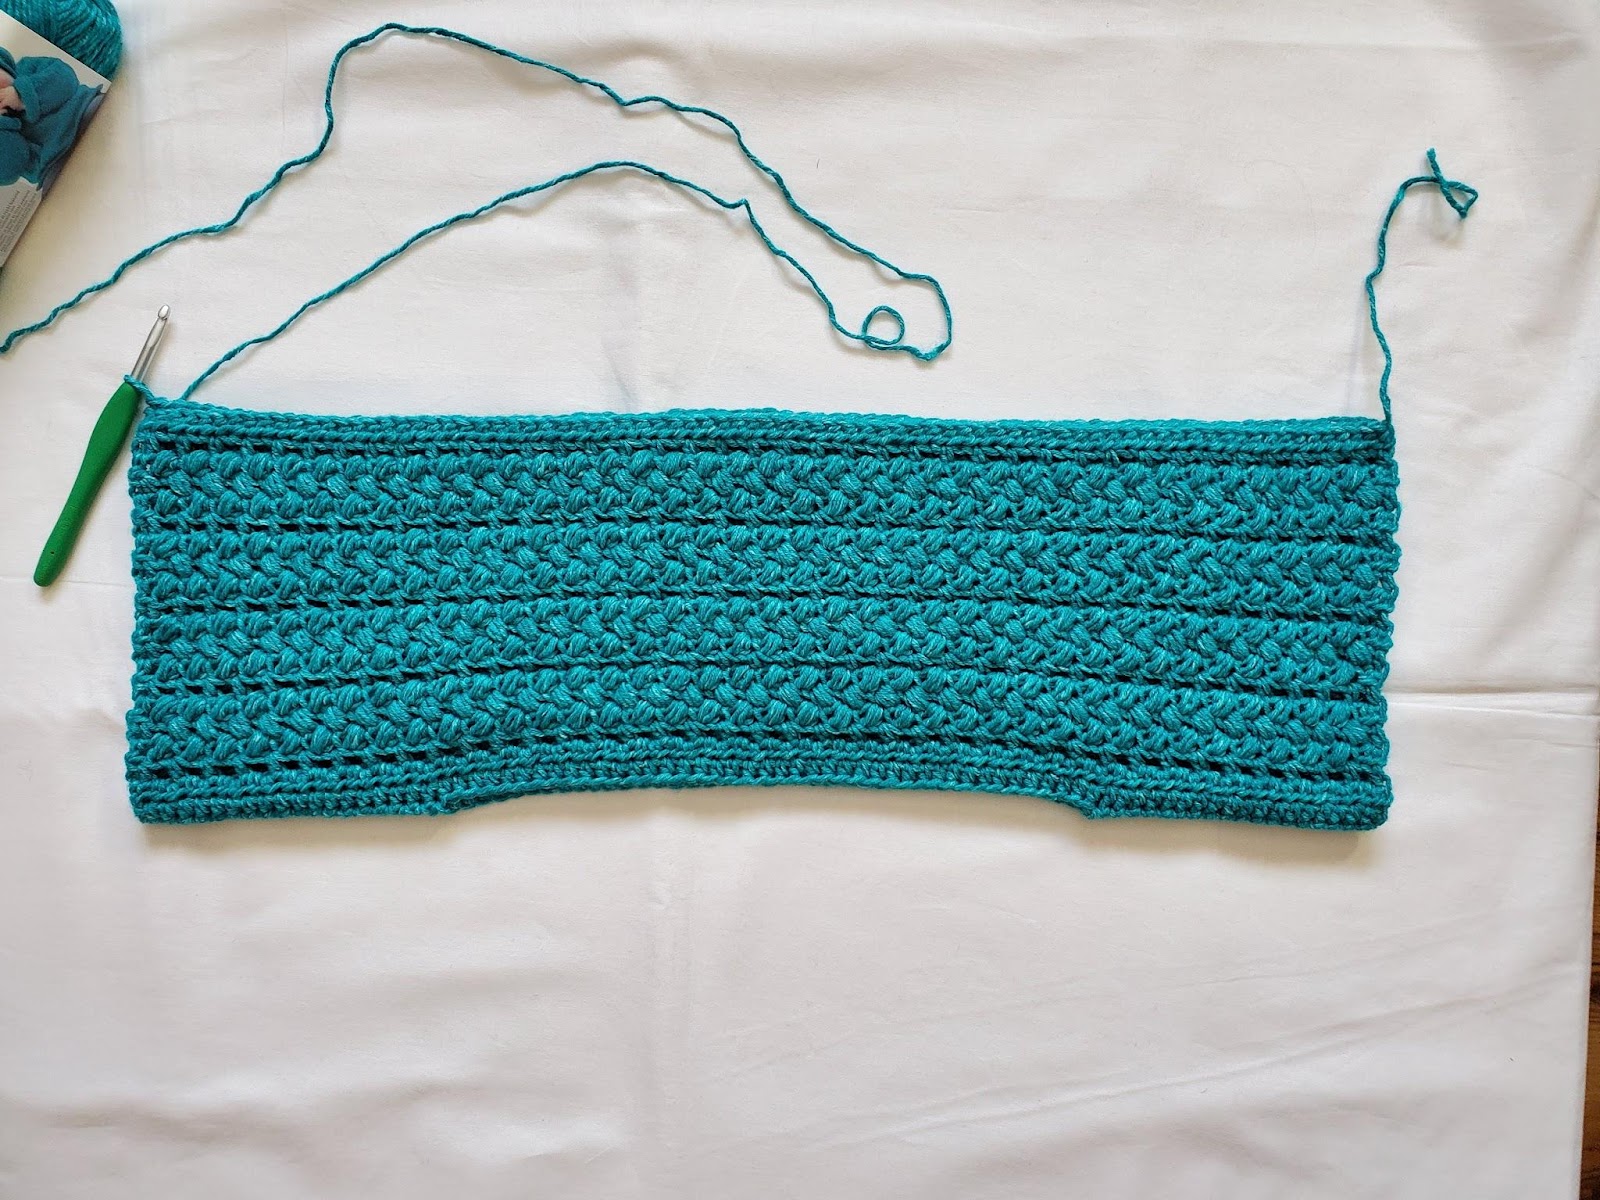
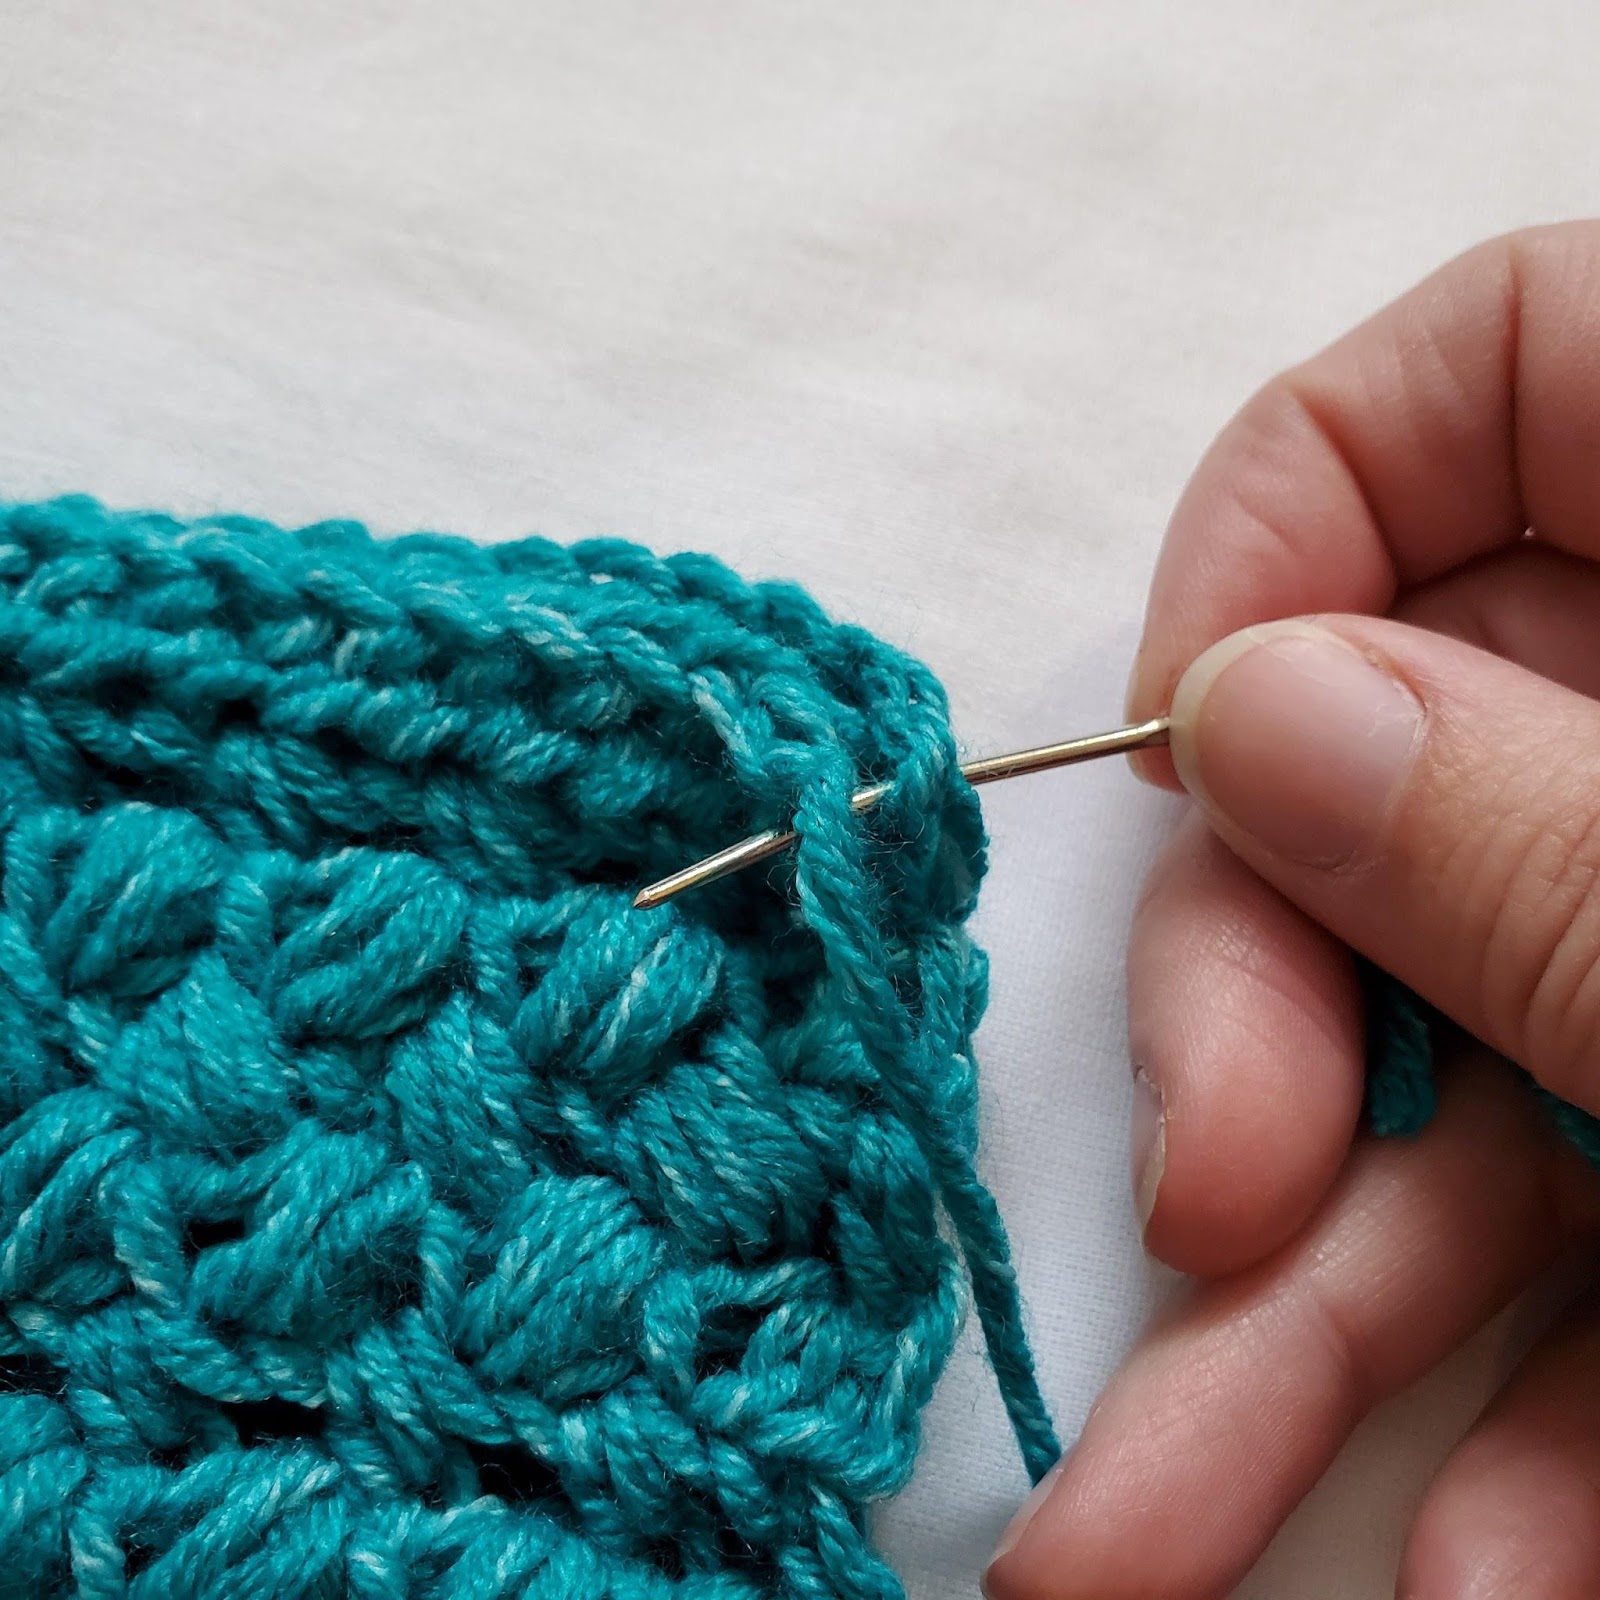
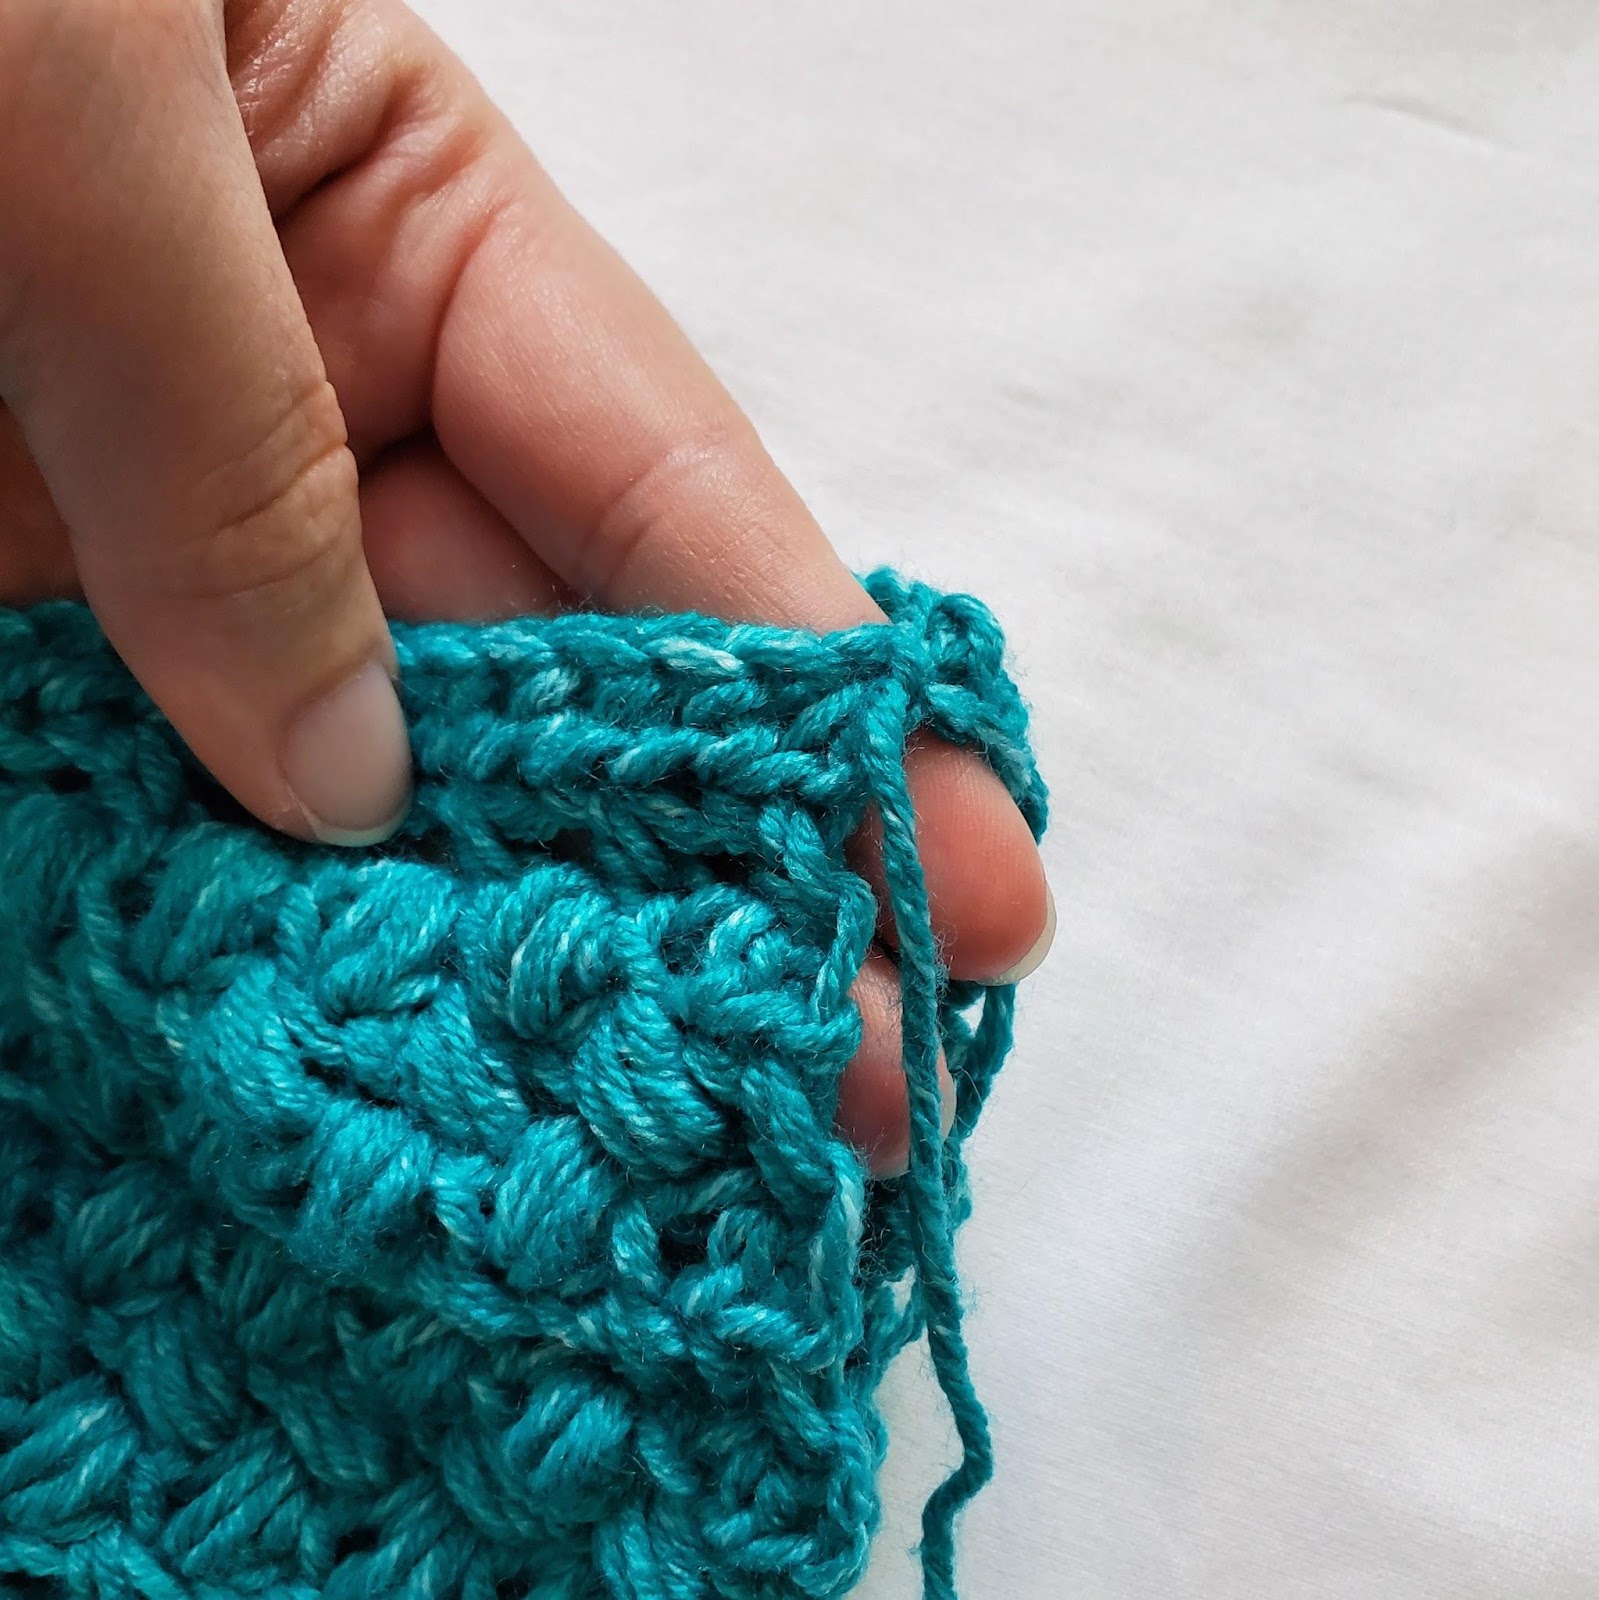
Repeat row 6 until you have 16 (17, 18, 20, 21, 22, 23, 24, 26) rows after the neck opening row. That should be a total of 33 (35, 37, 41, 43, 45, 47, 49, 53) rows. Do not bind off. We will now join at the underarms and continue working downward in the round. Begin by laying your project out as pictured with the right side facing you (see figure 3). Fold the bottom half up to meet the top half (see figure 4). Now take a look at your work. The top corners are where your underarms will be, and the opening along the bottom edge is your neck hole. Use the starting end of your yarn or a small piece of scrap yarn in the same colour, and a needle, to join the top right corners together (see figures 5 & 6). Pick up your hook again and ss into the 1st st on the other corner (see figure 7). Turn. You should now be looking at the front of your sweater.
Lower Body
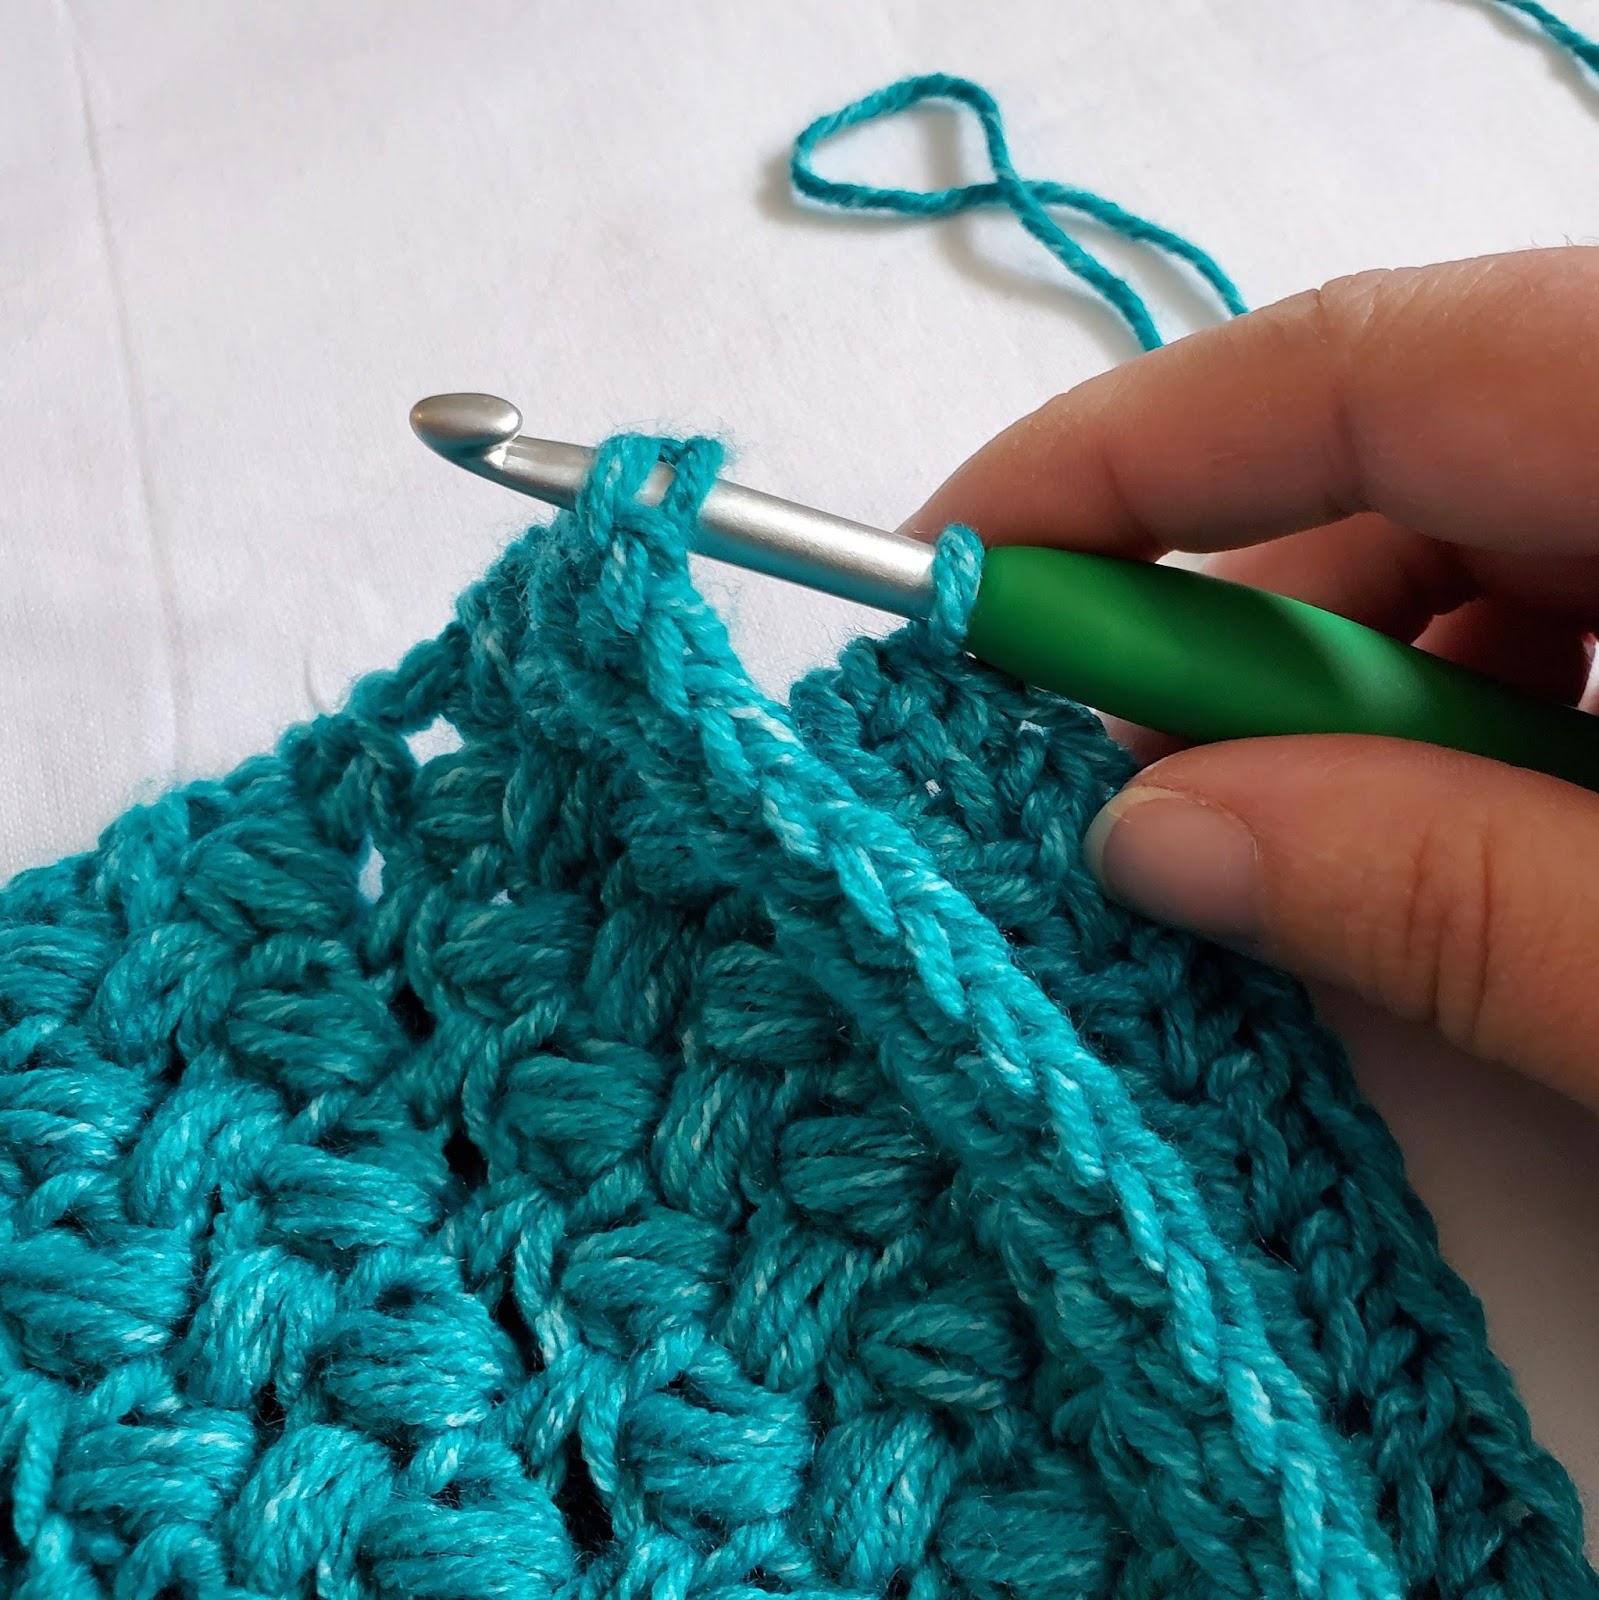
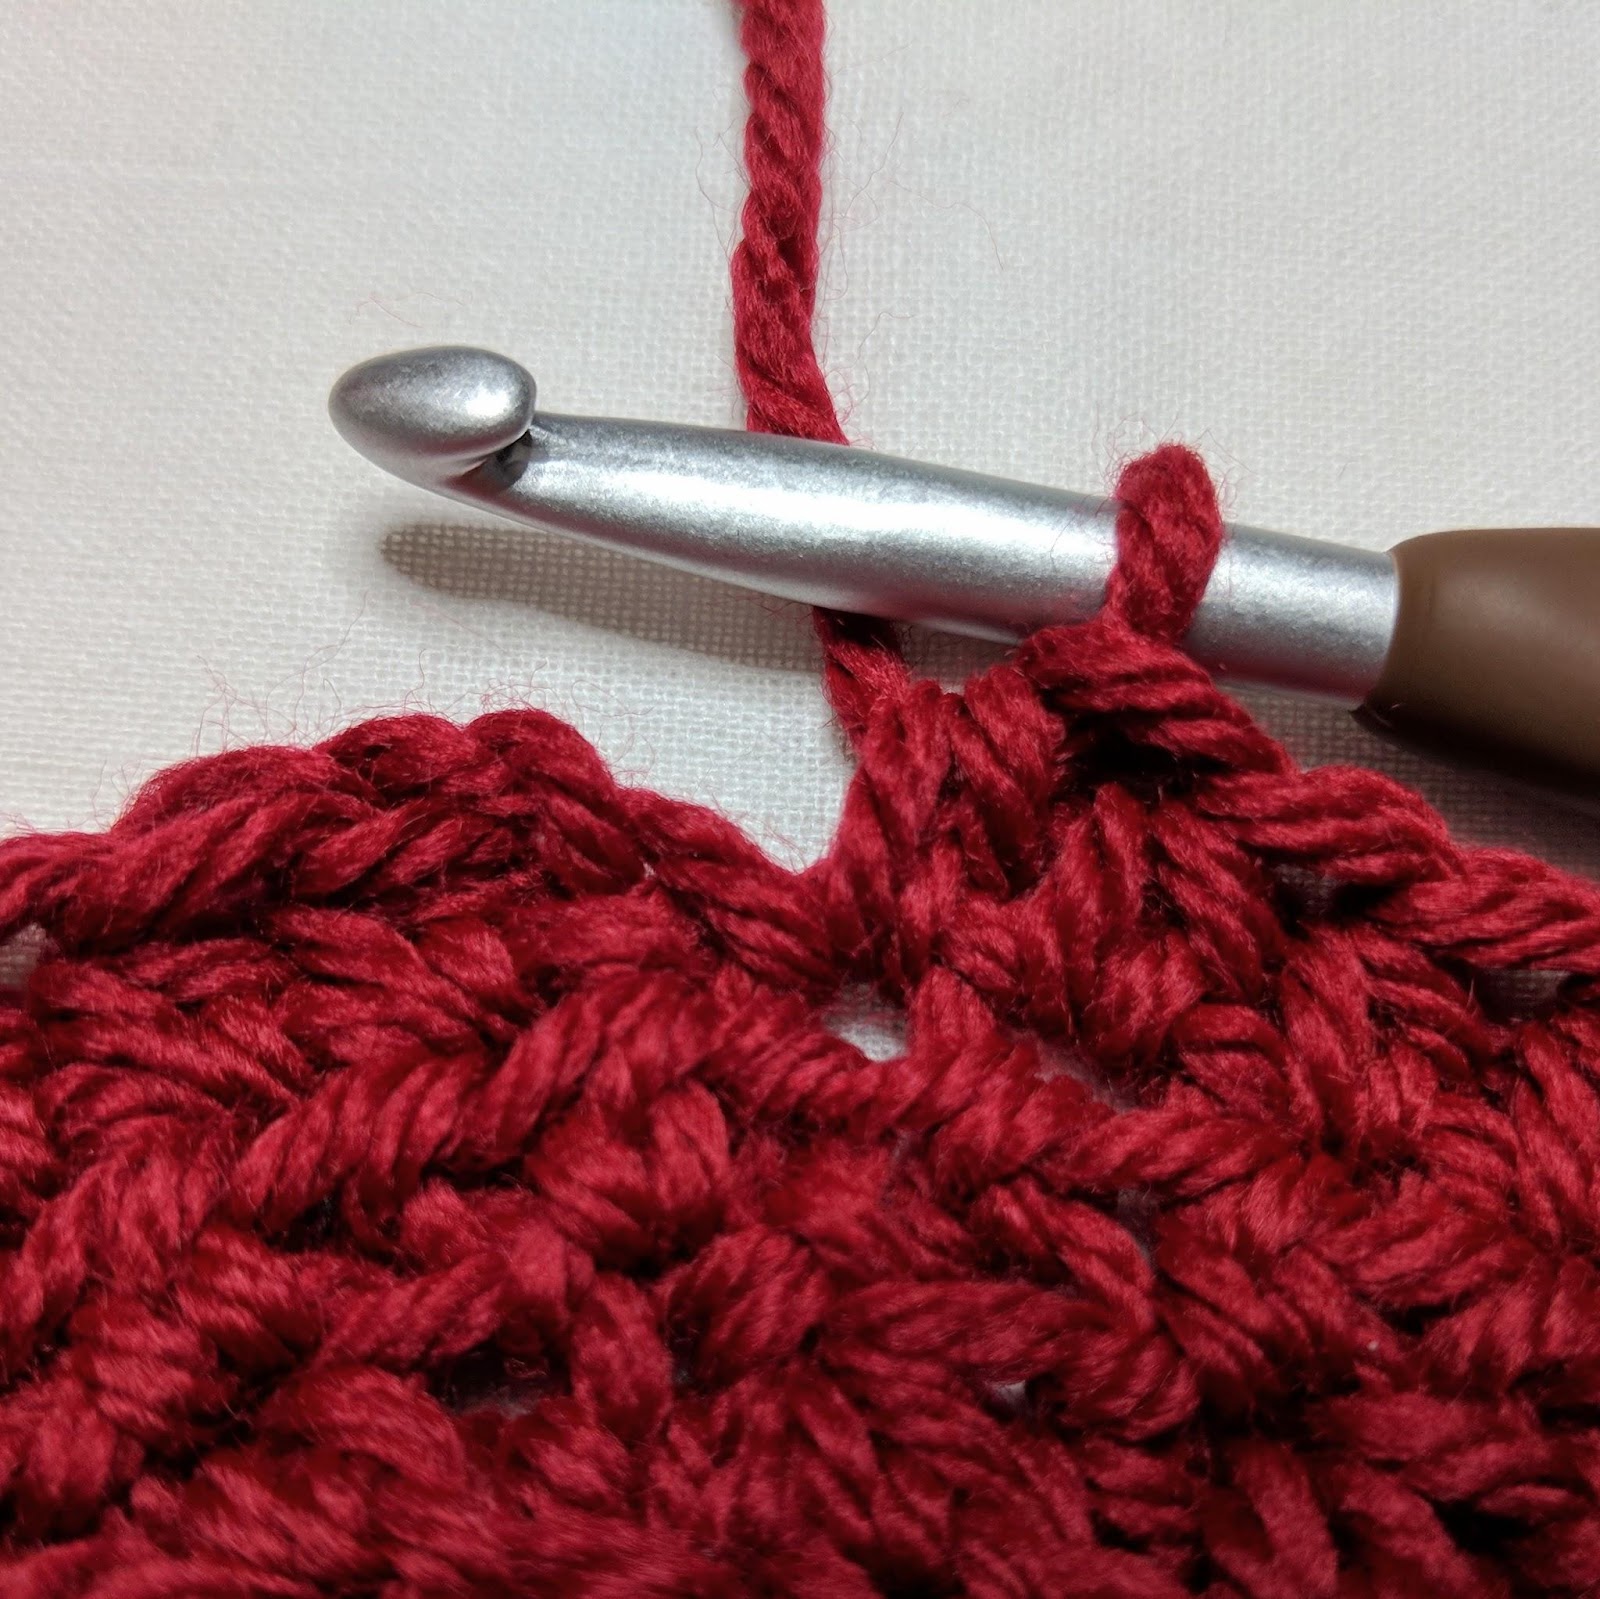
The ends of your rows should be joined, forming a circle, so we will now be working in the round. We will be joining each round with a ss and turning after each round (unless specified). To make this pattern easier to work, you will be starting each round in the 2nd stitch. This is the stitch immediately to the left of where you placed your slip stitch in the previous row. If you look at figure 8 below, you will see that I have ch1 and worked my 1st hdc into the next st. When you do this, you must remember that the stitch where you placed your slip stitch in the previous row, is where you will place your last stitch. (See figure 9) Remember: If you adjusted your sleeve size above, to switch back to working the original size you chose.
1. Ch1. *Hdc in next st in FLO. Hdc in next st in BLO. ** Repeat from * to ** around. Ss to join to 1st hdc. Turn. – 102 (114, 130, 146, 158, 174, 186, 202, 218) st
2. Ch1. *Hdc in next st in BLO. Hdc in next st in FLO. ** Repeat from * to ** around. Ss to join to 1st hdc. Turn. – 102 (114, 130, 146, 158, 174, 186, 202, 218) st
Repeat rows 1 & 2 until you have achieved your desired length, minus about ½”. Be sure your last row is a row 2 repeat. You want the wrong side facing you for the edging rows.
Bottom Trim
1. Ch1. Dss in each st around. Ss to join to 1st dss. Do not turn. – 102 (114, 130, 146, 158, 174, 186, 202, 218) st
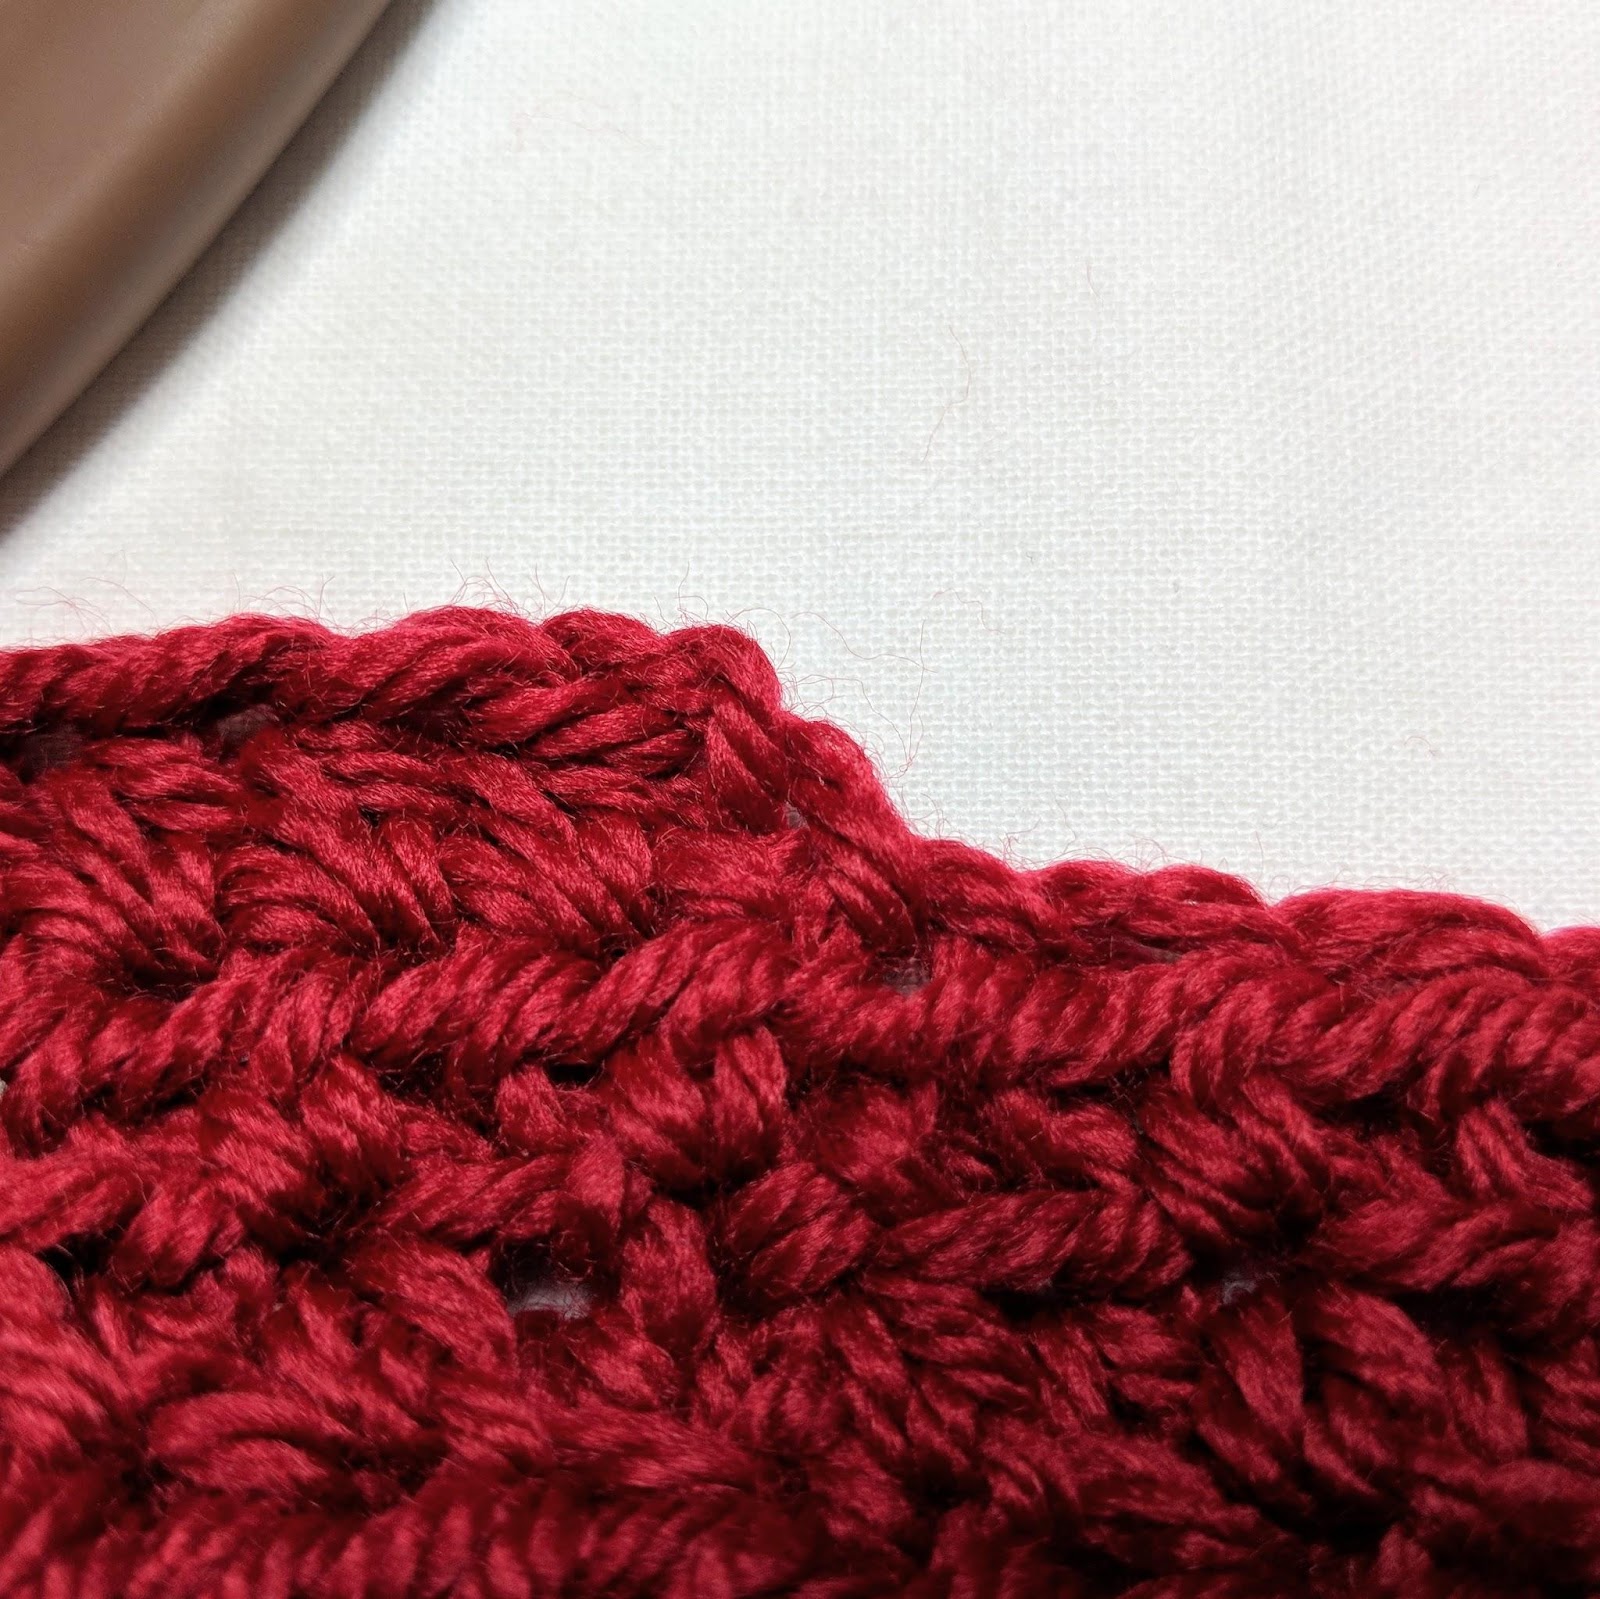
2. Ch1. Working this round in the BLO: Dss in each st around. Ss to join to 1st dss. Bind off. See figure 10 for a close up of the edging. – 102 (114, 130, 146, 158, 174, 186, 202, 218) st

Sleeves
Just as we did for the lower body, the sleeves are worked in the round. We will be joining each round with a ss, turning after each round, and starting each round in the second stitch. With the right side facing you, join your yarn in the bottom of the armhole.
1. Sc into the ends of each row in the following manner:
– 1 sc in the end of the 1st row.
– *2 sc in the end of the next row.
– 1 sc in the end of the next row. **
– Repeat from * to ** until you reach the sc row.
– 1 sc in the end of the sc row.
– *1 sc in the end of the next row.
– 2 sc in the end of the next row. **
– Repeat from * to ** until you work the rest of the rows.
– 1 sc in the armpit. Ss to join to 1st sc. Turn. – 50 (52, 56, 62, 64, 68, 70, 74, 80) st
2. (Wrong side) Ch1. *Hdc in next st in FLO. Hdc in next st in BLO. ** Repeat from * to ** around. Ss to join to 1st hdc. Turn. – 50 (52, 56, 62, 64, 68, 70, 74, 80) st
3. (Right side) Ch1. *Hdc in next st in BLO. Hdc in next st in FLO. ** Repeat from * to ** around. Ss to join to 1st hdc. Turn. – 50 (52, 56, 62, 64, 68, 70, 74, 80) st
Repeat rounds 2 & 3 until you have a total of 12 rounds. (Note: These instructions will create sleeves to fit a 20” long arm, from underarm to wrist. If your arm is longer or shorter than this, simply add or subtract rounds before moving on to the decrease rounds. Make sure to end with a round 2 repeat.)
For short sleeves: If you would like a short sleeve tee, just repeat rounds 2 & 3 until you have achieved your desired sleeve length, minus about ½”. Make sure to end with a round 3 repeat. Then you can skip the decrease rounds and go to the instructions for the sleeve trim below.
For ½ or ¾ length sleeves: Simply follow the instructions for the decrease rounds until you have achieved the desired length, minus about ½”. Make sure to end with an odd numbered round (ex: 3, 5, 7, etc). Then you can skip the rest of the decrease rounds and proceed to the sleeve trim instructions below.
We will now be working decrease rounds. To make this part easier to follow and read I will be using simple instructions. I will state whether the round begins with a FLO or a BLO, and whether you will be decreasing in the round. Each decrease row will have 2 decreases.
Example: Work a BLO, FLO hdc round with 2 (2, 2, 2, 2, 2, 2, 2, 2) decreases. This row begins with a BLO, so it will work as so: Ch1. Hdc2tog in the BLO of next 2 sts. Hdc2tog in the FLO of next 2 sts. *Hdc in BLO of next st. Hdc in FLO of next st. ** Repeat from * to ** around. Ss to join to 1st st. Turn.
1. Work a BLO, FLO hdc round with 2 (2, 2, 2, 2, 2, 2, 2, 2) decreases. Ss to join to 1st st. Turn. – 48 (50, 54, 60, 62, 66, 68, 72, 78) st
2. Work a FLO, BLO hdc round with 0 (0, 0, 0, 0, 0, 0, 0, 0) decreases. Ss to join to 1st st. Turn. – 48 (50, 54, 60, 62, 66, 68, 72, 78) st
3. Work a BLO, FLO hdc round with 0 (0, 0, 0, 0, 2, 0, 2, 2) decreases. Ss to join to 1st st. Turn. – 48 (50, 54, 60, 62, 64, 68, 70, 76) st
4. Work a FLO, BLO hdc round with 0 (0, 2, 2, 2, 0, 2, 0, 0) decreases. Ss to join to 1st st. Turn. – 48 (50, 52, 58, 60, 64, 66, 70, 76) st
5. Work a BLO, FLO hdc round with 2 (2, 0, 0, 0, 2, 0, 2, 2) decreases. Ss to join to 1st st. Turn. – 46 (48, 52, 58, 60, 62, 66, 68, 74) st
6. Work a FLO, BLO hdc round with 0 (0, 0, 0, 0, 0, 0, 0, 0) decreases. Ss to join to 1st st. Turn. – 46 (48, 52, 58, 60, 62, 66, 68, 74) st
7. Work a BLO, FLO hdc round with 0 (0, 2, 2, 2, 2, 2, 2, 2) decreases. Ss to join to 1st st. Turn. – 46 (48, 50, 56, 58, 60, 64, 66, 72) st
8. Work a FLO, BLO hdc round with 0 (0, 0, 0, 0, 0, 0, 0, 0) decreases. Ss to join to 1st st. Turn. – 46 (48, 50, 56, 58, 60, 64, 66, 72) st
9. Work a BLO, FLO hdc round with 2 (2, 0, 0, 0, 2, 2, 2, 2) decreases. Ss to join to 1st st. Turn. – 44 (46, 50, 56, 58, 58, 62, 64, 70) st
10. Work a FLO, BLO hdc round with 0 (0, 2, 2, 2, 0, 0, 0, 0) decreases. Ss to join to 1st st. Turn. – 44 (46, 48, 54, 56, 58, 62, 64, 70) st
11. Work a BLO, FLO hdc round with 0 (0, 0, 0, 0, 2, 2, 2, 2) decreases. Ss to join to 1st st. Turn. – 44 (46, 48, 54, 56, 56, 60, 62, 68) st
12. Work a FLO, BLO hdc round with 0 (0, 0, 0, 0, 0, 0, 0, 0) decreases. Ss to join to 1st st. Turn. – 44 (46, 48, 54, 56, 56, 60, 62, 68) st
13. Work a BLO, FLO hdc round with 2 (2, 2, 2, 2, 2, 2, 2, 2) decreases. Ss to join to 1st st. Turn. – 42 (44, 46, 52, 54, 54, 58, 60, 66) st
14. Work a FLO, BLO hdc round with 0 (0, 0, 0, 0, 0, 0, 0, 0) decreases. Ss to join to 1st st. Turn. – 42 (44, 46, 52, 54, 54, 58, 60, 66) st
15. Work a BLO, FLO hdc round with 0 (0, 0, 0, 2, 2, 2, 2, 2) decreases. Ss to join to 1st st. Turn. – 42 (44, 46, 52, 52, 52, 56, 58, 64) st
16. Work a FLO, BLO hdc round with 0 (2, 2, 2, 0, 0, 0, 0, 0) decreases. Ss to join to 1st st. Turn. – 42 (42, 44, 50, 52, 52, 56, 58, 64) st
17. Work a BLO, FLO hdc round with 2 (0, 0, 0, 2, 2, 2, 2, 2) decreases. Ss to join to 1st st. Turn. – 40 (42, 44, 50, 50, 50, 54, 56, 62) st
18. Work a FLO, BLO hdc round with 0 (0, 0, 0, 0, 0, 0, 0, 0) decreases. Ss to join to 1st st. Turn. – 40 (42, 44, 50, 50, 50, 54, 56, 62) st
19. Work a BLO, FLO hdc round with 0 (2, 2, 2, 2, 2, 2, 2, 2) decreases. Ss to join to 1st st. Turn. – 40 (40, 42, 48, 48, 48, 52, 54, 60) st
20. Work a FLO, BLO hdc round with 0 (0, 0, 0, 0, 0, 0, 0, 0) decreases. Ss to join to 1st st. Turn. – 40 (40, 42, 48, 48, 48, 52, 54, 60) st
21. Work a BLO, FLO hdc round with 2 (0, 0, 2, 2, 2, 2, 2, 2) decreases. Ss to join to 1st st. Turn. – 38 (40, 42, 46, 46, 46, 50, 52, 58) st
22. Work a FLO, BLO hdc round with 0 (2, 2, 0, 0, 0, 0, 0, 2) decreases. Ss to join to 1st st. Turn. – 38 (38, 40, 46, 46, 46, 50, 52, 56) st
23. Work a BLO, FLO hdc round with 0 (0, 0, 2, 2, 2, 2, 2, 2) decreases. Ss to join to 1st st. Turn. – 38 (38, 40, 44, 44, 44, 48, 50, 54) st
24. Work a FLO, BLO hdc round with 0 (0, 0, 0, 0, 0, 0, 0, 2) decreases. Ss to join to 1st st. Turn. – 38 (38, 40, 44, 44, 44, 48, 50, 52) st
25. Work a BLO, FLO hdc round with 2 (2, 2, 2, 2, 2, 2, 2, 2) decreases. Ss to join to 1st st. Turn. – 36 (36, 38, 42, 42, 42, 46, 48, 50) st
26. Work a FLO, BLO hdc round with 0 (0, 0, 0, 0, 0, 0, 0, 2) decreases. Ss to join to 1st st. Turn. – 36 (36, 38, 42, 42, 42, 46, 48, 48) st
27. Work a BLO, FLO hdc round with 0 (0, 2, 2, 2, 2, 2, 2, 2) decreases. Ss to join to 1st st. Turn. – 36 (36, 36, 40, 40, 40, 44, 46, 46) st
28. Work a FLO, BLO hdc round with 2 (2, 0, 0, 0, 0, 0, 2, 2) decreases. Ss to join to 1st st. Turn. – 34 (34, 36, 40, 40, 40, 44, 44, 44) st
29. Work a BLO, FLO hdc round with 0 (0, 2, 2, 2, 2, 2, 2, 2) decreases. Ss to join to 1st st. Turn. – 34 (34, 34, 38, 38, 38, 42, 42, 42) st
30. Work a FLO, BLO hdc round with 0 (0, 0, 0, 0, 0, 0, 2, 2) decreases. Ss to join to 1st st. Turn. – 34 (34, 34, 38, 38, 38, 42, 40, 40) st
31. Work a BLO, FLO hdc round with 2 (2, 2, 2, 2, 2, 2, 0, 0) decreases. Ss to join to 1st st. Turn. – 32 (32, 32, 36, 36, 36, 40, 40, 40) st
32. Work a FLO, BLO hdc round with 0 (0, 0, 0, 0, 0, 0, 0, 0) decreases. Ss to join to 1st st. Turn. – 32 (32, 32, 36, 36, 36, 40, 40, 40) st
33. Work a BLO, FLO hdc round with 2 (2, 2, 2, 2, 2, 2, 2, 2) decreases. Ss to join to 1st st. Turn. – 30 (30, 30, 34, 34, 34, 38, 38, 38) st
Sleeve Trim
34. Ch1. Dss in each st around. Ss to join to 1st dss. Do not turn. – 30 (30, 30, 34, 34, 34, 38, 38, 38) st
35. Ch1. Working this round in the BLO: Dss in each st around. Ss to join to 1st dss. Bind off. – 30 (30, 30, 34, 34, 34, 38, 38, 38) st
For short, ½, and ¾ sleeves: The instructions for the sleeve trim are the same, except your stitch count will be whatever it was on the last row you worked before working the trim.
Neck Trim
With the wrong side facing you, join your yarn anywhere on the neck.
1. Ch1. Working this round in the BLO: Dss in each st around. Ss to join to 1st dss. Bind off. – 58 (62, 70, 78, 82, 86, 90, 90, 90)
Weave in all your ends, and you’re done!
I hope you love your new pullover, and I look forward to seeing all of your beautiful pictures on Ravelry!
If you’d like to know when I post new patterns and tutorials, head on over to my Facebook and Instagram and give me a like and a follow!
If you enjoyed The Aspirations Pullover – Free Crochet Pattern, you may want to check out my other designs!
And until next time… Happy Hooking! 😉