
Free Crochet Cardigan Pattern – Boxed Baubles
The Free Crochet Cardigan Pattern – Boxed Baubles is copyrighted by I Need It Crochet. You may not copy, share, change, or sell the pattern itself. Also you may not claim this pattern as your own. All pictures contained in this pattern fall under the copyright and may not be used.
Finished items made from The Free Crochet Cardigan Pattern – Boxed Baubles belong to you, and you may do what you wish with them. If you choose to sell them on Etsy, I would very much appreciate it if you credited me as the pattern designer.
Pattern Availability Update
This pattern has previously been featured in a limited-time collaboration with Expression Fiber Arts. It is now available to view for free in the blog post below.
This collaboration has been such a joy, and I’m so happy to see this well-loved cardigan get a second life with such a beautiful yarn partner. If you decide to make one, I’d absolutely love to see it.
Free Crochet Cardigan Pattern – Boxed Baubles
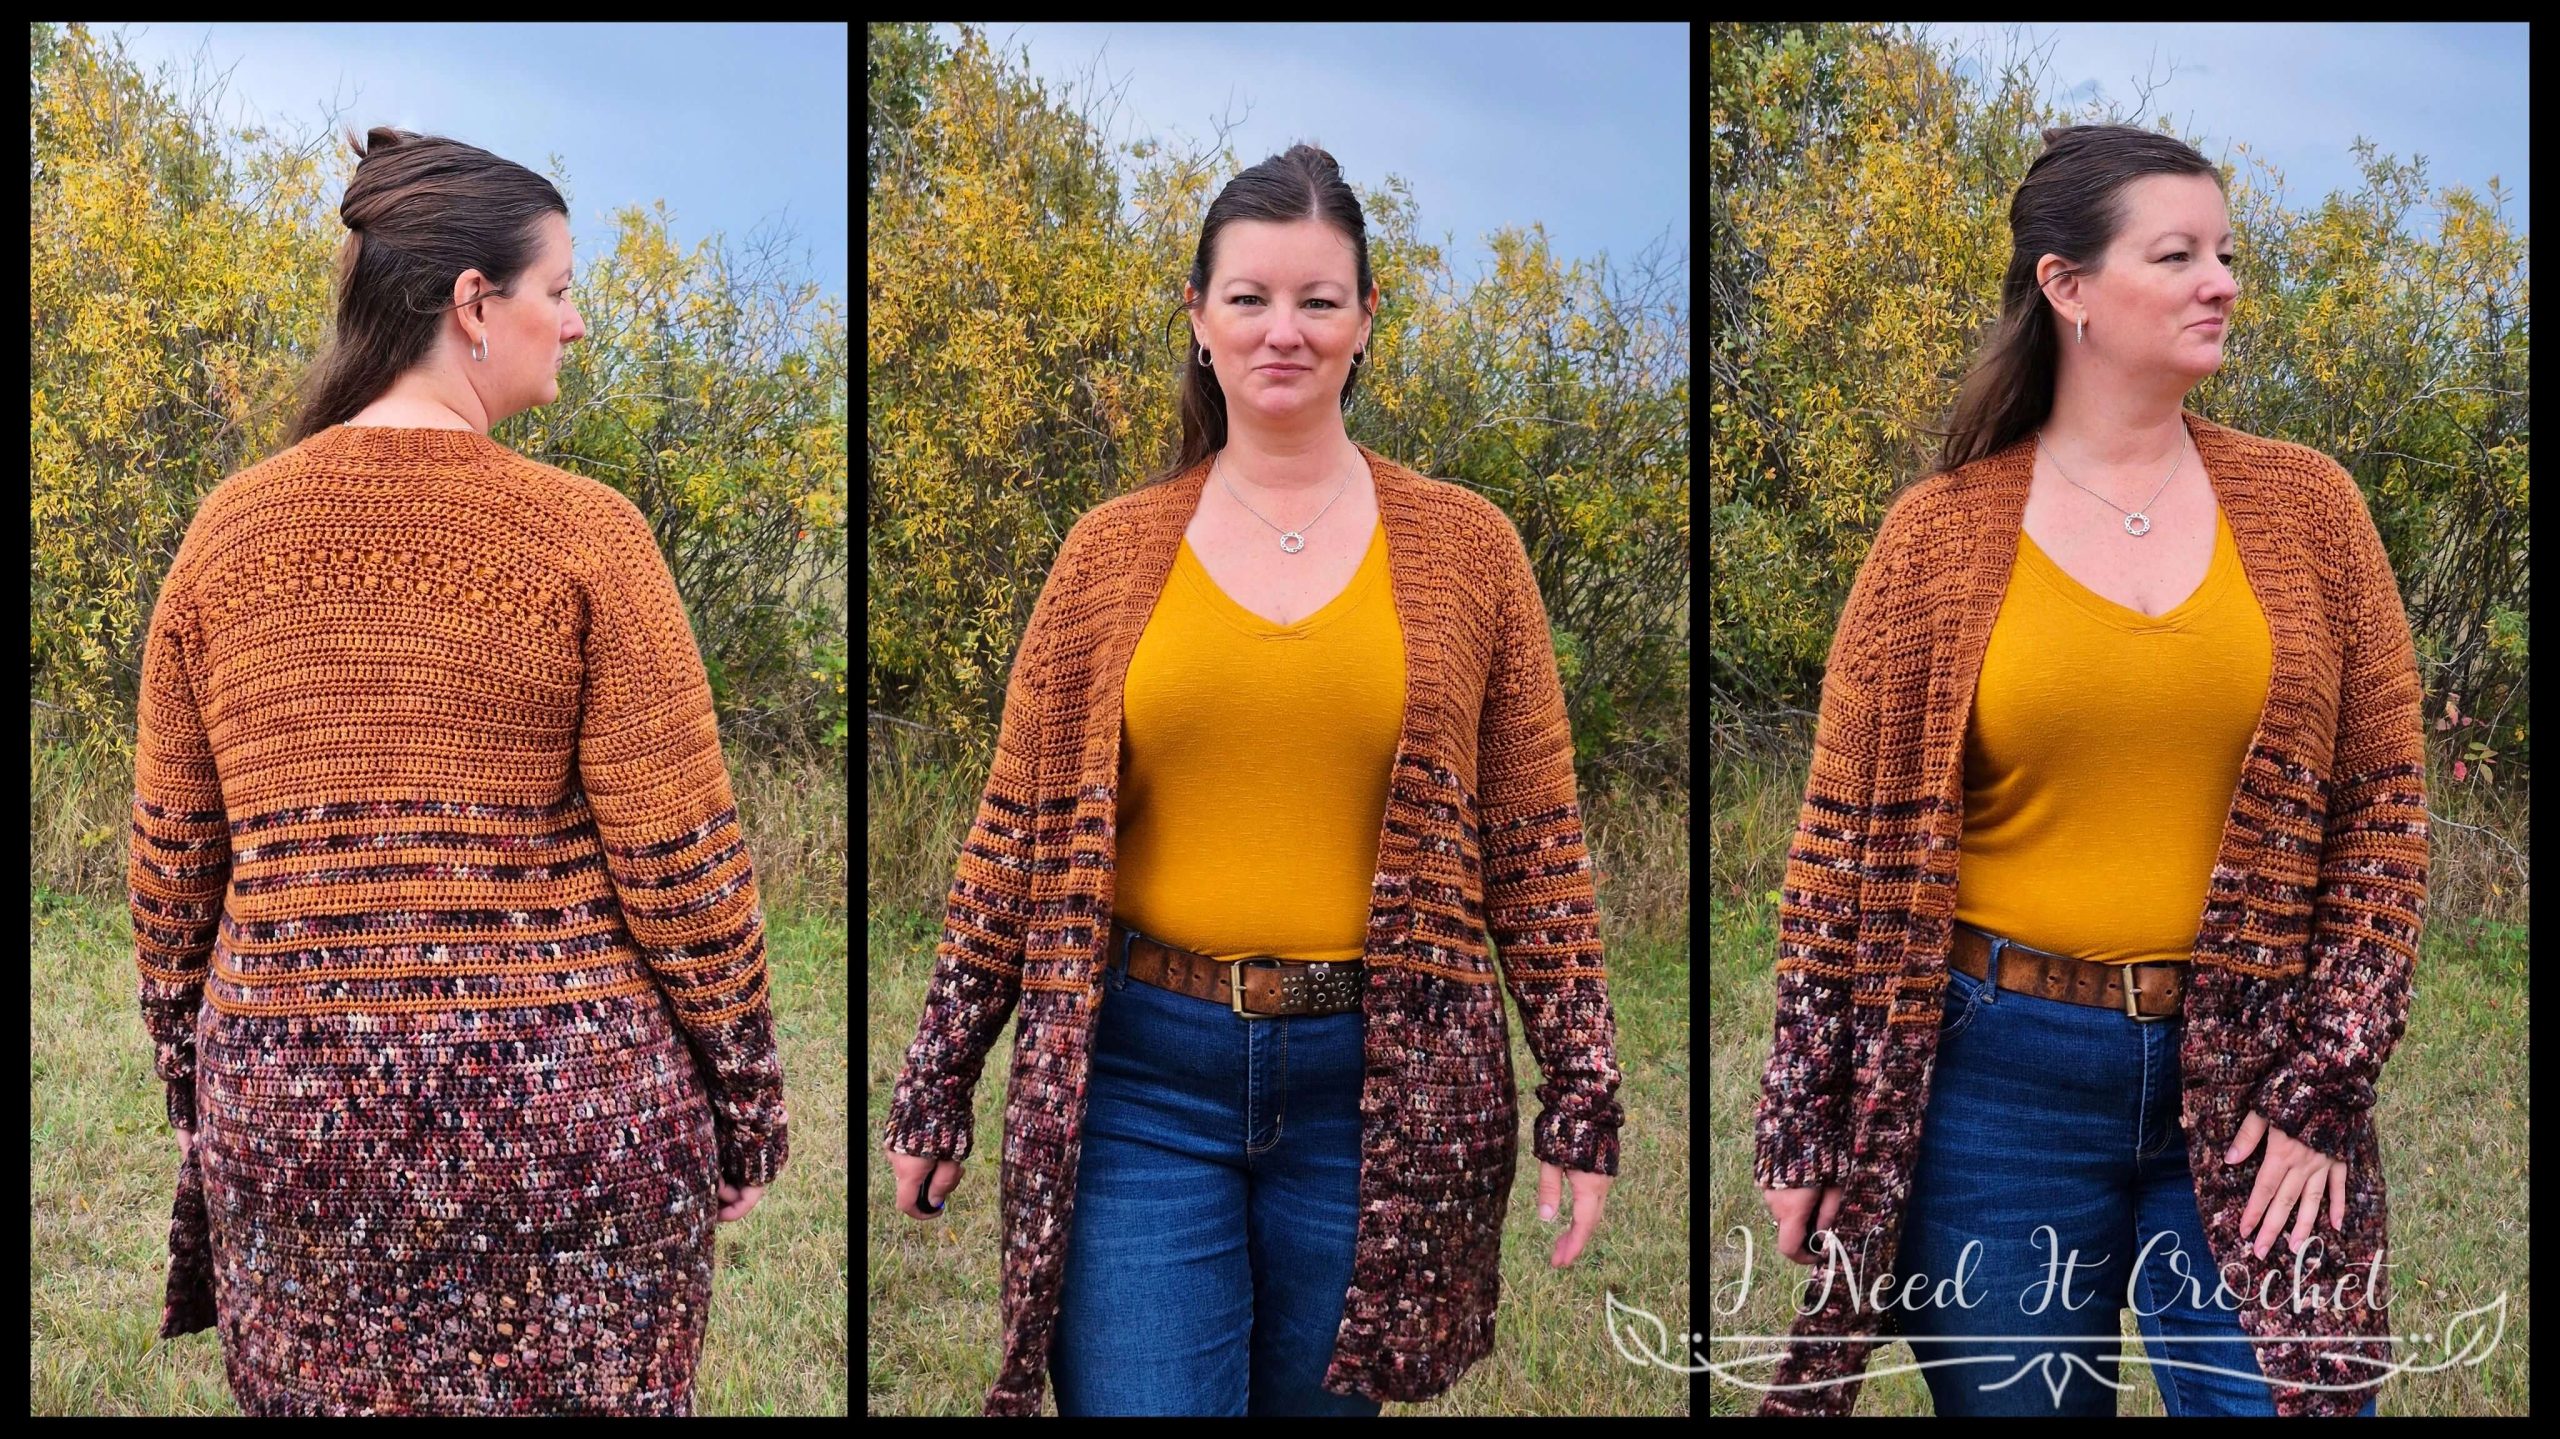
If you love a cozy crochet cardigan pattern that feels just as good to wear as it does to make, I have something special to share with you today.
I’ve teamed up with Expression Fiber Arts (EFA) for a limited-time collaboration to bring back one of my all-time favorite designs: the Boxed Baubles Cardigan. This cardigan has been deeply loved, heavily worn, and long missed in my wardrobe – and now it’s back with a beautiful yarn upgrade and a fully refreshed pattern.
A Crochet Cardigan Pattern Worth Re-making
The original Boxed Baubles Cardigan was one of those pieces I reached for constantly. So constantly, in fact, that I wore actual holes into it (the highest compliment a handmade garment can receive).
When Expression Fiber Arts approached me about collaborating on a remake, I couldn’t say yes fast enough. This new version keeps everything I loved about the original while bringing the pattern up to my current design standards with:
- A fresh, modern pattern rewrite
- Clearer instructions and improved sizing support
- Polished construction details for a smoother crochet experience
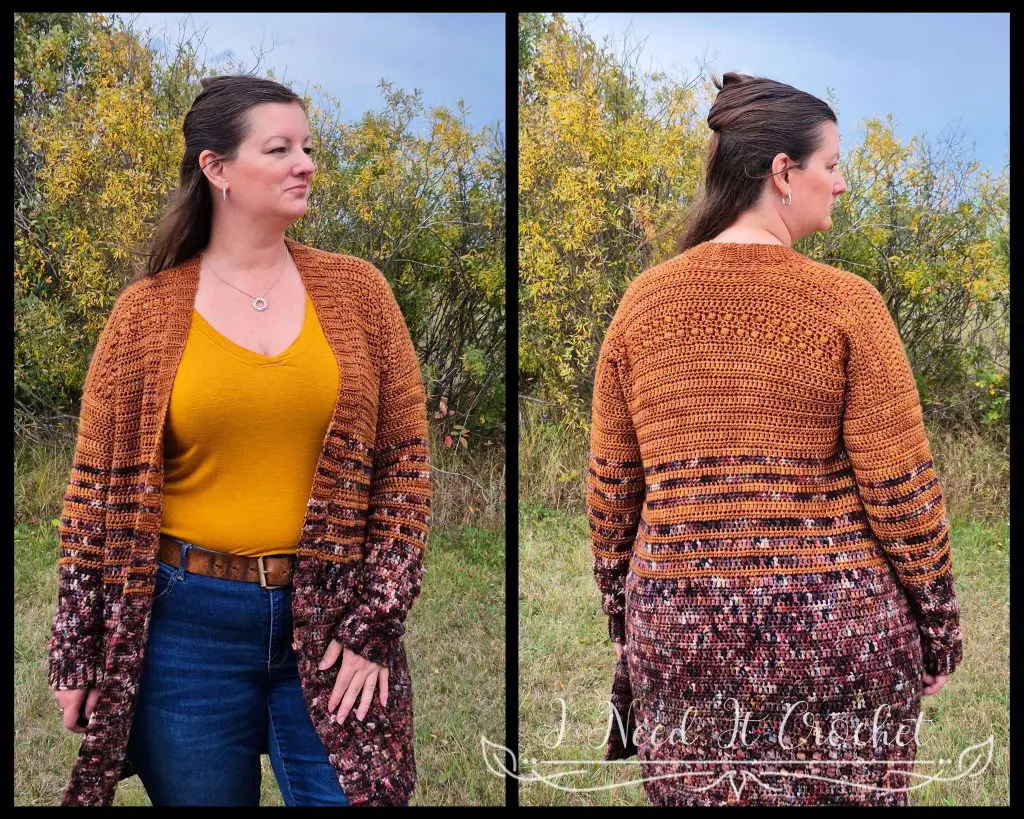
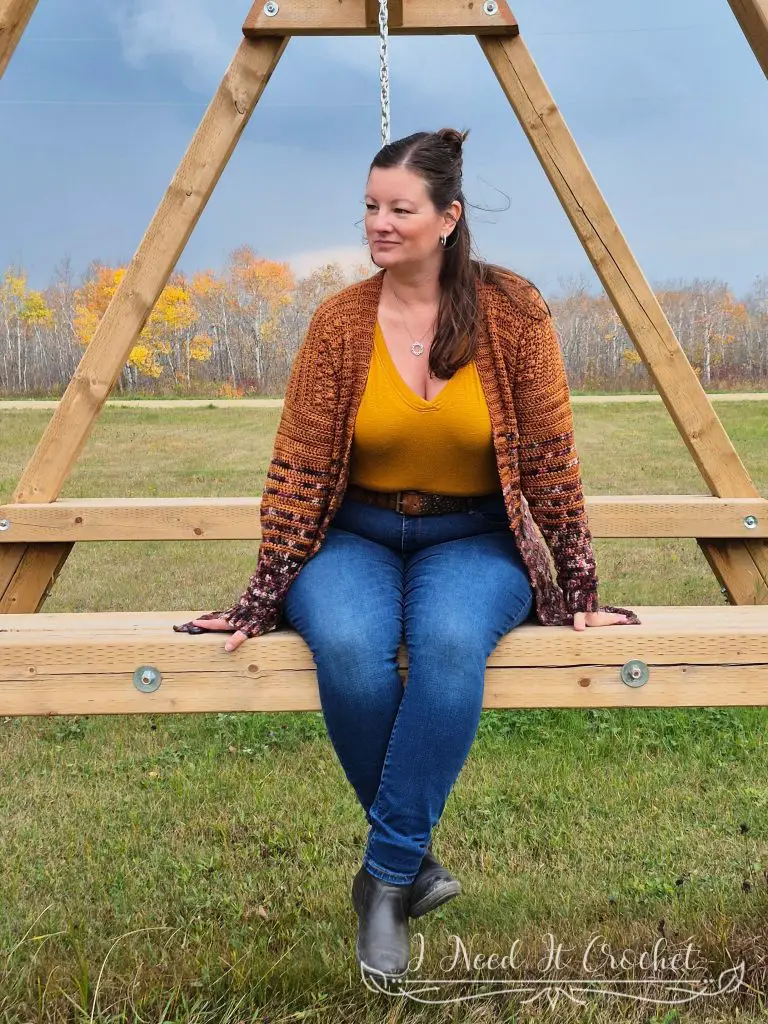
This is a relaxed-fit crochet cardigan pattern with beautiful texture, cozy structure, and just enough visual interest to keep things engaging without being fussy.
Let’s Talk About This Yarn (Because Wow)
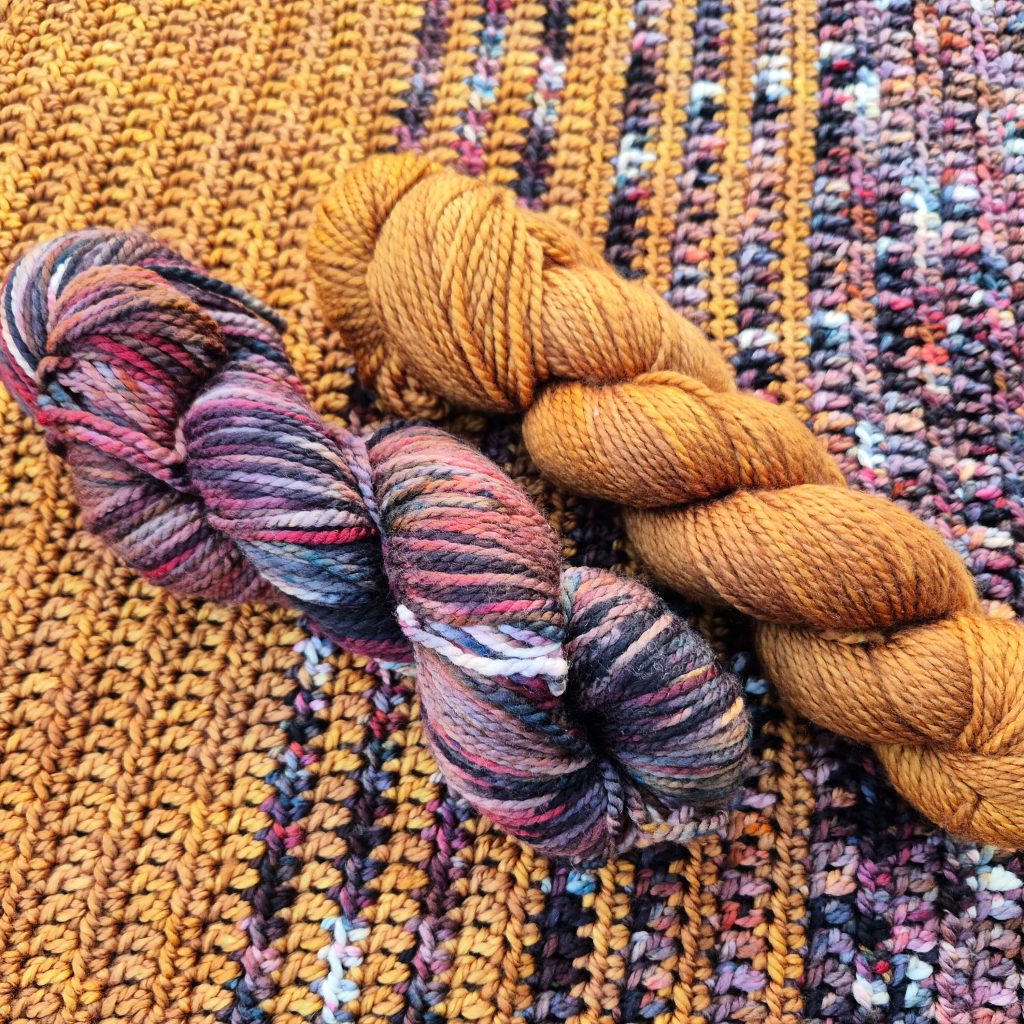
For this collaboration, I used Expression Fiber Arts Buttery Worsted yarn in the colours Coffee Stain and Cozied – and honestly, this yarn deserves a moment.
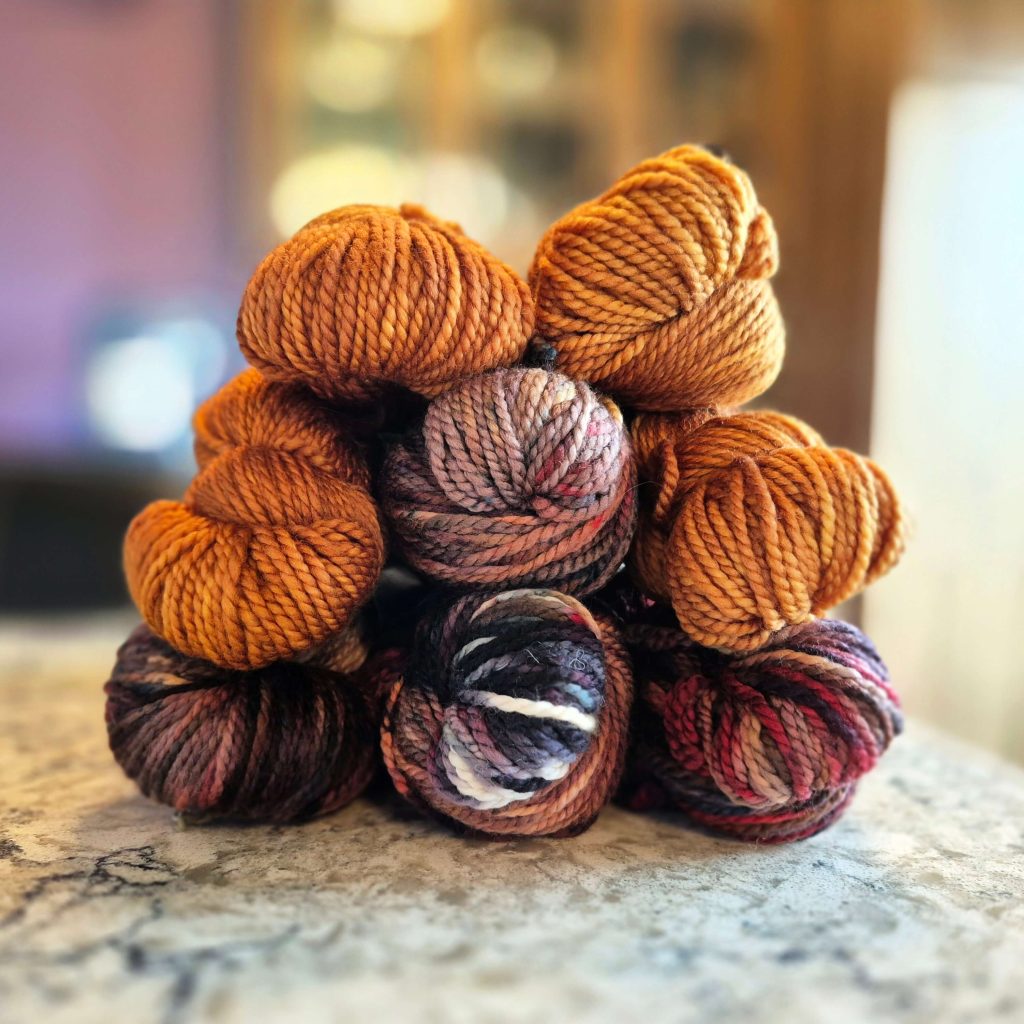
Buttery Worsted is exactly what it sounds like. It’s:
- Soft without being floppy
- Smooth with excellent stitch definition
- Warm and cozy, but still breathable
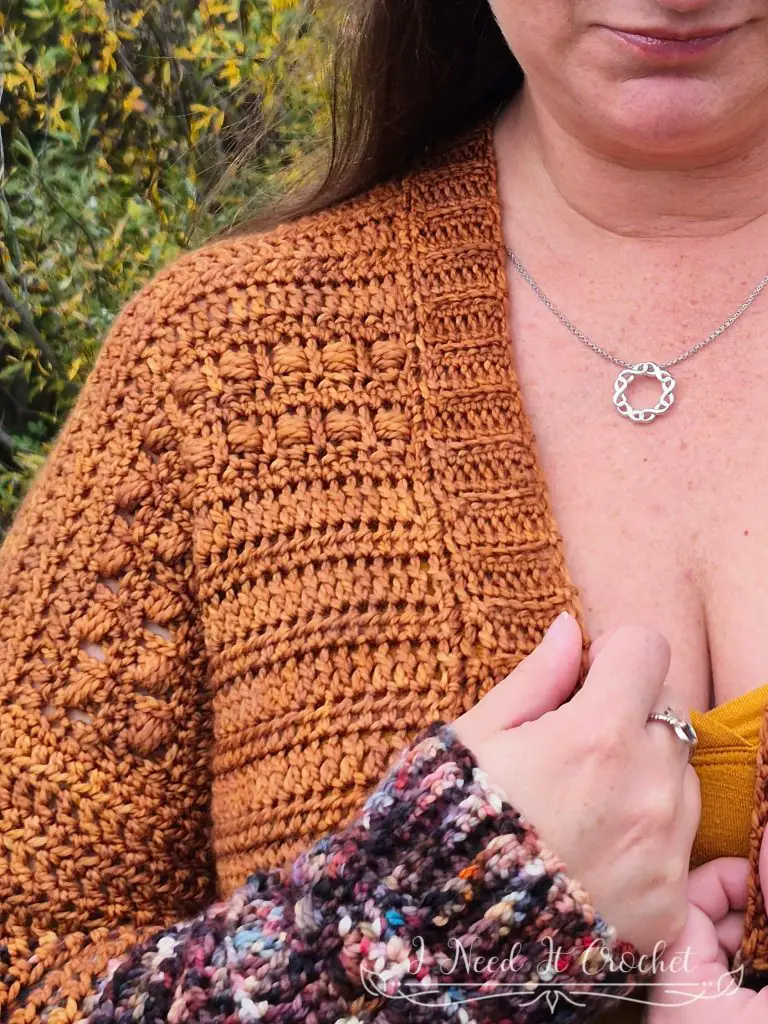
It works beautifully for crochet garments, especially cardigans where drape and comfort really matter. The texture of the Boxed Baubles stitch pattern absolutely shines in this yarn, making every stitch feel intentional and luxurious.
Free Crochet Cardigan Pattern – Boxed Baubles
Is the Boxed Baubles Cardigan Right for You?
This crochet cardigan pattern is a great fit if you:
- Love wearable, everyday crochet garments
- Enjoy textured stitches without complicated shaping
- Want a cardigan that layers easily over tees, tanks, or long sleeves
- Appreciate clear instructions and thoughtful pattern updates
It’s the kind of project you can sink into on slow afternoons and still feel excited to pick up again the next day.
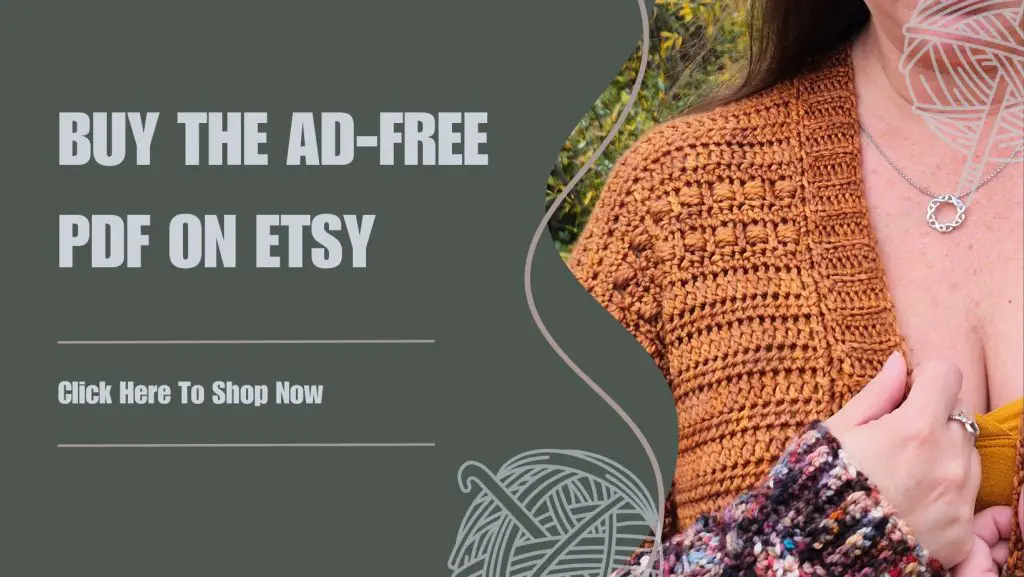
Where Can I Buy The Pdf?
The entire pattern is available to view for free on this page (you just have to scroll down to see it). But if you would prefer to have a printable pdf copy of the pattern, you can purchase it for a small fee from my Ravelry and Etsy stores. Just click the graphics below.
This pattern is 15 pages long and contains a full picture tutorial for the crochet bead stitch, as well as 13 additional pictures and detailed instructions of how to complete your crochet sweater scarf. A printable pdf will be easier to follow, and you can make notes on it as you go. I find it to be the easier option. But if you like to use the online version, it is here 24/7 for you to view. Enjoy!

Free Crochet Cardigan Pattern – Boxed Baubles
Free Crochet Cardigan Pattern – Boxed Baubles
Want to Pin it for later?
Click the image below and save the pin to your favourite crochet pattern boards!

Free Crochet Cardigan Pattern – Boxed Baubles
Finished Size:
Instructions given to fit size X-small; changes for small, medium, large, X-large, 2X-large, 3X-large, 4X-large and 5X-large are in ()
XS (S, M, L, XL, 2XL, 3XL, 4XL, 5XL)
To Fit Bust: 28” (32”, 36”, 40”, 44”, 48”, 52”, 56”, 60”)
Finished Bust: 30” (34”, 38”, 42”, 46”, 50”, 54”, 58”, 62”)
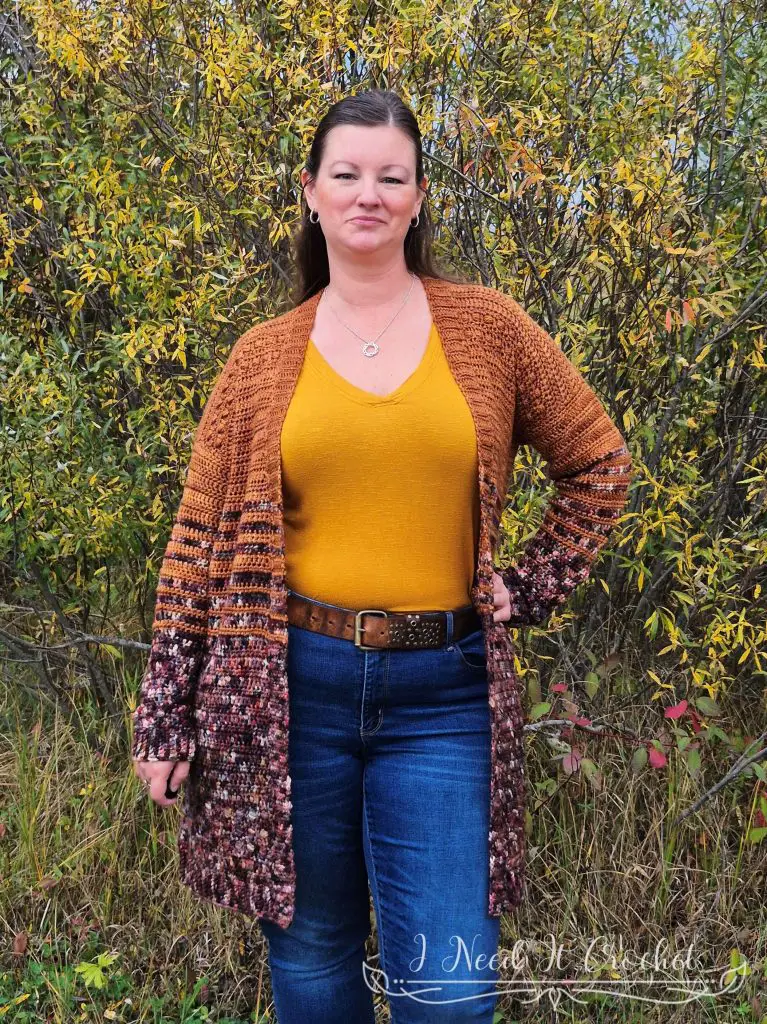
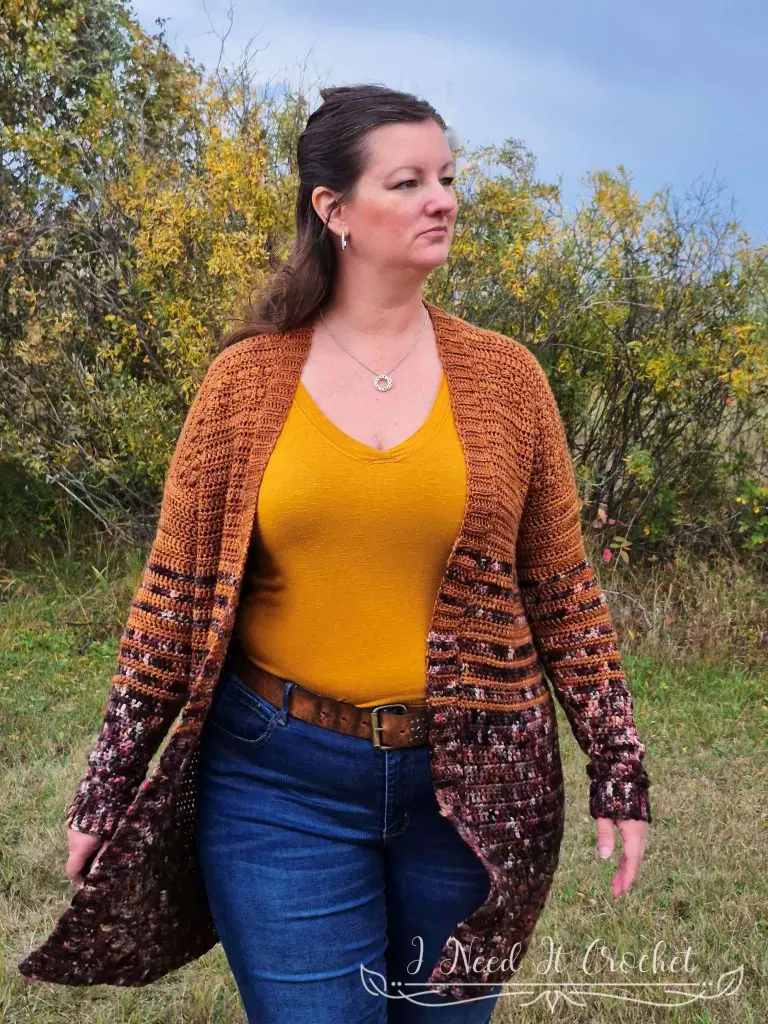
Finished Length: Customizable. Length on model shown is 33”.
Gauge:
1. Ch15, dc in 4th ch from hook and each ch across. – 13 st
2. Ch1, hdc in each st across. – 13 st
3. Ch3, dc in next st and each st across. – 13 st
Repeat rows 2 and 3 until you have 8 rows total. Swatch should measure 4” x 4”.
Materials:
I used Expression Fiber Arts Buttery Worsted, which is 100% Superwash Merino Wool, #4 Worsted weight yarn.
Any yarn of similar weight would work.
Approximately 1200 (1300, 1400, 1500, 1600, 1700,1800, 1900, 2000) yds.
6mm Hook
Stitch Markers
Yarn Needle
Scissors
Measuring Tape
Abbreviations:
Sk = Skip
Sp = Space
St = Stitch
Yo = Yarn Over
Ss = Slip Stitch
Ch = Chain
Sc = Single Crochet
Hdc = Half Double Crochet
Dc = Double Crochet
Esc = Extended Single Crochet (See Notes)
Notes:
Ch1 at the beginning of a row is never considered a stitch.
Ch2 at the beginning of a row is considered an esc.
Ch3 at the beginning of a row is considered a dc.
To make an esc: Insert hook in specified st, draw up a loop,
yo, pull through 1 loop, yo, pull through both loops.
For those who have never done the Bead Stitch, I have included a tutorial here. A Bd is counted as 2 sts.
I wrote this pattern with 2” of positive ease. If you would like a more fitted cardigan, choose your size according to the finished measurements.
The model above (that’s me) has a 42” bust, and is wearing a size XL.
Instructions
The main body of this cardigan is worked from the bottom up. You will start with the lower body, then split off for the armholes, continuing up until you have reached the shoulders. Then you will sew the shoulders closed, add the sleeves, and the trim. Note: Because of the nature of these stitches, you will notice that your work may slant. This is a result of working a dc row in one direction, then a hdc row in the other direction. Do not worry about this. When the body portion is finished you will be blocking your work, which will partially correct this. In the last step, you will be adding a trim, which will take care of the rest of the slanting.
For my cardigan, I used two different colours.
Main Colour (MC): Cozied
Contrast Colour (CC): Coffee Stain
Lower Body
With 6mm Hook (or hook used to obtain gauge)
Beginning with MC: Ch 86 (101, 113, 125, 140, 155, 164, 176, 191).
- Working into the back hump of the chain: Sc in 2nd ch from hook and each ch across. Turn. – 85 (100, 112, 124, 139, 154, 163, 175, 190) st
- (Wrong side) Ch1. Hdc in 1st st and each st across. Turn. – 85 (100, 112, 124, 139, 154, 163, 175, 190) st
- (Right side) Ch3. Dc in next st and each st across. Turn. – 85 (100, 112, 124, 139, 154, 163, 175, 190) st
- Ch2. *Sc in next 2 sts, esc in next st. ** Repeat from * to ** across. Turn. – 85 (100, 112, 124, 139, 154, 163, 175, 190) st
- Ch2. *Bd in next st, sk1 st, esc in next st. ** Repeat from * to ** across. Turn. – 85 (100, 112, 124, 139, 154, 163, 175, 190) st
Measurement Check: If you are still on gauge, your project should measure approximately 26” (30”, 34”, 38”, 42”, 46”, 50”, 54”, 58”) wide and 2 ¼” tall. It is common for people to crochet looser when making a large project as opposed to a small swatch. That is why it is always a good idea to measure your work after you have completed a few rows. If your piece is not the right size, try again with a different sized hook.
- – 10. Repeat rows 4 & 5, ending on a row 4 repeat. – 85 (100, 112, 124, 139, 154, 163, 175, 190) st
- Ch3. Dc in next st and each st across. Turn. – 85 (100, 112, 124, 139, 154, 163, 175, 190) st
- Ch1. Hdc in 1st st and each st across. Turn. – 85 (100, 112, 124, 139, 154, 163, 175, 190) st
Repeat rows 11 & 12 until you have reached the desired length for the lower body (this is below the armpit) of your cardigan, minus 2” (see colour change notes below). Be sure to end on a row 12 repeat. For example: I wanted my cardigan to be 26” below the armpit, so I repeated rows 11 & 12 until my work was 24” tall. Once you have reached your desired length, we will continue working upwards, starting with the upper right front panel. Do not bind off.
Colour Change Notes
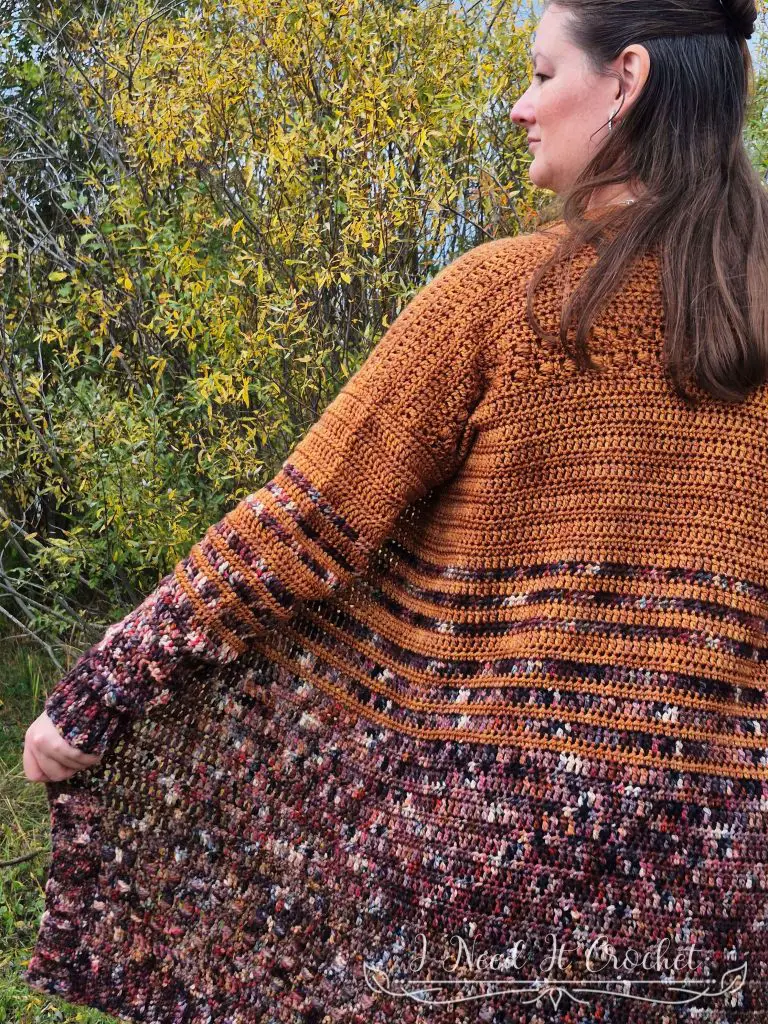
For my cardigan, I wanted the main colour to fade up into the contrast colour. To do this I switched colours every row or two in a pattern. If you would like your cardigan to look just like mine, simply follow the pattern outlined below.
Main Colour (MC): Cozied. Contrast Colour (CC): Coffee Stain
Rows 1-27: MC
Row 28 (hdc): CC
Row 29 (dc): Mc
Row 30 (hdc): CC
Row 31 (dc): MC
Row 32 (hdc): CC
Row 33 (dc): MC
Rows 34 (hdc) & 35 (dc): CC
Row 36 (hdc): MC
Row 37 (dc): CC
Row 38 (hdc): MC
Row 39 (dc): CC
Row 40 (hdc): MC
Row 41 – 49: CC
Free Crochet Cardigan Pattern – Boxed Baubles
Upper Panels and Arm Holes (CC)
Arm holes can be tricky. One can have a size XS bust, but size M arms. Or a size XL bust and size S arms. It’s one of the things that makes shopping for clothes very annoying. So, I made it easier for you. Simply complete rows 1-3 according to the body size you have already chosen (ex: S, M, L, etc.), then pick the size of the armholes you would like to make. From row 4, onward, you will follow the instructions for that size. Everyone’s measurements are different. I recommend that you measure the circumference of your upper arm and follow the instructions that fit or are slightly larger than that measurement. Your stitch count will stay the same as it was in row 1.
Upper Right Front Panel
- Ch3. Dc in next 17 (20, 23, 28, 31, 35, 37, 40, 43) sts. Leave remaining sts unworked. Turn. – 18 (21, 24, 29, 32, 36, 38, 41, 44) st
- Ch1. Hdc in 1st st and each st across. Turn. – 18 (21, 24, 29, 32, 36, 38, 41, 44) st
- Ch3. Dc in next st and each st across. Turn. – 18 (21, 24, 29, 32, 36, 38, 41, 44) st
Repeat rows 2 & 3 according to your chosen sleeve (circumference) size.
- For 13” sleeves: No repeats necessary.
- For 15” & 17” sleeves: Repeat rows 2 & 3, 1 more time (5 rows total).
- For 19” & 21” sleeves: Repeat rows 2 & 3, 2 more times (7 rows total).
- For 23” & 25” sleeves: Repeat rows 2 & 3, 3 more times (9 rows total).
Now we will add the boxed bead detail to the shoulder.
- Ch2, esc in next st. *Sc in next 2 sts, esc in next st. ** Repeat from * to ** across. Turn. – 18 (21, 24, 29, 32, 36, 38, 41, 44) st
- Ch2. *Bd in next st, sk1 st, esc in next st. ** Repeat from * to ** until there is only 1 st left. Esc in last st. Turn. – 18 (21, 24, 29, 32, 36, 38, 41, 44) st
- Repeat row 4. – 18 (21, 24, 29, 32, 36, 38, 41, 44) st
- Repeat row 5. – 18 (21, 24, 29, 32, 36, 38, 41, 44) st
- Repeat row 4. – 18 (21, 24, 29, 32, 36, 38, 41, 44) st
- Ch3. Dc in next st and each st across. Turn. – 18 (21, 24, 29, 32, 36, 38, 41, 44) st
Now, you will repeat rows 2 & 3 according to your chosen sleeve (circumference) size:
- For 13” sleeves: Repeat rows 2 & 3 until you have a total of 13 rows for the upper body.
- For 15” sleeves: Repeat rows 2 & 3 until you have a total of 15 rows for the upper body.
- For 17” sleeves: Repeat rows 2 & 3 until you have a total of 17 rows for the upper body.
- For 19” sleeves: Repeat rows 2 & 3 until you have a total of 19 rows for the upper body.
- For 21” sleeves: Repeat rows 2 & 3 until you have a total of 21 rows for the upper body.
- For 23” sleeves: Repeat rows 2 & 3 until you have a total of 23 rows for the upper body.
- For 25” sleeves: Repeat rows 2 & 3 until you have a total of 25 rows for the upper body.
Bind off, leaving a long tail for sewing/slip stitching the shoulder closed.
Upper Back Panel
With the right side facing you, join your yarn in the next unworked stitch on the Lower Body portion. (The next st to the left of the last st on row 1 of your Upper Right Front Panel.) Follow the instructions according to the arm hole size you have chosen. The stitch count should stay the same as in row 1 below.
- Ch3. Dc in next 48 (57, 63, 65, 74, 81, 86, 92, 101) sts. Leave remaining sts unworked. Turn. – 49 (58, 64, 66, 75, 82, 87, 93, 102) st
- Ch1. Hdc in 1st st and each st across. Turn. – 49 (58, 64, 66, 75, 82, 87, 93, 102) st
- Ch3. Dc in next st and each st across. Turn. – 49 (58, 64, 66, 75, 82, 87, 93, 102) st
Repeat rows 2 & 3 according to your chosen sleeve (circumference) size.
- For 13” sleeves: No repeats necessary.
- For 15” & 17” sleeves: Repeat rows 2 & 3, 1 more time (5 rows total).
- For 19” & 21” sleeves: Repeat rows 2 & 3, 2 more times (7 rows total).
- For 23” & 25” sleeves: Repeat rows 2 & 3, 3 more times (9 rows total).
Now we will add the boxed bead detail to the shoulder.
- Ch2, esc in next st. *Sc in next 2 sts, esc in next st. ** Repeat from * to ** until there is only 1 st left unworked. Esc in last st. Turn. – 49 (58, 64, 66, 75, 82, 87, 93, 102) st
- Ch2, esc in next st. *Bd in next st, sk1 st, esc in next st. ** Repeat from * to ** until there is only 1 st left. Esc in last st. Turn. – 49 (58, 64, 66, 75, 82, 87, 93, 102) st
- Repeat row 4. – 49 (58, 64, 66, 75, 82, 87, 93, 102) st
- Repeat row 5. – 49 (58, 64, 66, 75, 82, 87, 93, 102) st
- Repeat row 4. – 49 (58, 64, 66, 75, 82, 87, 93, 102) st
- Ch3. Dc in next st and each st across. Turn. – 49 (58, 64, 66, 75, 82, 87, 93, 102) st
Now, you will repeat rows 2 & 3 according to your chosen sleeve (circumference) size:
- For 13” sleeves: Repeat rows 2 & 3 until you have a total of 13 rows for the upper body.
- For 15” sleeves: Repeat rows 2 & 3 until you have a total of 15 rows for the upper body.
- For 17” sleeves: Repeat rows 2 & 3 until you have a total of 17 rows for the upper body.
- For 19” sleeves: Repeat rows 2 & 3 until you have a total of 19 rows for the upper body.
- For 21” sleeves: Repeat rows 2 & 3 until you have a total of 21 rows for the upper body.
- For 23” sleeves: Repeat rows 2 & 3 until you have a total of 23 rows for the upper body.
- For 25” sleeves: Repeat rows 2 & 3 until you have a total of 25 rows for the upper body.
Bind off.
Free Crochet Cardigan Pattern – Boxed Baubles
Upper Left Front Panel
With the right side facing you, join your yarn in the next unworked stitch on the Lower Body portion. (The next st to the left of the last st on row 1 of your Upper Back Panel.) Follow the instructions according to the arm hole size you have chosen. The stitch count should stay the same as in row 1 below.
- Ch3. Dc in next st and each st across. Turn. – 18 (21, 24, 29, 32, 36, 38, 41, 44) st
- Ch1. Hdc in 1st st and each st across. Turn. – 18 (21, 24, 29, 32, 36, 38, 41, 44) st
- Ch3. Dc in next st and each st across. Turn. – 18 (21, 24, 29, 32, 36, 38, 41, 44) st
Repeat rows 2 & 3 according to your chosen sleeve (circumference) size.
- For 13” sleeves: No repeats necessary.
- For 15” & 17” sleeves: Repeat rows 2 & 3, 1 more time (5 rows total).
- For 19” & 21” sleeves: Repeat rows 2 & 3, 2 more times (7 rows total).
- For 23” & 25” sleeves: Repeat rows 2 & 3, 3 more times (9 rows total).
Now we will add the boxed bead detail to the shoulder.
- Ch2. *Sc in next 2 sts, esc in next st. ** Repeat from * to ** until there is only 1 st left unworked. Esc in last st. Turn. – 18 (21, 24, 29, 32, 36, 38, 41, 44) st
- Ch2, esc in next st. *Bd in next st, sk1 st, esc in next st. ** Repeat from * to ** across. Turn. – 18 (21, 24, 29, 32, 36, 38, 41, 44) st
- Repeat row 4. – 18 (21, 24, 29, 32, 36, 38, 41, 44) st
- Repeat row 5. – 18 (21, 24, 29, 32, 36, 38, 41, 44) st
- Repeat row 4. – 18 (21, 24, 29, 32, 36, 38, 41, 44) st
- Ch3. Dc in next st and each st across. Turn. – 18 (21, 24, 29, 32, 36, 38, 41, 44) st
Now, you will repeat rows 2 & 3 according to your chosen sleeve (circumference) size:
- For 13” sleeves: Repeat rows 2 & 3 until you have a total of 13 rows for the upper body.
- For 15” sleeves: Repeat rows 2 & 3 until you have a total of 15 rows for the upper body.
- For 17” sleeves: Repeat rows 2 & 3 until you have a total of 17 rows for the upper body.
- For 19” sleeves: Repeat rows 2 & 3 until you have a total of 19 rows for the upper body.
- For 21” sleeves: Repeat rows 2 & 3 until you have a total of 21 rows for the upper body.
- For 23” sleeves: Repeat rows 2 & 3 until you have a total of 23 rows for the upper body.
- For 25” sleeves: Repeat rows 2 & 3 until you have a total of 25 rows for the upper body.
Bind off, leaving a long tail for sewing/slip stitching the shoulder closed.
Wet block your work to take care of the slanting. If the slanting doesn’t completely disappear, do not worry. The trim will take care of the rest of it. Whip stitch or slip stitch the tops of the shoulders closed. It would be a good idea to try on your cardigan at this point to see if you’re happy with it. Are the arm holes big enough? Is it the right length (keeping in mind you will be adding 2” with the trim)? Do you like the bust size (keeping in mind you will be adding 4” with the trim)? If you are not happy with the armhole sizes, that is easy enough to change at this point.
Sleeves
The sleeves are worked in the round. We will be joining each round with a ss and turning after each round. With the right side facing you, join your yarn in the bottom of the armhole. Reminder: You are working according to the arm hole size you chose above. The arm hole circumferences are as follows: 13” (15”, 17”, 19”, 21”, 23”, 25”). The stitch counts in this section are for your chosen arm size. Not your body size.
Colour Change Notes
If you are using two different colours and would like your cardigan to look like mine, follow the pattern outlined below.
Main Colour (MC): Cozied. Contrast Colour (CC): Coffee Stain
Rows 1 – 9: CC
Row 10 (hdc): MC
Row 11 (dc): CC
Row 12 (hdc): MC
Row 13 (dc): CC
Row 14 (hdc): MC
Rows 15 (dc) & 16 (hdc): CC
Row 17 (dc): MC
Row 18 (hdc): CC
Row 19 (dc): MC
Row 20 (hdc): CC
Row 21 (dc): MC
Row 22 (hdc): CC
Rows 23 – 33: MC
- Sc into the ends of each row in the following manner:
- 2 sc in the end of each dc row.
- 1 sc in the end of each hdc row.
- 1 sc in the end or each esc, sc row.
- 2 sc in the end of each esc, Bd row.
Continue in this manner around the entire armhole. Ss to your 1st st. Turn. – 40 (46, 52, 58, 64, 70, 76) st
- Ch1. Hdc in 1st st and each st around. Ss to 1st st. Turn. – 40 (46, 52, 58, 64, 70, 76) st
- Ch3. Dc in next st and each st around. Ss to 1st st. Turn. – 40 (46, 52, 58, 64, 70, 76) st
Repeat rows 2 & 3 until you have a total of 14 rows, ending with a row 2 repeat. Note: Following the instructions as written will give you 19” long finished sleeves (after you have finished all the rows and the cuffs). If you would like your sleeves to be longer or shorter, simply add or subtract upper arm rows in a multiple of 2. So for example if you want 18” sleeves, then you would repeat rows 2 & 3 for a total of 12 rows instead of 14.
We will now be working decrease rows. To make this part easier to follow and read I will be using simple instructions. I will state if whether the row is a hdc or dc row and how many decreases to work in that row. So, for example: Work a dc row with 1 (2, 2, 2, 2, 2, 3) decreases. That means that I want you to work a row of dc with 1 (2, 2, 2, 2, 2, 3) decreases evenly spaced. A decrease in a dc row is a dc2tog. A decrease in a hdc row is a hdc2tog.
- Work a dc row with 1 (2, 2, 2, 2, 2, 3) decreases. Ss to 1st st. Turn. – 39 (44, 50, 56, 62, 68, 73) st
- Work a hdc row with 0 (0, 0, 1, 1, 2, 2) decreases, Ss to 1st st. Turn. – 39 (44, 50, 55, 61, 66, 71) st
- Work a dc row with 1 (2, 2, 2, 2, 2, 3) decreases. Ss to 1st st. Turn. – 38 (42, 48, 53, 59, 64, 68) st
- Work a hdc row with 0 (0, 0, 1, 1, 2, 2) decreases, Ss to 1st st. Turn. – 38 (42, 48, 52, 58, 62, 66) st
- Work a dc row with 1 (2, 2, 2, 2, 2, 3) decreases. Ss to 1st st. Turn. – 37 (40, 46, 50, 56, 60, 63) st
- Work a hdc row with 0 (0, 0, 1, 2, 2, 2) decreases, Ss to 1st st. Turn. – 37 (40, 46, 49, 54, 58, 61) st
- Work a dc row with 1 (2, 2, 2, 2, 2, 3) decreases. Ss to 1st st. Turn. – 36 (38, 44, 47, 52, 56, 58) st
- Work a hdc row with 0 (0, 0, 1, 2, 2, 2) decreases, Ss to 1st st. Turn. – 36 (38, 44, 46, 50, 54, 56) st
- Work a dc row with 1 (2, 2, 2, 2, 3, 3) decreases. Ss to 1st st. Turn. – 35 (36, 42, 44, 48, 51, 53) st
- Work a hdc row with 0 (0, 1, 1, 2, 2, 2) decreases, Ss to 1st st. Turn. – 35 (36, 41, 43, 46, 49, 51) st
- Work a dc row with 1 (2, 2, 2, 2, 3, 3) decreases. Ss to 1st st. Turn. – 34 (34, 39, 41, 44, 46, 48) st
- Work a hdc row with 0 (0, 1, 2, 2, 2, 3) decreases, Ss to 1st st. Turn. – 34 (34, 38, 39, 42, 44, 45) st
- Work a dc row with 2 (2, 2, 2, 2, 3, 3) decreases. Ss to 1st st. Turn. – 32 (32, 36, 37, 40, 41, 42) st
- Work a hdc row with 0 (0, 1, 2, 2, 2, 3) decreases, Ss to 1st st. Turn. – 32 (32, 35, 35, 38, 39, 39) st
- Work a dc row with 2 (2, 2, 2, 2, 3, 3) decreases. Ss to 1st st. Turn. – 30 (30, 33, 33, 36, 36, 36) st
- Ch2, sc in next 2 sts. *Esc in next st, sc in next 2 sts. ** Repeat from * to ** around. SS to 1st st. Turn. – 30 (30, 33, 33, 36, 36, 36) st
- Ch2, Bd in next st, sk1 st. *Esc in next st, Bd in next st, sk1 st.** Repeat from * to ** around. Ss to 1st st. Turn. – 30 (30, 33, 33, 36, 36, 36) st
- Repeat row 30.
- Sleeve sizes 13”, 15”, 21”, 23”, & 25” only: Ch1, sc in next st (sc2tog made). Sc in each st around until you only have 2 sts left unworked. Sc2tog in last 2 sts. Ss to 1st st. Do not bind off. – 28 (28, n/a, n/a, 34, 34, 34) st
Sleeve sizes 17” & 19” only: Ch1, sc in next st (sc2tog made). Sc in each st around. Ss to 1st st. Do not bind off. – n/a (n/a, 32, 32, n/a, n/a, n/a) st
Sleeve Trim
The sleeve trim is made by working short rows off of each stitch of the end of the sleeve. Begin with RS facing you.
- Ch8 (see Figure 1). Sc in 2nd ch from hook and each ch across (see Figure 2). Ss into same st you chained from on sleeve body. Ss into next unworked st (see Figure 3). Turn. – 7 sc + 2 ss
- Sk2 ss. Sc in BLO of 1st st 6 sts. Sc in both loops of last st (see Figure 4). Turn. – 7 sc
- Ch1. Sc in 1st st. Sc in BLO of next 6 sts (see Figure 5). Ss into next 2 unworked sts on sleeve body (see Figure 6). Turn. – 7 sc + 2 ss
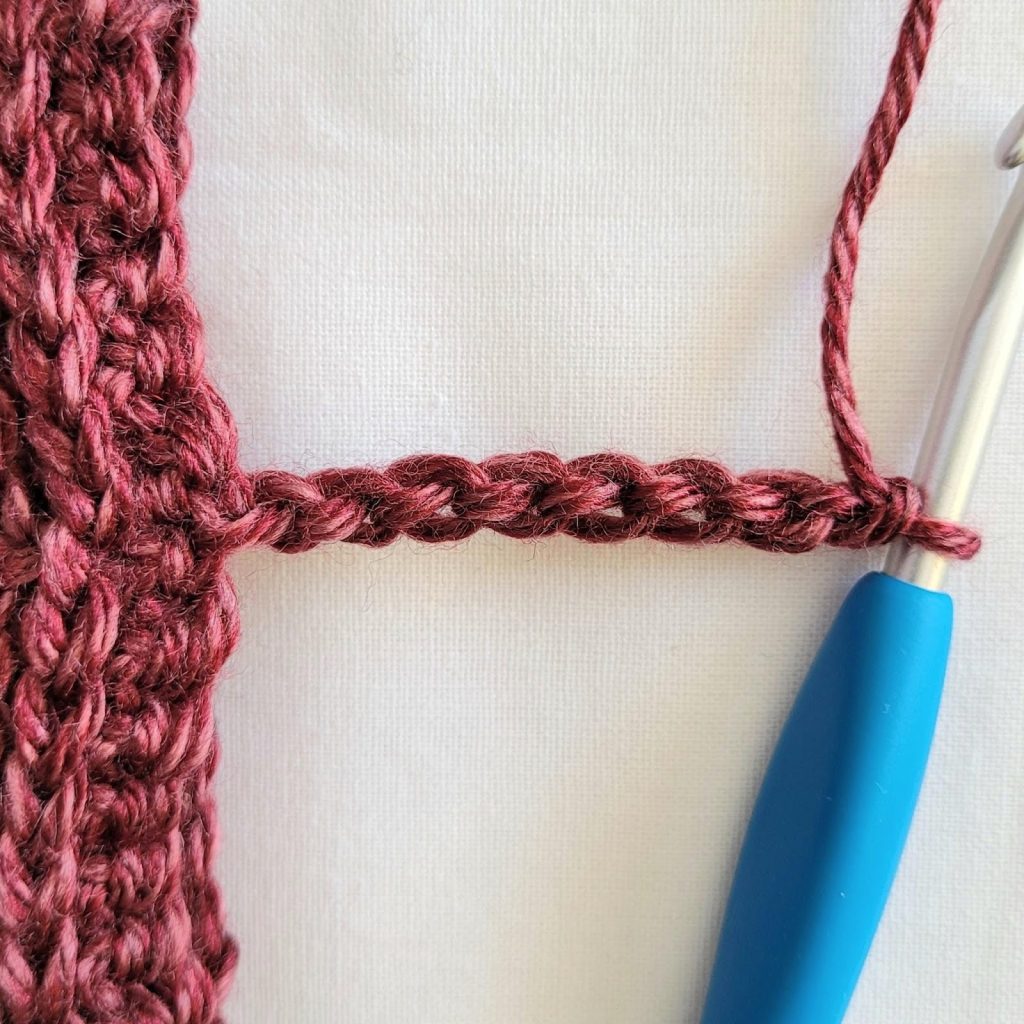
Figure 1
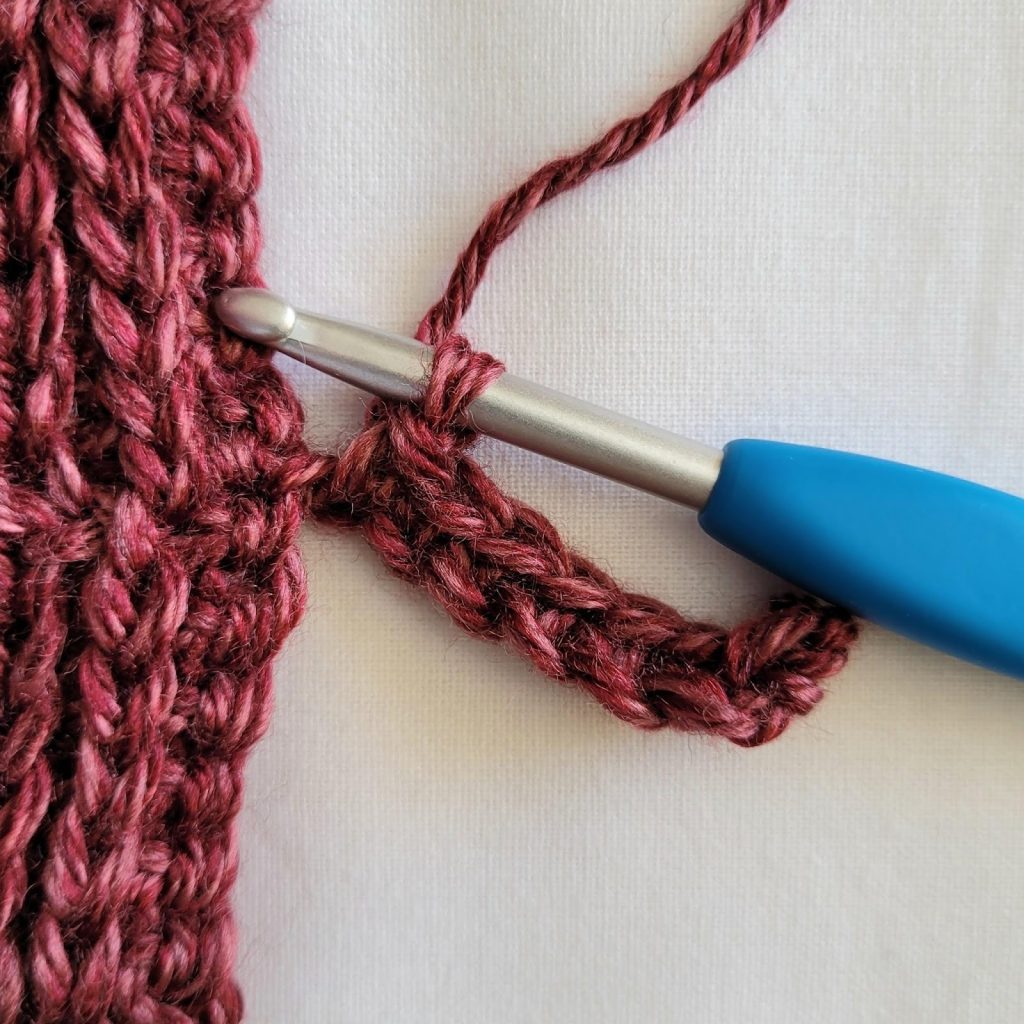
Figure 2
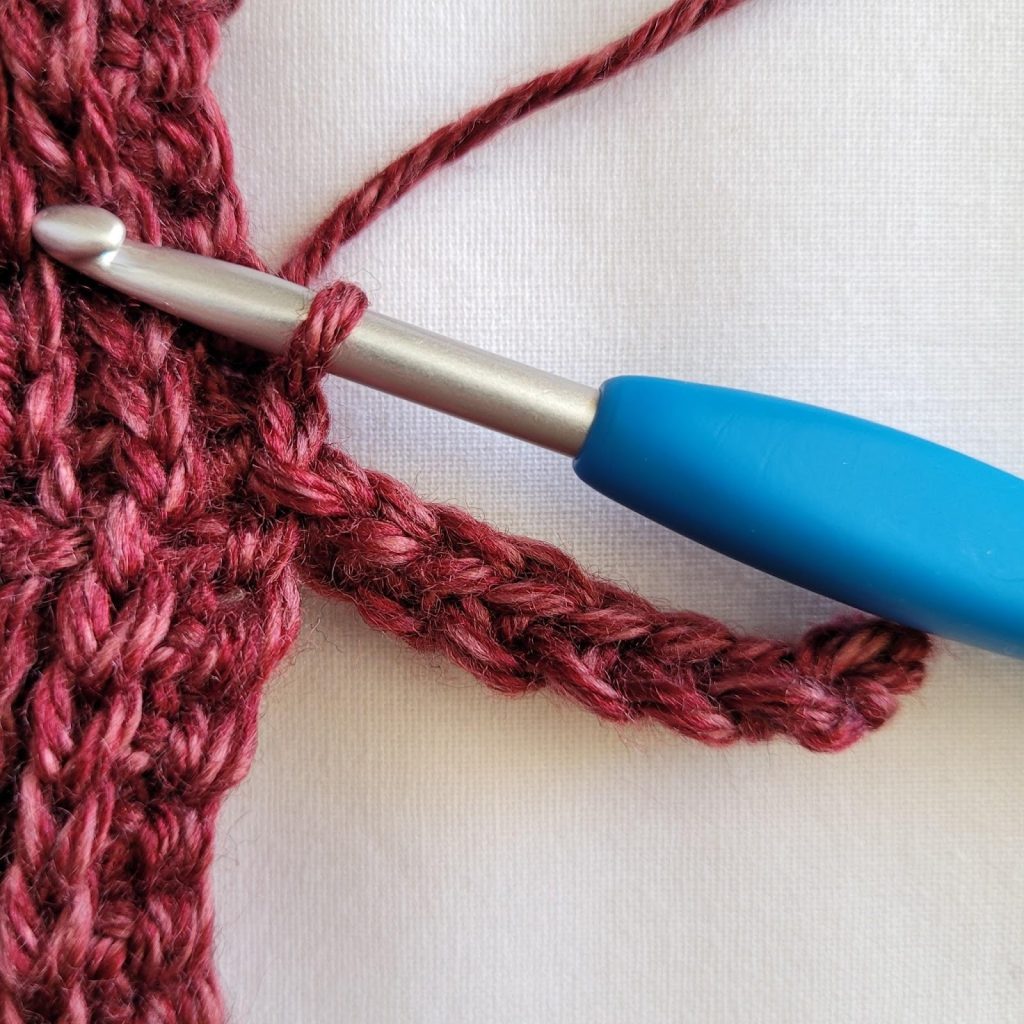
Figure 3
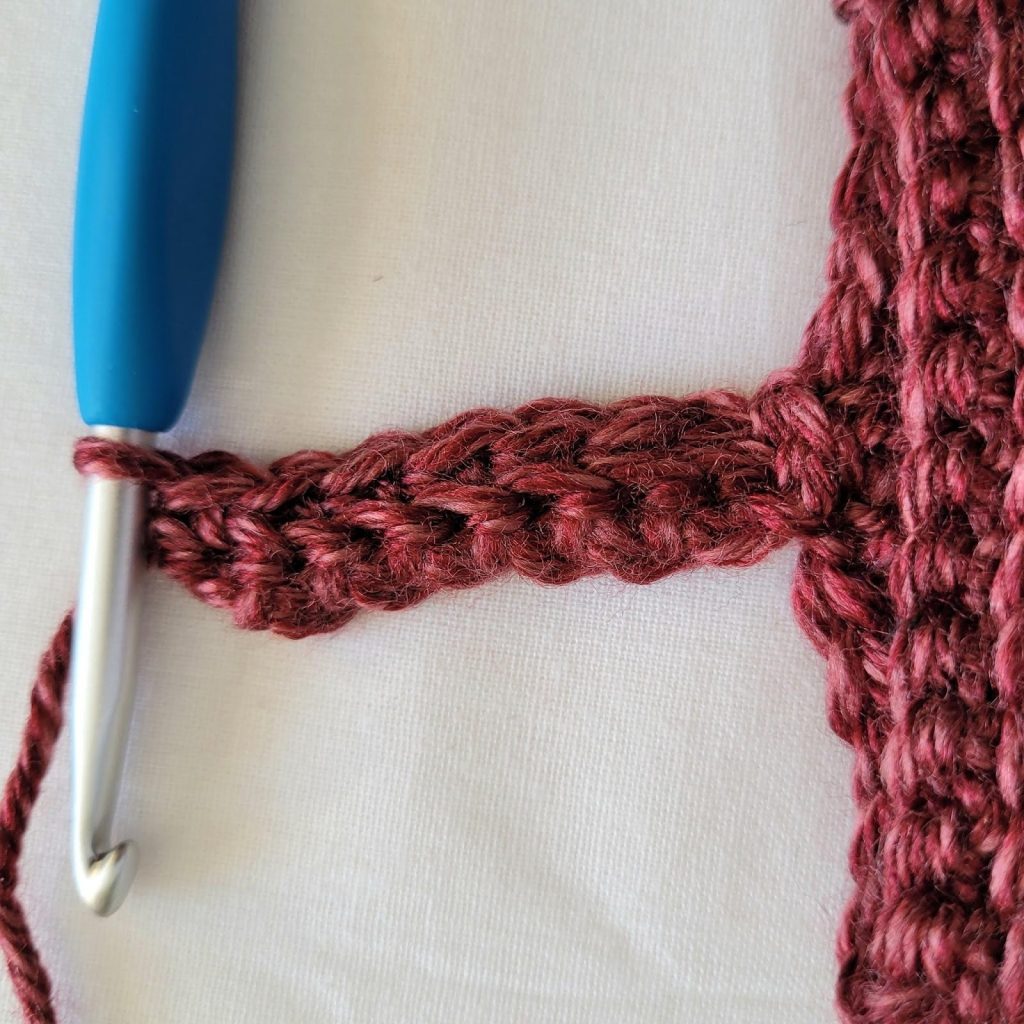
Figure 4
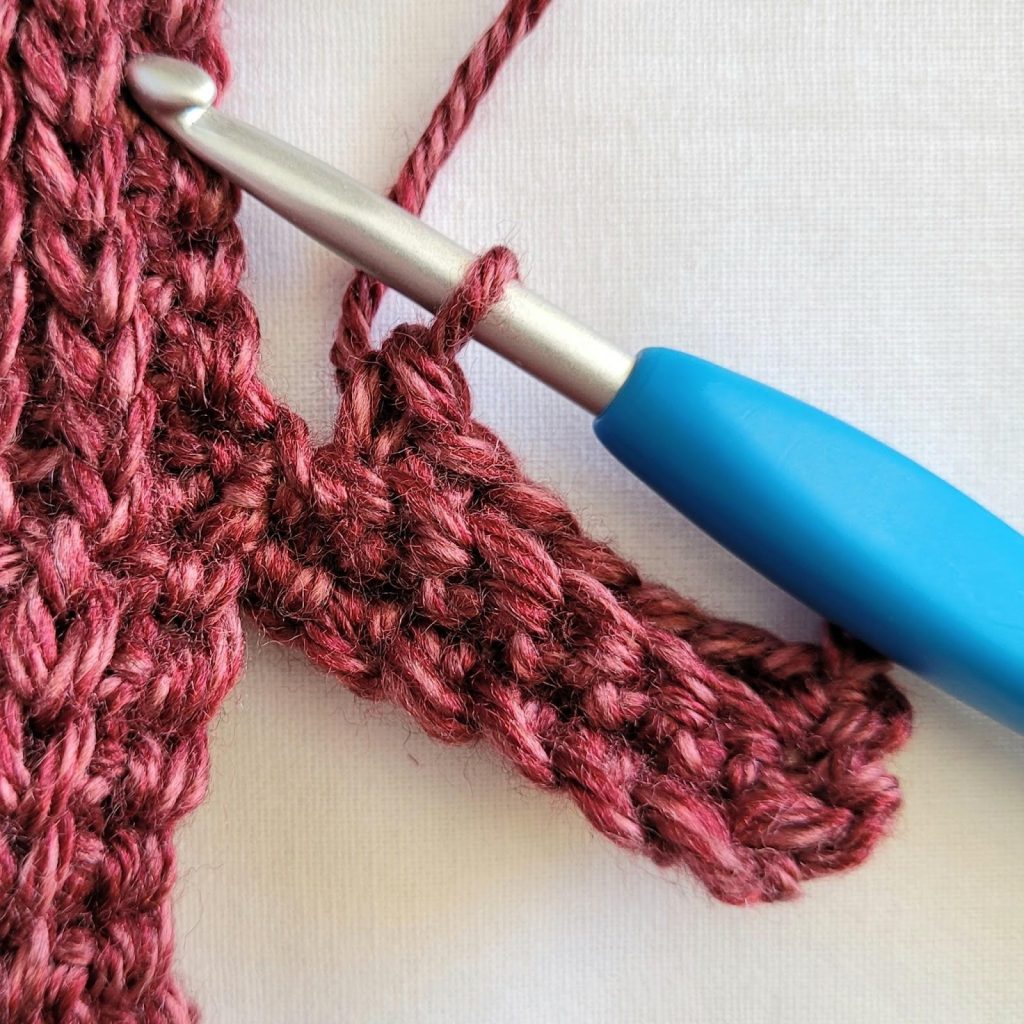
Figure 5
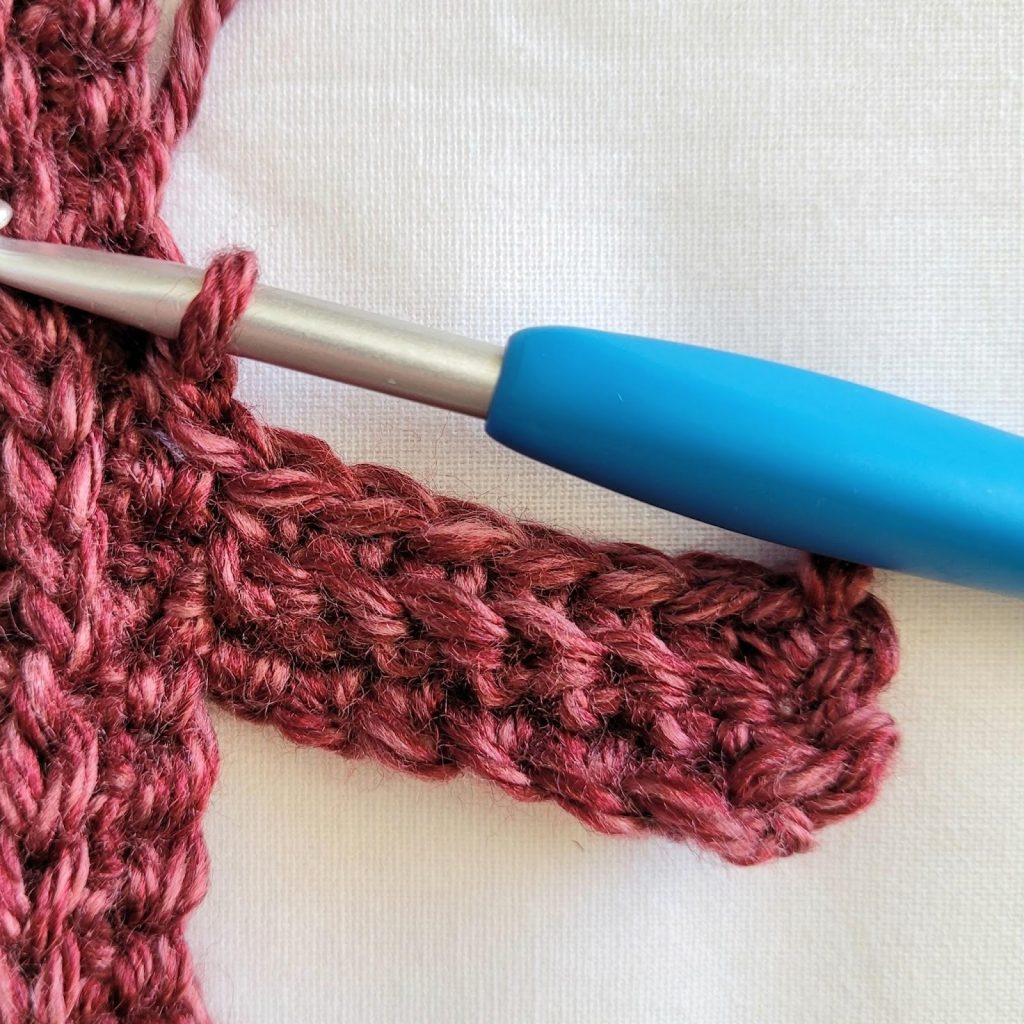
Figure 6
Repeat rows 2 & 3 all the way around the sleeve body. You will end with a row 2 repeat. Turn your work so the wrong side is facing you. Ss the ends of the cuff closed , working in the bottom bar of the 1st row and the BLO of the last row.
Repeat for the other sleeve.
Main Body Trim
Colour Changing Notes
If you are using two different colours and want your cardigan to look like mine, you will need to change colour where appropriate. I changed colours for the sc round as well as the ribbed trim.
We will begin the body trim by adding a row of sc around the front of the sweater. With the right side facing you, attach your yarn in the bottom right corner of the sweater. Sc evenly up the right front panel in the following manner:
- 1 sc in the end of the bottom sc row.
- 2 sc in the end of each dc row.
- 1 sc in the end of each hdc row.
- 1 sc in the end of each esc, sc row.
- 2 sc in the end of each esc, Bd row.
Continue in this manner until you have come to the top of the right front panel. Sc in each st along the back of the neck. Then sc evenly down the left front panel in the same manner as before. Do not bind off.
Once you have finished sc’ing in the front panels, we will add the ribbed trim. Note: Remember to change colours where appropriate.
- Ch8. (See figure 7) Sc in 2nd ch from hook and each ch across. Ss into the side of the last sc before your ch8. Ss into the next st. (See figure 8) Turn. – 7 sc + 2 ss
- Sk 2 ss. Sc in BLO of 1st st 6 sts. Sc in both loops of last st (see figure 9). Turn. – 7 sc
- Ch1. Sc in both loop of 1st st. Sc in BLO of next 6 sts. Ss into the next 2 unworked sts on body. Turn. – 7 sc + 2 ss

Figure 7
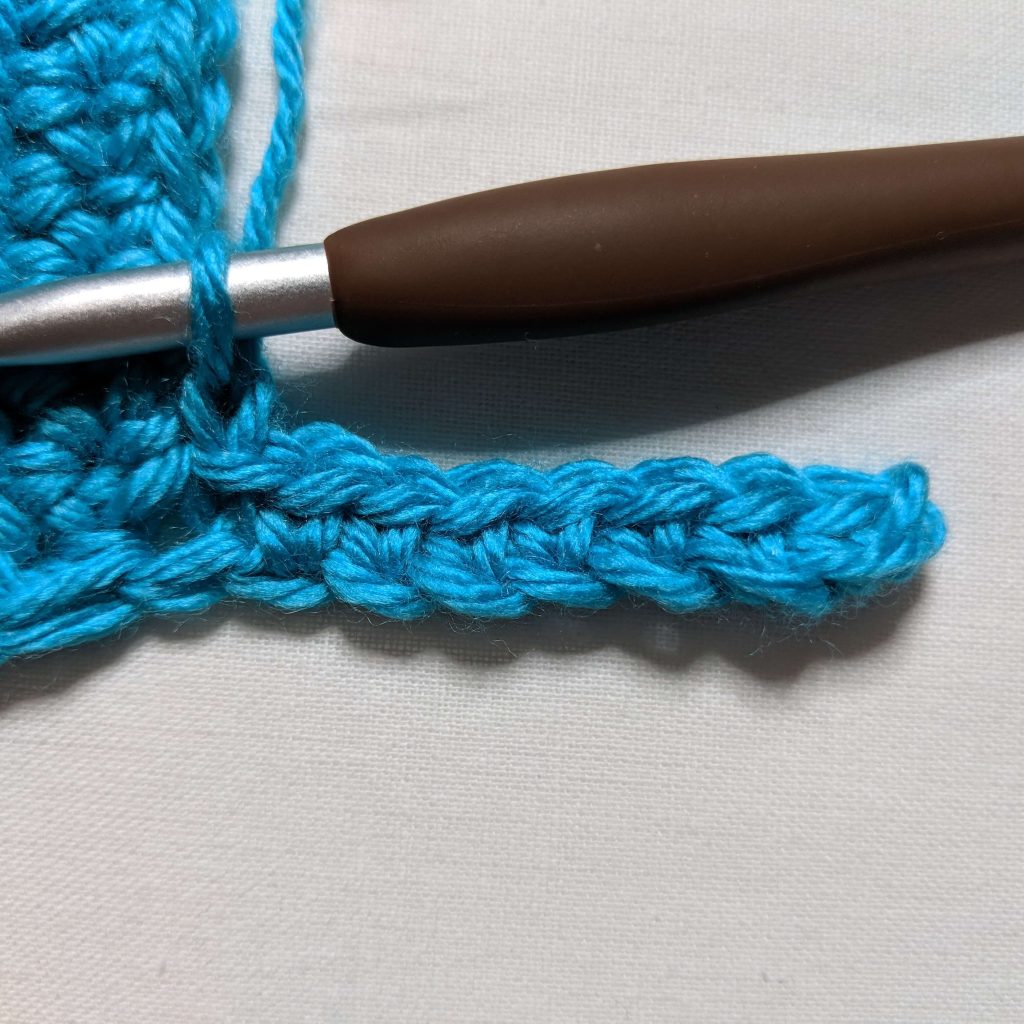
Figure 8
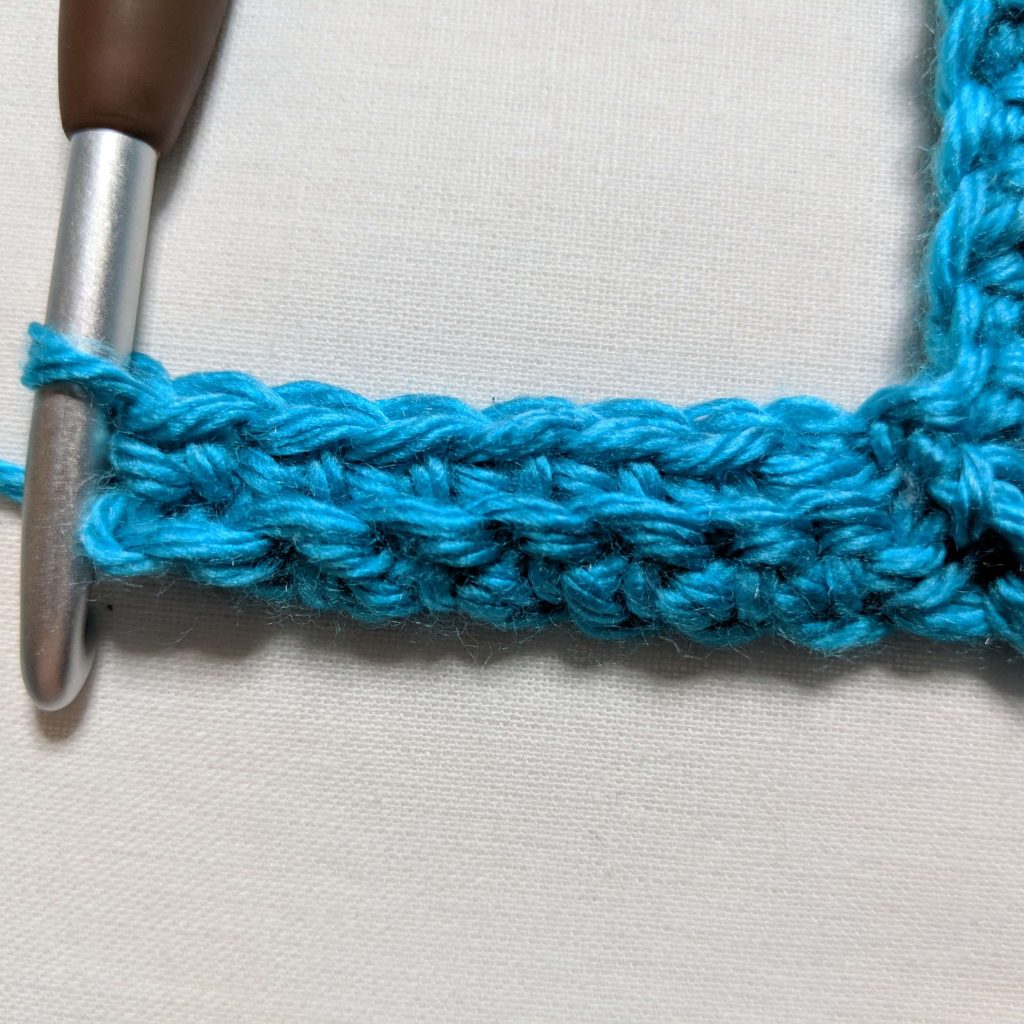
Figure 9
Repeat rows 2 and 3 until you have worked into every stitch along the bottom, and the side of the 1st sc you made in the side of the panel, and just finished a row 2 repeat. (See figure 10) Note: Sizes that began with an odd number of stitches (XS, XL, 3X, & 4X) will have an extra stitch. You can skip it. Now we will turn our work clockwise and add trim to the front panels.
- Ch8. (See figure 11) Sc in 2nd ch from hook and each ch across. Ss into the 1st st. Ss into the next st. (See Figure 12)Turn. – 7 sc + 2 ss
- Sk 2 ss. Sc in BLO of 1st st 6 sts. Sc in both loops of last st. Turn. – 7 sc
- Ch1. Sc in both loops of 1st st. Sc in BLO of next 6 sts. Ss into the next 2 unworked sts on body. Turn. – 7 sc + 2 ss
Repeat rows 2 & 3, first working into the side of the bottom edging, then around the entire front of the sweater, then into the bottom edging on the other side, finishing with a row 2 repeat. Bind off. When done correctly, figure 13 below is what your corners should look like.
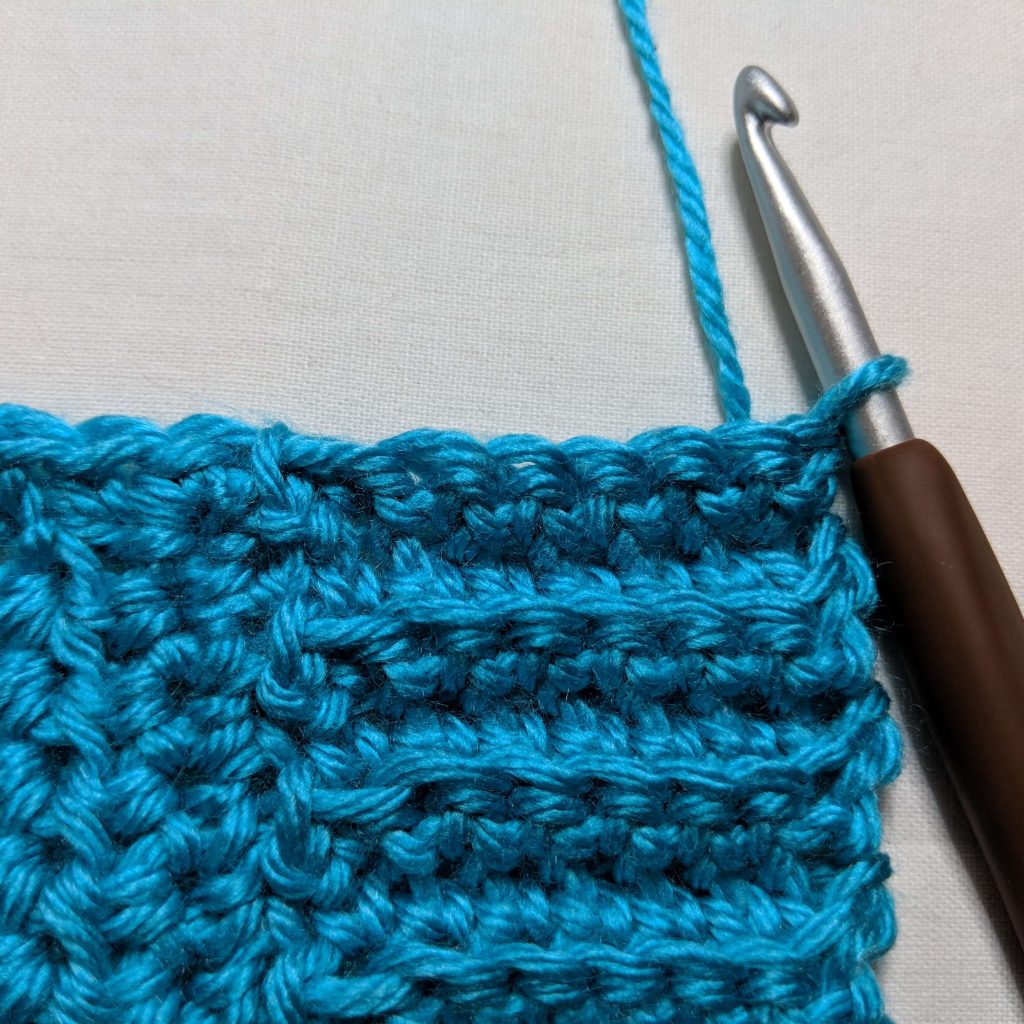
Figure 10
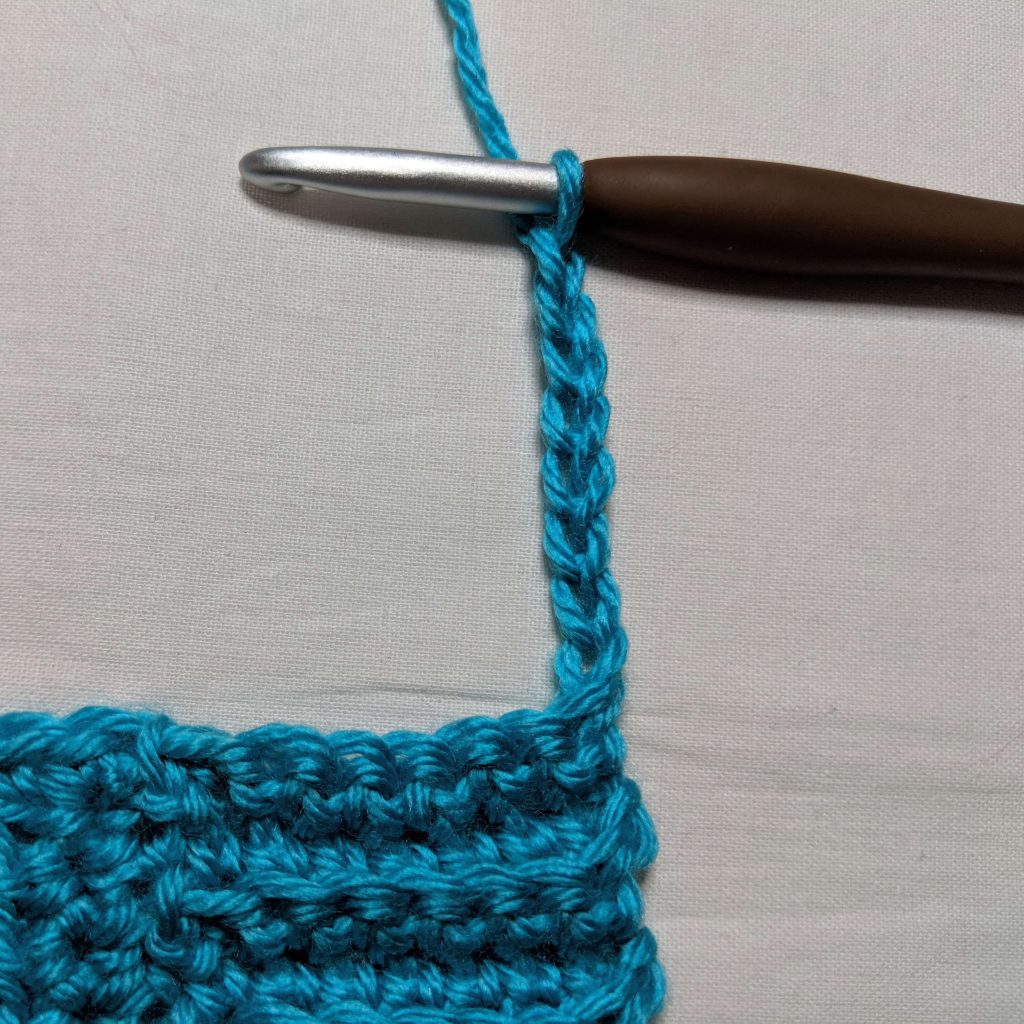
Figure 11
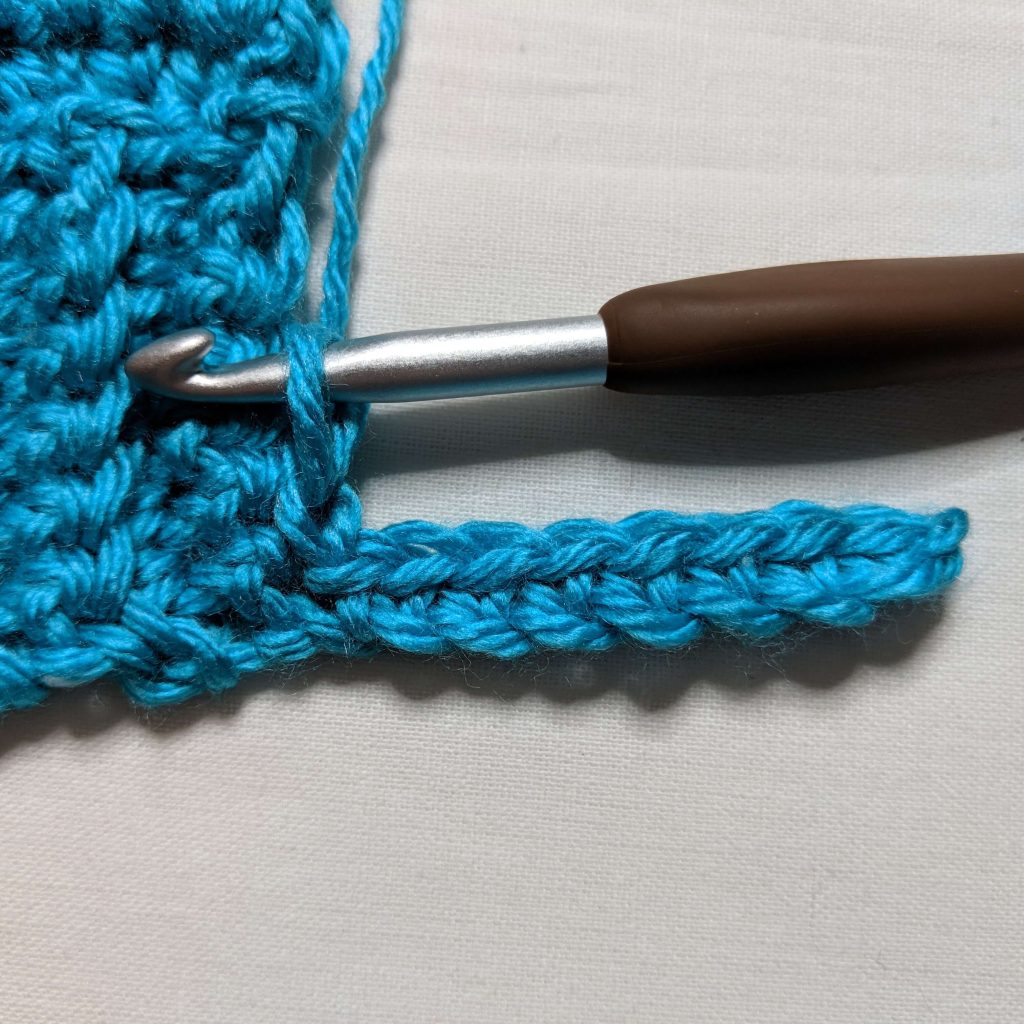
Figure 12
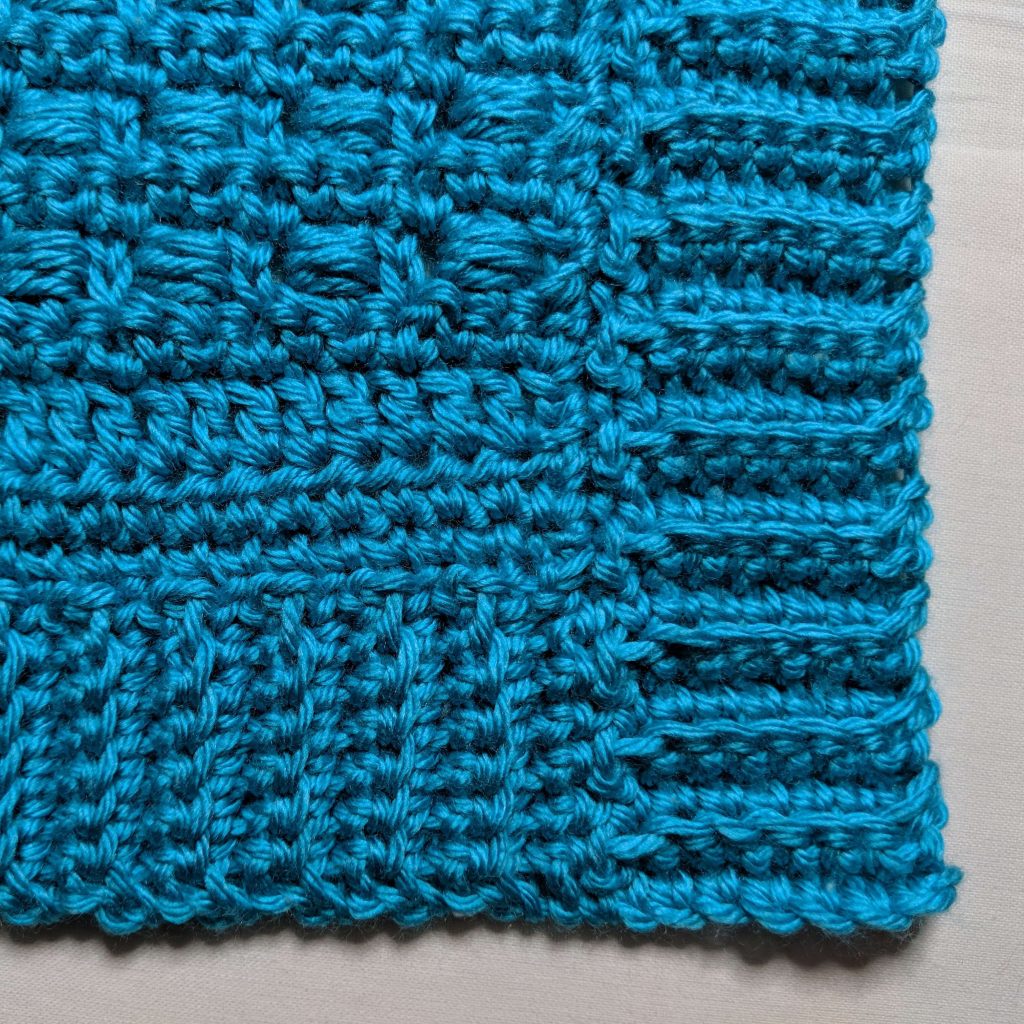
Figure 13
Weave in all your ends, and you’re done!
I can’t wait to see your take on the Boxed Baubles Cardigan. Be sure to share your finished photos over on Ravelry so we can all admire your beautiful makes and yarn choices. 💙
If you’d like a little heads-up whenever I release new crochet patterns and tutorials, come hang out with me on Facebook and Instagram. I share sneak peeks, behind-the-scenes design moments, and all the cozy crochet goodness over there.
And if you enjoyed making this sweater scarf, be sure to explore my other crochet patterns for more textured, wearable designs you’ll love stitching up next.
Free Crochet Cardigan Pattern – Boxed Baubles
And until next time… Happy hooking! 😉