
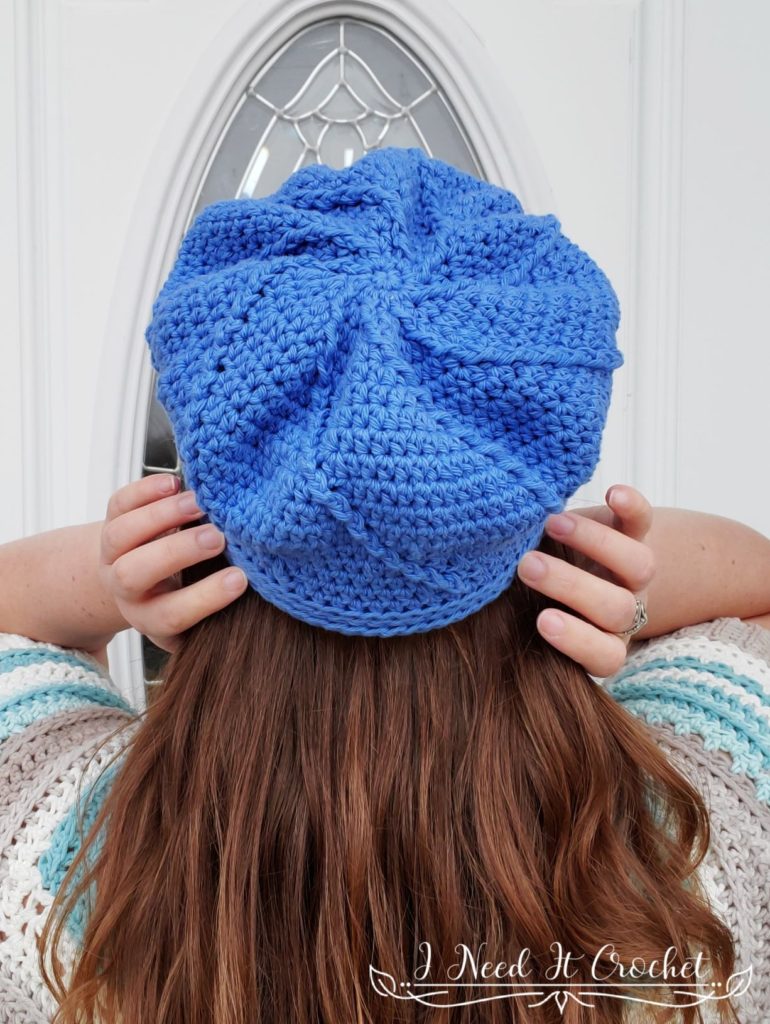
Twisted Newsboy – Free Crochet Hat Pattern
The Twisted Newsboy – Free Crochet Hat Pattern is copyrighted by I Need It Crochet. You may not copy, share, change, or sell the pattern itself. Also, you may not claim this pattern as your own. All pictures contained in this pattern fall under the copyright and may not be used.
Finished items made from the Twisted Newsboy – Free Crochet Hat Pattern belong to you, and you may do what you wish with them. If you choose to sell them on Etsy, I would very much appreciate it if you credited me as the pattern designer.


Or… Just scroll down to see it for free!
This is another design that has been dancing around in my head for the past couple of years. When I designed the Mixed Cluster Newsboy last year, I knew I finally had the skills to make this pattern concept a reality.
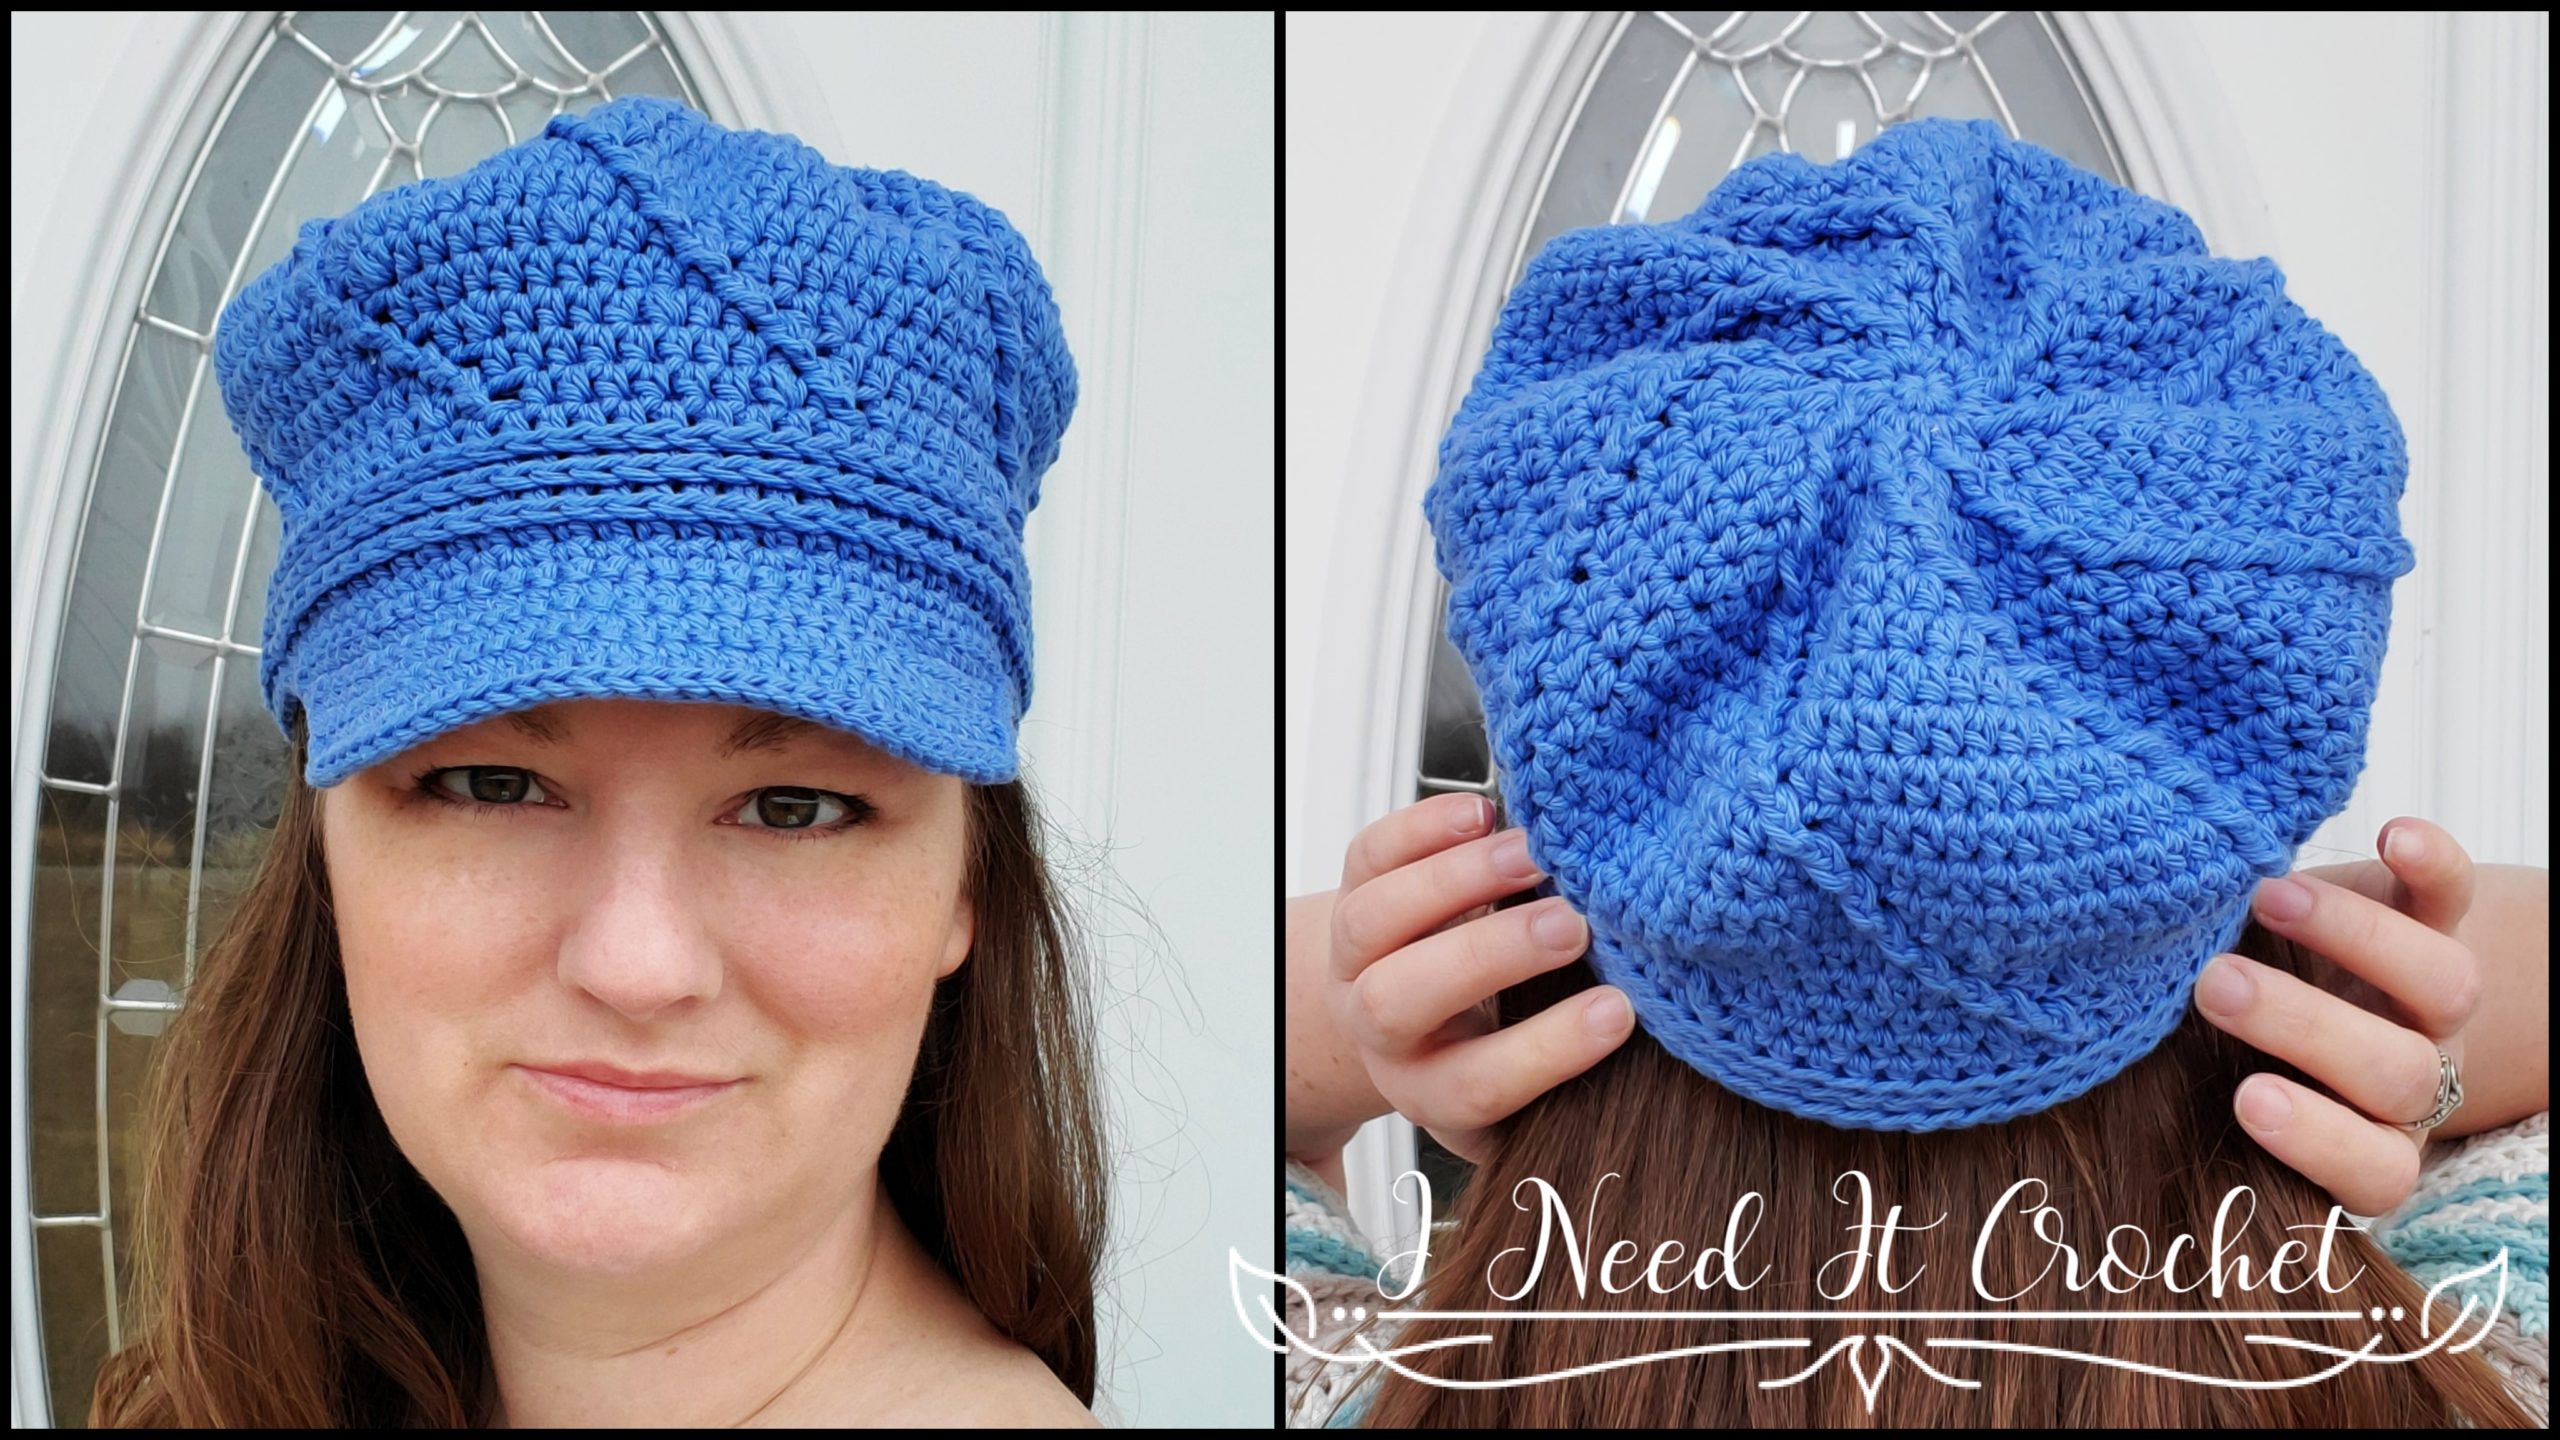
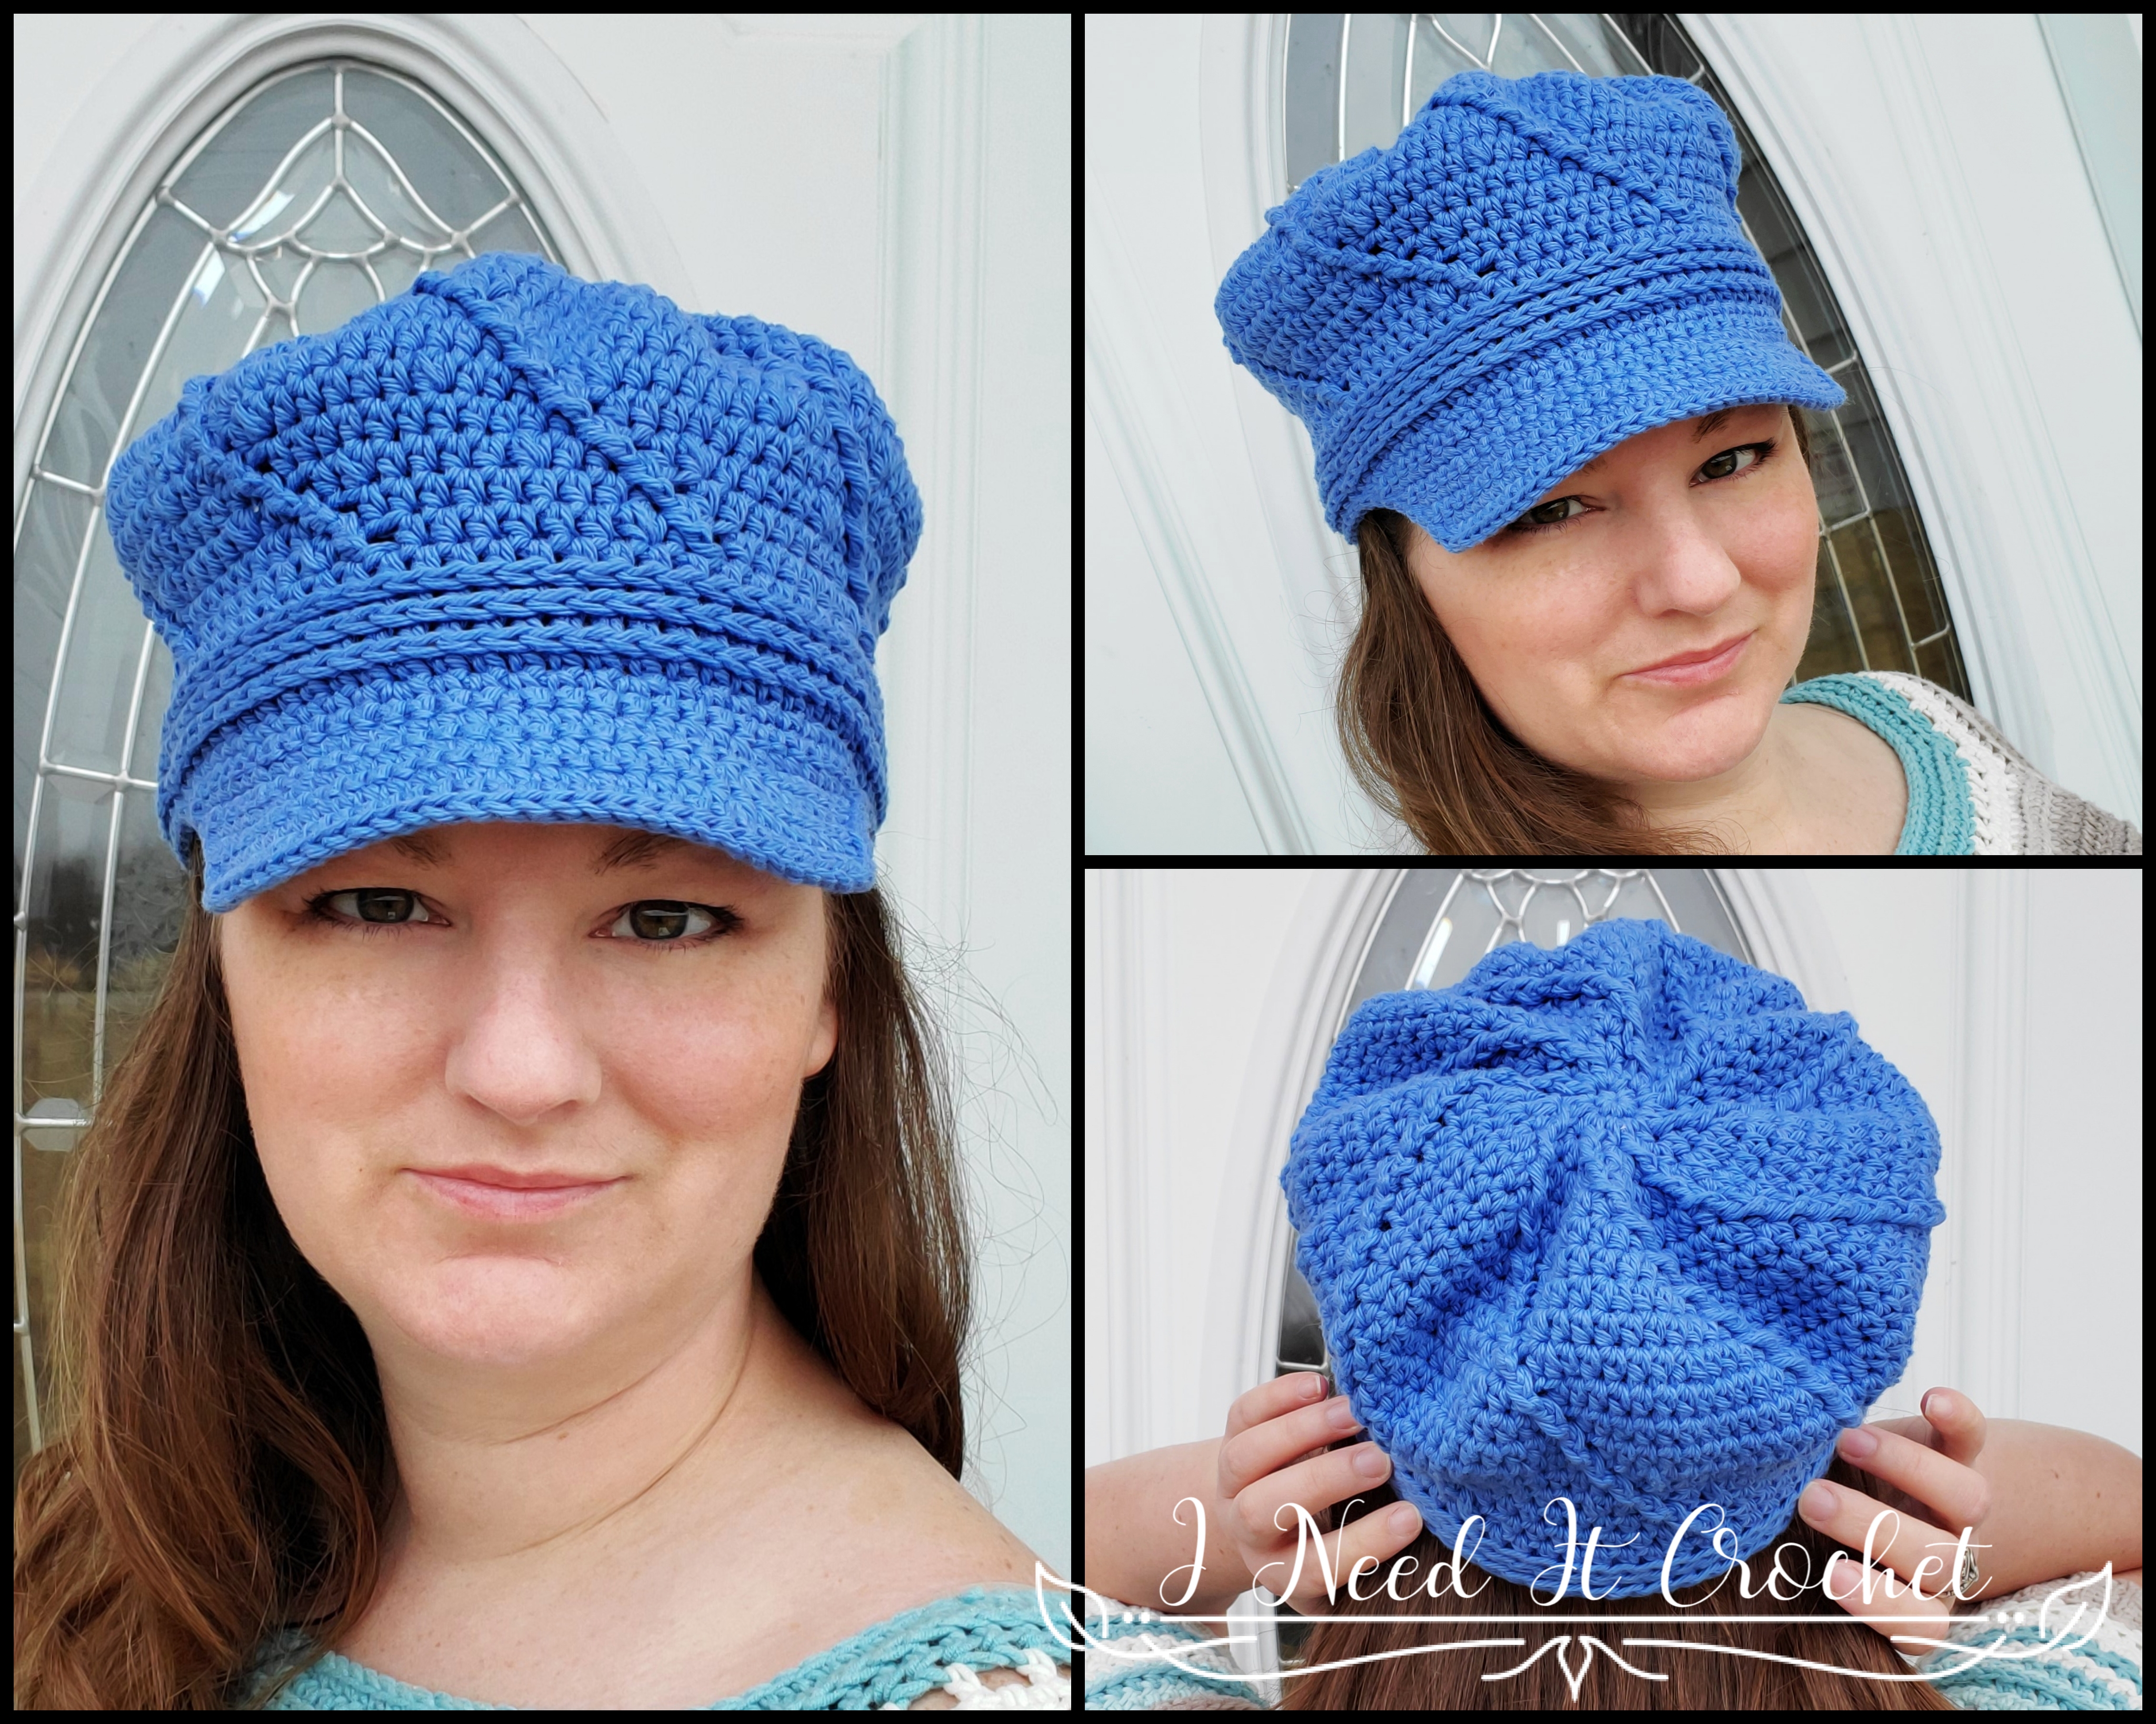
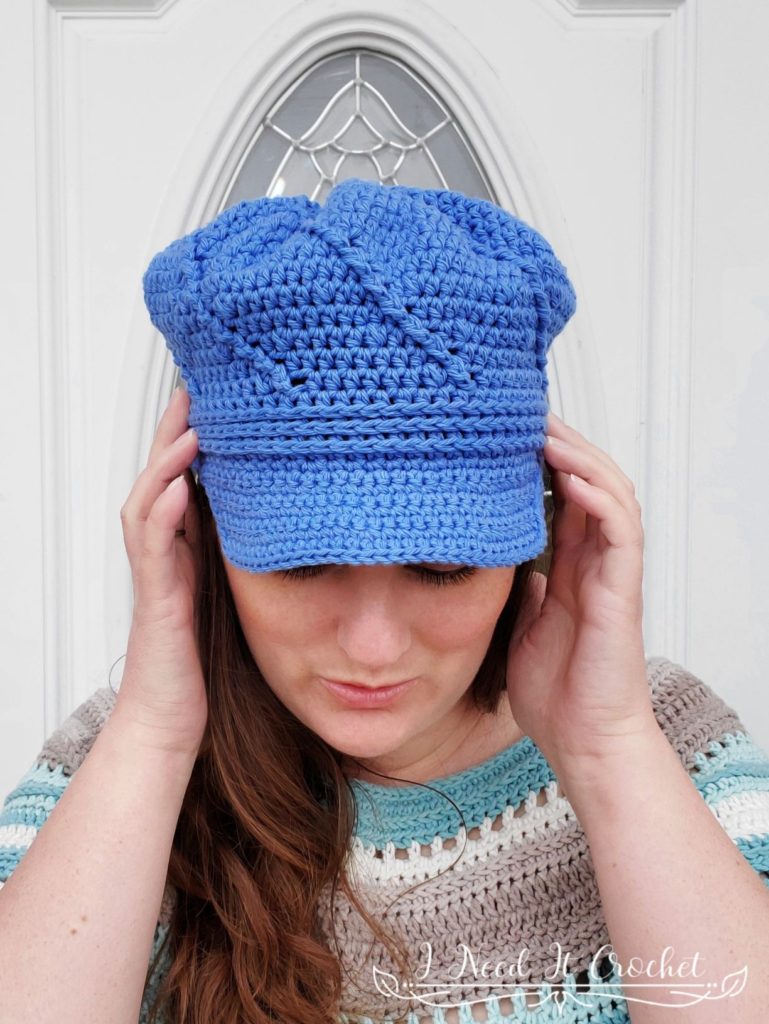
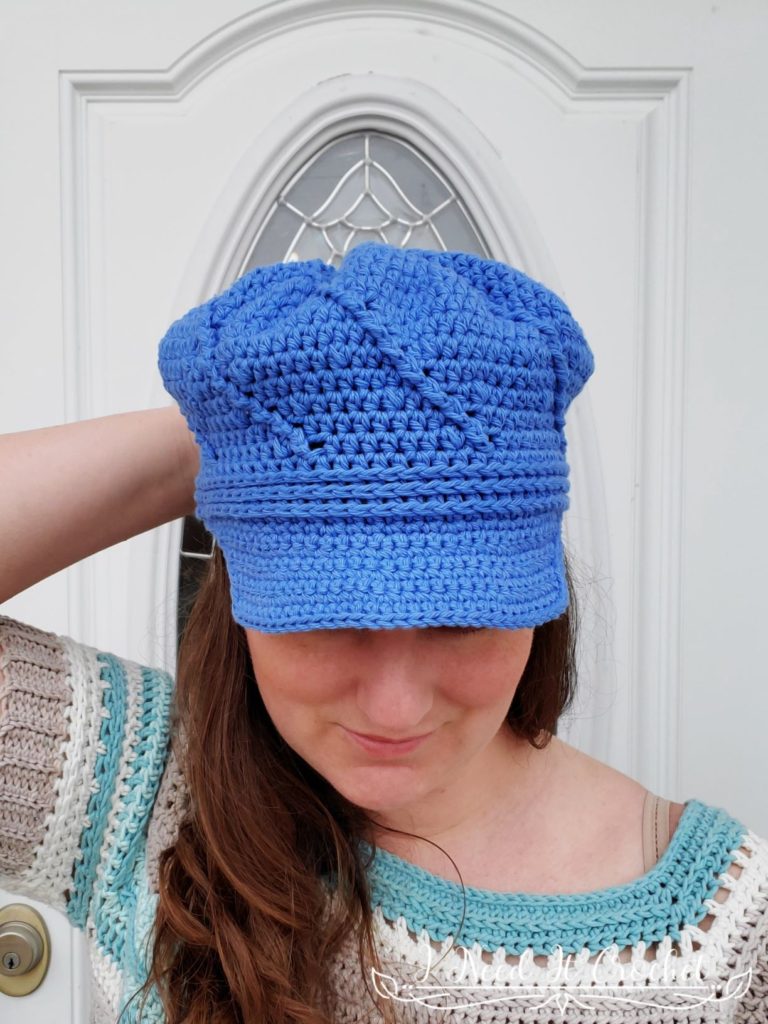
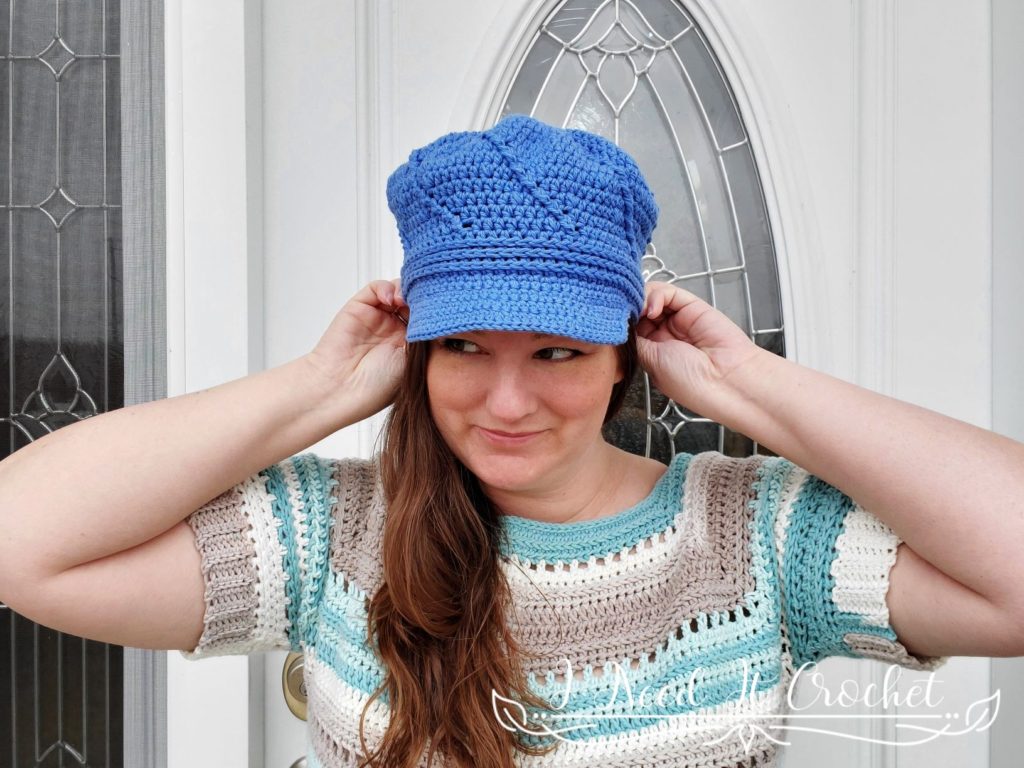
The design features a twisted detail created with the front post double crochet. The slightly puffy crown and venting will keep your head cool while the brim will protect you from the sun. I recommend using worsted or aran #4 100% cotton for this hat. This will make the brim nice and stiff so it will stand up on its own.
Twisted Newsboy – Free Crochet Brimmed Hat Pattern
Finished Sizes:
Instructions given to fit size Small; changes for Medium & Large are in ()
S (M, L)
To Fit Head Circumference: 21” (22”, 23”)
Finished Circumference: 21” (22”, 23”)
Materials:
I used Bernat Handicrafter Cotton, which is 100% Cotton, #4 Worsted weight yarn.
Any yarn of similar weight would work.
Approximately 190 (190, 210) yds.
4mm Hook
4.5mm Hook
Stitch Markers
Yarn Needle
Scissors
Measuring Tape
Abbreviations:
Yo = Yarn Over
Inc = Increase
Sk = Skip
Sp = Space
St = Stitch
Ss = Slip Stitch
Ch = Chain
Sc = Single Crochet
Hdc = Half Double Crochet
Sc2tog = Single Crochet Two Together
Fpdc = Front Post Double Crochet
3rd LO = Third Loop Only
Gauge Swatch:
Using 4.5mm hook.
13 hdc x 11 rows = 4″ x 4”
Notes:
Ch1 at the beginning of a row is never considered a stitch.
I have added many pictures to help you along the way.
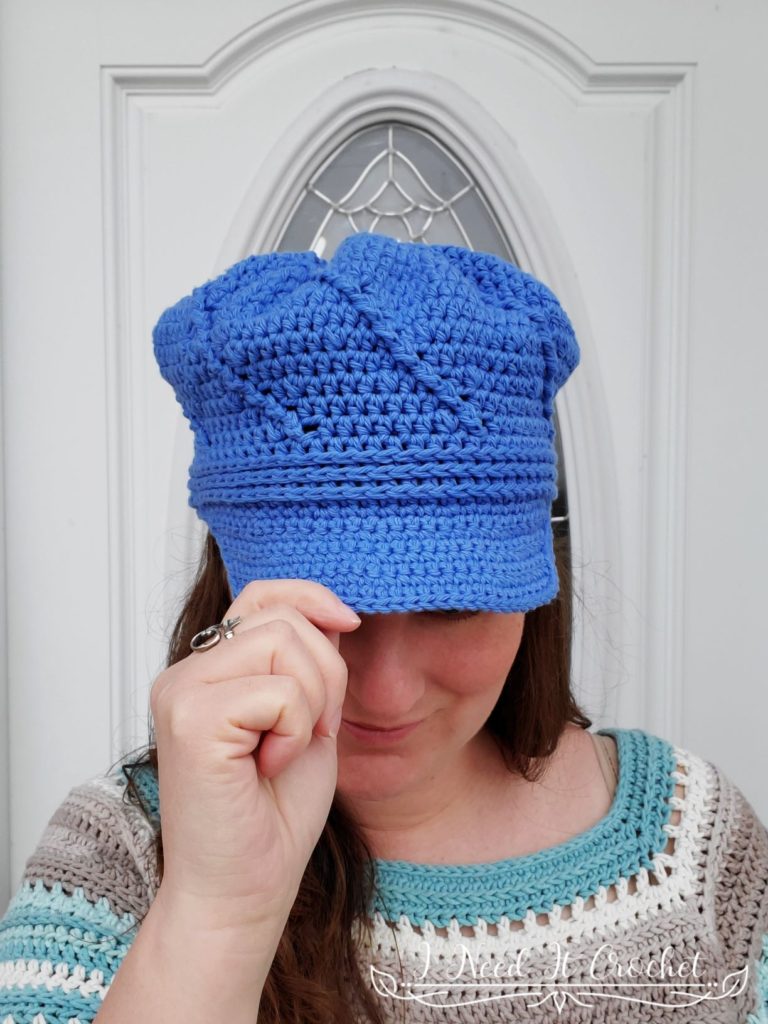
Model above is wearing a size Medium.
Read the instructions carefully.
Twisted Newsboy – Crochet Hat Pattern
Instructions
This hat is worked from the top down, beginning with the crown and then working down to the brim. The crown of the hat is worked in the round and you will not be turning after each round. The brim will be worked in rows, and you will be turning after each row. Some may find it helpful to place a stitch marker into your first stitch on each round.
A note on the fpdc: As a rule when you make the fpdc, it is worked into the post belonging to the top loop stitch that is traditionally used. Since fpdc is counted as a stitch, you skip the top loop stitch so as to not create additional stitches.
In addition to working regular fpdc sts, we will also be working fpdc increases (inc). When you are working a fpdc (inc), you work 1 fpdc, but you do not skip the top loop stitch. Instead, the pattern instructions will read such that you work 1 hdc into the top loop stitch. Then, you work a fpdc where instructed (this is the part that makes the fpdc (inc)).
Pay special attention to the instructions and don’t skip over the fpdc top loop stitch. In order to make this pattern easier to follow, I will instruct you on when you should be skipping the next st. The skipped stitch won’t necessarily be the fpdc top loop stitch. If the instructions do not say to skip the stitch, do not skip it.
To sum this up:
Fpdc (inc) = Work 1 fpdc where instructed paying attention to the directions. Then, continue the round, working into the next unworked stitch.
Fpdc around fpdc of previous round (sk 1 st) = Work 1 fpdc where instructed. Skip the top loop of the next st. This stitch won’t necessarily correspond with the top of the fpdc. Then, continue the round, working into the next unworked stitch.
Twisted Newsboy – Free Crochet Hat Pattern
Crown Of Newsboy Hat
With 4.5mm hook (or the hook used to achieve gauge)
Begin by making a magic circle.
- Ch1. Work 8 sc into the magic circle. Ss to join to 1st st. Pull the circle closed. – 8 st
- Ch1. Work 2 hdc into the 1st st and each st around. Ss to join to 1st st. – 16 st
- Ch1. Hdc in 1st st. Fpdc (inc) around st that is 1 round down and 1 st back (marked in yellow in Figure 1 and demonstrated in Figure 2). 2hdc in next st. *Hdc in next st. Fpdc (inc) around st that is 1 row down and 1 st back. 2hdc in next st.** Repeat from * to ** around. Ss to join to 1st st. Your fpdc sts should be slanted as in Figure 3. – 32 st
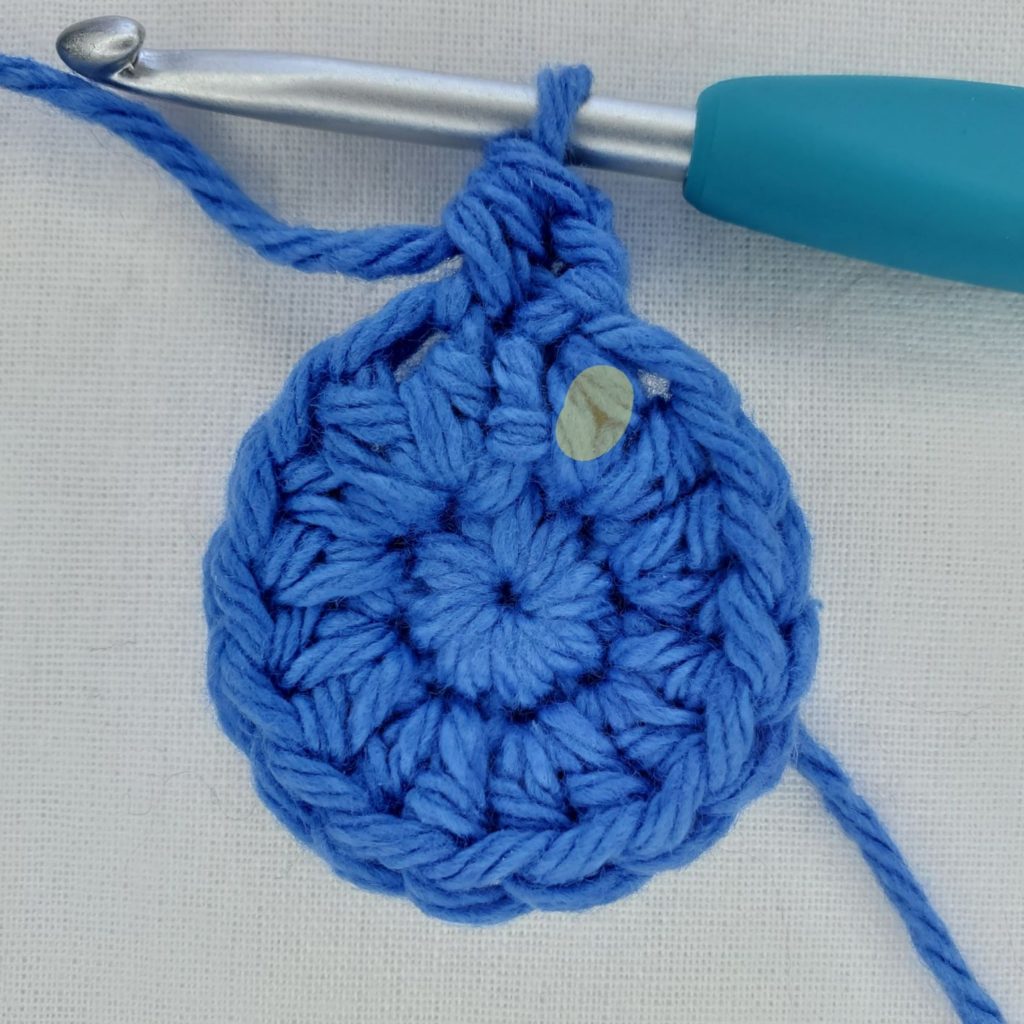
Figure 1
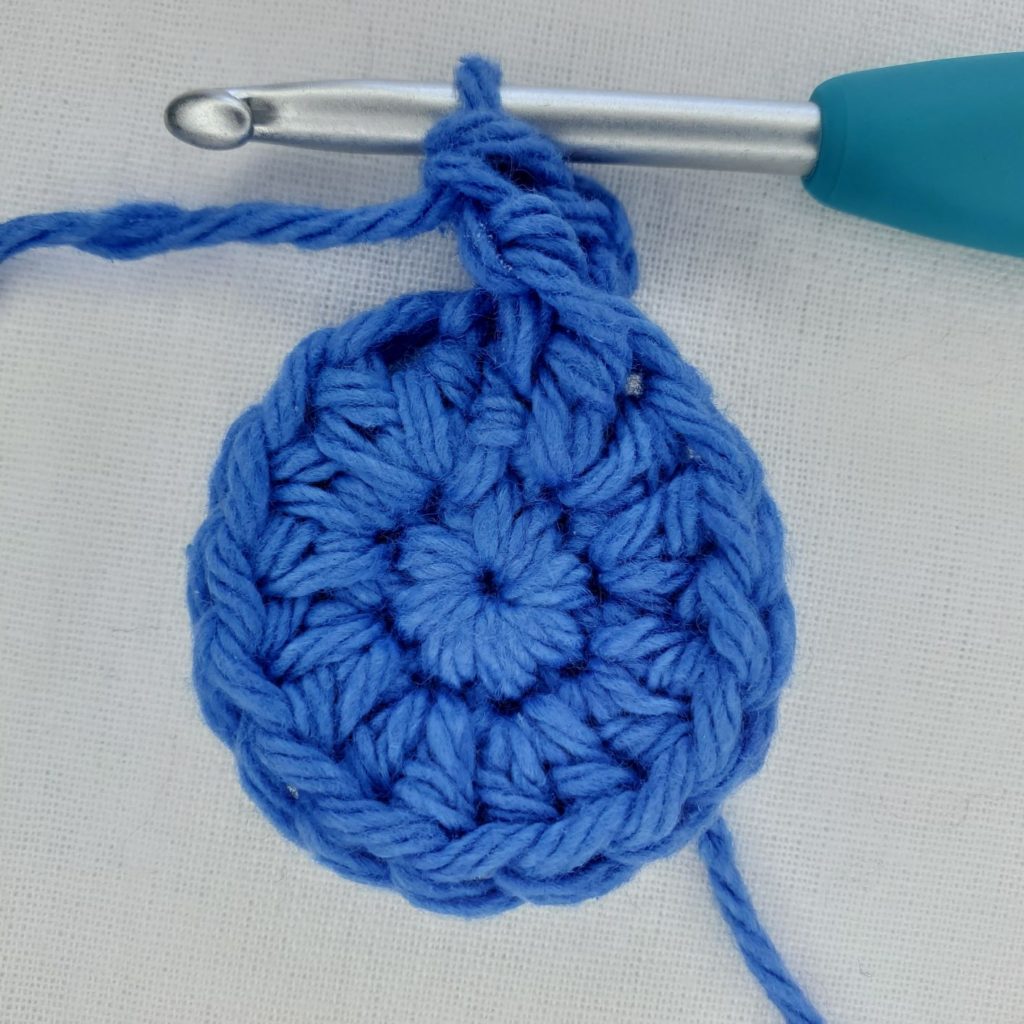
Figure 2
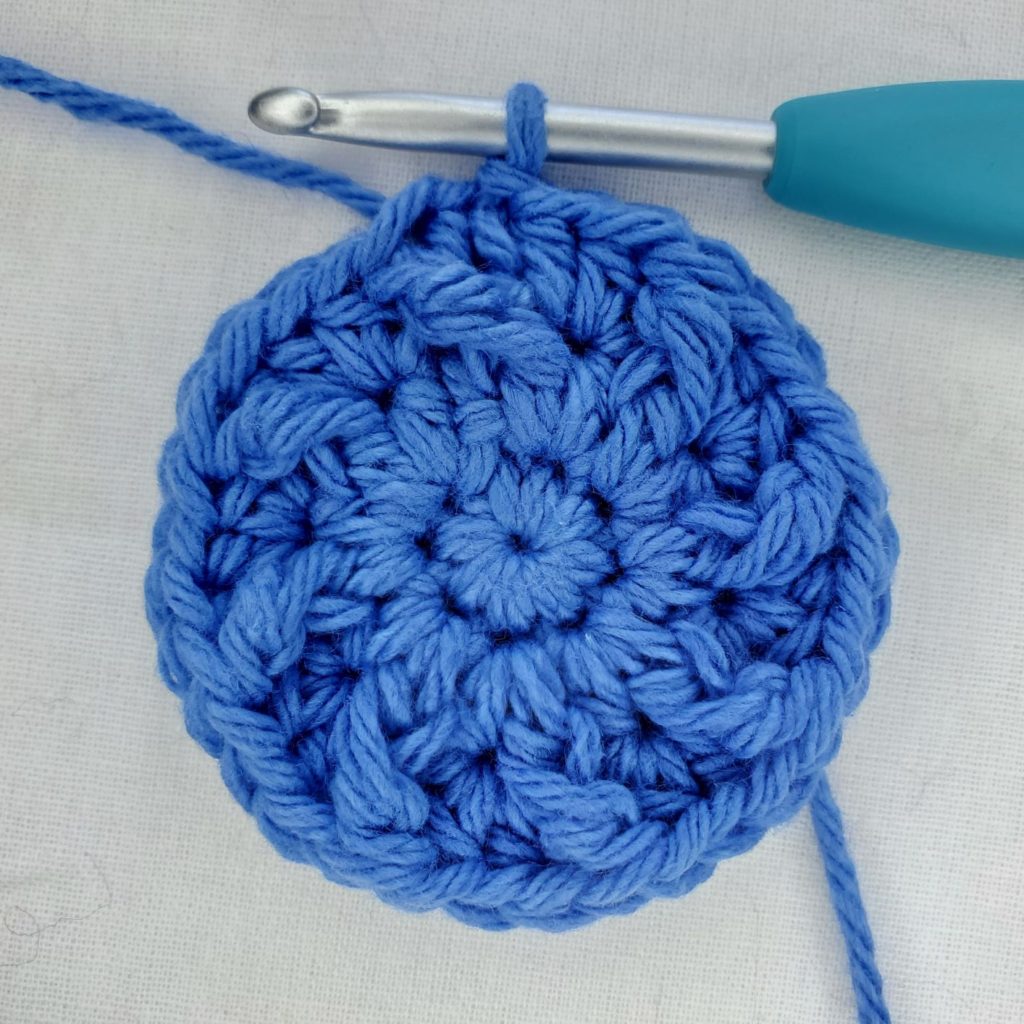
Figure 3
- Ch1. 2hdc in first 2 sts. Hdc in next st. Fpdc (inc) around fpdc of previous round (demonstrated in Figure 4). *2hdc in next 3 sts. Hdc in next st. Fpdc (inc) around fpdc of previous round.** Repeat from * to ** until there is only 1 st left unworked. 2hdc in last st. Ss to join to 1st st. – 64 st
Note: You will likely have noticed by now that your project does not lay flat but is wavy as in Figure 5. Do not fret. This is normal.
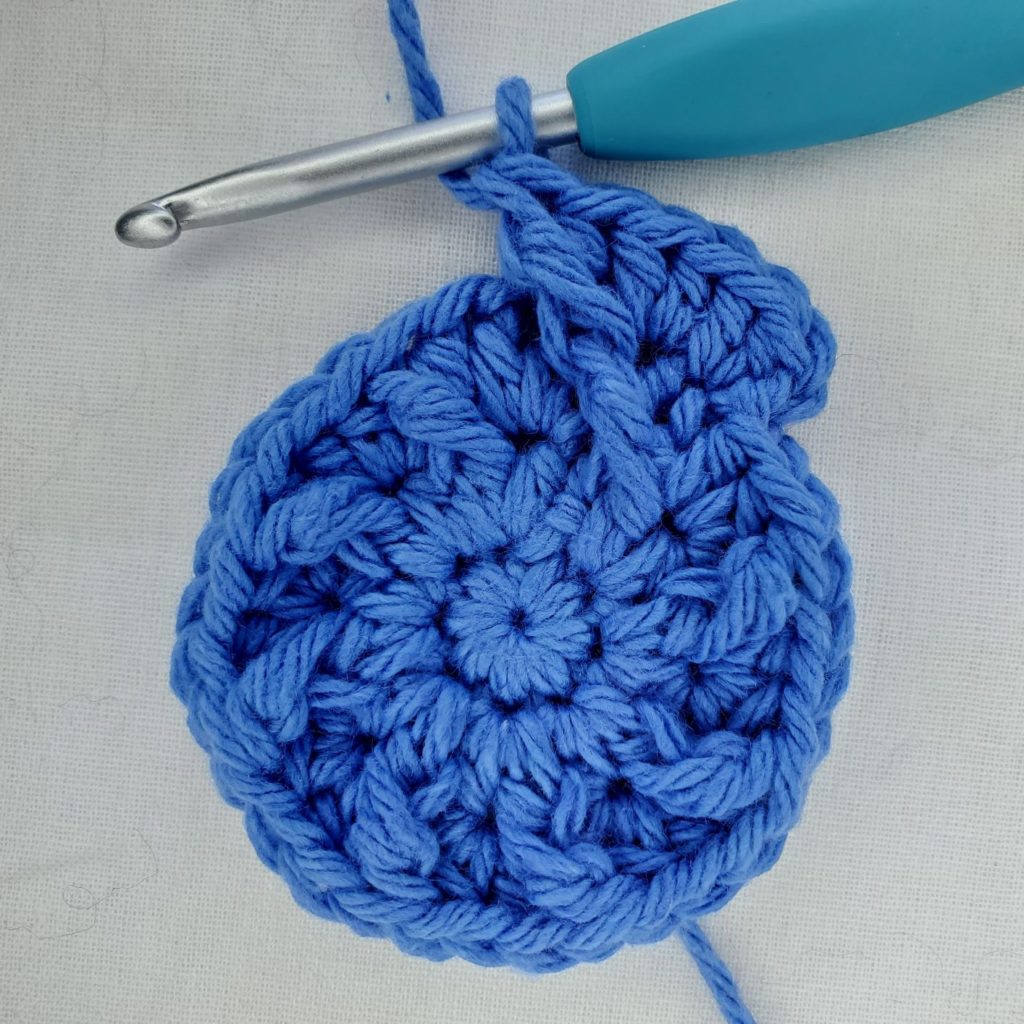
Figure 4
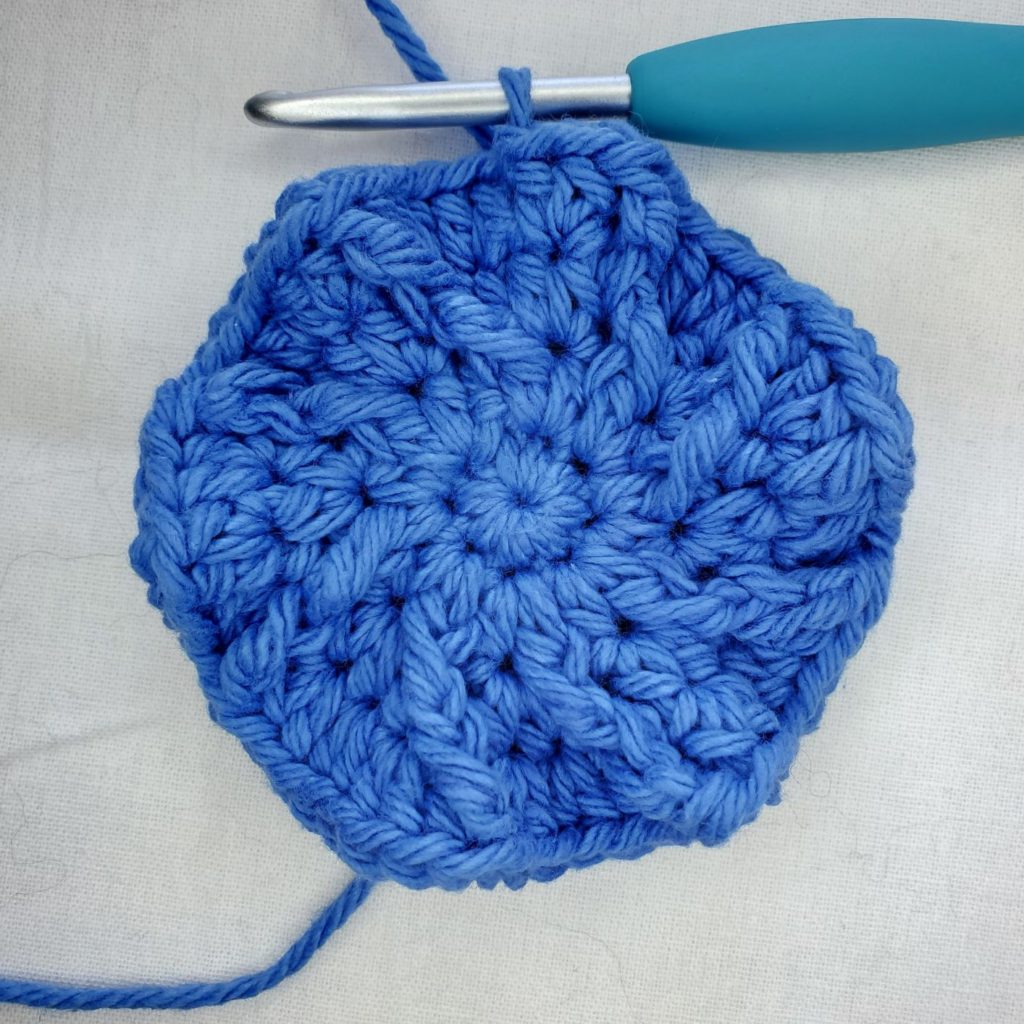
Figure 5
- Ch1. Hdc in 1st st and next 6 sts. Fpdc around fpdc of previous round (sk 1 st). *Hdc in next 7 sts. Fpdc (sk 1 st).** Repeat from * to ** around. Ss to join to 1st st. – 64 st
- Ch1. Hdc in 1st st. Fpdc around fpdc of previous round (sk 1 st). *Hdc in next st. 2hdc in next st. Hdc in next 3 sts. 2hdc in next st. Hdc in next st. Fpdc around fpdc of previous round (sk 1 st).** Repeat from * to ** until there are only 6 sts left unworked. Hdc in next st. 2hdc in next st. Hdc in next 3 sts. 2hdc in last st. Ss to join to 1st st. – 80 st
- Ch1. Hdc in 1st st and next 2 sts. Fpdc around fpdc of previous round (sk 1 st). *Hdc in next 9 sts. Fpdc around fpdc of previous round (sk 1 st).** Repeat from * to ** until there are only 6 sts left unworked. Hdc in last 6 sts. Ss to join to 1st st. – 80 st
- Ch1. 2hdc in 1st st. Hdc in next 4 sts. Fpdc (inc) around fpdc of previous round. *Hdc in next 5 sts. 2hdc in next st. Hdc in next 4 sts. Fpdc (inc) around fpdc of previous round.** Repeat from * to ** until there are only 5 sts left unworked. Hdc in last 5 sts. Ss to join to 1st st. – 96 st
- Ch1. Hdc in 1st st and next 7 sts. Fpdc around fpdc of previous round (sk 1 st). *Hdc in next 11 sts. Fpdc around fpdc of previous round (sk 1 st).** Repeat from * to ** until there are only 3 sts left unworked. Hdc in last 3 sts. Ss to join to 1st st. – 96 st
- Ch1. Hdc in 1st st and next 4 sts. 2hdc in next st. Hdc in next 4 sts. Fpdc around fpdc of previous round (sk 1 st). *2hdc in next st. Hdc in next 5 sts. 2hdc in next st. Hdc in next 4 sts. Fpdc around fpdc of previous round (sk 1 st).** Repeat from * to *** until there is only 1 st left unworked. 2hdc in last st. Ss to join to 1st st. – 112 st
- Ch1. Hdc in 1st st and next 12 sts. Fpdc around fpdc of previous round (sk 1 st). *Hdc in next 13 sts. Fpdc around fpdc of previous round (sk 1 st).** Repeat from * to ** around. Ss to join to 1st st. – 112 st
- Ch1. Hdc in 1st st. Fpdc around fpdc of previous round (sk 1 st). *Hdc in next 13 sts. Fpdc around fpdc of previous round (sk 1 st).** Repeat from * to ** until there are only 12 sts left unworked. Hdc in last 12 sts. Ss to join to 1st st. – 112 st
- Ch1. Hdc in 1st st and next 2 sts. Fpdc around fpdc of previous round (sk 1 st). *Hdc in next 13 sts. Fpdc around fpdc of previous round (sk 1 st).** Repeat from * to ** until there are only 10 sts left unworked. Hdc in last 10 sts. Ss to join to 1st st. – 112 st
- Ch1. Hdc2tog over 1st 2 sts. Hdc in next 3 sts. Fpdc around fpdc of previous round (sk 1 st). *Hdc in next st. Hdc2tog over next 2 sts. Hdc in next 5 sts. Hdc2tog over next 2 sts. Hdc in next 3 sts. Fpdc around fpdc of previous round (sk 1 st).** Repeat from * to ** until there are only 8 sts left unworked. Hdc in next st. Hdc2tog over next 2 sts. Hdc in next 5 sts. Ss to join to 1st st. – 96 st
- Ch1. Hdc in 1st st and next 5 sts. Fpdc around fpdc of previous round (sk 1 st). *Hdc in next 11 sts. Fpdc around fpdc of previous round (sk 1 st).** Repeat from * to ** until there are only 5 sts left unworked. Hdc in last 5 sts. Ss to join to 1st st. – 96 st
- Ch1. Hdc in 1st st and next 3 sts. Hdc2tog over next 2 sts. Hdc in next 2 sts. Fpdc around fpdc of previous round (sk 1 st). *Hdc in next st. Hdc2tog over next 2 sts. Hdc in next 4 sts. Hdc2tog over next 2 sts. Hdc in next 2 sts. Fpdc around fpdc of previous round (sk 1 st).** Repeat from * to ** until there are only 3 sts left unworked. Hdc in next st. Hdc2tog over last 2 sts. Ss to join to 1st st. – 80 st
- Ch1. Hdc in 1st st and next 8 sts. Fpdc around fpdc of previous round (sk 1 st). *Hdc in next 9 sts. Fpdc around fpdc of previous round (sk 1 st).** Repeat from * to ** around. Ss to join to 1st st. – 80 st
- Work only the instructions marked with your size.
Sizes S & M:
Ch1. Hdc in 1st st. Fpdc around fpdc of previous round (sk 1 st). *Hdc in next 6 sts. Hdc2tog over next 2 sts. Hdc in next st. Fpdc around fpdc of previous round (sk 1 st).** Repeat from * to ** until there are only 8 sts left unworked. Hdc in next 6 sts. Hdc2tog over last 2 sts. Ss to join to 1st st. – 72 (72, n/a) st
Size L:
Ch1. Hdc in 1st st. Fpdc around fpdc of previous round (sk 1 st). Hdc in next 6 sts. Hdc2tog over next 2 sts. Hdc in next st. Fpdc around fpdc of previous round (sk 1 st). *Hdc in next 9 sts. Fpdc around fpdc of previous round (sk 1 st). Hdc in next 6 sts. Hdc2tog over next 2 sts. Hdc in next st. Fpdc around fpdc of previous round (sk 1 st).** Repeat from * to ** until there are only 8 sts left unworked. Hdc in last 8. Ss to join to 1st st. – n/a (n/a, 76) st
3rd LO Join
When you join at the end of a round with a regular ss and then proceed to work in the 3rd LO, it creates a very noticeable seam. To rectify this, I do a 3rd LO join instead. This makes the join much less noticeable. To do a 3rd LO join, just follow these instructions.
- After you have finished the last st of the round, remove your hook (see Figure 6).
- Insert your hook from back to front through both loops of the 1st st (see Figure 7).
- Grab the loop with your hook and pull it through both loops.
- Pull your yarn tight to bring the ends together (see Figure 8).
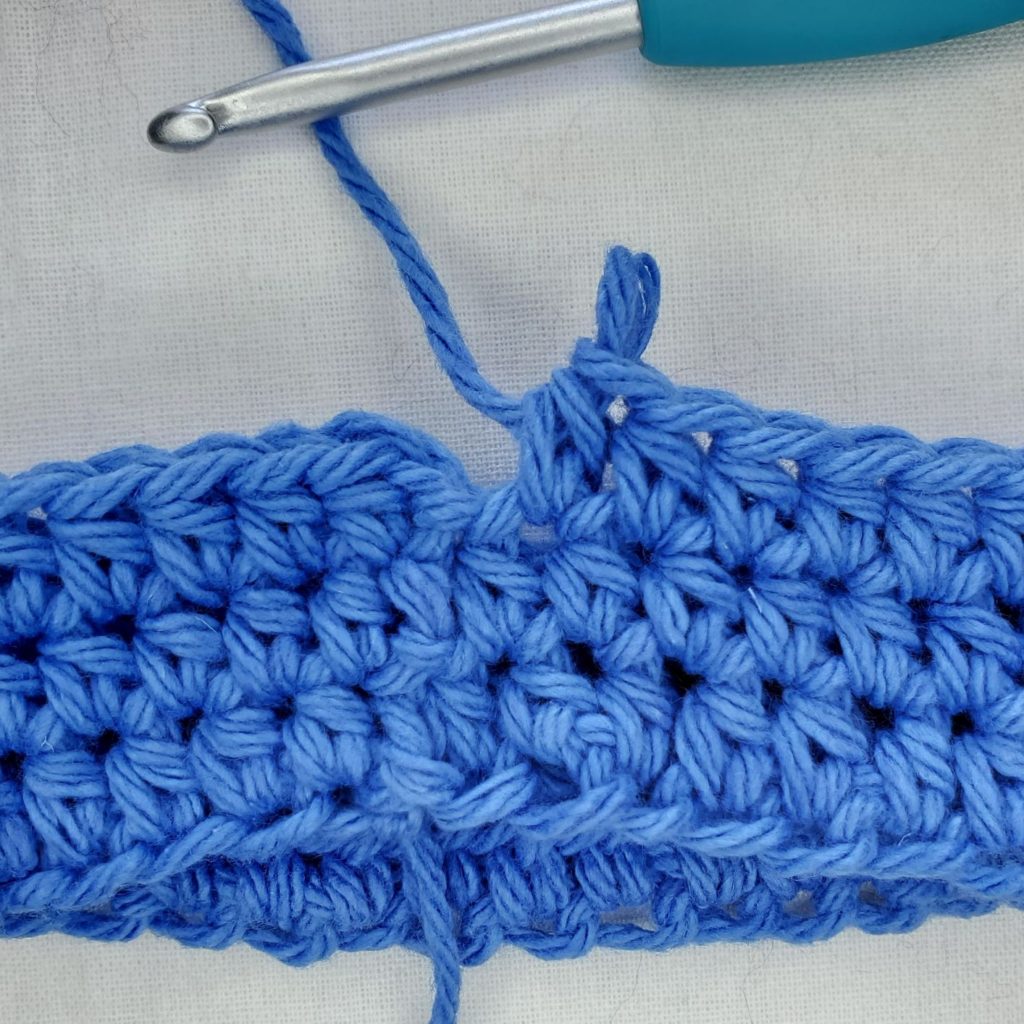
Figure 6
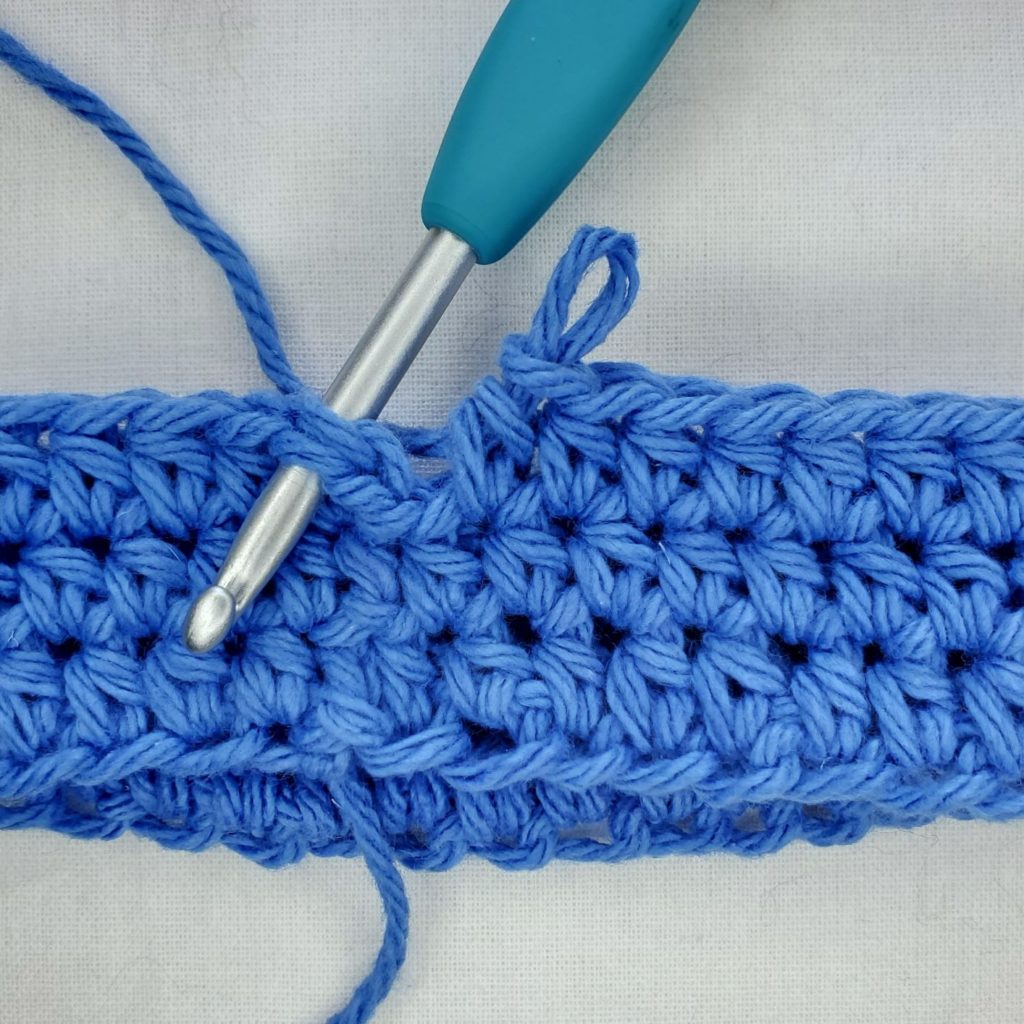
Figure 7
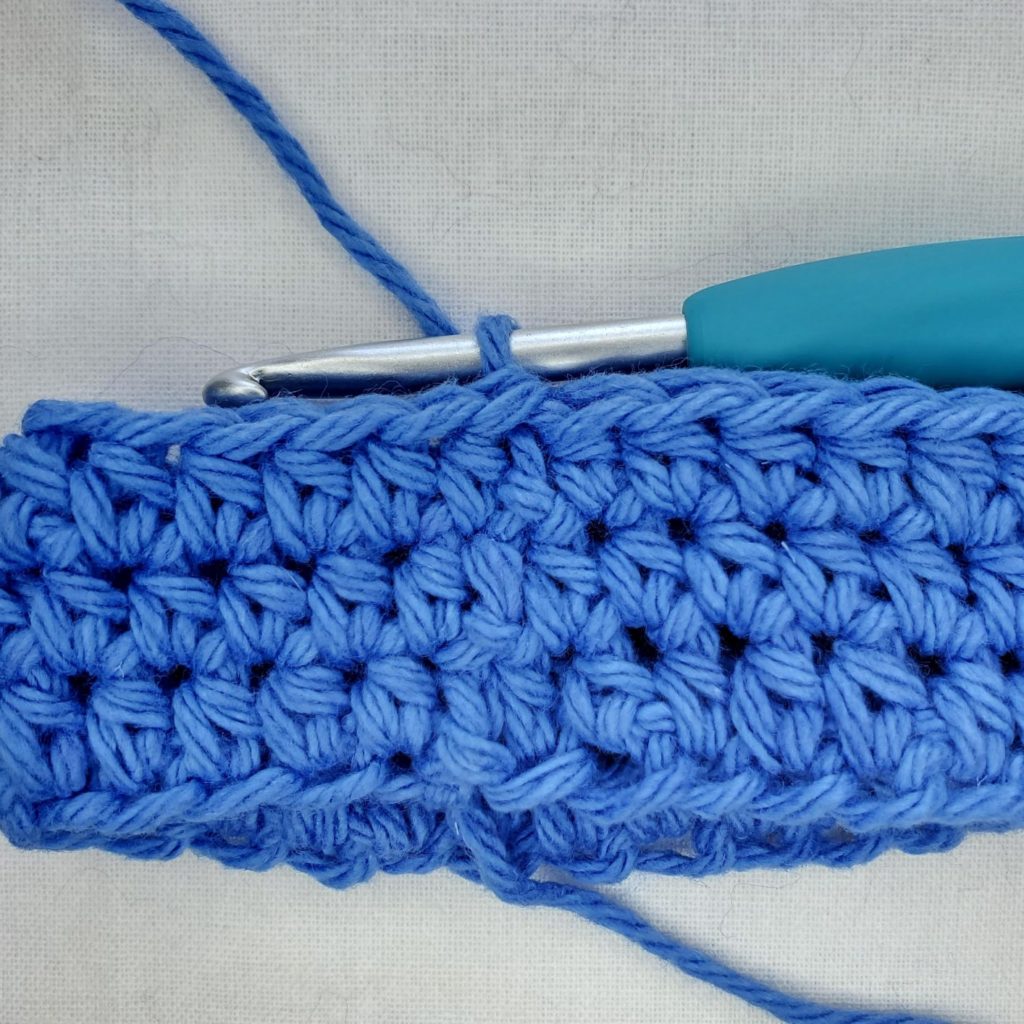
Figure 8
Your join should look like Figures 9 (1 round done) & 10 (2 rounds done).
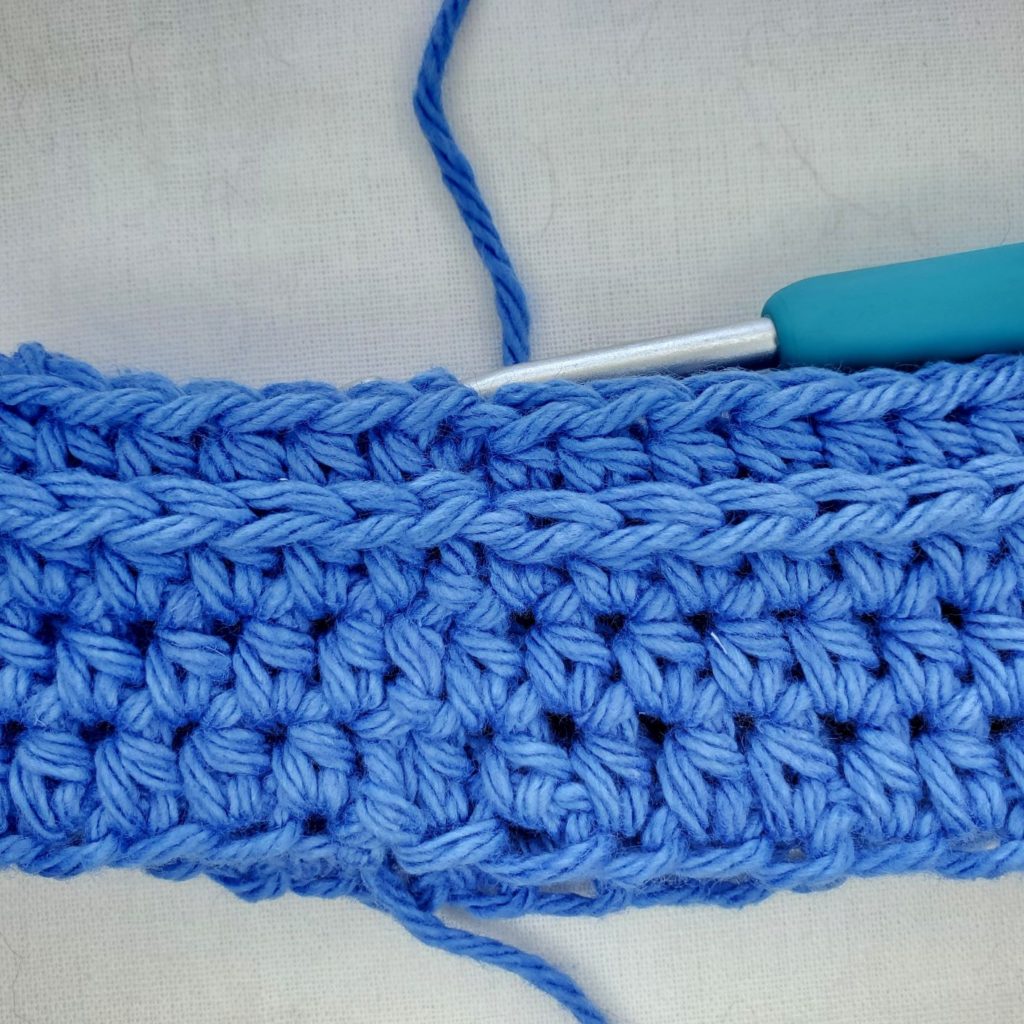
Figure 9
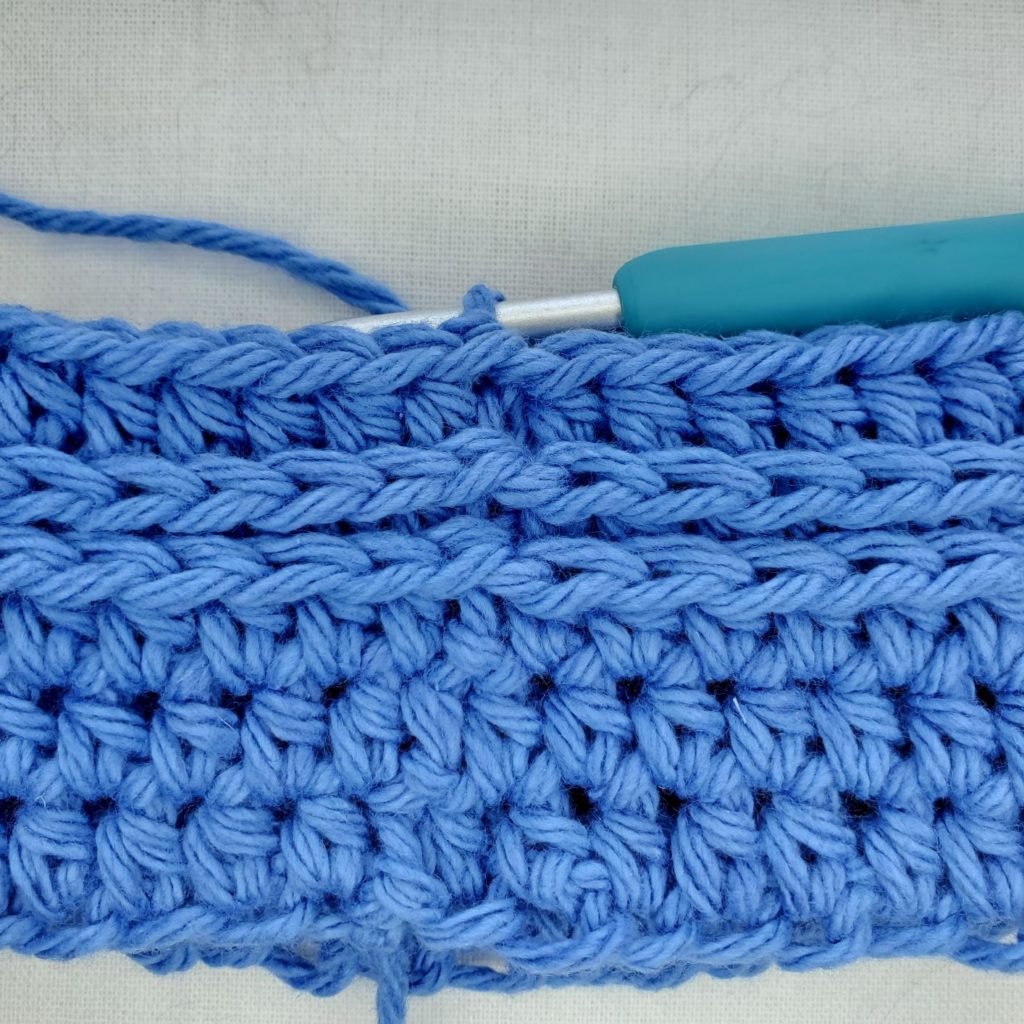
Figure 10
- Work only the instructions marked with your size.
Size S:
Ch1. Hdc in 1 st st and next 15 sts. Hdc2tog over next 2 sts. *Hdc in next 16 sts. Hdc2tog over next 2 sts.** Repeat from * to ** around. 3rd LO join. – 68 (n/a, n/a) st
Sizes M & L:
Ch1. Hdc in 1st st and each st around. 3rd LO join. – n/a (72, 76) st
3rd LO
The following rounds will be worked in the 3rd LO. In this pattern, the 3rd loop is located below the back loop on the wrong side of your work. This is the side facing away from you. In Figure 11, the front loop and back loop are highlighted in yellow. To locate the 3rd loop, tilt your work so that you’re looking at the wrong side almost upside down. The 3rd loop is labelled in Figure 12 in red. When working into the 3rd LO in this manner, a braided detail will appear on the side of your work facing you as demonstrated in Figure 13.
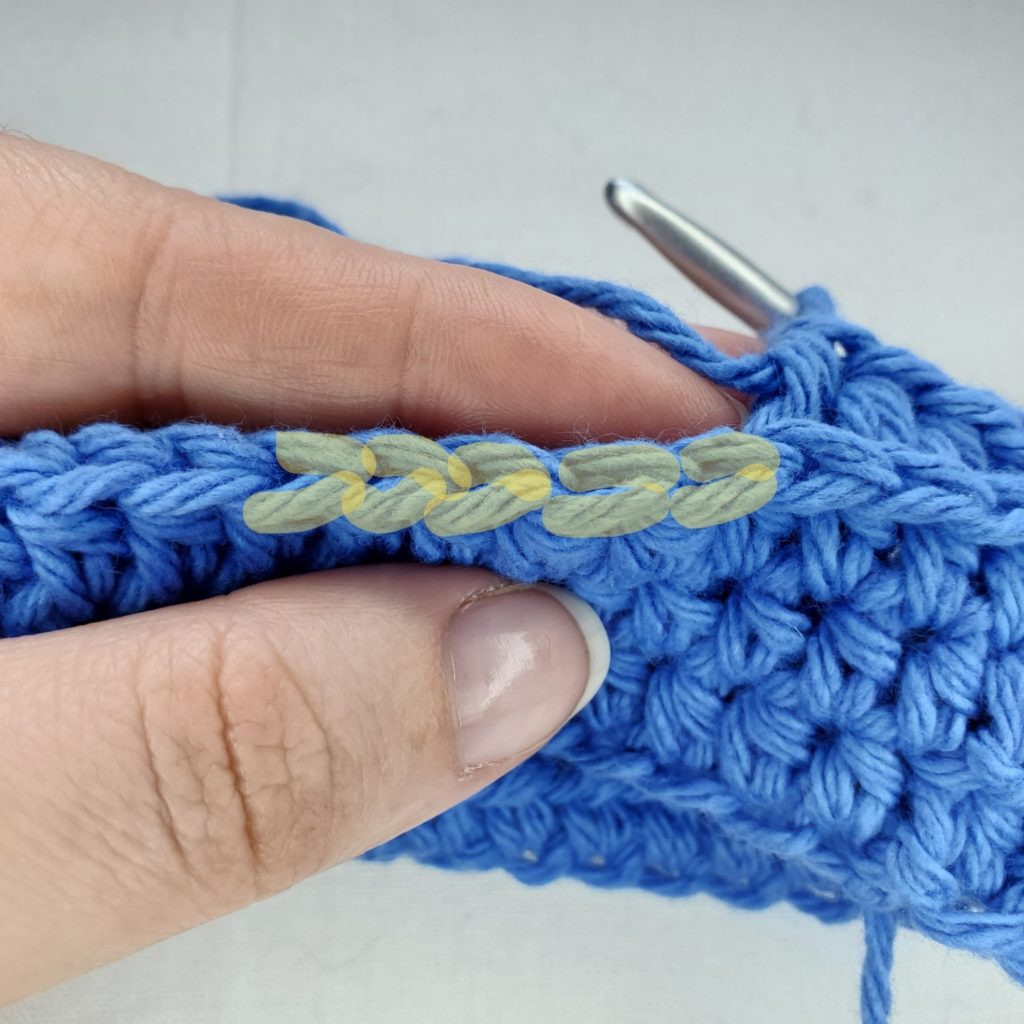
Figure 11
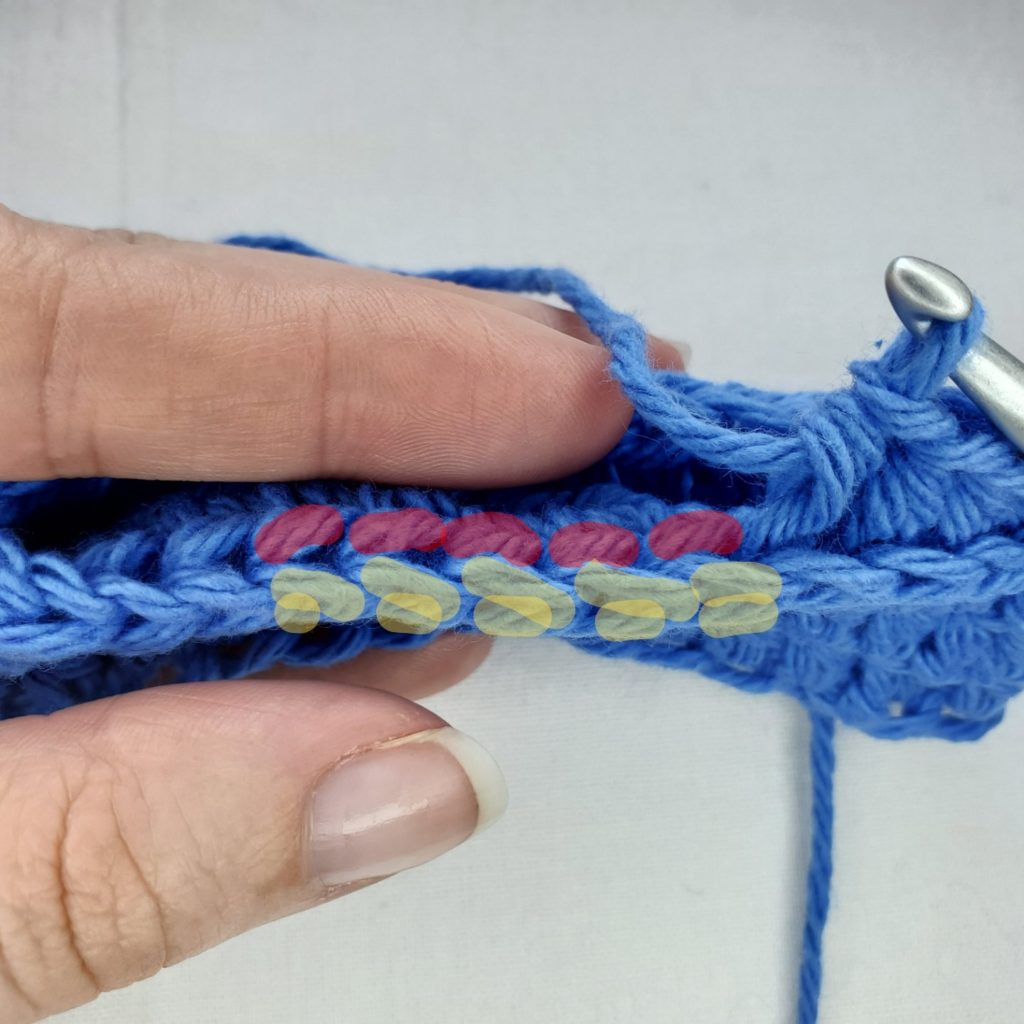
Figure 12
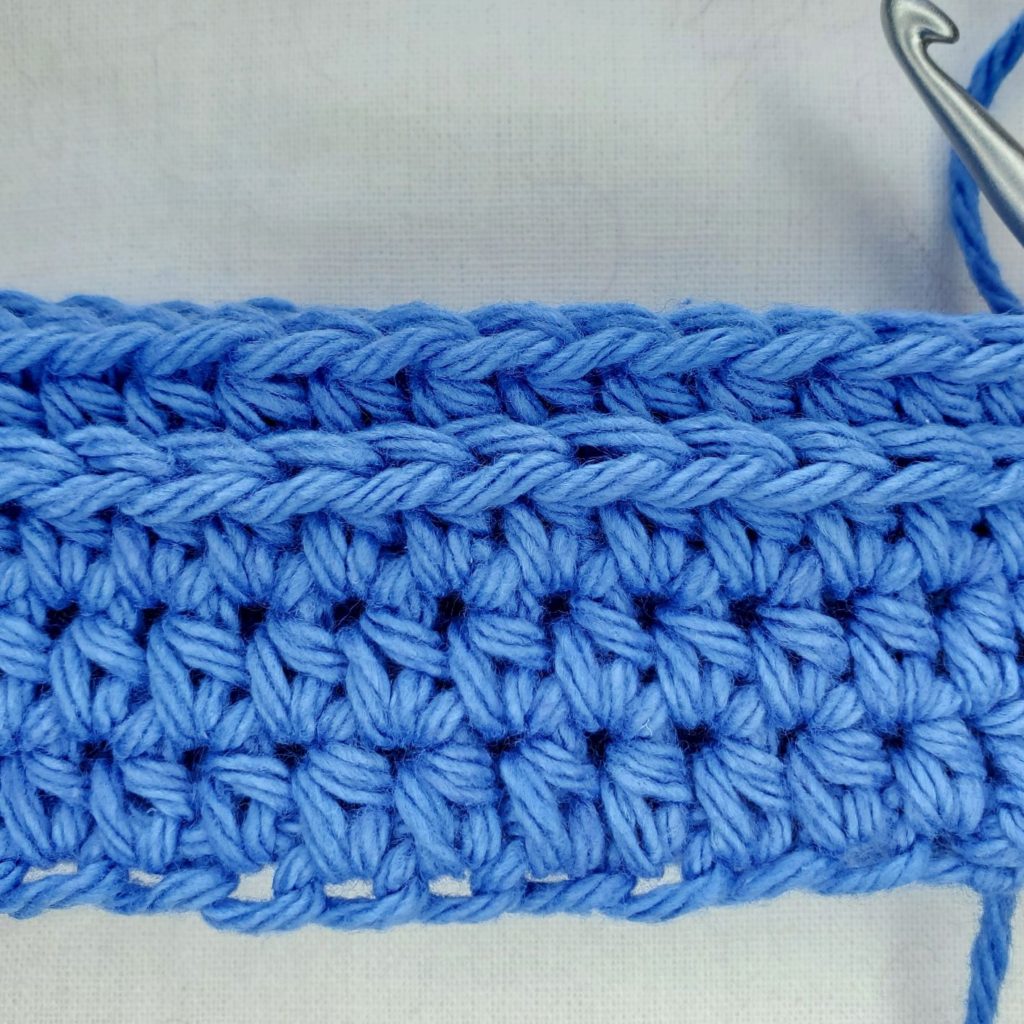
Figure 13
- Working in 3rd LO: Ch1. Hdc in 1st st and each st around. 3rd LO join. – 68 (72, 76) st
- Working in 3rd LO: Ch1. Hdc in 1st st and each st around. 3rd LO join. – 68 (72, 76) st
- Working in 3rd LO: Ch1. Sc in 1st st and each st around. Ss to join to 1st st. Do not bind off. – 68 (72, 76) st
Twisted Newsboy – Free Crochet Hat Pattern
Brim Of The Twisted Newsboy – Free Crochet Hat Pattern
The brim is worked in rows. I worked my brim using a 4mm hook (or 1 size smaller than the hook you used to achieve gauge). This made the brim nice and stiff so it would stand up on its own. The stitch counts for this part are only for the brim, not the entire hat. Tip: Place stitch markers on the first and last stitch of each row to help keep you on track.
Using a 4mm hook (or one size smaller than the hook used to obtain gauge)
- Ch1. Sc in next st (considered a sc2tog). Sc in next 4 sts, 2sc in next st. *Sc in next 5 sts, 2sc in next st.** Repeat from * to ** 2 more times. Sc in next 4 sts, sc2tog over next 2 sts. Leave remaining sts unworked. Turn. – 33 st
- Ch1. Sc in next st (considered a sc2tog). Sc in next 6 sts, 2sc in next st. *Sc in next 7 sts, 2sc in next st.** Repeat from * to ** 1 more time. Sc in next 6 sts, sc2tog over last 2 sts. Turn. – 34 st
- Ch1. Sc in next st (considered a sc2tog). Sc in each st across until there are only 2 sts left unworked. Sc2tog over last 2 sts. Turn. – 32 st
- Ch1. Sc in next st (considered a sc2tog). Sc in next 4 sts, 2sc in next st. Sc in next 5 sts, 2sc in next st. Sc in next 6 sts, 2sc in next st. Sc in next 5 sts, 2sc in next st. Sc in next 4 sts, sc2tog over last 2 sts. Turn. – 34 st
- Ch1. Sc in next st (considered a sc2tog). Sc in next 6 sts, 2sc in next st. Sc in next 7 sts, 2sc in next st. Sc in next 8 sts, 2sc in next st. Sc in next 6 sts, sc2tog over last 2 sts. Turn. – 35 st
- Ch1. Sc in next st (considered a sc2tog). Sc in each st across until there are only 2 sts left unworked. Sc2tog over last 2 sts. Turn. – 33 st
- (Right side) Ch1. Sc in next st (considered a sc2tog). Sc in next 6 sts, 2sc in next st. Sc in next 7 sts, 2sc in next st. Sc in next 7 sts, 2sc in next st. Sc in next 6 sts, sc2tog over last 2 sts. Turn. – 34st
- (Wrong side) Ch1. Sc in next st (considered a sc2tog). Sc in each st across until there are only 2 sts left unworked. Sc2tog over last 2 sts. Turn. – 32 st
Now we will ss around the entire edge of the hat. This will give the brim more stability and make the edge more stiff. At the end of row 8 you should have turned, which means the right side of your work should be facing you.
- Ss in the next st and each st along the front of the brim. (Should be 31 ss)
- Switch back to your 4.5mm hook (or the hook you used to achieve gauge).
- Work 8 ss along the side of the brim.
- Ss in each st around the bottom edge of the hat until you come to the other side of the brim.
- Work 8 ss along the side of the brim.
Invisible Join:
- Cut your yarn and pull on the loop until the end of your yarn comes out.
- Thread the end onto a yarn needle (see Figure 14).
- Run your needle through your 1st ss as shown in Figure 15.
- Pull it just tight enough that it looks like another ss as shown in Figure 16.
- Run your needle through the top of your last ss as shown in Figures 16 & 17. Make a knot to secure.
- Your join should now be invisible like in Figure 18.
Figure 14
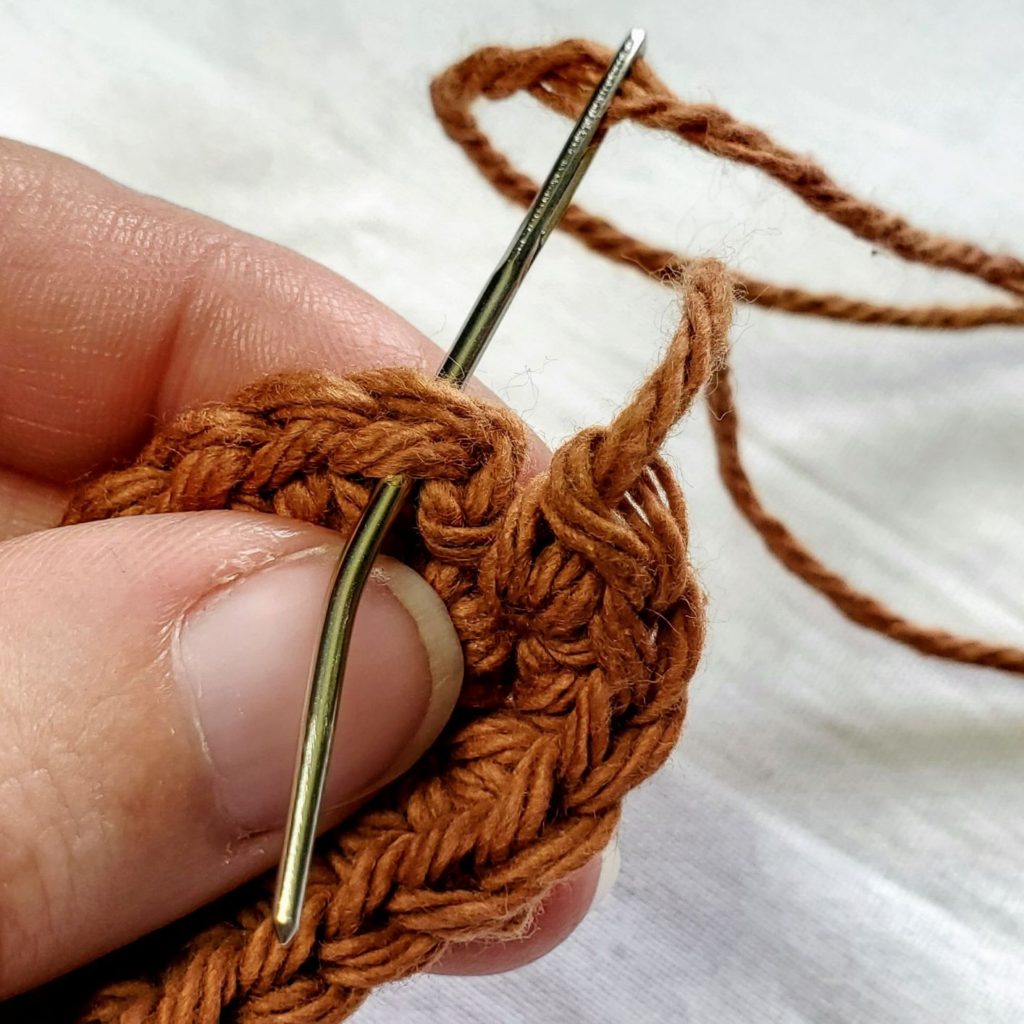
Figure 15
Figure 16
Figure 17
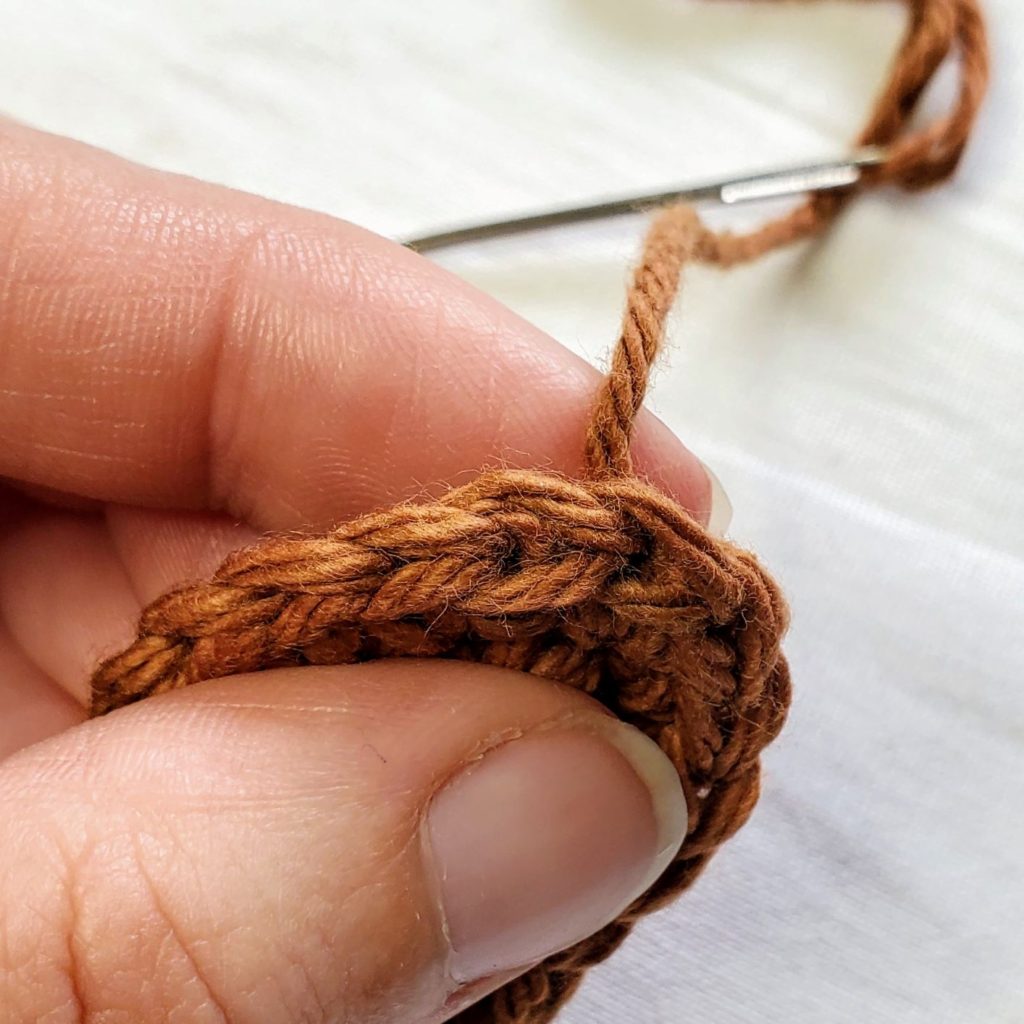
Figure 18
Weave in your ends, and you’re done!
I hope you love your new crochet hat, and I look forward to seeing all of your beautiful pictures on Ravelry!
If you’d like to know when I post new patterns and tutorials, head on over to my Facebook and Instagram and give me a like and a follow!
If you enjoyed The Twisted Newsboy – Free Crochet Hat Pattern, you may want to check out my other designs!
Twisted Newsboy – Free Crochet Hat Pattern
And until next time… Happy Hooking! 😉