

Crochet Cardigan Pattern Free – Crossroads Cardigan
The Crochet Cardigan Pattern Free – Crossroads Cardigan is copyrighted by I Need It Crochet. You may not copy, share, change, or sell the pattern itself. Also, you may not claim this pattern as your own. All pictures contained in this pattern fall under the copyright and may not be used.
Finished items made from the Crochet Cardigan Pattern Free – Crossroads Cardigan belong to you, and you may do what you wish with them. If you choose to sell them on Etsy, I would very much appreciate it if you credited me as the pattern designer.
Where Can I Buy The Pdf?
The entire pattern is available to view for free on this page (you just have to scroll down to see it). But if you would prefer to have a printable pdf copy of the pattern, you can purchase it for a small fee from my Ravelry and Etsy stores. Just click the graphics below.
This pattern is 17 pages long and contains 25 pictures to help you along the way. a printable pdf will be easier to follow, and you can make notes on it as you go. I find it to be the easier option. But if you like to use the online version, it is here 24/7 for you to view. Enjoy!


Crochet Cardigan Pattern Free – Crossroads Cardigan
From March 26 until May 13, 2023, I am running a crochet-a-long for the Crossroads Cardigan on Facebook! If you’d like to join, you can find the CAL group here.
Until April 15, 2023, the Ravelry pdf is 25% off! Click the button below and use code CCCAL2023.
I really enjoyed designing the Crossroads Sweater. So much so that I simply had to create a cardigan using the same stitch pattern.
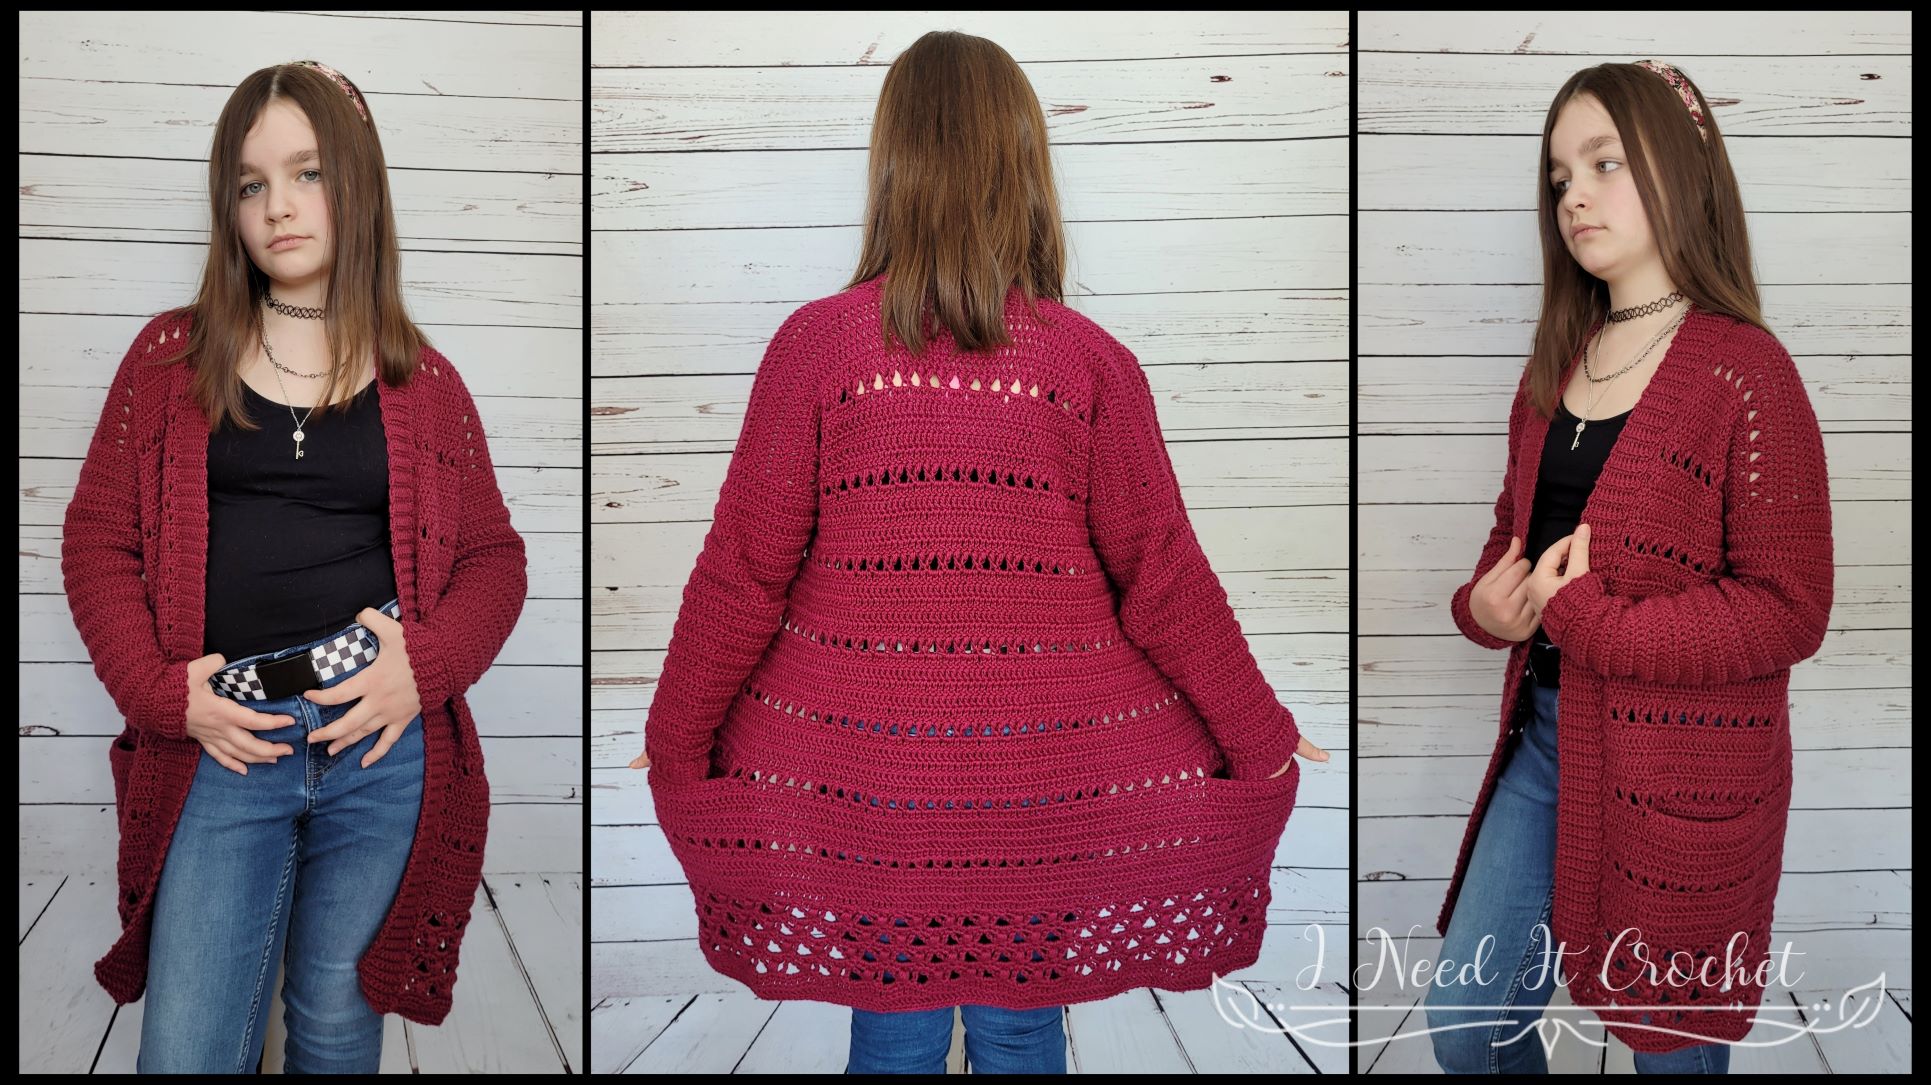
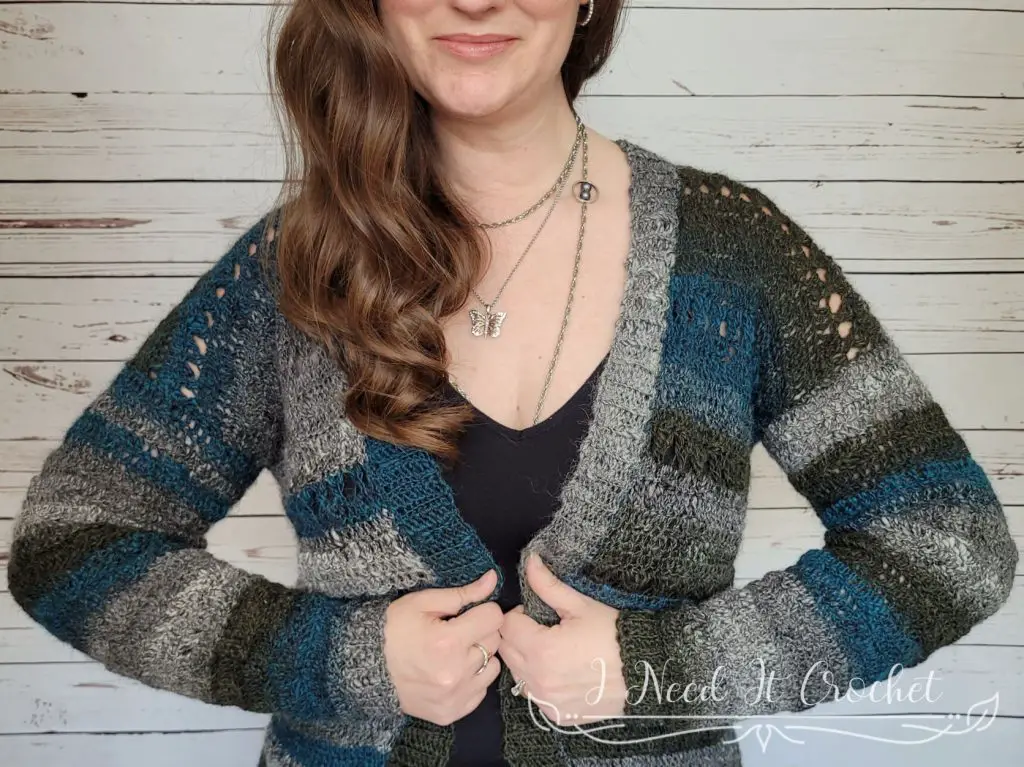
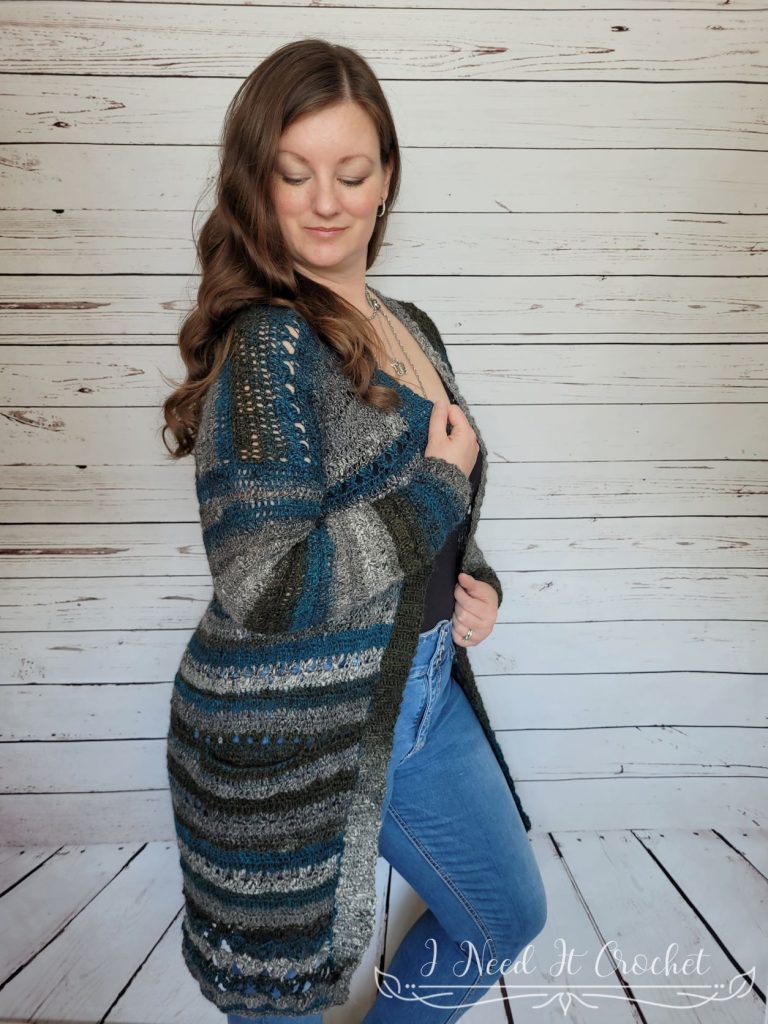
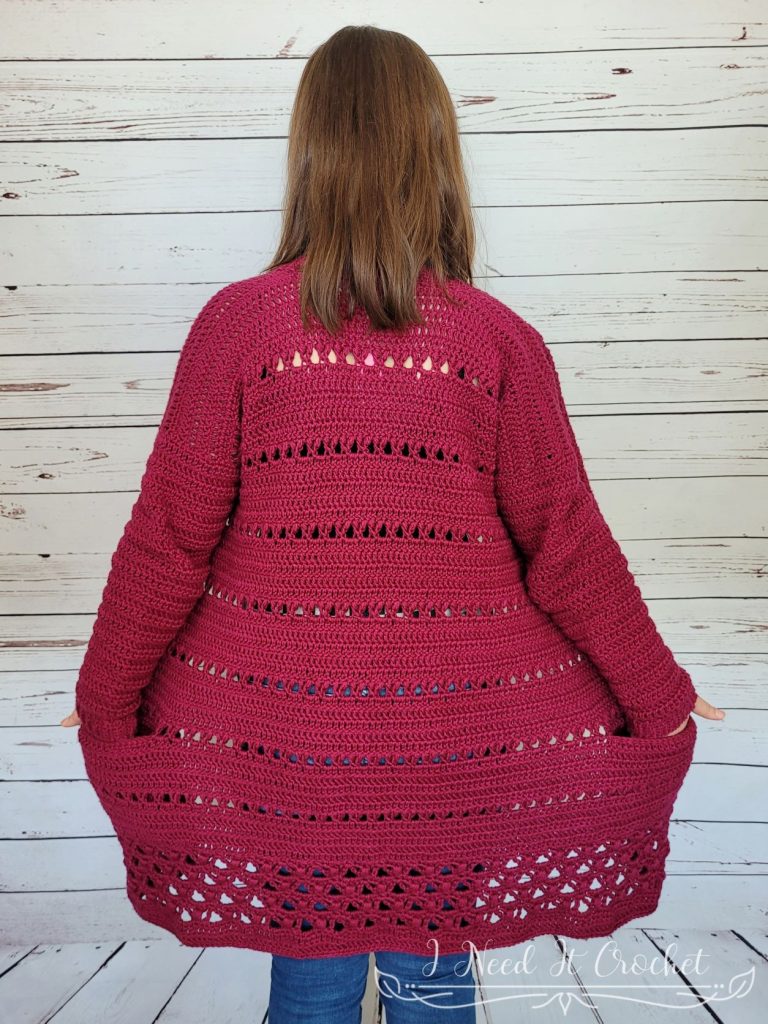
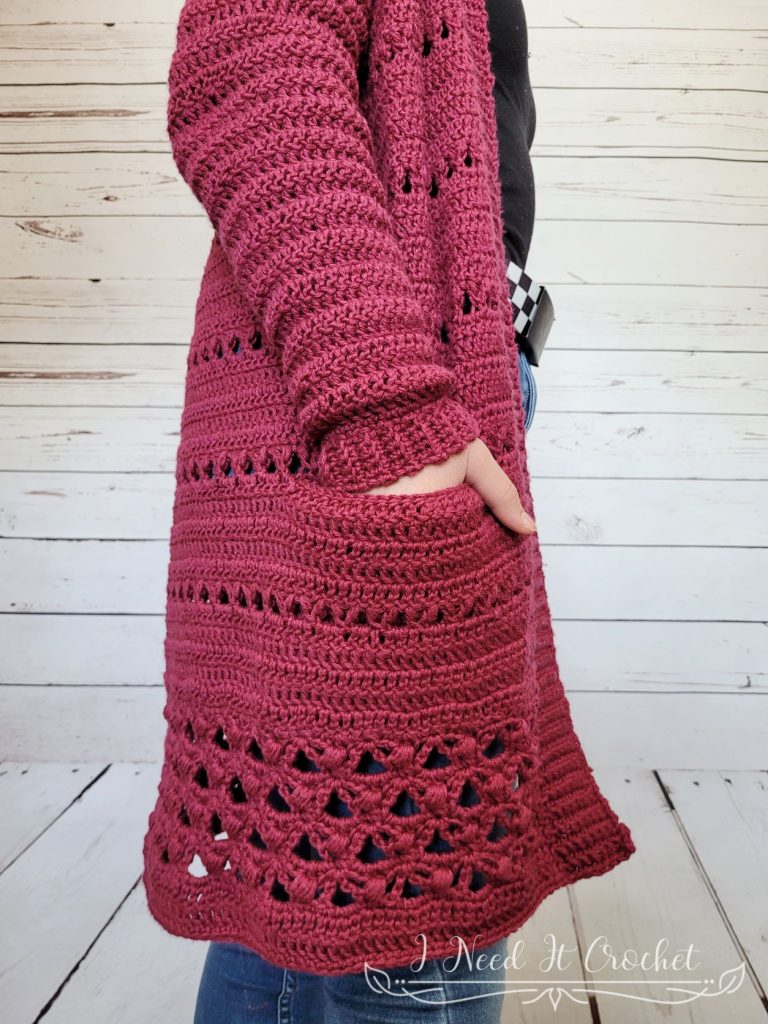
The Free Crochet Cardigan Pattern – Crossroads Cardigan is the perfect layering piece that will give you just a touch of warmth without being too hot and stifling. The Forked Clusters and Crown Puff Lattice will hold your attention while adding some delicacy to the design. This will be your go-to cardigan for the warmer days and nights ahead.
Crochet Cardigan Pattern Free – Crossroads Cardigan
How To Crochet The Crochet Cardigan Pattern Free – Crossroads Cardigan
Finished Sizes:
Instructions given to fit size X-small; changes for small, medium, large, X-large, 2X-large, 3X-large, 4X-large and 5X-large are in ()
XS (S, M, L, XL, 2XL, 3XL, 4XL, 5XL)
Body Circumference: 32 ¾” (36”, 40 ½”, 43 ¾”, 48 ½”, 53”, 56”, 61”, 65”)
Finished Length: Customizable.
Sleeve Circumference: Each size may choose whichever sleeve circumference they like from the following options: 10” (11”, 13”, 14”, 15”, 16 ¼”, 17 ¼”, 19 ¼”, 20 ¼”, 21 ½”, 22 ½”, 23 ½”)
Materials:
I used Mayflower Cotton Merino Classic, which is a 50% Cotton, 50% Merino Wool, #3 DK weight yarn.
Any yarn of similar weight would work.
Approximately 1300 (1400, 1500, 1600, 1700, 1850, 2000, 2150, 2300) yds.
5mm Hook
Stitch Markers
Yarn Needle
Scissors
Measuring Tape
Abbreviations:
RS = Right Side
WS = Wrong Side
Sk = Skip
St = Stitch
Ss = Slip Stitch
Ch = Chain
Sc = Single Crochet
Dc = Double Crochet
Tr = Treble Crochet
Fdc = Foundation Double Crochet
Sc2tog = Single Crochet 2 Together
Sc3tog = Single Crochet 3 together
Hdc5tog = Half Double Crochet 5 Together
Gauge:
See gauge swatch instructions below. Be sure to always check your gauge. It will save you much time and heartache.
Notes:
Ch1 at the beginning of a row is never considered a stitch.
Ch3 at the beginning of a row is considered a dc.
Ch4 at the beginning of a row is considered a tr.
You can find a tutorial for the Forked Cluster Stitch here.
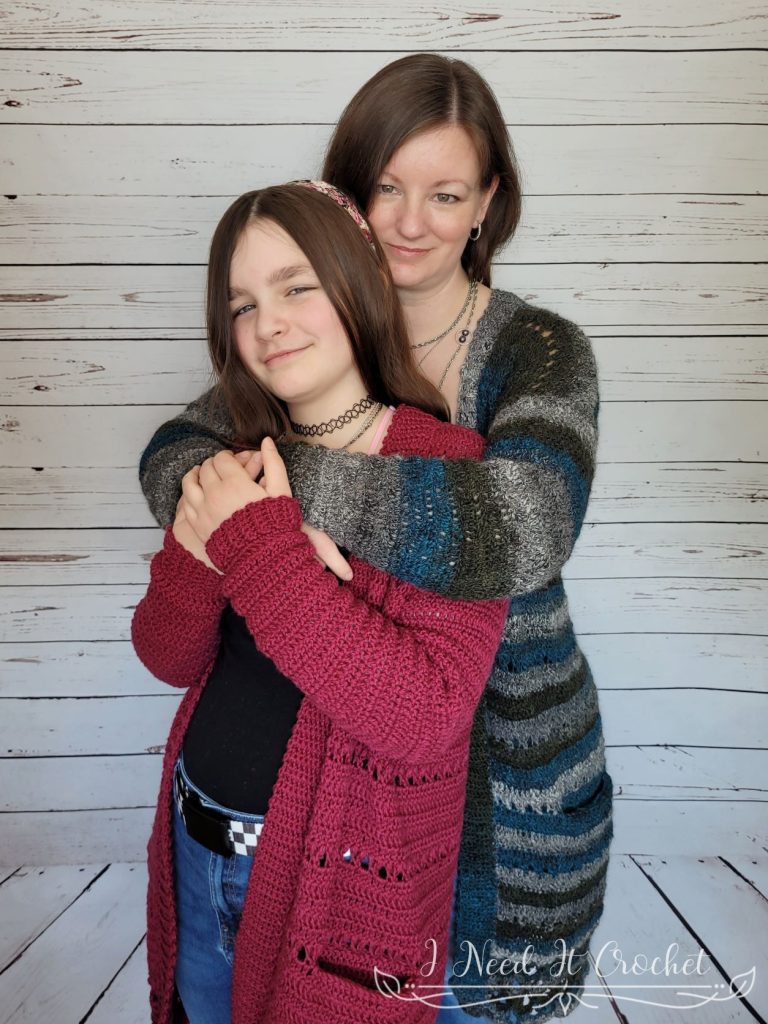
The adult model pictured has a 38” bust and 46” hips and is wearing a size L.
The younger model has a 32” bust and 35” hips and is wearing a size M.
Choose your size according to your largest measurement (bust/hips) and how you would like the cardigan to fit. For a close-fitting cardigan, choose the size closest to your largest measurement. For a loose cardigan, choose a size 2-3” larger.
Crochet Cardigan Pattern Free – Crossroads Cardigan
Gauge Swatch
The instructions below will create a gauge swatch that is 4 ½” (9”) wide by 4 ½” (9 ”) high. If you are making a larger size and/or you sometimes find your tension is off, I recommend making the larger swatch. But, of course, that is completely up to you. Also, the width of your swatch is much more important than the overall height. So if your width is on point, but your height is off, I recommend using the hook that gives you the correct width.
With 5mm hook
- Ch 19 (36). Dc in 4th ch from hook and each ch across. Turn. – 17 (34) st
- Ch3. Dc in 2nd st and each st across. Turn. – 17 (34) st
Repeat row 2 until you have a total of 9 (18) rows. Your swatch should measure 4 ½” (9”) W by 4 ½” (9 ”) H.
Instructions
This cardigan is worked from the top down in rows. You will begin with the upper back, working until you have reached the proper armhole depth. Then, you will add the upper front panels, working the same amount of rows as the upper back. Next, you will work the lower body, leaving slits for the pockets and adding lace to the bottom. The ribbed front trim is added after, working in short rows. Finally, you will add the sleeves and inner pockets.
With 5mm hook (or hook used to obtain gauge)
Upper Back
- (RS) Ch 62 (68, 80, 86, 92, 104, 110, 122, 128). Working into the bottom bar, sc in 2nd ch from hook and each ch across. Turn. – 61 (67, 79, 85, 91, 103, 109, 121, 127) st
- – 6. Ch3. Dc in next st and each st across. Turn. – 61 (67, 79, 85, 91, 103, 109, 121, 127) st
- Ch3, dc in next st. Ch1, , fc over next 3 sts. *Ch2, fc over next 3 sts. ** Repeat from * to ** until there are only 2 sts left unworked. Ch1, dc in last 2 sts. Turn. – 61 (67, 79, 85, 91, 103, 109, 121, 127) st
Gauge Check: Your project should be 16” (17 ½”, 21”, 22 ¼”, 24”, 27”, 28 ½”, 31 ½”, 33 ¼”) wide. If your project width is off, you may want to start again with a different sized hook.
Follow this paragraph according to your chosen arm hole size (sleeve circumference). You may choose whichever sleeve size you want, no matter what sweater size you are working. To determine your arm hole size, use a soft tape measure to measure around the largest part of your upper arm. For a fitted sleeve, choose the size that is closest to your upper arm measurement. For a relaxed sleeve, choose a size 1 or more inches larger.
The sleeve options are: 10” (11”, 13”, 14”, 15”, 16 ¼”, 17 ¼”, 19 ¼”, 20 ¼”, 21 ½”, 22 ½”, 23 ½”) around.
Repeat rows 2 – 7 until you have a total of 10 (11, 13, 14, 15, 16, 17, 19, 20, 21, 22, 23) rows. Bind off.
Note: The repeat of row 2 is worked over fc and ch sts. You may work your dc sts into the ch st or the ch sp. Whichever you like as long as you have 1 dc per fc and ch st.
Upper Front
Flip your project so that the RS is facing you and the bottom of the starting chain is facing up. Join your yarn in the bottom of the 1st starting chain. Begin following these directions according to your body size.
- (RS) Ch1. Working into the bottom of the starting ch, sc in 1st 24 (27, 30, 33, 39, 42, 45, 48, 54) sts. Turn. – 24 (27, 30, 33, 39, 42, 45, 48, 54) st
- – 6. Ch3. Dc in next st and each st across. Turn. – 24 (27, 30, 33, 39, 42, 45, 48, 54) st
- Ch3, dc in next st. Ch1, fc over next 3 sts. *Ch2, fc over next 3 sts. ** Repeat from * to ** until there is only 1 st left unworked. Ch1, dc in last st. Turn. – 24 (27, 30, 33, 39, 42, 45, 48, 54) st
Repeat rows 2 – 7 until you have worked the same number of rows as you did for the Upper Back. Bind off. Your project should now look similar to Figure 1 below.
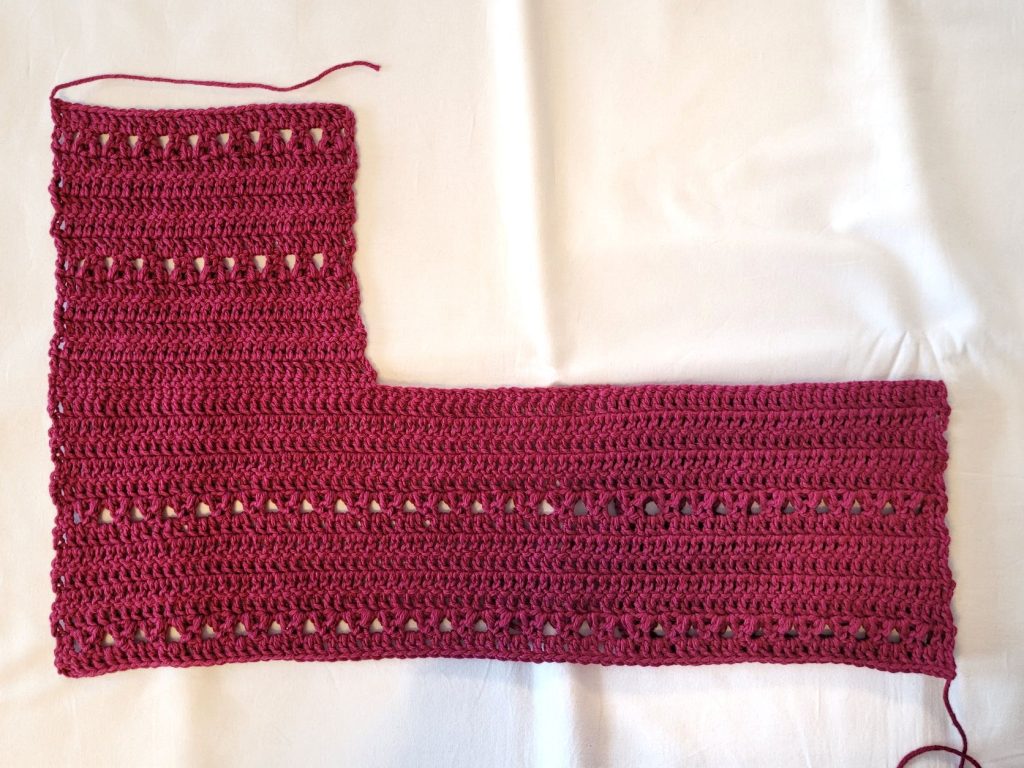
Figure 1
Flip your project so that once again, the RS is facing you and the bottom of the starting chain is facing up. Count 24 (27, 30, 33, 39, 42, 45, 48, 54) sts from the left side and join your yarn in the last st counted.
- (RS) Ch1. Working into the bottom of the starting ch, sc in 1st 24 (27, 30, 33, 39, 42, 45, 48, 54) sts. Turn. – 24 (27, 30, 33, 39, 42, 45, 48, 54) st
- – 6. Ch3. Dc in next st and each st across. Turn. – 24 (27, 30, 33, 39, 42, 45, 48, 54) st
- Ch4 (counts as dc + ch1), fc over next 3 sts. *Ch2, fc over next 3 sts. ** Repeat from * to ** until there are only 2 sts left unworked. Ch1, dc in last 2 st. Turn. – 24 (27, 30, 33, 39, 42, 45, 48, 54) st
Repeat rows 2 – 7 until you have worked the same number of rows as you did for the Upper Back. Bind off.
- Your project should now look similar to Figure 2 below. Fold the Upper Front panels down over the Upper Back panel with RS facing out as shown in Figure 3.
- Use the available yarn ends to secure the front to the back just at the bottom corners. To do this, I just pull the yarn through the stitch and tie a knot.
- With these rows all tied together, your stitch count should now be 109 (121, 139, 151, 169,187,199, 217, 235) st
- Turn your project and join your yarn in whichever end contains a yarn tail, as seen in Figure 3.
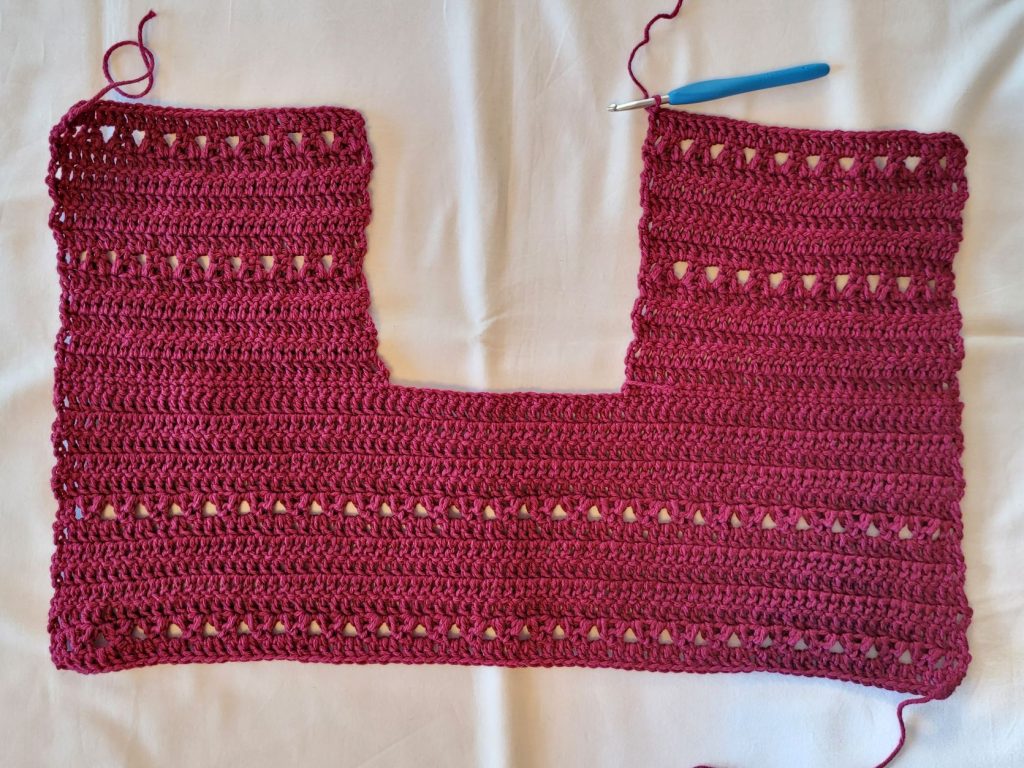
Figure 2
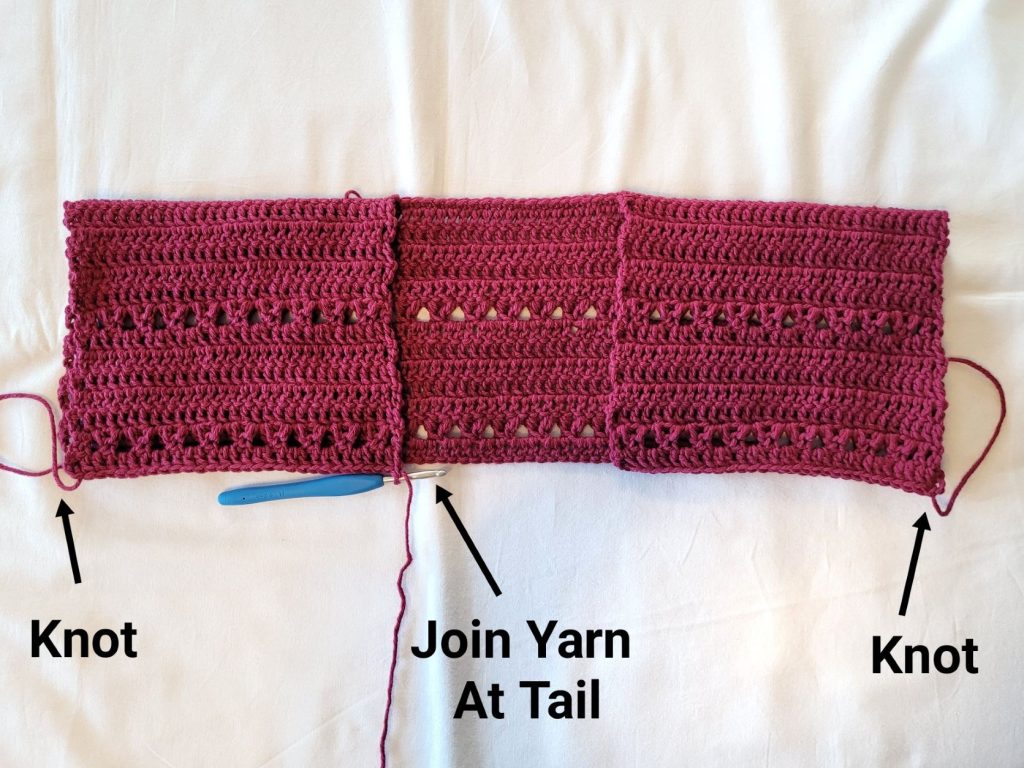
Figure 3
Crochet Cardigan Pattern Free – Crossroads Cardigan
Lower Body
This section is numbered to correspond with the row numbers in the Upper Front and Back. If you finished the Upper Front and Back with a repeat of row 2, begin with row 3 below. If you finished with a repeat of row 7, begin with row 2 below.
In the first row, you will need to increase your stitch count by 1 stitch. That means that in one of the stitches from your first row, you should add 2dc. You can do this in any stitch, but it’s best to add it near the middle. You will only have to do this once.
- – 6. Ch3. Dc in next st and each st across. Turn. – 110 (122, 140, 152, 170, 188, 200, 218, 236) st
- Ch4 (counts as dc + ch1), fc over next 3 sts. *Ch2, fc over next 3 sts. ** Repeat from * to ** until there is only 1 st left unworked. Ch1, dc in last st. Turn. – 110 (122, 140, 152, 170, 188, 200, 218, 236) st
Repeat rows 2 – 7 until you have achieved the length where you would like to add your pockets. You must finish with a repeat of row 7. Below I have some suggestions for how many rows to work before adding your pockets. These are total row counts, starting from the 1st sc row at the shoulder.
- 37 rows for short/petite people. My smaller model is 4’10”, and this pocket height worked for her.
- 43 rows for average height people. I am 5’6”, and this pocket height worked for me.
- 49 total rows for tall people.
Pocket Opening
The next row will contain the pocket openings.
- Ch3. Dc in next 3 (6, 9, 12, 18, 21, 24, 27, 33) sts. Follow the instructions below to create a pocket opening using fdc. Dc in next 61 (67, 79, 85, 91, 103, 109, 121, 127) sts. Repeat the instructions below to create a 2nd pocket opening. Dc in last 3 (6, 9, 12, 18, 21, 24, 27, 33) sts. Turn. – 110 (122, 140, 152, 170, 188, 200, 218, 236) st
Pocket Opening:
- Yo, insert hook in ch sp previously worked, yo, pull up a loop (see Figure 4).
- Yo, pull through 1 loop (see Figure 5). Yo, pull through 2 loops twice. You have now created your 1st fdc (see Figure 6).
- *Yo, insert hook in bottom 2 loops of previous fdc, yo, pull up a loop (see Figure 7).
- Yo, pull through 1 loop. Yo, pull through 2 loops twice.** You have now created your 2nd fdc (see Figure 8).
- Repeat from * to ** 18 more times. You should now have 20 fdc (see Figure 9).
- This next step will close the end of the pocket opening with a dc. Yo, insert hook in bottom 2 loops of previous fdc. Sk 20 sts for the pocket opening, insert hook through 21st st/ch sp. Yo, pull loop through st/ch sp and bottom loops of previous fdc (see Figure 10). Yo, pull through 2 loops twice (see Figure 11).
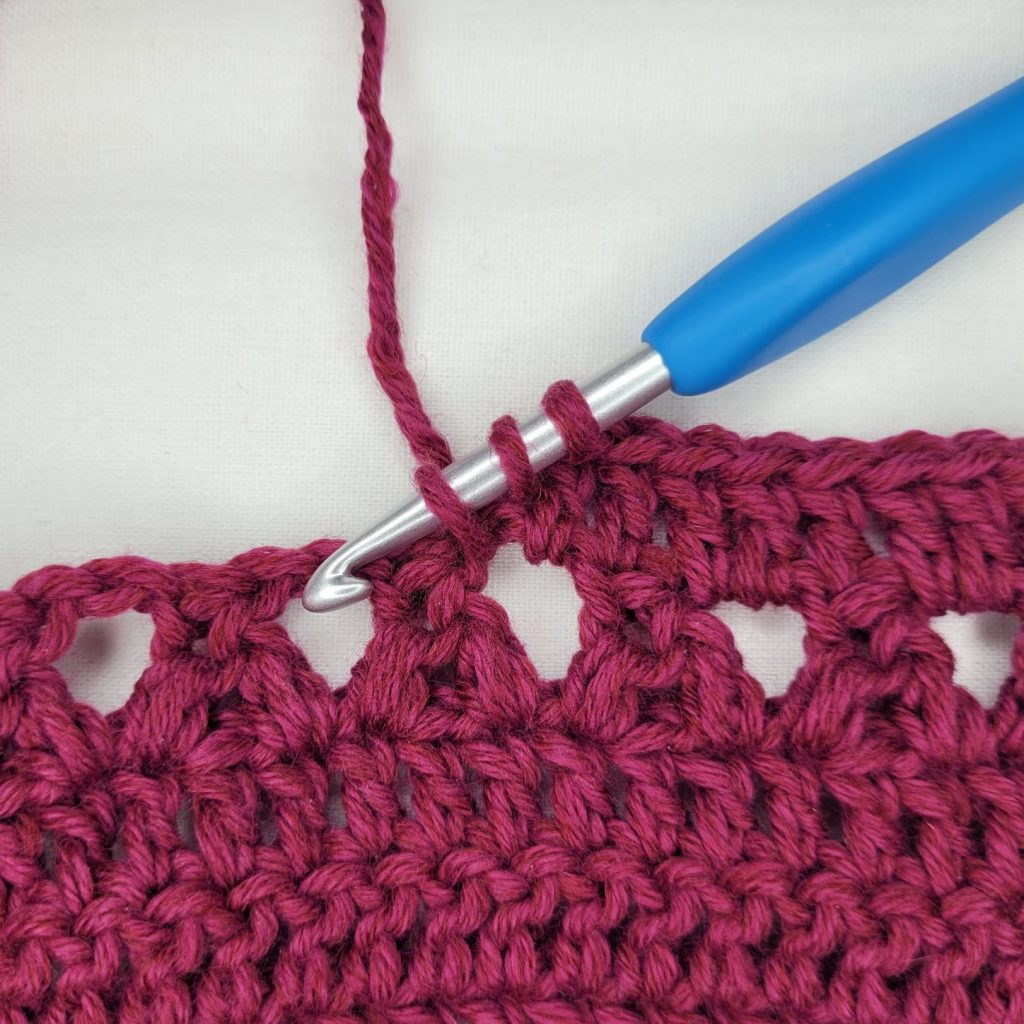
Figure 4
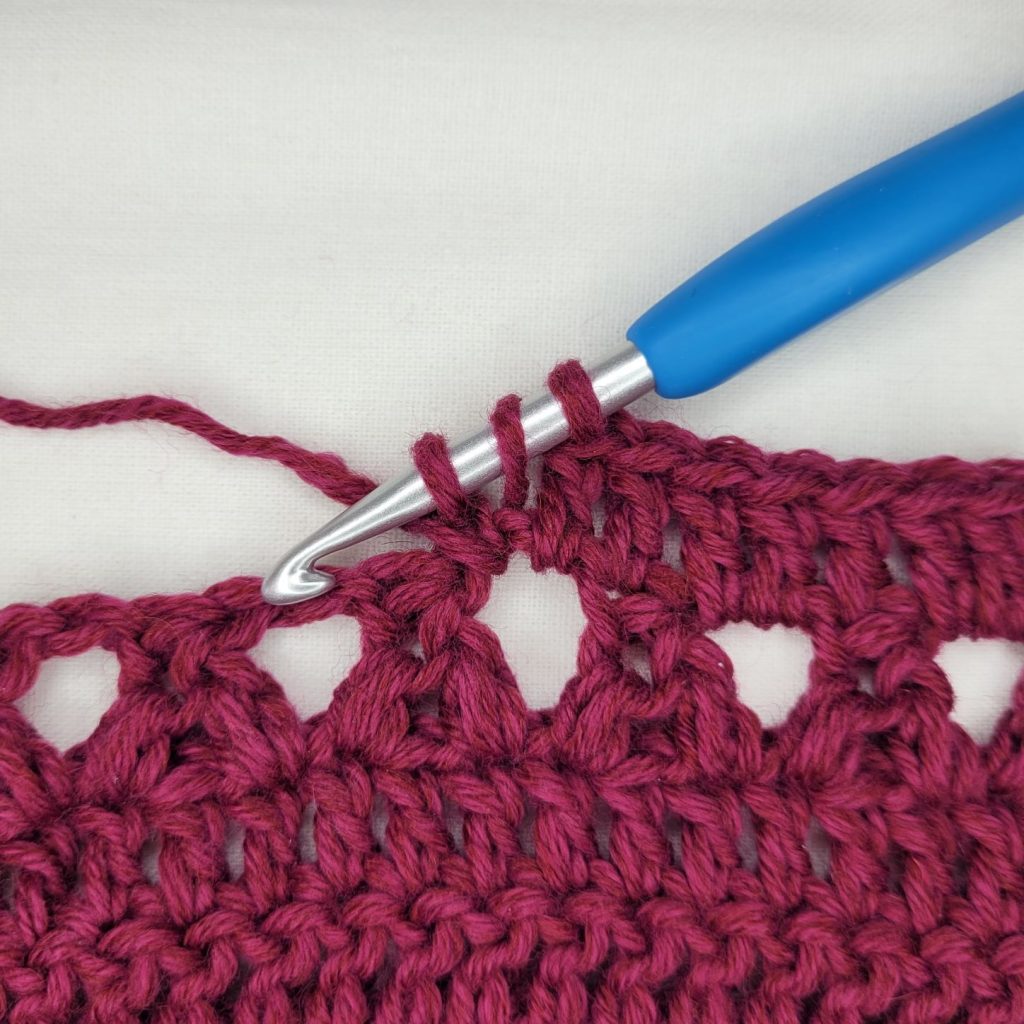
Figure 5
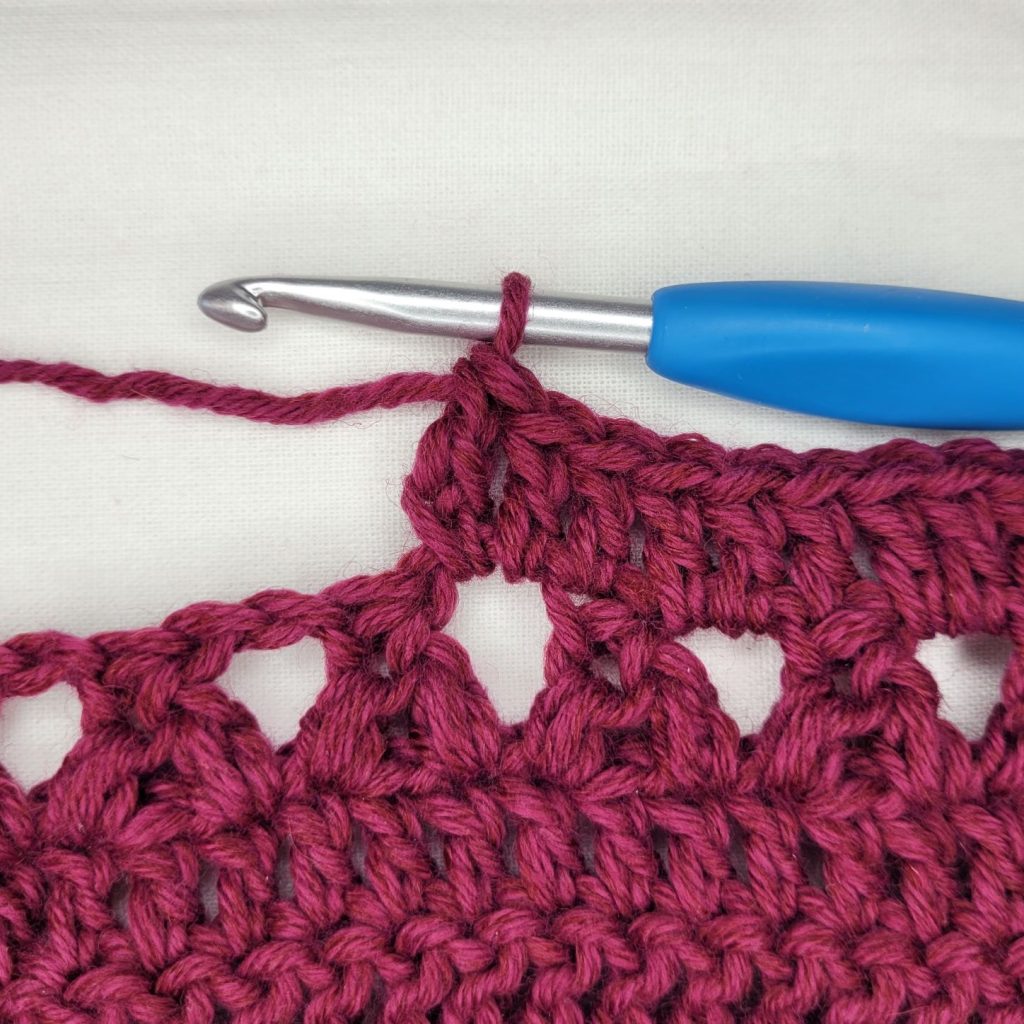
Figure 6
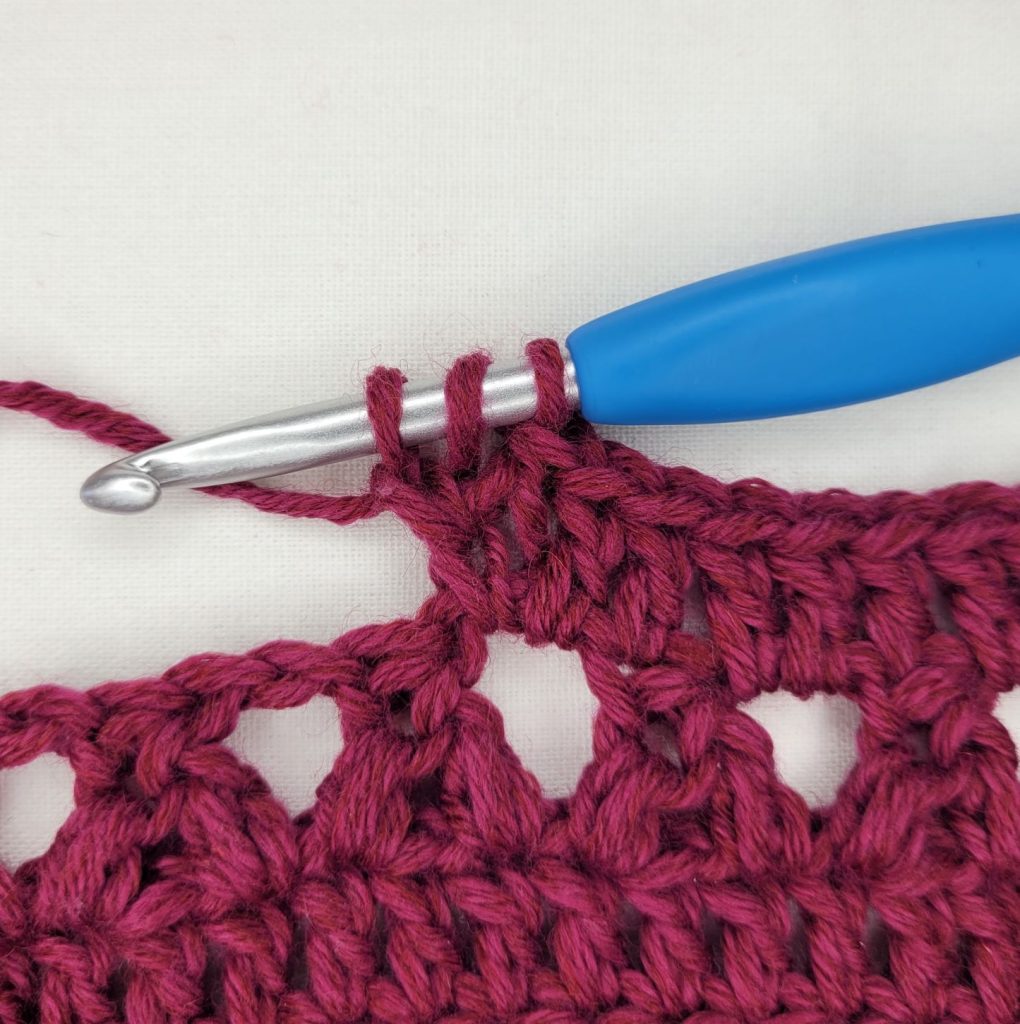
Figure 7
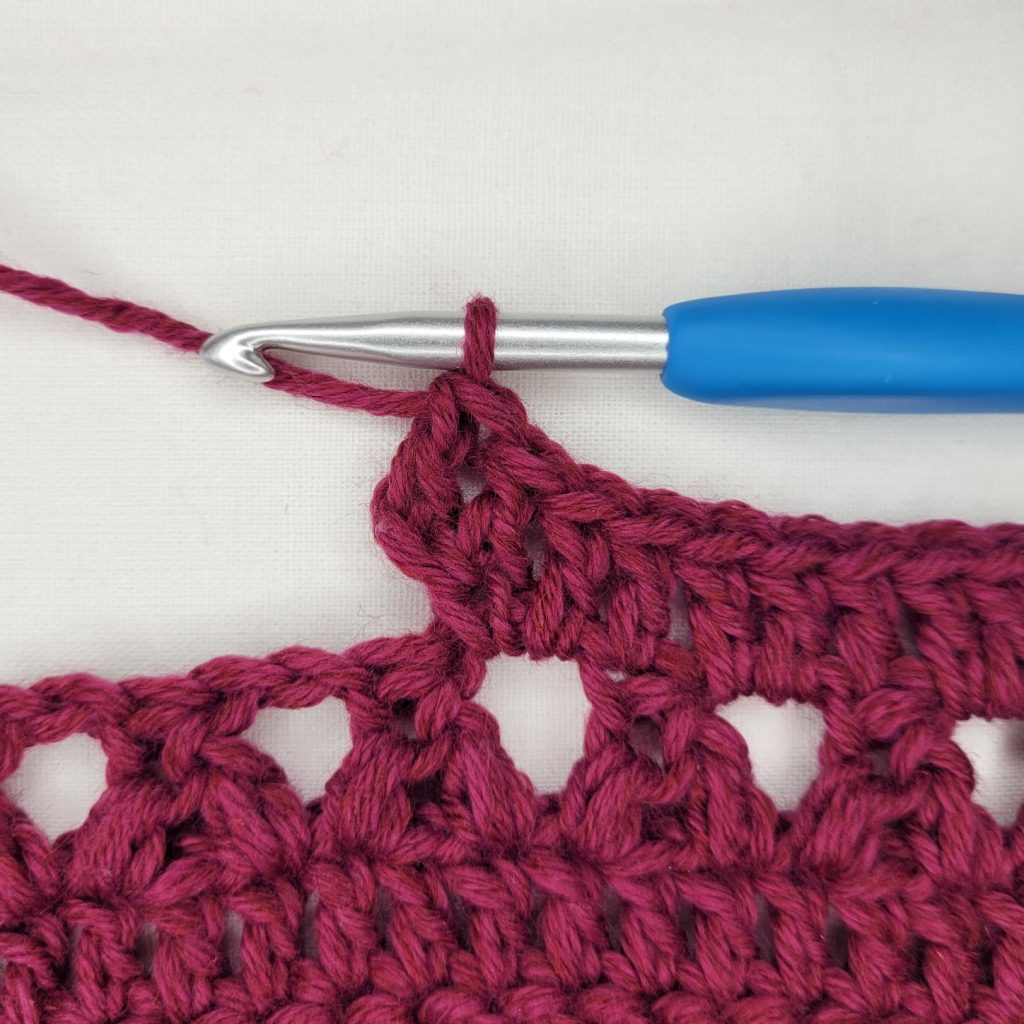
Figure 8
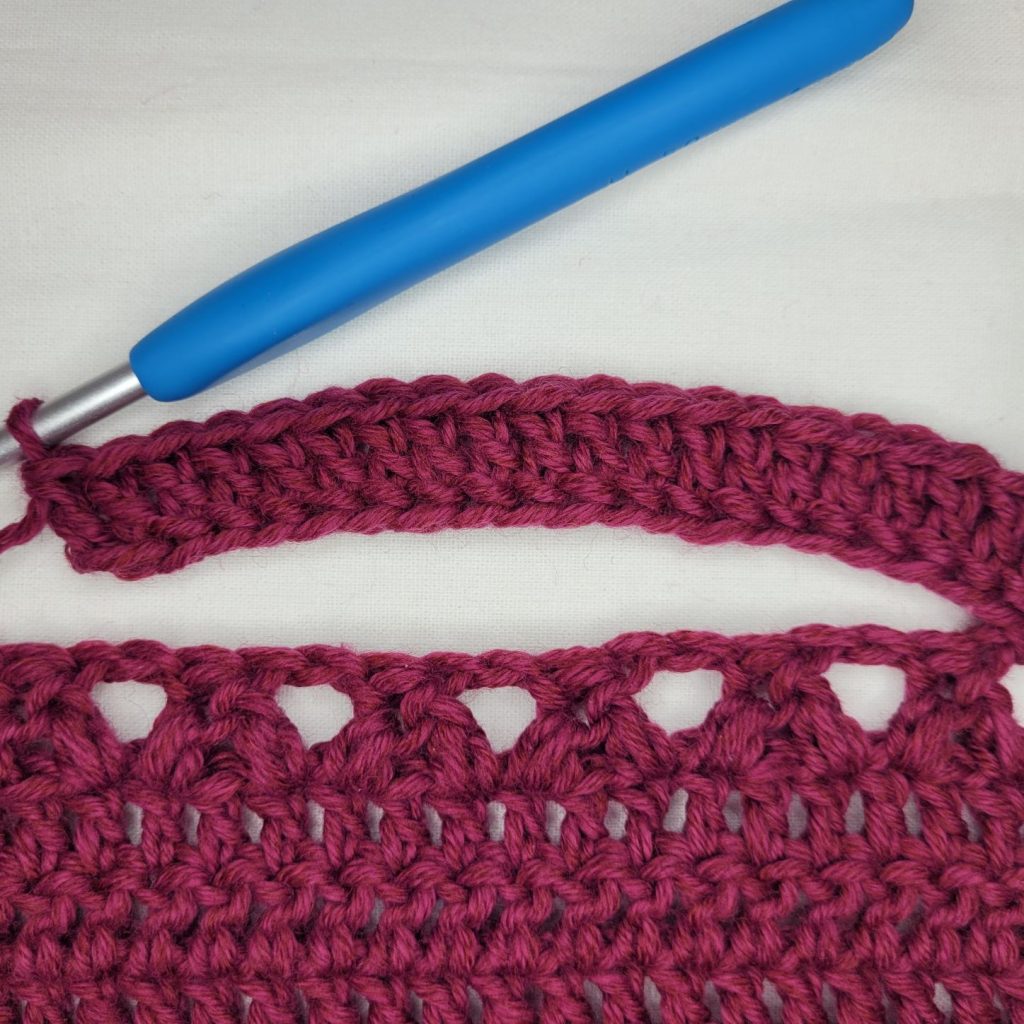
Figure 9
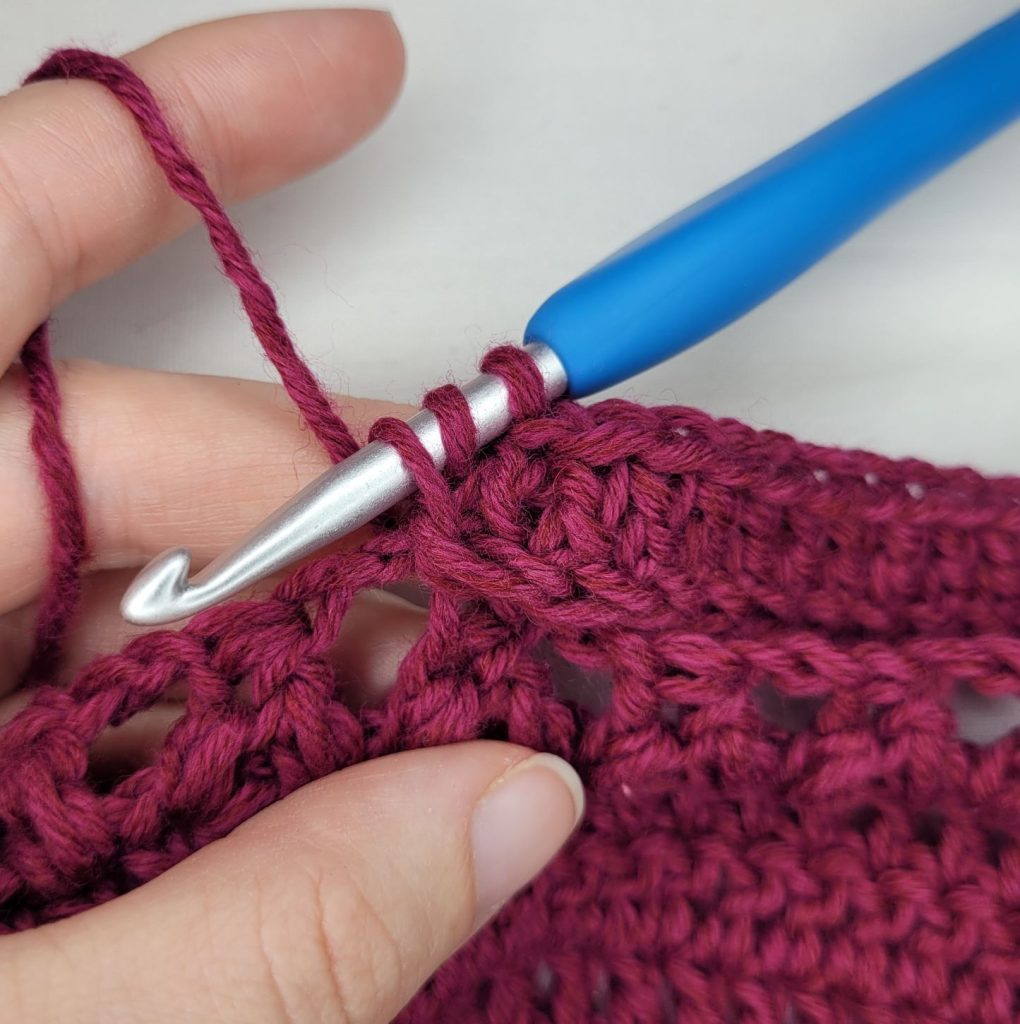
Figure 10
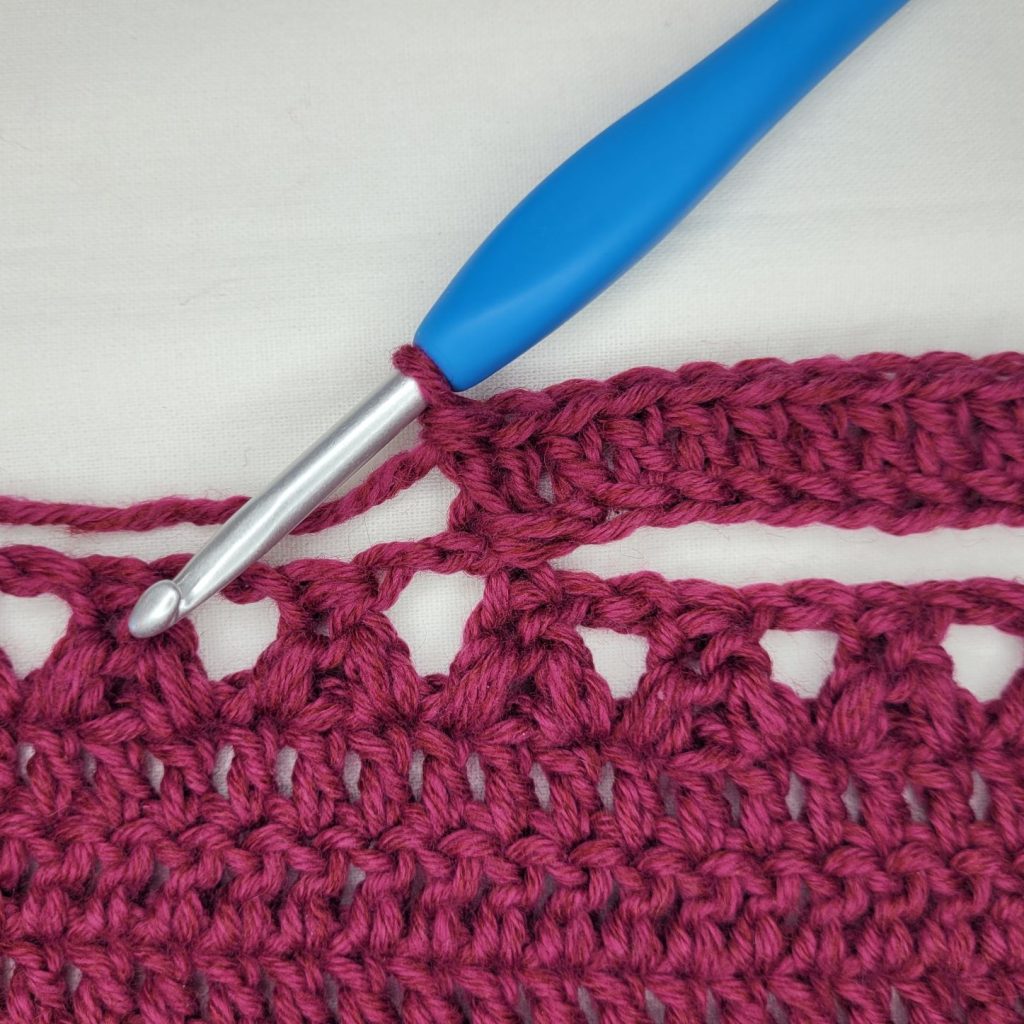
Figure 11
Beginning with a repeat of row 3 (because the pocket row counts as a repeat of row 2), continue repeating rows 2 – 7 of the Lower Body until your sweater is the desired length, minus 5 ½”. You must end on a repeat of row 6. It is recommended you work at least 10 more rows to cover up the pockets that you will be adding later. If you work too few rows, your pockets will be visible through the lace portion of the sweater body.
Note: In the last row, you will need to decrease your stitch count by 1 stitch. This means you should work a dc2tog somewhere in the last row. It doesn’t matter where you do this, though it’s better that it be near the middle.
Crochet Cardigan Pattern Free – Crossroads Cardigan
Lace
- (RS) Ch3, hdc in 1st st (counts as dc, hdc in same st). Sc in next st, sc3tog over next 3 sts, sc in next st. *(Hdc, dc, hdc) in next st. Sc in next st, sc3tog over next 3 sts, sc in next st. ** Repeat from * to ** until there is only 1 st left unworked. (Hdc, dc) in last st. Turn. See example in Figure 12. – 109 (121, 139, 151, 169, 187, 199, 217, 235) st
- (WS) Ch3, sk 2 st, (tr, ch3, tr) in next st. *Sk 2 st, hdc5tog in next st, sk 2 st, (tr, ch3, tr) in next st. ** Repeat from * to ** until there are only 3 sts left unworked. Sk 2 st, dc in last st. Turn. See example in Figure 13. – 109 (121, 139, 151, 169, 187, 199, 217, 235) st
- Ch1, sc in next st (counts as sc2tog). (Sc, hdc, dc, hdc, sc) in next ch3 sp. *Sc3tog over next 3 sts. (Sc, hdc, dc, hdc, sc) in next ch3 sp. ** Repeat from * to ** until there are only 2 sts left unworked. Sc2tog over last 2 sts. Turn. See example in Figure 14. – 109 (121, 139, 151, 169, 187, 199, 217, 235) st
- Ch5, tr in 1st st (counts as tr, ch1, tr in same st). Sk 2 st, hdc5tog in next st. *Sk 2 st, (tr, ch3, tr) in next st, sk 2 st, hdc5tog in next st. ** Repeat from * to ** until there are only 3 sts left. Sk 2 st, (tr, ch1, tr) in last st. Turn. See example in Figure 15. – 109 (121, 139, 151, 169, 187, 199, 217, 235) st
- Ch3, hdc in 1st st (counts as dc, hdc in same st). Sc in next ch1 sp, sc3tog over next 3 sts. *(Sc, Hdc, dc, hdc, sc) in next ch3 sp. Sc3tog over next 3 sts. ** Repeat from * to ** until there are only 2 sts left unworked. Sc in next ch1 sp, (hdc, dc) in last st. Turn. See example in Figure 16. – 109 (121, 139, 151, 169, 187, 199, 217, 235) st
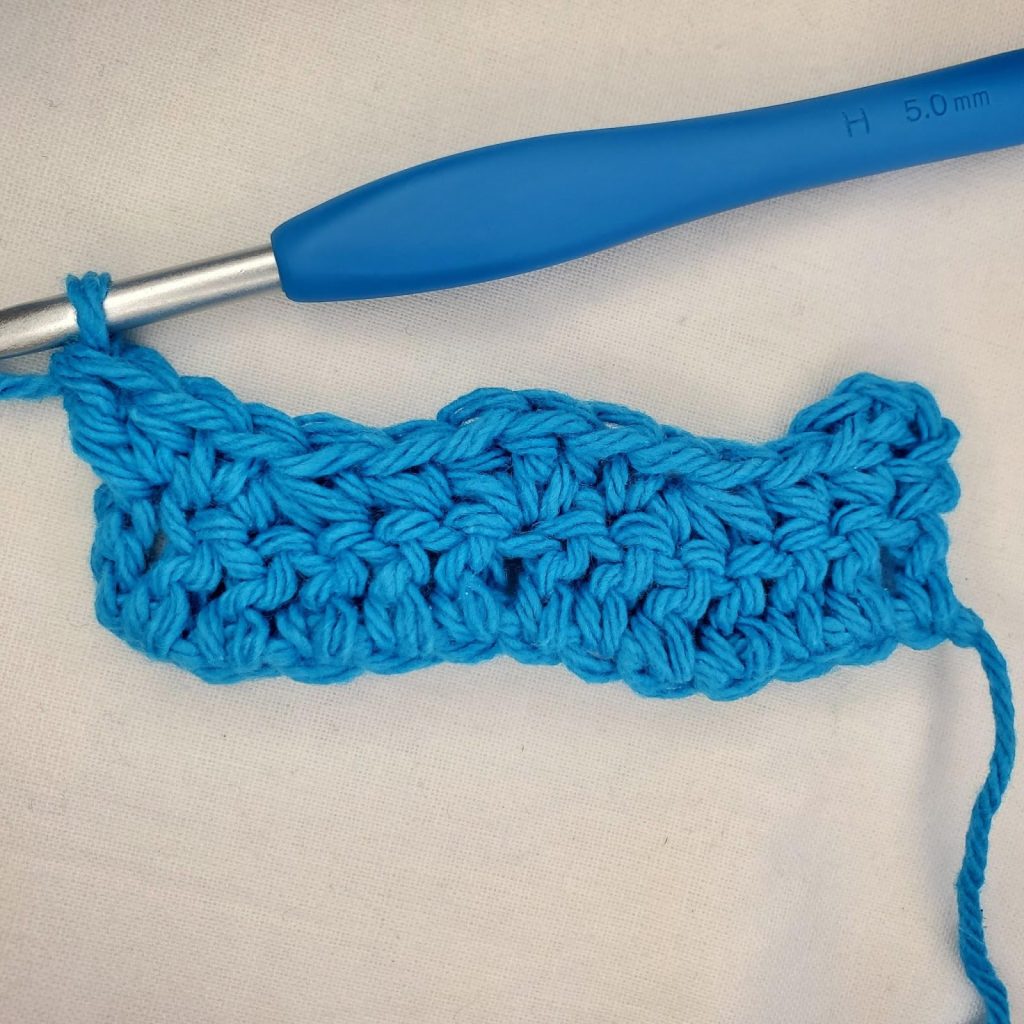
Figure 12
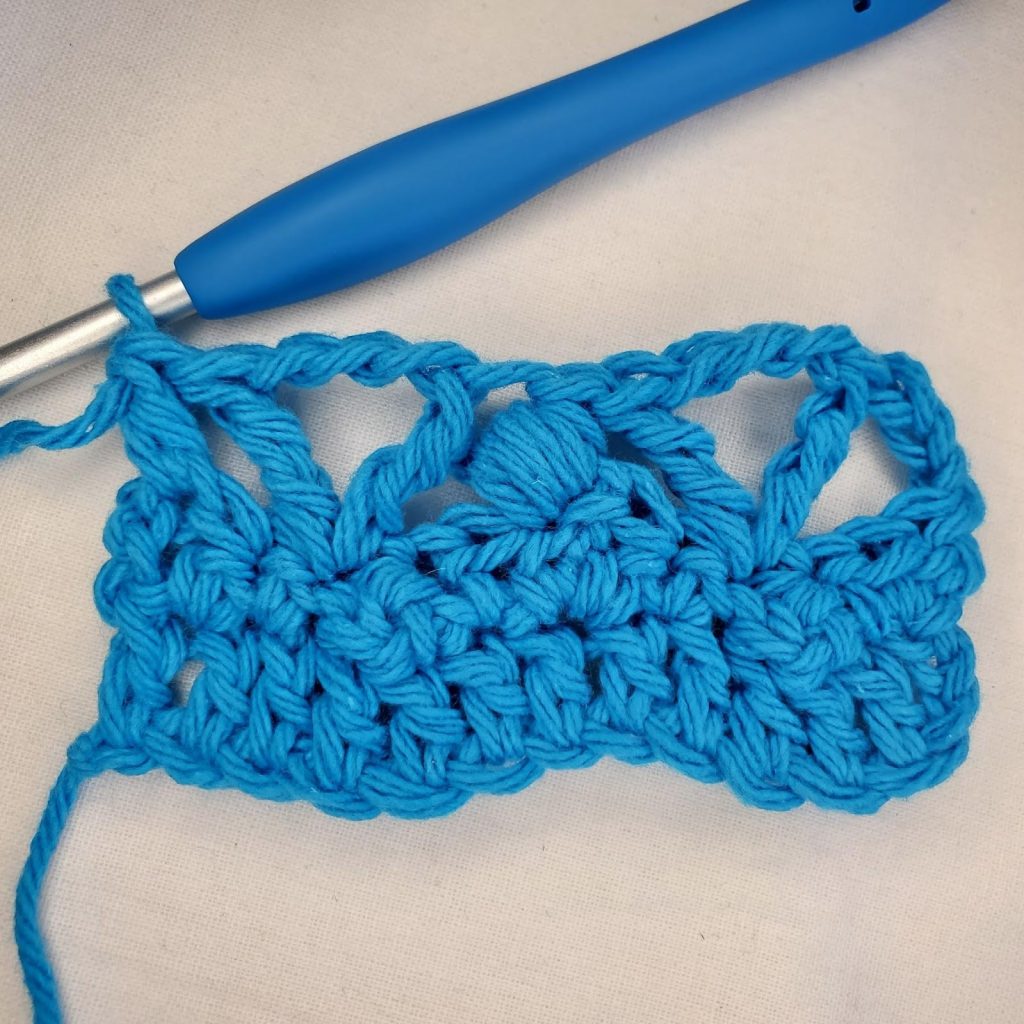
Figure 13
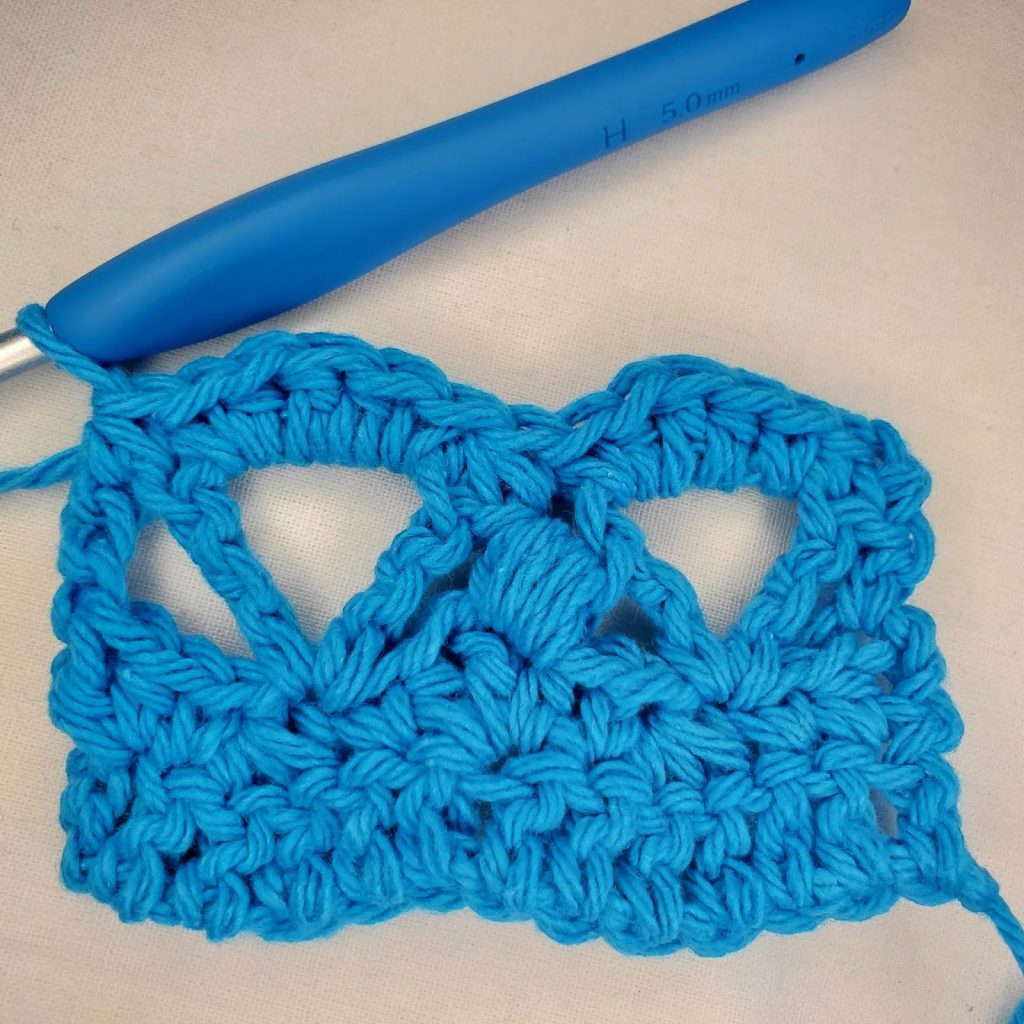
Figure 14
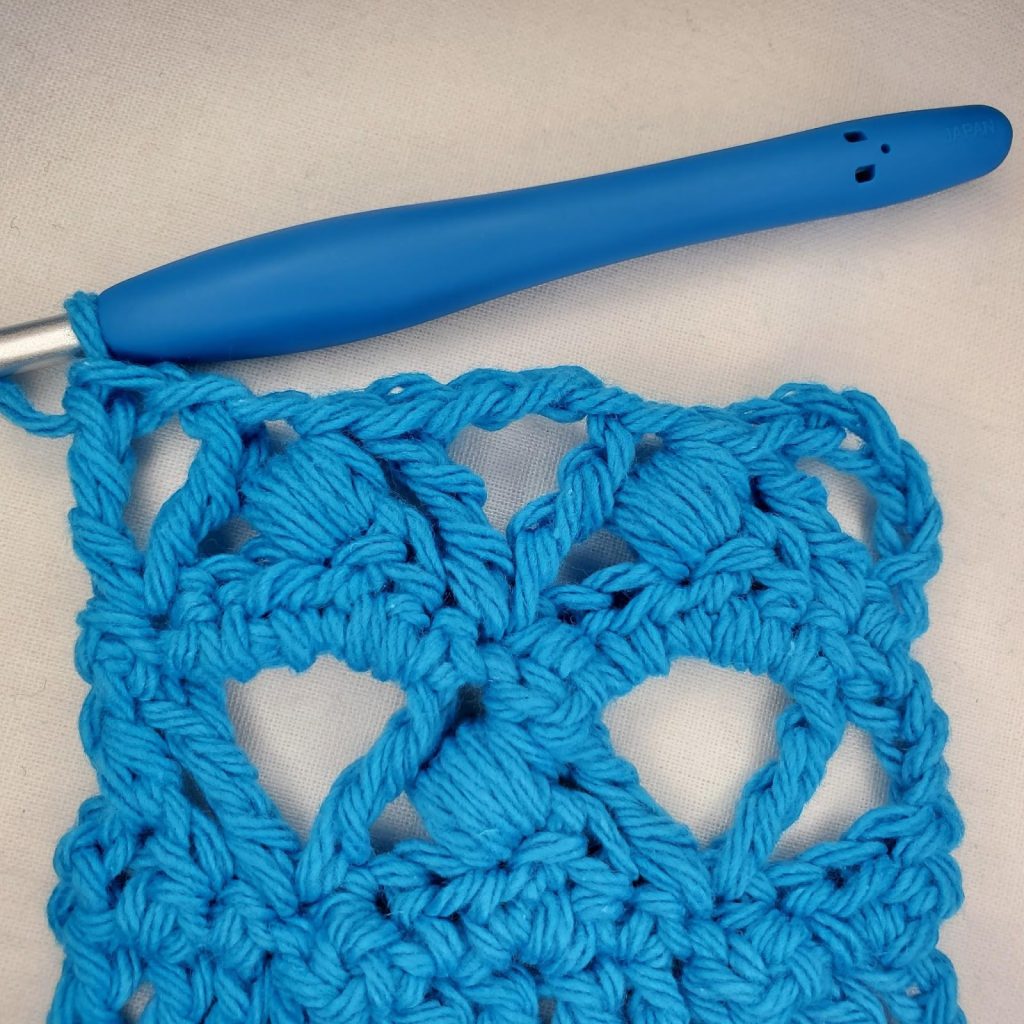
Figure 15

Figure 16
Repeat Lace rows 2 – 4.
- Ch1. Sc in 1st st and each st across. Turn. – 109 (121, 139, 151, 169, 187, 199, 217, 235) st
- Ch3. Dc in next st and each st across. Turn. – 109 (121, 139, 151, 169, 187, 199, 217, 235) st
- (RS) Ch3. Dc in next st and each st across. Do not turn. – 109 (121, 139, 151, 169, 187, 199, 217, 235) st
Edging & Ribbing
Next, we are going to add sc border around the edge of the sweater before working a ribbed edging along the front. You should still have the RS facing you.
Ch1, then sc up the side of the front, across the back of the neck, down the other side of the front, and across the bottom using the following specifications:
- Place 1sc in the end of each sc.
- Place 2sc in the end of each dc.
- Place 3sc in the end of each tr.
- Place 1sc in each st along the back of the neck.
- After working down the other side of the front, ch1 and place 1sc in each st along the bottom.
You should now have worked all the way around the sweater and be back where you started with the RS still facing you. Now we will add the ribbing to the front. Do not turn.
- (RS) Ch9. Sc in 2nd ch from hook and each ch across. Ss to side of st you just chained from (see Figure _). Ss to next st. Turn. – 8 st
- (WS) Sk 2 ss. Sc in BLO of each st across until there is 1 st left. Sc in both loops of last st (see Figure _). Turn. – 8 st
- Ch1. Sc in both loops of 1st st. Sc in BLO of each st across. Ss to next st of body 2 times (see Figure _). Turn. – 8 st
Repeat rows 2 & 3 up the front of the sweater, across the back of the neck, and down the front of the sweater. Bind off.
Sleeves
The sleeves are worked in the round, but you will still turn at the end of each round. Begin by joining your yarn at the bottom of the arm hole with the right side facing you. Work the instructions below according to your chosen arm circumference, not your body size.
Upper Arm Circumference: 10” (11”, 13”, 14”, 15”, 16 ¼”, 17 ¼”, 19 ¼”, 20 ¼”, 21 ½”, 22 ½”, 23 ½”)
Wrist Circumference: 7 ¼” (7 ¼”, 7 ¼”, 8 ½”, 8 ½”, 8 ½”, 8 ½”, 10”, 10”, 10”, 10”, 10”)
Note: I have written the sleeves to be 19” long. If you would like your sleeves to be longer or shorter than mine, simply work more or less even rounds. I find it very helpful to use a row counter when working this sleeve pattern to keep track of how many rounds I’ve worked.
- Ch1. Sc around the armhole, placing 2sc in each dc and 1sc in each sc. Ss to join to 1st st. Turn. – 38(42,50,54,58,62,66,74,78,82,86,90) st
Count 19 (21, 25, 27, 29, 31, 33, 37, 39, 41, 43, 45) sts and place a st marker in the last st.
Decrease Round: Ch3. Dc in next st and each st around until you come to the st marker. Dc2tog. Move st marker up to current row. Dc in each st until you only have 2 sts left. Dc2tog. Ss to join to 1st st. Turn.
Even Round: Ch3. Dc in next st and each st around (remember to move the st marker up to the current row). Ss to join to 1st st. Turn.
- (WS). Sizes 20 1/4″, 21 1/2″, 22 1/2″, 23 1/2″: Decrease round.
All Other Sizes: Even round.
– 38 (42, 50, 54, 58, 62, 66, 74, 76, 80, 84, 88) st - All Sizes: Even round. – 38 (42, 50, 54, 58, 62, 66, 74, 76, 80, 84, 88) st
- Sizes 19 1/4″, 20 1/4″, 21 1/2″, 22 1/2″, 23 1/2″: Decrease round.
All Other Sizes: Even round.
– 38 (42, 50, 54, 58, 62, 66, 72, 74, 78, 82, 86) st - All Sizes: Even round. – 38 (42, 50, 54, 58, 62, 66, 72, 74, 78, 82, 86) st
- Sizes 17 1/4″, 19 1/4″, 20 1/4″, 21 1/2″, 22 1/2″, 23 1/2″: Decrease round.
All Other Sizes: Even round.
– 38 (42, 50, 54, 58, 62, 64, 70, 72, 76, 80, 84) st - All Sizes: Even round. – 38 (42, 50, 54, 58, 62, 64, 70, 72, 76, 80, 84) st
- Sizes 17 1/4″, 19 1/4″, 20 1/4″, 21 1/2″, 22 1/2″, 23 1/2″: Decrease round.
All Other Sizes: Even round.
– 38 (42, 50, 54, 58, 62, 62, 68, 70, 74, 78, 82) st - All Sizes: Even round. – 38 (42, 50, 54, 58, 62, 62, 68, 70, 74, 78 ,82) st
- Sizes 16 1/4″, 17 1/4″, 19 1/4″, 20 1/4″, 21 1/2″, 22 1/2″, 23 1/2″: Decrease round.
All Other Sizes: Even round.
– 38 (42, 50, 54, 58, 60, 60, 66, 68, 72, 76, 80) st - All Sizes: Even round. – 38 (42, 50, 54, 58, 60, 60, 66, 68, 72, 76, 80) st
- Sizes 16 1/4″, 17 1/4″, 19 1/4″, 20 1/4″, 21 1/2″, 22 1/2″, 23 1/2″: Decrease round.
All Other Sizes: Even round.
– 38 (42, 50, 54, 58, 58, 58, 64, 66, 70, 74, 78) st - All Sizes: Even round. – 38 (42, 50, 54, 58, 58, 58,64, 66, 70, 74, 78) st
- Sizes 15″, 16 1/4″, 17 1/4″, 19 1/4″, 20 1/4″, 21 1/2″, 22 1/2″, 23 1/2″: Decrease round.
All Other Sizes: Even round.
– 38 (42, 50, 54, 56, 56, 56, 62, 64, 68, 72, 76) st - Sizes 13″, 14″: Decrease round.
All Other Sizes: Even round.
– 38 (42, 48, 52, 56, 56, 56, 62, 64, 68, 72, 76) st - Sizes 15″, 16 1/4″, 17 1/4″, 19 1/4″, 20 1/4″, 21 1/2″, 22 1/2″, 23 1/2″: Decrease round.
All Other Sizes: Even round.
– 38 (42, 48, 52, 54, 54, 54, 60, 62, 66, 70, 74) st - All Sizes: Even round. – 38 (42, 48, 52, 54, 54, 54, 60, 62, 66, 70, 74) st
- All Sizes: Decrease round. – 36 (40, 46, 50, 52, 52, 52, 58, 60, 64, 68, 72) st
- All Sizes: Even round. – 36 (40, 46, 50, 52, 52, 52, 58, 60, 64, 68, 72) st
- Sizes 15″, 16 1/4″, 17 1/4″, 19 1/4″, 20 1/4″, 21 1/2″, 22 1/2″, 23 1/2″: Decrease round.
All Other Sizes: Even round.
– 36 (40, 46, 50, 50, 50, 50, 56, 58, 62, 66, 70) st - Sizes 13″, 14″: Decrease round.
All Other Sizes: Even round.
– 36 (40, 44, 48, 50, 50, 50, 56, 58, 62, 66, 70) st - Sizes 15″, 16 1/4″, 17 1/4″, 19 1/4″, 20 1/4″, 21 1/2″, 22 1/2″, 23 1/2″: Decrease round.
All Other Sizes: Even round.
– 36 (40, 44, 48, 48, 48, 48, 54, 56, 60, 64, 68) st - Sizes 11″: Decrease round.
All Other Sizes: Even round.
– 36 (38, 44, 48, 48, 48, 48, 54, 56, 60, 64, 68) st - Sizes 13″, 14″, 15″, 16 1/4″, 17 1/4″, 19 1/4″, 20 1/4″, 21 1/2″, 22 1/2″, 23 1/2″: Decrease round.
All Other Sizes: Even round.
– 36 (38, 42, 46, 46, 46, 46, 52, 54, 58, 62, 66) st - Sizes 23 1/2″: Decrease round.
All Other Sizes: Even round.
– 36 (38, 42, 46, 46, 46, 46, 52, 54, 58, 62, 64) st - Sizes 13″, 14″, 15″, 16 1/4″, 17 1/4″, 19 1/4″, 20 1/4″, 21 1/2″, 22 1/2″, 23 1/2″: Decrease round.
All Other Sizes: Even round.
– 36 (38, 40, 44, 44, 44, 44, 50, 52, 56, 60, 62) st - Sizes 23 1/2″: Decrease round.
All Other Sizes: Even round.
– 36 (38, 40, 44, 44, 44, 44, 50, 52, 56, 60, 60) st - All Sizes: Decrease round.
– 34 (36, 38, 42, 42, 42, 42, 48, 50, 54, 58, 58) st - Sizes 22 1/2″, 23 1/2″: Decrease round.
All Other Sizes: Even round.
– 34 (36, 38, 42, 42, 42, 42, 48, 50, 54, 56, 56) st - Sizes 13″, 14″, 15″, 16 1/4″, 17 1/4″, 19 1/4″, 20 1/4″, 21 1/2″, 22 1/2″, 23 1/2″: Decrease round. All Other Sizes: Even round.
– 34 (36, 36, 40, 40, 40, 40, 46, 48, 52, 54, 54) st - Sizes 11″, 22 1/2″, 23 1/2″: Decrease round.
All Other Sizes: Even round.
– 34 (34, 36, 40, 40, 40, 40, 46, 48, 52, 52, 52) st - Sizes 13″, 14″, 15″, 16 1/4″, 17 1/4″, 19 1/4″, 20 1/4″, 21 1/2″, 22 1/2″, 23 1/2″: Decrease round.
All Other Sizes: Even round.
– 34 (34, 34, 38, 38, 38, 38, 44, 46, 50, 50, 50) st - Sizes 21 1/2″, 22 1/2″, 23 1/2″: Decrease round.
All Other Sizes: Even round.
– 34 (34, 34, 38, 38, 38, 38, 44, 46, 48, 48, 48) st - All Sizes: Decrease round.
– 32 (32, 32, 36, 36, 36, 36, 42, 44, 46, 46, 46) st - Sizes 21 1/2″, 22 1/2″, 23 1/2″: Decrease round.
All Other Sizes: Even round.
– 32 (32, 32, 36, 36, 36, 36, 42, 44, 44, 44, 44) st - All Sizes: Decrease round. – 30 (30, 30, 34, 34, 34, 34, 40, 42, 42, 42, 42) st
- Sizes 20 1/4″, 21 1/2″, 22 1/2″, 23 1/2″: Decrease round.
All Other Sizes: Even round.
– 30 (30, 30, 34, 34, 34, 34, 40, 40, 40, 40, 40) st - All Sizes: Decrease round. – 28 (28, 28, 32, 32, 32, 32, 38, 38, 38, 38, 38) st
Cuffs
- Ch1. Sc in 1st st and each st around. Ss to join to 1st st. Do not turn. – 28 (28, 28, 32, 32, 32, 32, 38, 38, 38, 38, 38) st
We will now work the ribbed cuff. You should still have the RS facing you.
- (RS) Ch6. Sc in 2nd ch from hook and each ch across. Ss to 1st st of the sleeve (the st you just chained from), ss to next st of the sleeve (see Figure 17). Turn. – 5 st
- (WS) Sk 2 ss. Sc in BLO of each st across until there is 1 st left. Sc in both loops of last st (see Figure 18). Turn. – 5 st
- Ch1. Sc in both loops of 1st st. Sc in BLO of each st across. Ss to next st of sleeve body 2 times. (see Figure 19). Turn. – 5 st
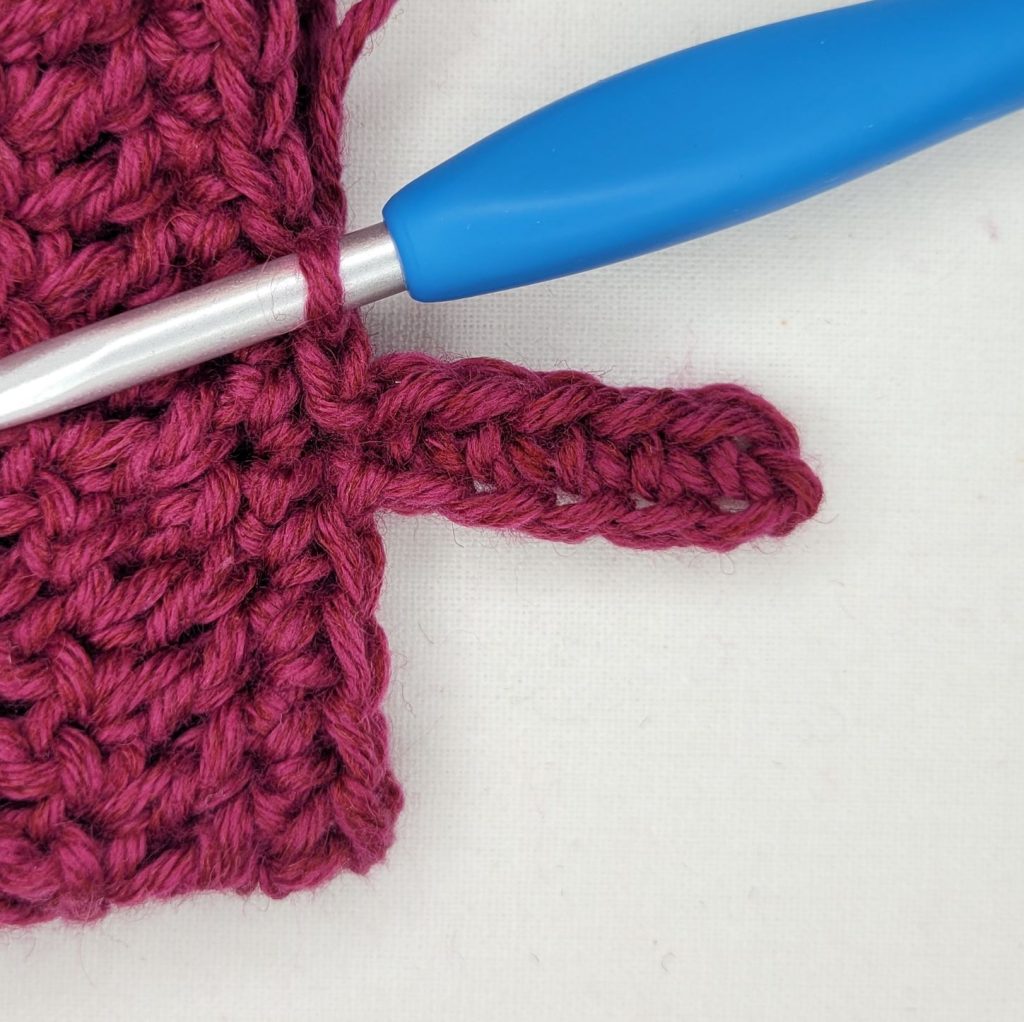
Figure 17
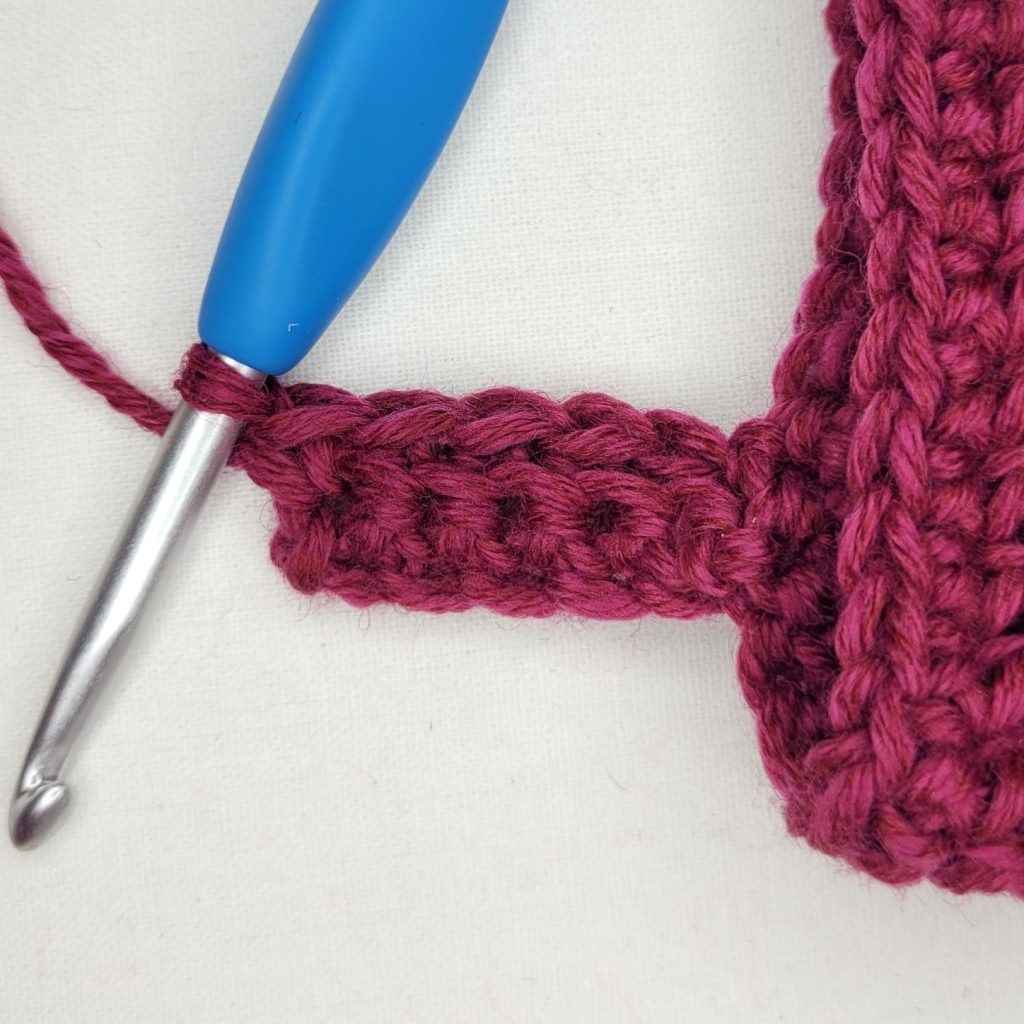
Figure 18
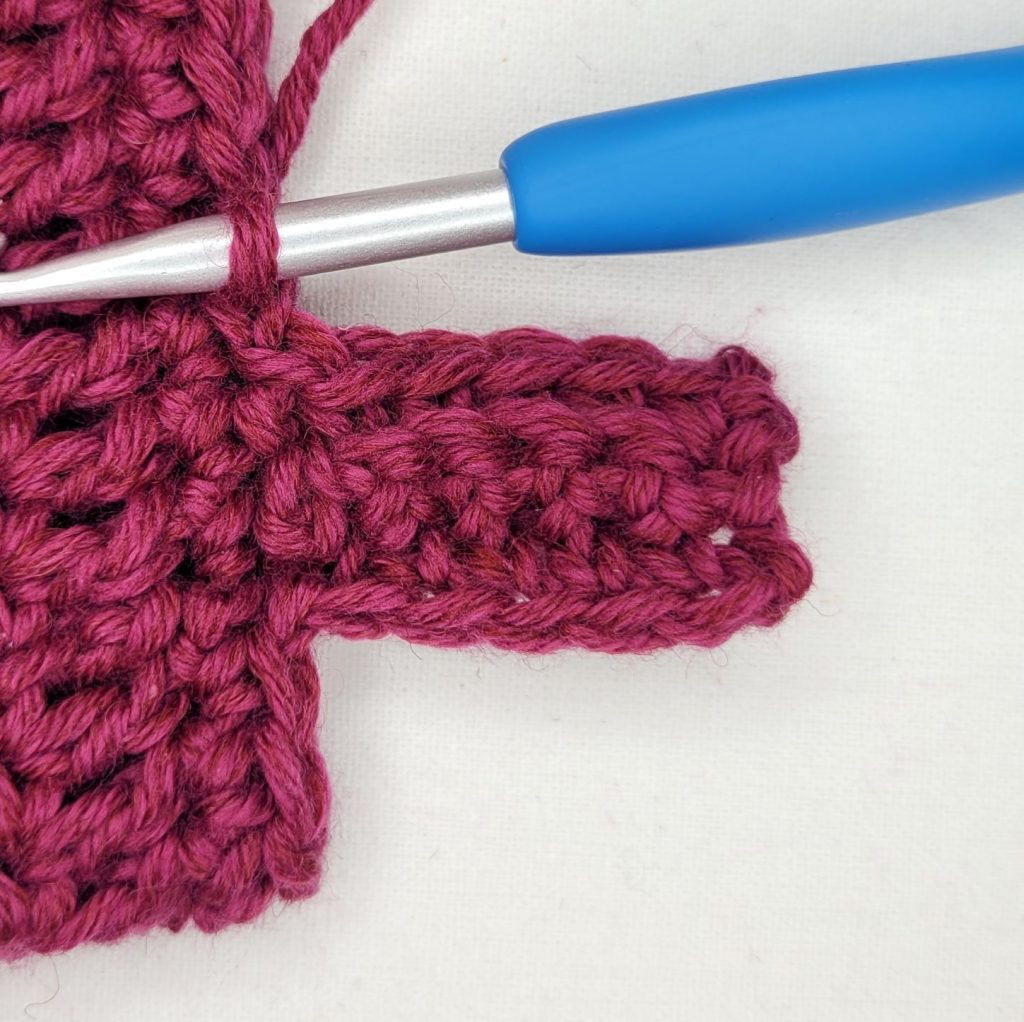
Figure 19
Repeat rows 2 & 3 around the edge of the sleeve until all sts have been worked, ending with a repeat of row 2. Turn the sleeve so the WS is facing you. SS the edges of the cuff closed, working through the bottom bar of the 1st row and the BLO of the last row (see Figures 20 & 21). Your seam should be almost invisible once you turn the sleeve right side out (see Figure 22). Bind off.
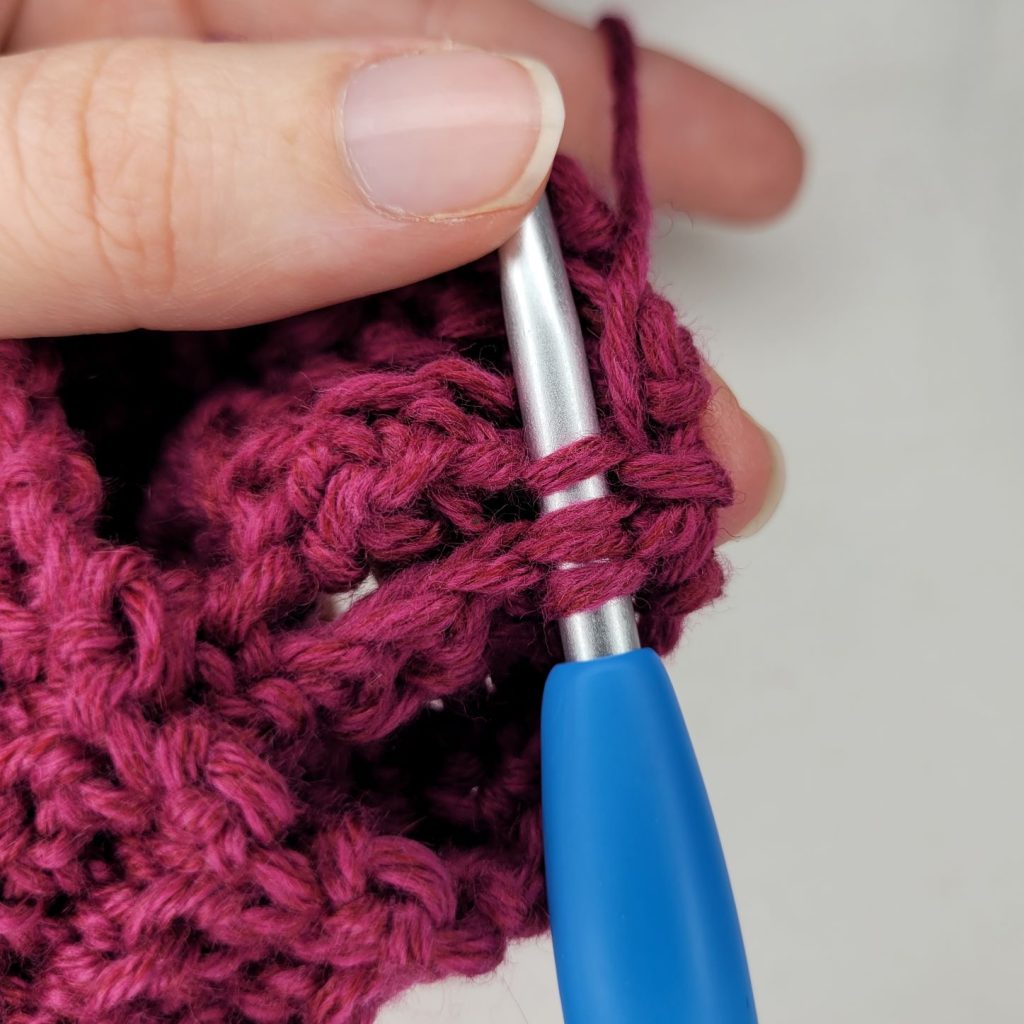
Figure 20
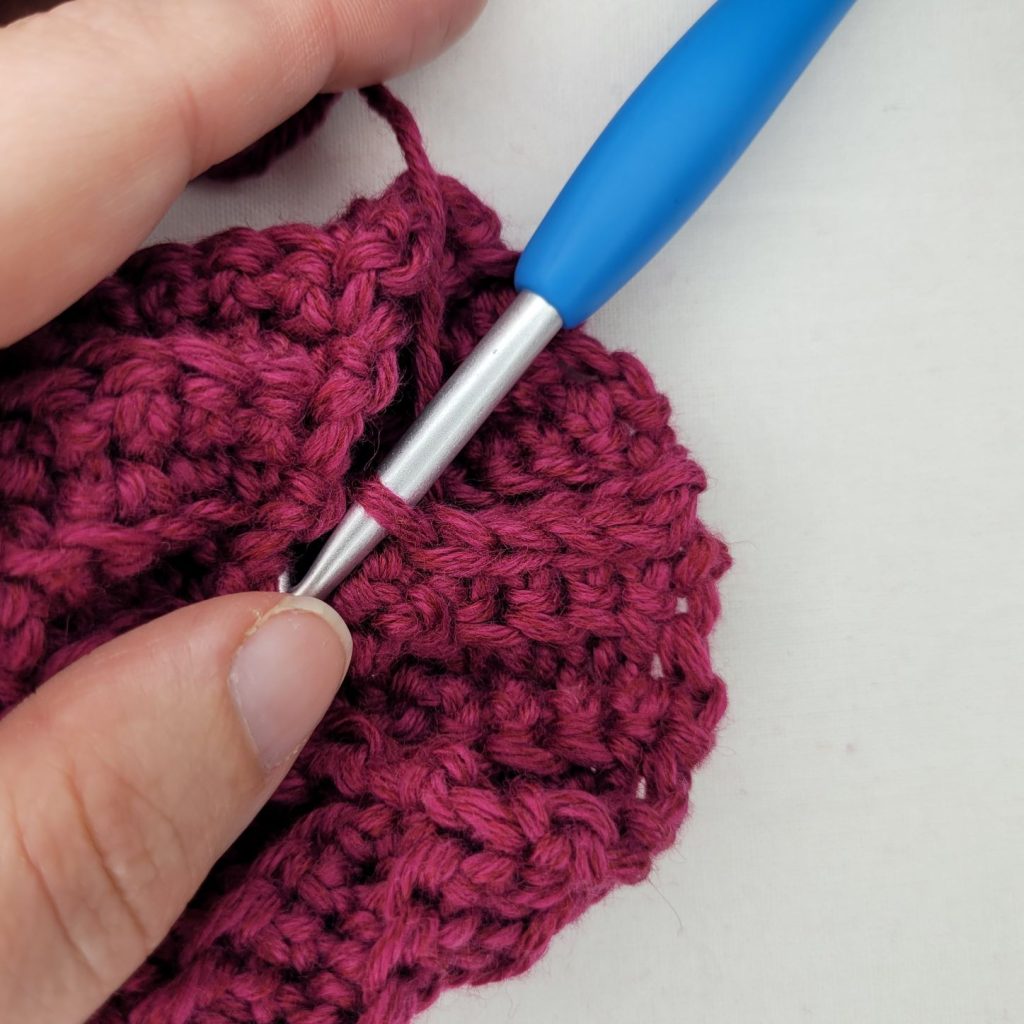
Figure 21
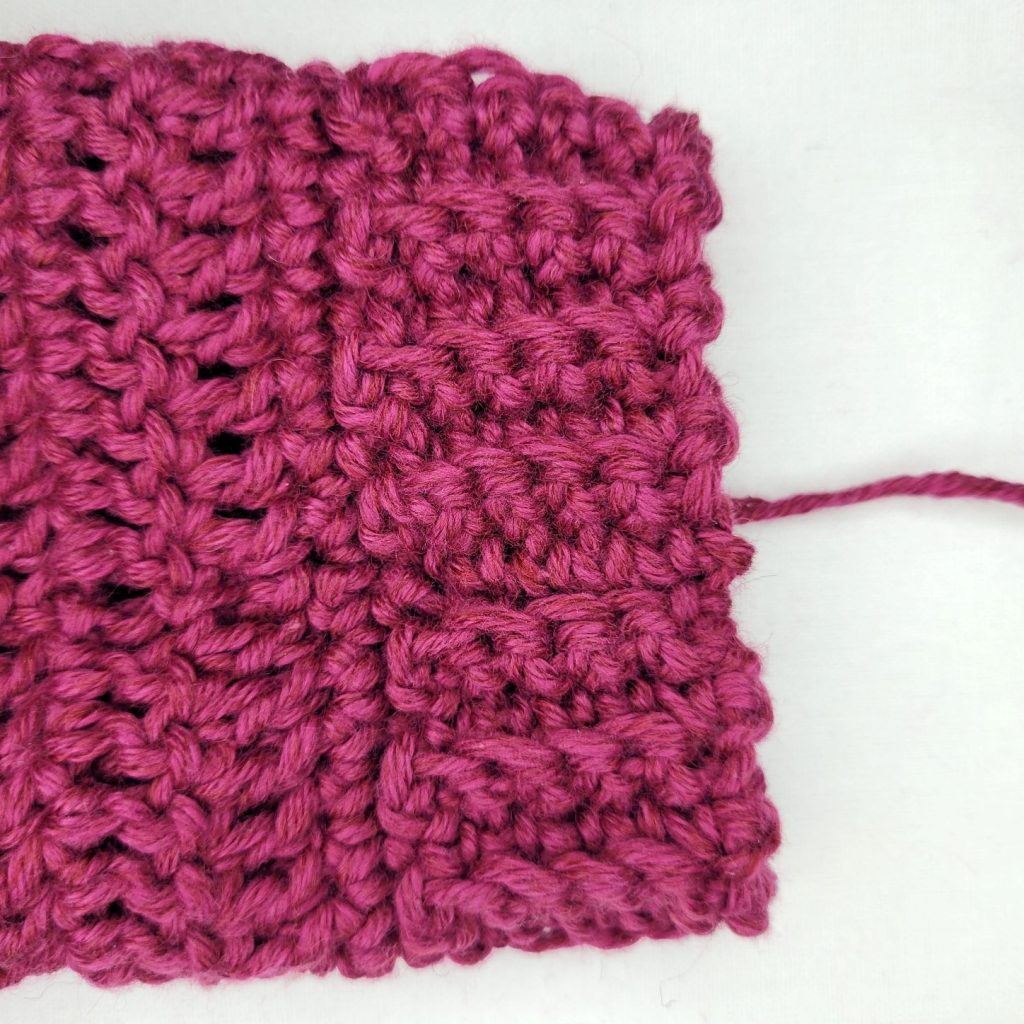
Figure 22
Pockets
We will now make 2 pocket inserts and attach them to the sweater. Begin with a yarn tail at least 12” long (for sewing the bottom of the pocket closed).
Ch40. Ss to 1st ch to form a ring.
- Ch3. Dc in next ch and each ch around. Ss to join to 1st st. Turn. – 40 st
- Ch3. Dc in next st and each st around. Ss to join to 1st st. Turn. – 40 st
Repeat round 2 until you have a total of 12 rounds. Use the starting yarn tail to whip stitch the bottom of the pocket closed.
You can either bind off and whip stitch the pocket insert to the pocket opening or you can ss the insert to the opening as I have.
To do this, I began by slip stitching the front of the pocket with the right side facing me (see Figure 23). Once I got around to the back of the pocket, I adjusted my hook and yarn so that I could ss the back with the wrong side facing me (see Figure 24). This gave my pocket a clean look without any visible seams (see Figure 25).
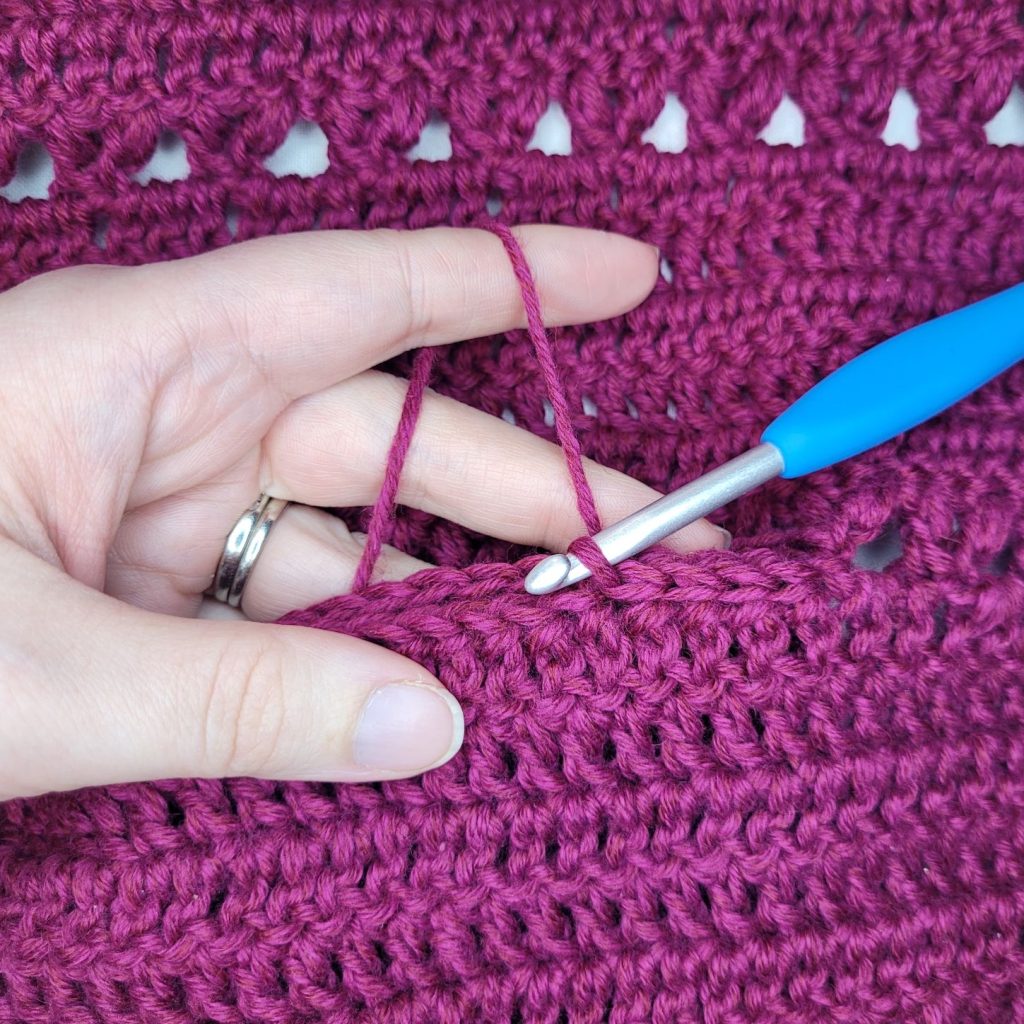
Figure 23
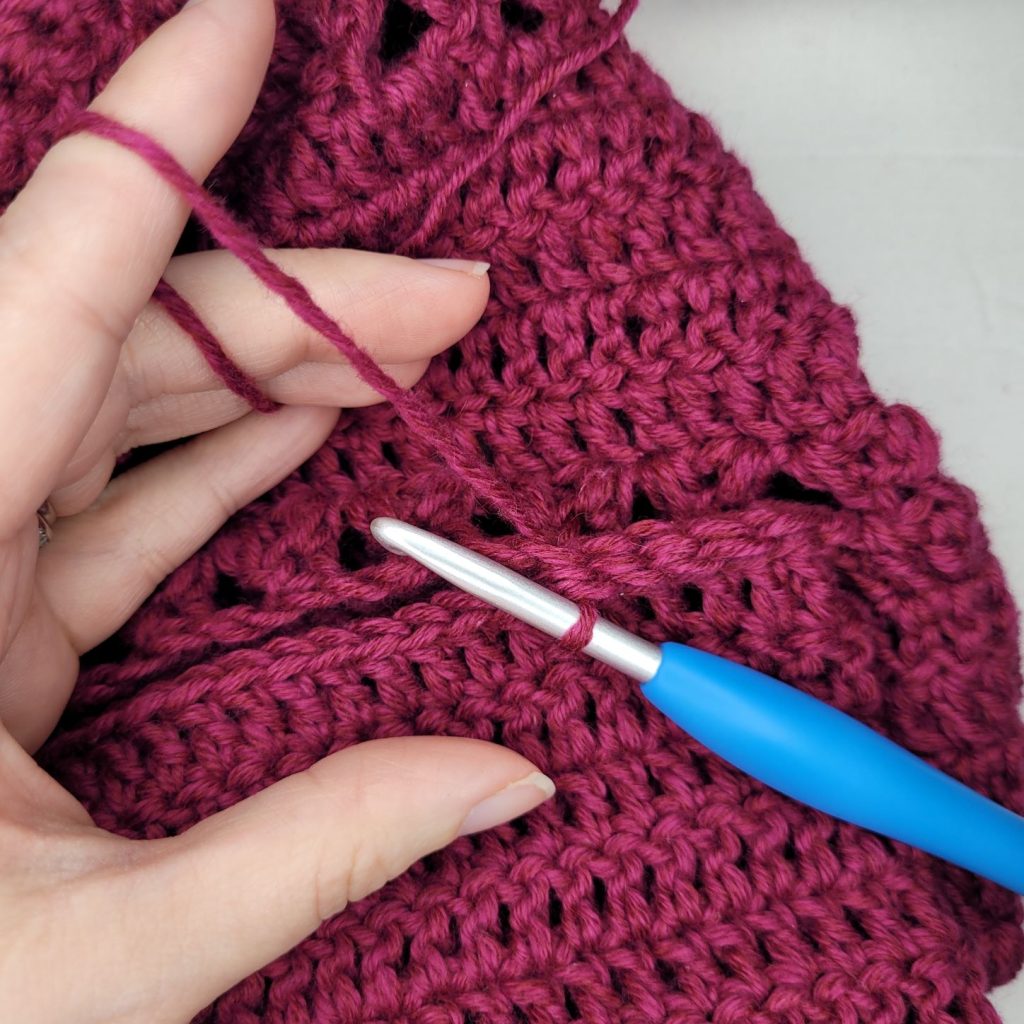
Figure 24
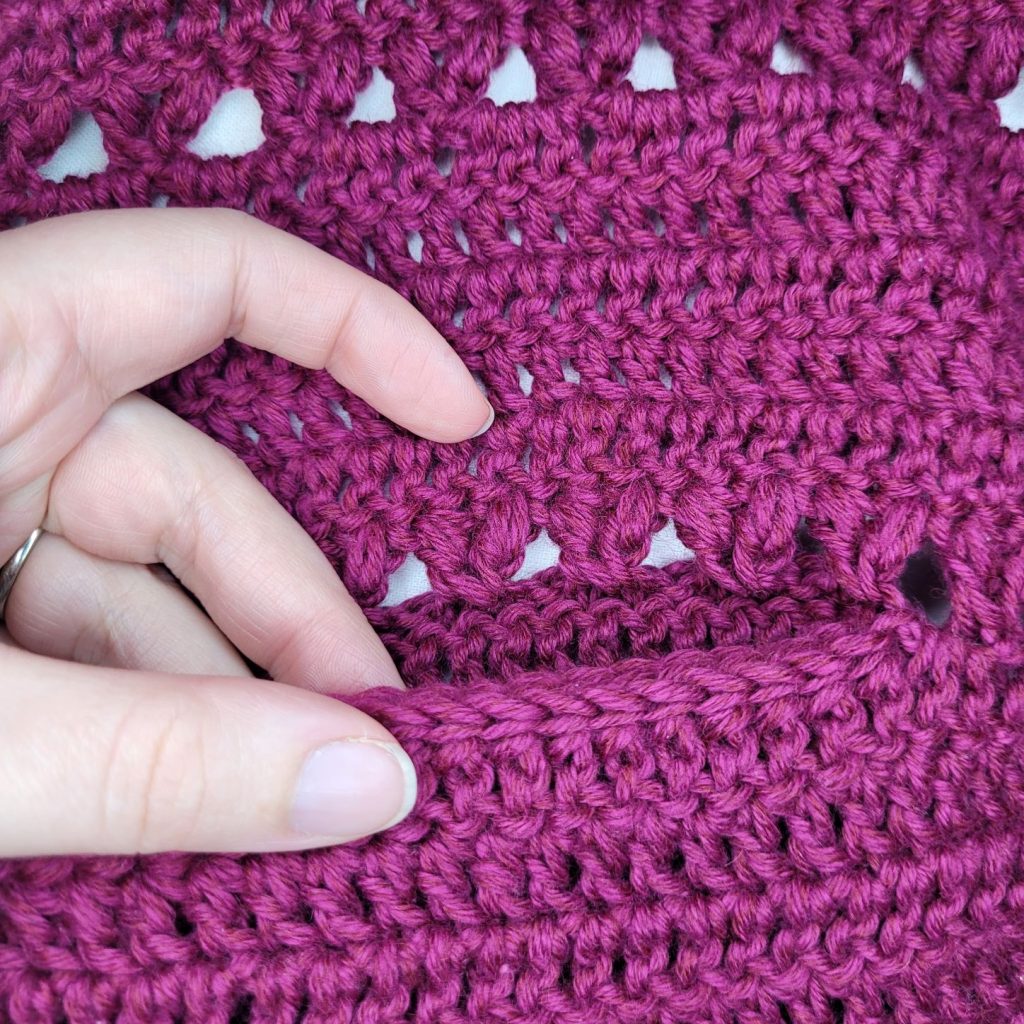
Figure 25
Weave in your ends, and you’re done!
I hope you love your new crochet cardigan, and I look forward to seeing all of your beautiful pictures on Ravelry!
If you’d like to know when I post new patterns and tutorials like the Free Crochet Cardigan Pattern – Crossroads Cardigan, head on over to my Facebook and Instagram and give me a like and a follow!
If you enjoyed The Free Crochet Cardigan Pattern – Crossroads Cardigan, you may want to check out my other designs!
Crochet Cardigan Pattern Free – Crossroads Cardigan
And until next time… Happy Hooking! 😉