
The Free Crochet Cardigan Pattern – Trailhead Cardigan is copyrighted by I Need It Crochet. You may not copy, share, change, or sell the pattern itself. Also, you may not claim this pattern as your own. All pictures contained in this pattern fall under the copyright and may not be used.
Finished items made from the Free Crochet Cardigan Pattern – Trailhead Cardigan belong to you, and you may do what you wish with them. If you choose to sell them on Etsy, I would very much appreciate it if you credited me as the pattern designer.
Where Can I Buy The Pdf?
The entire pattern is available to view for free on this page (you just have to scroll down to see it). But if you would prefer to have a printable pdf copy of the pattern, you can purchase it for a small fee from my Ravelry and Etsy stores. Just click the graphics below.
This pattern is 13 pages long and contains 33 pictures to help you along the way. A printable pdf will be easier to follow, and you can make notes on it as you go. I find it to be the easier option. But if you like to use the online version, it is here 24/7 for you to view. Enjoy!

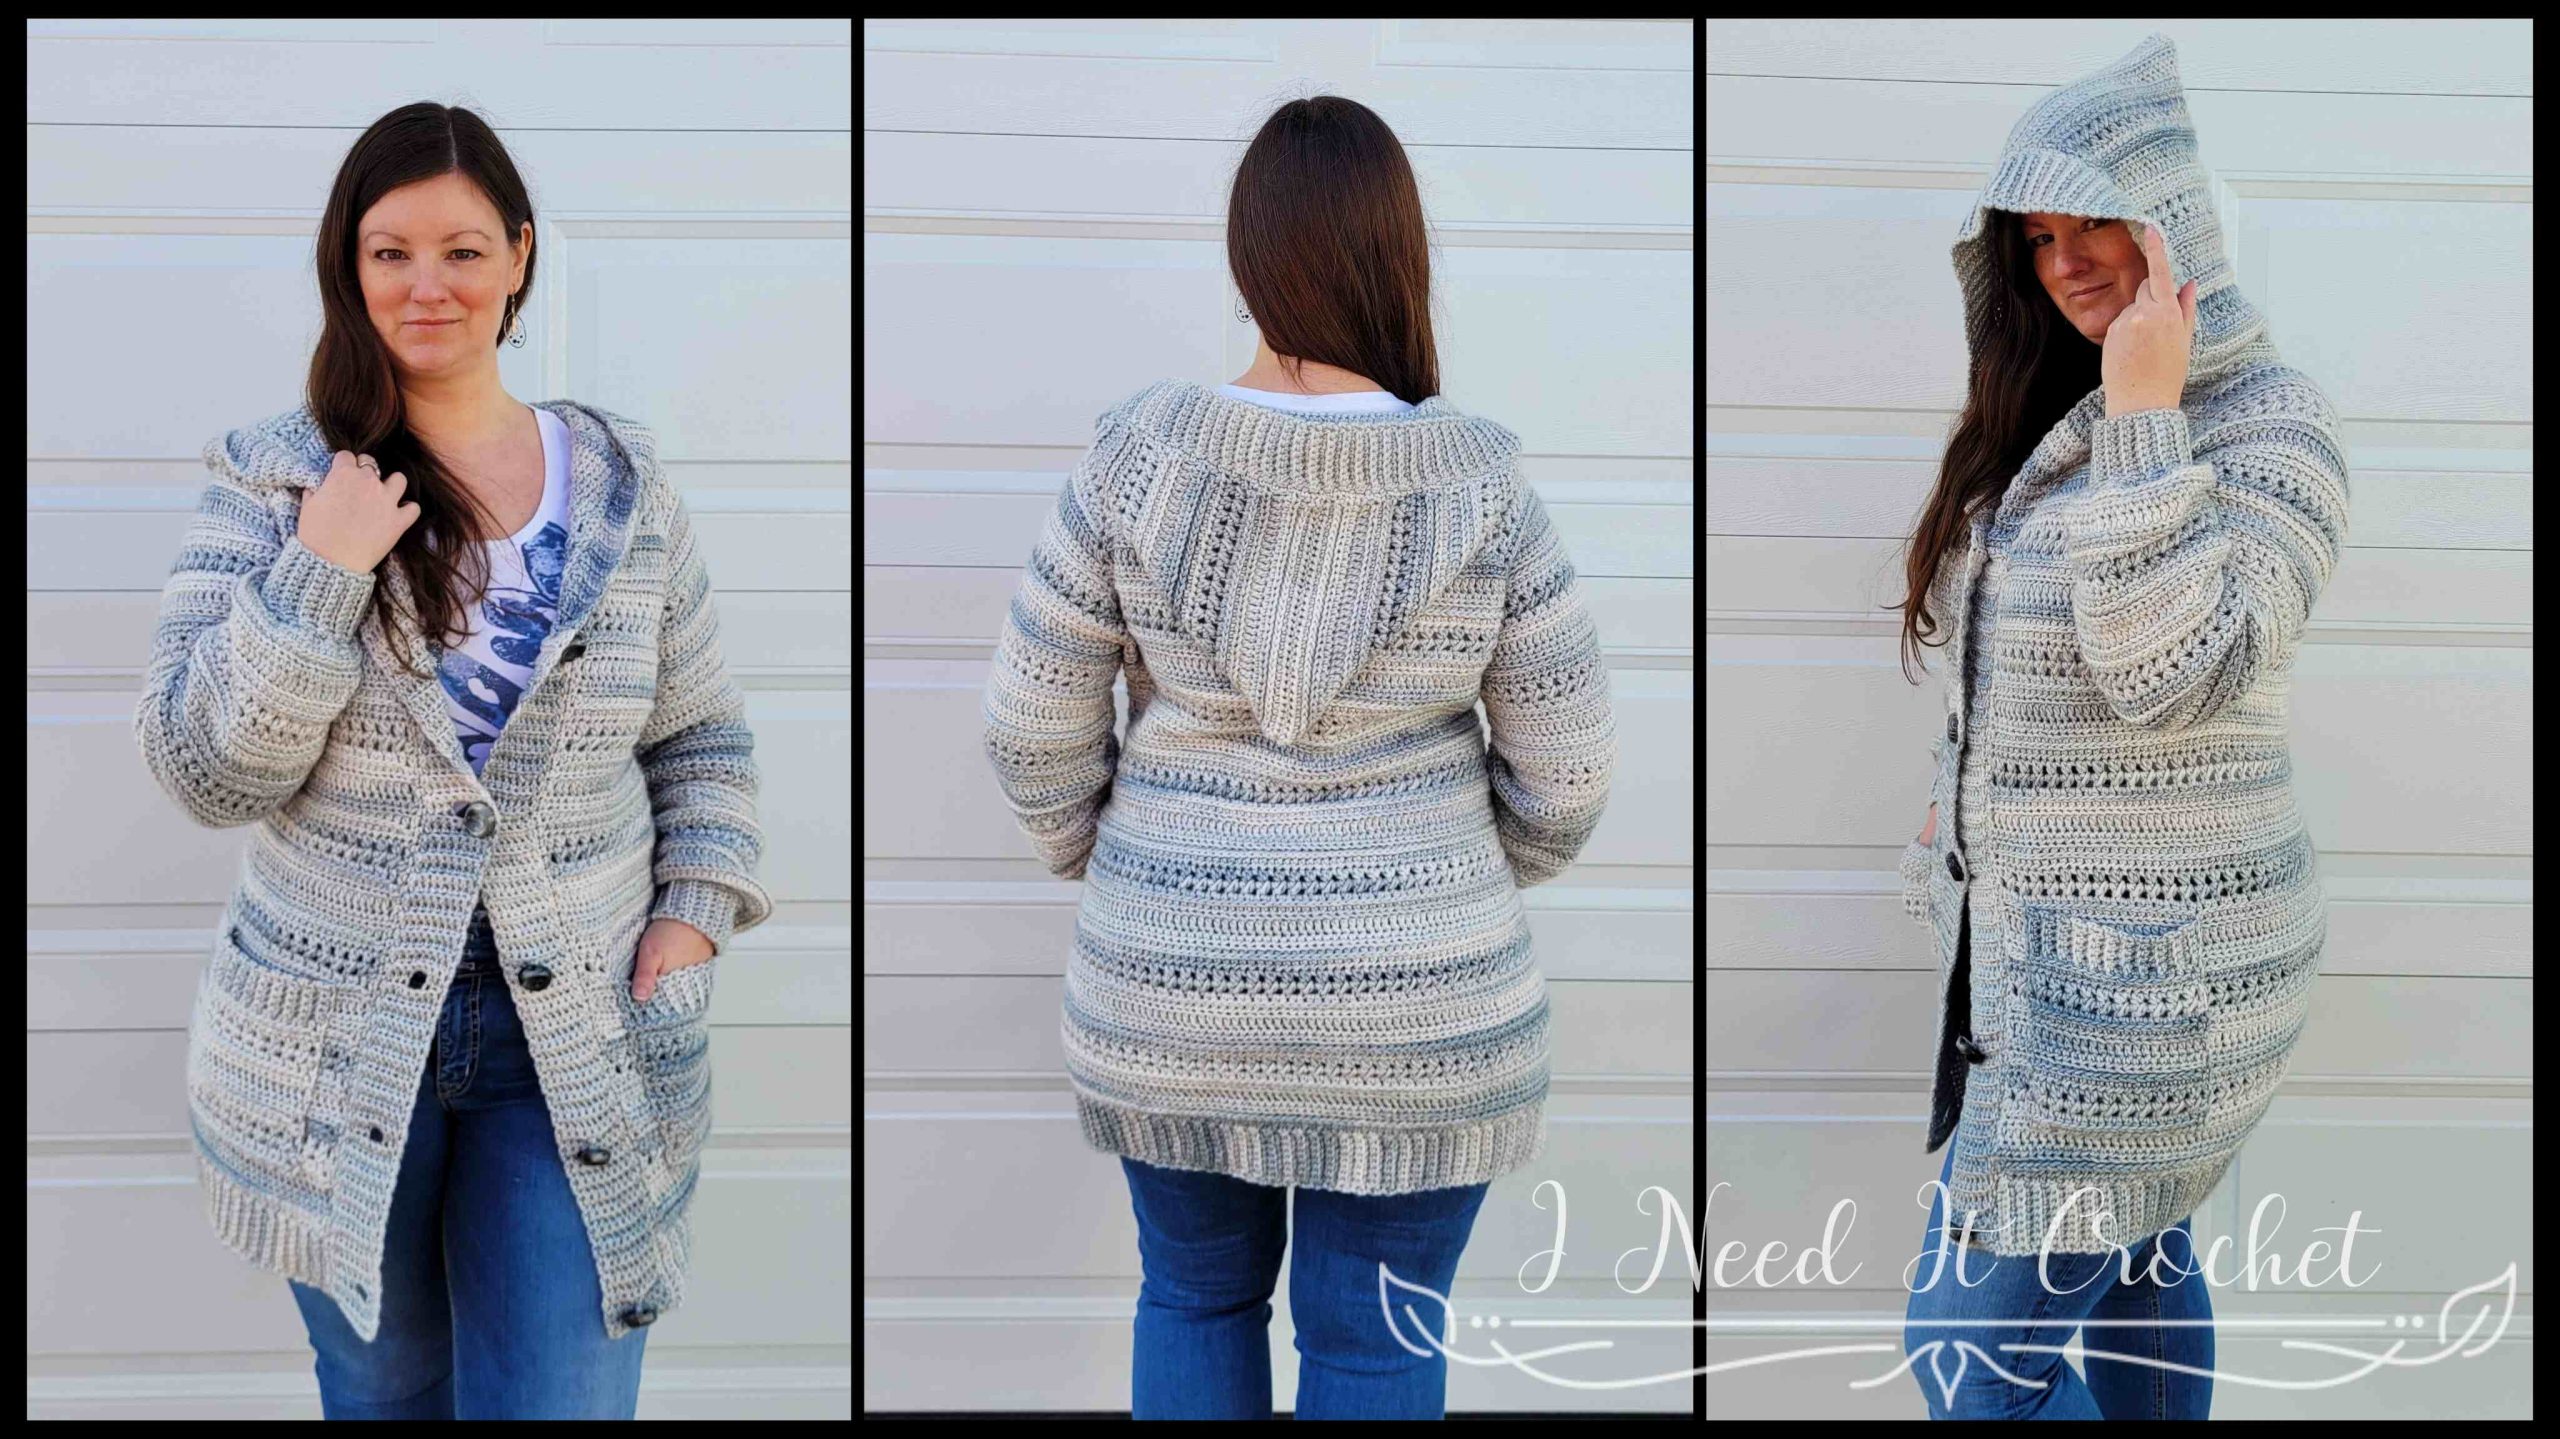
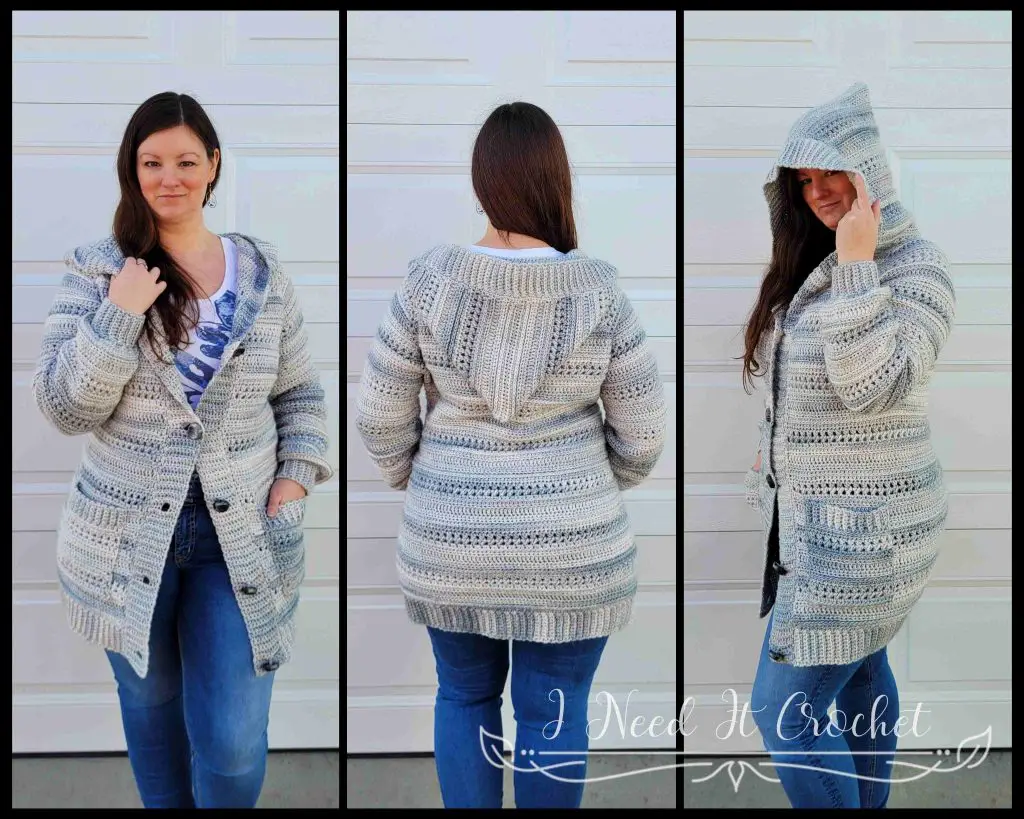
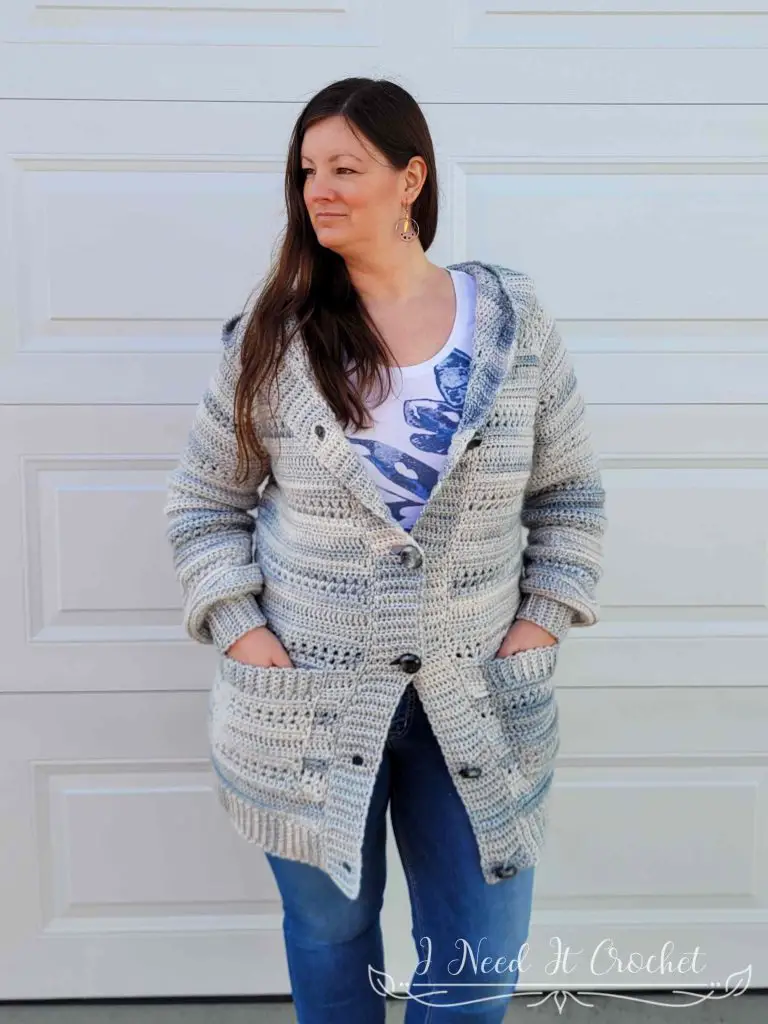
Free Crochet Cardigan Pattern – Trailhead Cardigan

Free Crochet Cardigan Pattern – Trailhead Cardigan
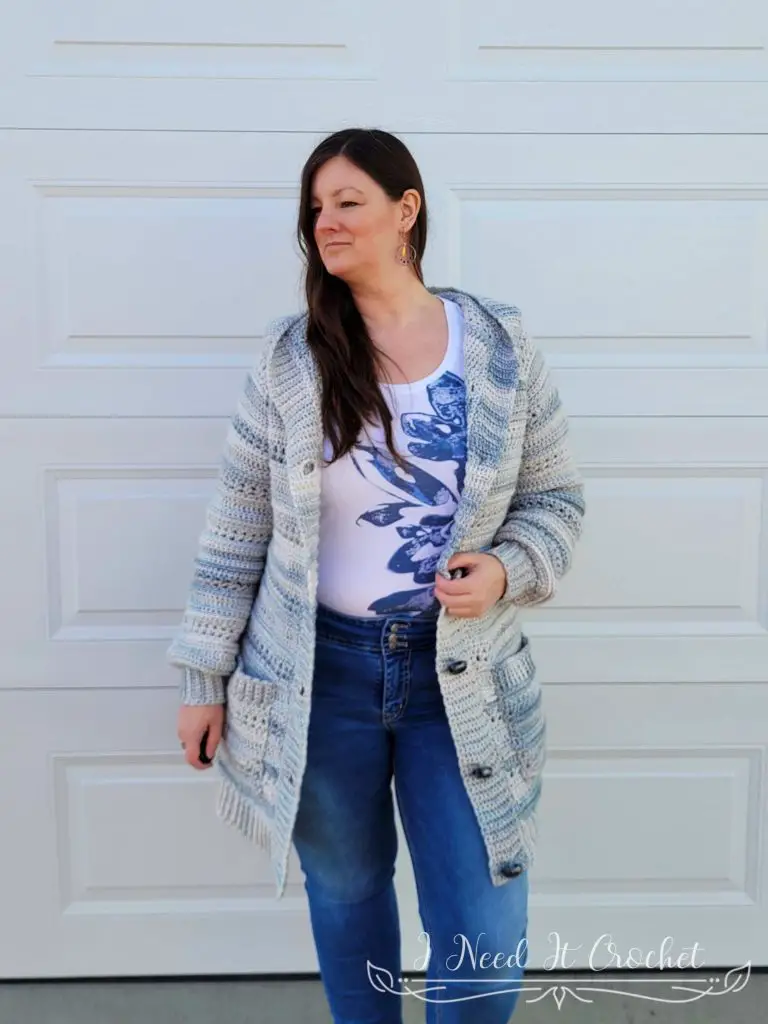
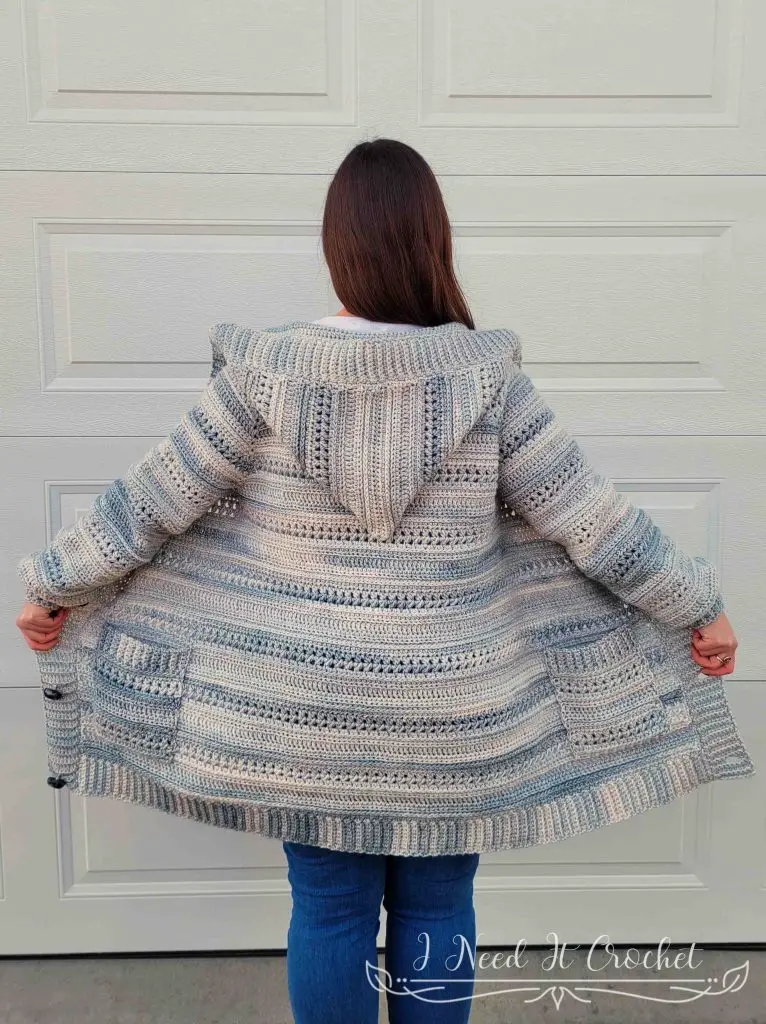
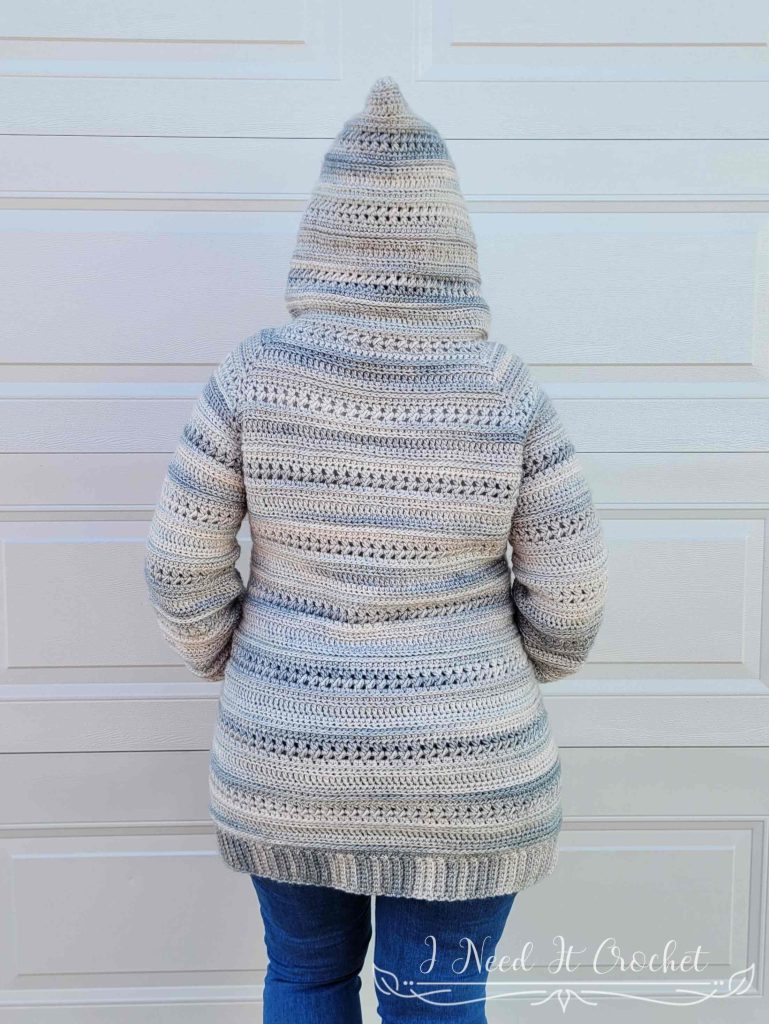
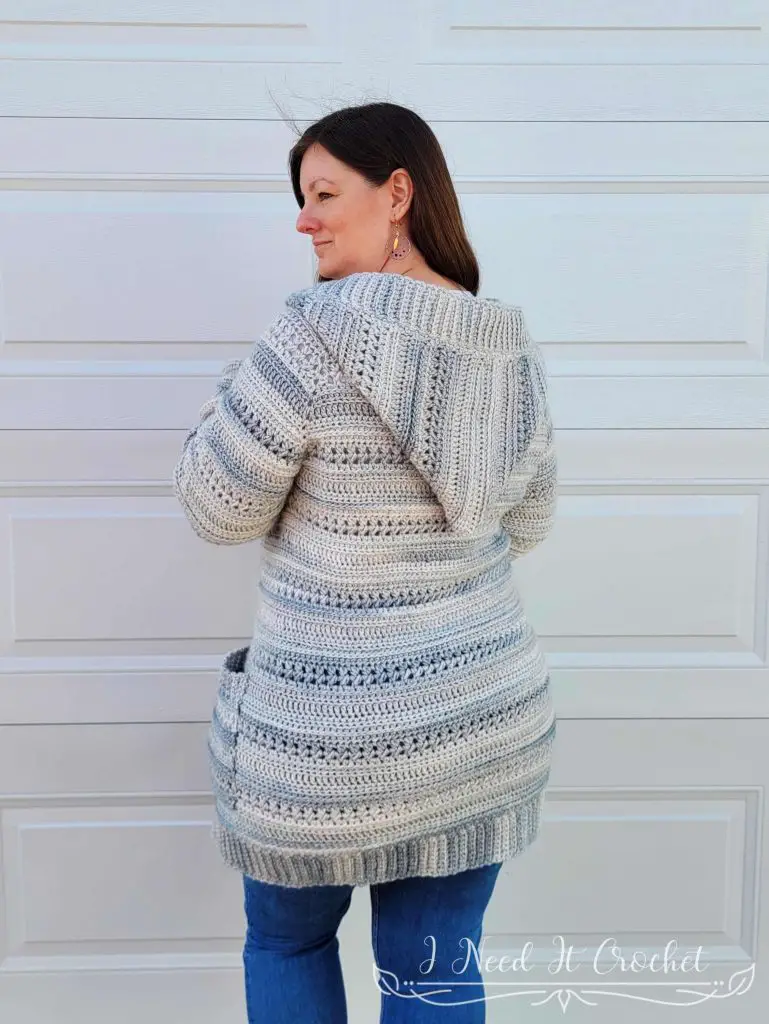
My family and I have a long-standing annual tradition: we unplug from our busy digital lives and go camping. Removing our digital distractions connects us on a deeper level. The memories we make while spending that quiet time together are some of my favourites.
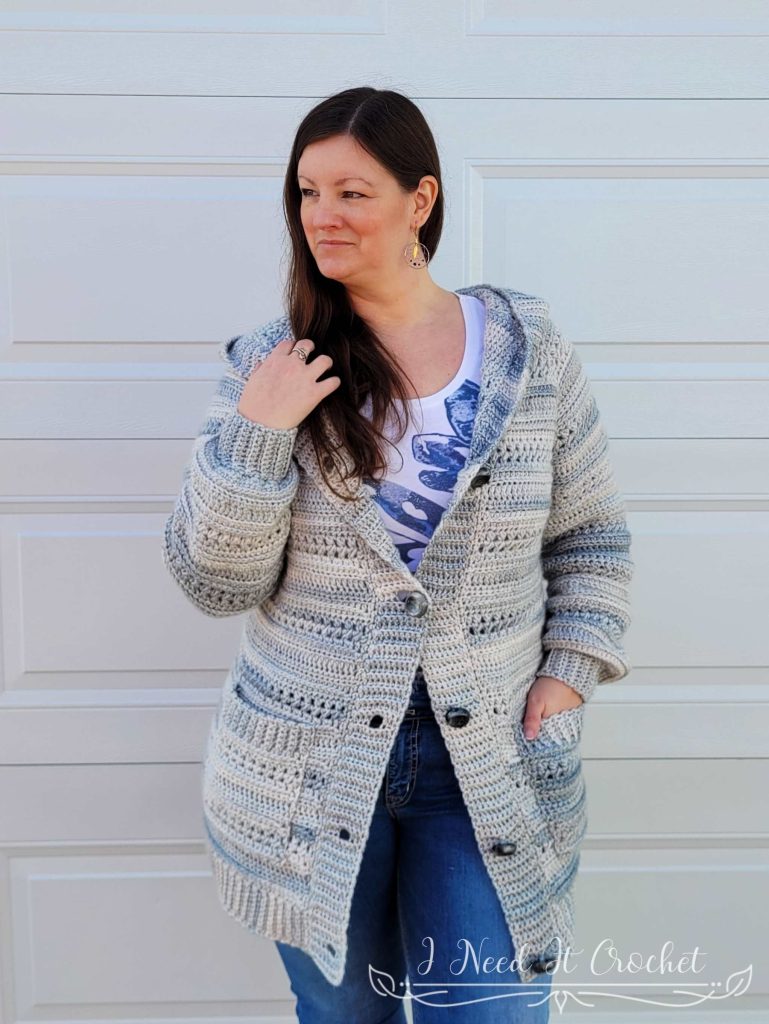
This cardigan will be my go-to extra layer for this year’s cool nights by the fire. It features a comfortable fit and patch pockets. It’s the perfect sweater for relaxing in the hammock with a book or playing late-night board games with the kids.
Want to Pin it for later?
Click the image below and save the pin to your favourite crochet pattern boards!
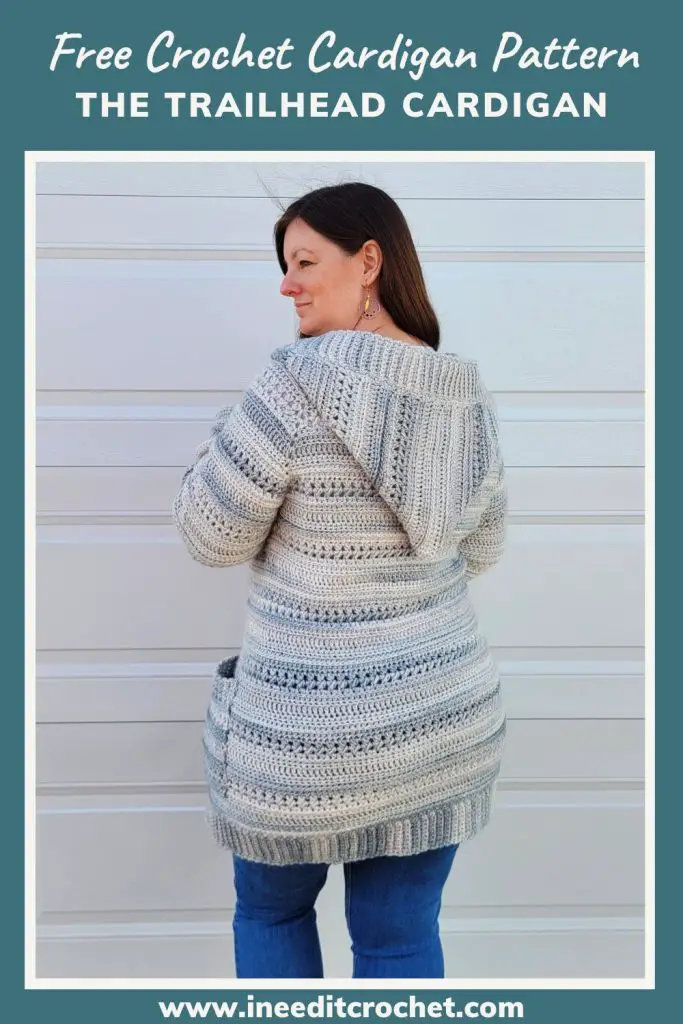
Free Crochet Cardigan Pattern – Trailhead Cardigan
Finished Sizes:
Instructions given to fit size X-small; changes for small, medium, large, X-large, 2X-large, 3X-large, 4X-large and 5X-large are in ()
XS (S, M, L, XL, 2XL, 3XL, 4XL, 5XL)
Body Circumference: 28” (32”, 36”, 40”, 44”, 48”, 52”, 56”, 60”)
Finished Length: Customizable.
Arm Circumference: 11” (11”, 12 ¼”, 13 ½”, 15”, 16 ¼”, 18”, 19 ¼”, 20”)
Materials:
I used Caron Blossom Cakes, which is a 61% Cotton, 39% Acrylic, #4 worsted weight yarn.
Any yarn of similar weight would work.
Approximately 1600 (1700, 1800, 1900, 2000, 2100, 2200, 2300, 2400) yds.
6mm Hook
Stitch Markers
Yarn Needle
Scissors
Measuring Tape
Abbreviations:
RS = Right Side
WS = Wrong Side
Sk = Skip
St = Stitch
Ss = Slip Stitch
Ch = Chain
Sc = Single Crochet
Hdc = Half Double Crochet
Dc = Double Crochet
Hdc2tog = Half Double Crochet 2 Together
Blo = Back Loop Only
3rd Lo = 3rd Loop Only
Gauge:
See gauge swatch instructions below. Be sure to always check your gauge. It will save you much time and heartache.
Notes:
Ch1 and ch2 at the beginning of a row is never considered a stitch.
Ch3 at the beginning of a row is considered a dc.
Each ch between sts counts as a st.
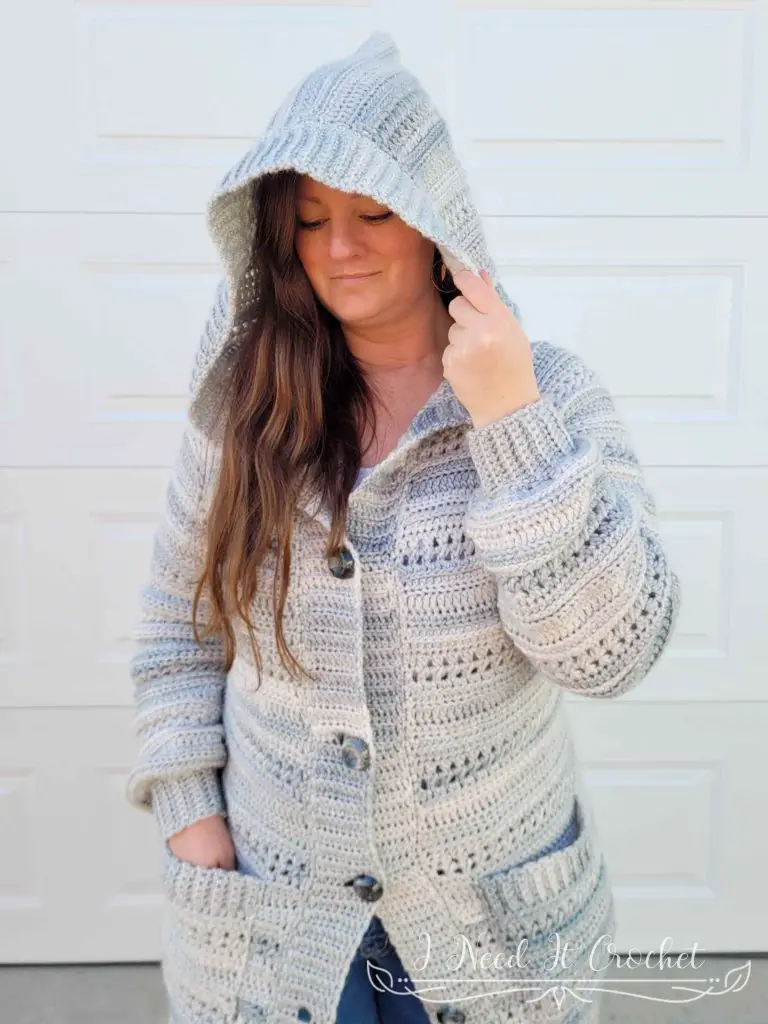
The model above (that’s me) has a 41” bust and is wearing a size XL.
Choose your size according to your largest measurement (bust/waist/hips) and how you would like the sweater to fit. For a close-fitting sweater, choose the size closest to your largest measurement. For a loose sweater, choose a size 2-3” larger.
Free Crochet Cardigan Pattern – Trailhead Cardigan
Gauge Swatch
The instructions below will create a gauge swatch that is 4” (8”) wide by 4 ” (8”) high. If you are making a larger size and/or you sometimes find your tension is off, I recommend making the larger swatch. But, of course, that is completely up to you. Also, the width of your swatch is much more important than the overall height. So if your width is on point, but your height is off, I recommend using the hook that gives you the correct width.
With 6mm hook
- Ch15 (29). Hdc in 2nd ch from hook and each ch across. Turn. – 14 (28) st
- Ch1. Hdc in 1st st. Hdc in 3rd lo until 1 st left. Hdc in last st. Turn. – 14 (28) st
- Ch1. Hdc in 1st st. *Hdc2tog, ch1.** Repeat from * to ** until 1 st left. Hdc in last st. Turn. – 14 (28) st
- Ch1. Hdc in 1st st. Hdc2tog over next 2 ch1 sp (skipping over the top of the hdc2tog as seen Figure 1). Ch1. *Hdc2tog over same ch1 sp just worked and next ch1 sp (see Figure 2). Ch1.** Repeat from * to ** until 3 st left. Hdc2tog over same ch1 sp just worked and sp between last 2 sts. Ch1, hdc in last st (see Figure 3). Turn. – 14 (28) st
- Ch1. Hdc in 1st st. Hdc in next ch1 sp (see Figure 4). *Sk 1 st, 2hdc in next ch1 sp (see Figure 5).** Repeat from * to ** until 2 sts left. Sk 1 st, hdc in sp between last 2 sts. Hdc in last st (see Figure 6). Turn. – 14 (28) st
- Ch1. Hdc in 1st st. Hdc in 3rd lo until 1 st left. Hdc in last st. Turn. – 14 (28) st
- Ch3. Dc in blo of next and each st until 1 left. Dc in last st. Turn. – 14 (28) st
- Ch1. Hdc in 1st and each st across. Turn. – 14 (28) st
- Ch1. Hdc in 1st st. Hdc in blo until 1 st left. Hdc in last st. Turn. – 14 (28) st
Small swatch is complete.
For Large Swatch: Repeat rows 2-9.
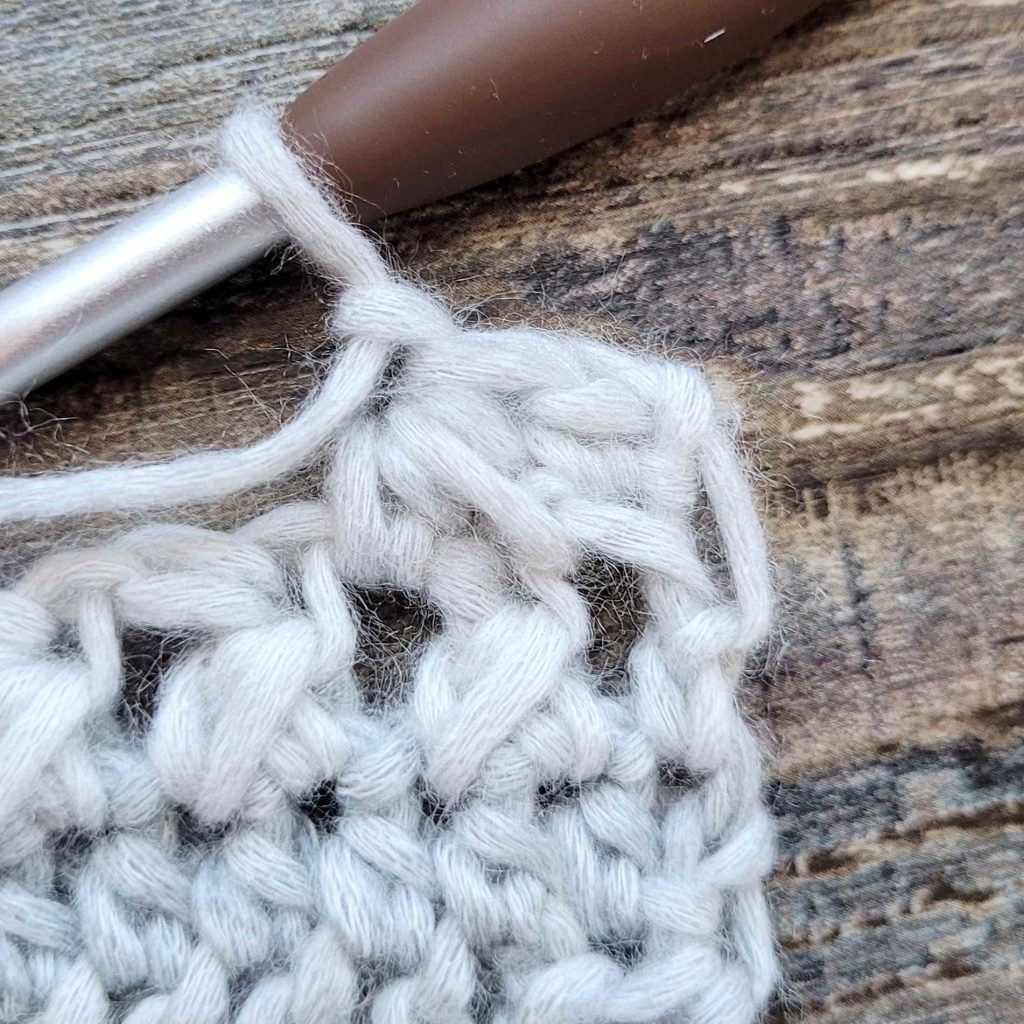
Figure 1
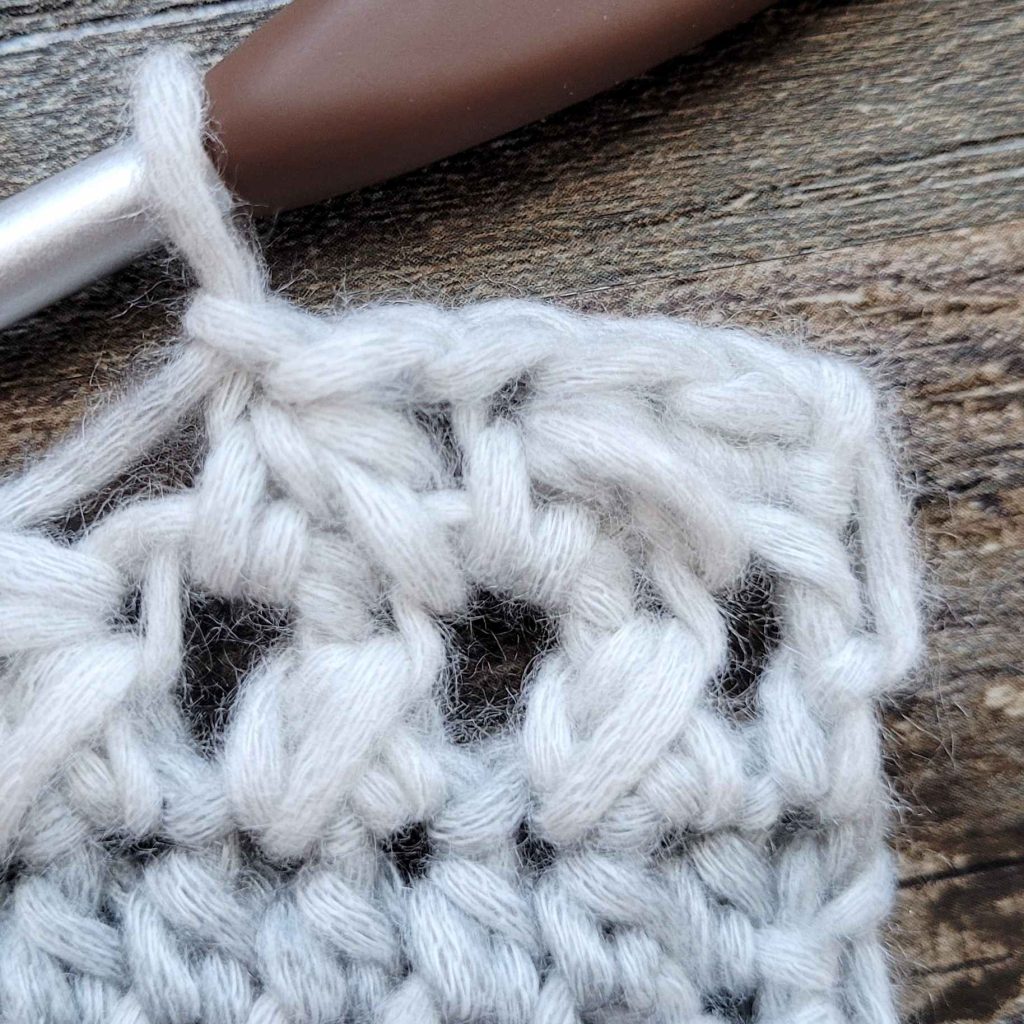
Figure 2
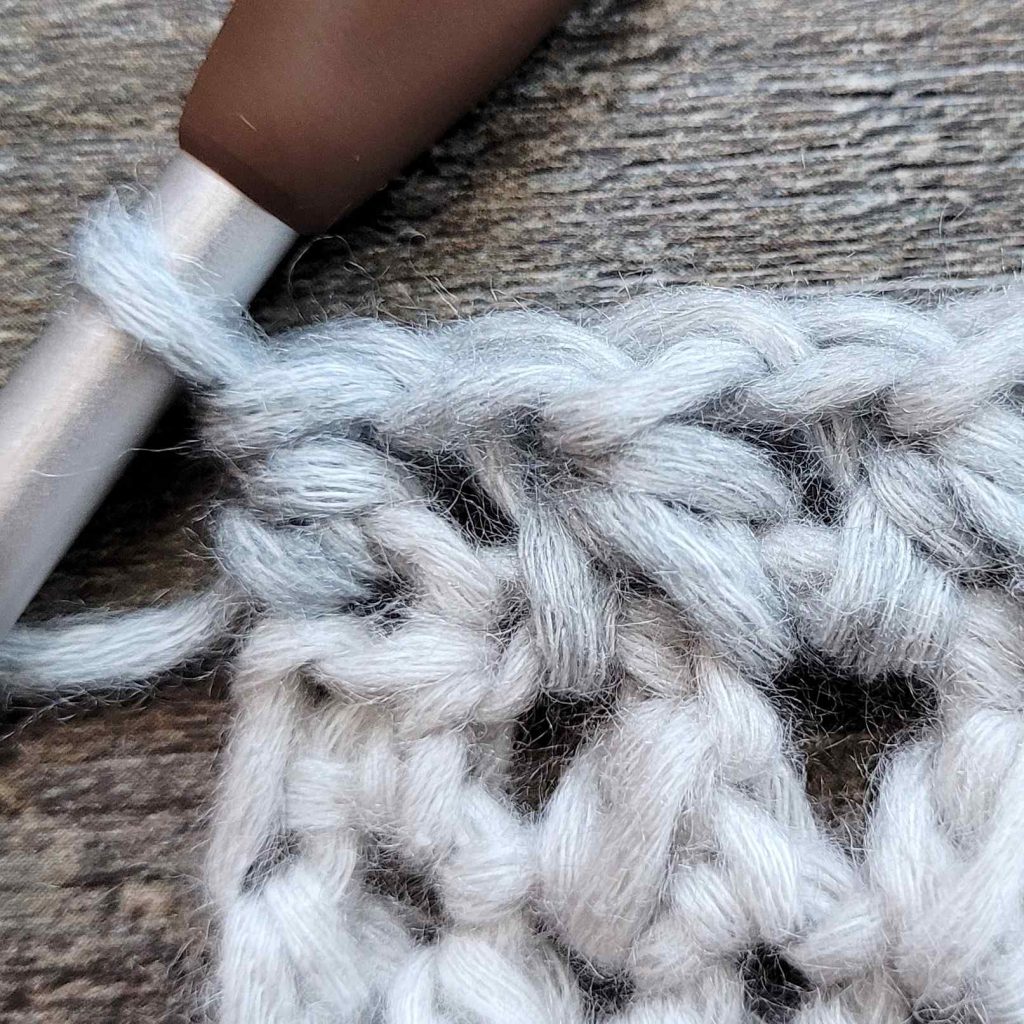
Figure 3
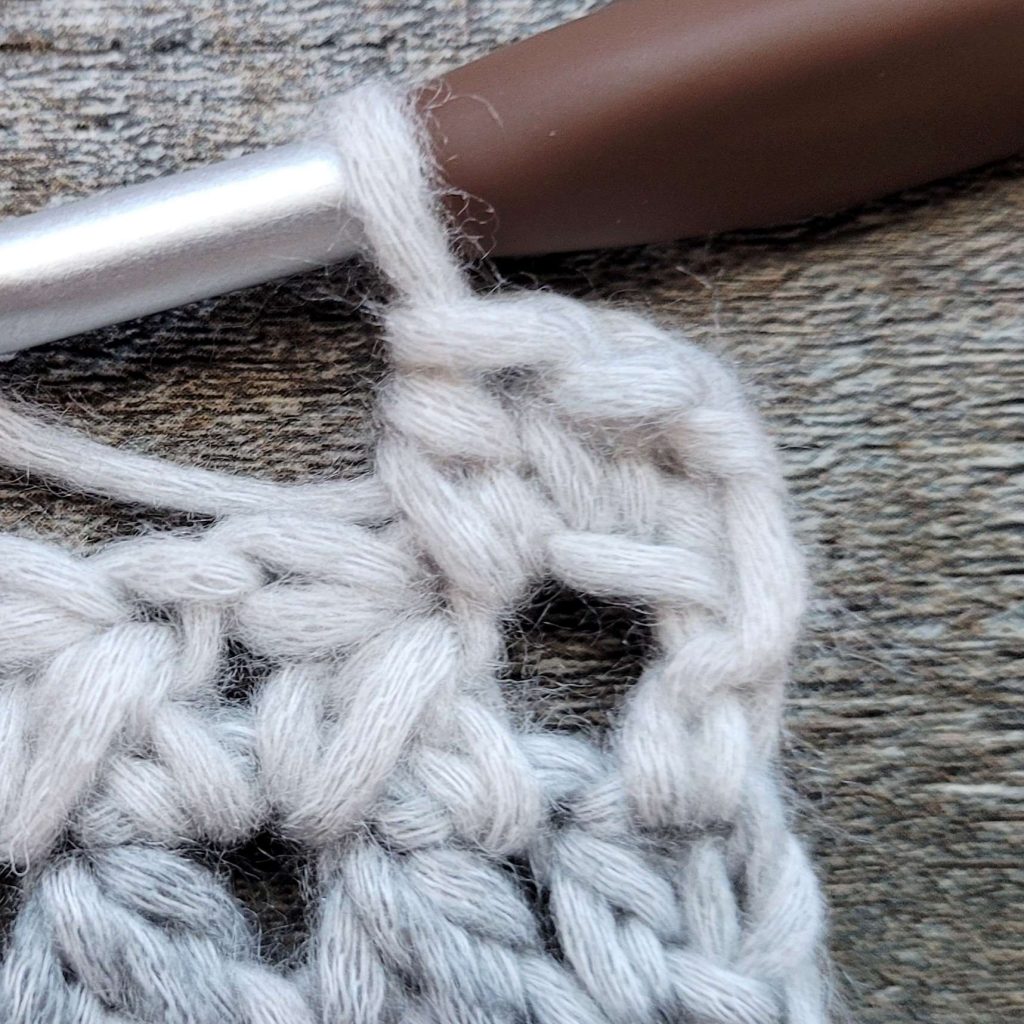
Figure 4

Figure 5
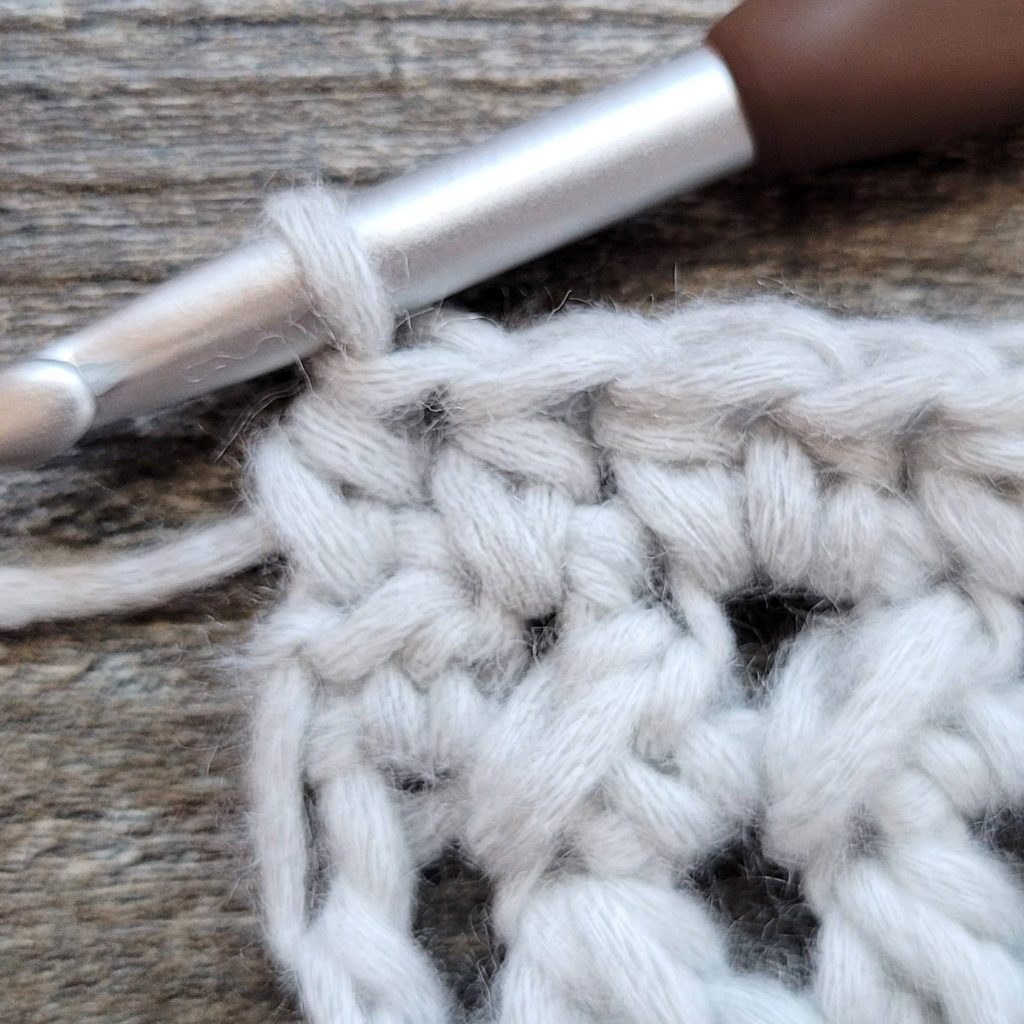
Figure 6
Instructions
The body of the sweater is worked from the top down. We will start with a rectangular yoke, fold the project in half, and continue downwards, working the lower body. Then, we will add the sleeves, the hood, and the ribbed trim. Finally, we will make and sew on the pockets.
With 6mm hook (or hook used to obtain gauge)
Yoke
- (WS) Ch 39 (51, 57, 63, 73, 79, 89, 95, 99). Working into the back hump of the chain:
– Sc in 2nd ch and next 3 (7, 9, 9, 11, 13, 13, 15, 17) chs.
– (Sc, ch1, sc) in next ch. Sc in next 4 (4, 4, 4, 6, 6, 8, 8, 8) chs.
– (Sc, ch1, sc) in next ch. Sc in next 18 (22, 24, 30, 32, 34, 40, 42, 42) ch.
– (Sc, ch1, sc) in next ch. Sc in next 4 (4, 4, 4, 6, 6, 8, 8, 8) chs.
– (Sc, ch1, sc) in next ch. Sc in last 4 (8, 10, 10, 12, 14, 14, 16, 18) chs. Turn.
– 42 (54, 60, 66, 76, 82, 92, 98, 102) st + 4 ch1 corners - (RS) Ch1. Hdc in 1st st. *Hdc in each st until the next ch1 corner. (hdc, ch1, hdc) in ch1 sp. ** Repeat from * to ** 3 more times. Hdc in each st to end. Turn. – 50 (62, 68, 74, 84, 90, 100, 106, 110) st + 4 ch1 corners
- Ch1. Hdc in 1st st. *Hdc in 3rd lo until the next ch1 corner. (hdc, ch1, hdc) in ch1 sp. ** Repeat from * to ** 3 more times. Hdc in 3rd lo until 1 st left. Hdc in last st. Turn. – 58 (70, 76, 82, 92, 98, 108, 114, 118) st + 4 ch1 corners
- Ch3. *Dc in blo until the next ch1 corner. (dc, ch1, dc) in ch1 sp. ** Repeat from * to ** 3 more times. Dc in blo until 1 st left. Dc in last st. Turn. – 66 (78, 84, 90, 100, 106, 116, 122, 126) st + 4 ch1 corners
- Ch1. Hdc in 1st st. *Hdc in each st until the next ch1 corner. (hdc, ch1, hdc) in ch1 sp. ** Repeat from * to ** 3 more times. Hdc in each st to end. Turn. – 74 (86, 92, 98, 108, 114, 124, 130, 134) st + 4 ch1 corners
- Ch1. Hdc in 1st st. *Hdc in blo until the next ch1 corner. (hdc, ch1, hdc) in ch1 sp. ** Repeat from * to ** 3 more times. Hdc in blo until 1 st left. Hdc in last st. Turn. – 82 (94, 100, 106, 116, 122,132, 138, 142) st + 4 ch1 corners
- Ch1. Hdc in 1st st. *Hdc in 3rd lo until the next ch1 corner. (hdc, ch1, hdc) in ch1 sp. ** Repeat from * to ** 3 more times. Hdc in 3rd lo until 1 st left. Hdc in last st. Turn. – 90 (102, 108, 114, 124, 130, 140, 146, 150) st + 4 ch1 corners
- Ch1. Hdc in 1st st. [*Hdc2tog, ch1.** Repeat from * to ** until the next ch1 corner. (Hdc, ch1, hdc) in ch1 sp. ] Repeat from [ to ] 3 more times. Repeat from * to ** until 1 st left. Hdc in last st. Turn. – 98 (110, 116, 122, 132, 138, 148, 154, 158) st + 4 ch1 corners
- Ch1. Hdc in 1st st. [Hdc2tog over next 2 ch1 sp (skipping over the hdc2tog as seen in Figure 1). Ch1. *Hdc2tog in same ch1 sp just worked and next ch1 sp (see Figure 2). Ch1.** Repeat from * to ** until 3 sts left before next ch1 corner. Hdc2tog in same ch1 sp just worked and sp between next 2 sts. Ch1. Hdc in next st. (Hdc, ch1, hdc) in ch1 sp. Hdc in next st. ] Repeat from [ to ] 3 more times. Hdc2tog over next 2 ch1 sp. Ch1. Repeat from * to ** until 3 sts left. Hdc2tog in same ch1 sp just worked and sp between next 2 sts. Ch1. Hdc in last st. Turn. – 106 (118, 124, 130, 140, 146, 156, 162, 166) st + 4 ch1 corners
- Ch1. Hdc in 1st st. [Hdc in ch1 sp. *Sk 1 st, 2hdc in next ch1 sp.** Repeat from * to ** until 3 sts left before the next ch1 corner. Sk 1 st, hdc in sp between next 2 sts. Hdc in next 2 sts. (Hdc, ch1, hdc) in ch1 sp. Hdc in next 2 sts. ] Repeat from [ to ] 3 more times. Hdc in next ch1 sp. Repeat from * to ** until 2 sts left. Sk 1 st, hdc in sp between 2 sts. Hdc in last st. Turn. – 114 (126, 132, 138, 148, 154, 164, 170, 174) st + 4 ch1 corners
Repeat rows 3-10 until you have a total of 16 (16, 18, 20, 22, 24, 26, 28, 30) rows. Do not bind off.
Your stitch count should now be 162 ( 174, 196, 218, 244, 266, 292, 314, 334) st + 4 ch1 corners
Free Crochet Cardigan Pattern – Trailhead Cardigan
Lower Body
Your project should now look similar to Figure 7. Fold it in half, with the WS together, as seen in Figure 8, making sure to match up the corners. Use locking st markers to hold the front and back corners together.
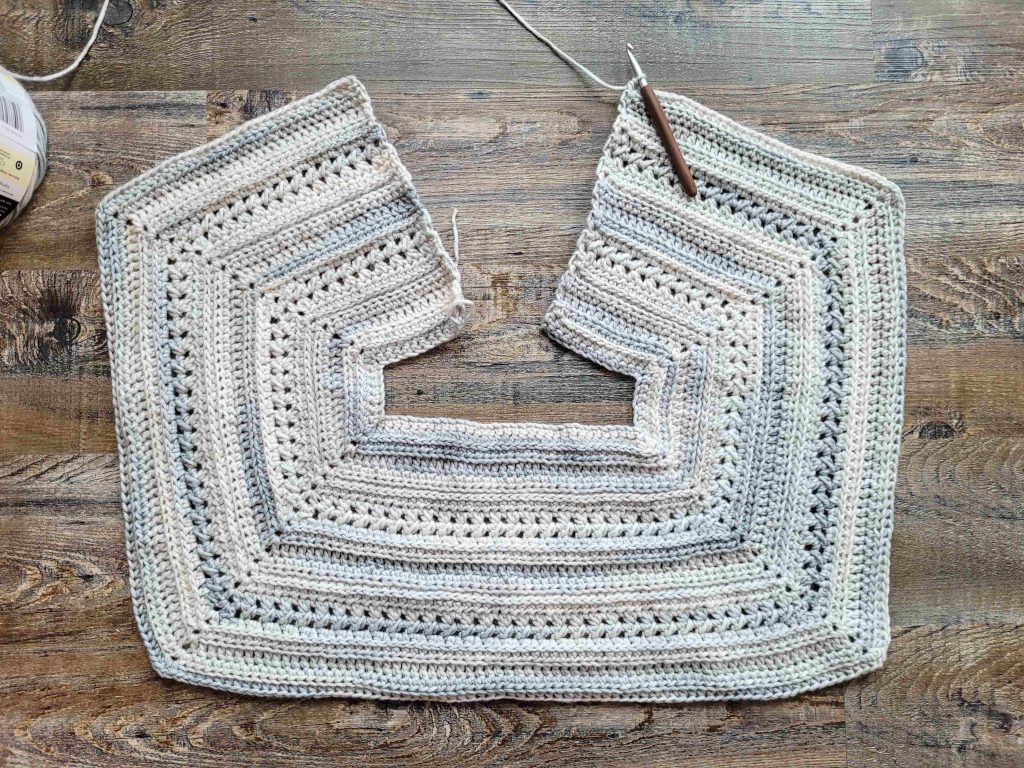
Figure 7

Figure 8
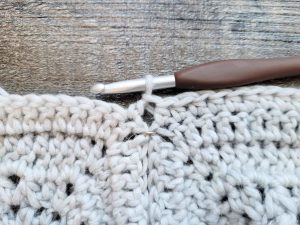
Figure 9
Begin with row 9 (9, 3, 5, 7, 9, 3, 5, 7).
Note: Your 1st row will be worked across the sts, skipping the ch1 corners with the st markers. See Figure 9 for an example. It will look different depending on what row you’re starting with.
- (WS) Ch1. Hdc in 1st st. Hdc in 3rd lo until 1 st left. Hdc in last st. Turn. – 90 (102, 116, 130, 144, 158, 172, 186, 198) st
- (RS) Ch3. Dc in blo until 1 st left. Dc in last st. Turn. – 90 (102, 116, 130, 144, 158, 172, 186, 198) st
- Ch1. Hdc in 1st st and each st across. Turn. – 90 (102, 116, 130, 144, 158, 172, 186, 198) st
- Ch1. Hdc in 1st st. Hdc in blo until 1 st left. Hdc in last st. Turn. – 90 (102, 116, 130, 144, 158, 172, 186, 198) st
- Ch1. Hdc in 1st st. Hdc in 3rd lo until 1 st left. Hdc in last st. Turn. – 90 (102, 116, 130, 144, 158, 172, 186, 198) st
- Ch1. Hdc in 1st st. *Hdc2tog, ch1.** Repeat from * to ** until 1 st left. Hdc in last st. Turn. – 90 (102, 116, 130, 144, 158, 172, 186, 198) st
- Ch1. Hdc in 1st st. Hdc2tog over next 2 ch1 sp. Ch1. *Hdc2tog in same ch1 sp just worked and next ch1 sp. Ch1.** Repeat from * to ** until 3 sts left. Hdc2tog in same ch1 sp just worked and sp between last 2 sts. Ch1, hdc in last st. Turn. – 90 (102, 116, 130, 144, 158, 172, 186, 198) st
Note For Sizes XS & S: For your first row, the hdc2tog will “straddle” the skipped ch1 corners at the underarms. This is normal.
- Ch1. Hdc in 1st st. Hdc in ch1 sp. *Sk 1 st, 2hdc in next ch1 sp.** Repeat from * to ** until 2 sts left. Sk 1 st, hdc in sp between last 2 sts, hdc in last st. Turn. – 90 (102, 116, 130, 144, 158, 172, 186, 198) st
Once you have completed row 10, repeat rows 3-10 until you have reached your desired length, minus 2 ½”. Bind off.
Sleeves
The sleeves are worked in rounds. We will join and turn at the end of each round.
With the wrong side facing you, join your yarn in the ch1 sp (as pictured in Figure 10). Your first round will begin and end in the ch1 spaces located in the underarm (see Figure 11). This will create a hole in the underarm (as seen in Figure 12), which can easily be sewn closed using the yarn tail. Be sure you give yourself enough of a yarn tail at the beginning of your sleeve to do this.
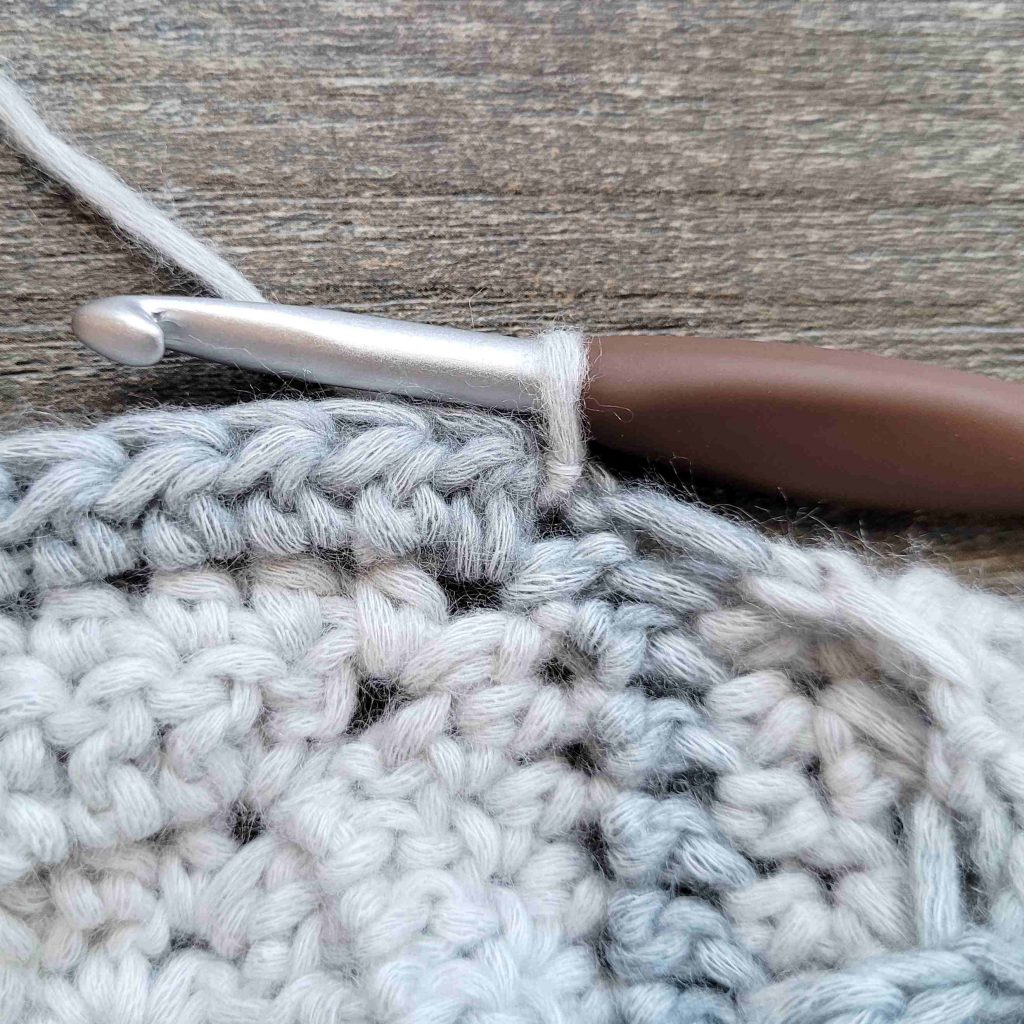
Figure 10
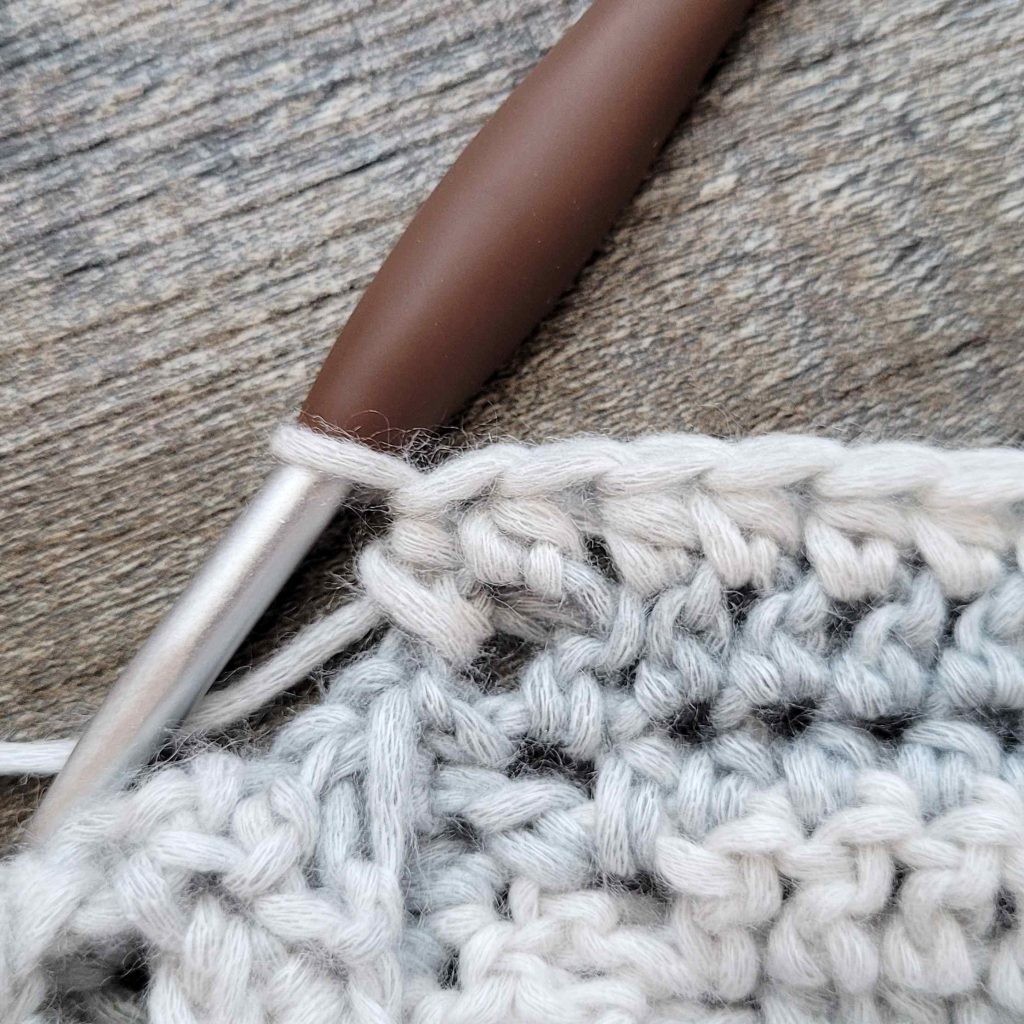
Figure 11
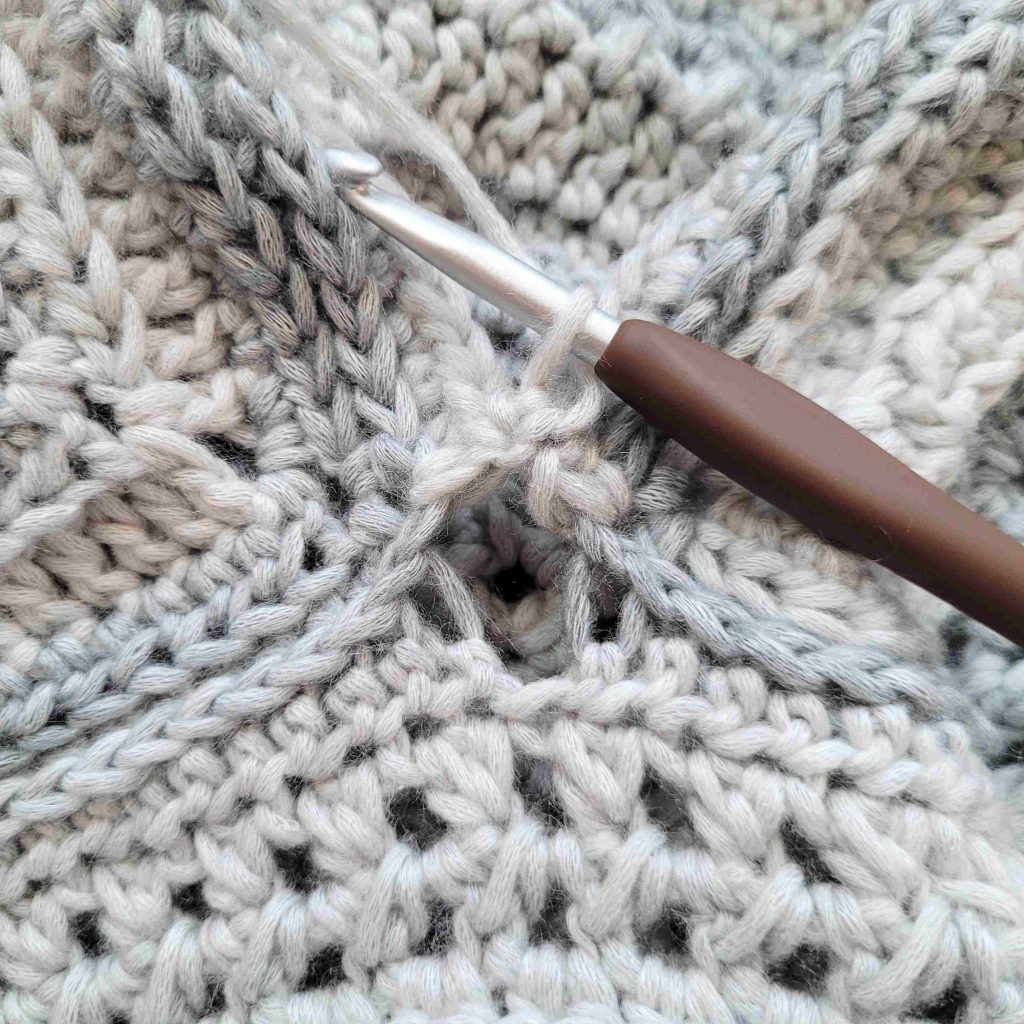
Figure 12
Begin with round 9 (9, 3, 5, 7, 9, 3, 5, 7).
- (WS) Ch1. Hdc in 3rd lo of 1st and each st around. Ss to join to 1st st. Turn. – 36 (36, 40, 44, 50, 54, 60, 64, 68) st
- (RS) Ch3. Dc in blo around. Ss to join to 1st st. Turn. – 36 (36, 40, 44, 50, 54, 60, 64, 68) st
- Ch1. Hdc in 1st st and each st around. Ss to join to 1st st. Turn. – 36 (36, 40, 44, 50, 54, 60, 64, 68) st
- Ch1. Hdc in blo of 1st st and each st around. Ss to join to 1st st. Turn. – 36 (36, 40, 44, 50, 54, 60, 64, 68) st
- Ch1. Hdc in 3rd lo of 1st st and each st around. Ss to join to 1st st. Turn. – 36 (36, 40, 44, 50, 54, 60, 64, 68) st
- Ch1. *Hdc2tog, ch1.** Repeat from * to ** around. Ss to join to 1st st. Turn. – 36 (36, 40, 44, 50, 54, 60, 64, 68) st
- Ch1, sk 1st st. Hdc2tog over next 2 ch1 sp. Ch1. *Hdc2tog in same ch1 sp just worked and next ch1 sp. Ch1.** Repeat from * to ** around. Ss to join to 1st st. Turn. – 36 (36, 40, 44, 50, 54, 60, 64, 68) st
- Ch1. *Sk 1 st, 2hdc in next ch1 sp.** Repeat from * to ** around. Ss to join to 1st st. Turn. – 36 (36, 40, 44, 50, 54, 60, 64, 68) st
Repeat rounds 3-10 until your sleeve is the desired length minus 2 ½”. Your last round should be an odd numbered round. Then, proceed to the last round outlined below.
Last Round: Ch1. Sc2tog around. Ss to join to 1st st. Do not turn. – 18 (18, 20, 22, 25, 27, 30, 32, 34) st
Cuffs
The cuff is worked in short rows off of the last round of the sleeve. You should have the RS of your work facing you.
- (RS) Ch10 (see Figure 13). Sc in 2nd ch and each ch across. Ss to st you chained from. Ss to next st (see Figure 14). Turn. – 9 st + 2 ss
- (WS) Sk 2 ss, sc in blo of next 8 sts. Sc in both loops of last st (see Figure 15). Turn. – 9 st
- Ch1. Sc in 1st st. Sc in blo of next 8 sts. Ss to next 2 unworked sts (see Figure 16). Turn. – 9 st + 2 ss
Repeat rows 2 & 3 all the way around the sleeve edge, ending with a repeat of row 2 (see Figure 17). Note: Sizes XL & 2XL will need to ss to the last 3 sts on their last repeat of row 3.
With the wrong side facing you, slip stitch the ends of the cuff together, working through the bottom of the first row and back loop of the last row (see Figure 18). Bind off
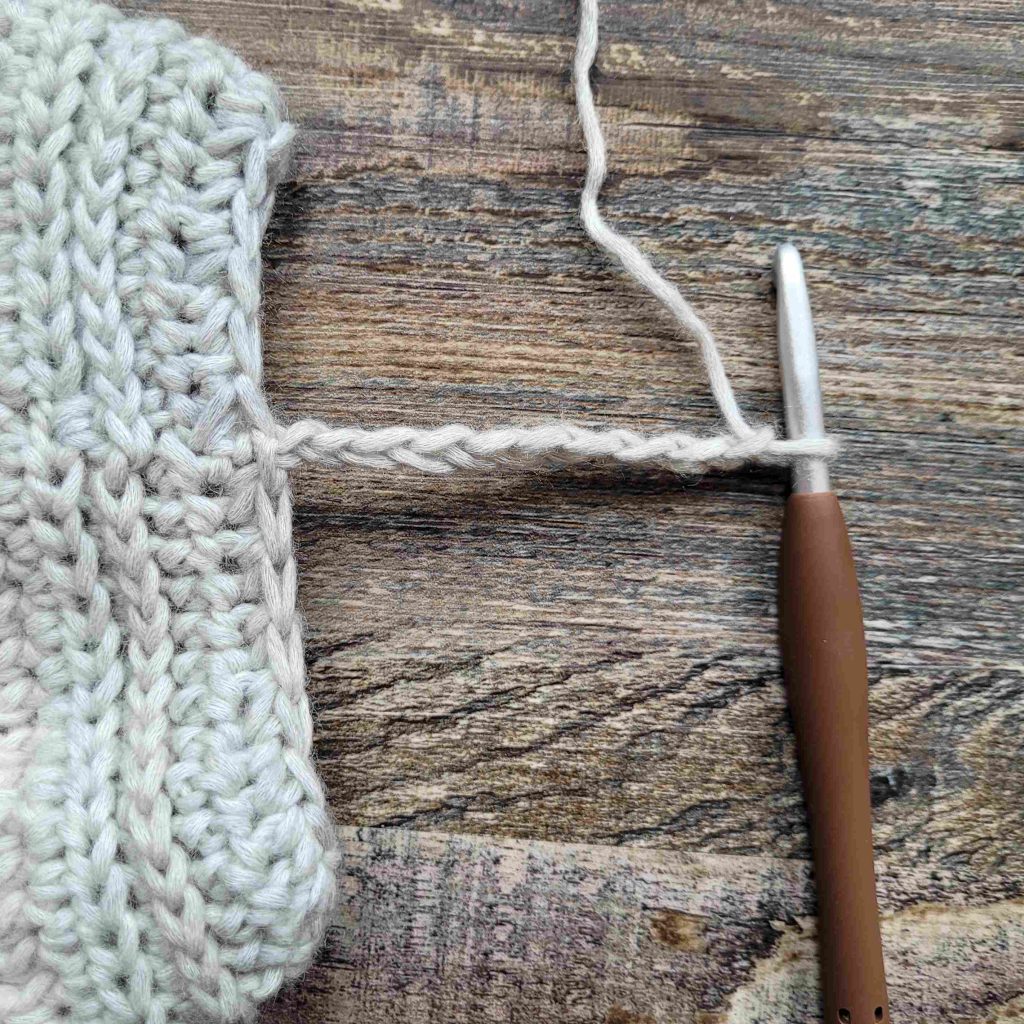
Figure 13
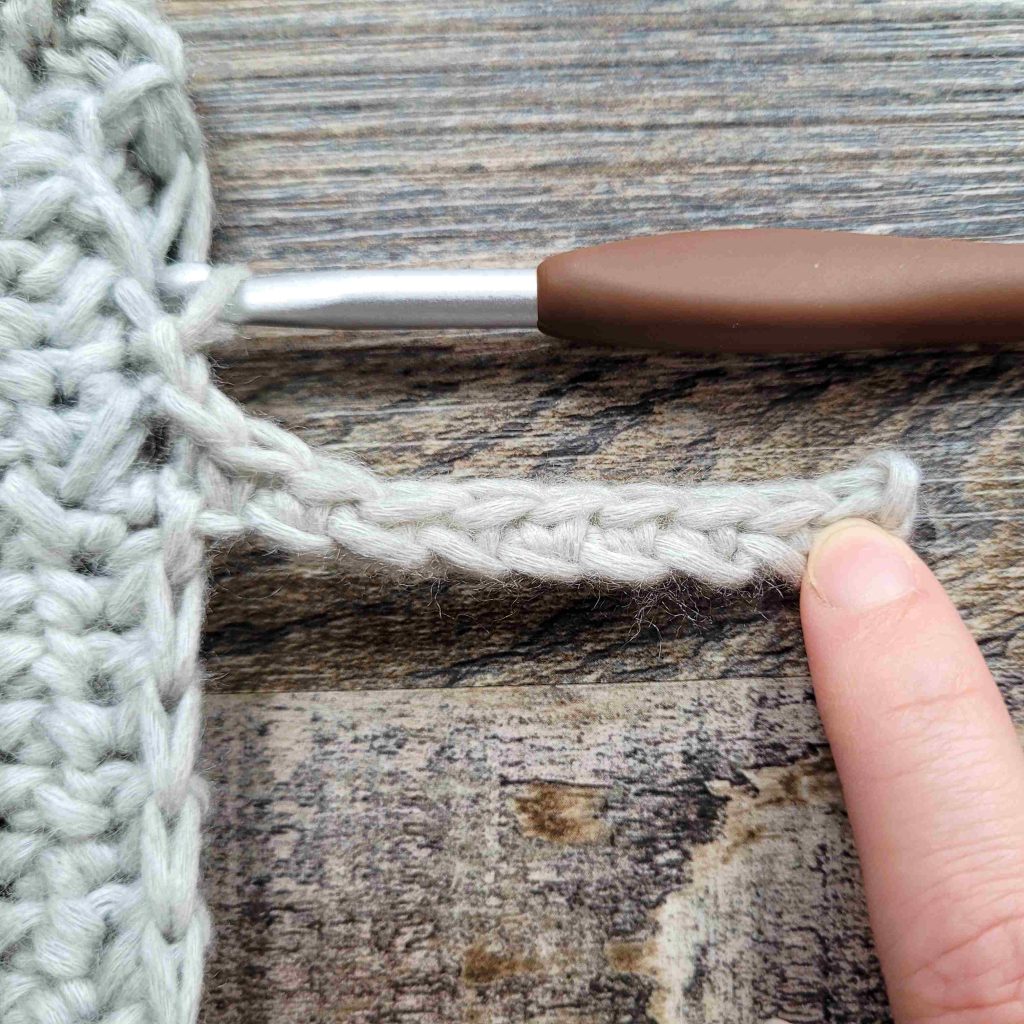
Figure 14
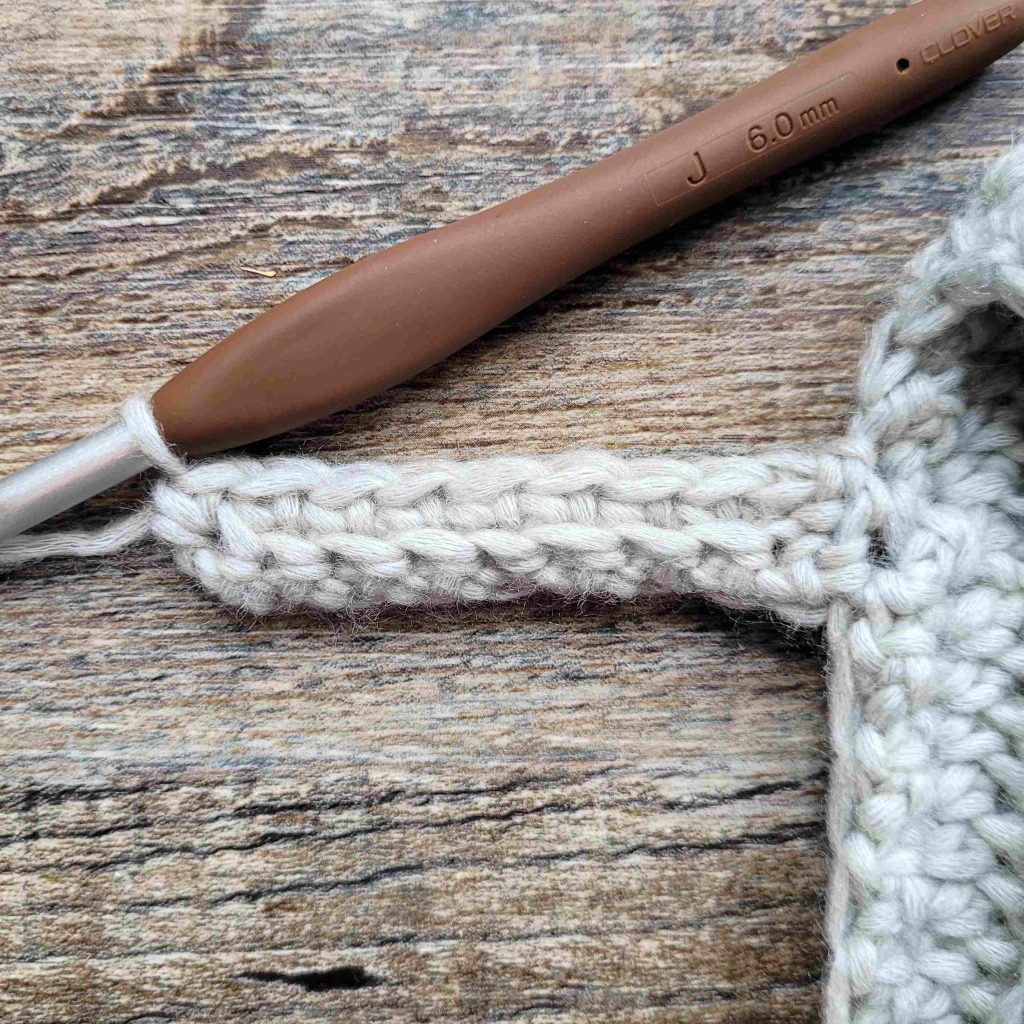
Figure 15
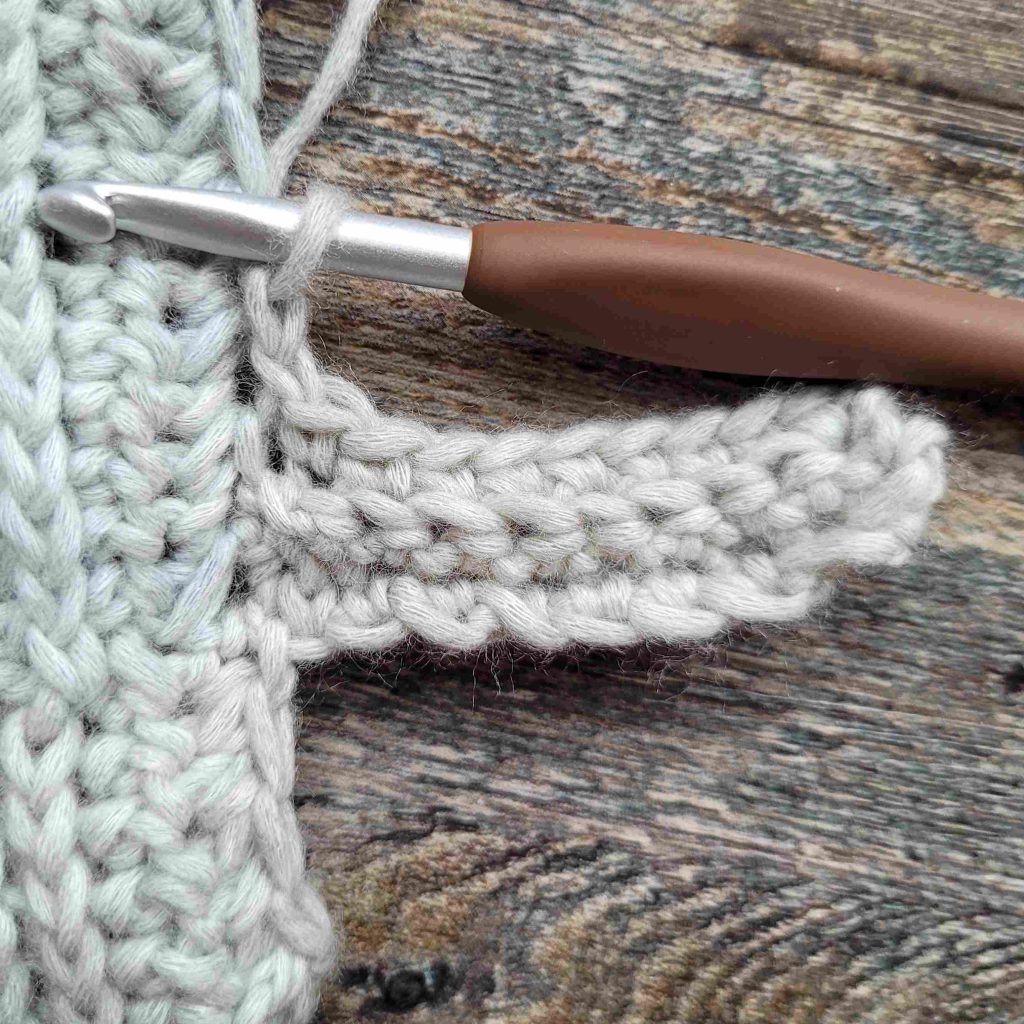
Figure 16
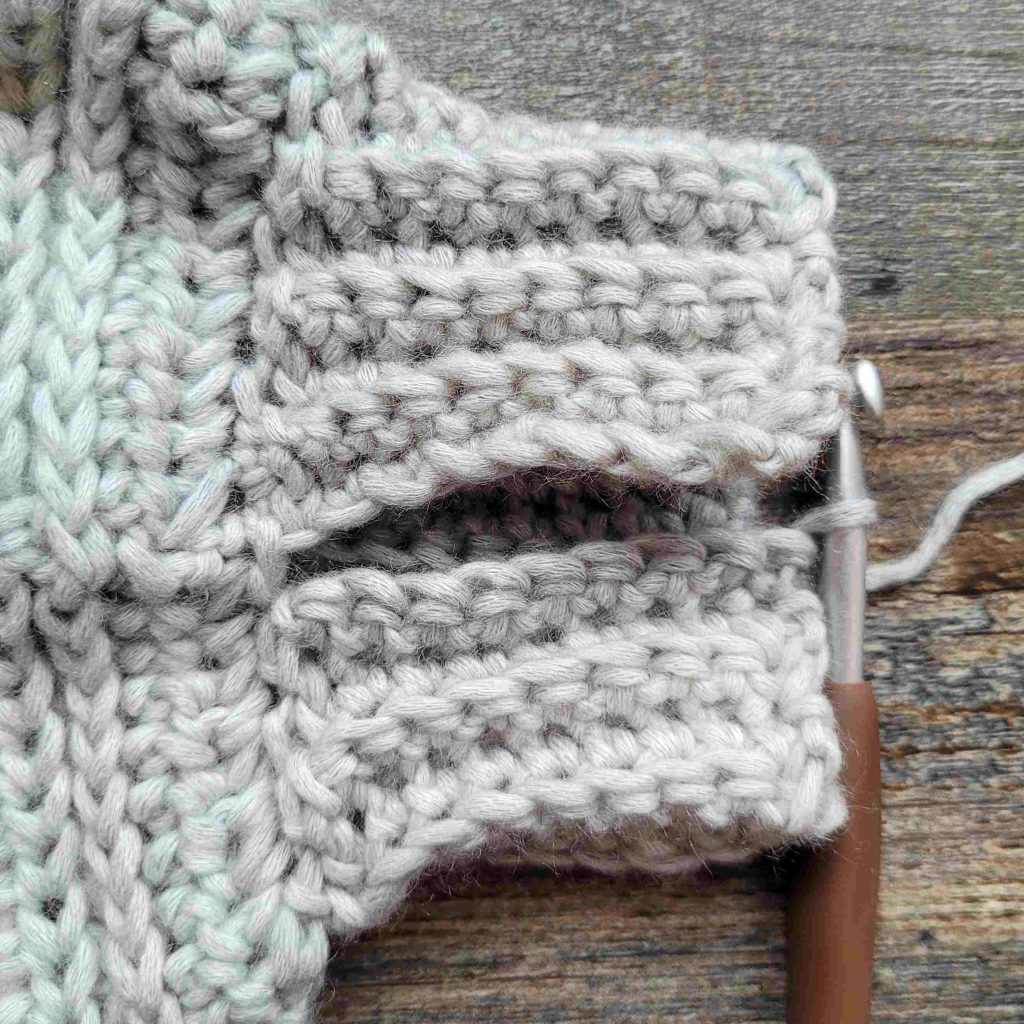
Figure 17
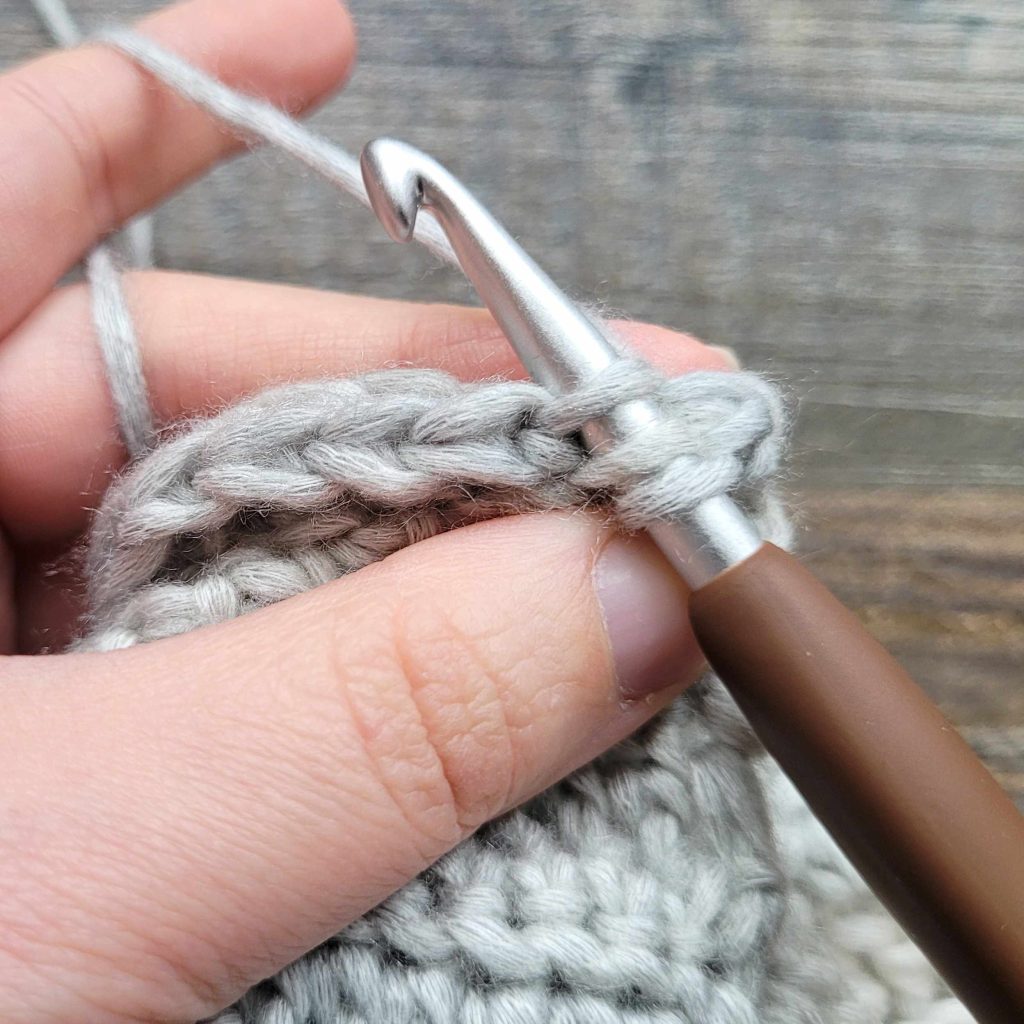
Figure 18
Free Crochet Cardigan Pattern – Trailhead Cardigan
Hood
With the RS facing you, join your yarn in the bottom of 1st ch of the neck (as seen in Figure 19). The 1st row will be worked into the bottom of the Yoke starting chain.

Figure 19
- (RS) Ch1. Hdc in 1st st. *Hdc2tog, ch1.** Repeat from * to ** until 1 st left. Hdc in last st. Turn. – 38 (50, 56, 62, 72, 78, 88, 94, 102) st
- (WS) Ch1. Hdc in 1st st. Hdc2tog over next 2 ch1 sp. Ch1. *Hdc2tog in same ch1 sp just worked and next ch1 sp. Ch1.** Repeat from * to ** until 3 sts left. Hdc2tog in same ch1 sp just worked and sp between last 2 sts. Ch1, hdc in last st. Turn. – 38 (50, 56, 62, 72, 78, 88, 94, 102) st
- Ch1. Hdc in 1st st. Hdc in ch1 sp. *Sk 1 st, 2hdc in next ch1 sp.** Repeat from * to ** until 2 sts left. Sk 1 st, hdc in sp between last 2 sts, hdc in last st. Turn. – 38 (50, 56, 62, 72, 78, 88, 94, 102) st
- Ch1. Hdc in 1st st. Hdc in 3rd lo until 1 st left. Hdc in last st. Turn. – 38 (50, 56, 62, 72, 78, 88, 94, 102) st
- Ch3. Dc in blo until 1 st left. Dc in last st. Turn. – 38 (50, 56, 62, 72, 78, 88, 94, 102) st
- Ch1. Hdc in 1st st and each st across. Turn. – 38 (50, 56, 62, 72, 78, 88, 94, 102) st
- Ch1. Hdc in 1st st. Hdc in blo until 1 st left. Hdc in last st. Turn. – 38 (50, 56, 62, 72, 78, 88, 94, 102) st
- Ch1. Hdc in 1st st. Hdc in 3rd lo until 1 st left. Hdc in last st. Turn. – 38 (50, 56, 62, 72, 78, 88, 94, 102) st
Repeat rows 1-8 until your hood is the desired height. For reference, I worked until my hood was 14” high.
Bind off, leaving a long tail for sewing. Fold the hood in half with the right sides together and whip stitch the top of the hood closed.
Trim
The ribbed trim is created by working short rows off of the body of the sweater. We will begin by adding a row of sc to the inner edge of the front opening (marked as red arrows in Figure 20). With the RS facing you, join your yarn in the side of the last row you worked of the Lower Body (marked as a red dot in Figure 20).
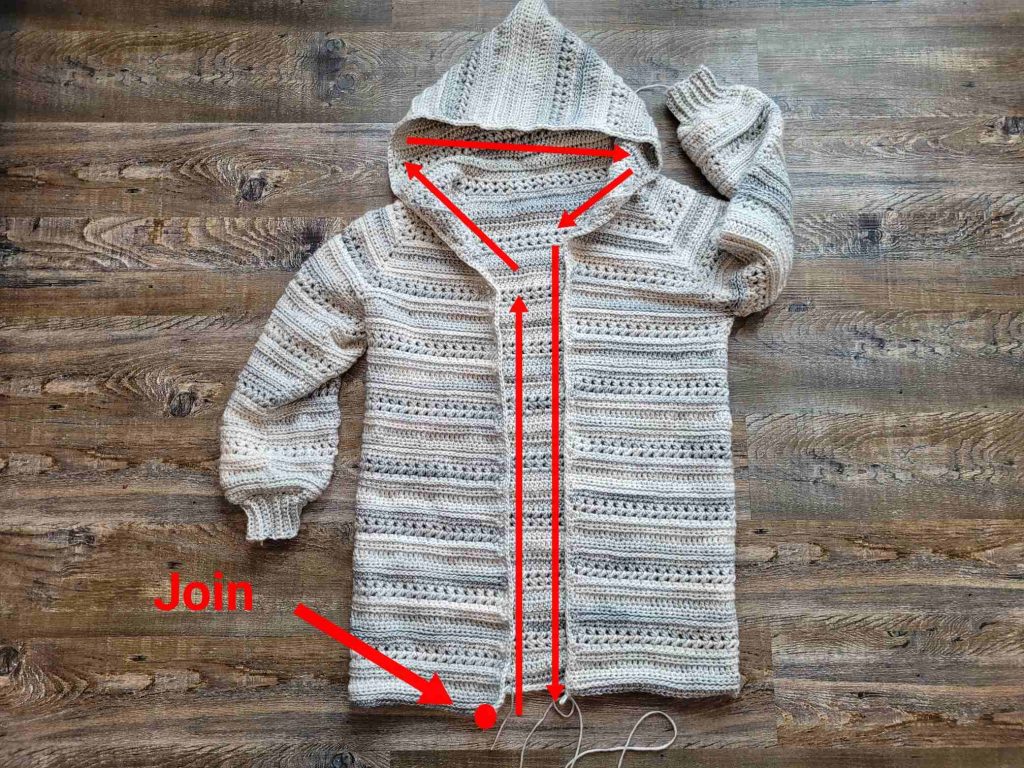
Figure 20
- Ch1. Sc evenly up the side, around the hood, and down the other side, working in the following manner:
– Work 1 sc into the side of each sc row.
– Alternate between working 1 or 2 sc into the side of each hdc row.
– Work 2 sc into the end of each dc row.
The total st count does not matter. Just be sure that the stitches are even, and your edge is laying flat with no puckering or waviness. Do not bind off.
Free Crochet Cardigan Pattern – Trailhead Cardigan
Ribbing
First, we will add the ribbing to the bottom of the sweater. Then, we will rotate the project and add more ribbing, working up one side of the front and down the other.
- (RS) Ch10 (see Figure 21). Sc in 2nd ch from hook and each ch across. Ss into side of sc you chained from. Ss to next st on bottom of sweater (see Figure 22). Turn. – 9 st + 2 ss
- (WS) Sk 2 ss. Sc in blo of 1st 8 sts. Sc in both loops of last st. Turn. – 9 st
- Ch1. Sc in 1st st. Sc in blo of last 8 sts. Ss to next 2 unworked sts on body of sweater. Turn. – 9 st + 2 ss
Repeat rows 2 & 3 across the whole bottom of the sweater, as seen in Figure 23.
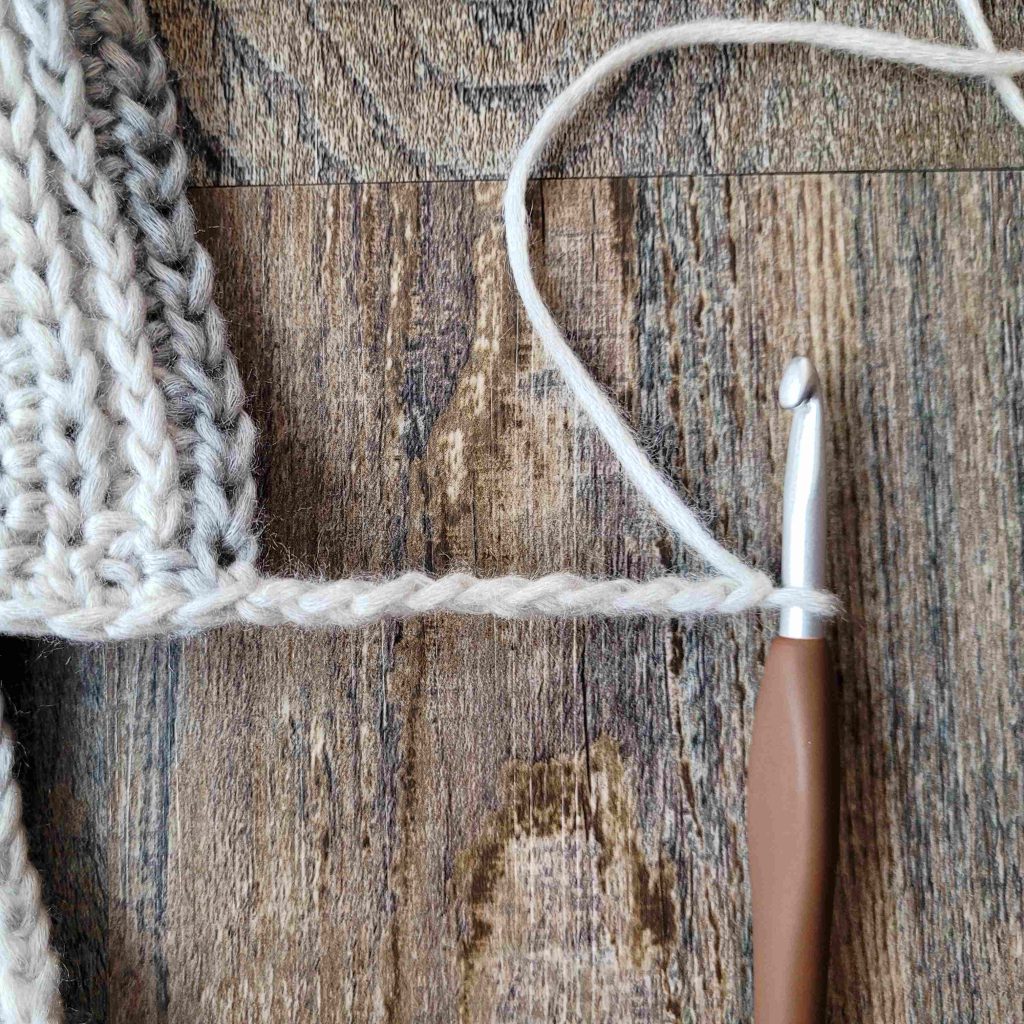
Figure 21
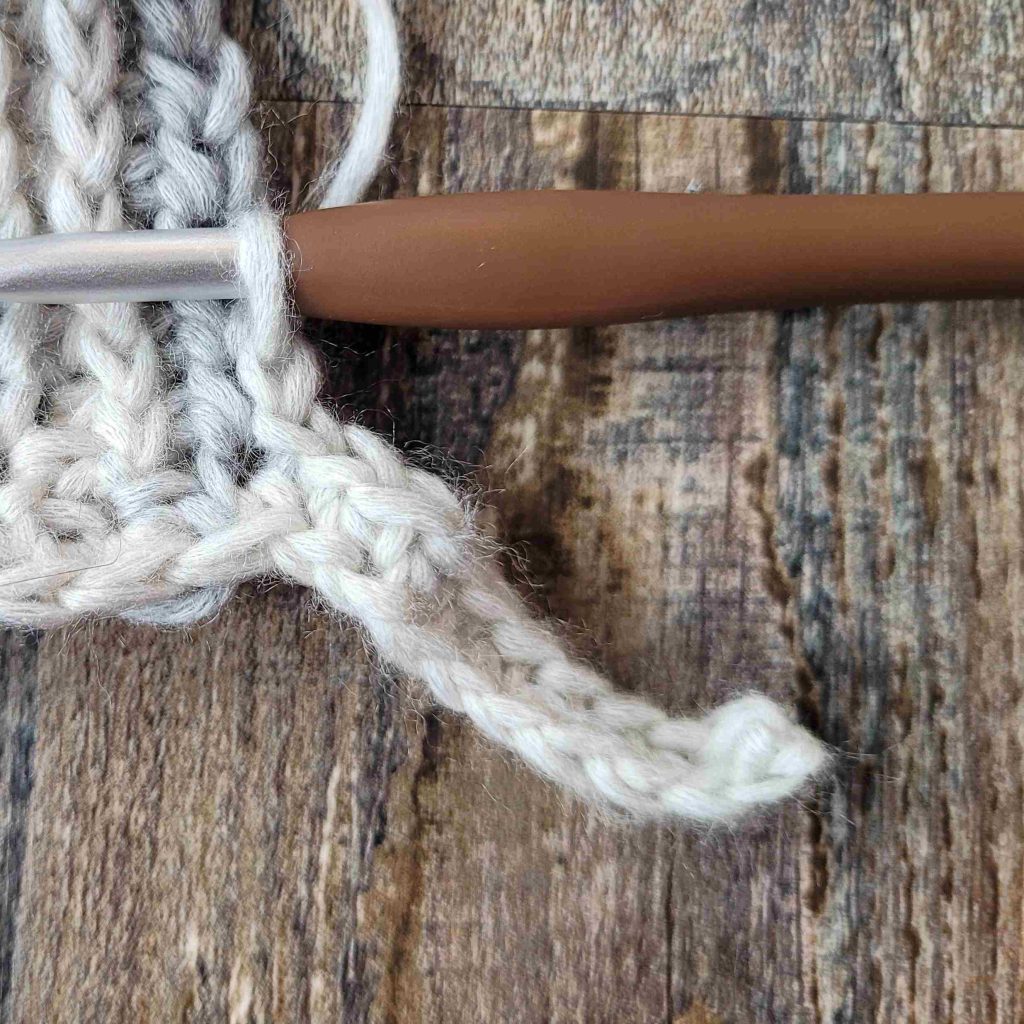
Figure 22
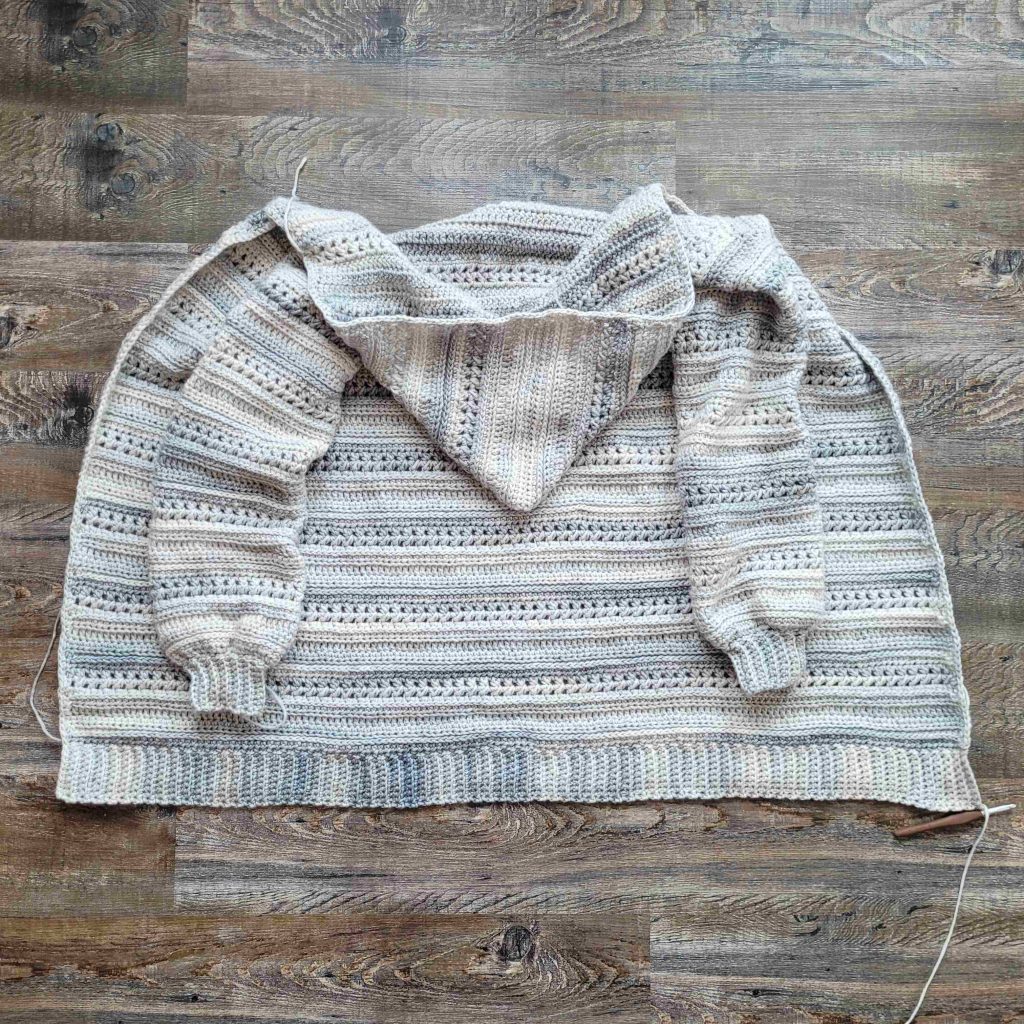
Figure 23
If you are adding buttons to your sweater, it is at this point that you should figure out the buttonhole placement. To do this, I laid my sweater flat and placed the buttons where I would like them to be along the edge of my sweater. Then, I used locking stitch markers to mark where I should place the button holes on the other side. I have illustrated this in Figure 24. Be sure the button holes are evenly spaced.
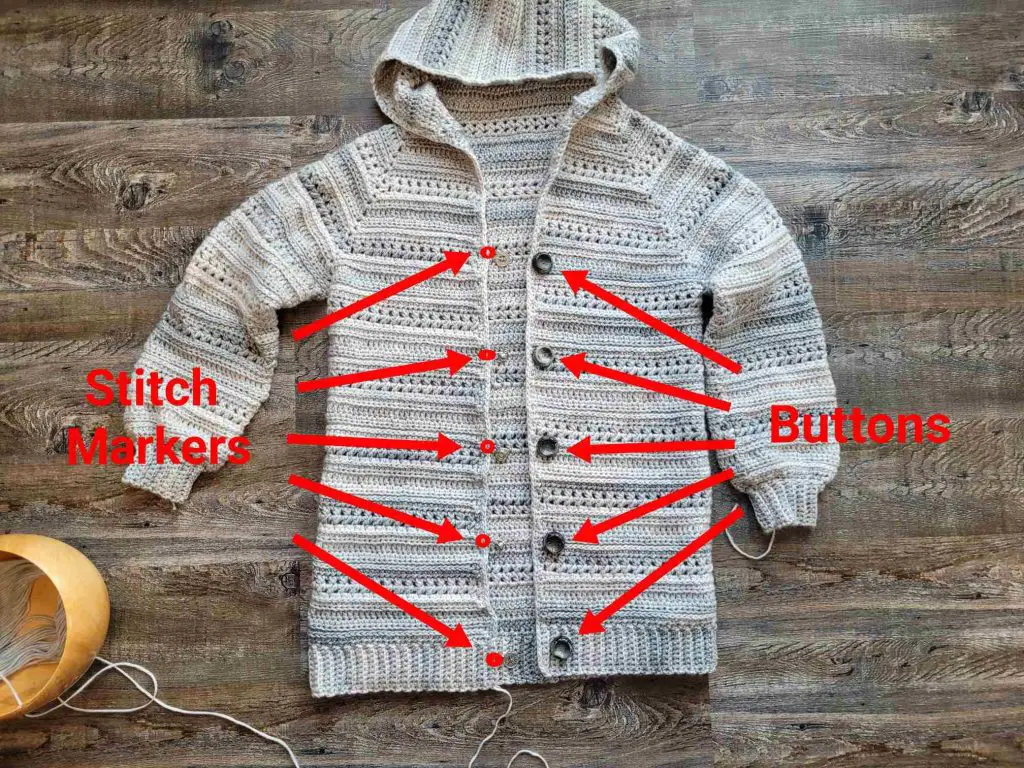
Figure 24
Now we will add ribbing to the front of the sweater. If you are not adding buttons, then simply repeat the ribbing instructions above, beginning at the ch10 of row 1 (see Figure 25), working across your last row of ribbing (see Figure 26) up the side, around the hood, down the other side, and across the bottom of your first row of ribbing (see Figure 27). If you are adding buttons, then follow the same instructions, adding the button hole rows as you hit each stitch marker.
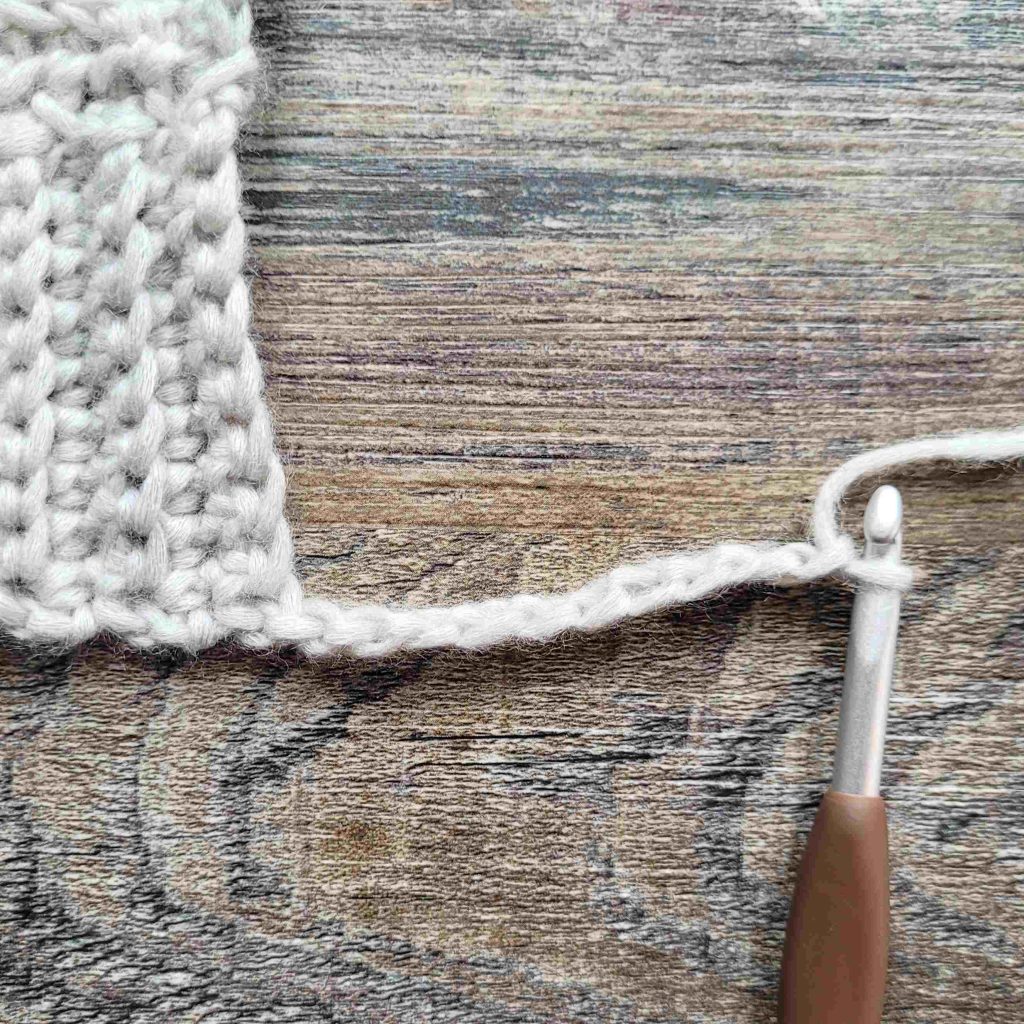
Figure 25
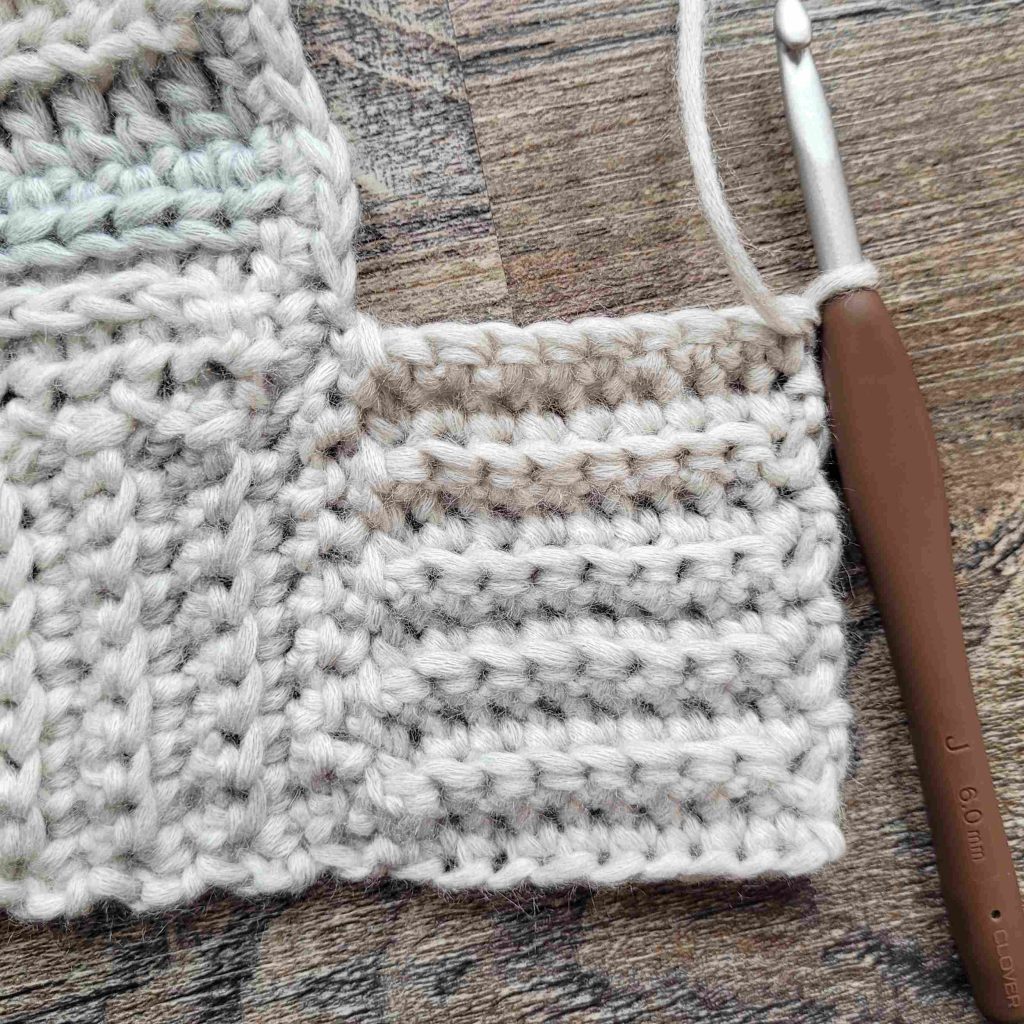
Figure 26
Figure 27
Button Holes
When you come to a stitch marker, you want to have just finished a repeat of row 2 (see Figure 28). It’s ok if you are off of your stitch marker by 1 stitch. It won’t make a difference. Work the button rows below, then continue working normal ribbing rows.
- Ch1. Sc in 1st st. Sc in blo of next 2 sts. Ch3, sk 3 sts, sc in blo of last 3 sts. Ss to next 2 sts (see Figure 29). Turn. – 9 st + 2 ss
- Sk 2 ss, Sc in blo of next 3 sts. 3sc in ch3 sp. Sc in blo of next 2 sts. Sc in both loops of last st. Turn (see Figure 30). – 9 st
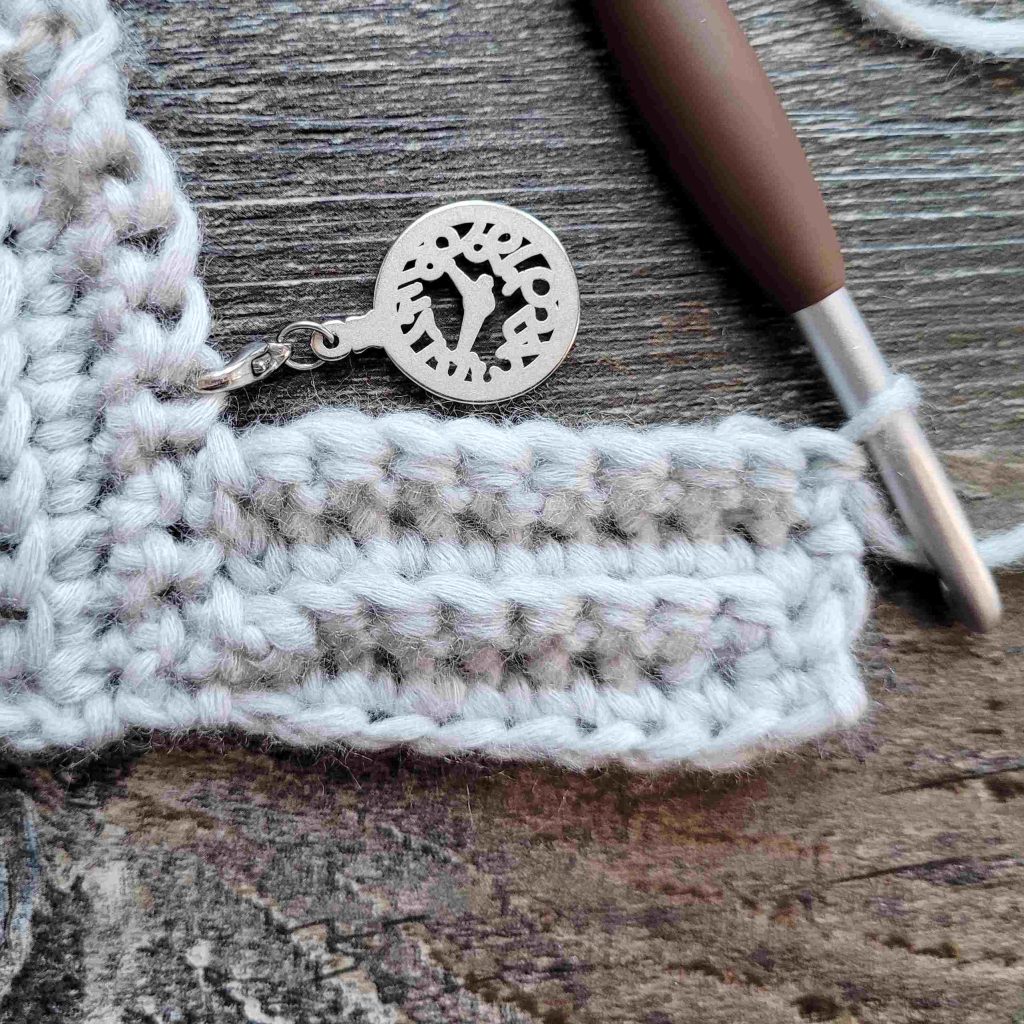
Figure 28
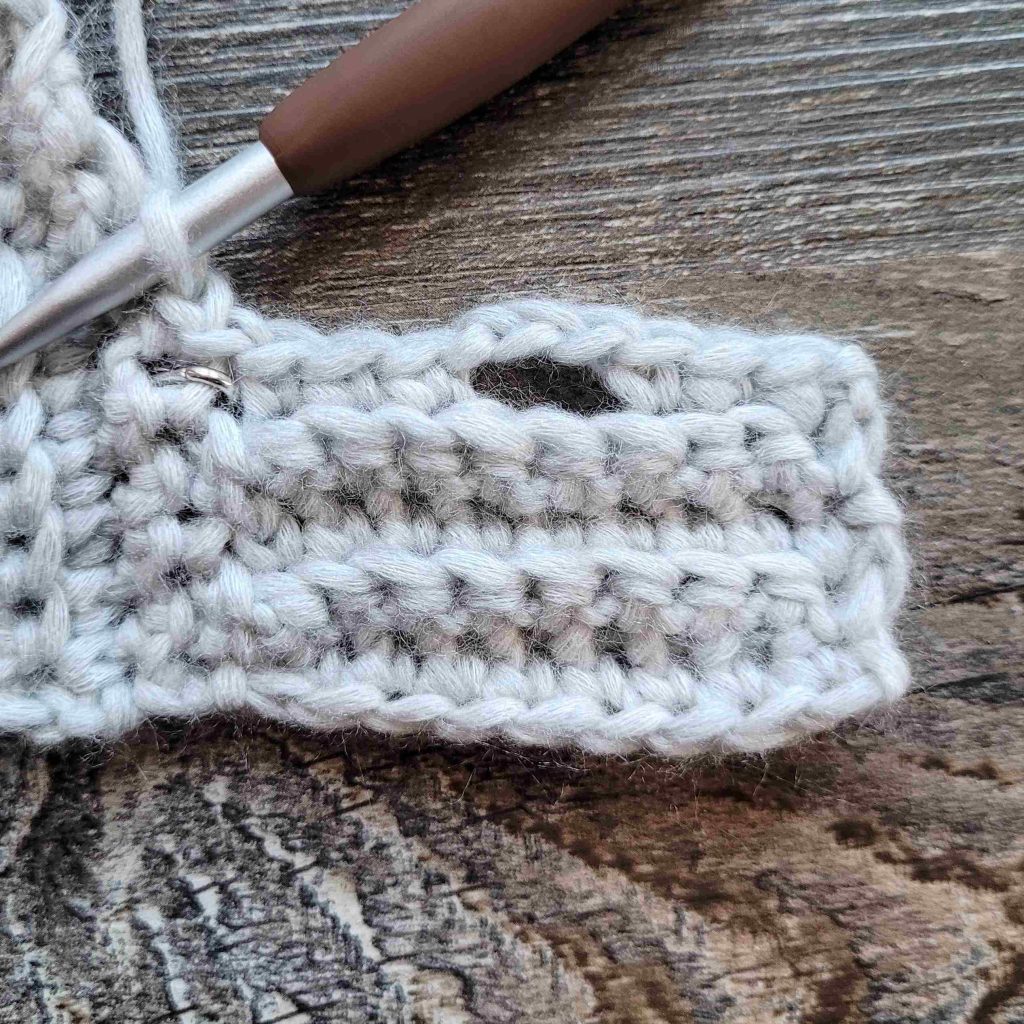
Figure 29
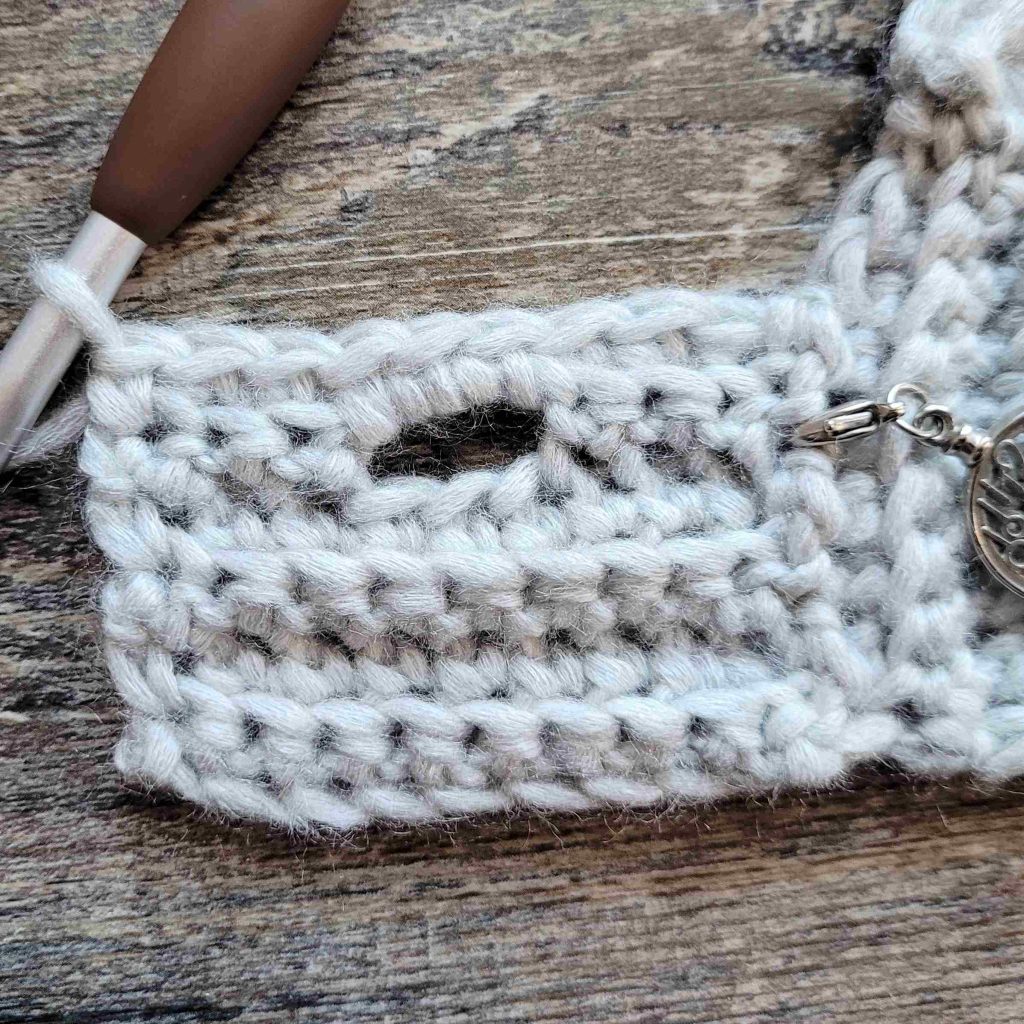
Figure 30
Once you have added ribbing to the entire front, bind off.
Free Crochet Cardigan Pattern – Trailhead Cardigan
Pockets
The following instructions will make pockets that are approximately 6 ¼” wide by 7 ½” deep. If you would like a wider or narrower pocket you can add or subtract rows to the pocket ribbing in multiples of 2 (this will also add or subtract stitches to the pocket body in multiples of 2). If you would like a deeper or shorter pocket you can add or subtract rows to the pocket body in multiples of 2.
Pocket Ribbing
We’ll start by making the ribbing at the top of the pocket, then add rows along the side of the ribbing to create the body of the pocket. Begin with a long tail for sewing the pocket on when it is complete.
- (WS) Ch6. Sc in 2nd ch from hook and each ch across. Turn. – 5 st
- (RS) Ch1. Sc in 1st st. Sc in blo of last 4 sts. Turn. – 5 st
- Ch1. Sc in blo of 1st 4 sts. Sc in both loops of last st. Turn. – 5 st
Repeat rows 2 & 3 until you have a total of 22 rows. Do not turn on the last row. Do not bind off. Your project should look similar to Figure 31. The 1st row of the pocket body will be worked into the sides of the ribbing rows as seen in Figures 32 & 33.
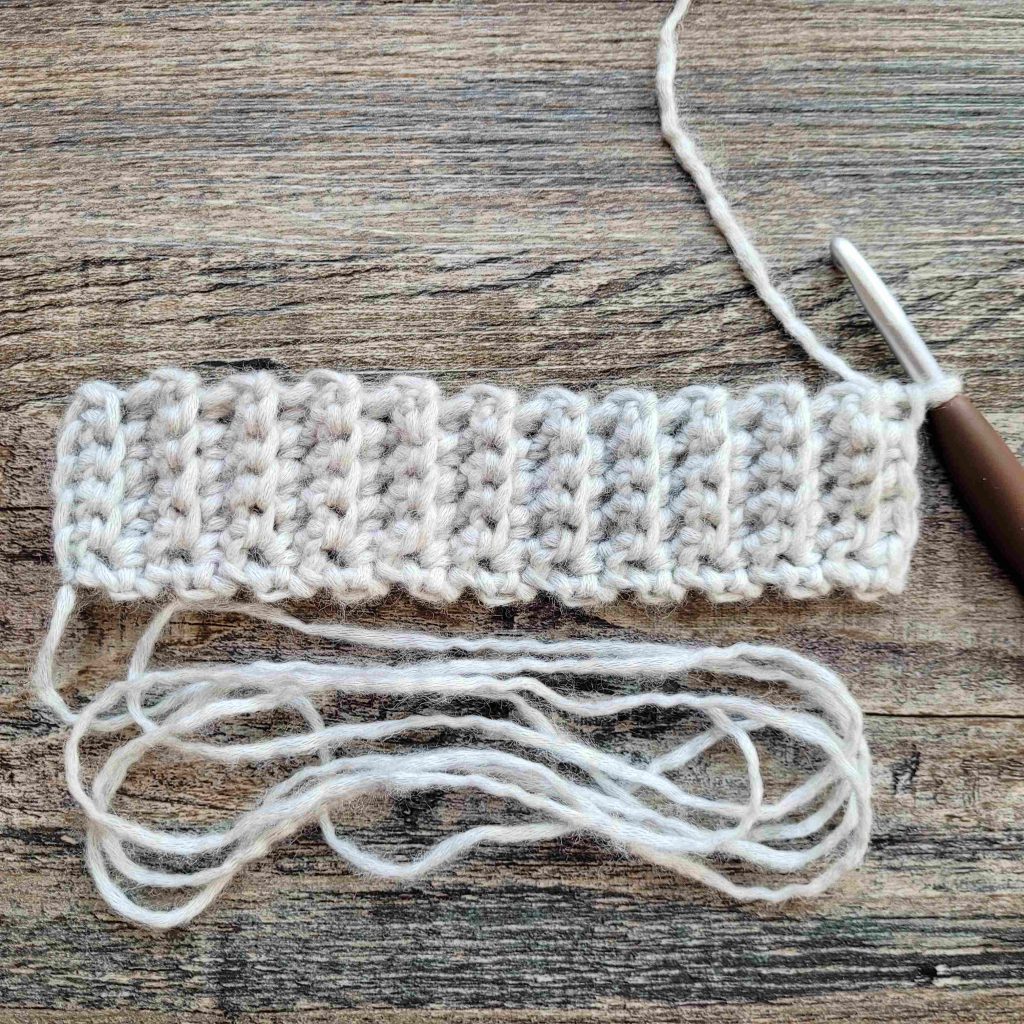
Figure 31
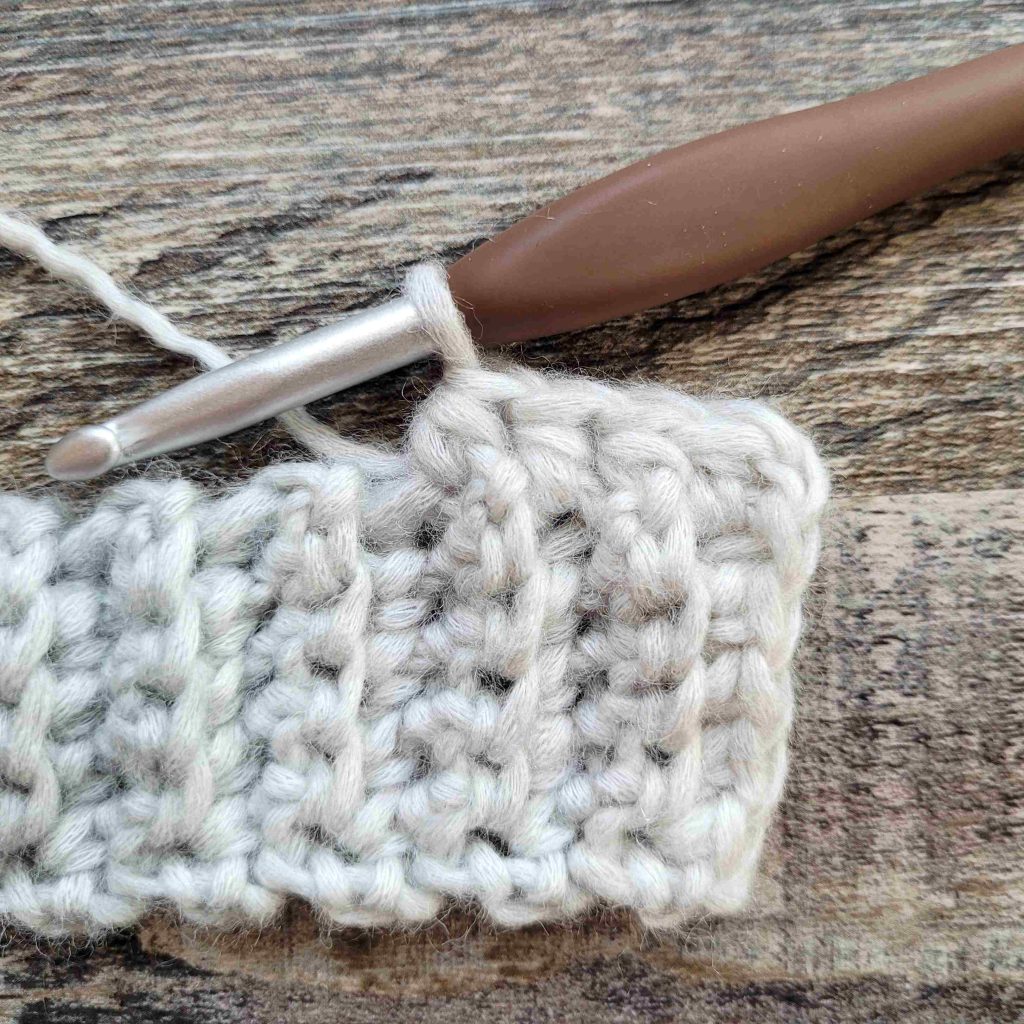
Figure 32
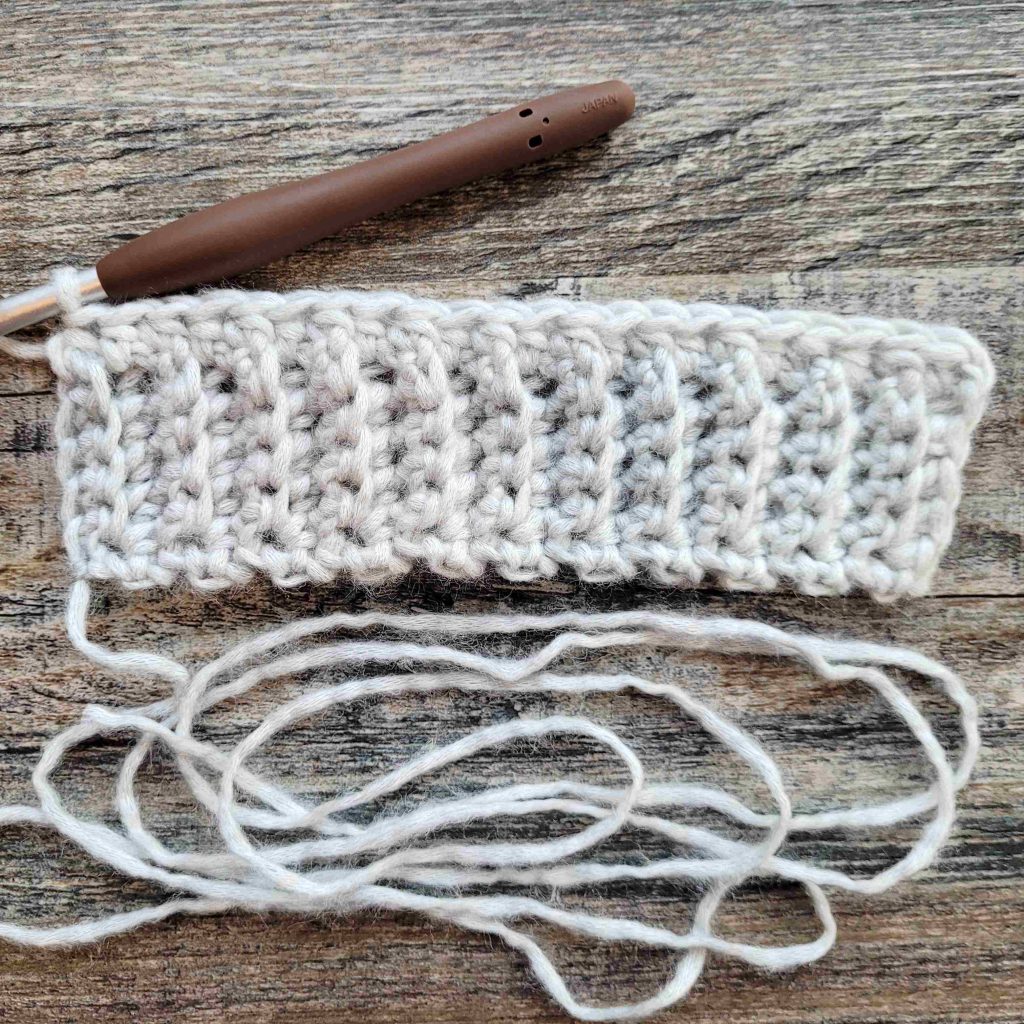
Figure 33
Pocket Body
- (RS) Ch1. Work 1 hdc into the side of each ribbing row. Turn. – 22 st
- (WS) Ch1. Hdc in 1st st. Hdc in 3rd lo until 1 st left. Hdc in last st. Turn. – 22 st
- Ch1. Hdc in 1st st. *Hdc2tog, ch1.** Repeat from * to ** until 1 st left. Hdc in last st. Turn. – 22 st
- Ch1. Hdc in 1st st. Hdc2tog over next 2 ch1 sp. Ch1. *Hdc2tog in same ch1 sp just worked and next ch1 sp. Ch1.** Repeat from * to ** until 3 sts left. Hdc2tog in same ch1 sp just worked and sp between last 2 sts. Ch1, hdc in last st. Turn. – 22 st
- Ch1. Hdc in 1st st. Hdc in ch1 sp. *Sk 1 st, 2hdc in next ch1 sp.** Repeat from * to ** until 2 sts left. Sk 1 st, hdc in sp between last 2 sts, hdc in last st. Turn. – 22 st
- Ch1. Hdc in 1st st. Hdc in 3rd lo until 1 st left. Hdc in last st. Turn. – 22 st
- Ch3. Dc in blo until 1 st left. Dc in last st. Turn. – 22 st
- Ch1. Hdc in 1st st and each st across. Turn. – 22 st
- Ch1. Hdc in 1st st. Hdc in blo until 1 st left. Hdc in last st. Turn. – 22 st
Repeat rows 2-6 so you have a total of 14 rows. Bind off. Sew the pockets to the sweater.
Add your buttons, weave in your ends, and you’re done!
I hope you love your new crochet cardigan, and I look forward to seeing all of your beautiful pictures on Ravelry!
If you’d like to know when I post new patterns and tutorials like the Free Crochet Cardigan Pattern – Trailhead Cardigan, head on over to my Facebook and Instagram and give me a like and a follow!
If you enjoyed the Free Crochet Cardigan Pattern – Trailhead Cardigan, you may want to check out my other designs!
Free Crochet Cardigan Pattern – Trailhead Cardigan
And until next time… Happy Hooking! 😉
Hi, i read your blog from time to time and i own a similar one and i was just
wondering if you get a lot of spam responses? If so how do you
reduce it, any plugin or anything you can advise? I get so much lately it’s driving me insane so any assistance is very much appreciated.
Hi there. Thanks for reading the blog!
I don’t have a plugin. But if I get a lot of spam from a certain IP, then I will block them to stop it. I also have comment approval turned on, so I have to approve all comments manually.
Hope that helps, and good luck with your blog!
What a great looking sweater! And I love the raglan sleeves (my pet peeve is shoulder seams halfway down the arms). Thank you SO MUCH for your generosity!
Thank you, Sue! I’m glad you love it! <3
I have been searching for so long for a pattern like this! Your patterns are well written and easy to follow. Can’t wait to make more of them!
Thank you, Hannah!
I’m so glad you are enjoying my designs! Thank you for your kind words! <3