
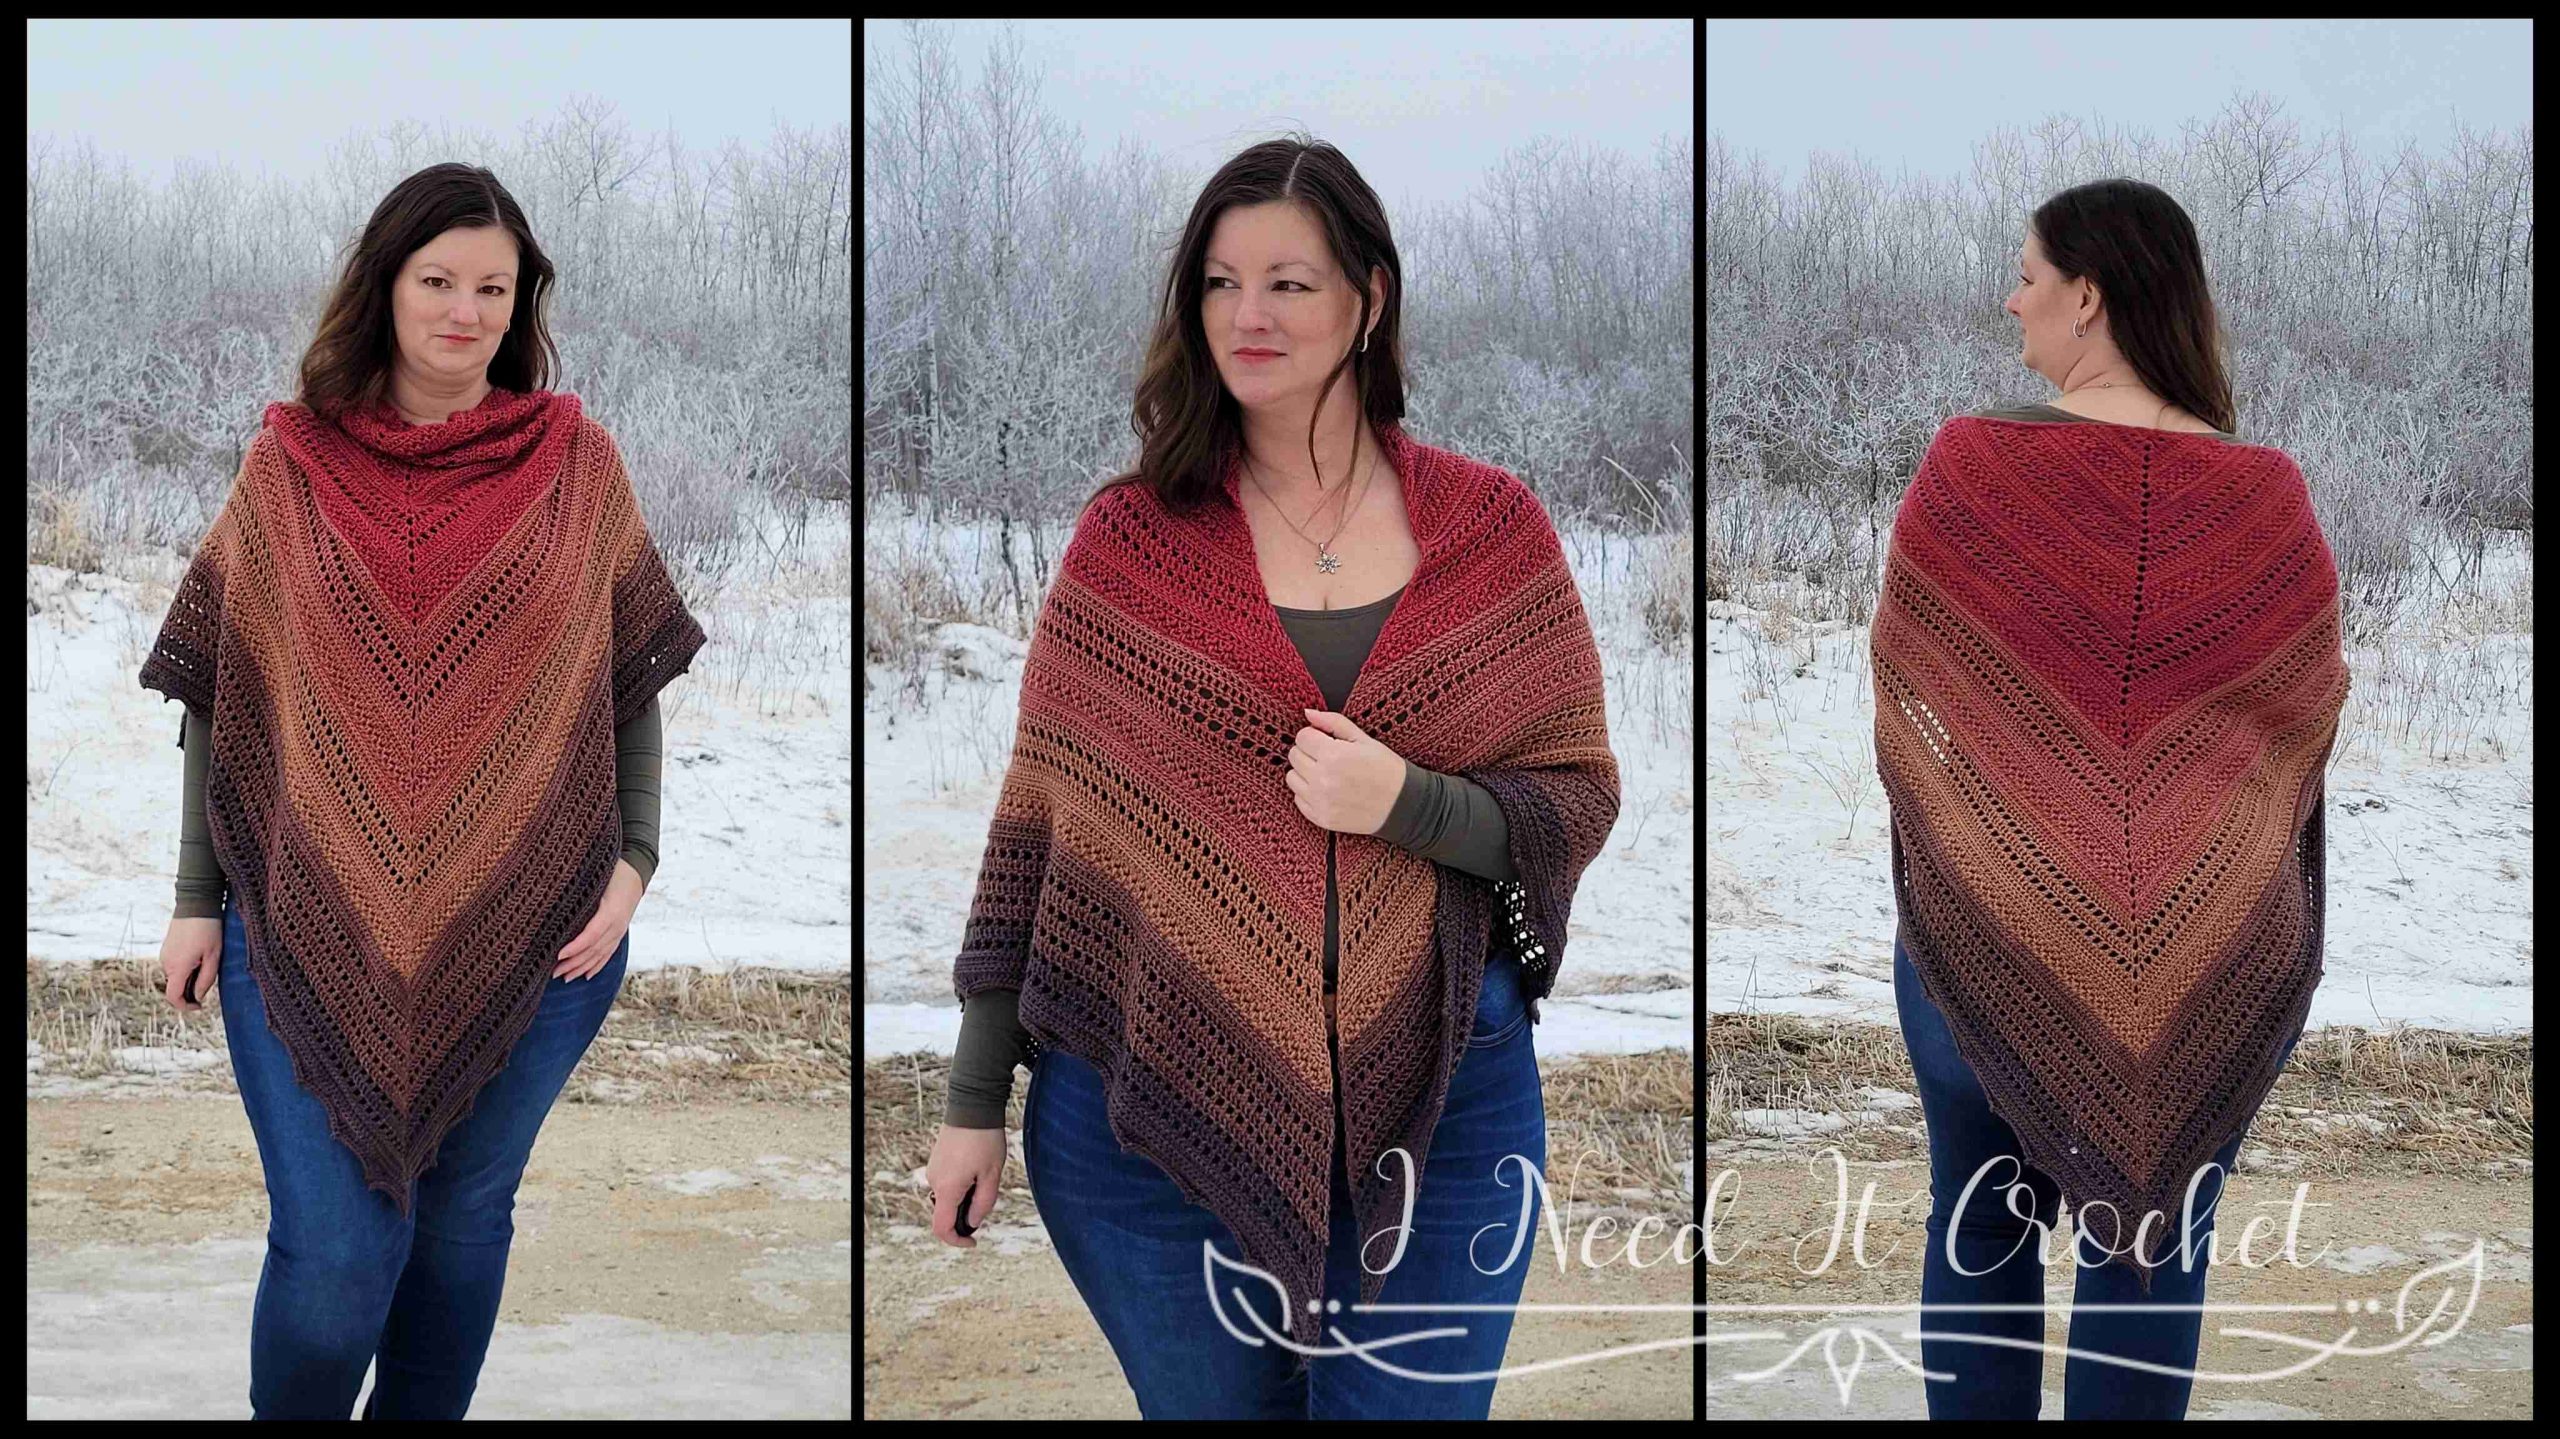
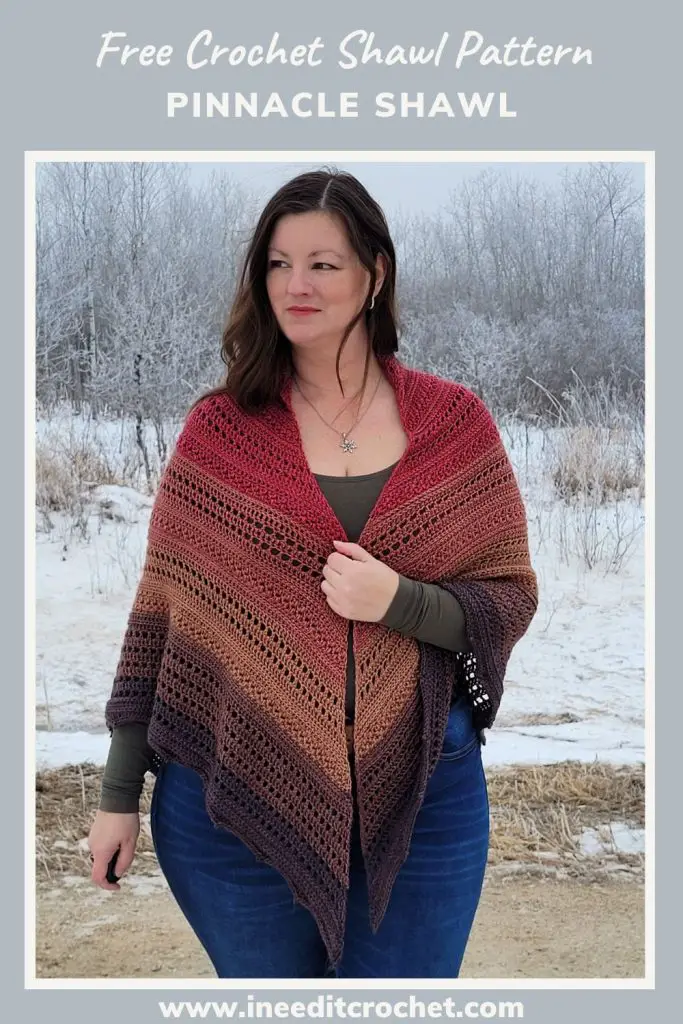
Free Crochet Shawl Pattern – Pinnacle Shawl
The Free Crochet Shawl Pattern – Pinnacle Shawl is copyrighted by I Need It Crochet. You may not copy, share, change, or sell the pattern itself. Also, you may not claim this pattern as your own. All pictures contained in this pattern fall under the copyright and may not be used.
Finished items made from the Free Crochet Shawl Pattern – Pinnacle Shawl belong to you, and you may do what you wish with them. If you choose to sell them on Etsy, I would very much appreciate it if you credited me as the pattern designer.
Where Can I Buy The Pdf?
The entire pattern is available to view for free on this page (you just have to scroll down to see it). But if you would prefer to have a printable pdf copy of the pattern, you can purchase it for a small fee from my Ravelry and Etsy stores. Just click the graphics below.
This pattern is 7 pages long and contains stitch tutorials for the mixed cluster and 3rd loop only stitches, plus detailed instructions of how to complete your crochet shawl. A printable pdf will be easier to follow, and you can make notes on it as you go. I find it to be the easier option. But if you like to use the online version, it is here 24/7 for you to view. Enjoy!
Free Crochet Shawl Pattern – Pinnacle Shawl
Free Crochet Shawl Pattern – Pinnacle Shawl
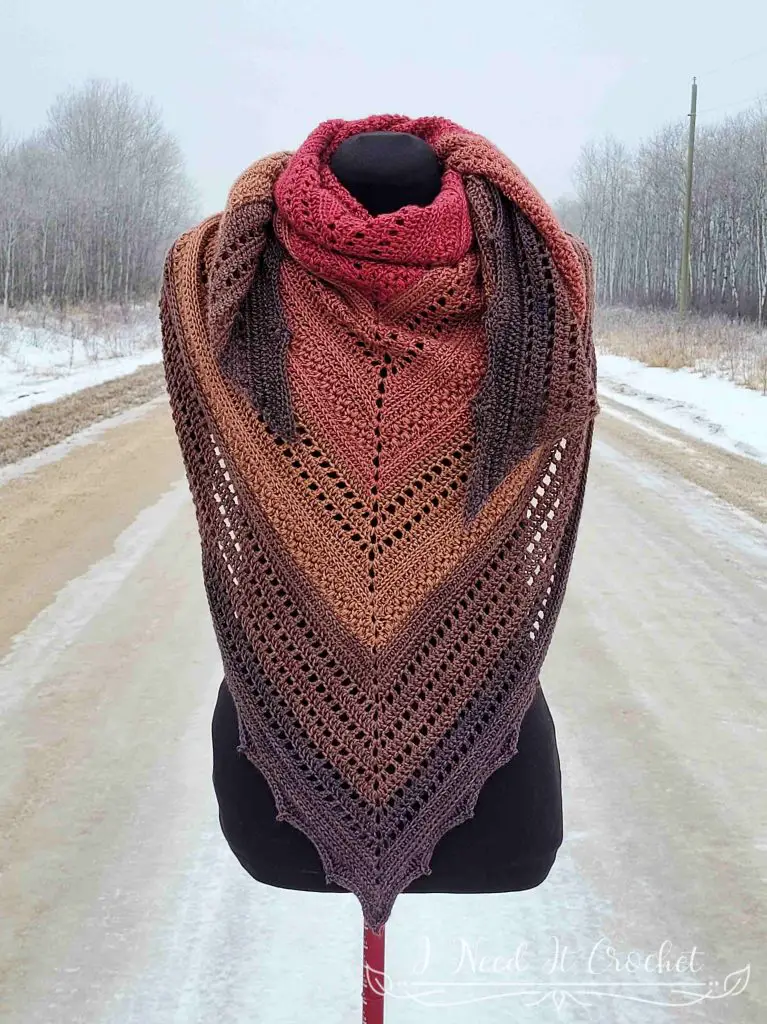
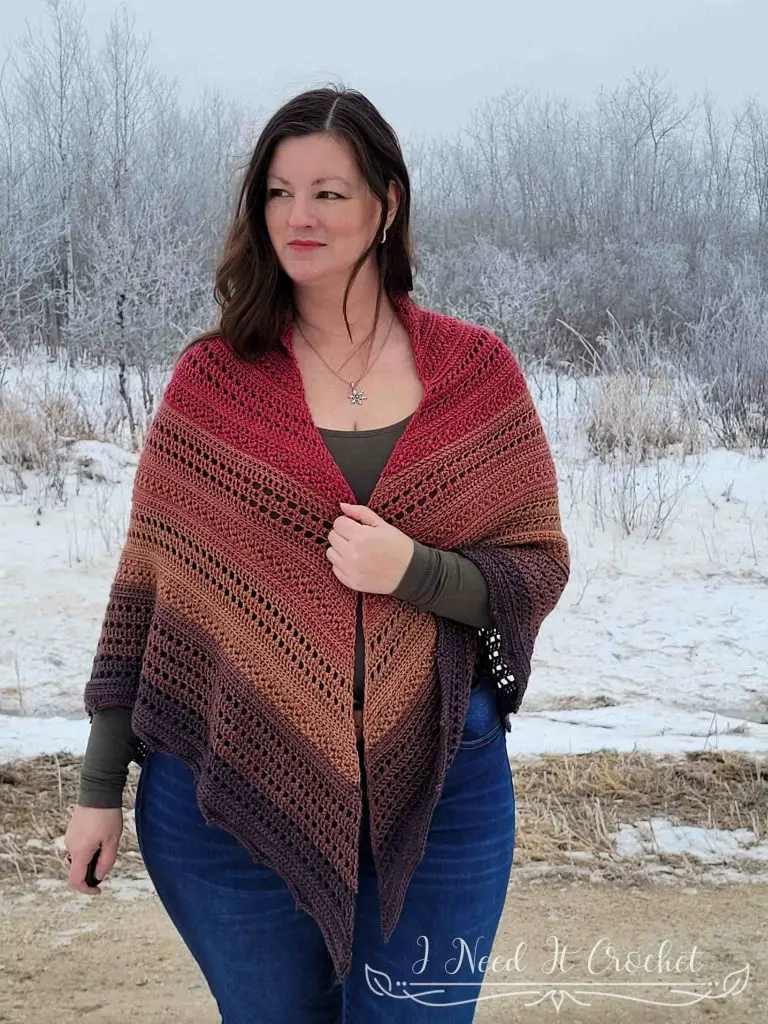
When I created the Pinnacle Pullover, I knew right away that those stitches paired with Expression Fiber Arts Beacon DK Yarn, would be perfect for a matching shawl.
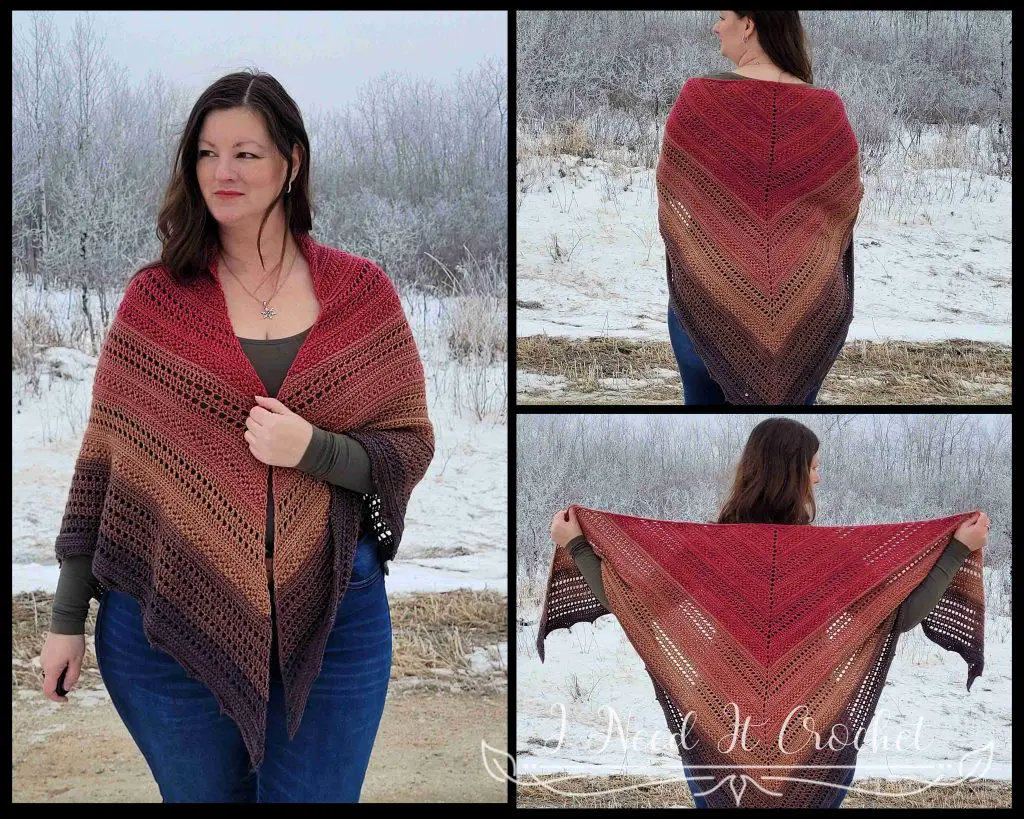
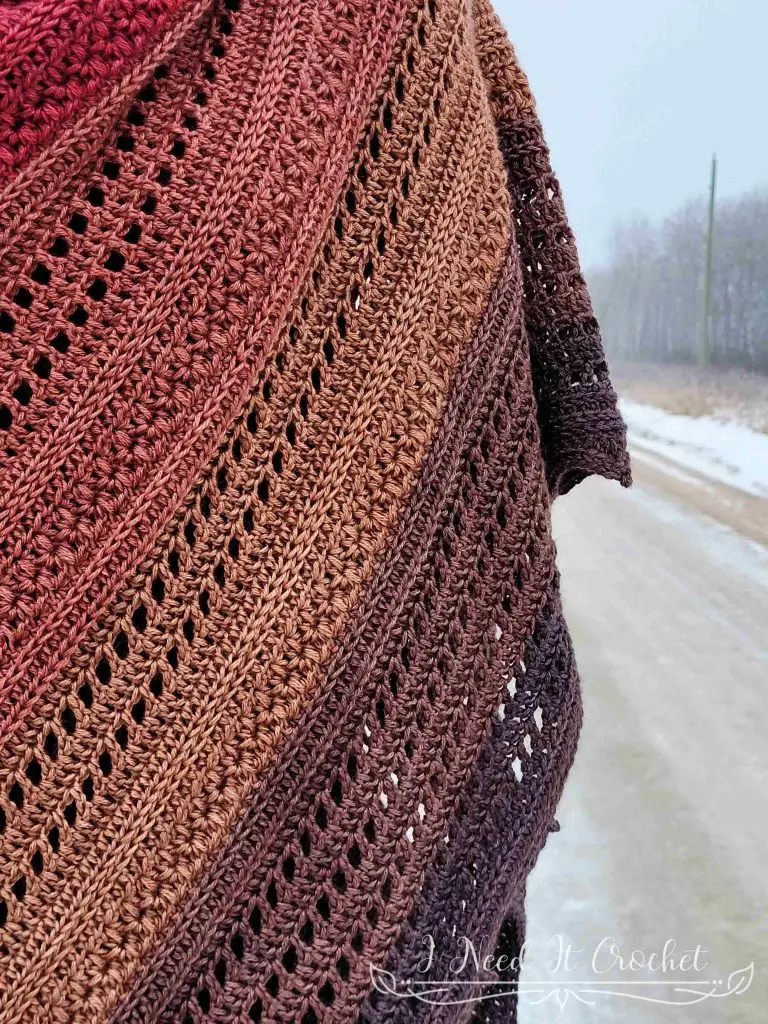
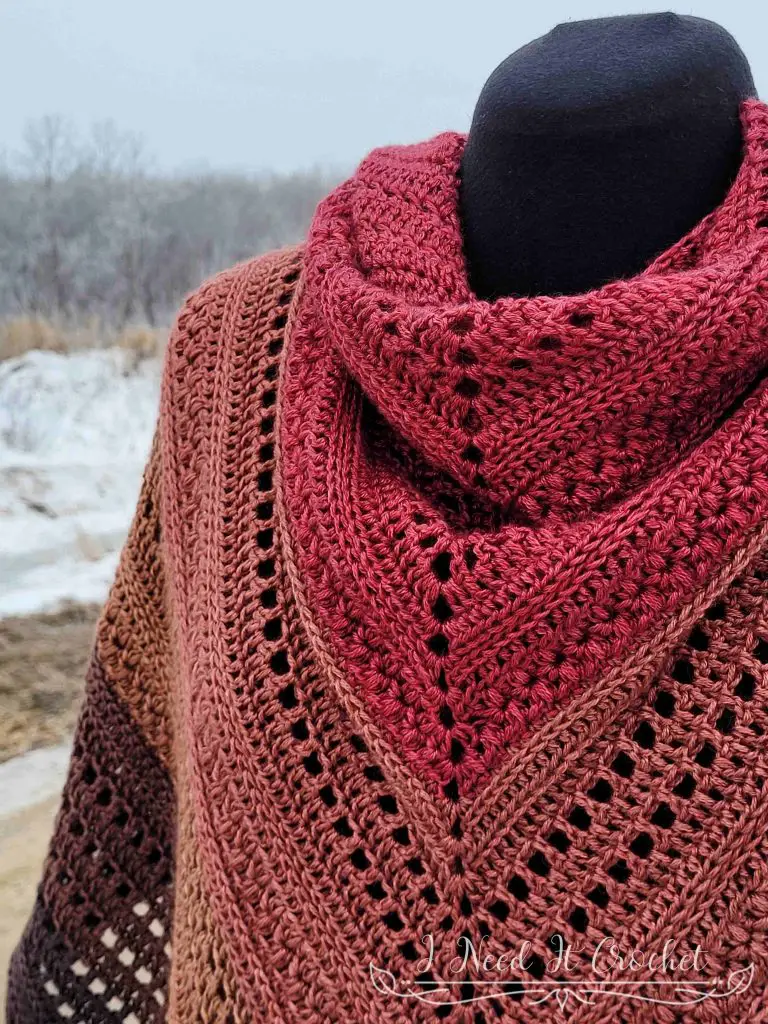
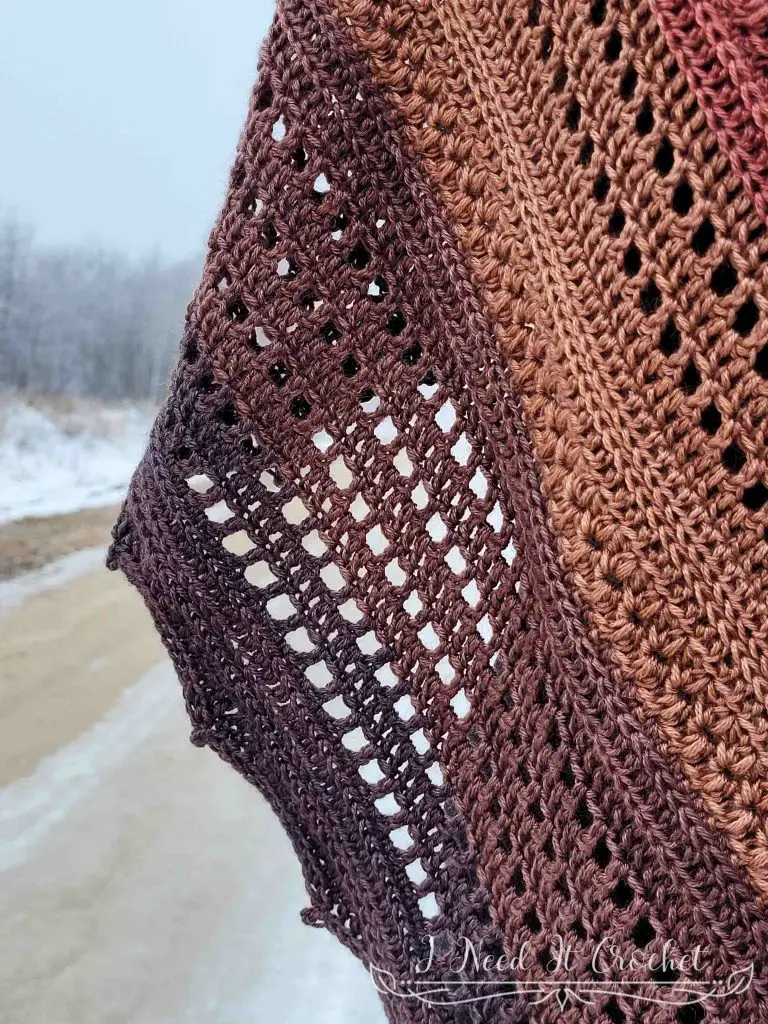
Constructed from a combination of simple and textured stitches, this shawl is a quick and easy project. Basic double crochet and mesh stitches give the piece lightness and drape, while the mixed cluster, back loop, and third loop stitches add character.
Want to Pin it for later?
Click the image below and save the pin to your favourite crochet pattern boards!
Free Crochet Vest Pattern – Fuzzy Textures
Free Crochet Shawl Pattern – Pinnacle Shawl
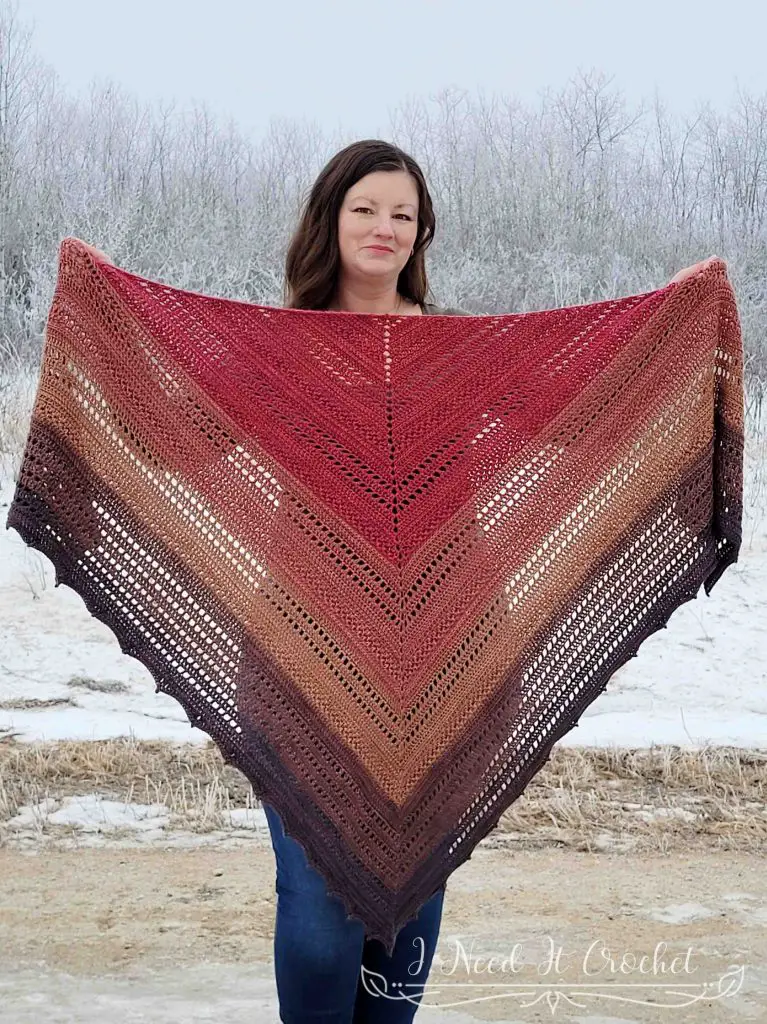
Finished Size:
Instructions given to make a 39” H x 77” W shawl (after blocking) with added notes for making a smaller or larger shawl.
Abbreviations:
RS = Right Side
WS = Wrong Side
Beg = Beginning
Sk = Skip
St = Stitch
Sp = Space
Ss = Slip Stitch
Ch = Chain
Sc = Single Crochet
Hdc = Half Double Crochet
Dc = Double Crochet
Tr = Treble Crochet
Dbtr = Double Treble Crochet
Blo = Back Loop Only
3rd Lo = 3rd Loop Only
Materials:
I used Expression Fiber Arts Beacon DK yarn, which is a 25% Baby Camel/25% Mulberry Silk/50% Lyocelll, #3 DK weight yarn.
Any yarn of similar weight would work.
Approximately 1250 yds.
4.5mm Hook
Stitch Markers
Yarn Needle
Scissors
Measuring Tape
Gauge:
If you are using a different yarn, gauge is not very important with this shawl. Use a hook that suits your yarn and gives it a good drape.
If you are using the same yarn I used and you would like to achieve the same drape, you may want to get close to the gauge I achieved.
I have noted in the pattern at which points you should measure for gauge.
Notes:
Ch1 at the beginning of a row is never considered a stitch.
Ch1 between sts does count as a stitch.
Ch3 at the beginning of a row is considered a dc.
Free Crochet Shawl Pattern – Pinnacle Shawl
About The Yarn:
I’m so thrilled to be teaming up with Expression Fiber Arts once again! This time, I’ve given the Pinnacle Shawl a fresh new look with their luscious Beacon DK yarn—and I couldn’t be happier with the result!
Free Crochet Shawl Pattern – Pinnacle Shawl
This incredible yarn is crafted from a dreamy blend of Baby Camel, Mulberry Silk, and Lyocell, creating one of the softest fibers I’ve ever worked with. The colors are rich and vibrant, with just a touch of sheen, while the fabric itself has a beautiful drape and just the right amount of spring. No matter which shade you choose, I promise—you won’t be disappointed! This is truly the most luxurious yarn I’ve ever had the pleasure of using.

Free Crochet Shawl Pattern – Pinnacle Shawl
This yarn is only available on the Expression Fiber Arts website. Just click the button below to shop their beautiful colourways!
Instructions
This shawl is created in one piece, working in rows. For my shawl I changed colours on rows: 33, 47, 57, & 66.
With 4.5 mm hook:
Ch4, ss to 1st ch to form a ring. Or, begin with a magic ring and pull tight after row 1.
- (RS) Ch3. Work 3dc, ch2, 4dc into ring. Turn. – 8 st + ch2 peak
- (WS) Ch4 (counts as dc + ch1). Dc in next st. *Ch1, sk1 st, dc in next st.** Ch1, (dc, ch2, dc) in ch2 sp. Ch1, dc in next st. Repeat from * to **. Ch1, dc in last st. Turn. – 14 st + ch2 peak
- Ch3, dc in 1st st (counts as 2dc in 1st st). Dc in each st and ch sp until the ch2. (2dc, ch2, 2dc) in ch2 sp. Dc in each st and ch sp until 1 left. 2dc in last st. Turn. – 20 st + ch2 peak
- Ch1, 2hdc in 1st st. Hdc in each st until ch2. (2hdc, ch2, 2hdc) in ch2 sp. Hdc in each st until 1 left. 2hdc in last st. Turn. – 26 st + ch2 peak
- Ch1, 2hdc in 1st st. Hdc in blo of each st until ch2. (2hdc, ch2, 2hdc) in ch2 sp. Hdc in blo of each st until 1 left. 2hdc in both loops of last st. Turn. – 32 st + ch2 peak
- Ch1, 2hdc in 1st st. Hdc in 3rd lo of each st until ch2. (2hdc, ch2, 2hdc) in ch2 sp. Hdc in 3rd lo of each st until 1 left. 2hdc in top loops of last st. Turn. – 38 st + ch2 peak
Gauge check: At this point my triangle measured 3 ¼” H x 5 ¼” W (unblocked).
Free Crochet Shawl Pattern – Pinnacle Shawl
- Ch1, hdc in 1st st. Ch1, beg in same st, mc until ch2. (2hdc, ch2, 2hdc) in ch2 sp. Ch1, beg in next st, mc to last st. Add 1 more hdc to last st. Turn. – 44 st + ch2 peak
- Ch1, 2hdc in 1st st. Ch1, beg in next st, mc until the ch2. (2hdc, ch2, 2hdc) in ch2 sp. Ch1, beg in next st, mc until 1 st left. 2hdc in last st. Turn. – 50 st + ch2 peak
- Ch1, 2hdc in 1st st. Hdc in each st until ch2. (2hdc, ch2, 2hdc) in ch2 sp. Hdc in each st until 1 left. 2hdc in last st. Turn. – 56 st + ch2 peak
- Ch1, 2hdc in 1st st. Hdc in 3rd lo of each st until ch2. (2hdc, ch2, 2hdc) in ch2 sp. Hdc in 3rd lo of each st until 1 left. 2hdc in top loops of last st. Turn. – 62 st + ch2 peak
Gauge check: Your triangle should measure 5 ¼” H x 8 ” W (unblocked). If your measurements are not close to correct, try again with a different sized hook.
- Ch3, dc in 1st st. Dc in blo of each st until ch2. (2dc, ch2, 2dc) in ch2 sp. Dc in blo of each st until 1 left. 2dc in both loops of last st. Turn. – 68 st + ch2 peak
- Ch4 (counts as dc + ch1), dc in next st. *Ch1, sk1 st, dc in next st.** Repeat from * to ** until the center ch2. Ch1, (dc, ch2, dc) in ch2 sp. Ch1, dc in next st. Repeat from * to ** until 1 st left. Ch1, dc in last st. Turn. – 74 st + ch2 peak
- Ch3, dc in 1st st (counts as 2dc in 1st st). Dc in each st and ch sp until the ch2. (2dc, ch2, 2dc) in ch2 sp. Dc in each st and ch sp until 1 left. 2dc in last st. Turn. – 80 st + ch2 peak
- Ch4 (counts as dc + ch1), dc in next st. *Ch1, sk1 st, dc in next st.** Repeat from * to ** until the center ch2. Ch1, (dc, ch2, dc) in ch2 sp. Ch1, dc in next st. Repeat from * to ** until 1 st left. Ch1, dc in last st. Turn. – 86 st + ch2 peak
Repeat rows 3-14 until you have reached the desired length, minus approximately 7” (measuring at the center peak) Be sure to end with a repeat of row 14. Then repeat rows 13 & 14 three times (adding a total of 6 rows). For reference: I repeated rows 3-14 until I had a total of 62 rows. Then, I repeated rows 13 & 14 three more times, bringing my total up to 68 rows (giving me a st count of 410 st + ch2 peak). Next, you will work the finishing rows below.
Free Crochet Shawl Pattern – Pinnacle Shawl
Finishing Rows
- (RS) Ch1, 2hdc in 1st st. Hdc in each st until ch2. (2hdc, ch2, 2hdc) in ch2 sp. Hdc in each st until 1 left. 2hdc in last st. Turn. – 416 st + ch2 peak
- (WS) Ch1, 2hdc in 1st st. Hdc in 3rd lo of each st until ch2. (2hdc, ch2, 2hdc) in ch2 sp. Hdc in 3rd lo of each st until 1 left. 2hdc in top loops of last st. Turn. – 422 st + ch2 peak
- Ch1, 2hdc in 1st st. Hdc in blo of each st until ch2. (2hdc, ch2, 2hdc) in ch2 sp. Hdc in blo of each st until 1 left. 2hdc in both loops of last st. Turn. – 428 st + ch2 peak
- Ch1, 2sc in 1st st. Sc in 3rd lo of each st until ch2. (2sc, ch2, 2sc) in ch2 sp. Sc in 3rd lo of each st until 1 left. 2sc in top loops of last st. Turn. – 434 st + ch2 peak
- (Ch4, tr) in 1st st (counts as 2tr). 2dc in next st. Hdc in next 4 sts. *Sc in next 6 sts. Hdc in next st. (Hdc, dc) in next st. Tr in next 2 sts, (dc, hdc) in next st. Hdc in next st.** Repeat from * to ** until 7 sts before the ch2 peak. Sc in next 6 sts. (Hdc, dc) in next st. Place st marker. (Dc, tr, dc) in ch2 sp. (Dc, hdc) in next st. Repeat from * to ** until 12 sts left. Sc in next 6 sts. Hdc in next 4 sts. 2dc in next st. 2tr in last st. Turn. – 439 st
- Ch2, ss into 2nd ch from hook. Dss in 1st 18 sts. Ch2, ss into 2nd ch from hook. *Dss in next 14 sts. Ch2, ss into 2nd ch from hook.** Repeat from * to ** until 1 st before the st marker. Dss in next 13 sts. Ch2, ss in 2nd ch from hook. Repeat from * to ** until 18 sts left. Dss in last 18 sts. Ch2, ss in 2nd ch from hook. Bind off.
You may choose to finish off the top of your shawl. If you are using a multicoloured yarn or long colour changing yarn, you may want to skip this step (like I did) as it will interrupt the colour flow on the main body of the shawl.
With the right side facing you, join your yarn at the right corner. Ch1 and sc across the top edge of the shawl, working into the ends of each row. The number of stitches does not really matter, as long as it looks flat and even. For my shawl, I worked this row in the following manner:
- I worked 1 sc in the end of each sc or dss row.
- I alternated between working 1 and 2 sc in the end of each hdc and mc row.
- I worked 2 sc in the end of each dc row.
- I worked 3 sc in the end of each tr row.
When you finish working across the top, bind off.
Weave in your ends, and you’re done! I highly recommend blocking your shawl. Mine was a bit wonky, and blocking flattened it out and greatly improved the shape and drape.
I hope you love your new crochet shawl, and I look forward to seeing all of your beautiful pictures on Ravelry!
If you’d like to know when I post new patterns and tutorials like the Free Crochet Shawl Pattern – Pinnacle Shawl, head on over to my Facebook and Instagram and give me a like and a follow!
If you enjoyed the Free Crochet Shawl Pattern – Pinnacle Shawl, you may want to check out my other designs!
Free Crochet Shawl Pattern – Pinnacle Shawl
And until next time… Happy Hooking! 😉