
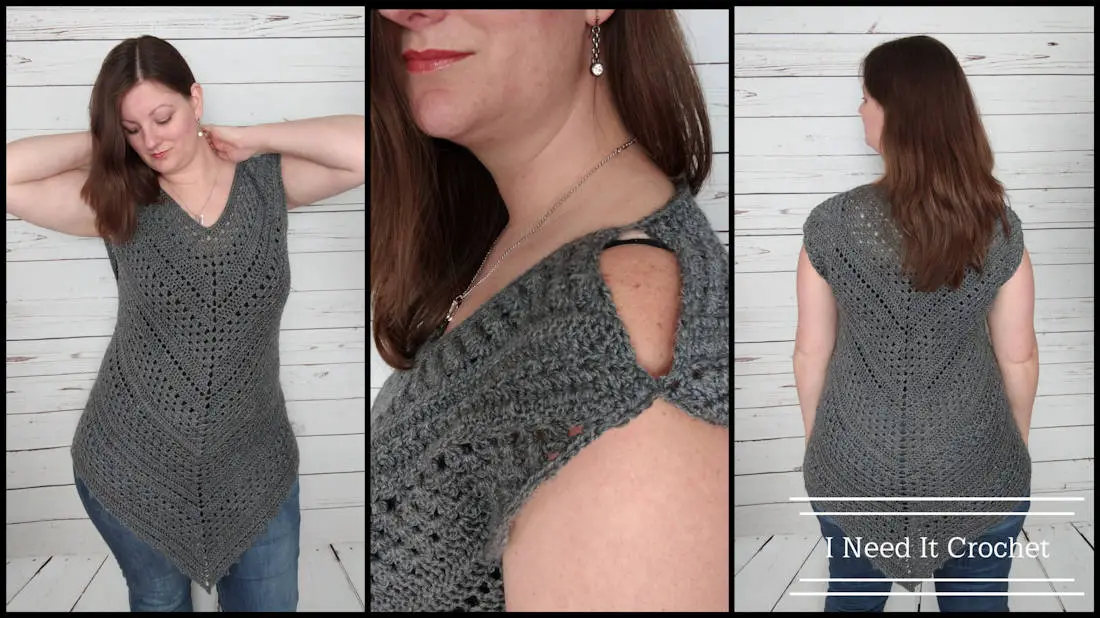
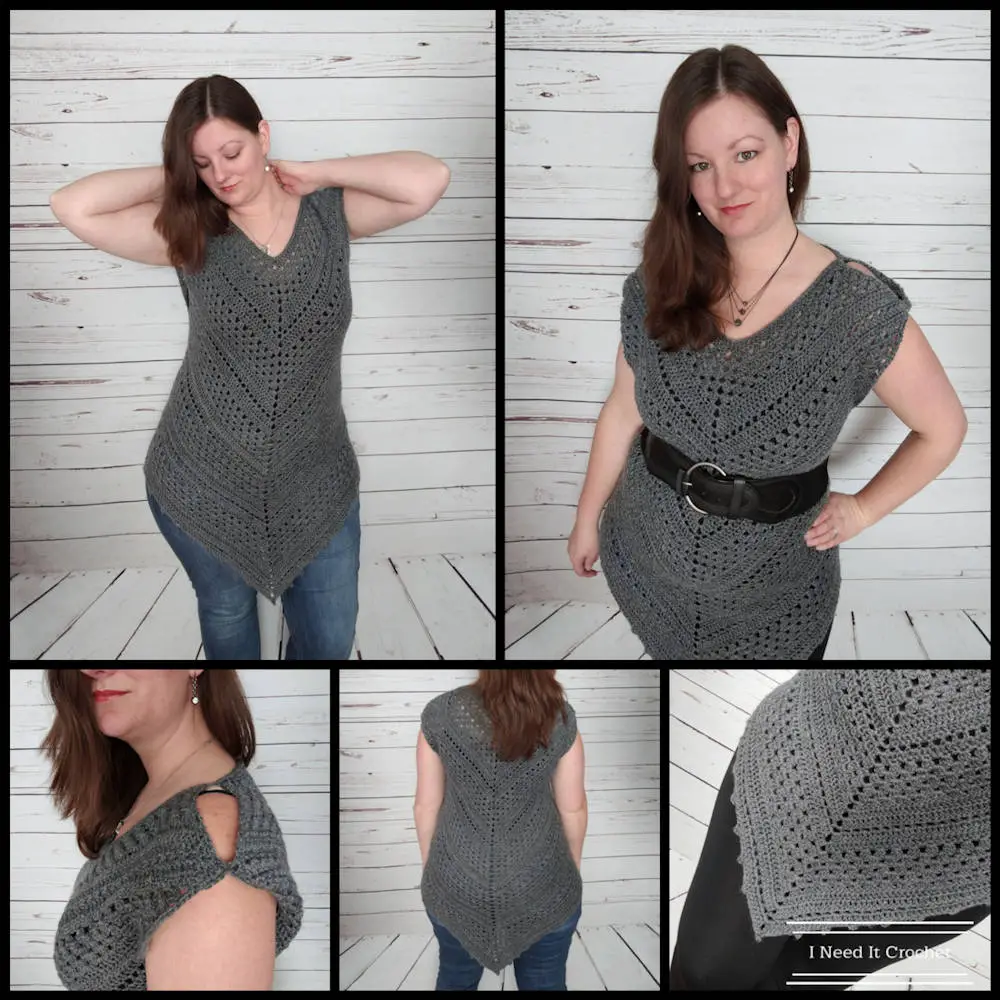
Angles Tunic – Free Crochet Pattern
The Angles Tunic – Free Crochet Pattern is copyrighted by I Need It Crochet. You may not copy, share, change, or sell the pattern itself. Also, you may not claim this pattern as your own. All pictures contained in this pattern fall under the copyright and may not be used.
Finished items made from the Angles Tunic – Free Crochet Pattern belong to you and you may do what you wish with them. If you choose to sell them on Etsy I would very much appreciate it if you credited me as the pattern designer.

Or…Scroll down to find the free crochet pattern!
I’m not sure if you have noticed, but I love clothing with angles. It’s a great way to wear something memorable without having to make it a very loud colour (though I have been known to wear loud colours from time to time). And it breaks up the monotony when you’re making something large like a piece of clothing. I get bored easily, so I like to throw in fun stitches and patterns to wake up the senses!
When I made the Blissful Boho Shrug, I fell in love with the triangle shape and how it complimented my body’s shape (ahem, hourglass with extra minutes). So, I decided to design a tunic with the triangle shape in mind. It turned into this fun, easy to wear garment. I named it the Angles Tunic. This piece is not going to spend very much time in my closet. I’m gonna wear it again and again! I hope you love yours just as much!
Finished Sizes:
Instructions given to fit size X-small; changes for small, medium, large, X-large and XX-large are in ()
XS (S, M, L, XL, XXL)
To fit bust size: 31-33” (34-35”, 36-37”, 38-40”, 41-43”, 44-45’)
Finished Bust: 34” (36”, 38”, 40”, 44”, 46”)
Finished Length: Customizable. Length on model shown is 25” at the sides.
Gauge:
Work the pattern and check gauge at two specified points:
Row 5: 5 ¼” W x 3“ H
Row 10: 11” W x 6“ H
You will find reminders within the pattern to check you gauge.
Materials:
I used Loops & Threads Woolike. It is 85% Acrylic, 15% Nylon. #2 fingering/baby weight.
Any yarn of similar weight would work.
Approximately 1000 (1100, 1200, 1400, 1500) yds to make the length shown.
4.5mm Hook
H/5mm Hook
Stitch Markers
Yarn Needle
Scissors
Abbreviations:
Sk = Skip
Sp = Space
St = Stitch
Ss = Slip Stitch
Ch = Chain
Sc = Single Crochet
Hdc = Half Double Crochet
Dc= Double Crochet
Sh = Shell (See Notes)
Hdc2tog = Half Double Crochet 2 together
Dc2tog = Double Crochet 2 together
Dc3tog = Double crochet 3 together
Notes:
Shell: A shell in this pattern consists of 3 Dc in one stitch.
Ch1 and ch2 at the beginning of a row is never considered a stitch.
Ch1 between Hdc is always considered a stitch.
Ch3 at the beginning of a row is always considered a Dc.
I have added many pictures to help you along the way.
The model above has a 40” bust and is wearing a size Large.
Choose your size according to the finished measurements noted above and your preferences.
Instructions
The Angles Tunic is made by crocheting the back panel down to the armpits, then crocheting the front panel down to the armpits and joining it to the back panel. Then you work back and forth in the round until you have the desired length.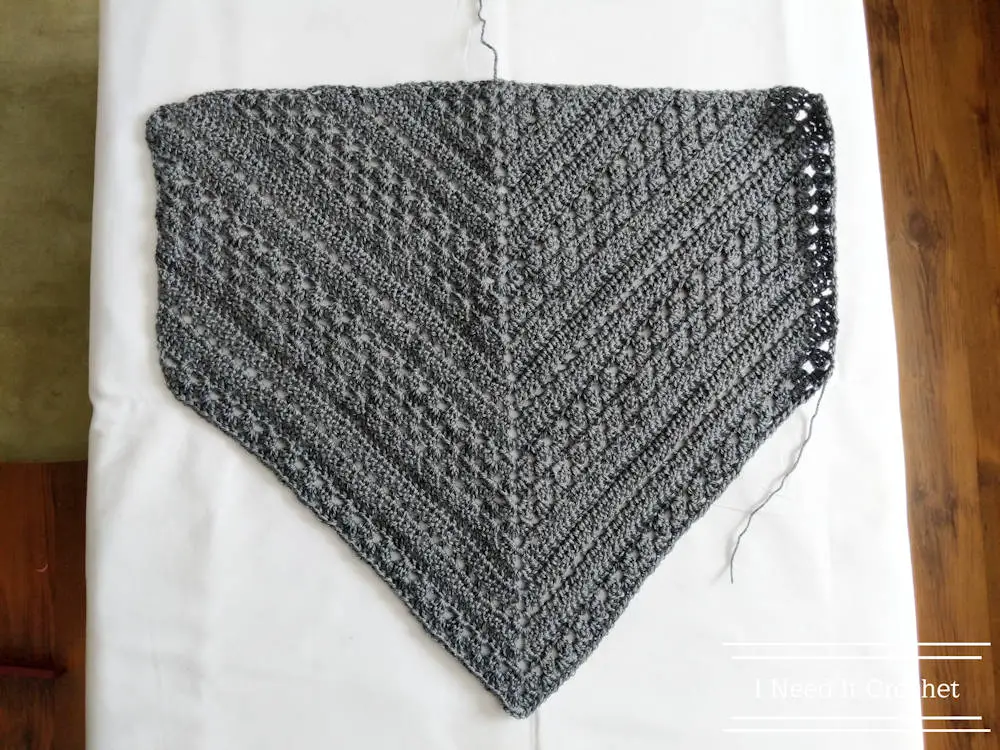
Tunic Pattern
Top Back Panel
With 4.5mm Hook
Ch 4 and Ss to the 1st ch to form a ring. Work row 1 into this ring.
1. (This will be the right side of your garment.) Ch3. 3Dc (Dc and Sh), ch2, 4 Dc (Sh and Dc made). Turn.
- 8 st + ch2
2. (This will be the wrong side of your garment.) Ch3, Sh in space between 1st Dc and Sh, (Sh, ch2, Sh) in ch2 ,Shell in space between Sh and last ch3, Dc in top of Ch3. Turn.
- 14 st + ch2
Change to 5mm Hook
3. Ch3,Sh between 1st Dc and 1st Sh and between each Sh across up to ch2.
(Sh, ch2, Sh)in ch2. Sh between each Sh across and between last Sh and ch3. . Dc in top of ch3. Turn.
- 20s t + ch2
4. Repeat Row 3.
- 26 st + ch2
5. Repeat Row 3. Check gauge.
- 32 st + ch2
6. Ch3. Dc in same st. Dc in each st up to ch2.
(2Dc, ch2, 2Dc) in ch2.
Dc in each st up to starting ch3.
2Dc in top of ch3. Turn.
- 38st + ch2
7. Repeat Row 6.
- 44 st + ch2
8. Ch1, (Hdc, ch1, Hdc) in 1st st.
*Ch1, sk 1 st, Hdc in next st**. Repeat from * to ** until you come to ch2.
Ch1, sk 1 st, (Hdc, ch2, Hdc) in ch2.
*Ch1, sk 1 st, Hdc in next st**. Repeat from * to ** until you come to starting ch3.
C1, sk 1 st, (Hdc, ch1, Hdc) in top of starting ch3. Turn.
- 50 st + ch2
9. Repeat Row 6.
- 56 st + ch2
10. Repeat Row 6. Check Gauge.
- 62 st + ch2
11. Ch3. *Sh in next st, sk 2 sts**. Repeat from * to ** until you come to the ch2.
(Sh, ch2, Sh) in ch2.
*Sk 2 sts, Sh in next st**. Repeat from * to ** until there are only 4 sts left (3Dc and a starting ch3).
Sk 2 sts. Sh in next st. Dc in last st. Turn.
- 68 st + ch2
12. Ch3, Sh between 1st Dc and 1st Sh and between each Sh of the previous row up to ch2.
(Sh, ch2, Sh) in ch2.
Sh between each Sh of the previous row and between last Sh and ch3.
Dc in top of ch3. Turn.
- 74s t + ch2
13. Repeat Row 12.
- 80 st + ch2
14. Repeat Row 12.
- 86 st + ch2
15. Repeat Row 12.
Size XS: Skip rows 16-21 and carry on to instructions below.
All other sizes go to next row.
- 92 st + ch2
16. Ch3. Dc in same st. Dc in each st up to ch2.
(2Dc, ch2, 2Dc) in ch2.
Dc in each st up to starting ch3.
2Dc in top of ch3. Turn.
Size S: Skip rows 17-21 and carry on to instructions below.
All other sizes go to next row.
- 98st + ch2
17. Repeat Row 6.
Size M: Skip rows 18-21 and carry on to instructions below.
All other sizes go to next row.
- 104 st + ch2
18. Ch1, (Hdc, ch1, Hdc) in 1st st.
*Ch1, sk 1 st, Hdc in next st**. Repeat from * to ** until you come to ch2.
Ch1, sk 1 st, (Hdc, ch2, Hdc) in ch2.
*Ch1, sk 1 st, Hdc in next st**. Repeat from * to ** until you come to starting ch3.
C1, sk 1 st, (Hdc, ch1, Hdc) in top of starting ch3. Turn.
Size L: Skip rows 19-21 and carry on to instructions below.
All other sizes go to next row.
- 110 st + ch2
19. Repeat Row 6.
- 116 st + ch2
20. Repeat Row 6.
Size XL: Skip row 21 and carry on to instructions below.
All other sizes go to next row.
- 122 st + ch2
21. Ch3. *Sh in next st, sk 2 sts**. Repeat from * to ** until you come to the ch2.
(Sh, ch2, Sh) in ch2.
*Sk 2 sts, Sh in next st**. Repeat from * to ** until there are only 4 sts left (3Dc and a starting ch3).
Sk 2 sts. Sh in next st. Dc in last st. Turn.
Size XXL: Carry on to instructions below.
- 128 st + ch2
Your stitch count should be 92 (98, 104, 110, 122, 128) st + ch2.
The top of your work (the longest side of your triangle) should be 17” (18”, 19”, 20”, 22”, 23”) across.
We will now be working the same pattern, except without the increases on each end. Continue on to your correct row number. (If you just worked row 15, go to row 16 and so on.)
Example: If you’re making a size Large, you should have 18 rows. Then you would move on to row 19 below.
16. Ch2. Dc2tog in next 2 st (This is considered a Dc3tog).
Dc in each st up to ch2.
(2Dc, ch2, 2Dc) in ch2.
Dc in each st until there are 3 stitches left in the row.
Dc3tog. Turn.
- 92 (98, 104, 110, 122, 128) st + ch2
17. Repeat Row 16.
- 92 (98, 104, 110, 122, 128) st + ch2
18. Work pattern according to your size.
[Sizes XS, M, XXL]: Ch1, Hdc2tog in 1st and 2nd st.
Hdc in next st, *Ch1, sk 1 st, Hdc in next st**. Repeat from * to ** until you come to 1 st before ch2. Ch1, sk 1 st, (Hdc, ch2, Hdc) in ch2.
*Ch1, sk 1 st, Hdc in next st**. Repeat from * to ** until you come to the last 4 st.
Ch1, Hdc in next st, Hdc2tog in last 2 sts. Turn.
[Sizes S, L, XL]: Ch1, Hdc2tog in 1st and 2nd st.
*Ch1, sk 1 st, Hdc in next st**. Repeat from * to ** until you come to ch2.
Ch1, sk 1 st, (Hdc, ch2, Hdc) in ch2.
*Ch1, sk 1 st, Hdc in next st**. Repeat from * to ** until you come to the last 3 st.
Ch1, Hdc2tog in last 2 st. Turn.
- 92 (98, 104, 110, 122, 128) st + ch2
19. Repeat Row 16.
- 92 (98, 104, 110, 122, 128) st + ch2
20. Repeat Row 16.
- 92 (98, 104, 110, 122, 128) st + ch2
21. Ch3, sk next 3 sts.
*Sh, Sk next 2 sts**. Repeat until you come to ch2. (Sh, ch2, Sh) in ch2.
*Sk next 2 sts, Sh**. Repeat until you have 4 sts left unworked.
Sk 3 sts, Dc in top of ch3. Turn.
- 92 (98, 104, 110, 122, 128) st + ch2
22. Repeat Row 21.
- 92 (98, 104, 110, 122, 128) st + ch2
23. Repeat Row 21.
- 92 (98, 104, 110, 122, 128) st + ch2
24. Repeat Row 21.
- 92 (98, 104, 110, 122, 128) st + ch2
25. Repeat Row 21.
- 92 (98, 104, 110, 122, 128) st + ch2
26. Ch2. Dc2tog in next 2 st (This is considered a Dc3tog).
Dc in each st up to ch2. (2Dc, ch2, 2Dc) in ch2.
Dc in each st until there are 3 stitches left in the row (2 Dc and starting ch3). Dc3tog. Turn.
- 92 (98, 104, 110, 122, 128) st + ch2
27. Repeat Row 16.
- 92 (98, 104, 110, 122, 128) st + ch2
28. Work pattern according to your size.
[Sizes XS, M, XXL]: Ch1, Hdc2tog in 1st and 2nd st.
Hdc in next st, *Ch1, sk 1 st, Hdc in next st**. Repeat from * to ** until you come to 1 st before ch2.
Ch1, sk 1 st, (Hdc, ch2, Hdc) in ch2.
*Ch1, sk 1 st, Hdc in next st**. Repeat from * to ** until you come to the last 4 st.
Ch1, Hdc in next st, Hdc2tog in last 2 sts. Turn.
[Sizes S, L, XL]: Ch1, Hdc2tog in 1st and 2nd st.
*Ch1, sk 1 st, Hdc in next st**. Repeat from * to ** until you come to ch2.
Ch1, sk 1 st, (Hdc, ch2, Hdc) in ch2.
*Ch1, sk 1 st, Hdc in next st**. Repeat from * to ** until you come to the last 3 st.
Ch1, Hdc2tog in last 2 st. Turn.
- 92 (98, 104, 110, 122, 128) st + ch2
29. Repeat Row 16.
Size XS: Skip rows 30-34 and carry on to instructions below.
All other sizes go to next row.
- 92 (98, 104, 110, 122, 128) st + ch2
30. Repeat Row 16.
Size S: Skip rows 31-34 and carry on to instructions below.
All other sizes go to next row.
- 92 (98, 104, 110, 122, 128) st + ch2
31. Ch3, sk next 3 sts.
*Sh, Sk next 2 sts**. Repeat until you come to ch2. (Sh, ch2, Sh) in ch2.
*Sk next 2 sts, Sh**. Repeat until you have 4 sts left unworked (including starting ch3).
Sk 3 sts, Dc in top of ch3. Turn.
Size M: Skip rows 32-34 and carry on to instructions below.
All other sizes go to next row.
- 92 (98, 104, 110, 122, 128) st + ch2
32. Repeat Row 21.
Size L: Skip rows 33-34 and carry on to instructions below.
All other sizes go to next row.
- 92 (98, 104, 110, 122, 128) st + ch2
33. Repeat Row 21.
Size XL: Skip row 34 and carry on to instructions below.
All other sizes go to next row.
- 92 (98, 104, 110, 122, 128) st + ch2
34. Repeat Row 21.
Size XXL: Carry on to instructions below.
- 92 (98, 104, 110, 122, 128) st + ch2
You should now have 29 (30, 31, 32, 33, 34) rows.
This will be the depth of your arm holes. The right and left edges of your piece should be 7 ½” (8”, 8 ½”, 9”, 9 ½”, 10”) high.
Note: I designed the Angles Tunic with large armholes in mind to keep it loose and comfortable to wear. If you prefer to have close fitting armholes all you have to do is work less row repeats. But be sure to work your front panel with the same row repeats as your back.
Fasten off, leaving an extra inch of tail more than you normally would.
Top Front Panel
Now you will work the front panel from the neckline down to the bottoms of the arm holes.
Set up rows:
With 5mm Hook
1. (This will be the right side of your garment.) Ch57, Sc in 2nd ch from hook and each ch across. Turn.
- 56 st +ch2
2. (This will be the wrong side of your garment.) Ch3. 2Dc in same st (should be 3 Dc in 1st st). Dc in next 26 sts.
2Dc in next st. Ch2. 2Dc in next st.
Dc in next 26 sts. 3Dc in last st. Turn.
- 62 st + ch2
Crochet Tunic Pattern
3. Ch3. *Sh in next st, sk 2 sts**. Repeat from * to ** until you come to the ch2.
(Sh, ch2, Sh) in ch2.
*Sk 2 sts, Sh in next st**. Repeat from * to ** until there are only 4 sts left (3Dc and a starting ch3).
Sk 2 sts. Sh in next st. Dc in last st. Turn.
- 68 st + ch2
4. Ch3, Sh between 1st Dc and 1st Sh and between each Sh of the previous row up to ch2.
(Sh, ch2, Sh) in ch2.
Sh between each Sh of the previous row and between last Sh and ch3.
Dc in top of ch3. Turn.
- 74s t + ch2
5. Repeat Row 4.
- 80 st + ch2
6. Repeat Row 4.
- 86 st + ch2
7. Repeat Row 4.
Size XS: Skip rows 8-13 and carry on to instructions below.
All other sizes go to next row.
- 92 st + ch2
8. Ch3. Dc in same st. Dc in each st up to ch2.
(2Dc, ch2, 2Dc) in ch2.
Dc in each st up to starting ch3.
2Dc in top of ch3. Turn.
Size S: Skip rows 9-13 and carry on to instructions below.
All other sizes go to next row.
- 98st + ch2
9. Repeat Row 8.
Size M: Skip rows 10-13 and carry on to instructions below.
All other sizes go to next row.
- 104 st + ch2
10. Ch1, (Hdc, ch1, Hdc) in 1st st.
*Ch1, sk 1 st, Hdc in next st**. Repeat from * to ** until you come to ch2.
Ch1, sk 1 st, (Hdc, ch2, Hdc) in ch2.
*Ch1, sk 1 st, Hdc in next st**. Repeat from * to ** until you come to starting ch3.
C1, sk 1 st, (Hdc, ch1, Hdc) in top of starting ch3. Turn.
Size L: Skip rows 11-13 and carry on to instructions below.
All other sizes go to next row.
- 110 st + ch2
11. Repeat Row 8.
- 116 st + ch2
12. Repeat Row 8.
Size XL: Skip row 13 and carry on to instructions below.
All other sizes go to next row.
- 122 st + ch2
13. Repeat row 3.
Size XXL: Carry on to instructions below.
- 128 st + ch2
We will now be working the same pattern, except without the increases on each end. Continue on to your correct row number below. (If you just worked row 7, go to row 8 and so on.)
Example: If you’re making a size Large, after you complete row 10, you would move on to row 11 below.
8. Ch2. Dc2tog in next 2 st (This is considered a Dc3tog).
Dc in each st up to ch2.
(2Dc, ch2, 2Dc) in ch2.
Dc in each st until there are 3 stitches left in the row (2 Dc and starting ch3).
Dc3tog. Turn.
- 92 (98, 104, 110, 122, 128) st + ch2
9. Repeat Row 8.
- 92 (98, 104, 110, 122, 128) st + ch2
10. Work pattern according to your size.
[Sizes XS, M, XXL]: Ch1, Hdc2tog in 1st and 2nd st.
Hdc in next st, *Ch1, sk 1 st, Hdc in next st**. Repeat from * to ** until you come to 1 st before ch2.
Ch1, sk 1 st, (Hdc, ch2, Hdc) in ch2.
*Ch1, sk 1 st, Hdc in next st**. Repeat from * to ** until you come to the last 4 st.
Ch1, Hdc in next st, Hdc2tog in last 2 sts. Turn.
[Sizes S, L, XL]: Ch1, Hdc2tog in 1st and 2nd st.
*Ch1, sk 1 st, Hdc in next st**. Repeat from * to ** until you come to ch2.
Ch1, sk 1 st, (Hdc, ch2, Hdc) in ch2.
*Ch1, sk 1 st, Hdc in next st**. Repeat from * to ** until you come to the last 3 st.
Ch1, Hdc2tog in last 2 st. Turn.
- 92 (98, 104, 110, 122, 128) st + ch2
11. Repeat Row 8.
- 92 (98, 104, 110, 122, 128) st + ch2
12. Repeat Row 8.
- 92 (98, 104, 110, 122, 128) st + ch2
13. Ch3, sk next 3 sts.
*Sh, Sk next 2 sts**. Repeat until you come to ch2. (Sh, ch2, Sh) in ch2.
*Sk next 2 sts, Sh**. Repeat until you have 4 sts left unworked (including starting ch3).
Sk 3 sts, Dc in top of ch3. Turn.
- 92 (98, 104, 110, 122, 128) st + ch2
14. Repeat Row 13.
- 92 (98, 104, 110, 122, 128) st + ch2
15. Repeat Row 13.
- 92 (98, 104, 110, 122, 128) st + ch2
16. Repeat Row 13.
- 92 (98, 104, 110, 122, 128) st + ch2
17. Repeat Row 13.
- 92 (98, 104, 110, 122, 128) st + ch2
18. Ch2. Dc2tog in next 2 st (This is considered a Dc3tog).
Dc in each st up to ch2.
(2Dc, ch2, 2Dc) in ch2.
Dc in each st until there are 3 stitches left in the row (2 Dc and starting ch3).
Dc3tog. Turn.
- 92 (98, 104, 110, 122, 128) st + ch2
19. Repeat Row 8.
- 92 (98, 104, 110, 122, 128) st + ch2
20. Work pattern according to your size.
[Sizes XS, M, XXL]: Ch1, Hdc2tog in 1st and 2nd st.
Hdc in next st, *Ch1, sk 1 st, Hdc in next st**. Repeat from * to ** until you come to 1 st before ch2.
Ch1, sk 1 st, (Hdc, ch2, Hdc) in ch2.
*Ch1, sk 1 st, Hdc in next st**. Repeat from * to ** until you come to the last 4 st.
Ch1, Hdc in next st, Hdc2tog in last 2 sts. Turn.
[Sizes S, L, XL]: Ch1, Hdc2tog in 1st and 2nd st.
*Ch1, sk 1 st, Hdc in next st**. Repeat from * to ** until you come to ch2.
Ch1, sk 1 st, (Hdc, ch2, Hdc) in ch2.
*Ch1, sk 1 st, Hdc in next st**. Repeat from * to ** until you come to the last 3 st.
Ch1, Hdc2tog in last 2 st. Turn.
- 92 (98, 104, 110, 122, 128) st + ch2
21. Repeat Row 8.
Size XS: Skip rows 22-26 and carry on to join the panels together.
All other sizes, go to next row.
- 92 (98, 104, 110, 122, 128) st + ch2
22. Repeat Row 8.
Size S: Skip rows 23-26 and carry on to join the panels together.
All other sizes, go to next row.
- 92 (98, 104, 110, 122, 128) st + ch2
23. Ch3, sk next 3 sts.
*Sh, Sk next 2 sts**. Repeat until you come to ch2.
(Sh, ch2, Sh) in ch2.
*Sk next 2 sts, Sh**. Repeat until you have 4 sts left unworked (including starting ch3).
Sk 3 sts, Dc in top of ch3. Turn.
Size M: Skip rows 24-26 and carry on to join the panels together.
All other sizes, go to next row.
- 92 (98, 104, 110, 122, 128) st + ch2
24. Repeat Row 13.
Size L: Skip rows 25-26 and carry on to join the panels together.
All other sizes, go to next row.
- 92 (98, 104, 110, 122, 128) st + ch2
25. Repeat Row 13.
Size XL: Skip row 26 and carry on to join the panels together.
All other sizes, go to next row.
- 92 (98, 104, 110, 122, 128) st + ch2
26. Repeat Row 13.
Size XXL: Carry on to join the panels together.
- 92 (98, 104, 110, 122, 128) st + ch2
Your piece should have 21 (22, 23, 24, 25, 26) rows and match up with your back piece.
Do not fasten off.
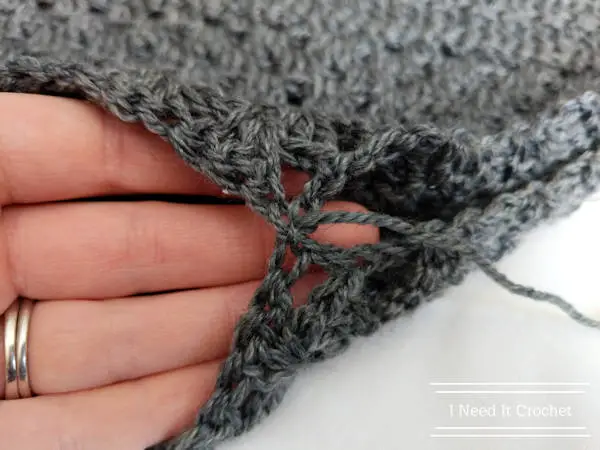
Joining the Panels
You will now join the two panels together.
– Lay the panels one on top of the other with the wrong sides facing each other (right sides facing you).
– Use the tail end of your back panel to tie it to the matching stitch of your front panel. (I recommend doing this just to give the piece more stability as you begin working from the armpits down. )
– Grab your hook and front panel again and ss to the matching stitch on the back panel. Turn.
– You will now be working in the round, but still turning your work at the end of each row.
Angles Tunic – Free Crochet Pattern
Bottom
Continue on to the row appropriate to your size: 30 (31, 32, 33, 34, 35).
30. Ch2. Starting in next st, Dc3tog. *Dc in each Dc until you get to ch2. (2Dc, ch2, 2Dc) in ch2. Dc in next 43 (46, 49, 52, 58, 61) sts. Dc3tog.** Dc3tog. Repeat from * to **. Ss to 1st Dc3tog. Turn.
- 184 (196, 208, 220, 244, 256) st + 2x ch2
31. Ch3. 2Dc between 2 Dc3tog of previous row.
Sk 4 sts (Dc3tog and 3 Dc), *Sh in next st, sk 2 sts. ** Repeat until you get to ch2.
(Sh, ch2, Sh) in ch2.
*Sk 2 st, Sh in next st.** Repeat from * to ** until you have 14 (15, 16, 17, 19, 20) Sh.
Sk 4 sts (3 Dc and Dc3tog) and Sh in sp between 2 Dc3tog of previous row.
Sk 4 sts (Dc3tog and 3 Dc), *Sh in next st, sk 2 sts. ** Repeat until you get to ch2.
(Sh, ch2, Sh) in ch2.
*Sk 2 st, Sh in next st.** Repeat from * to ** until you have 14 (15, 16, 17, 19, 20) Sh.
Sk 4 sts, Ss to top of starting ch3. Turn.
- 186 (198, 210, 222, 246, 258) st + 2x ch2
32. Ch3, sk 1st sp, Sh in next sp and in each sp up to ch2.
(Sh, ch2, Sh) in ch2.
Sh in next 14 (15, 16, 17, 19, 20) sp.
Dc in next 2 sp.
Sh in each sp up to ch2.
(Sh, ch2, Sh) in ch2.
Sh in next 14 (15, 16, 17, 19, 20) sp.
Dc in last sp. Ss to top of starting ch3. Turn.
- 184 (196, 208, 220, 244, 256) st + 2x ch2
33. Ch3. 2Dc between Ch3 and Dc of previous row. (Sh made).
Sk 4 sts (Dc and Sh), Sh in each sp until you get to ch2.
(Sh, ch2, Sh) in ch2.
Sh in each sp until you have 14 (15, 16, 17, 19, 20) Sh.
Sk 4 sts (Sh and Dc) and Sh in sp between 2 Dc of previous row.
Sk 4 sts (Dc and Sh), Sh in each sp until you get to ch2.
(Sh, ch2, Sh) in ch2.
*Sh in each sp until you have 14 (15, 16, 17, 19, 20) Sh.
Sk 3 sts, Ss to top of starting ch3. Turn.
- 186 (198, 210, 222, 246, 258) st + 2x ch2
34. Repeat Row 32.
- 184 (196, 208, 220, 244, 256) st + 2x ch2
35. Repeat Row 33.
- 186 (198, 210, 222, 246, 258) st + 2x ch2
36. Ch2, Dc2tog in 1st 2 sts.
*Dc in each st until you get to ch2. (2Dc, ch2, 2Dc) in ch2.
Dc in next 43 (46, 49, 52, 58, 61) sts. Dc3tog.** Sk 1 st. Dc3tog.
Repeat from * to **. There will be 1 st left unworked.
Ss to 1st Dc3tog. Turn.
- 184 (196, 208, 220, 244, 256) st + 2x ch2
37. Ch2. Starting in next st, Dc3tog. *Dc in each Dc until you get to ch2. (2Dc, ch2, 2Dc) in ch2. Dc in next 43 (46, 49, 52, 58, 61) sts. Dc3tog.** Dc3tog. Repeat from * to **. Ss to 1st Dc3tog. Turn.
- 184 (196, 208, 220, 244, 256) st + 2x ch2
38. Ch1. Starting in next st, Hdc2tog.
*Ch1, sk 1 st, Hdc in next st**. Repeat from * to ** until you come to ch2.
Ch1, sk 1 st, (Hdc, ch2, Hdc) in ch2.
*Ch1, sk 1 st, Hdc in next st. Repeat from * to ** over next 43 (46, 49, 52, 58, 61) sts.
Hdc2tog. Hdc2tog. *Ch1, sk 1 st, Hdc in next st**. Repeat from * to ** until you come to ch2.
Ch1, sk 1 st, (Hdc, ch2, Hdc) in ch2.
*Ch1, sk 1 st, Hdc in next st. Repeat from * to ** over next 43 (46, 49, 52, 58, 61) sts.
Hdc2tog. Ss to 1st Hdc2tog.
- 184 (196, 208, 220, 244, 256) st + 2x ch2
39. Repeat row 37.
- 184 (196, 208, 220, 244, 256) st + 2x ch2
40. Repeat row 37.
- 184 (196, 208, 220, 244, 256) st + 2x ch2
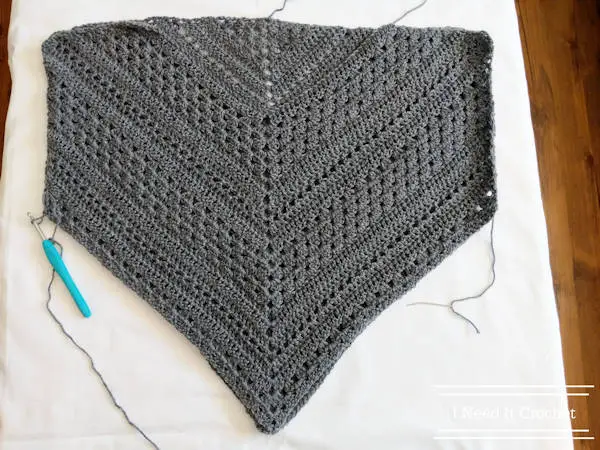
Your top should peak in the middle front and back and come up to a corner at the sides. Here’s a side view to give you idea what it should look like.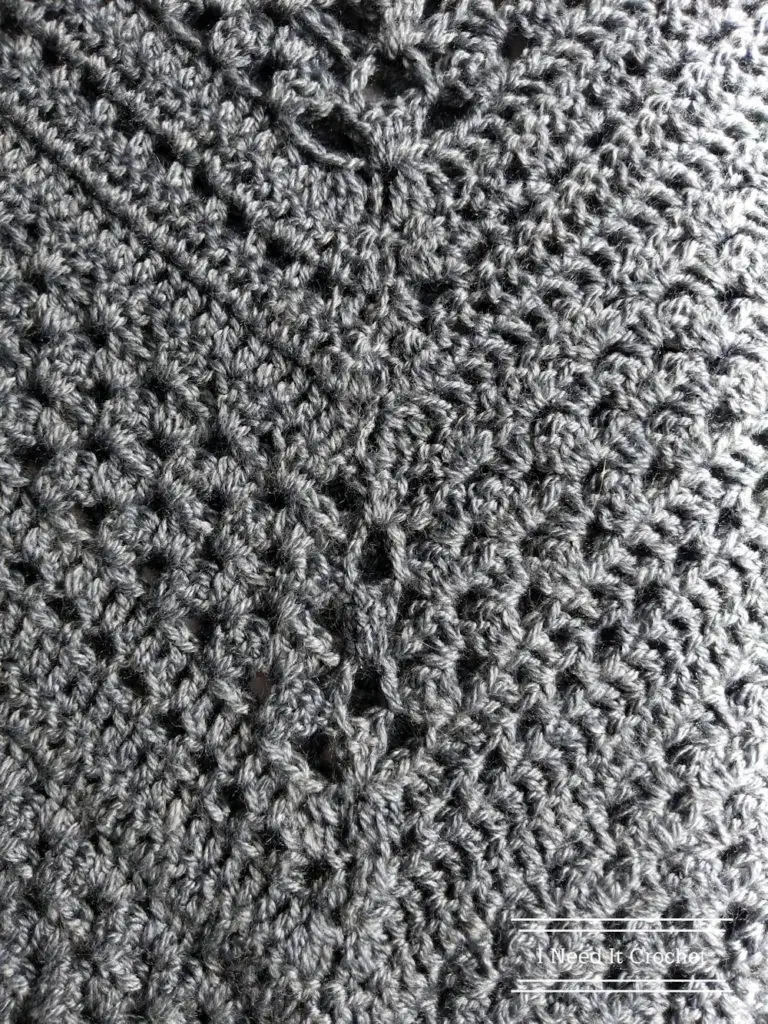
Now you will repeat rows 31-40 until you have reached your desired length. You will want to end off on a row that is a repeat of rows 32, 34, 36, 37, 39, or 40. This is because the other rows have an off number of stitches or are a Hdc, ch1 row. The others just don’t mesh well with the edging.
Edging
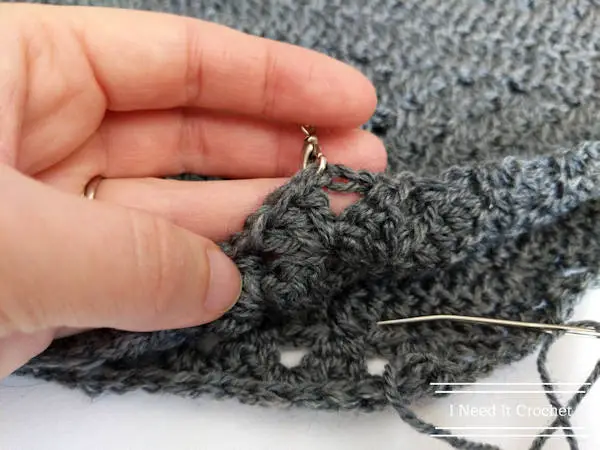
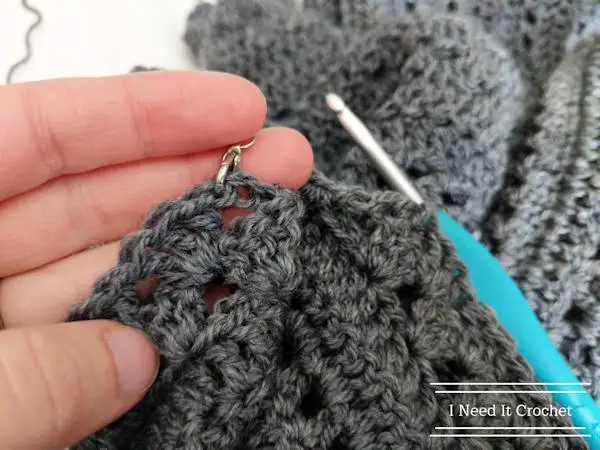
Next we will be adding a picot edging. For those of you who have never done picots, here is a little tutorial.
Know how to do a picot? Awesome!! Now, just follow the instructions according to your size.
Turn and Ch1.
– *Sc in next 6, picot. ** Repeat from * to ** until you have 7 (7, 8, 8, 9, 10) picots.
– Sc in next 4 (7, 4, 7, 7, 4) sts. (This should bring you to the ch2)
– Sc2, picot, Sc2 in ch2.
– Sc in next 4 (7, 4, 7, 7, 4) sts.
– *Picot, Sc in next 6 sts. ** Repeat from * to ** until you have 7 (7, 8, 8, 9, 10) picots.
– Ss to first Sc. Fasten of.
Now you will finish off the sleeve and neck edges and tack them together. This gives the Angles Tunic a sexy cold shoulder. Of course, if you don’t love the cold shoulder, you can always whip stitch the tops of the sleeves together to give it a solid shoulder.
Sleeves
– With the right side of your piece facing you, join your yarn with a slip stitch into an armpit.
– Sc up the side of the armhole, placing 1 Sc in every Hdc row, 2 Sc in every Dc row, and 3 Sc in every Ch3 (Sh) row until you get to the top of the sleeve, with only 1 stitch left unworked.
– Ss into the top stitch. Then Ss into the top stitch of the other side of the sleeve.
– Continue to Sc down the other side of the sleeve, using the same amount of Sc you used in the first side.
– Ss to your first Sc. Fasten off.
– Repeat with the other sleeve.
Neck
– Lay your top flat on a surface.
– Match up the neck edge on the front of your top with the top of row 9 on the back. I find it helpful to hold them together with a locking stitch marker.
– Do the same with both sides of the neck.
– With the right side of your piece facing you, join your yarn in the center back of the neck.
– Sc around the back of the neck, placing 1 Sc in the ring, 1 Sc in every Hdc row, 2 Sc in every Dc row, and 3 Sc in every Ch3 (Sh) row until you get to the last stitch before your stitch marker.
– Ss into the last stitch of the back. Then Ss into the first stitch of the front.
– Sc in each of next 26 sts.
– Sc2tog (into the 2 sc at the bottom on the V).
– Sc in each of the next 26 sts.
– Ss into the last stitch of the front. Then Ss into the first stitch of the back.
– Sc around the back of the neck, placing 1 Sc in the ring, 1 Sc in every Hdc row, 2 Sc in every Dc row, and 3 Sc in every Ch3 (Sh) row until you get to your first sc.
– Ss to your first sc. Fasten off.
Weave in your ends and you’re done!
I hope you enjoyed making your Angles Tunic as much as I did! I’m really excited about its versatility! Make it extra long and it’s a dress. Extra short and it’s a crop top. Make it in cotton yarn and it would be a super cute bathing suit cover! The possibilities are endless!
Now go rock it!
Angles Tunic – Free Crochet Pattern
Angles Tunic – Free Crochet Pattern
Until next time… Happy Hooking! 😉