
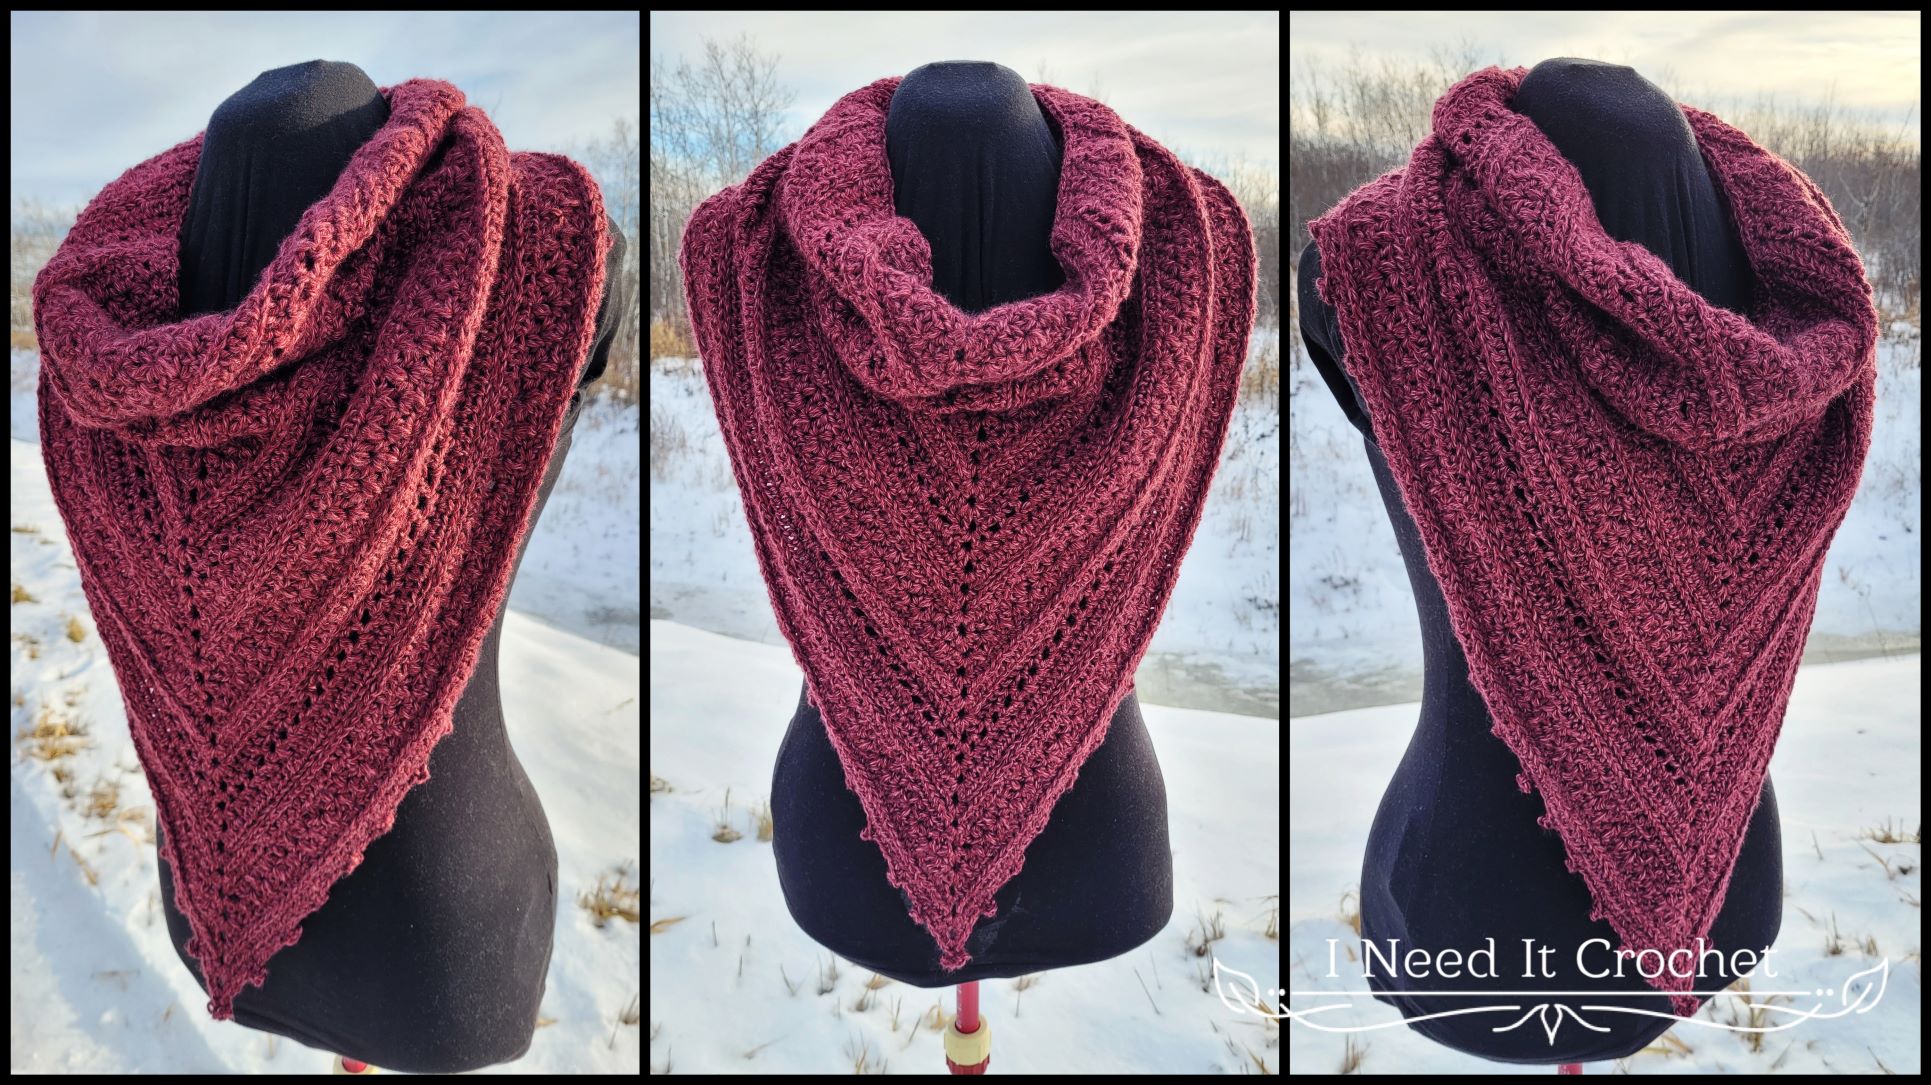
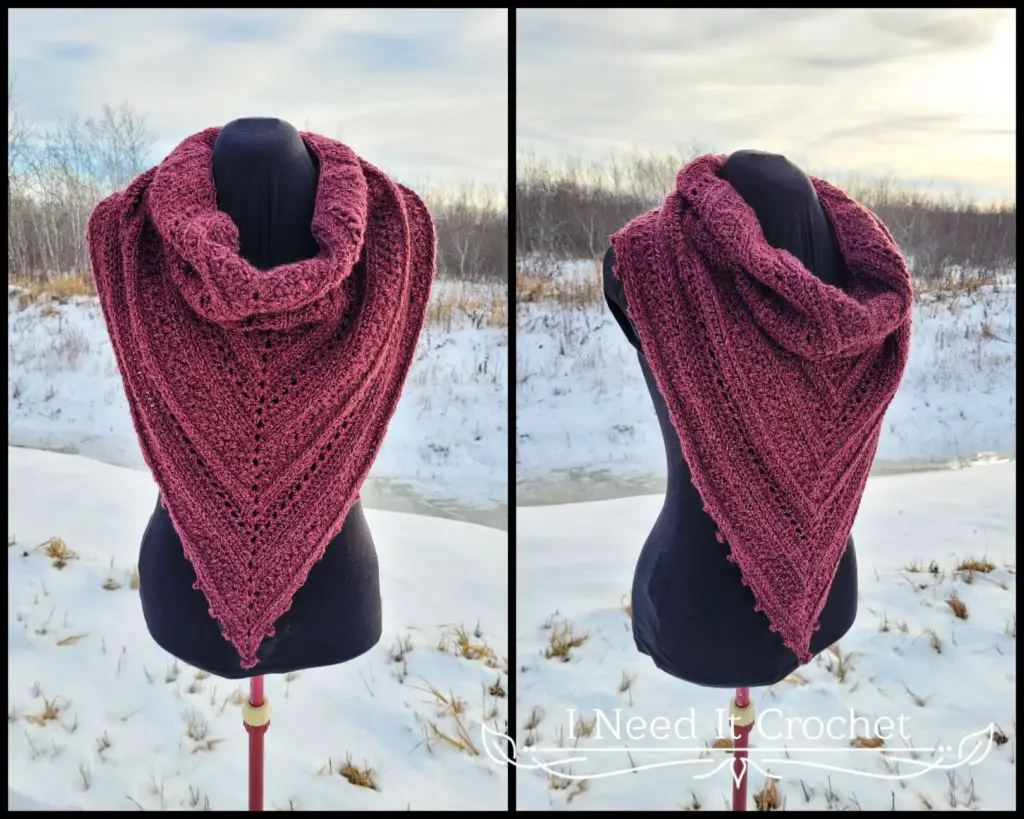
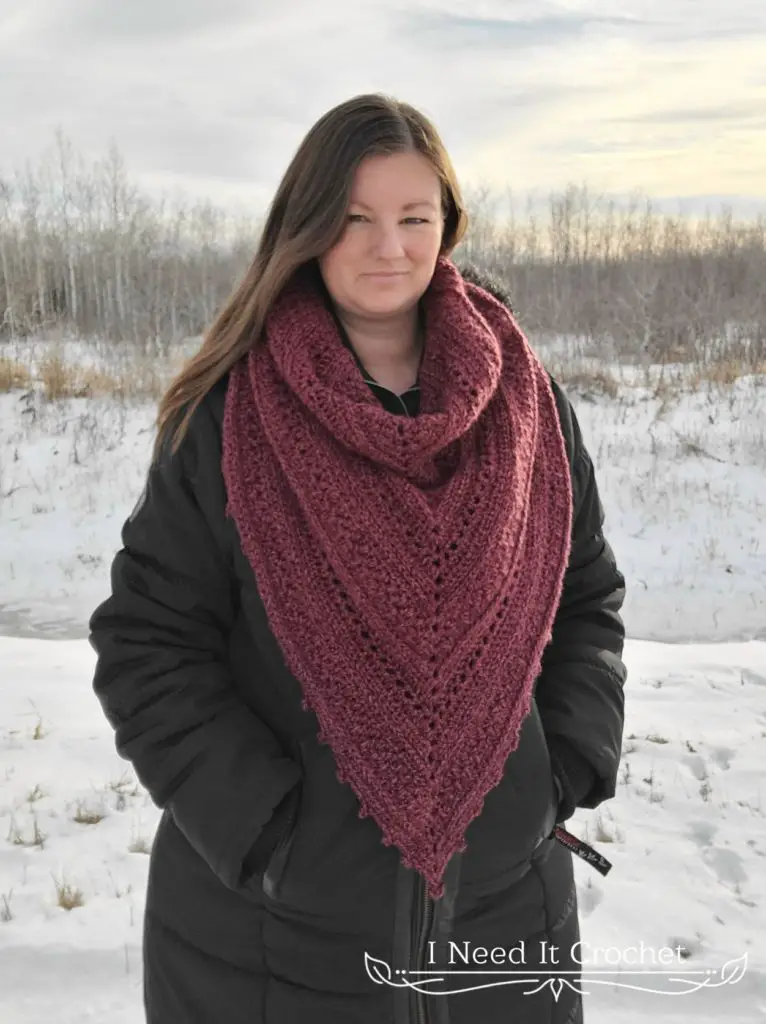
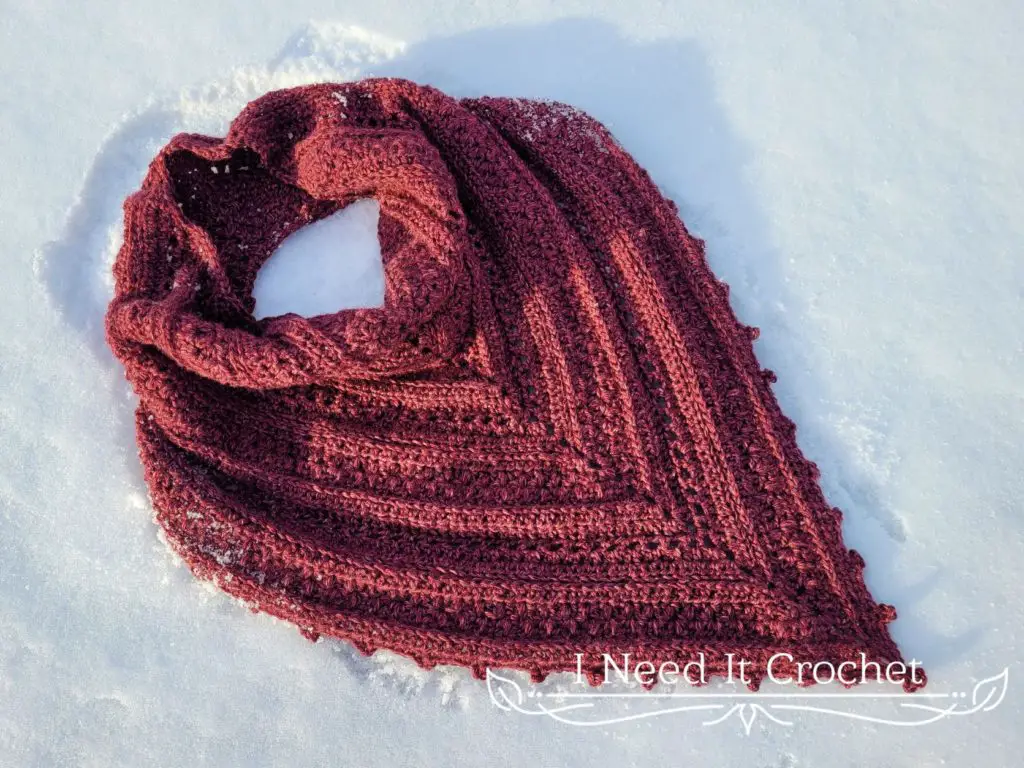
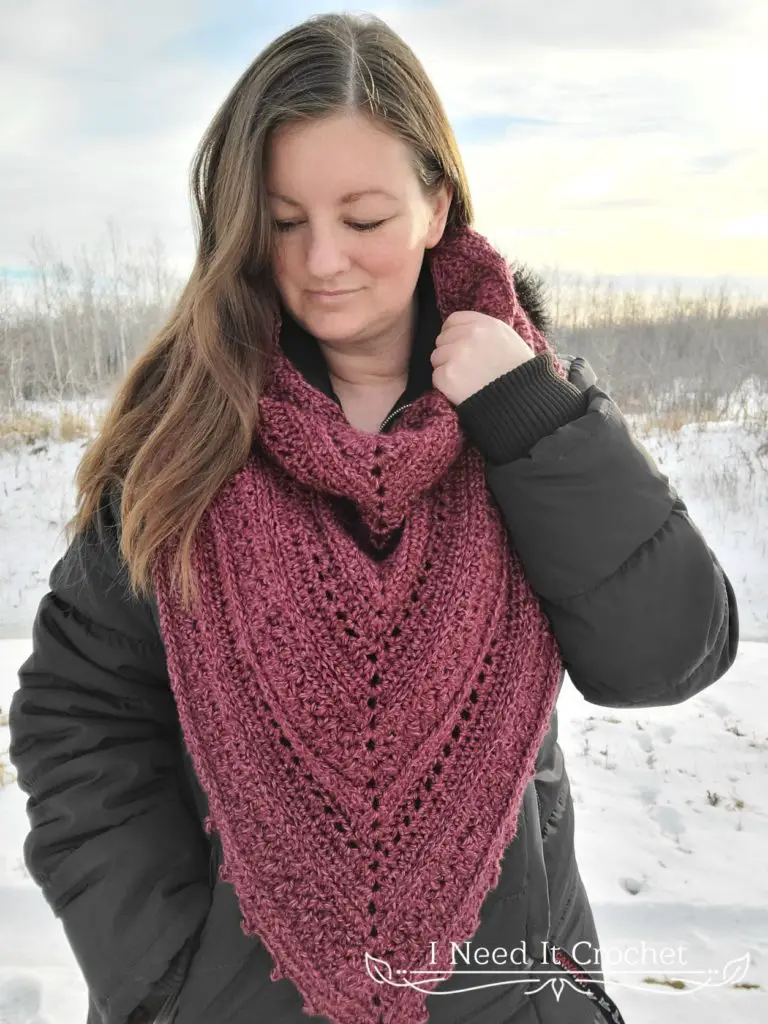
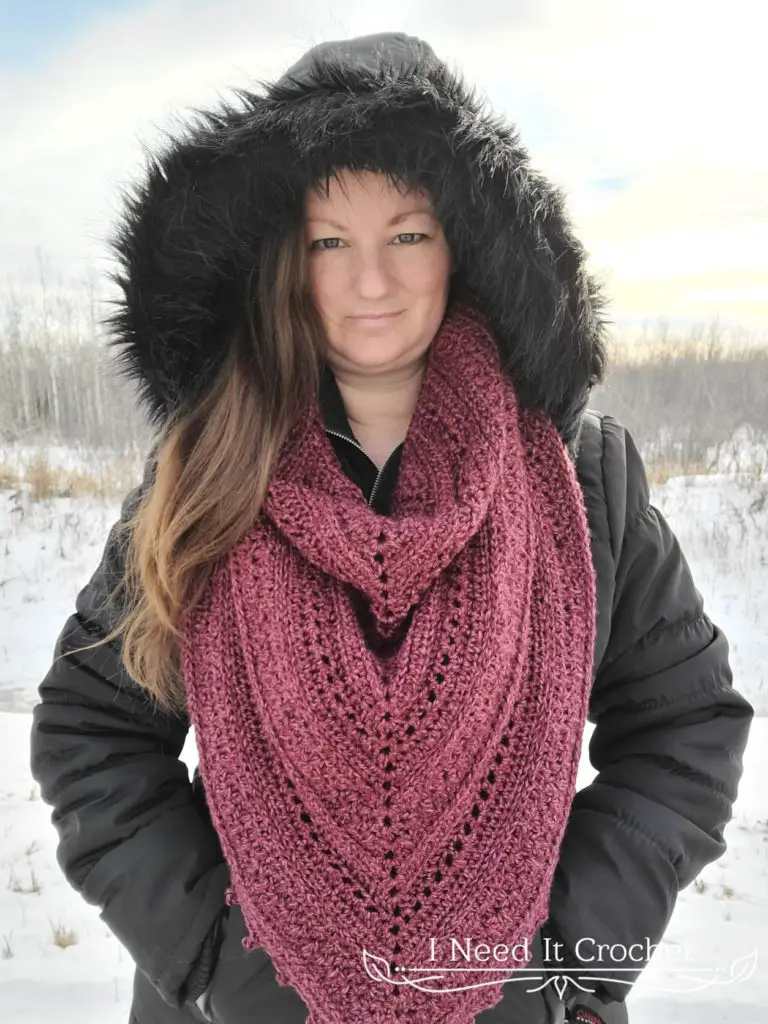
Culmination Bandana Cowl – Free Crochet Cowl Pattern
The Culmination Bandana Cowl – Free Crochet Cowl Pattern is copyrighted by I Need It Crochet. You may not copy, share, change, or sell the pattern itself. Also, you may not claim this pattern as your own. All pictures contained in this pattern fall under the copyright and may not be used.
Finished items made from the Culmination Bandana Cowl – Free Crochet Cowl Pattern belong to you, and you may do what you wish with them. If you choose to sell them on Etsy, I would very much appreciate it if you credit me as the pattern designer.


Or… Just scroll down to see it for free!
2021 is almost finished. At the end of every year, I like to take a look back to see how far I’ve come. This year, I have learned so much about my craft, my business, and myself. I feel like I have truly grown as a person.
The Culmination Bandana Cowl is a testament to my growth and a reminder that there is always something new to learn. I can’t wait to see what new and exciting things I’ll learn in 2022.
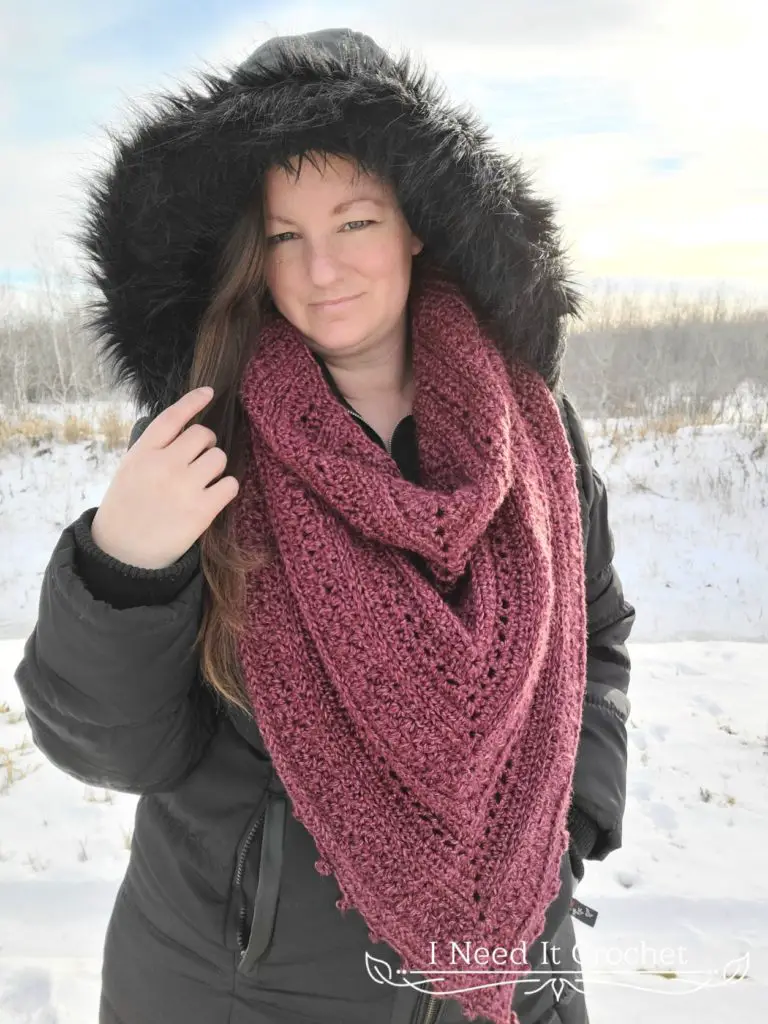
Culmination Bandana Cowl – Free Crochet Cowl Pattern
How to crochet the Culmination Bandana Cowl – Free Crochet Cowl Pattern
Finished Size:
Neck is 31” in circumference. Cowl is 28” long from the neck down to the point.
Instructions also given to make a stacked cowl or hooded cowl.
Gauge:
There will be instructions to measure your project for gauge at two separate points in the pattern.
Be sure to check your gauge. It will save you time and heartache.
Materials:
I used Lion Brand Heartland, which is 100% Acrylic, #4 Worsted weight yarn.
Any yarn of similar weight would work.
Approximately 500 yds.
6mm Hook
Stitch Markers
Yarn Needle
Scissors
Measuring Tape
Abbreviations:
Sk = Skip
Sp = Space
St = Stitch
Ss = Slip Stitch
Ch = Chain
Sc = Single Crochet
Hdc = Half Double Crochet
Dc = Double Crochet
Mc = Mixed Cluster (See Notes and Tutorial Below)
BLO = Back Loop Only
Notes:
Ch1 at the beginning of a row is never considered a stitch.
Ch1 between sts is always considered a stitch.
Ch2 at the beginning of a row is never considered a stitch.
Ch3 at the beginning of a row is always considered a Dc.
A Mixed Cluster counts as 2 stitches.
Find a tutorial for the Mixed Cluster Stitch here.
Find a tutorial for working into the 3rd Loop Only here.
Find a Tutorial For the Picot Stitch here.
I have added many pictures to help you along the way.
Culmination Bandana Cowl – Crochet Cowl Pattern
Instructions
To make this cowl, we will first create a large triangle. Then, we will join the top two corners of the triangle and begin working in the round, adding height to the neck of the cowl and length to the bandana.
With 6mm Hook
Begin with a magic ring, or ch4 and ss to 1st ch to form a ring.
- (Right side) Ch3. Working into the ring, 3dc, ch2, 4dc. Turn. – 8 st + ch2
- (Wrong side) Ch1. Hdc in 1 st st, ch1, hdc in next st. Ch1, sk1, hdc in next st. Ch1, (hdc, ch2, hdc) in ch2 sp. Ch1, hdc in next st. Ch1, sk1, hdc in next st. Ch1, hdc in last st. Turn. – 14 st + ch2
- Ch1. 2hdc in 1st st. Hdc in each st and ch sp until you reach the center ch2. (2hdc, ch2, 2hdc) in ch2 sp. Hdc in each st and ch sp until there is only 1 st left unworked. 2hdc in last st. Turn. – 20 st + ch2
- Ch1. 2hdc in 1st st. Hdc in each st until you reach the center ch2. (2hdc, ch2, 2hdc) in ch2 sp. Hdc in each st until there is only 1 st left unworked. 2hdc in last st. Turn. – 26 st + ch2
Gauge check: Your triangle should now measure approximately 4” wide and 3” high. Width is measured across the edge that contains the magic ring or ch4 ring. Height is measured from the ring to the center of the last row worked. If your measurements are not close to correct, try again with a different sized hook.
- Ch1. 2hdc in 1st st. Hdc in BLO of each st until you reach the center ch2. (2hdc, ch2, 2hdc) in ch2 sp. Hdc in BLO of each st until there is only 1 st left unworked. 2hdc in both loops of last st. Turn. – 32 st + ch2
- Ch1. 2hdc in 1st st. Hdc in 3rd LO of each st until you reach the center ch2. (2hdc, ch2, 2hdc) in ch2 sp. Hdc in 3rd LO of each st until there is only 1 st left unworked. 2hdc in top loops of last st. Turn. – 38 st + ch2
- Ch1. Hdc in 1st st. Ch1. Beginning in 1st st, mc across to center ch2. (2hdc, ch2, 2hdc) in ch2 sp. Ch1. Beginning in next st, mc across until all sts have been worked. Hdc in last st. Turn. – 44 st + ch2
- Ch1. 2hdc in 1st st. Ch1. Beginning in next st, mc across to center ch2. (2hdc, ch2, 2hdc) in ch2 sp. Ch1. Beginning in next st, mc across until there is only 1 st left unworked. 2hdc in last st. Turn. – 50 st + ch2
Gauge check: Your triangle should now measure approximately 8 ½” wide and 5 ¼” high. If your measurements are not close to correct, try again with a different sized hook.
- Ch1. 2hdc in 1st st. Hdc in each st until you reach the center ch2. (2hdc, ch2, 2hdc) in ch2 sp. Hdc in each st until there is only 1 st left unworked. 2hdc in last st. Turn. – 56 st + ch2
- Ch1. 2hdc in 1st st. Hdc in 3rd LO of each st until you reach the center ch2. (2hdc, ch2, 2hdc) in ch2 sp. Hdc in 3rd LO of each st until there is only 1 st left unworked. 2hdc in top loops of last st. Turn. – 62 st + ch2
- Ch3, dc in 1st st. Dc in BLO of each st until you reach the center ch2. (2dc, ch2, 2dc) in ch2 sp. Dc in BLO of each st until there is only 1 st left unworked. 2dc in both loops of last st. Turn. – 68 st + ch2
- Ch1. Hdc in 1st st. Ch1, hdc in next st. *Ch1, sk1, hdc in next st.** Repeat from * to ** until you reach the center ch2. Ch1, (hdc, ch2, hdc) in ch2 sp. Ch1, hdc in next st. Repeat from * to ** until there is only 1 st left unworked. Ch1, hdc in last st. Turn. – 74 st + ch2
From here we will repeat rows 3-12 until we have a total of 30 rows. To make things a little easier, I have added the row repeats and stitch counts below.
- Repeat row 3. – 80 st + ch2
- Repeat row 4. – 86 st + ch2
- Repeat row 5. – 92 st + ch2
- Repeat row 6. – 98 st + ch2
- Repeat row 7. – 104 st + ch2
- Repeat row 8. – 110 st + ch2
- Repeat row 9. – 116 st + ch2
- Repeat row 10. – 122 st + ch2
- Repeat row 11. – 128 st + ch2
- Repeat row 12. – 134 st + ch2
- Repeat row 3. – 140 st + ch2
- Repeat row 4. – 146 st + ch2
- Repeat row 5. – 152 st + ch2
- Repeat row 6. – 158 st + ch2
- Repeat row 7. – 164 st + ch2
- Repeat row 8. – 170 st + ch2
- Repeat row 9. – 176 st + ch2
- Repeat row 10. – 182 st + ch2
Culmination Bandana Cowl – Free Crochet Cowl Pattern
You should now have a large triangle, similar to Figure 1 (except yours will be larger with more rows). We will now join two of the corners. Using your hook, ss into the 1st st of row 30 as in Figure 2. Your last stitch should now be joined to your 1st st. Turn.
We will continue to work downward but now in the round, building height into the neck of the cowl and length into the bandana. See Figures 3 & 4 for an example of what the next round will look like. In order to keep the stitches in the correct positions, we will skip the 1st stitch of each round and work the last stitch of each round into the 1st skipped stitch.
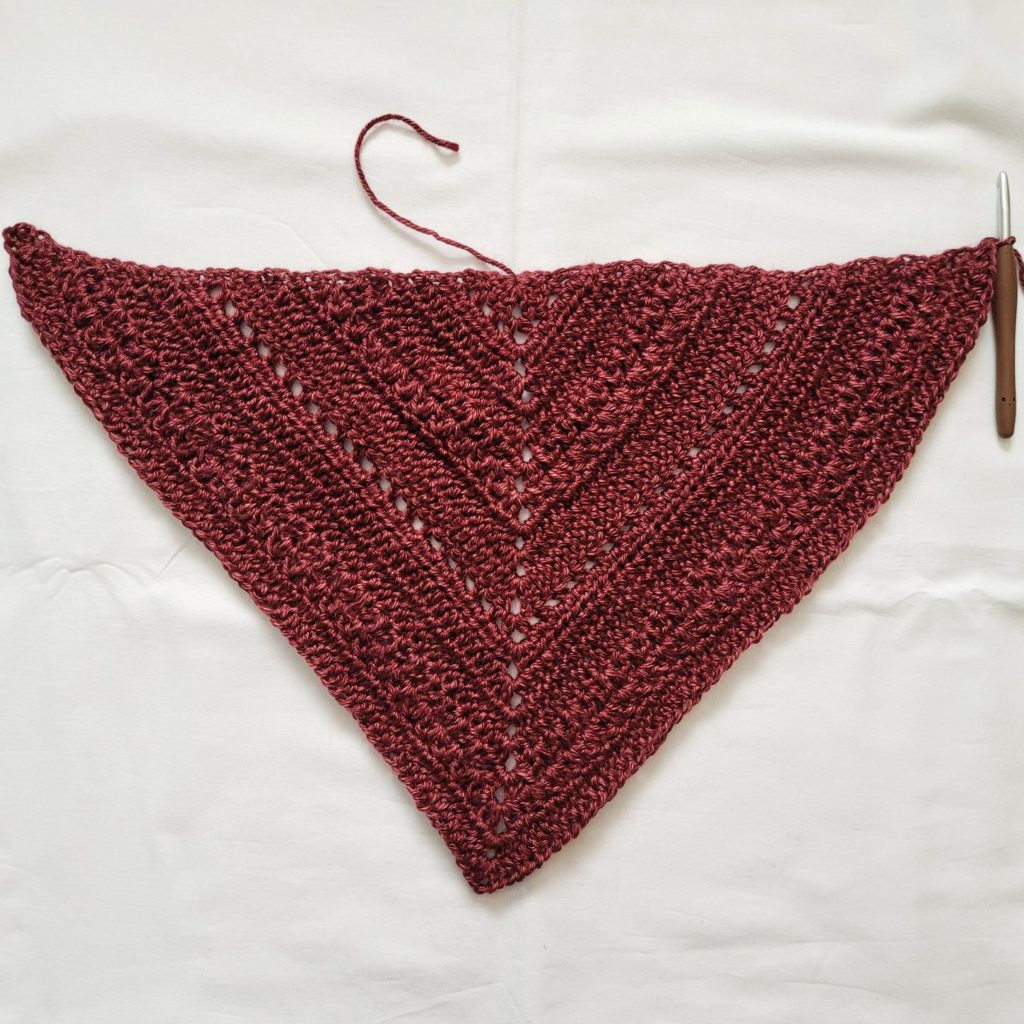
Figure 1
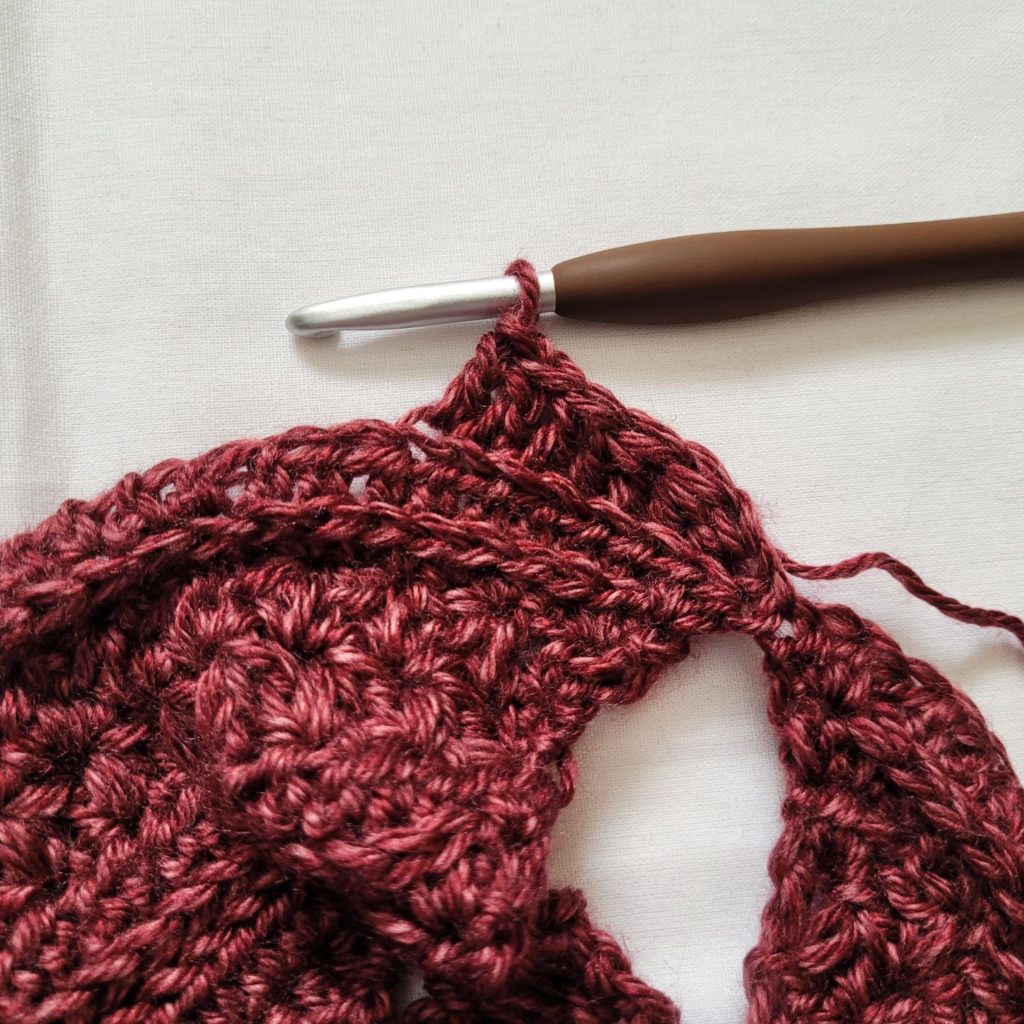
Figure 3
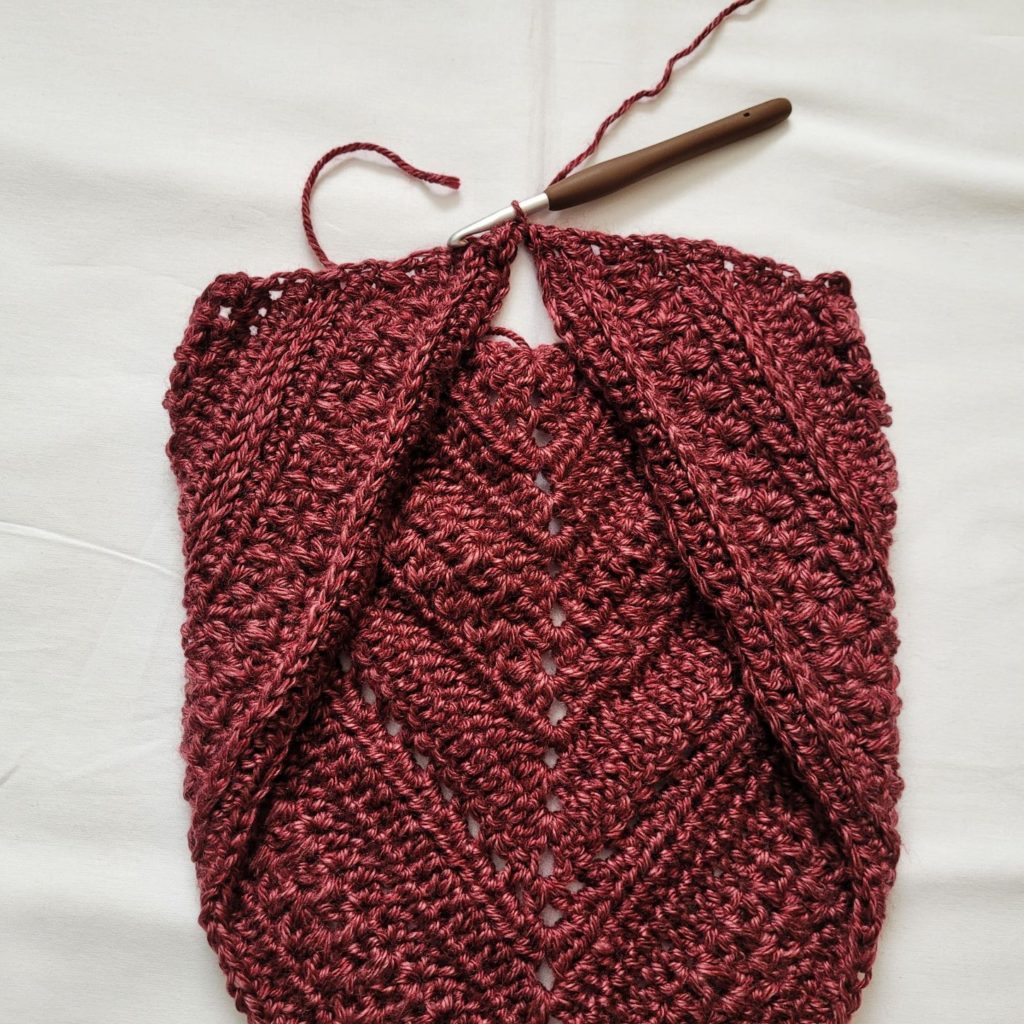
Figure 2

Figure 4
- Working this round in BLO: Ch2, sk 1st st. Dc2tog twice. Dc in each st until you reach the center ch2. (2dc, ch2, 2dc) in ch2 sp. Dc in each st until you have 3 sts left before the starting ch2 (1st st). Dc2tog twice, placing last half of the 2nd dc2tog into the same st as the ch2 (1st st). Ss to join to 1st st. Turn. – 182 st + ch2
- Ch1, sk 1st st. Hdc2tog twice. Hdc in next st. *Ch1, sk1, hdc in next st.** Repeat from * to ** until you reach the center ch2. Ch1, (hdc, ch2, hdc) in ch2 sp. Ch1, hdc in next st. Repeat from * to ** until there are 3 sts left before the starting ch1 (1st st). Hdc2tog twice placing last half of the 2nd hdc2tog into the same st as the ch1 (1st st). Ss to join to 1st st. Turn. – 182 st + ch2
- Ch1, sk 1st st. Hdc2tog twice. Hdc in each st and ch sp until you reach the center ch2. (2hdc, ch2, 2hdc) in ch2 sp. Hdc in each st and ch sp until there are 3 sts left before the starting ch1 (1st st). Hdc2tog twice placing last half of the 2nd hdc2tog into the same st as the ch1 (1st st). Ss to join to 1st st. Turn. – 182 st + ch2
- Ch1, sk 1st st. Hdc2tog twice. Hdc in each st until you reach the center ch2. (2hdc, ch2, 2hdc) in ch2 sp. Hdc in each st until there are 3 sts left before the starting ch1 (1st st). Hdc2tog twice placing last half of the 2nd hdc2tog into the same st as the ch1 (1st st). Ss to join to 1st st. Turn. – 182 st + ch2
- Working this round in the BLO: Ch1, sk 1st st. Hdc2tog twice. Hdc in each st until you reach the center ch2. (2hdc, ch2, 2hdc) in ch2 sp. Hdc in each st until there are 3 sts left before the starting ch1 (1st st). Hdc2tog twice placing last half of the 2nd hdc2tog into the same st as the ch1 (1st st). Ss to join to 1st st. Turn. – 182 st + ch2
- Working this round in the 3rd LO: Ch1, sk 1st st. Hdc2tog twice. Hdc in each st until you reach the center ch2. (2hdc, ch2, 2hdc) in ch2 sp. Hdc in each st until there are 3 sts left before the starting ch1 (1st st). Hdc2tog twice placing last half of the 2nd hdc2tog into the same st as the ch1 (1st st). Ss to join to 1st st. Turn. – 182 st + ch2
- Ch1, sk 1st st. Hdc2tog twice. Hdc in next st. Beginning in the same st, mc across to the center ch2. (2hdc, ch2, 2hdc) in ch2 sp. Ch1. Beginning in next st, mc across until there is 3 sts left before the starting ch1 (1st st). Hold back (or pull out) the last ch1 of the last mc. Hdc in same st as the last mc finished in. Hdc2tog twice placing last half of the 2nd hdc2tog into the same st as the ch1 (1st st). Ss to join to 1st st. Turn. – 182 st + ch2
- Ch1, sk 1st st. Hdc2tog twice. Hdc in next st. Beginning in same st, mc across to center ch2. (2hdc, ch2, 2hdc) in ch2 sp. Ch1. Beginning in next st, mc across until there is 3 sts left before the starting ch1 (1st st). Hold back (or pull out) the last ch1 of the last mc. Hdc in same st as the last mc finished in. Hdc2tog twice placing last half of the 2nd hdc2tog into the same st as the ch1 (1st st). Ss to join to 1st st. Turn. – 182 st + ch2
- Ch1, sk 1st st. Hdc2tog twice. Hdc in next st. *Ch1, sk1, hdc in next st.** Repeat from * to ** until you reach the center ch2. Ch1, (hdc, ch2, hdc) in ch2 sp. Ch1, hdc in next st. Repeat from * to ** until there are 3 sts left before the starting ch1 (1st st). Hdc2tog twice placing last half of the 2nd hdc2tog into the same st as the ch1 (1st st). Ss to join to 1st st. Turn. – 182 st + ch2
- Working this round in the 3rd LO: Ch1, sk 1st st. Hdc2tog twice. Hdc in each st until you reach the center ch2. (2hdc, ch2, 2hdc) in ch2 sp. Hdc in each st until there are 3 sts left before the starting ch1 (1st st). Hdc2tog twice placing last half of the 2nd hdc2tog into the same st as the ch1 (1st st). Ss to join to 1st st. Turn. – 182 st + ch2
If you are making a stacked or hooded cowl, repeat rounds 31-40 until the neck of your cowl is as high as you like. Then, proceed to round 41 below.
If you are making the size I have pictured, proceed to round 41 below.
- Ch1, sk 1st st. Sc in next 2 sts, picot. *Sc in next 5 sts, picot.** Repeat from * to ** until there are 4 sts left before the center ch2. Sc in next 4 sts. (2sc, ch5 picot, 2sc) in ch2 sp. Sc in next 4 sts, picot. Repeat from * to ** until there are no sts left before the starting ch1 (1st st). Sc in same st as the ch1 (1st st). Ss to join to 1st st. Bind off. – 186 st + 37 picot
Culmination Bandana Cowl – Free Crochet Cowl Pattern
Finishing
This step is optional and you may want to skip it if you chose to use a long-gradient yarn because it will mess with the look. We will now add a simple sc border to the neck edge of the cowl. Join your yarn anywhere at the back of the neck edge with the right side facing you.
- Ch1. Sc around neck edge in the following manner:
- Alternate between 1 and 2 sc in the edge of each hdc/mc row (1 in next, 2 in next, repeat).
- 2sc in the end of each dc row.
- When you have worked all the way around, ss to join to the 1st st. Bind off.
Note: The exact number of stitches is not important here. What really matters is that the sc border looks even, and the neck opening isn’t pinched or wavy.
Weave in your ends, and you’re done!
I hope you love your new crochet cowl, and I look forward to seeing all of your beautiful pictures on Ravelry!
If you’d like to know when I post new patterns and tutorials, head on over to my Facebook and Instagram and give me a like and a follow!
If you enjoyed The Culmination Bandana Cowl – Free Crochet Cowl Pattern , you may want to check out my other designs!
Culmination Bandana Cowl – Free Crochet Cowl Pattern
And until next time… Happy Hooking! 😉
Hi Sarah,
I really like your ”Culmination” set! And the colour is fabulous too! I was looking to find the gloves, but I can’t seem to find the pattern?
Hi Jennifer,
Thank you so much! I’m glad you like it!
The gloves pattern hasn’t been released yet. It will be available next Friday. If you’d like to be notified when it has been published, be sure to subscribe to my newsletter. 😉
Sarah
This Culmination Collection is beautiful. And, I really appreciate that you have included links to the tutorials for the special stitches. Thank you so much for sharing your designs and work with us. I look forward to seeing what other new wonderful pieces you create in 2022. Best wishes for you and yours in the coming year :o)
Thank you so much for your kind words!
Designing has been a truly fulfilling experience, and I am so glad I have been able to run this website and produce new patterns this past year.
I am so excited to see what 2022 brings.
Wishing you the happiest holidays and a prosperous new year. <3