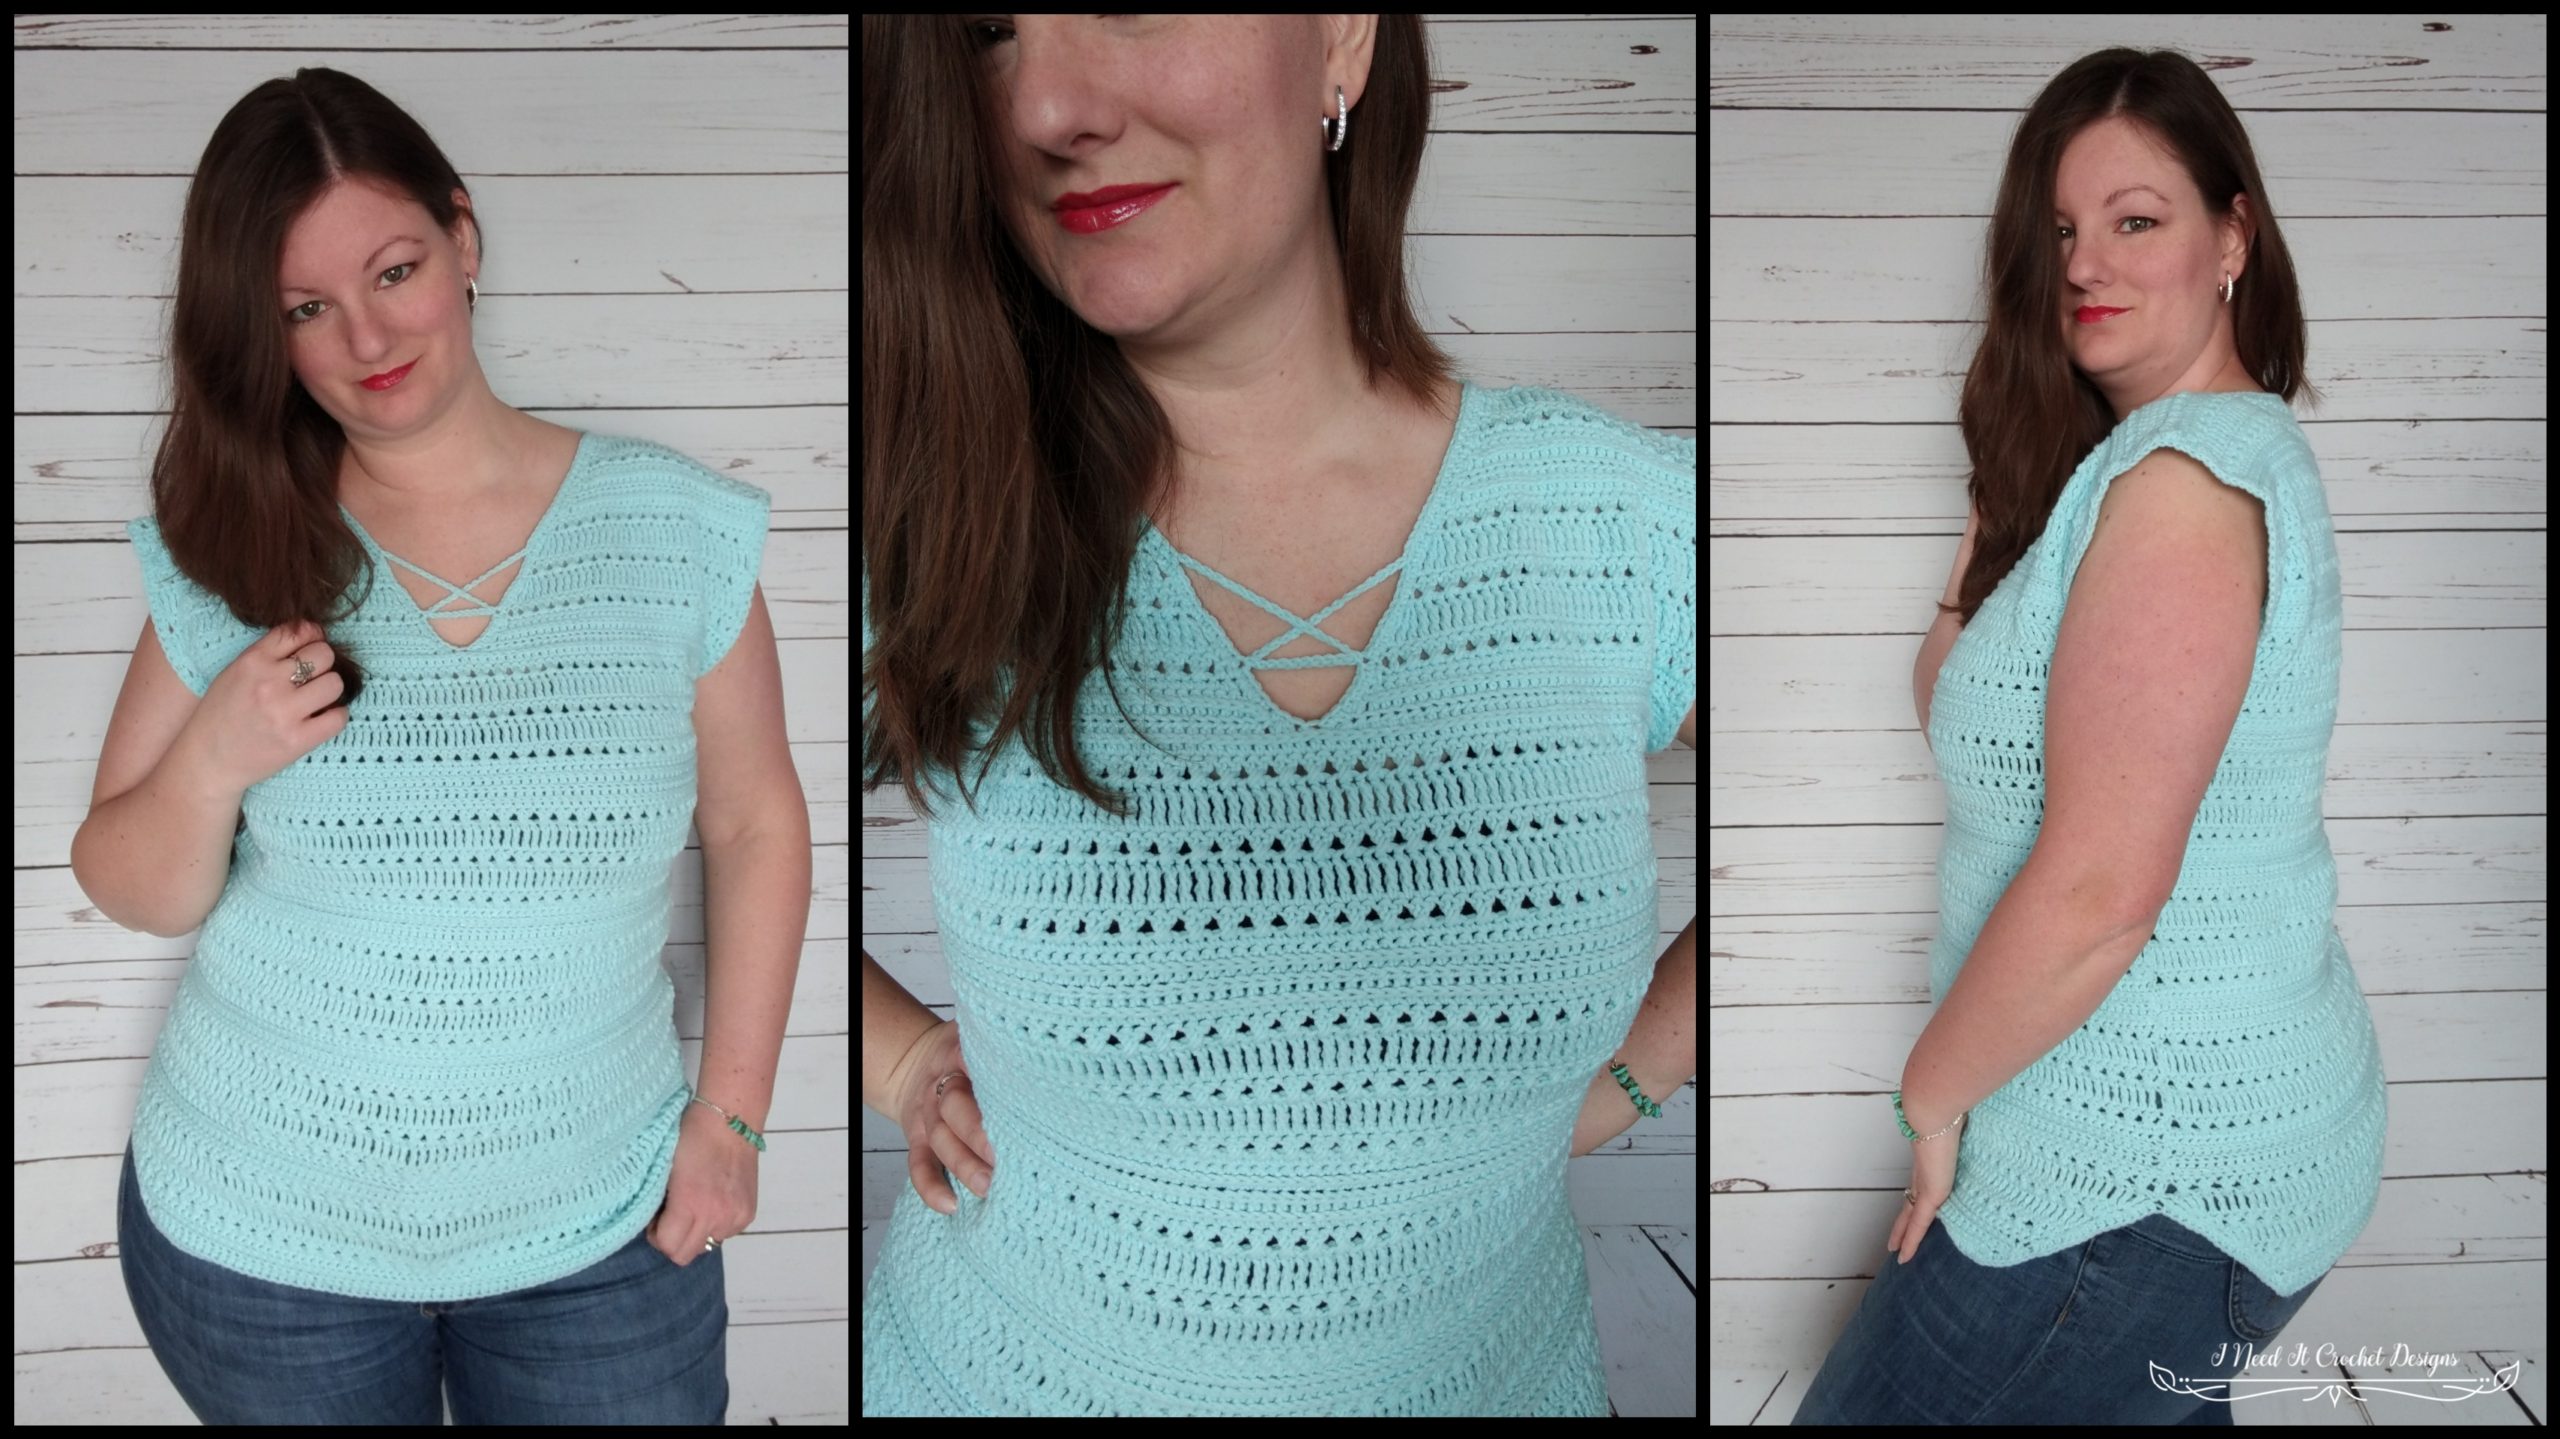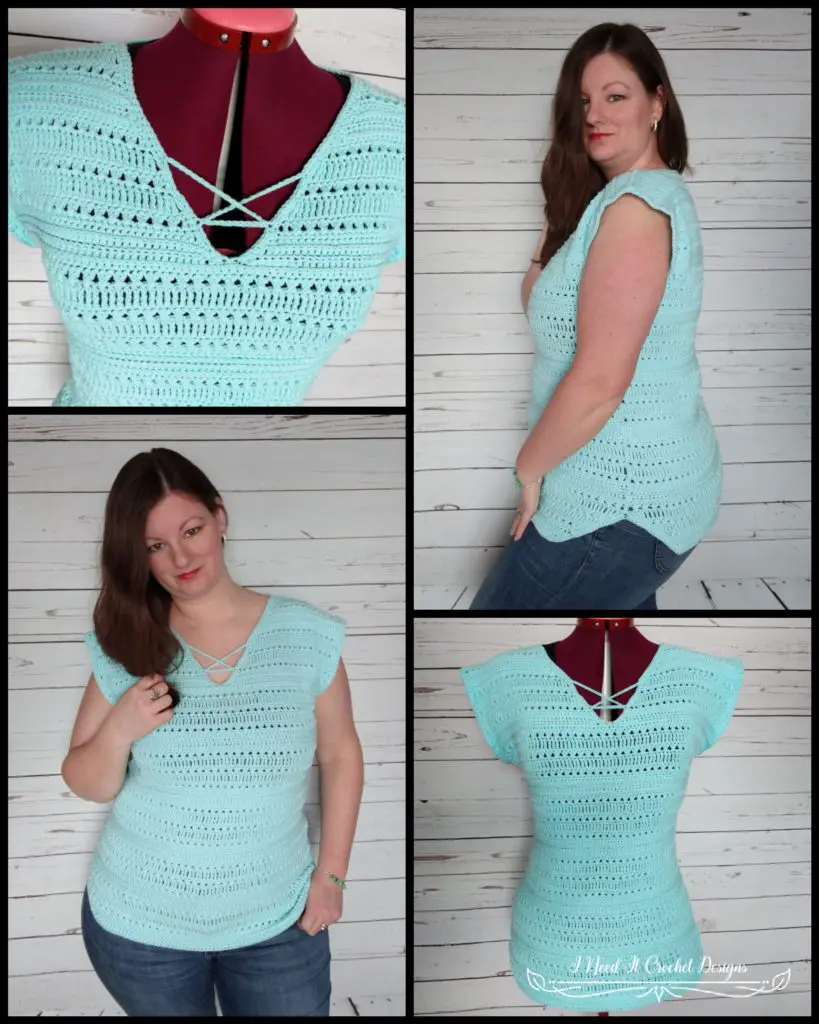
The Fran’s V Neck Blouse free crochet pattern is copyrighted by I Need It Crochet. You may not copy, share, change, or sell the pattern itself. Also, you may not claim this pattern as your own. All pictures contained in this pattern fall under the copyright and may not be used.
Finished items made from this pattern belong to you and you may do what you wish with them. If you choose to sell them on Etsy I would very much appreciate it if you credited me as the pattern designer.


Or… Scroll down to find the free crochet pattern!
As you may have noticed, I am crazy over cute tops. There are so many different ways to make and wear them. I wear stretchy jeans a lot and I think they’re great, but put me in a pretty top and that sets my mood for the whole day. This one is a little special to me. It’s the top I was working on when my mom passed away. I was deep in grief for a long while after and so, it sat, unfinished. But mom would have hated to see such a pretty pattern go to waste, so I picked it up again and finished it off. It would have suited her, so I named it after her. I think she would have loved that. <3
Crochet Top Info
Finished Sizes:
Instructions given to fit size X-small; changes for small, medium, large, X-large and XX-large are in ()
XS (S, M, L, XL, XXL)
To fit bust size: 31-33” (34-35”, 36-37”, 38-40”, 41-43”, 44-45’)
Finished Bust: 34” (36”, 38”, 40”, 44”, 46”)
Finished Length: 25 ½” (25 ½”, 26”, 26 ½”, 27”, 27”)
Materials:
I used Loops and threads Cambria. It is 100% Acrylic. #2 fingering/baby weight. 15wpi.
Any yarn of similar weight would work.
Approximately 750 (750, 850, 950, 1050, 1150) yds.
G/4.5mm Hook
Stitch Markers
Yarn Needle
Scissors
Gauge:
See below for gauge swatch pattern.
Please check your gauge before beginning. It will save you time and heartache!
Abbreviations:
Sk = Skip
BLO = Back Loop Only
St = Stitch
Ss = Slip Stitch
Ch = Chain
Sc = Single Crochet
Hdc = Half Double Crochet
Dc = Double Crochet
Tr = Treble Crochet
Hdc2tog = Half Double Crochet 2 together
Dc2tog = Double Crochet 2 together
Tr3tog = Treble Crochet 3 together
Notes:
Click these links for tutorials on the CDc and 3rd LO.
Ch1 and ch2 at the beginning of a row is never considered a stitch.
Ch3 at the beginning of a row is considered a Dc, except when starting a Tr3tog.
Ch4 at the beginning of a row is always considered a Tr.
I have added many pictures to help you along the way.
The model above has a 40” bust and is wearing a size Large.
Choose your size according to the finished measurements noted above and your preferences.
Gauge Pattern
Ch 19.
1. Hdc in 2nd ch from hook and each ch across. Turn.
- 18 sts
2. Working in 3rd LO: Ch 1, Hdc in each st across. Turn.
- 18 sts
3. Working in BLO: Ch 1, Hdc in each st across. Turn.
- 18 sts
4. Working in 3rd LO: Ch 1, Sc in each st across. Turn.
- 18 sts
5. Ch 1, Sc in each st across. Turn.
- 18 sts
6. Ch 3. CDc in next 2 sts and each st across until you have 1 st left unworked. Dc in last st. Turn.
- 18 sts
7. Ch 4, Tr in next st and each st across. Turn.
- 18 sts
8. Ch 3. CDc in next 2 sts and each st across until you have 1 st left unworked. Dc in last st. Turn.
- 18 sts
9. Ch 4, Tr in next st and each st across. Turn.
- 18 sts
10. Ch 3. CDc in next 2 sts and each st across until you have 1 st left unworked. Dc in last st. Turn.
- 18 sts
Finished swatch should measure 4” wide and 4” tall.
Free Crochet Top Pattern
Instructions
The Fran’s V Neck Blouse is made of two pieces. First we will make the front panel, then the back panel. Then we will whip stitch the front and back together, finish off the edges and add a little detail to the neckline.
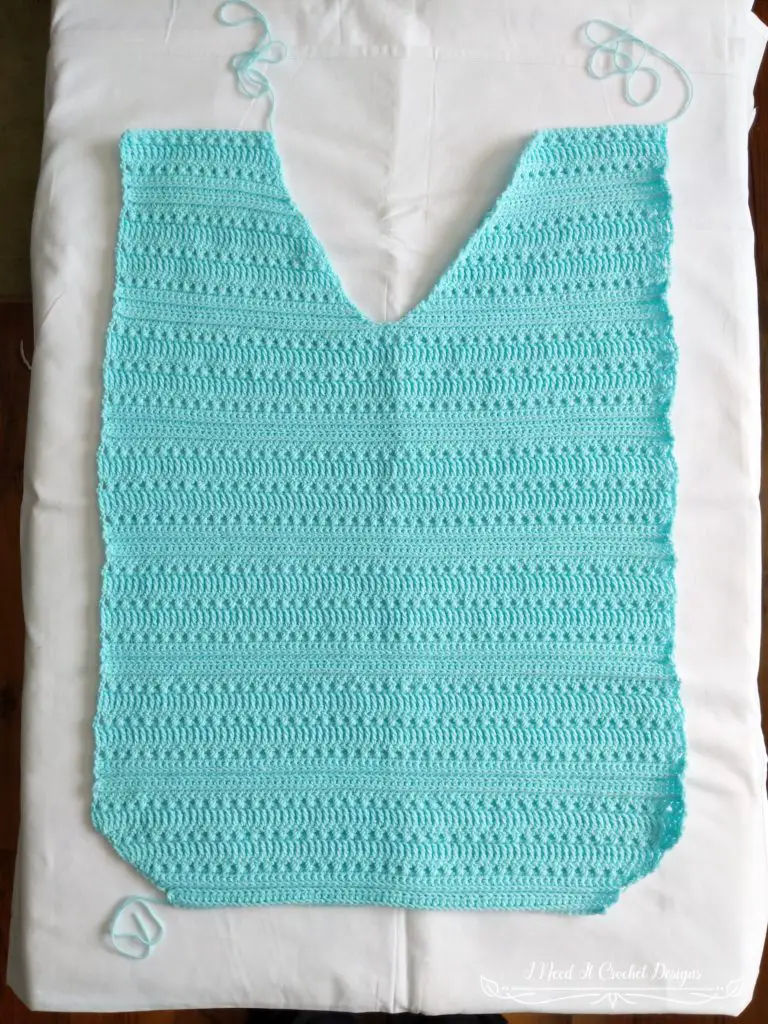
Front Panel
With 4.5mm Hook
Ch 51 (55, 59, 63, 71, 75)
1. (This will be the right side of your garment.) 2Hdc in 2nd ch from hook. Hdc in each ch across until 1 ch left unworked. 2Hdc in last ch. Turn.
- 52 (56, 60, 64, 72, 76) sts
2. (This will be the wrong side of your garment.) Working this row in 3rd LO: Ch1, 2Hdc in 1st st. Hdc in each st across until 1 st left unworked. 2Hdc in last ch. Turn.
- 54 (58, 62, 66, 74, 78) sts
3. Working this row in BLO: Ch1, (2Hdc) in 1st st. Hdc in each st across until 1 st left unworked. 2Hdc in last st. Turn.
- 56 (60, 64, 68, 76, 80) sts
4. Working this row in 3rd LO: Ch 1, 2Sc in 1st st. Sc in each st across until 1 st left unworked. 2Sc in last st. Turn.
- 58 (62, 66, 70, 78, 82) sts
5. Ch 1, 2Sc in 1st st. Sc in each st across until 1 st left unworked. 2Sc in last st. Turn.
- 60 (64, 68, 72, 80, 84) sts
6. Ch3. 2Dc in 1st st. CDc in next 2 sts and each st across until 1 st left unworked. 3Dc in last st. Turn.
- 64 (68, 72, 76, 84, 88) sts
7. Ch4, 2Tr in 1st st. Tr in each st across until 1 st left unworked. 3Tr in last st. Turn.
- 68 (72, 76, 80, 88, 92) sts
8. Repeat Row 6.
- 72 (76, 80, 84, 92, 96) sts
9. Repeat Row 7.
- 76 (80, 84, 88, 96, 100) sts
Your piece should look something like this.

10. Ch3, CDc in next 2 sts and each st across until 1 st left unworked. Dc in last st. Turn.
- 76 (80, 84, 88, 96, 100) sts
11. Ch1, Hdc in 1st st and each st across. Turn.
- 76 (80, 84, 88, 96, 100) sts
12. Working this row in 3rd LO: Ch1, Hdc in 1st st and each st across Turn.
- 76 (80, 84, 88, 96, 100) sts
13. Working this row in BLO: Ch1, Hdc in 1st st and each st across. Turn.
- 76 (80, 84, 88, 96, 100) sts
14. Working this row in 3rd LO: Ch 1, Sc in 1st st and each st across. Turn.
- 76 (80, 84, 88, 96, 100) sts
15. Ch 1, Sc in 1st st and each st across. Turn.
- 76 (80, 84, 88, 96, 100) sts
16. Ch3. CDc in next 2 st and each st across until 1 st left unworked. Dc in last st. Turn.
- 76 (80, 84, 88, 96, 100) sts
17. Ch4, Tr in next st and each st across. Turn.
- 76 (80, 84, 88, 96, 100) sts
18. Repeat Row 16.
- 76 (80, 84, 88, 96, 100) sts
19. Repeat Row 17.
- 76 (80, 84, 88, 96, 100) sts
20. Repeat Row 16.
- 76 (80, 84, 88, 96, 100) sts
Repeat rows 11-20 three times. Then repeat row 11. You will have 51 rows. Do not fasten off.
Now we will form the V-shaped neckline, working one shoulder at a time.
Right Shoulder
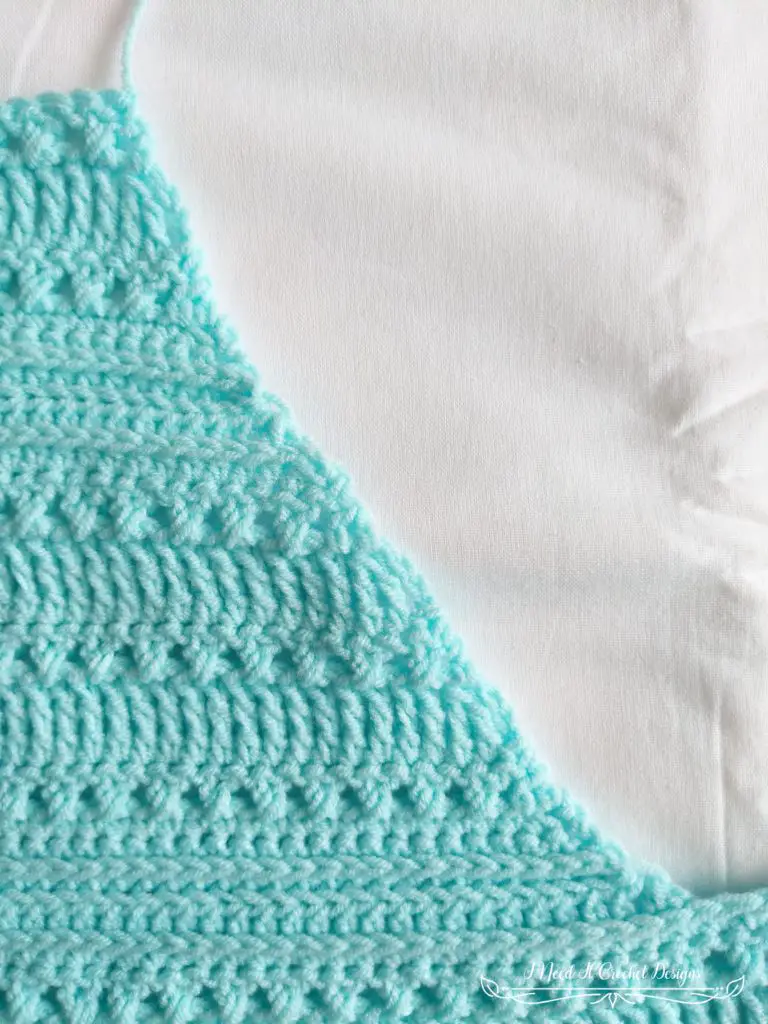
1. Working this row in 3rd LO: Ch1, Hdc in 1st st and next 34(36, 38, 40, 44, 46) sts. Hdc2tog. Leave the rest of the stitches unworked. Turn.
- 36 (38, 40, 42, 46, 48)
2. Working this row in BLO: Ch1, Hdc2tog over 1st 2 sts. Hdc in each st across. Turn.
- 35 (37, 39, 41, 45, 47)
3. Working this row in 3rd LO: Ch1, Sc in each st across until you have 2 sts left unworked. Sc2tog over last 2 sts. Turn.
- 34 (36, 38, 40, 44, 46)
4. Ch1, Sc2tog over 1st 2 sts. Sc in each st across. Turn.
- 33 (35, 37, 39, 43, 45)
5. Ch3. CDc in next 2 sts and each st across until you have 2 sts left unworked. Dc2tog in last 2 sts. Turn.
- 32 (34, 36, 38, 42, 44)
6. Ch3, Tr2tog over next 2 sts (Tr3tog made). Tr in each st across. Turn.
- 30 (32, 34, 36, 40, 42)
7. Ch3, CDc over next 2 sts and each st across until you have 3 sts left unworked. Work the last 3 sts as follows:
Sk 1 st, Dc in next st.
Yo, insert hook in skipped st and draw up a loop.
Yo and pull yarn through 2 loops.
Yo, insert hook through last st and draw up a loop.
Yo and pull yarn through 2 loops.
Yo and pull yarn through all 3 loops. Turn.
- 29 (31, 33, 35, 39, 41)
8. Ch3, Tr2tog over next 2 sts (Tr3tog made). Tr in each st across. Turn.
- 27 (29, 31, 33, 37, 39)
9. Ch3, CDc over next 2 sts and each st across until you have 2 sts left unworked. Dc2tog over last 2 sts. Turn.
- 26 (28, 30, 32, 36, 38)
10. Ch1, Hdc2tog over 1st 2 sts. Hdc in each st across. Turn.
- 25 (27, 29, 31, 35, 37)
11. Working this row in 3rd LO: Ch1, Hdc in each st across until you have 2 sts left unworked. Hdc2tog over last 2 sts. Turn.
- 24 (26, 28, 30, 34, 36)
12. Working this row in BLO: Ch1, Hdc2tog over 1st 2 sts. Hdc in each st across. Turn.
- 23 (25, 27, 29, 33, 35)
13. Working this row in 3rd LO: Ch1, Sc in each st across until you have 2 sts left unworked. Sc2tog over last 2 sts. Turn.
- 22 (24, 26, 28, 32, 34)
14. Ch1, Sc2tog over 1st 2 sts. Sc in each st across. Turn.
- 21 (23, 25, 27, 31, 33)
15. Ch3. CDc in next 2 sts and in each st across until you have 2 sts left unworked. Dc2tog in last 2 sts. Turn.
Size XS/S: Skip rows 16-18, fasten off, leaving a long tail for sewing the shoulder seam and proceed to Left Shoulder.
All other sizes proceed to next row.
- 20 (22, 24, 26, 30, 32)
16. Ch3, Tr2tog over next 2 sts (Tr3tog made). Tr in each st across. Turn.
Size M: Skip rows 17-18, fasten off, leaving a long tail for sewing the shoulder seam and proceed to Left Shoulder.
All other sizes proceed to next row.
- NA (NA, 22, 24, 28, 30)
17. Ch3, CDc over next 2 sts and each st across until you have 3 sts left unworked. Work the last 3 sts as follows:
Sk 1 st, Dc in next st.
Yo, insert hook in skipped st and draw up a loop.
Yo and pull yarn through 2 loops.
Yo, insert hook through last st and draw up a loop.
Yo and pull yarn through 2 loops.
Yo and pull yarn through all 3 loops. Turn.
Size L: Skip row 18, fasten off, leaving a long tail for sewing the shoulder seam and proceed to Left Shoulder.
All other sizes proceed to next row.
- NA (NA, NA, 23, 27, 29)
18. Ch3, Tr2tog over next 2 sts (Tr3tog made). Tr in each st across. Fasten off.
- NA (NA, NA, NA, 25, 27)
Left Shoulder
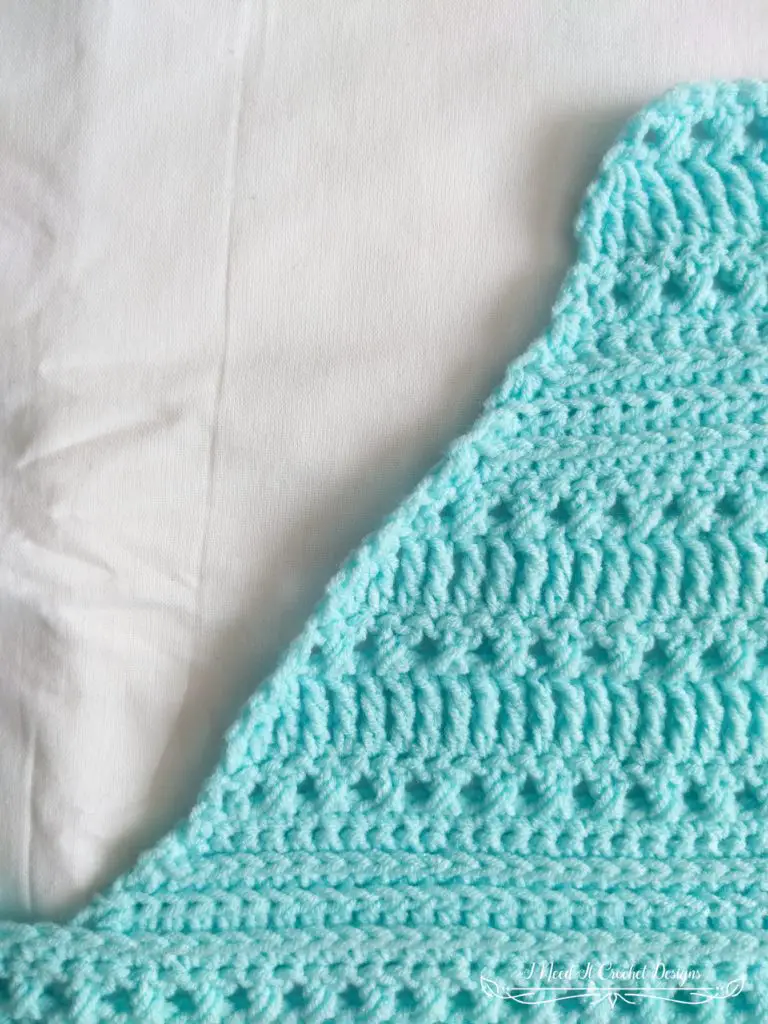
With the right side of your piece facing you, count back 37(39, 41, 43, 47, 49) sts and place a stitch marker. Turn your work and join your yarn in the 3rd LO of this st with a ss. (You should end up with 2 sts unworked in the bottom of the V between the shoulders. )
1. Working this row in 3rd LO: Ch1, Hdc2tog in 1st 2 sts. Hdc in each st across. Turn.
- 36 (38, 40, 42, 46, 48)
2. Working this row in BLO: Ch1, Hdc in 1st st and each st across until you have 2 sts left unworked. Hdc2tog over last 2 sts. Turn.
- 35 (37, 39, 41, 45, 47)
3. Working this row in 3rd LO: Ch1, Sc2tog over 1st 2 sts. Sc in each st across. Turn.
- 34 (36, 38, 40, 44, 46)
4. Ch1, Sc in 1st st and each st across until you have 2 sts left unworked. Sc2tog over last 2 sts. Turn.
- 33 (35, 37, 39, 43, 45)
5. Ch2, Dc in next st (Dc2tog made). CDc in each st across until you have 1 st left unworked. Dc in last st. Turn.
- 32 (34, 36, 38, 42, 44)
6. Ch4, Tr in next st and each st across until you have 3 sts left unworked. Tr3tog over last 3 sts. Turn.
- 30 (32, 34, 36, 40, 42)
7. Ch2 (not considered a stitch), CDc over next 2 sts and each st across until you have 1 st left unworked. Dc in last st. Turn.
- 29 (31, 33, 35, 39, 41)
8. Ch4, Tr in next st and each st across until you have 3 sts left unworked. Tr3tog over next 3 sts. Turn.
- 27 (29, 31, 33, 37, 39)
9. Ch2, Dc in next st (Dc2tog made). CDc in each st across until you have 1 st left unworked. Dc in last st. Turn.
- 26 (28, 30, 32, 36, 38)
10. Ch1, Hdc in 1st st and each st across until you have 2 sts left unworked. Hdc2tog over last 2 sts. Turn.
- 25 (27, 29, 31, 35, 37)
11. Working this row in 3rd LO: Ch1, Hdc2tog in 1st 2 sts. Hdc in each st across. Turn.
- 24 (26, 28, 30, 34, 36)
12. Working this row in BLO: Ch1, Hdc in 1st st and each st across until you have 2 sts left unworked. Hdc2tog over last 2 sts. Turn.
- 23 (25, 27, 29, 33, 35)
13. Working this row in 3rd LO: Ch1, Sc2tog over 1st 2 sts. Sc in each st across. Turn.
- 22 (24, 26, 28, 32, 34)
14. Ch1, Sc in 1st st and each st across until you have 2 sts left unworked. Sc2tog over last 2 sts. Turn.
- 21 (23, 25, 27, 31, 33)
15. Ch2, Dc in next st (Dc2tog made). CDc in each st across until you have 1 st left unworked. Dc in last st. Turn.
Size XS/S: Skip rows 16-18, fasten off, leaving a long tail for sewing the shoulder seam.
All other sizes proceed to next row.
- 20 (22, 24, 26, 30, 32)
16. Ch4, Tr in next st and each st across until you have 3 sts left unworked. Tr3tog over last 3 sts. Turn.
Size M: Skip rows 17-18, fasten off, leaving a long tail for sewing the shoulder seam.
All other sizes proceed to next row.
- NA (NA, 22, 24, 28, 30)
17. Ch2 (not considered a stitch), CDc over next 2 sts and each st across until you have 1 st left unworked. Dc in last st. Turn.
Size L: Skip row 18, fasten off, leaving a long tail for sewing the shoulder seam.
All other sizes proceed to next row.
- NA (NA, NA, 23, 27, 29)
18. Ch4, Tr in next st and each st across until you have 3 sts left unworked. Tr3tog over next 3 sts. Fasten off, leaving a long tail for sewing the shoulder seam.
- NA (NA, NA, NA, 25, 27)
Back Panel
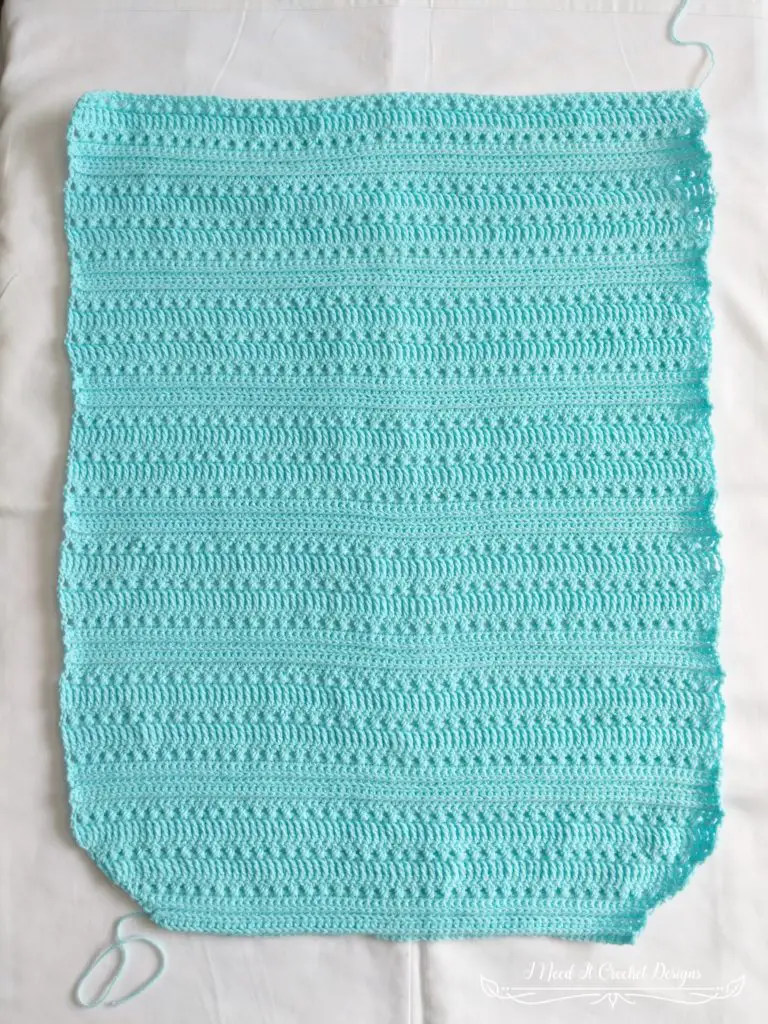
Ch 51 (55, 59, 63, 71, 75
1. (This will be the right side of your garment.) 2Hdc in 2nd ch from hook. Hdc in each ch across until 1 ch left unworked. 2Hdc in last ch. Turn.
- 52 (56, 60, 64, 72, 76) sts
2. (This will be the wrong side of your garment.) Working this row in 3rd LO: Ch1, 2Hdc in 1st st. Hdc in each st across until 1 st left unworked. 2Hdc in last ch. Turn.
- 54 (58, 62, 66, 74, 78) sts
3. Working this row in BLO: Ch1, (2Hdc) in 1st st. Hdc in each st across until 1 st left unworked. 2Hdc in last st. Turn.
- 56 (60, 64, 68, 76, 80) sts
4. Working this row in 3rd LO: Ch 1, 2Sc in 1st st. Sc in each st across until 1 st left unworked. 2Sc in last st. Turn.
- 58 (62, 66, 70, 78, 82) sts
5. Ch 1, 2Sc in 1st st. Sc in each st across until 1 st left unworked. 2Sc in last st. Turn.
- 60 (64, 68, 72, 80, 84) sts
6. Ch3. 2Dc in 1st st. CDc in next 2 sts and each st across until 1 st left unworked. 3Dc in last st. Turn.
- 64 (68, 72, 76, 84, 88) sts
7. Ch4, 2Tr in 1st st. Tr in each st across until 1 st left unworked. 3Tr in last st. Turn.
- 68 (72, 76, 80, 88, 92) sts
8. Repeat Row 6.
- 72 (76, 80, 84, 92, 96) sts
9. Repeat Row 7.
- 76 (80, 84, 88, 96, 100) sts
10. Ch3, CDc in next 2 sts and each st across until 1 st left unworked. Dc in last st. Turn.
- 76 (80, 84, 88, 96, 100) sts
11. Ch1, Hdc in 1st st and each st across. Turn.
- 76 (80, 84, 88, 96, 100) sts
12. Working this row in 3rd LO: Ch1, Hdc in 1st st and each st across Turn.
- 76 (80, 84, 88, 96, 100) sts
13. Working this row in BLO: Ch1, Hdc in 1st st and each st across. Turn.
- 76 (80, 84, 88, 96, 100) sts
14. Working this row in 3rd LO: Ch 1, Sc in 1st st and each st across. Turn.
- 76 (80, 84, 88, 96, 100) sts
15. Ch 1, Sc in 1st st and each st across. Turn.
- 76 (80, 84, 88, 96, 100) sts
16. Ch3. CDc in next 2 st and each st across until 1 st left unworked. Dc in last st. Turn.
- 76 (80, 84, 88, 96, 100) sts
17. Ch4, Tr in next st and each st across. Turn.
- 76 (80, 84, 88, 96, 100) sts
18. Repeat Row 16.
- 76 (80, 84, 88, 96, 100) sts
19. Repeat Row 17.
- 76 (80, 84, 88, 96, 100) sts
20. Repeat Row 16.
- 76 (80, 84, 88, 96, 100) sts
Repeat rows 11-20 until you have a total of 66 (66, 67, 68, 69, 69) rows. Fasten off.
Lay the panels one on top of the other with the right sides facing each other. Whip stitch up the sides starting at the top of Row 9. Leave 18 (18, 19, 20, 21, 21) rows open at the top for the arm holes. Note: If you prefer looser arm holes you can make them any size you want. We will just be finishing off the edges of the arm holes, so this part does not require any special stitch count.
Whip stitch the shoulders together. Pull the top right side out.
Arm Holes
With right side facing you, join your yarn in the armpit of your piece. Place Hdcs around the edges of the armholes as follows:
Ch1.
– 2 Hdc in the end of each CDc row.
– 3 Hdc in the end of each Tr row.
– 6 Hdc across the end of each set of Hdc/Sc rows.
– 1 “extra” Hdc in the seam of the shoulder.
If you follow my recommendations for arm hole size and hdc per row you should end up with 63 (63, 69, 73, 79, 79) Hdc around each arm hole.
Bottom Hem
Join yarn in side seam. Working with right side facing you:
Ch1.
– Place 21 Hdc in the sides of rows 9-2.
– Place 1 Sc in side of row 1.
– Working in bottom of row 1:
– 2 Sc in 1st st, Hdc in next 46 (50, 54, 58, 66, 70) sts. 2 Sc in last st.
– Place 1 Sc in side of row 1.
– Place 21 Hdc in the sides of rows 2-9.
Repeat these steps for the other half of the hem.
- 188 (196, 204, 212, 228, 236) sts
Neck Line
Now we will finish off the edges and add a little detail to the neckline.
Working with front right side facing you, join your yarn at the top of the right side of the V (by the shoulder seam).
1. Ch1.
Work Sc stitches down the side of the V as follows:
– 3 Sc in the end of each CDc row.
– 4 Sc in the end of each Tr row.
– 7 Sc across the end of each set of Hdc/Sc rows except the set at the bottom of the V.
– 6 Sc in the end of the last set of Hdc/Sc rows.
– Place Sc2tog in the 2 unworked sts at the bottom of the V.
Continue up the other side of the V:
– 6 Sc in the end of the next set of Hdc/Sc rows.
– 7 Sc across the end of each set of Hdc/Sc rows except the set at the bottom of the V.
– 4 Sc in the end of each Tr row.
– 3 Sc in the end of each CDc row.
Once you have finished adding Scs to the V:
– Sc in each st across the back of the neck.
– Ss to starting Sc.
- 103 (103, 115, 123, 135, 135) sts
Now we will place some stitch markers to help you with the next part.
– Find the Sc2tog at the bottom of your V.
– Count 7 sts to the right and place a stitch marker.
– Count 10 more sts to the right and place another st maker.
– Go back to your Sc2tog.
– Count 7 sts to the left and place a stitch marker.
– Count 10 more sts to the left and place another st maker.
Your neck should look something like this. I have added some numbers to the stitch markers to make it easier to understand how to work row 2. I also added some pictures to help you.
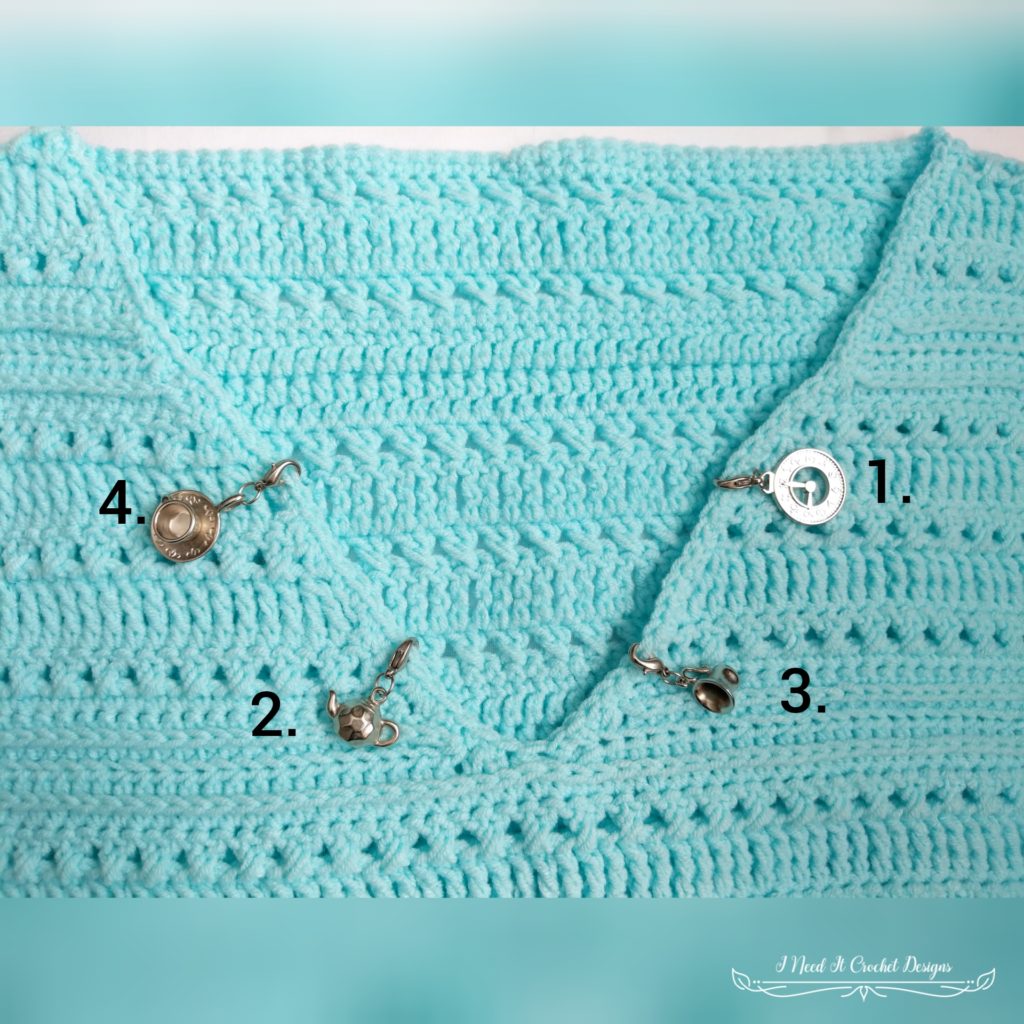
2. Ch 1.
– Sc in each st until you come to the st just before stitch marker #1. Ss in stitch marked #1.
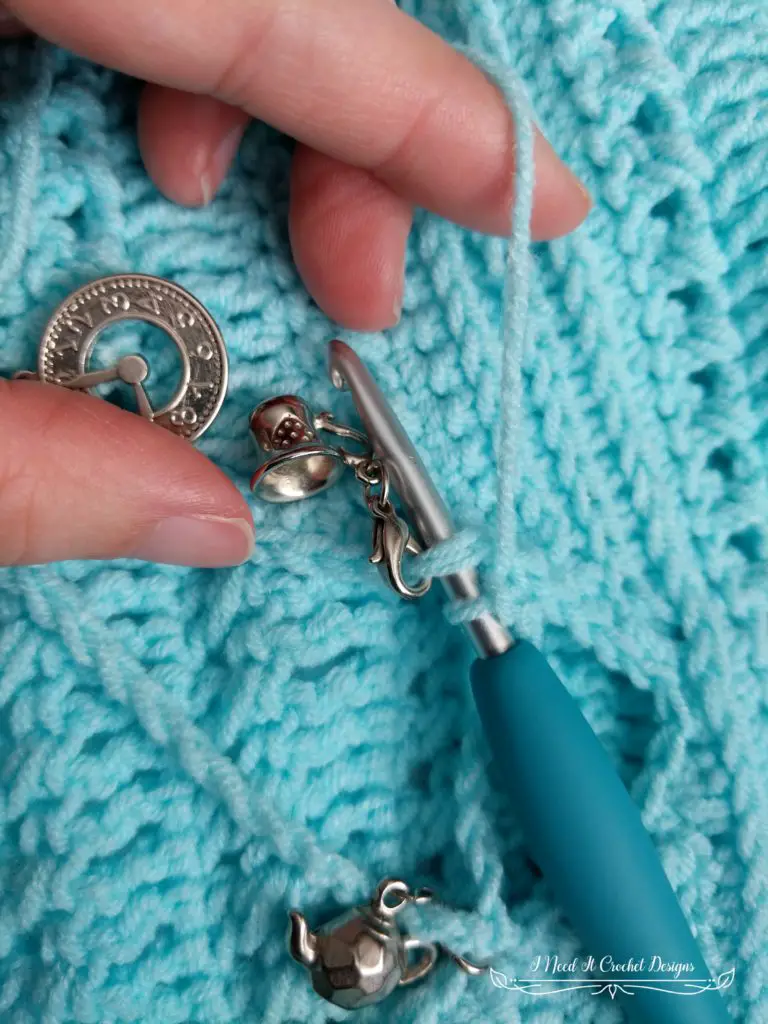
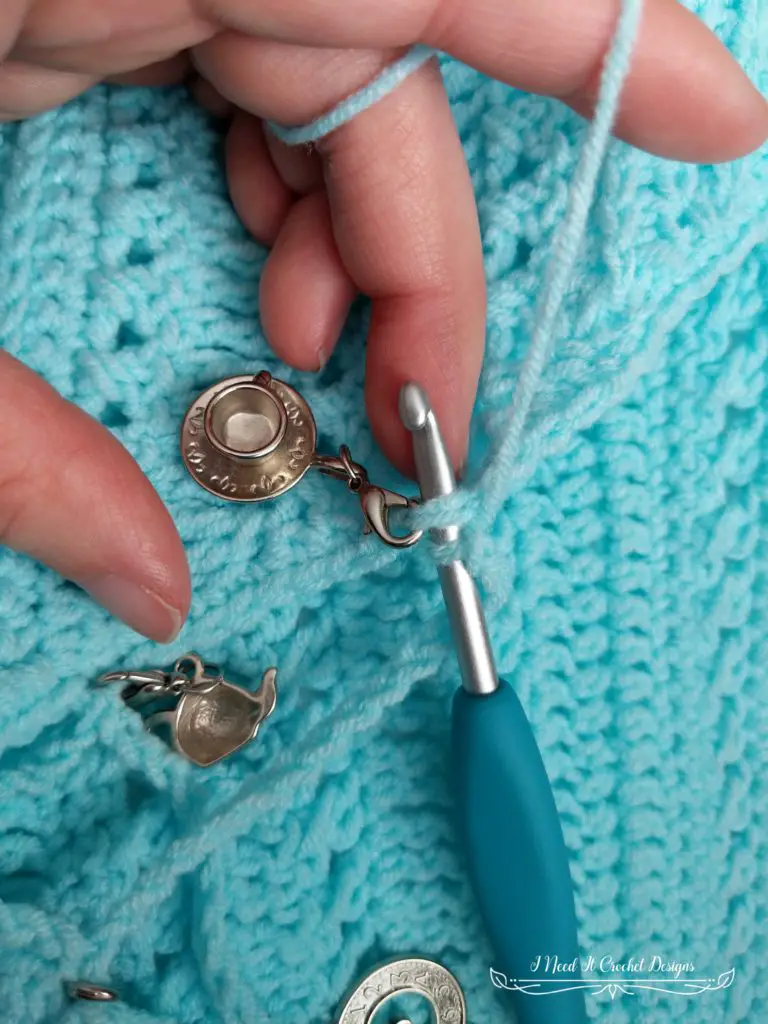
– Ch 16, Ss to st marked #2. (I make these chains pretty tight so they don’t sag. The number of chains doesn’t matter so much as the idea that they should reach the next st marker without being saggy or stretching too much. Play with your chain numbers to achieve this. )
– Note: To make your chains lay flat with minimal twisting, always insert your hook through the back to the front.
– Rotate you piece clockwise.
– Ch 10, Ss to marker #3.
– Rotate your piece clockwise.
– Ch 16, Ss to marker #4.
– Rotate your piece counter clockwise so that you’re working toward the shoulder.
– Sc in the next st and each st around.
– Ss to starting Sc.
- 68 (68, 80, 88, 100, 100) sts, not including ss and ch
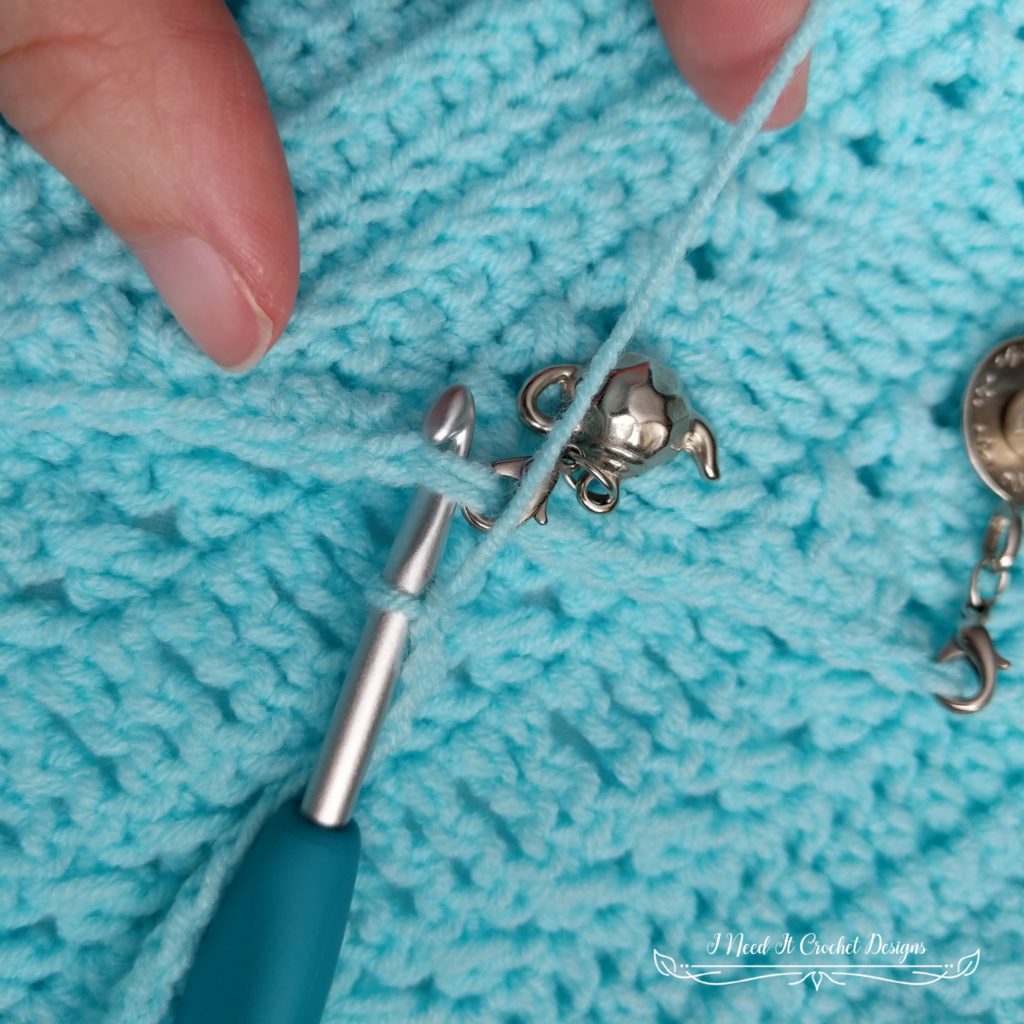
Marker # 2
Marker # 3
Marker # 4
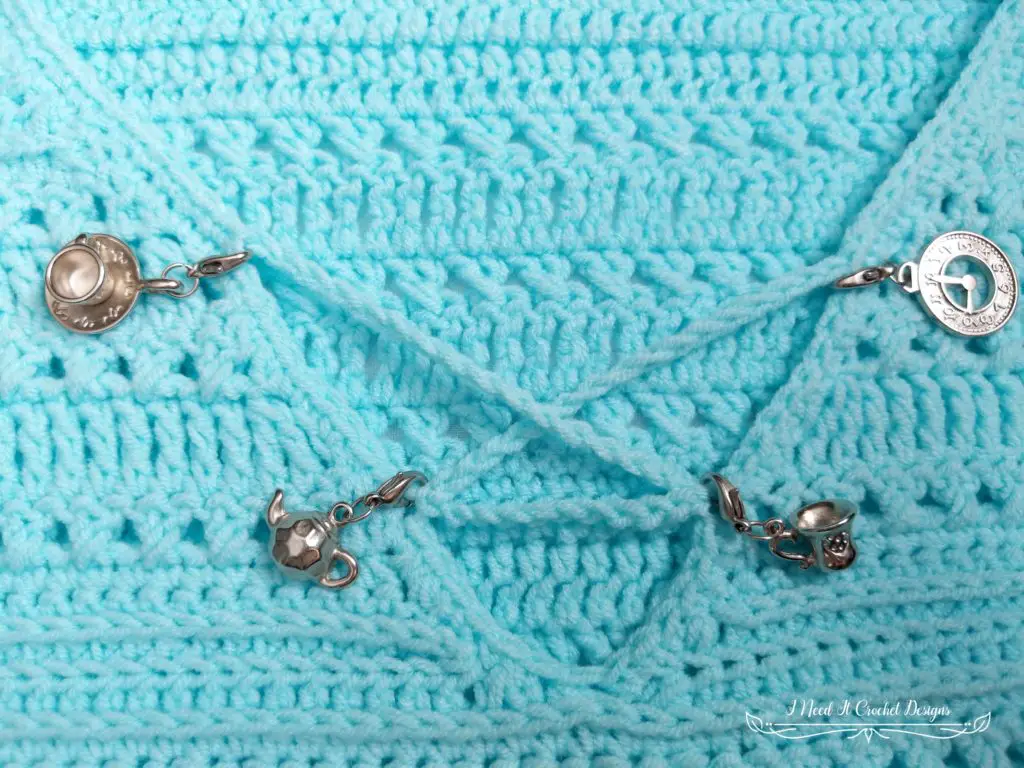
Finished Detail
Now you just have to weave in your ends and you are done!
I hope you enjoyed making your Fran’s V Neck Blouse. Wear it with a smile, and while you’re at it… go hug your Mom. <3 I look forward to seeing all your beautiful pictures on Ravelry!
If you’d like to know when I post new patterns and tutorials, head on over to my Facebook and Instagram and give me a like and a follow!
If you enjoyed this free pattern for the Fran’s V Neck Blouse, you may want to check out my other designs!
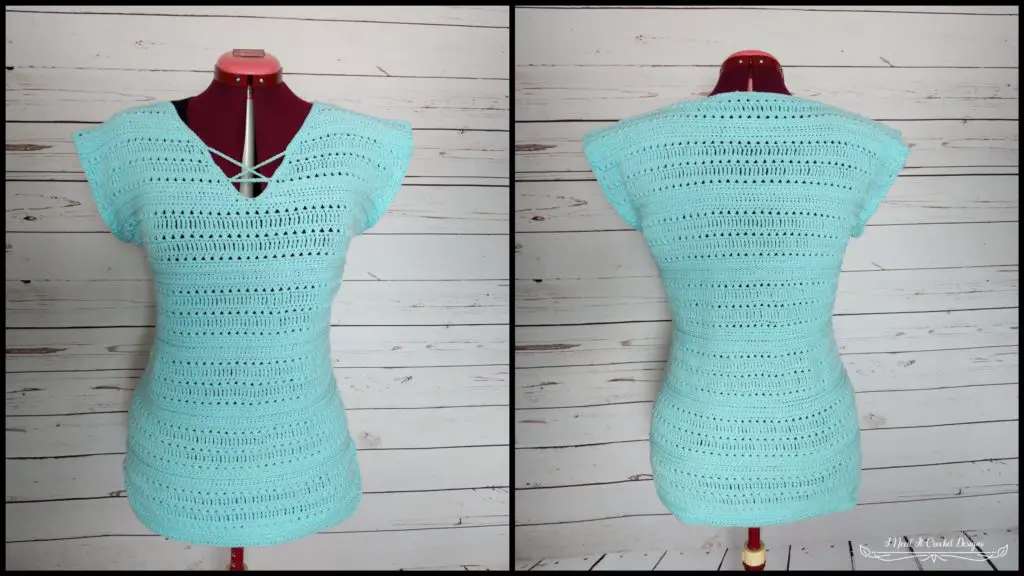
Until next time… Happy Hooking! 😉

