
The Free Crochet Tunic Pattern – Summer Beauty is copyrighted by I Need It Crochet. You may not copy, share, change, or sell the pattern itself. Also, you may not claim this pattern as your own. All pictures contained in this pattern fall under the copyright and may not be used.
Finished items made from the Free Crochet Tunic Pattern – Summer Beauty belong to you, and you may do what you wish with them. If you choose to sell them on Etsy, I would very much appreciate it if you credited me as the pattern designer.


Or… Just scroll down to see it for free!
A while back, a wonderful lady by the name of Linda contacted me. She explained that she is a fan of The Angles Tunic. She asked that I design another tunic and gifted me two cakes of beautiful yarn. Of course, I was happy to oblige.
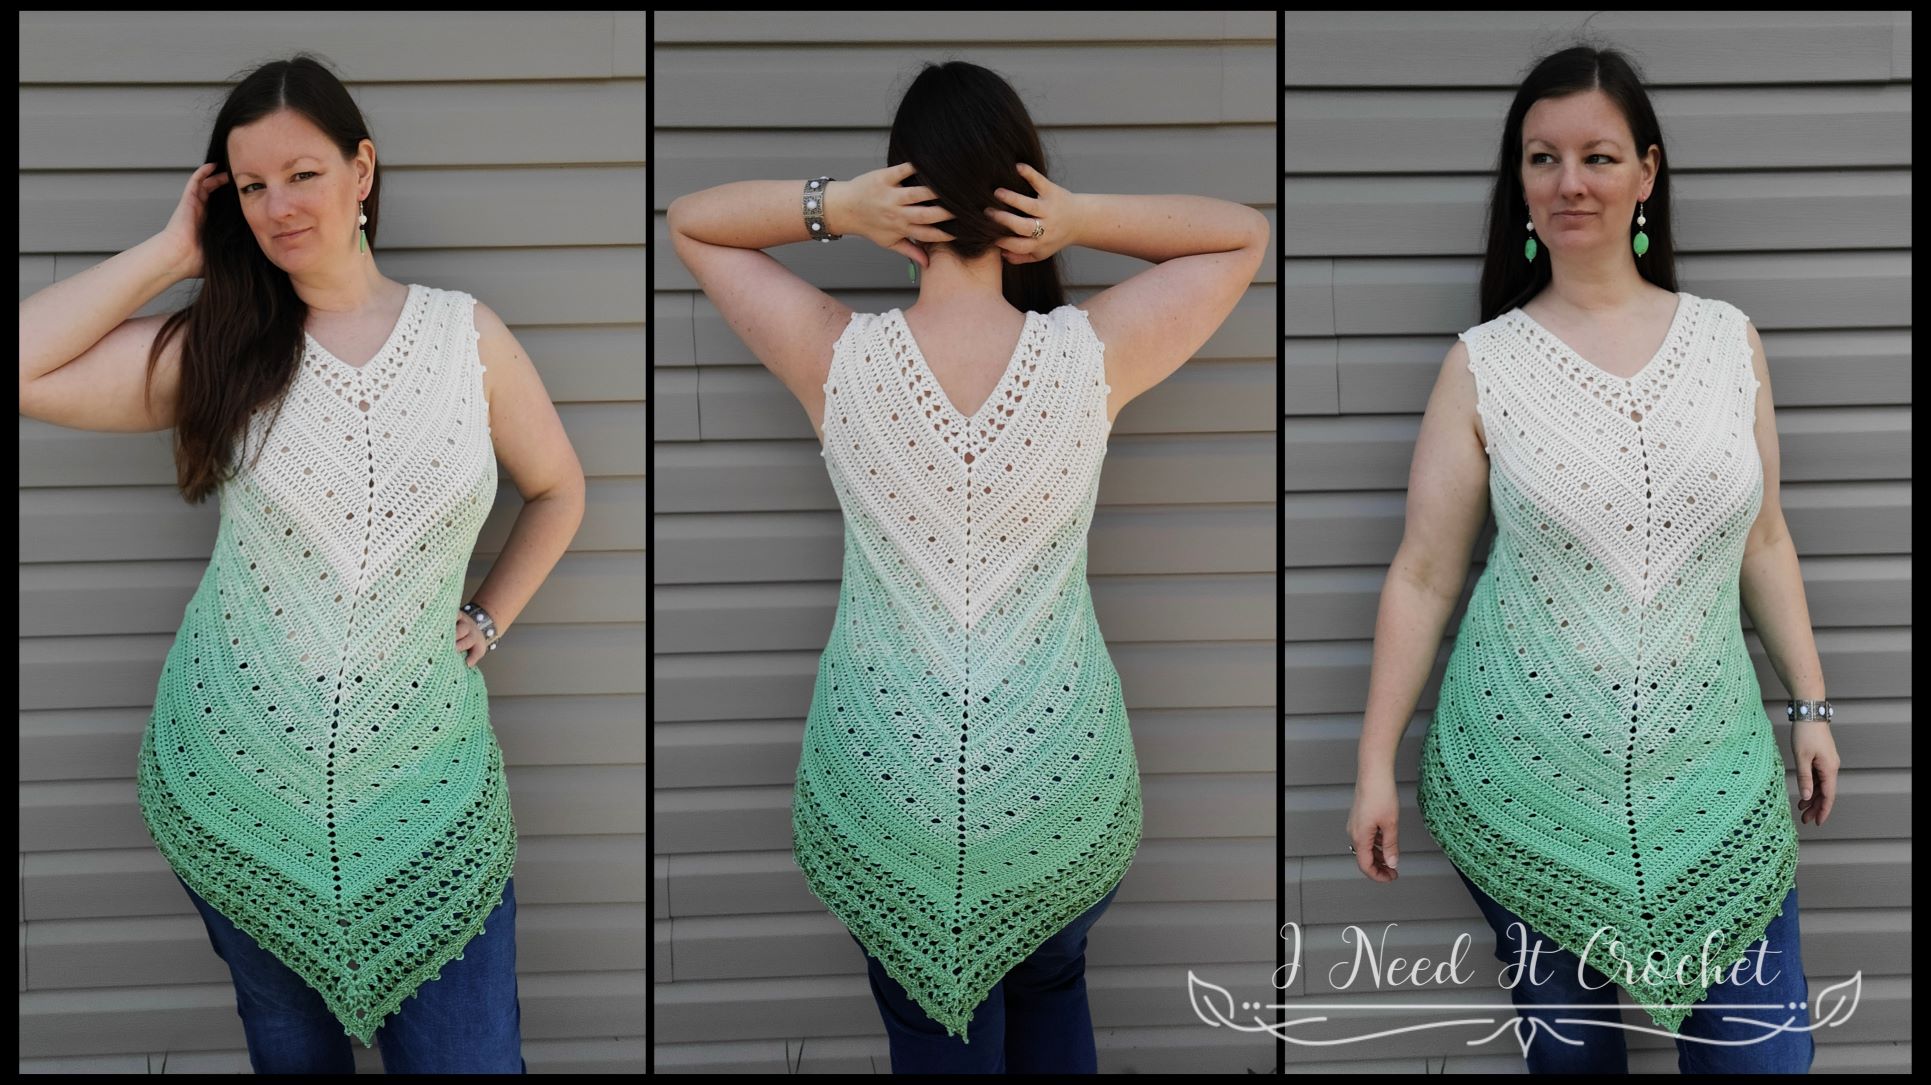
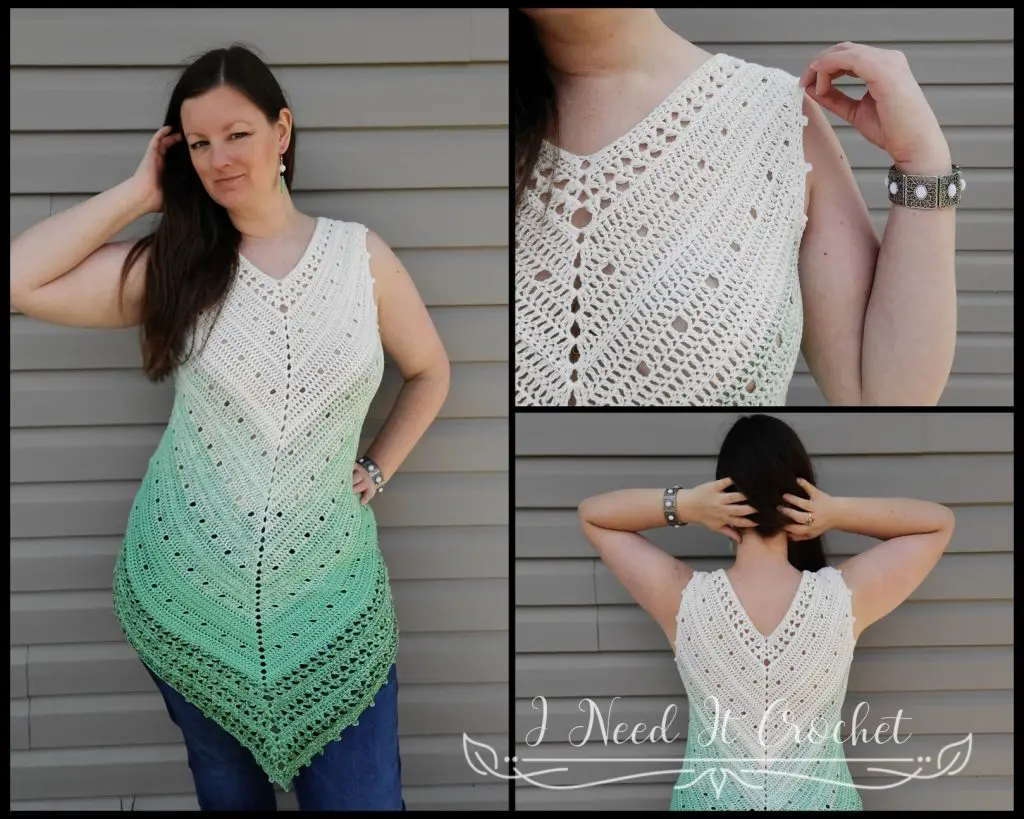
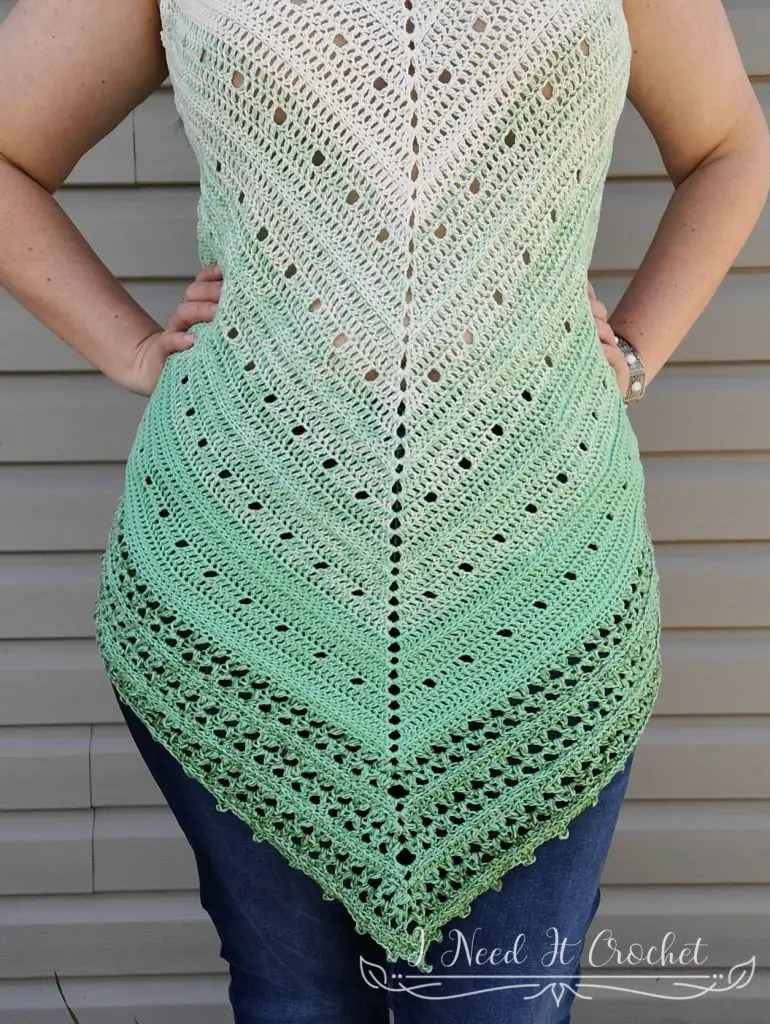
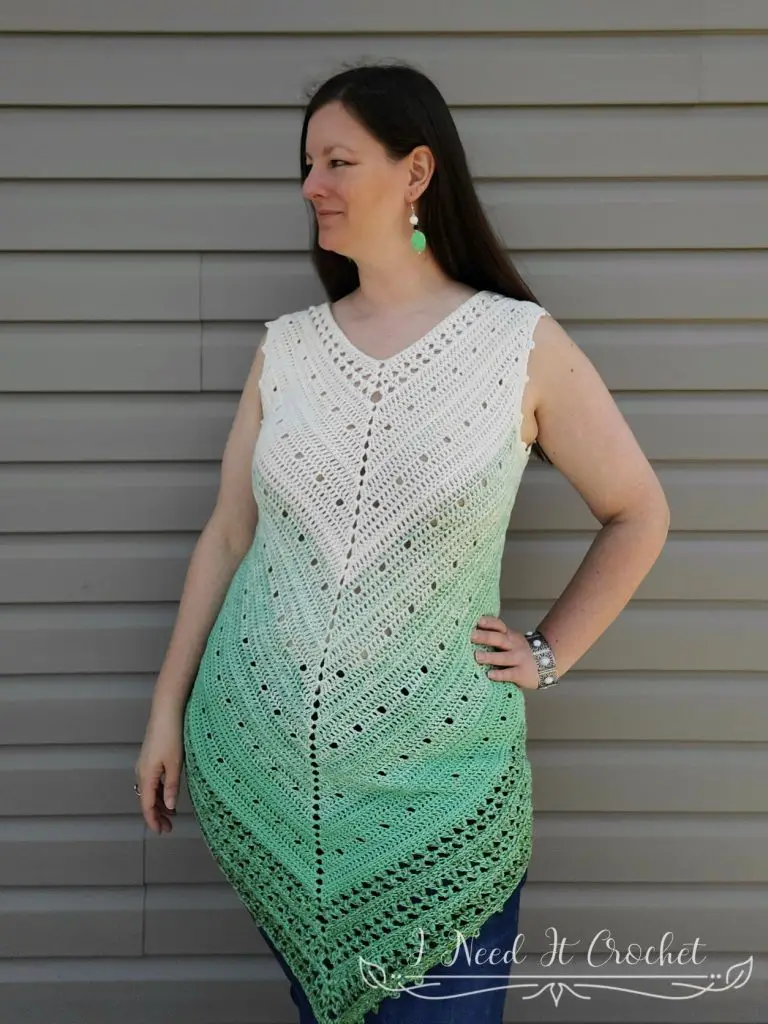
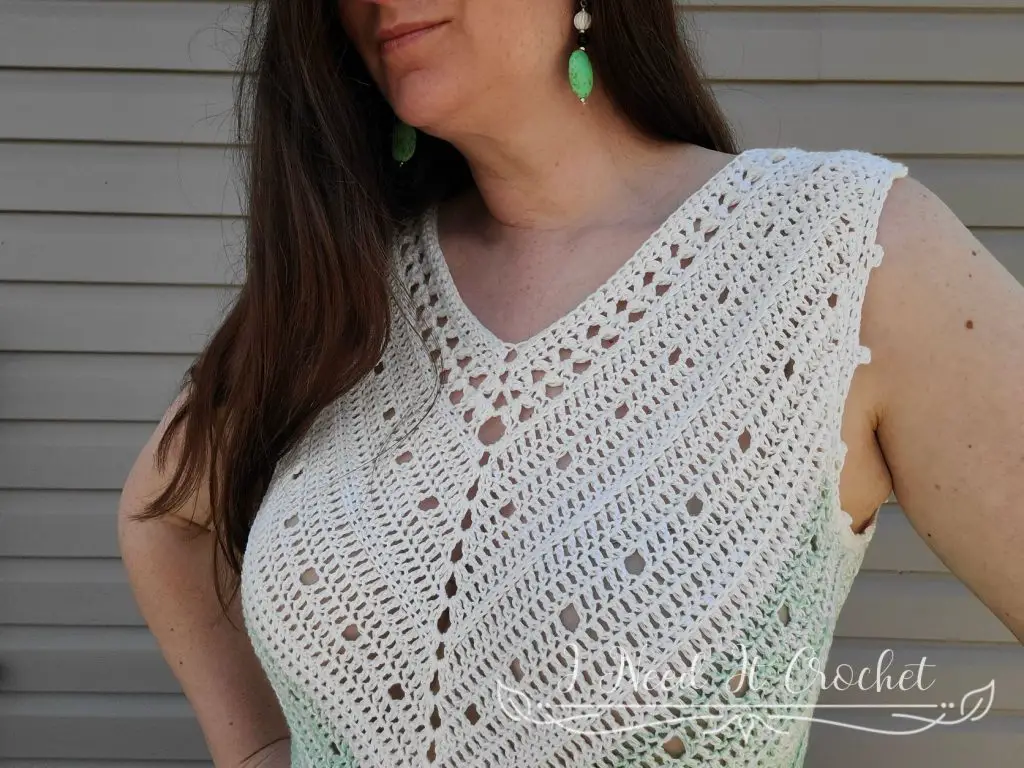
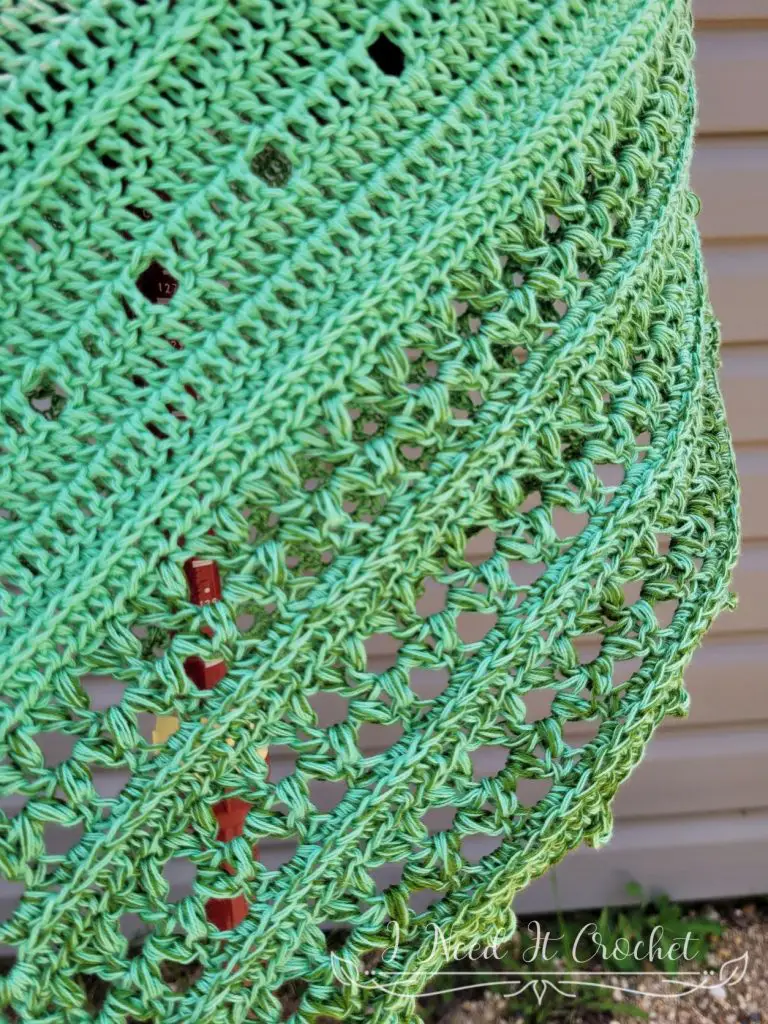
The Summer Beauty Tunic features row upon row of the forked cluster stitch, creating a stunning detail that is lacy and structured. Made with sport weight yarn, this tunic is light and airy. Wear it over jeans, leggings, shorts, or even your bathing suit.
At the moment, Linda is taking custom yarn orders by email only. You can contact her at kravnsumyarn@gmail.com .
Click the button below to purchase the Summer Beauty Tunic crochet pattern for only $6.00 CAN.
How To Crochet The Free Crochet Tunic Pattern – Summer Beauty
Finished Sizes:
Instructions given to fit size X-small; changes for small, medium, large, X-large, 2X-large, 3X-large, 4X-large and 5X-large are in ()
XS (S, M, L, XL, 2XL, 3XL, 4XL, 5XL)
Body Circumference: 28” (32”, 36”, 40”, 44”, 48”, 52”, 56”, 60”)
Across Shoulders: 11 ½” (12”, 13”, 14”, 15”, 16”, 16 ½”, 17 ½”, 18 ½”)
Finished Length: Customizable.
Arm Hole Depth: 7 ½” (8”, 9”, 9 ¾”, 9 ¾”, 10 ½”, 10 ½”, 11”, 11”)
Gauge:
- Ch21. Dc in 4th ch and each across. Turn. – 19 st
- Ch3. Dc in next st and each across. Turn. – 19 st
Repeat row 2 until you have a total of 9 rows. Your swatch should measure 4” W x 4” H. If you are making a plus size tunic, I recommend you make a larger swatch of 38 sts and 18 rows. This swatch should measure 8” W x 8” H.
Materials:
I used Kravn’ Sum Yarn, which is a 100% Cotton, #2 Fine weight yarn.
Any yarn of similar weight would work.
Approximately 900 (1000, 1100, 1200, 1300, 1400, 1500, 1600, 1700) yds.
4mm Hook
Stitch Markers
Yarn Needle
Scissors
Measuring Tape
Abbreviations:
RS = Right Side
WS = Wrong Side
Sk = Skip
St = Stitch
Ss = Slip Stitch
Ch = Chain
Sc = Single Crochet
Dc = Double Crochet
Fc = Forked Cluster (Find the tutorial here)
Notes:
Ch1 at the beginning of a row is never considered a stitch.
Ch3 at the beginning of a row is considered a dc.
Each ch between sts is considered a st.
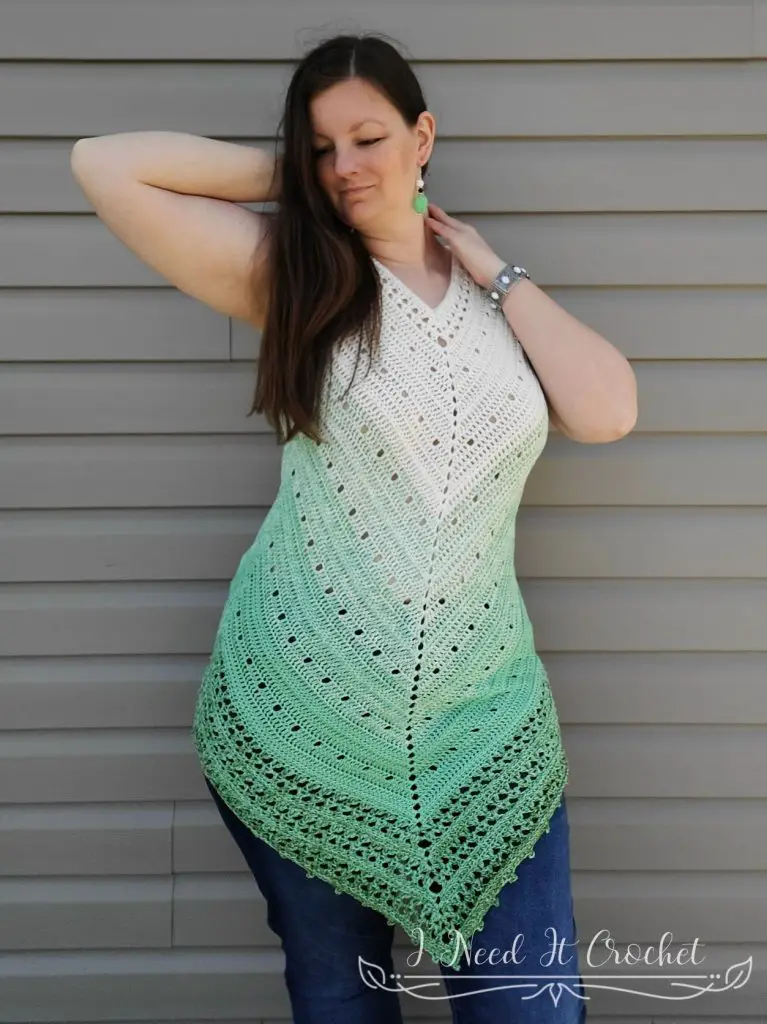
The model above (that’s me) has a 40” bust, and is wearing a size L.
Choose your size according to your largest measurement (bust/waist/hip) and how you would like the tunic to fit. As you can see from the pictures, the tunic has a bit of stretch and accommodates my 47” hips with no problem.
Free Crochet Tunic Pattern – Summer Beauty
Instructions
This pattern is worked in sections. The shoulders and neckline are worked in the round, turning after each round is completed. The arm holes and upper body are then completed in rows. Then, we will work the lower body – once again – in the round, turning after each round is completed. This will make the project completely seamless.
If you are having trouble getting the proper stitch counts, I highly recommend using stitch markers to mark the last stitches before your ch1 and ch2 peaks. Some stitches, like the hdc, can look a lot like a ch st once you turn them around, which can lead to confusion. I also recommend that when counting, you divide the final stitch count into 4 and count each side separately. This will ensure that you have the correct number of stitches on each side.
Section 1 – Neckline and Shoulders
For this section we will be constructing a large diamond with a diamond shaped hole in the middle, similar to Figure 1. If you are using a long colour change yarn like I am, you will want to set aside several yards of the first colour to finish off the armholes at the end.
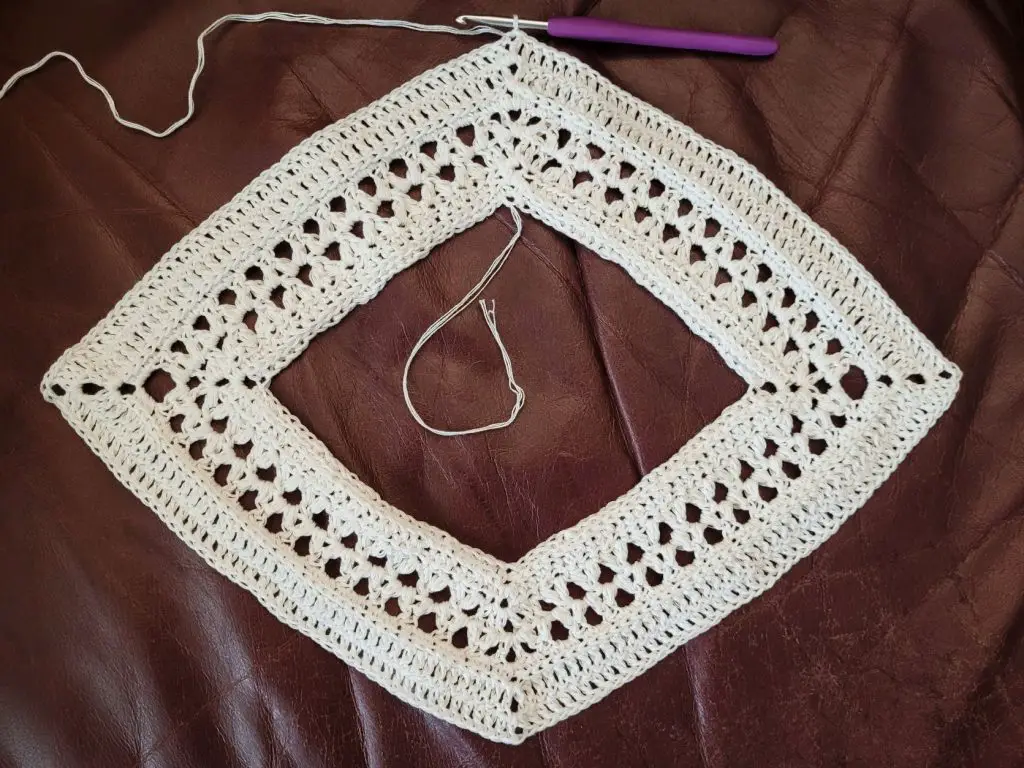
Figure 1
With 4mm hook (or hook used to obtain gauge):
Ch 106 (106, 106, 106, 106, 130, 130, 130, 130). Ss to 1st ch to form a large circle. Be careful you do not twist your chain while doing so.
- (RS) Working into the back hump of the ch: Ch1. (Hdc, ch1, hdc) in 1st ch. [Hdc in next 25 (25, 25, 25, 25, 31, 31, 31, 31) chs. 2hdc in next ch, ch2, 2hdc in next ch. Hdc in next 25 (25, 25, 25, 25, 31, 31, 31, 31) chs. ] (Hdc, ch1, hdc) in next ch. Repeat from [ to ]. Ss to join to 1st st. Ss loosely into ch1 sp. Turn. – 112 (112, 112, 112, 112, 136, 136, 136, 136) st + 2 ch1 + 2 ch2
- (WS) Ch1. [(Hdc, ch1, hdc) in ch1 sp. Hdc in 3rd LO across to next ch2 peak. (2hdc, ch2, 2hdc) in ch2 sp. Hdc in 3rd LO across to next ch1. ] Repeat from [ to ]. Ss to join to 1st st. Ss loosely into ch1 sp. Turn. – 124 (124, 124, 124, 124, 148, 148, 148, 148) st + 2 ch1 + 2 ch2
- Ch4 (counts as dc + ch1), dc in ch1 sp. [Dc in next 2 sts. Ch1, fc over next 3 sts. *Ch2, fc over next 3 sts.** Repeat from * to ** until there are only 2 sts left before the next ch2 peak. Ch2, fc over next 2 sts and into the ch2 sp. Ch1, (dc, ch2, dc) in same ch2 sp. Ch1, fc into same ch2 sp and over next 2 sts. Repeat from * to ** until there are only 2 sts left before the next ch1 peak. Ch1, dc in next 2 sts. ] (Dc, ch1, dc) in ch1 sp. Repeat from [ to ]. Ss to join to 1st st. Ss loosely into ch1 sp. Turn. – 136 (136, 136, 136, 136, 160, 160, 160, 160) st (inc 40 (40, 40, 40, 40, 48, 48, 48, 48) fc) + 2 ch 1 + 2 ch2
- Ch4 (counts as dc + ch1), dc in ch1 sp. [Ch1, fc over next 3 sts. *Ch2, fc over next 3 sts (note: when working fc over ch, work into ch sp rather than into ch sts).** Repeat from * to ** until there is only 1 sts left before the next ch2 peak. Ch2, fc into same ch1 sp just worked, over next st, and into ch2 sp. Ch4. Fc into same ch2 sp, over next st and into next ch1 sp. Ch2, fc into same ch1 sp and over next 2 sts. Repeat from * to ** until the next ch1 peak.] Ch2, (dc, ch1 dc) in ch1 sp. Repeat from [ to ]. Ch1, ss to join to 1st st. Ss loosely into ch1 sp. Turn. – 144 (144, 144, 144, 144, 168, 168, 168, 168) st (inc 48 (48, 48, 48, 48, 56, 56, 56, 56) fc) + 2 ch1 + 2 ch4
- Ch1. [(Hdc, ch1, hdc) in ch1 sp. Hdc across to next ch4 peak. (3hdc, ch2, 3hdc) in ch4 sp. Hdc across to next ch1. ] Repeat from [ to ]. Ss to join to 1st st. Ss loosely into ch1 sp. Turn. – 160 (160, 160, 160, 160, 184, 184, 184, 184) st + 2 ch1 + 2 ch2
Size XS only: Do ss to join to 1st st, but do not ss into ch1 sp. Do turn at the end of the round. Do not bind off. Skip rows 6 – 11 and continue to Section 2.
- Ch4 (counts as dc + ch1), dc in ch1 sp. [Dc in 3rd LO across to next ch2 peak. (2dc, ch2, 2dc) in ch2 sp. Dc in 3rd LO across to next ch1.] (Dc, ch1, dc) in ch1 sp. Repeat from [ to ]. Ss to join to 1st st. Ss loosely into ch1 sp. Turn. – n/a (172, 172, 172, 172, 196, 196, 196, 196) st + 2 ch1 + 2 ch2
Size S only: Do ss to join to 1st st, but do not ss into ch1 sp. Do turn at the end of the round. Do not bind off. Skip rows 7 – 11 and continue to Section 2.
- Ch4 (counts as dc + ch1), dc in ch1 sp. [Dc across to next ch2 peak. (2dc, ch2, 2dc) in ch2 sp. Dc across to next ch1.] (Dc, ch1, dc) in ch1 sp. Repeat from [ to ]. Ss to join to 1st st. Ss loosely into ch1 sp. Turn. – n/a (n/a, 184, 184, 184, 208, 208, 208, 208) st + 2 ch1 + 2 ch2
Size M only: Do ss to join to 1st st, but do not ss into ch1 sp. Do turn at the end of the round. Do not bind off. Skip rows 8 – 11 and continue to Section 2.
- Ch4 (counts as dc + ch1), dc in ch1 sp. [Dc in next 6 sts. *Ch1, sk1 st, dc in next 5 sts.** Repeat from * to ** until there are only 4 sts left before the next ch2 peak. Ch1, sk1 st, dc in next 3 sts. (2dc, ch2, 2dc) in ch2 sp. Dc in next 3 sts. Repeat from * to ** until there are only 7 sts left before the next ch1 peak. Ch1. sk1 st, dc in next 6 sts.] (Dc, ch1, dc) in ch1 sp. Repeat from [ to ]. Ss to join to 1st st. Ss loosely into ch1 sp. Turn. – n/a (n/a, n/a, 196, 196, 220, 220, 220, 220) st + 2 ch1 + 2 ch2
Sizes L & 2X only: Do ss to join to 1st st, but do not ss into ch1 sp. Do turn at the end of the round. Do not bind off. Skip rows 9 – 11 and continue to Section 2.
- Ch4 (counts as dc + ch1), dc in ch1 sp. Dc across to next ch2 peak. (2dc, ch2, 2dc) in ch2 sp. Dc across to next ch1. ] Repeat from [ to ]. Ss to join to 1st st. Ss loosely into ch1 sp. Turn. – n/a (n/a, n/a, n/a, 208, n/a, 232, 232, 232) st + 2 ch1 + 2 ch2
Sizes XL & 3X only: Do ss to join to 1st st, but do not ss into ch1 sp. Do turn at the end of the round. Do not bind off. Skip rows 10 -11 and continue to Section 2.
- Ch4 (counts as dc + ch1), dc in ch1 sp. Dc across to next ch2 peak. (2dc, ch2, 2dc) in ch2 sp. Dc across to next ch1. ] Repeat from [ to ]. Ss to join to 1st st. Ss loosely into ch1 sp. Turn. – n/a (n/a, n/a, n/a, n/a, 220, n/a, 244, 244) st + 2 ch1 + 2 ch2
Sizes 2X & 4X only: Do ss to join to 1st st, but do not ss into ch1 sp. Do turn at the end of the round. Do not bind off. Skip row 11 and continue to Section 2.
- Ch1. [(Hdc, ch1, hdc) in ch1 sp. Hdc across to next ch2 peak. (2hdc, ch2, 2hdc) in ch2 sp. Hdc across to next ch1. ] Repeat from [ to ]. Ss to join to 1st st. Ss loosely into ch1 sp. Turn. – n/a (n/a, n/a, n/a, n/a, n/a, n/a, n/a, 256) st + 2 ch1 + 2 ch2
Size 5X only: Do ss to join to 1st st, but do not ss into ch1 sp. Do turn at the end of the round. Do not bind off. Continue to Section 2.
Measurement Check: Fold your project in half as shown in Figure 2. Make sure the ch2 peaks are in the center and the ch1 peaks are at the sides. Also make sure that the project is laying flat and not spread too far open. Measure across from one ch1 peak to the other. Your width should be 11 ½” (12”, 13”, 14”, 15”, 16”, 16 ½”, 17 ½”, 18 ½”).
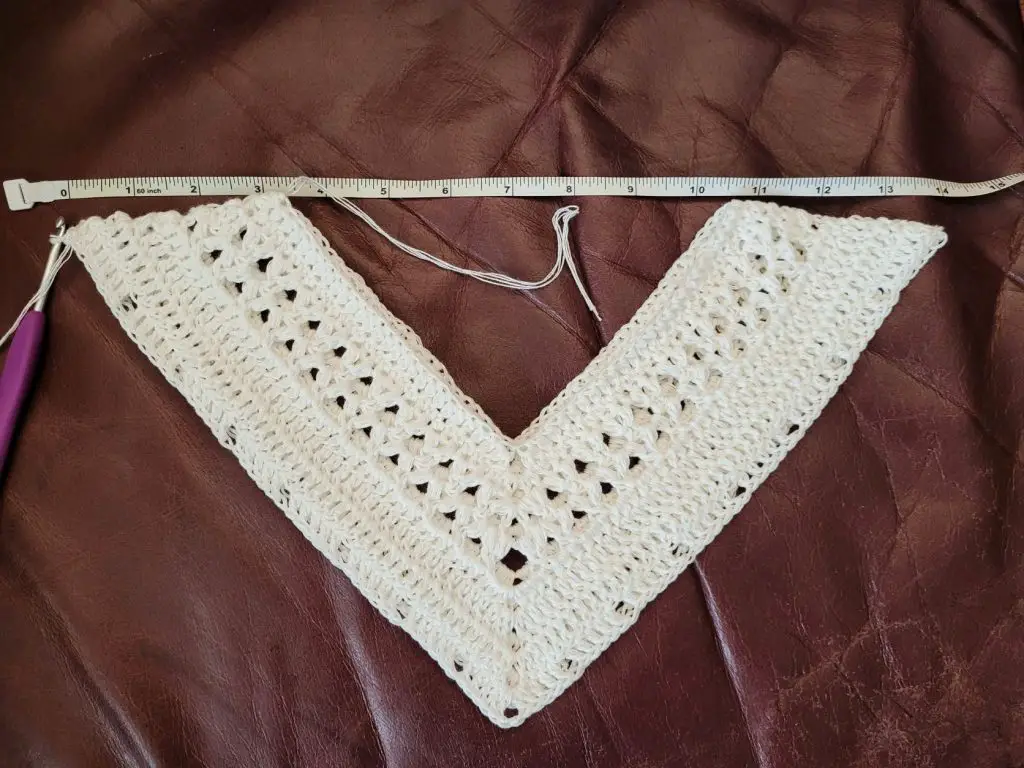
Figure 2
Free Crochet Tunic Pattern – Summer Beauty
Section 2 – Arm Rows
Now that the neckline and shoulders are finished, we will move on to the arm rows. We will be working the front half and back half of the tunic separately in rows.
Set Up Row
You will begin with a set up row, which means you will only be working one of the rows below. I have numbered the rows below to correspond with the rounds in Section 1. If you finished Section 1 on round 7, you will work row 8 below. If you finished Section 1 on round 11, you will work row 6 below.
- Ch2, sk 1st st. Dc2tog. Dc in 3rd LO across to next ch2 peak. (2dc, ch2, 2dc) in ch2 sp. Dc in 3rd LO across until you have only 3 sts left before the next ch1 peak. Dc3tog. Turn, leaving remaining sts unworked. – 80 (86, 92, 98, 104, 110, 116, 122, 128) st + ch2
- Ch2, sk 1st st. Dc2tog. Dc across to next ch2 peak. (2dc, ch2, 2dc) in ch2 sp. Dc across until you have only 3 sts left before the next ch1 peak. Dc3tog. Turn, leaving remaining sts unworked. – 80 (86, 92, 98, 104, 110, 116, 122, 128) st + ch2
- Ch2, sk 1st st. Dc2tog. Dc in next 3 sts. *Ch1, sk1 st. Dc in next 5 sts.** Repeat from * to ** until there are only 4 sts left before the next ch2 peak. Ch1, sk1 st. Dc in next 3 sts. (2dc, ch2, 2dc) in ch2 sp. Dc in next 3 sts. Repeat from * to ** until there are only 7 sts left before the next ch1 sp. Ch1, sk1 st. Dc in next 3 sts. Dc3tog. Turn, leaving remaining sts unworked. – 80 (86, 92, 98, 104, 110, 116, 122, 128) st + ch2
- Ch2, sk 1st st. Dc2tog. Dc across to next ch2 peak. (2dc, ch2, 2dc) in ch2 sp. Dc across until you have only 3 sts left before the next ch1 peak. Dc3tog. Turn, leaving remaining sts unworked. – 80 (86, 92, 98, 104, 110, 116, 122, 128) st + ch2
- Ch2, sk 1st st. Dc2tog. Dc across to next ch2 peak. (2dc, ch2, 2dc) in ch2 sp. Dc across until you have only 3 sts left before the next ch1 peak. Dc3tog. Turn, leaving remaining sts unworked. – 80 (86, 92, 98, 104, 110, 116, 122, 128) st + ch2
- Ch1, sk 1st st. Hdc2tog. Hdc across to next ch2 peak. (2hdc, ch2, 2hdc) in ch2 sp. Hdc across until you have only 3 sts left before the next ch1 peak. Hdc3tog. Turn, leaving remaining sts unworked. – 80 (86, 92, 98, 104, 110, 116, 122, 128) st + ch2
Free Crochet Tunic Pattern – Summer Beauty
Arm Rows
Now that you have worked your setup row, we will continue to add rows until we have reached the appropriate arm hole depth. The rows below are again numbered to correspond with the rows above. If you worked setup row 7, you will begin with row 8 below and each row after. If you worked setup row 11, you will begin with row 6 below.
- Ch2, sk 1st st. Dc2tog. Dc in 3rd LO across until you reach the next ch2 peak. (2dc, ch2, 2dc) in ch2 sp. Dc in 3rd LO until you have only 3 sts left. Dc3tog. Turn. – 80 (86, 92, 98, 104, 110, 116, 122, 128) st + ch2
- Ch2, sk 1st st. Dc2tog. Dc across to next ch2 peak. (2dc, ch2, 2dc) in ch2 sp. Dc across until you have only 3 sts left. Dc3tog. Turn. – 80 (86, 92, 98, 104, 110, 116, 122, 128) st + ch2
- Follow only the row instructions marked with your size.
Sizes XS, M, XL, 3X, & 5X:
Ch2, sk 1st st. Dc2tog. Dc in next 3 sts. *Ch1, sk1 st. Dc in next 5 sts.** Repeat from * to ** until there are only 4 sts left before the next ch2 peak. Ch1, sk1 st. Dc in next 3 sts. (2dc, ch2, 2dc) in ch2 sp. Dc in next 3 sts. Repeat from * to ** until there are only 7 sts left. Ch1, sk1 st, dc in next 3 sts. Dc3tog. Turn. – 80 (n/a, 92, n/a, 104, n/a, 116, n/a, 128) st + ch2
Sizes S, L, 2X, & 4X:
Ch2, sk 1st st. Dc2tog. *Ch1, sk1 st. Dc in next 5 sts.** Repeat from * to ** until there are only 4 sts left before the next ch2 peak. Ch1, sk1 st. Dc in next 3 sts. (2dc, ch2, 2dc) in ch2 sp. Dc in next 3 sts. Repeat from * to ** until there are only 4 sts left. Ch1, sk1 st. Dc3tog. Turn. – n/a (86, n/a, 98, n/a, 110, n/a, 122, n/a) st + ch2
- Ch2, sk 1st st. Dc2tog. Dc across until you reach the next ch2 peak. (2dc, ch2, 2dc) in ch2 sp. Dc across until you have only 3 sts left. Dc3tog. Turn. – 80 (86, 92, 98, 104, 110, 116, 122, 128) st + ch2
- Ch2, sk 1st st. Dc2tog. Dc across until you reach the next ch2 peak. (2dc, ch2, 2dc) in ch2 sp. Dc across until you have only 3 sts left. Dc3tog. Turn. – 80 (86, 92, 98, 104, 110, 116, 122, 128) st + ch2
- Ch1, sk 1st st. Hdc2tog. Hdc across until you reach the next ch2 peak. (2hdc, ch2, 2hdc) in ch2 sp. Hdc across until you have only 3 sts left. Hdc3tog. Turn. – 80 (86, 92, 98, 104, 110, 116, 122, 128) st + ch2
Repeat rows 6 – 11 until Section 2 is approximately 6 ¼” (6”, 6 ¾”, 7”, 6 ½”, 6 ½”, 5 ¾”, 5 ½”, 5”) high. Measure along the decrease stitches on either end of your arm rows (located at the top and bottom of Figure 3). This will give you a final armhole depth of approximately 7 ½” (8”, 9”, 9 ¾”, 9 ¾”, 10 ½”, 10 ½”, 11”, 11”). Do not bind off. Your project should now look similar to Figure 3 below.
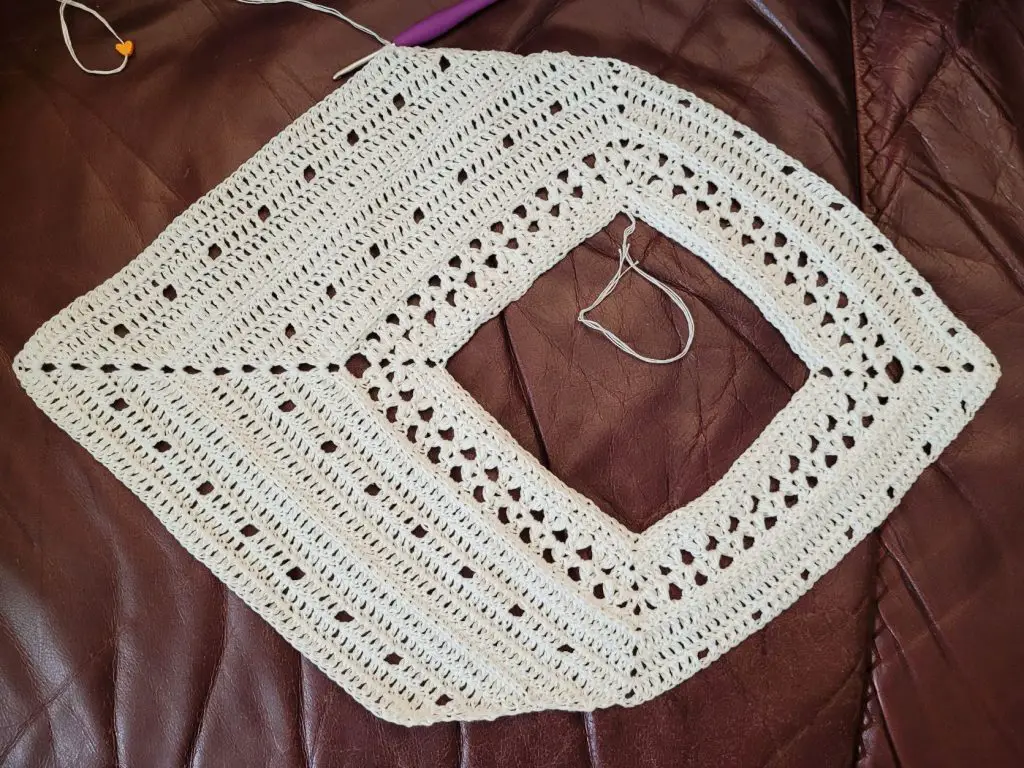
Figure 3
Continue on to the Increase Rows below.
Increase Rows
We will now add increase rows until our project is the same width as half the bust circumference. The rows are numbered to correspond with the Arm Rows. I have not added stitch counts to these rows, because your stitch count for each row will depend on which arm row you left off on. It is best to keep track of your counts on a piece of scrap paper. Each row should increase your count by 6 sts. If you finish up to row 11 and have not worked the proper amount of rows yet, begin again from row 6. You will be working 3 (4, 5, 6, 7, 9, 10, 12, 13) total Increase Rows.
- (Ch3, dc) in 1st st. Dc in 3rd LO across until you reach the next ch2 peak. (2dc, ch2, 2dc) in ch2 sp. Dc in 3rd LO across until you have only 1 st left. (2dc) in last st. Turn.
- (Ch3, dc) in 1st st. Dc across to next ch2 peak. (2dc, ch2, 2dc) in ch2 sp. Dc across until you have only 1 st left. (2dc) in last st. Turn.
- This row will depend on your current stitch count. Take your current stitch count and divide that by 2. If the number you get is an even number, work the instructions marked A). If the number you get is an odd number, work the instructions marked B). Make note of which variation you used so you can reference it later.
A) (Ch3, dc) in 1st st. Dc in next 5 sts. *Ch1, sk1 st, dc in next 5 sts.** Repeat from * to ** until there are only 4 sts left before the ch2 peak. Ch1, sk1 st, dc in next 3 sts. (2dc, ch2, 2dc) in ch2 sp. Dc in next 3 sts. Repeat from * to ** until there is only 1 st left unworked. (2dc) in last st. Turn.
B) (Ch3, dc) in 1st st. Dc in next 2 sts. *Ch1, sk1 st, dc in next 5 sts.** Repeat from * to ** until there are only 4 sts left before the ch2 peak. Ch1, sk1 st, dc in next 3 sts. (2dc, ch2, 2dc) in ch2 sp. Dc in next 3 sts. Repeat from * to ** until there are only 4 sts left unworked. Ch1, sk1 st, dc in next 2 sts. (2dc) in last st. Turn.
- (Ch3, dc) in 1st st. Dc across to next ch2 peak. (2dc, ch2, 2dc) in ch2 sp. Dc across until you have only 1 st left. (2dc) in last st. Turn.
- (Ch3, dc) in 1st st. Dc across to next ch2 peak. (2dc, ch2, 2dc) in ch2 sp. Dc across until you have only 1 st left. (2dc) in last st. Turn.
- Ch1, (2hdc) in 1st st. Hdc across to next ch2 peak. (2hdc, ch2, 2hdc) in ch2 sp. Hdc across until you have only 1 st left. (2hdc) in last st. Turn.
Once you have worked the proper amount of rows, bind off. You should have a total of 98 (110, 122, 134, 146, 164, 176, 194, 206) st + ch2.
Once you have finished Section 2 for one half, you will need to do the same for the other half. With the WS (RS, WS, RS, WS, RS, WS, RS, WS) facing you, join your yarn in the 1st unworked st of the other half of your tunic (skipping the ch1 peak). Work this half just as you did with the 1st half. Beginning with the Setup row. Be sure to work the exact same amount of arm rows as you did with the 1st half. Once you are finished the 2nd half, do not bind off. Your project should now look similar to Figure 4 below.
Free Crochet Tunic Pattern – Summer Beauty
Section 3 – Body
The body of this tunic is worked in rounds. We will begin by joining the front and back halves. Lay your project out with the RS facing up as in Figure 4. Fold the project in half, lining up the corners, as in Figure 5. Use the yarn end (shown on the right of Figure 5) to join to the 1st st on the other half of the project. I just pass the yarn through the stitch and make a knot. Then, take the hook end (shown on the left in Figure 5) and slip stitch into the 1st st of the other half. Your front and back halves should now be joined at the sides. Turn.
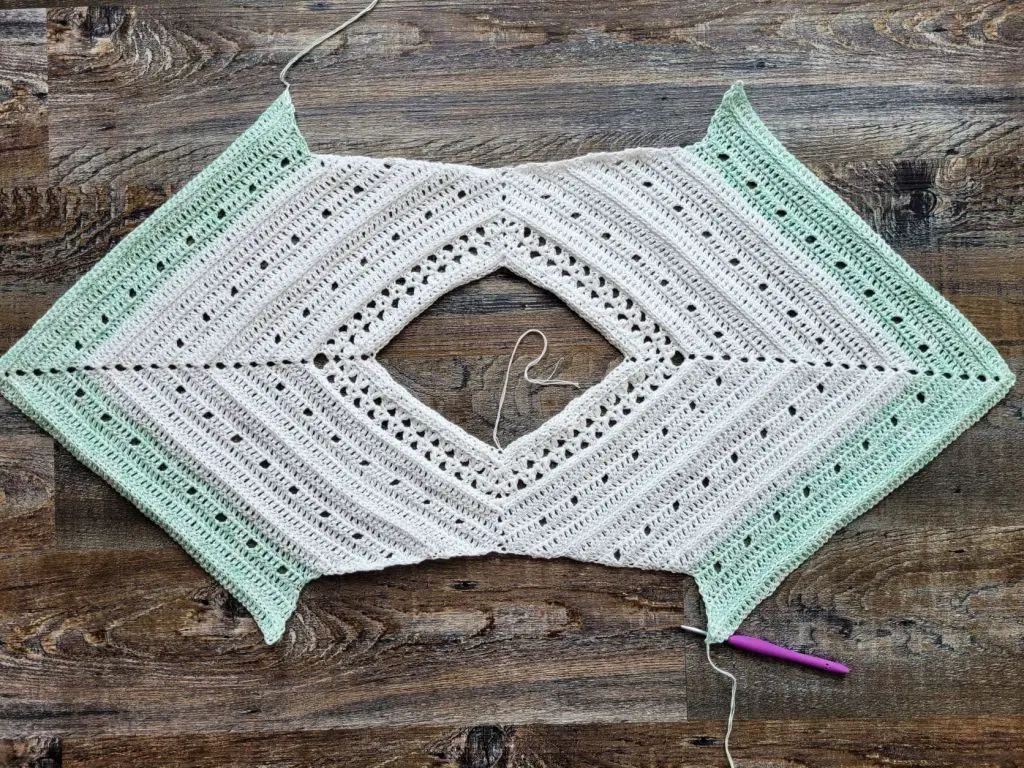
Figure 4
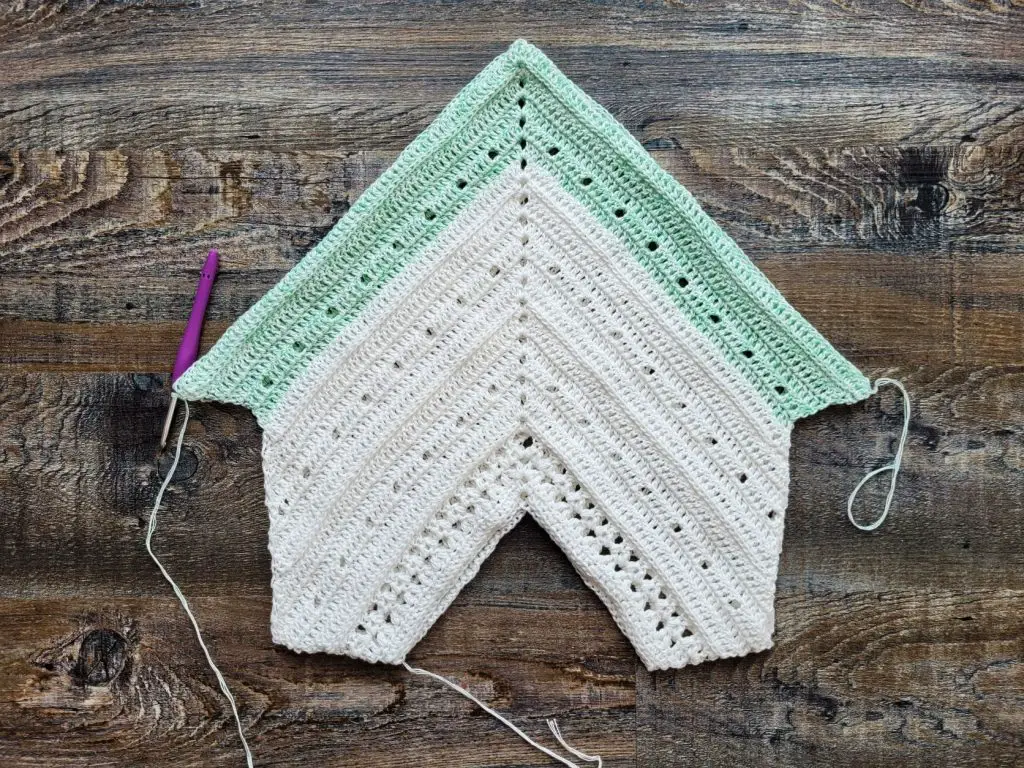
Figure 5
Set Up Round
We will begin with a Set Up Round. Work only 1 round below. Work only the round numbered after the last row you worked.
- Ch2, sk 1st st. Dc3tog. *Dc in 3rd LO across to next ch2 peak. (2dc, ch2, 2dc) in ch2 sp.** Dc in 3rd LO across until you have only 3 sts left before the side join. Dc3tog twice. Place st marker in last st worked. Repeat from * to **. Dc in 3rd LO across until you have only 2 sts left before the starting ch2. Dc2tog. Ss to join to 1st st. Turn. – 196 (220, 244, 268, 292, 328, 352, 388, 412) st + 2 ch2
- Ch2, sk 1st st. Dc3tog. *Dc across to next ch2 peak. (2dc, ch2, 2dc) in ch2 sp.** Dc across until you have only 3 sts left before the side join. Dc3tog twice. Place st marker in last st worked. Repeat from * to **. Dc across until you have only 2 sts left before the starting ch2. Dc2tog. Ss to join to 1st st. Turn. – 196 (220, 244, 268, 292, 328, 352, 388, 412) st + 2 ch2
- Work only the instructions marked with your size.
Sizes 2X & 3X only:
Ch2, sk 1st st. Dc3tog. [Dc in next 3 sts. *Ch1, sk1 st, dc in next 5 sts.** Repeat from * to ** until there are only 4 sts left before the next ch2 peak. Ch1, sk1 st, dc in next 3 sts. (2dc, ch2, 2dc) in ch2 sp. Dc in next 3 sts.] Repeat from * to ** until there are only 7 sts left before the side join. Ch1, sk1 st, Dc in next 3 sts. Dc3tog twice. Place st marker in last st worked. Repeat from [ to ]. Repeat from * to ** until there are only 6 sts left before the starting ch2. Ch1, sk1 st, dc in next 3 sts. Dc2tog. Ss to join to 1st st. Turn. – 196 (220, 244, 268, 292, 328, 352, 388, 412) st + 2 ch2
Sizes XS, S, M, L, XL, 4X, & 5X only:
Ch2, sk 1st st. Dc3tog. [*Ch1, sk1 st, dc in next 5 sts.** Repeat from * to ** until there are only 4 sts left before the next ch2 peak. Ch1, sk1 st, dc in next 3 sts. (2dc, ch2, 2dc) in ch2 sp. Dc in next 3 sts.] Repeat from * to ** until there are only 4 sts left before the side join. Ch1, sk1 st. Dc3tog twice. Place st marker in last st worked. Repeat from [ to ]. Repeat from * to ** until there are only 3 sts left before the starting ch2. Ch1, sk1 st, dc2tog. Ss to join to 1st st. Turn. – 196 (220, 244, 268, 292, 328, 352, 388, 412) st + 2 ch2
- Ch2, sk 1st st. Dc3tog. *Dc across to next ch2 peak. (2dc, ch2, 2dc) in ch2 sp.** Dc across until you have only 3 sts left before the side join. Dc3tog twice. Place st marker in last st worked. Repeat from * to **. Dc across until you have only 2 sts left before the starting ch2. Dc2tog. Ss to join to 1st st. Turn. – 196 (220, 244, 268, 292, 328, 352, 388, 412) st + 2 ch2
- Ch2, sk 1st st. Dc3tog. *Dc across to next ch2 peak. (2dc, ch2, 2dc) in ch2 sp.** Dc across until you have only 3 sts left before the side join. Dc3tog twice. Place st marker in last st worked. Repeat from * to **. Dc across until you have only 2 sts left before the starting ch2. Dc2tog. Ss to join to 1st st. Turn. – 196 (220, 244, 268, 292, 328, 352, 388, 412) st + 2 ch2
- Ch1, sk 1st st. Hdc3tog. *Hdc across to next ch2 peak. (2hdc, ch2, 2hdc) in ch2 sp.** Hdc across until you have only 3 sts left before the side join. Hdc3tog twice. Place st marker in last st worked. Repeat from * to **. Hdc across until you have only 2 sts left before the starting ch2. Hdc2tog. Ss to join to 1st st. Turn. – 196 (220, 244, 268, 292, 328, 352, 388, 412) st + 2 ch2
Body Rounds
Begin with the round numbered after the set up round you just worked, and then continue on from there. Once you have completed round 11, repeat rounds 6 – 11 until you have the desired length, minus 7”. You want to end on a repeat of round 11.
- Ch2, sk 1st st. Dc3tog. *Dc in 3rd LO across to next ch2 peak. (2dc, ch2, 2dc) in ch2 sp.** Dc in 3rd LO across until you have only 3 sts left before the st marker. Dc3tog twice. Place st marker in last st worked. Repeat from * to **. Dc in 3rd LO across until you have only 2 sts left before the starting ch2. Dc2tog. Ss to join to 1st st. Turn. – 196 (220, 244, 268, 292, 328, 352, 388, 412) st + 2 ch2
- Ch2, sk 1st st. Dc3tog. *Dc across to next ch2 peak. (2dc, ch2, 2dc) in ch2 sp.** Dc across until you have only 3 sts left before the st marker. Dc3tog twice. Place st marker in last st worked. Repeat from * to **. Dc across until you have only 2 sts left before the starting ch2. Dc2tog. Ss to join to 1st st. Turn. – 196 (220, 244, 268, 292, 328, 352, 388, 412) st + 2 ch2
- Work only the instructions marked with your size.
Sizes 2X & 3X only:
Ch2, sk 1st st. Dc3tog. [Dc in next 3 sts. *Ch1, sk1 st, dc in next 5 sts.** Repeat from * to ** until there are only 4 sts left before the next ch2 peak. Ch1, sk1 st, dc in next 3 sts. (2dc, ch2, 2dc) in ch2 sp. Dc in next 3 sts.] Repeat from * to ** until there are only 7 sts left before the st marker. Ch1, sk1 st, Dc in next 3 sts. Dc3tog twice. Place st marker in last st worked. Repeat from [ to ]. Repeat from * to ** until there are only 6 sts left before the starting ch2. Ch1, sk1 st, dc in next 3 sts. Dc2tog. Ss to join to 1st st. Turn. – 196 (220, 244, 268, 292, 328, 352, 388, 412) st + 2 ch2
Sizes XS, S, M, L, XL, 4X, & 5X only:
Ch2, sk 1st st. Dc3tog. [*Ch1, sk1 st, dc in next 5 sts.** Repeat from * to ** until there are only 4 sts left before the next ch2 peak. Ch1, sk1 st, dc in next 3 sts. (2dc, ch2, 2dc) in ch2 sp. Dc in next 3 sts.] Repeat from * to ** until there are only 4 sts left before the st marker. Ch1, sk1 st. Dc3tog twice. Place st marker in last st worked. Repeat from [ to ]. Repeat from * to ** until there are only 3 sts left before the starting ch2. Ch1, sk1 st, dc2tog. Ss to join to 1st st. Turn. – 196 (220, 244, 268, 292, 328, 352, 388, 412) st + 2 ch2
- Ch2, sk 1st st. Dc3tog. *Dc across to next ch2 peak. (2dc, ch2, 2dc) in ch2 sp.** Dc across until you have only 3 sts left before the st marker. Dc3tog twice. Place st marker in last st worked. Repeat from * to **. Dc across until you have only 2 sts left before the starting ch2. Dc2tog. Ss to join to 1st st. Turn. – 196 (220, 244, 268, 292, 328, 352, 388, 412) st + 2 ch2
- Ch2, sk 1st st. Dc3tog. *Dc across to next ch2 peak. (2dc, ch2, 2dc) in ch2 sp.** Dc across until you have only 3 sts left before the st marker. Dc3tog twice. Place st marker in last st worked. Repeat from * to **. Dc across until you have only 2 sts left before the starting ch2. Dc2tog. Ss to join to 1st st. Turn. – 196 (220, 244, 268, 292, 328, 352, 388, 412) st + 2 ch2
- Ch1, sk 1st st. Hdc3tog. *Hdc across to next ch2 peak. (2hdc, ch2, 2hdc) in ch2 sp.** Hdc across until you have only 3 sts left before the st marker. Hdc3tog twice. Place st marker in last st worked. Repeat from * to **. Hdc across until you have only 2 sts left before the starting ch1. Hdc2tog. Ss to join to 1st st. Turn. – 196 (220, 244, 268, 292, 328, 352, 388, 412) st + 2 ch2
Free Crochet Tunic Pattern – Summer Beauty
Section 4 – Bottom Lace Edging
- Ch1, sk 1st st. Hdc3tog. *Hdc in 3rd LO across to next ch2 peak. (2hdc, ch2, 2hdc) in ch2 sp.** Hdc in 3rd LO across until you have only 3 sts left before the st marker. Hdc3tog twice. Place st marker in last st worked. Repeat from * to **. Hdc in 3rd LO across until you have only 2 sts left before the starting ch1. Hdc2tog. Ss to join to 1st st. Turn. – 196 (220, 244, 268, 292, 328, 352, 388, 412) st + 2 ch2
- Ch2, sk 1st st. Dc3tog. [Dc in next 2 sts. Ch1, fc over next 3 sts. *Ch2, fc over next 3 sts.** Repeat from * to ** until there are only 2 sts left before the next ch2 peak. Ch2, fc over next 2 sts and into ch2 sp. Ch1, (dc, ch2, dc) in same ch2 sp. Ch1, fc into same ch2 sp and over next 2 sts.] Repeat from * to ** until there are only 5 sts left before the st marker. Ch1, dc in next 2 sts. Dc3tog twice. Place st marker in last st worked. Repeat from [ to ]. Repeat from * to ** until there are only 4 sts left before the starting ch2. Ch1, dc in next 2 sts. Dc2tog. Ss to join to 1st st. Turn. – 196 (220, 244, 268, 292, 328, 352, 388, 412) st + 2 ch2
- Ch2, sk 1st st. Dc3tog. [Ch1, fc over next 3 sts. *Ch2, fc over next 3 sts.** Repeat from * to ** until there is only 1 st left before the next ch2 peak. Ch2, fc into same ch1 sp just worked, over next st, and into ch2 sp. Ch4. Fc into same ch2 sp, over next st and into next ch1 sp. Ch2, fc into same ch1 sp and over next 2 sts.] Repeat from * to ** until there are only 3 sts left before the st marker. Ch1. Dc3tog twice. Place st marker in last st worked. Repeat from [ to ]. Repeat from * to ** until there are only 2 sts left before the starting ch2. Ch1, dc2tog. Ss to join to 1st st. Turn. – 192 (216, 240, 264, 288, 324, 348, 384, 408) st + 2 ch4
- Ch1, sk 1st st. Hdc3tog. *Hdc across to next ch4 peak. (3hdc, ch2, 3hdc) in ch4 sp.** Hdc across until you have only 3 sts left before the st marker. Hdc3tog twice. Place st marker in last st worked. Repeat from * to **. Hdc across until you have only 2 sts left before the starting ch1. Hdc2tog. Ss to join to 1st st. Turn. – 196 (220, 244, 268, 292, 328, 352, 388, 412) st + 2 ch2
Repeat rounds 1 – 4 until you have a total of 12 lace rounds.
- Ch1, sk 1st st. Sc3tog. *Sc in 3rd LO across to next ch2 peak. (2sc, ch2, 2sc) in ch2 sp.** Sc in 3rd LO across until you have only 3 sts left before the st marker. Sc3tog twice. Place st marker in last st worked. Repeat from * to **. Sc in 3rd LO across until you have only 2 sts left before the starting ch1. Sc2tog. Ss to join to 1st st. Turn. – 196 (220, 244, 268, 292, 328, 352, 388, 412) st + 2 ch2
- Work only the instructions marked with your size.
Sizes 2X & 3X only:
Ch1, sk 1st st. Sc3tog. [Sc in next 2 sts, pic. *Sc in next 6 sts, pic.** Repeat from * to ** until you have only 5 sts left before the next ch2 peak. Sc in next 5 sts. (Sc, pic, sc) in ch2 sp. Sc in next 5 sts, pic.] Repeat from * to ** until you have only 5 sts left before the st marker. Sc in next 2 sts. Sc3tog twice. Repeat from [ to ]. Repeat from * to ** until you have only 4 sts left before the starting ch1. Sc in next 2 sts, sc2tog. Ss to join to 1st st. Bind off.
Sizes XS, S, M, L, XL, 4X, & 5X only:
Ch1, sk 1st st. Sc3tog. [Sc in next 5 sts, pic. *Sc in next 6 sts, pic.** Repeat from * to ** until you have only 5 sts left before the next ch2 peak. Sc in next 5 sts. (Sc, pic, sc) in ch2 sp.] Repeat from * to ** until you have only 8 sts left before the st marker. Sc in next 5 sts. Sc3tog twice. Repeat from [ to ]. Repeat from * to ** until you have only 7 sts left before the starting ch1. Sc in next 5 sts, sc2tog. Ss to join to 1st st. Bind off.
Section 5 – Finishing
We will now finish off the edges of the arm holes. With the RS facing you, join your yarn in the bottom middle of the armhole.
- Ch1. Sc around the edge of the armhole, placing 2 sts in each row and 2 sts in the ch2 peak. Work all the way around the armhole. Ss to join to 1st st. Do not turn.
- Ch1, sc in 1st 6 sts, pic. *Sc in next 6 sts, pic.** Repeat from * to ** around. If you have less than 6 sts left before the end, sc in each to end. Ss to join to 1st st. Bind off.
Usually I would add a finishing round to the neck, but since you worked your first round in the back hump of the chain, it does not need it. If you really want to add a finish to the neck, I suggest a round of ss.
Weave in your ends, and you’re done!
I hope you love your new crochet tunic, and I look forward to seeing all of your beautiful pictures on Ravelry!
If you’d like to know when I post new patterns and tutorials like the Free Crochet Tunic Pattern – Summer Beauty, head on over to my Facebook and Instagram and give me a like and a follow!
If you enjoyed The Free Crochet Tunic Pattern – Summer Beauty, you may want to check out my other designs!
Free Crochet Tunic Pattern – Summer Beauty
And until next time… Happy Hooking! 😉
What is your advice for working with multiple skiens of gradual color changing yarn? I wnt to use a Hobbii Cotton kings, or Dahlia, but i plan on making a 5x so i know I will need several skiens. I want to make the color change consistent…
Great question!
For the 5X in gradient yarn I would get 2000 yds just to be safe. And the great thing about Cotton Kings and Dahlia, is it’s multi-stranded so it’s easy to see where the colour changes. You will probably have to cut and knot yarn if you want to take multiple cakes and work them into one long colour change. The place where this will be most finnicky is the top where you’re working the shoulders and armholes. I would work the 1st colour of one cake, then cut and knot onto the 1st colour of the other cake. If you get through all of the 1st colour, if you are still on Section 2, you may have to do some frogging and redoing to make the colours even on the front and back. Once you get down to where you join the front and back and begin working in the round (Section 3), it will be much easier.
Oh! Just came back to say you also need to be sure to set aside a bit of your first colour so you have enough to finish off the arm holes and neckline.
Do you think fingering weight yarn would work? I just got some gorgeous yarn from expression fiber arts that I would love to use on this pattern
Hi Terri,
I love Expression Fiber Arts! <3
Unfortunately, I don't think fingering weight yarn would work well with this pattern. The gauge is already on the loose side to give the resulting fabric lots of drape. I think using a thinner yarn might result in too loose a fabric and it may stretch out when worn.
I hope that was helpful!
- Sarah