
Sarah’s Perfect Poncho – Free Crochet Pattern
Sarah’s Perfect Poncho – Free Crochet Pattern is copyrighted by I Need It Crochet. You may not copy, share, change, or sell the pattern itself. Also you may not claim this pattern as your own. All pictures contained in this pattern fall under the copyright and may not be used.
Finished items made from Sarah’s Perfect Poncho – Free Crochet Pattern belong to you, and you may do what you wish with them. If you choose to sell them on Etsy, I would very much appreciate it if you credited me as the pattern designer.


Or… Just scroll down to see it for free!
Autumn here is beautiful, but it can be brutal as well. It often rains, sometimes snows, and the temperature usually hovers only a few degrees above freezing.
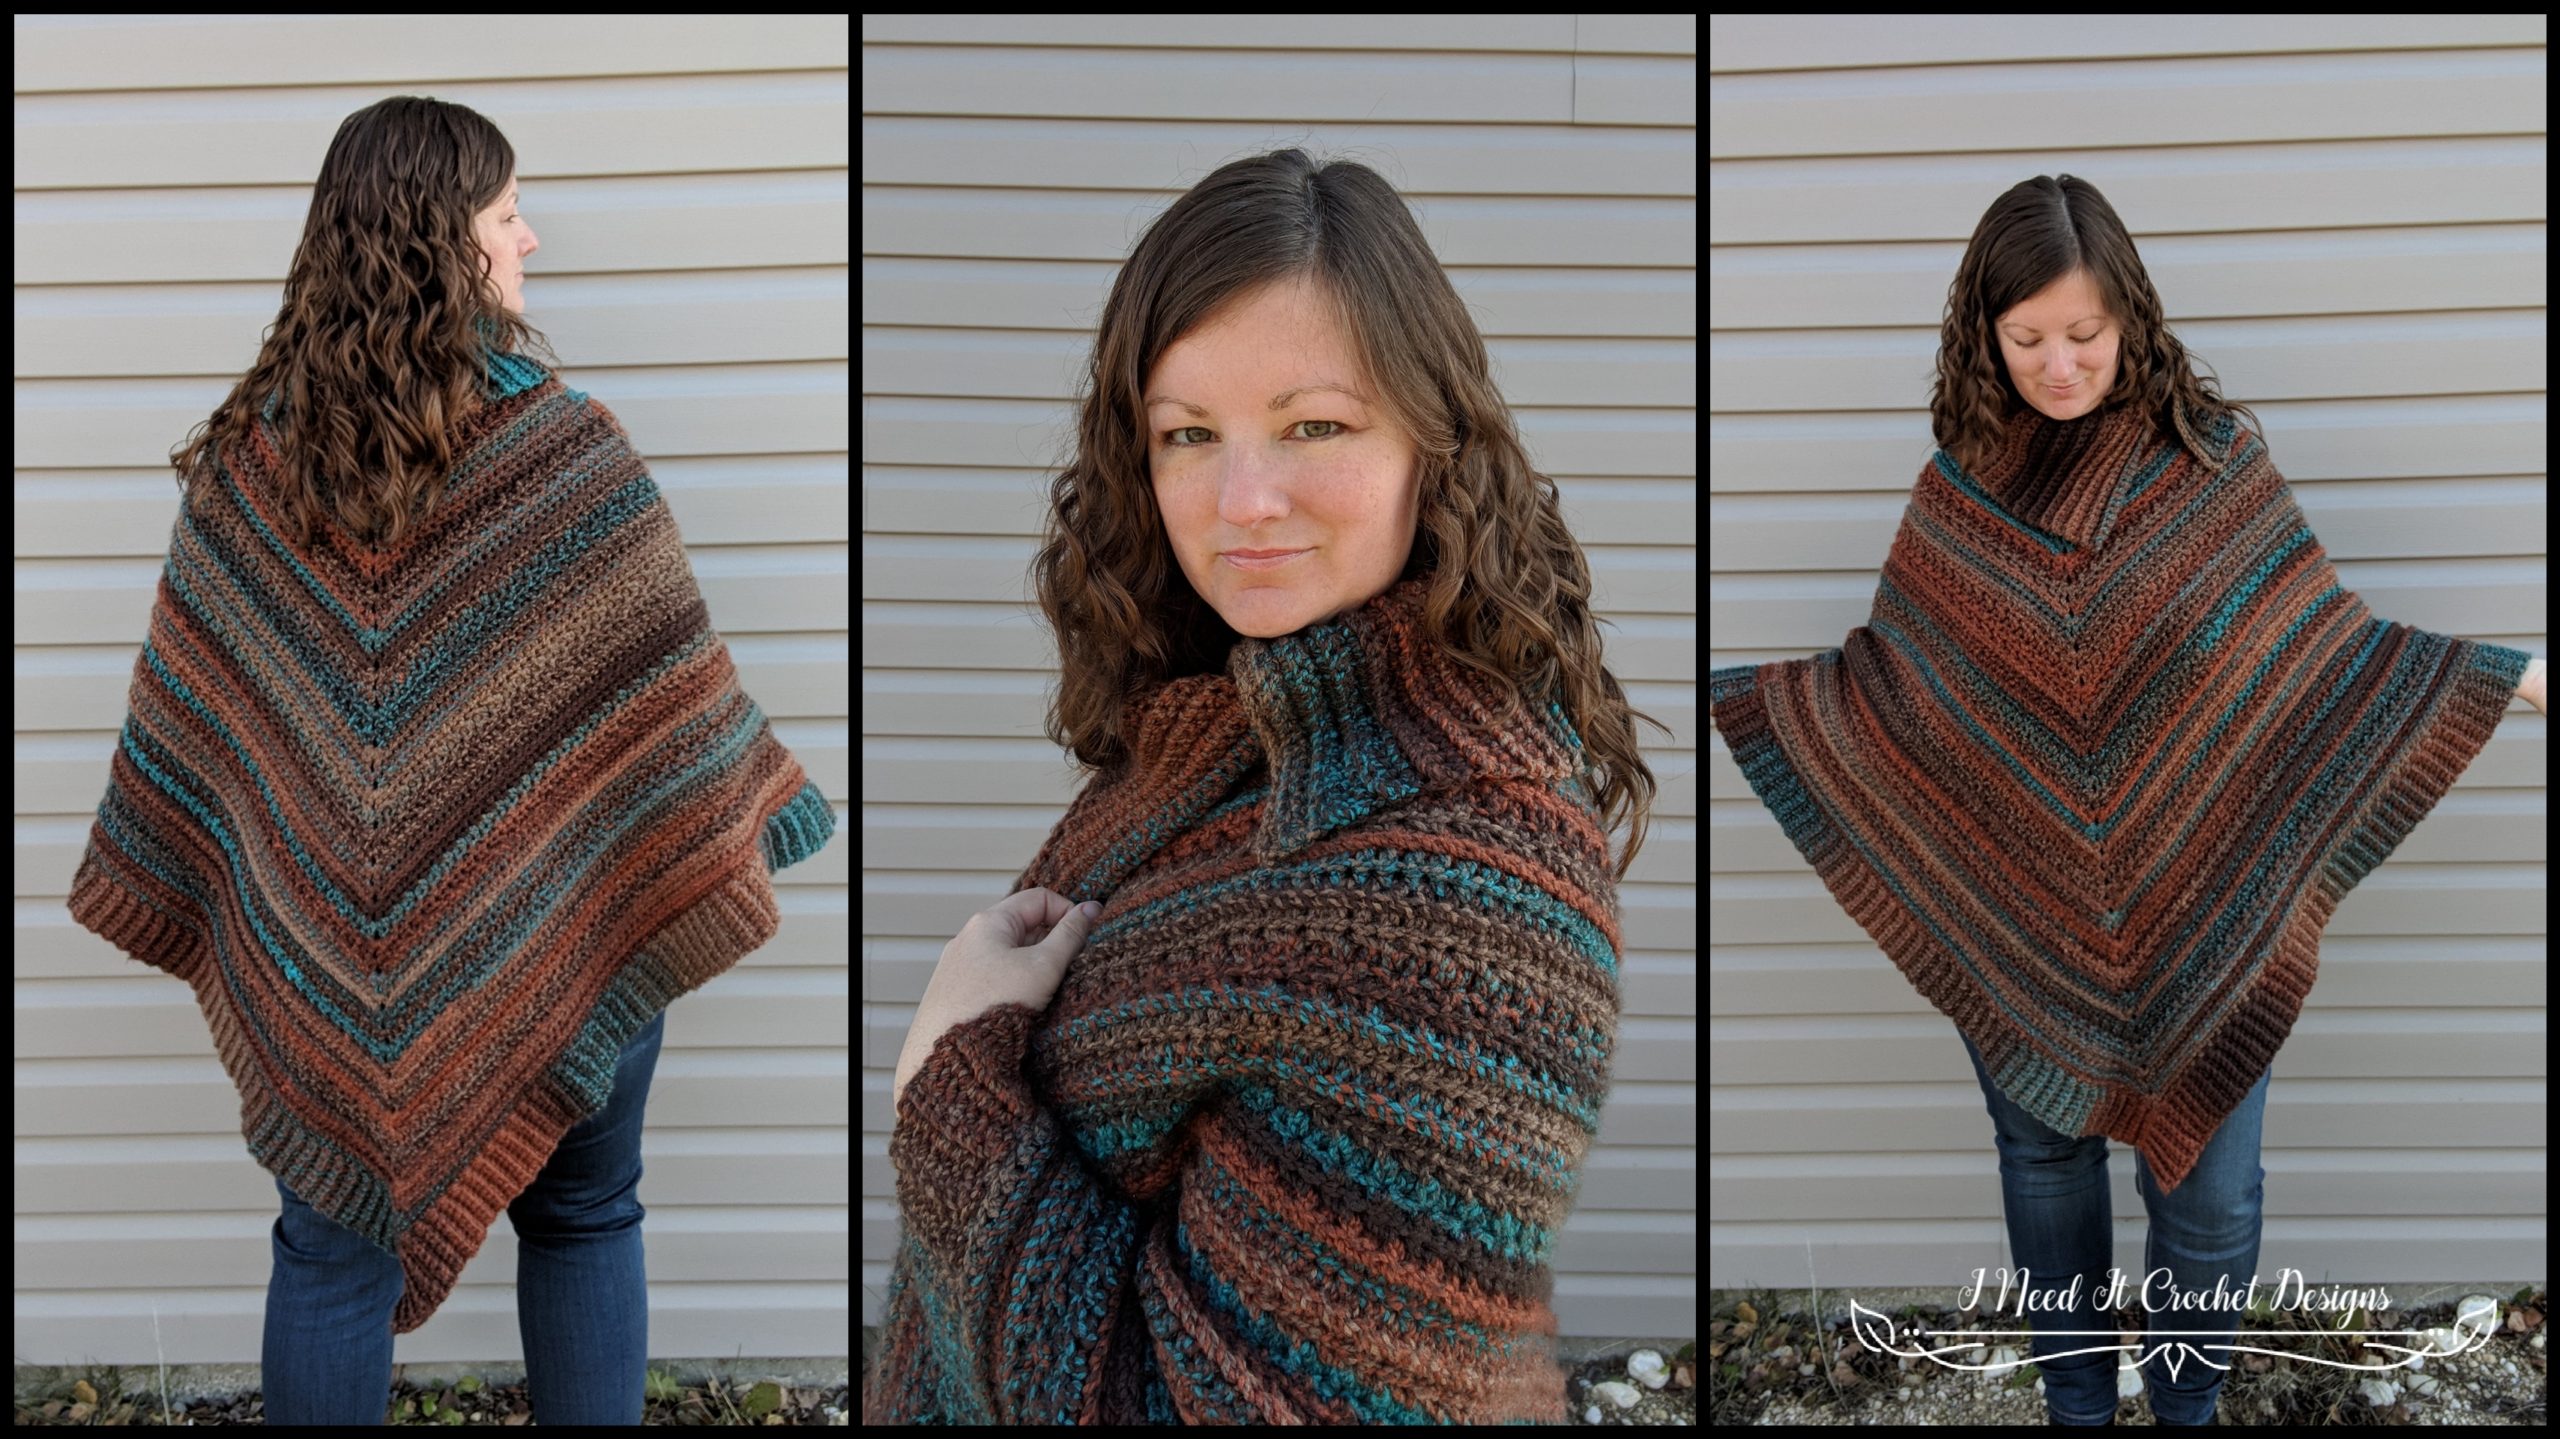
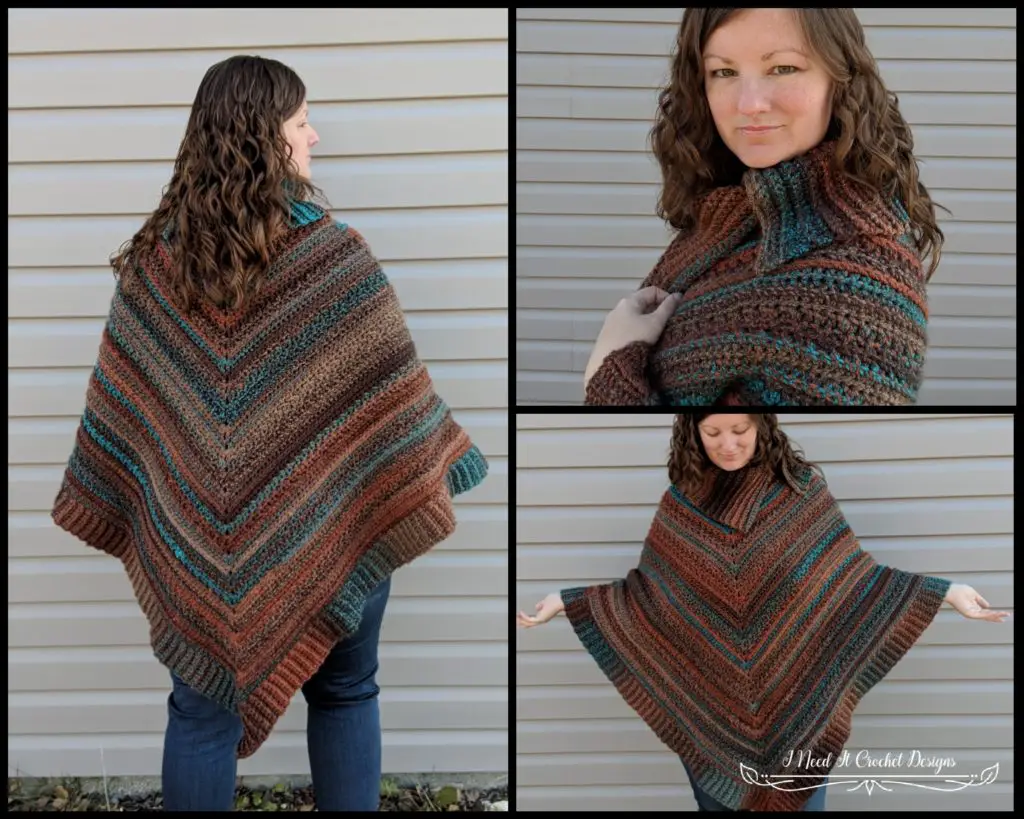
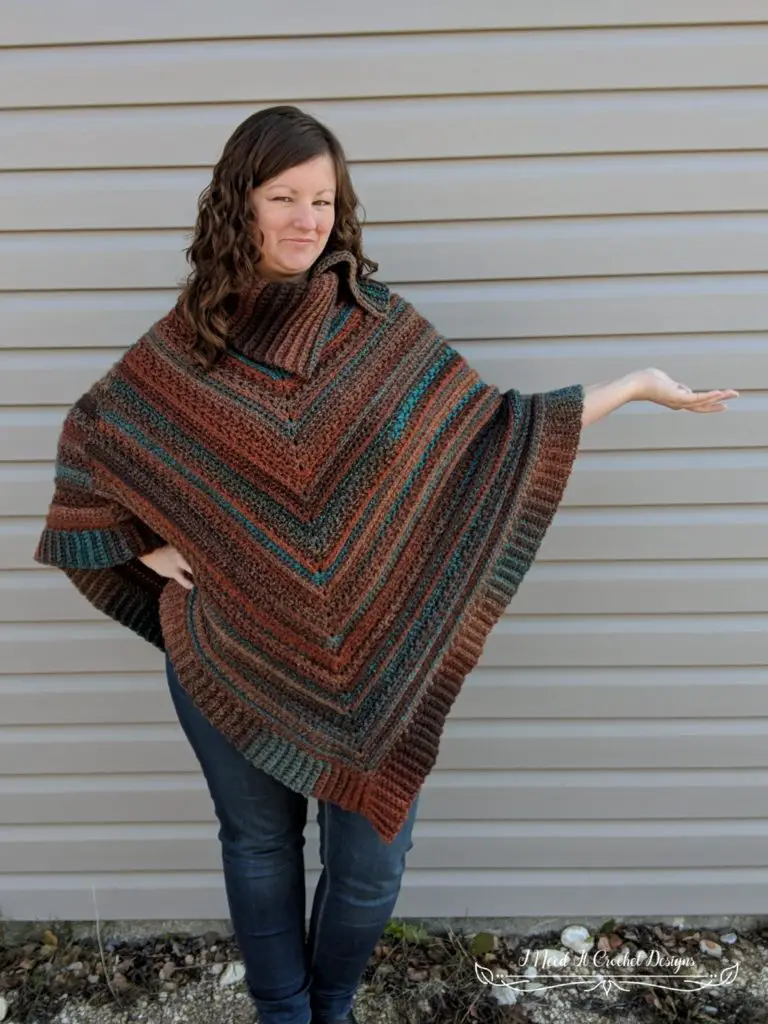
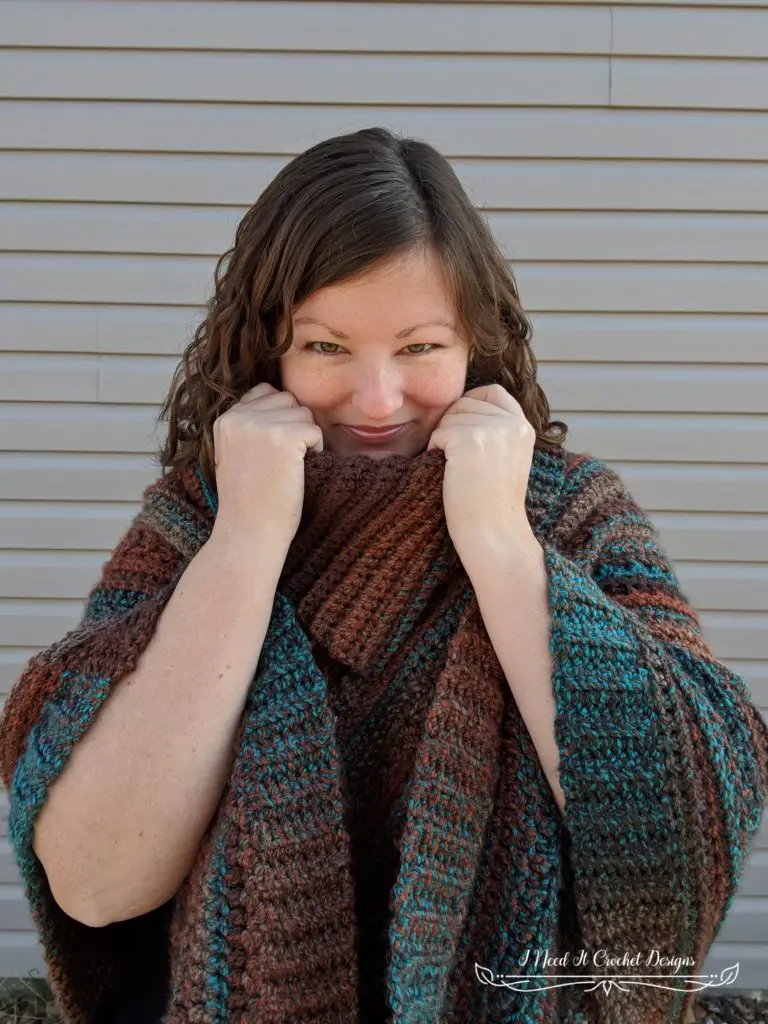
This pattern was born out of necessity. I simply had to have a Fall poncho. I wanted something made with a bulky yarn, something warm with no lacy parts to it, something with a large cowl neck that I could turn up when the temperature drops. There are quite a few poncho patterns out there, but none of them were just right for me. So I made my own! My perfect poncho. <3
Crochet Poncho Pattern
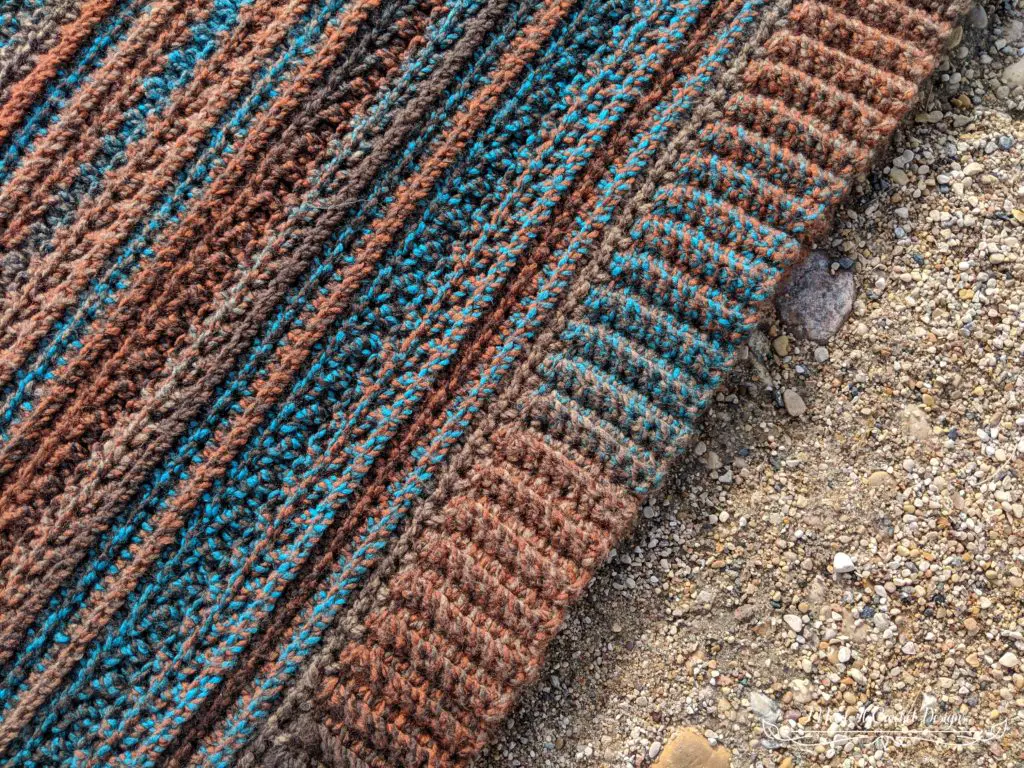
Now, let me just take a minute to talk about this yarn. I’ve admired it many times before on my trips to Michael’s, but I never bought it. Part of me was a little intimidated by it. I wasn’t sure I would be able to design a pattern that would look great with this yarn, as it has a very busy colour design. Also, I was afraid that whatever I designed would look great in this yarn, but nothing else. And that’s not how I roll. I like people to have options! That’s one of my favourite things about crochet!
Well, I worked up my nerve, grabbed my balls (of yarn, haha!) and proceeded to the checkout. I figured I would just have to try, and if it didn’t work out, oh well. And now, I am so glad I did! I am seriously in love with this yarn! Not only is it absolutely gorgeous, but it is sooo soft, and squooshy!
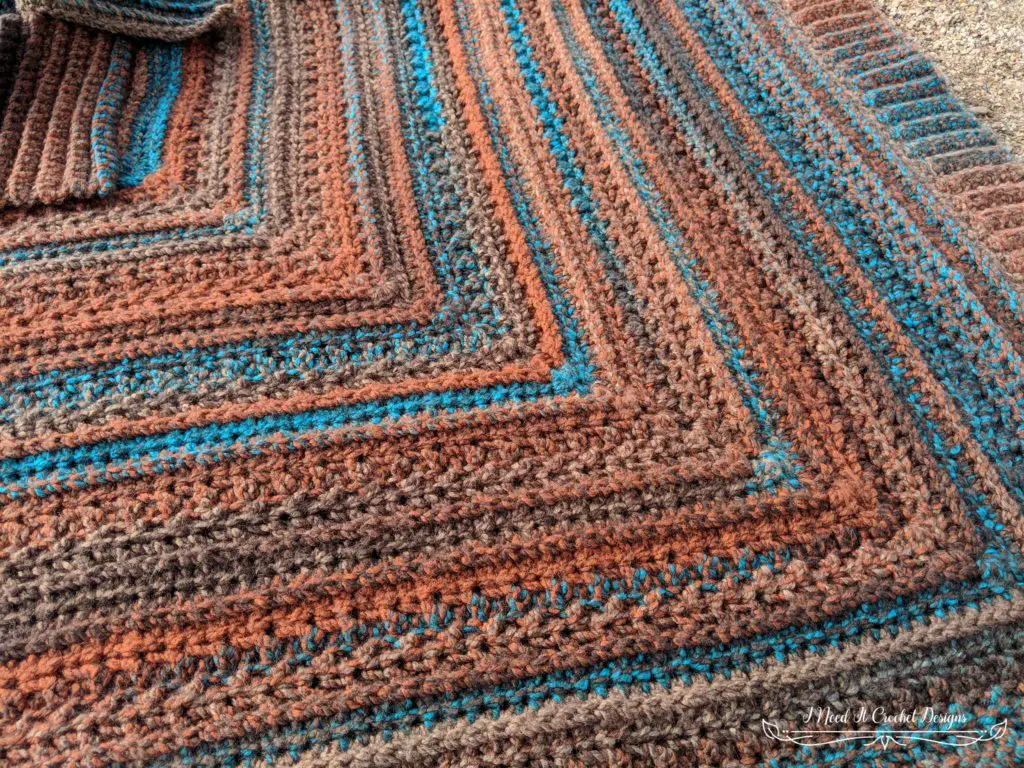
At first, I tried some more complicated stitch patterns. But I found the colour pattern became overwhelming. So, I toned it down a bit, but still kept it interesting. Because that’s my jam. I don’t like to get bored while I crochet. Especially on a large project!
Sarah’s Perfect Poncho – Free Crochet Pattern
Finished Size:
The sizing for this poncho is customizable. It would fit any teen/adult size.
Gauge:
11 hdc = 4” across.
Vertical tension is not important in this pattern as the sizing is customized.
Materials:
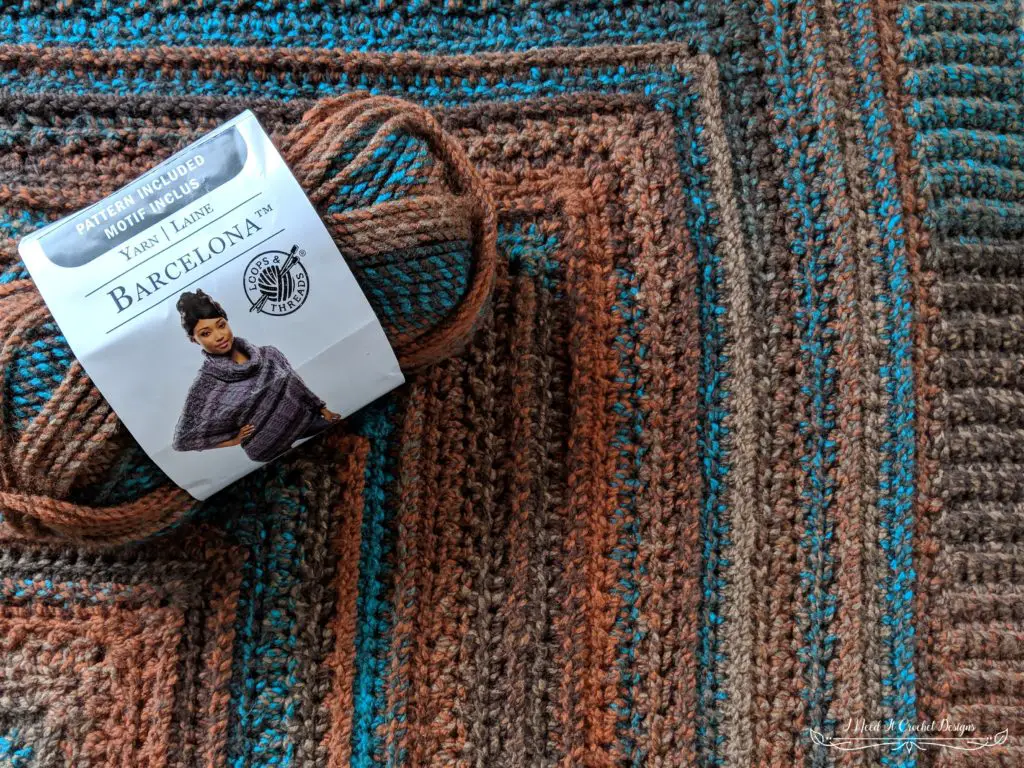
I used Loops & Threads Barcelona, which is 100% Acrylic, #5 Bulky weight yarn.
Any yarn of similar weight would work.
Approximately 1500 yds to make my poncho.
6.5mm Hook
Stitch Markers
Yarn Needle
Scissors
Measuring Tape
Abbreviations:
Sk = Skip
Sp = Space
St = Stitch
Ss = Slip Stitch
Ch = Chain
Sc = Single Crochet
Hdc = Half Double Crochet
BLO = Back Loop Only
FLO = Front Loop Only
Notes:
Ch1 at the beginning of a row is never considered a stitch.
Ss is not considered a stitch.
I have provided a tutorial for working into the 3rd loop. You can find it here.
I have also provided a tutorial for an alternative joining method. You can find it here.
I have added many pictures to help you along the way.
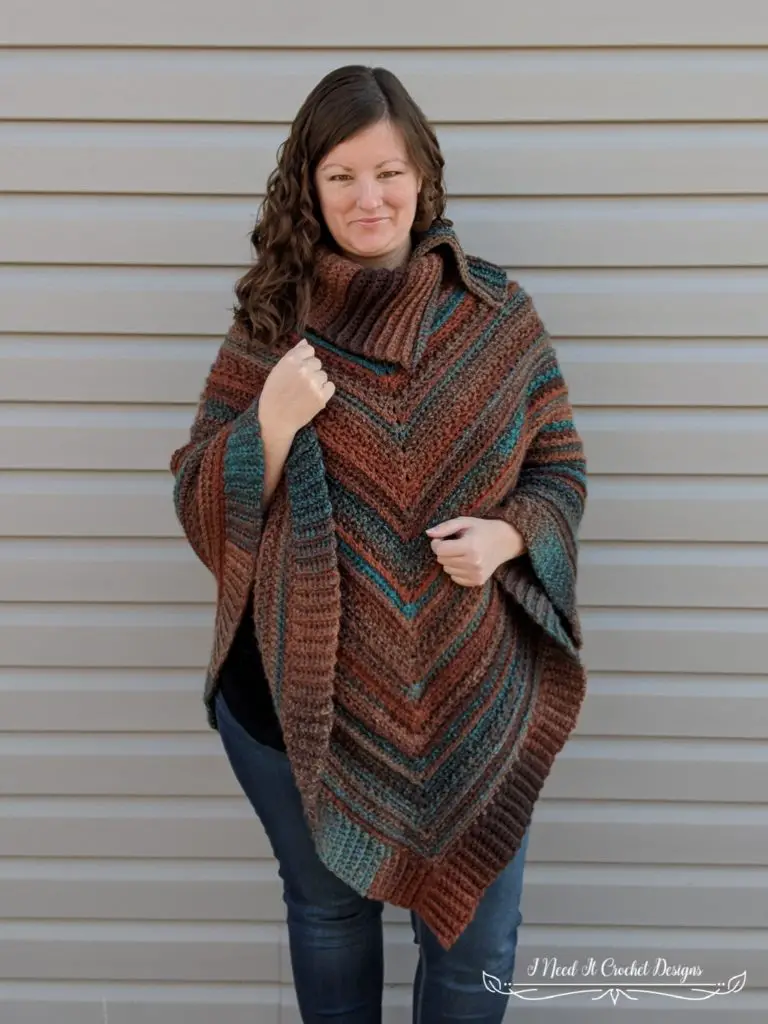
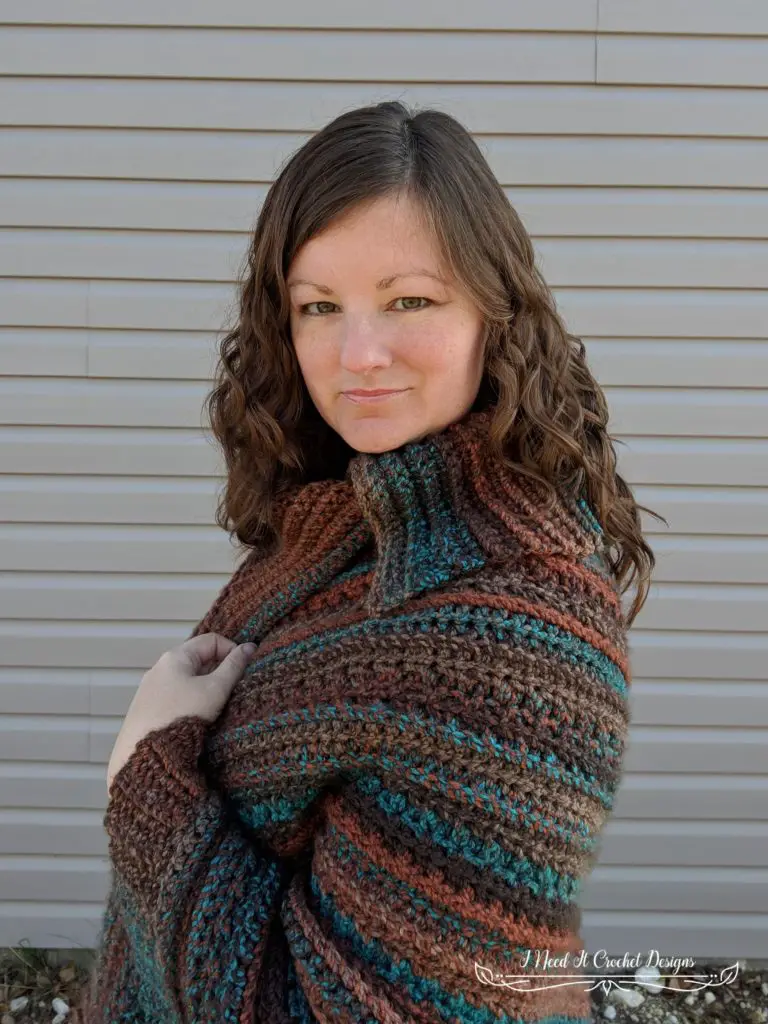
The model above (that’s me) is 5’6” with a 42” bust, and arms 20” long from the point of the shoulder.
Sarah’s Perfect Poncho – Free Crochet Pattern
Instructions
You begin by making the neck hole, and work from the top down in the round. You will be joining each round with a ss and turning after each round. Make sure to begin each round from the stitch you just put your last ss into. To make this easier, I used the ss like it was the top two loops of my first stitch. You will continue until you have made the poncho to your preferred length minus 2 ½”. Then, you will add the bottom trim and cowl neck.
With 6.5mm Hook
Ch68, ss to 1st ch to form a ring.
1. Working into the back hump of the chain: Ch1. Hdc in 1st ch and next 16 ch. Ch1. Hdc next 34 ch. Ch1. Hdc in next 17 ch. Ss to 1st hdc (see alternative join method). Turn. – 68 st
2. Working this row in the 3rd LO: Ch1. *Hdc in each st until you reach the ch1. (2hdc, ch1, 2hdc) in ch1 sp. ** Repeat from * to ** once. Hdc in each st until you reach the end. Ss to 1st hdc. Turn. – 76 st
3. Ch1. Hdc in BLO of 1st st. [*Hdc in FLO of next st. Hdc in BLO of next st. ** Repeat from * to ** until you reach the ch1. (Hdc, ch1, hdc) in ch1 sp. ] Repeat everything in [] once. *Hdc in FLO of next st. Hdc in BLO of next st. ** Repeat from * to ** until you reach the end. Ss to 1st hdc. Turn. – 80 st
4. Ch1. Hdc in BLO of 1st st. [*Hdc in FLO of next st. Hdc in BLO of next st. ** Repeat from * to ** until you reach the ch1. (2hdc, ch1, 2hdc) in ch1 sp. ] Repeat everything in [] once. *Hdc in FLO of next st. Hdc in BLO of next st. ** Repeat from * to ** until you reach the end. Ss to 1st hdc. Turn. – 88 st
5. Ch1. Hdc in BLO of 1st st. Hdc in FLO of next st. [*Hdc in BLO of next st. Hdc in FLO of next st. ** ** Repeat from * to ** until you reach the ch1. (Hdc, ch1, hdc) in ch1 sp. ] Repeat everything in [] once. *Hdc in BLO of next st. Hdc in FLO of next st. ** Repeat from * to ** until you reach the end. Ss to 1st hdc (see alternative join method). Turn. – 92 st
6. Working this row in the 3rd LO: Ch1. *Hdc in each st until you reach the ch1. (2hdc, ch1, 2hdc) in ch1 sp. ** Repeat from * to ** once. Hdc in each st until you reach the end. Ss to 1st hdc. Turn. – 100 st
7. Ch1. *Hdc in each st until you reach the ch1. (Hdc, ch1, hdc) in ch1 sp. ** Repeat from * to ** once. Hdc in each st until you reach the end. Ss to 1st hdc (see alternative join method). Turn. – 104 st
8. Working this row in the 3rd LO: Ch1. *Hdc in each st until you reach the ch1. (2hdc, ch1, 2hdc) in ch1 sp. ** Repeat from * to ** once. Hdc in each st until you reach the end. Ss to 1st hdc. Turn. – 112 st
9. Ch1. Hdc in BLO of 1st st. Hdc in FLO of next st. [*Hdc in BLO of next st. Hdc in FLO of next st. ** ** Repeat from * to ** until you reach the ch1. (Hdc, ch1, hdc) in ch1 sp. ] Repeat everything in [] once. *Hdc in BLO of next st. Hdc in FLO of next st. ** Repeat from * to ** until you reach the end. Ss to 1st hdc (see alternative join method). Turn. – 116 st
10. Ch1. Hdc in BLO of 1st st. Hdc in FLO of next st. [*Hdc in BLO of next st. Hdc in FLO of next st. ** ** Repeat from * to ** until you reach the ch1. (2hdc, ch1, 2hdc) in ch1 sp. ] Repeat everything in [] once. *Hdc in BLO of next st. Hdc in FLO of next st. ** Repeat from * to ** until you reach the end. Ss to 1st hdc (see alternative join method). Turn. – 124 st
11. Ch1. Hdc in BLO of 1st st. [*Hdc in FLO of next st. Hdc in BLO of next st. ** Repeat from * to ** until you reach the ch1. (Hdc, ch1, hdc) in ch1 sp. ] Repeat everything in [] once. *Hdc in FLO of next st. Hdc in BLO of next st. ** Repeat from * to ** until you reach the end. Ss to 1st hdc (see alternative join method). Turn. – 128 st
12. Working this row in the 3rd LO: Ch1. *Hdc in each st until you reach the ch1. (2hdc, ch1, 2hdc) in ch1 sp. ** Repeat from * to ** once. Hdc in each st until you reach the end. Ss to 1st hdc. Turn. – 136 st
13. Ch1. *Hdc in each st until you reach the ch1. (Hdc, ch1, hdc) in ch1 sp. ** Repeat from * to ** once. Hdc in each st until you reach the end. Ss to 1st hdc (see alternative join method). Turn. – 140 st
14. Working this row in the 3rd LO: Ch1. *Hdc in each st until you reach the ch1. (2hdc, ch1, 2hdc) in ch1 sp. ** Repeat from * to ** once. Hdc in each st until you reach the end. Ss to 1st hdc. Turn. – 148 st
Repeat rounds 3-14 until you have achieved the desired length, minus 2 ½”. Be sure to end on a round 8 or 14 repeat. Do not bind off. We will now work the bottom trim. Turn so that the right side of your work is facing you.
Crochet Poncho Tutorial
Bottom Trim
Ch9.
1. Sc in 2nd ch from hook and each ch across. Ss into the 1st st. Ss into the next st. Turn. – 8 st
2. Sk 2 ss. Sc in BLO of each st across. Turn. – 8 st
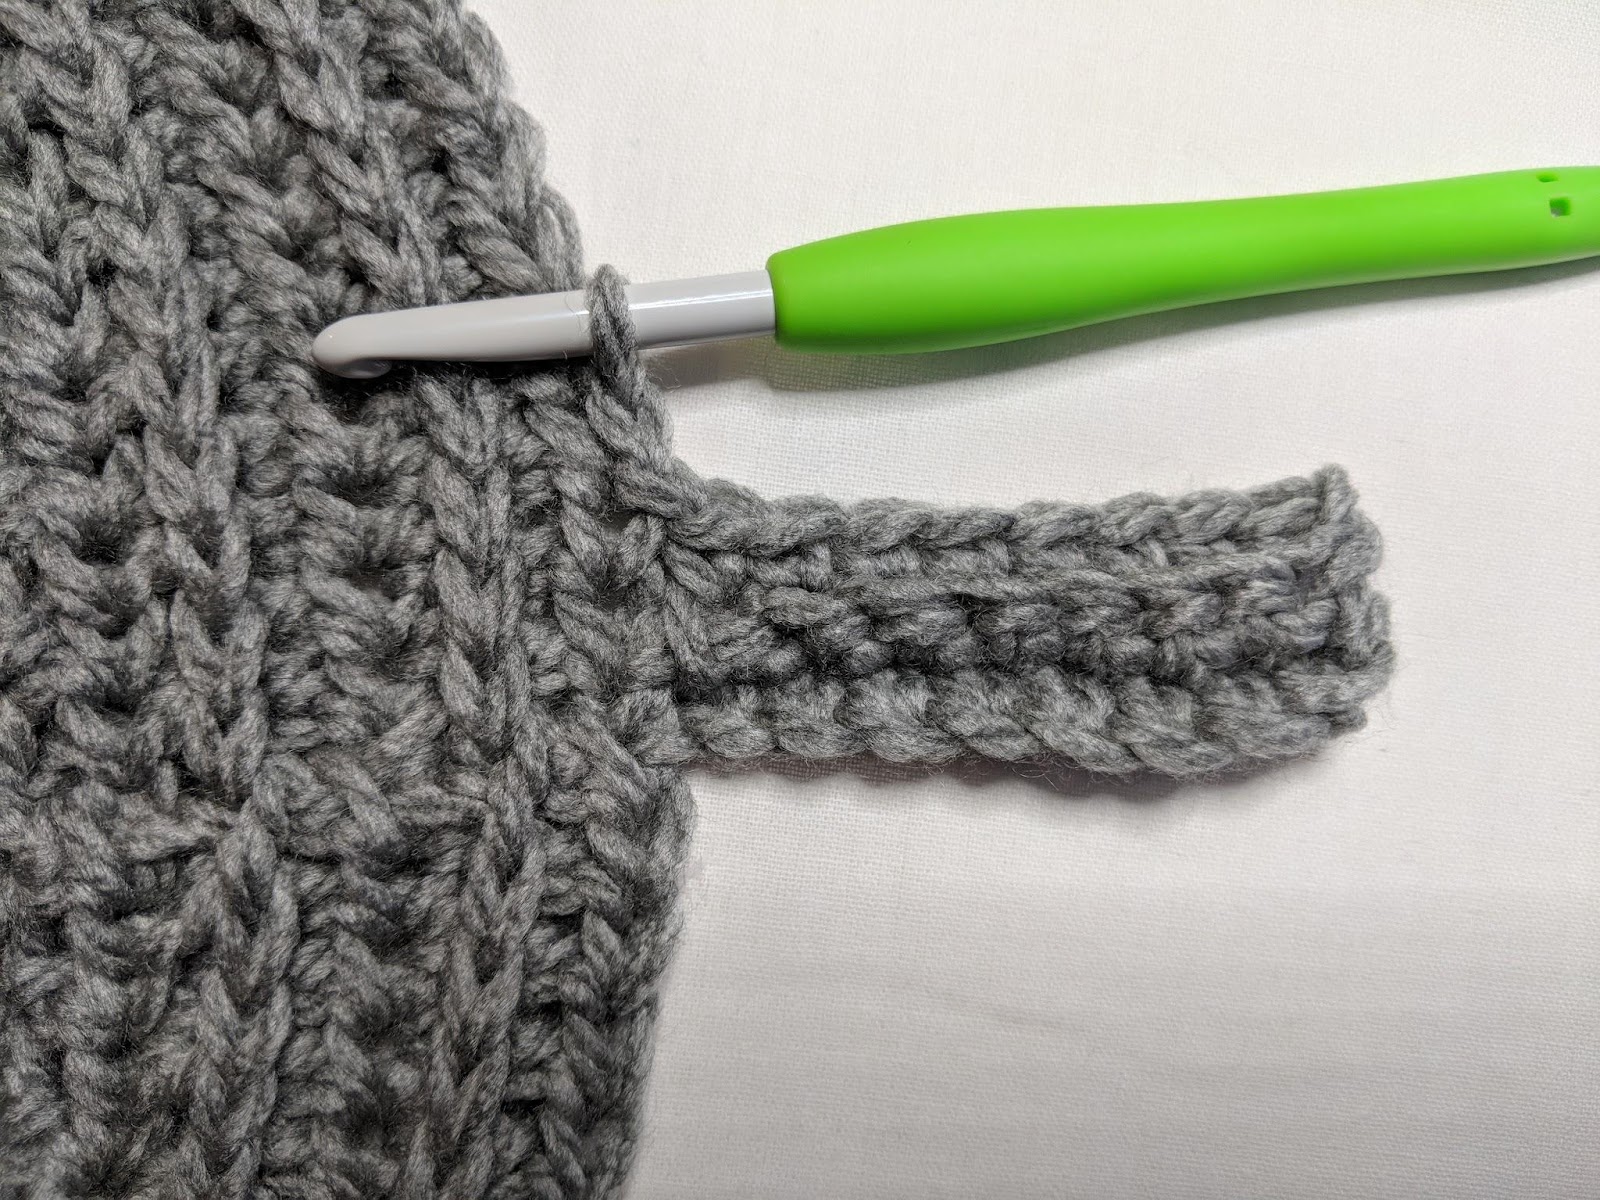
3. Ch1. Sc in BLO of 1st st and each st across. Ss into the next unworked st on body. Ss into the next unworked st on body (see figure 1). Turn. – 8 st
Repeat rows 2 and 3 until you have only 1 st left before the ch1. * You should have just completed a row 2 repeat. Work row 3, placing the 1st ss into the last st before the ch1 and the 2nd ss into the ch1 sp. Then, you will repeat row 2 (see figure 2). Rotate your work about a ¼ turn clockwise, and we will continue working on the trim.
Ch9 (see figure 3).
1. Sc in 2nd ch from hook and each ch across. Ss into the 1st st. Ss into the next st. Turn. – 8 st
2. Sk 2 ss. Sc in BLO of each st across. Turn. – 8 st
3. Ch1. Sc in BLO of 1st st and each st across. Ss into the next unworked st on body. Ss into the next unworked st on body. Turn. – 8 st
Repeat rows 2 & 3 across. When you have worked into all of the sc sts and get back to the ch1 sp, be sure to count that as a st too (see figure 4). Note that every stitch receives 1 ss, and 1 row of edging, except the ch1 sp. The ch1 sp receives a ss and row of edging before you create your corner and after as well.
Then, continue working rows 2 & 3 as instructed ** up to the st before the next ch1. Repeat from * to ** until you reach your first trim row. Your last row should be a row 2 repeat. Turn your work so that the right side is facing you. Whip stitch the trim closed, working through the bottom loop of the 1st row and the BLO of the last row.


Crochet Poncho Pattern
Cowl Neck
Now we will add the cowl neck using the same method that we used to add the bottom trim, but first, we have to decide which peak side of the poncho is to be the front. If you made your poncho in a solid colour, this will be easier as both sides look the same, but if you used striping or muti-coloured yarn like I did, you may have a side that is your favourite.
Once you have picked a side as the front, you will now place stitch markers to mark where the ends of the cowl will be. Lay the poncho out with the front facing you and the right side up. Starting at the peak, count 8 stitches up the right side and place a stitch marker. Count 9 more stitches going in the same direction, and place another stitch marker.
Note: This will place the split of the cowl neck on your left side when you’re wearing the poncho. If you prefer the split to be on the other side, simply follow the same instructions going up the left side. There are many ways to design a cowl neck. If you’re not in love with the way I did it, get creative! You could move the slit to the front, or the shoulder. You could make it a solid cowl neck (just don’t bother with the stitch markers and sew up the end when you’re done). You could add buttons or embellishments. Make it yours, and have fun! Ok, let’s get on to the next part.
Attach your yarn at the 2nd stitch marker in the FLO.
Ch25
1. Sc in 2nd ch from hook and each ch across. Ss into the 1st st in the FLO. Ss into next st in FLO. Turn. – 24 st
2. Sk 2 ss. Sc in BLO of each st across. Turn. – 24 st
3. Ch1. Sc in BLO of 1st st and next 23 sts. Ss into the FLO of the next st. Ss into the FLO of the next st. Turn. – 24 st
Repeat rows 2 & 3 until you reach the 1st stitch marker. You will have just finished a row 3 repeat, and put your 2nd ss into the FLO of the st with a stitch marker.
1. Sk 2 ss. Sc in BLO of each st across. Turn. – 24 st
2. Ch1. Sc in BLO of 1st st and next 23 sts. Ss into the next st. Ss into the next st. Turn. – 24 st
Repeat rows 1 & 2 around the neck until you come back around to the 2nd stitch marker. You should have just finished a row 1 repeat.
1. Ch1. Sc in BLO of 1st st and next 23 sts. Ss into the BLO of the next st. Ss into the BLO of the next st. Turn. – 24 st
2. Sk 2 ss. Sc in BLO of each st across. Turn. – 24 st
Repeat rows 1 & 2 until you reach the 1st stitch marker again. Bind off.
Weave in your ends, and you’re done!
Sarah’s Perfect Poncho – Free Crochet Pattern
I hope you love your new poncho, and I look forward to seeing all of your beautiful pictures on Ravelry!
If you’d like to know when I post new patterns and tutorials, head on over to my Facebook and Instagram and give me a like and a follow!
If you enjoyed Sarah’s Perfect Poncho – Free Crochet Pattern, you may want to check out my other designs!
Crochet Poncho Pattern
And until next time… Happy Hooking! 😉
Want To Find More Free Crochet Poncho Patterns?
Check out my other great crochet poncho patterns below!
Love the pattern for the Poncho.
Thank you so much, Karen! <3