

The Aerwyna Shrug free crochet pattern is copyrighted by I Need It Crochet. You may not copy, share, change, or sell the pattern itself. Also, you may not claim this pattern as your own. All pictures contained in this pattern fall under the copyright and may not be used.
Finished items made from The Aerwyna Shrug free crochet pattern belong to you and you may do what you wish with them. If you choose to sell them on Etsy I would very much appreciate it if you credited me as the pattern designer.


Or… Just scroll down to see it for free!
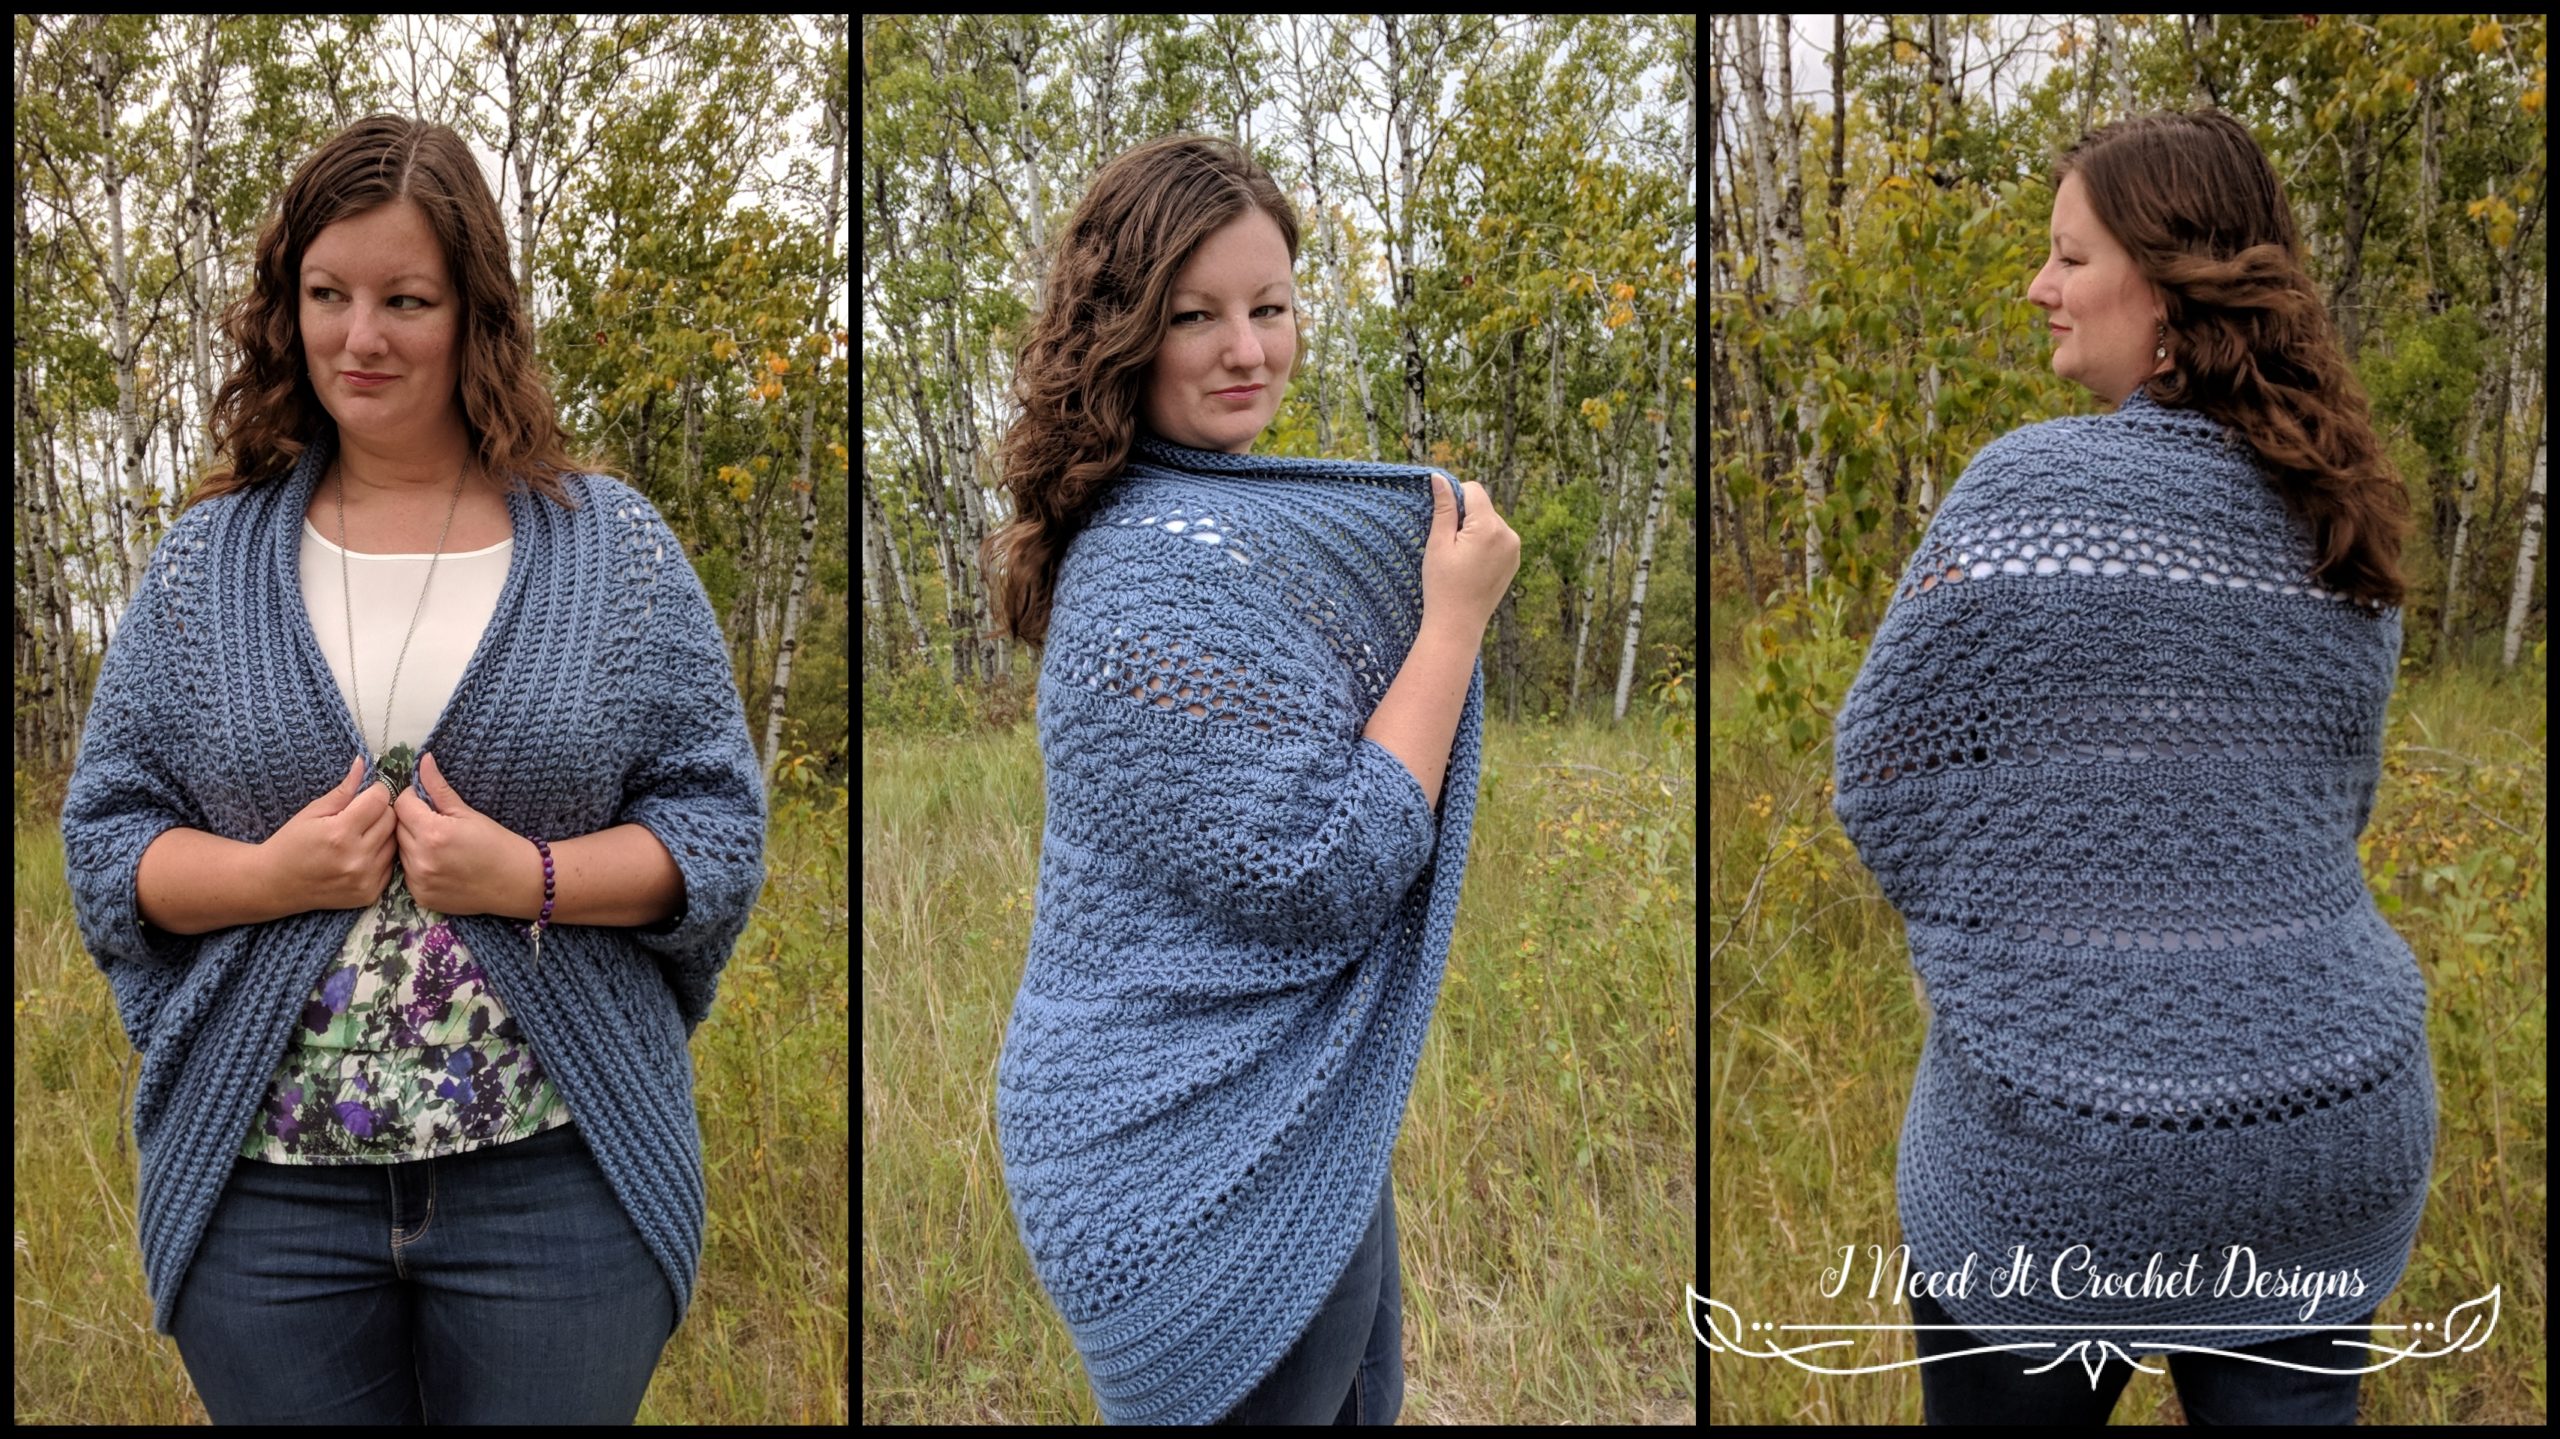
As I was making the Aerwyna Blouse, I simply fell in love with the stitch pattern. The alternating shells, along with the lacy stitches really makes the piece look like rippling water. I am very happy that I was able to incorporate this lovely stitch pattern into a cocoon shrug. This design is quite figure flattering and would look incredible in multi-coloured yarn as well as solids.
The Aerwyna Shrug is a wonderful layering piece for fall. Made with worsted weight yarn, this shrug is warm, but not stifling. It would look great outdoors with a short or long sleeved tee and jeans. Or as a pretty topper with a dress. Made in cotton, The Aerwyna Shrug would make a great summer sweater as well! Especially for those that work in an air conditioned office.
Finished Sizes:
Instructions given to fit size X-small/small; changes for medium/large, X-large/2X-large, 3X-large/4X-large, and 5X-large/6X-large are in ()
XS/S (M/L, XL/2XL, 3XL/4XL, 5XL/6XL)
To fit Bust: 33”-37” (37”-42”, 42”-50”, 50”-58”, 58”-66”)
Shoulder Width: 14”-15” (15 ½”-17”, 17 ½”-18”, 18”-18 ½”, 18 ½”-19”)Finished Length: Customizable. Length on model shown is 32”.
Materials:
I used Caron Simply Soft, which is 100% Acrylic, #4 Worsted weight yarn.
Any yarn of similar weight would work.
Approximately 1050 (1200, 1400, 1500, 1600) yds to make the length shown.
Stitch Markers
Yarn Needle
Scissors
Measuring Tape
Gauge:
See gauge swatch pattern below.
Always be sure to make a gauge swatch before you begin. It will save you a lot of time and heartache
Abbreviations:
Sk = Skip
Sp = Space
St = Stitch
Ss = Slip Stitch
Ch = Chain
Sc = Single Crochet
Sc2tog = Single Crochet 2 Together
Hdc = Half Double Crochet
Dc= Double Crochet
Vst = V Stitch (See Notes)
Sh = Shell Stitch (See Notes)
Notes:
Ch1 at the beginning of a row is never considered a stitch.
Ch3 at the beginning of a row is always considered a Dc.
For the purposes of this pattern, a Shell consists of 5 Dc in 1 stitch.
A V Stitch consists of a (Dc, Ch1, Dc) all in the same stitch.
When asked to work into a Vst, you are working into the ch space between the dcs of the Vst.
In part of this pattern you will be crocheting into the third loop. For those who don’t yet know how to do that, I have made a little tutorial. You can find it here.
I have added many pictures to help you along the way.
The model above has a 40” bust and is wearing a size Medium/Large.
Choose your size according to the measurements noted above and your preferences.
Gauge Swatch (5 ¼” x 5 ¼”)
1. Ch 21. Dc in 3rd ch and each ch across. Turn. – 19dc
2. Ch 1, Sc in 1st st. *Ch3, sk 2 sts, sc in next st.** Repeat from * to ** across. – 6 ch3 + 6 sc
3. Ch 3, V st in each ch3 sp across. Dc in last st. Turn. – 6 V st + 2 dc
4. Ch 3, V st in each V st across. Dc in top of ch 3. Turn. – 6 V st + 2 dc
5. Ch 3, 3 dc in each V st across. Dc in top of ch 3. Turn. – 20 dc
6. Ch 1, sc in 1st st. Sk 2 sts, Sh in next st, sk 2 sts, Sc2tog in next 2 sts. * Sk 2 sts, Sh in next st, Sk 2 sts, sc in next st. ** Repeat from * to **. Turn. – 3 Sh, 4 sc
7. Ch 3, 2 dc in 1st st. *Sk 2 sts, sc in next st, sk 2 sts, Sh in next st. ** Repeat from * to ** until there are only 3 sts left. Sk 2 sts, 3 dc in last st. Turn. – 2 Sh, 3 sc, 6 dc
8. Ch 1, sc in 1st st. * Sk 2 sts, Sh in next st, Sk 2 sts, sc in next st. ** Repeat from * to ** across. Turn. – 3 Sh, 4 sc
9. Repeat row 7.
10. Repeat row 8.
Your gauge swatch should measure 5 ¼” x 5 ¼”. If your measurements are off, try again with a different sized hook.
Instructions
This shrug is created by making a large rectangle, folding it in half and sewing arm holes. Then we will join the yarn in the top and work in the round to create the edging. The sleeves are finished off with a simple sc.
Begin with about 16” of a tail.
Ch 123 (141, 165, 189, 219) and proceed to row 1.
Or,
FDC 121 (139, 163, 187, 217). This is the right side of your work. Turn and proceed to row 2.
1. Dc in 4th ch and each ch across. This is the right side of your work. Turn. – 121 (139, 163, 187, 217) dc.
2. Ch 1. Sc in 1st st. * Ch 3, sk 2 sts, sc in next st. ** Repeat from * to ** across. Turn. – 40 (46, 54, 62, 72) ch3 + 41 (47, 55, 63, 73) sc.
3. Ch 3. V st in each ch3 sp across. Dc in last st. Turn. – 40 (46, 54, 62, 72) V st + 2 dc.
4. Ch 3, V st in each V st across. Dc in top of ch 3. Turn. – 40 (46, 54, 62, 72) V st + 2 dc.
5. Ch 3, 3 dc in each V st across. Dc in top of ch 3. Turn. – 122 (140, 164, 188, 218) dc.
6. Ch 1. *Sc in 1st st. Sk 2 sts, Sh in next st, sk 2 sts. ** Repeat from * to ** 9 (10, 12, 14, 17) times. Sc2tog in next 2 sts. * Sk 2 sts, Sh in next st, Sk 2 sts, sc in next st. ** Repeat from * to ** across. Turn. – 20 (23, 27, 31, 36) Sh, 21 (24, 28, 32, 37) sc
7. Ch 3, 2 dc in 1st st. *Sk 2 sts, sc in next st, sk 2 sts, Sh in next st. ** Repeat from * to ** until there are only 3 sts left. Sk 2 sts, 3 dc in last st. Turn. – 19 (22, 26, 30, 35) Sh, 20 (23, 27, 31, 36) sc, 6 dc
8. Ch 1, sc in 1st st. * Sk 2 sts, Sh in next st, Sk 2 sts, sc in next st. ** Repeat from * to ** across. Turn. – 20 (23, 27, 31, 36) Sh, 21 (24, 28, 32, 37) sc
9. Repeat row 7.
10. Repeat row 8.
11. Ch 3. Dc in next st and each st across. Turn. 121 (139, 163, 187, 217) dc.
Repeat rows 2 – 11, 4 more times, then repeat rows 2 – 5, 1 more time. Fasten off, leaving about 16” of a tail. You should now have a rectangle that is approximately 33” (38”, 45”, 52”, 60”) wide, and 26” high. (See figure 1)
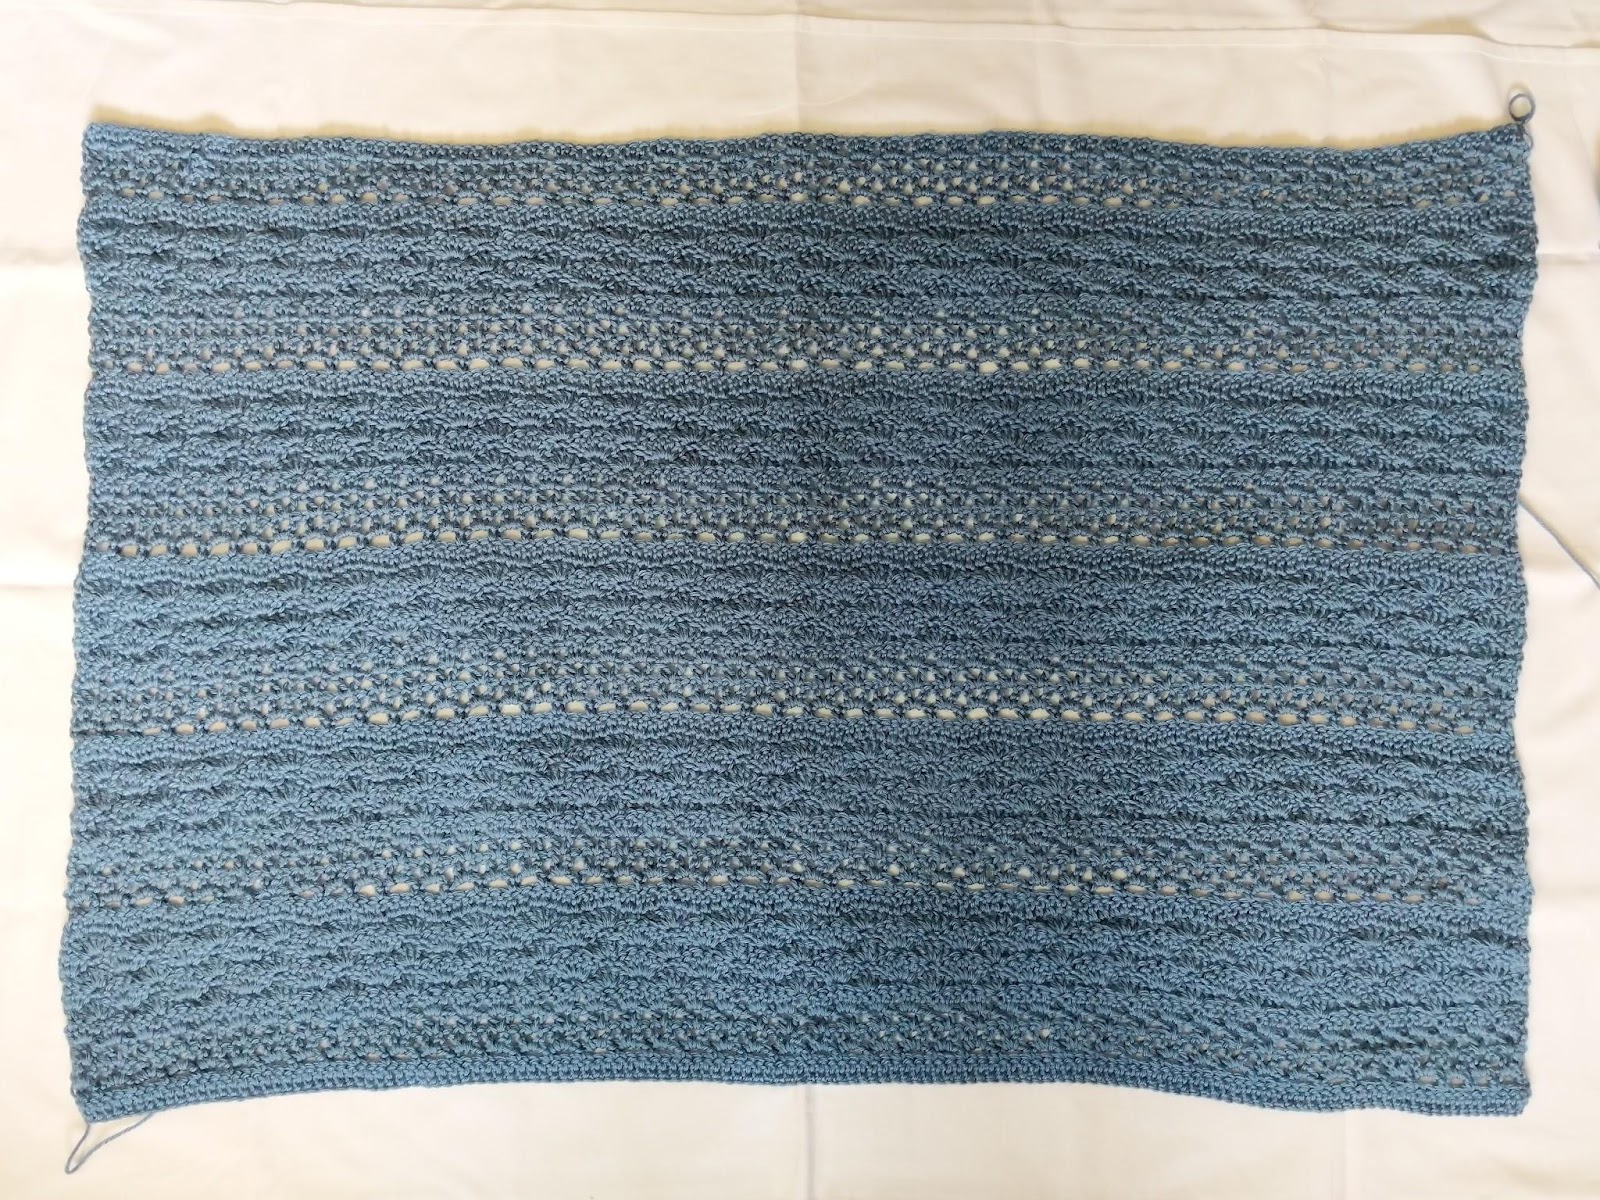
It is not a big deal if your rectangle is a bit wider than predicted. It will not change the final look very much. However, the height of your rectangle will change the look quite a bit. The shrug shown on the model sits at about 32” below the shoulders. If you would like your shrug to be longer or shorter than the one pictured, simply add or subtract rows. However, it is recommended to always end with a row 5 repeat, so that the rows will match up when you sew the sleeves in the next step. Also keep in mind that adding rows will make the front of the finished shrug wider, just as subtracting rows will make the front narrower.
Sewing The Sleeves
– Lay your rectangle out so that the right side is facing up and the top row is farthest from you. (Like in figure 1, except the end of the yarn where you just fastened off should be on the left.)
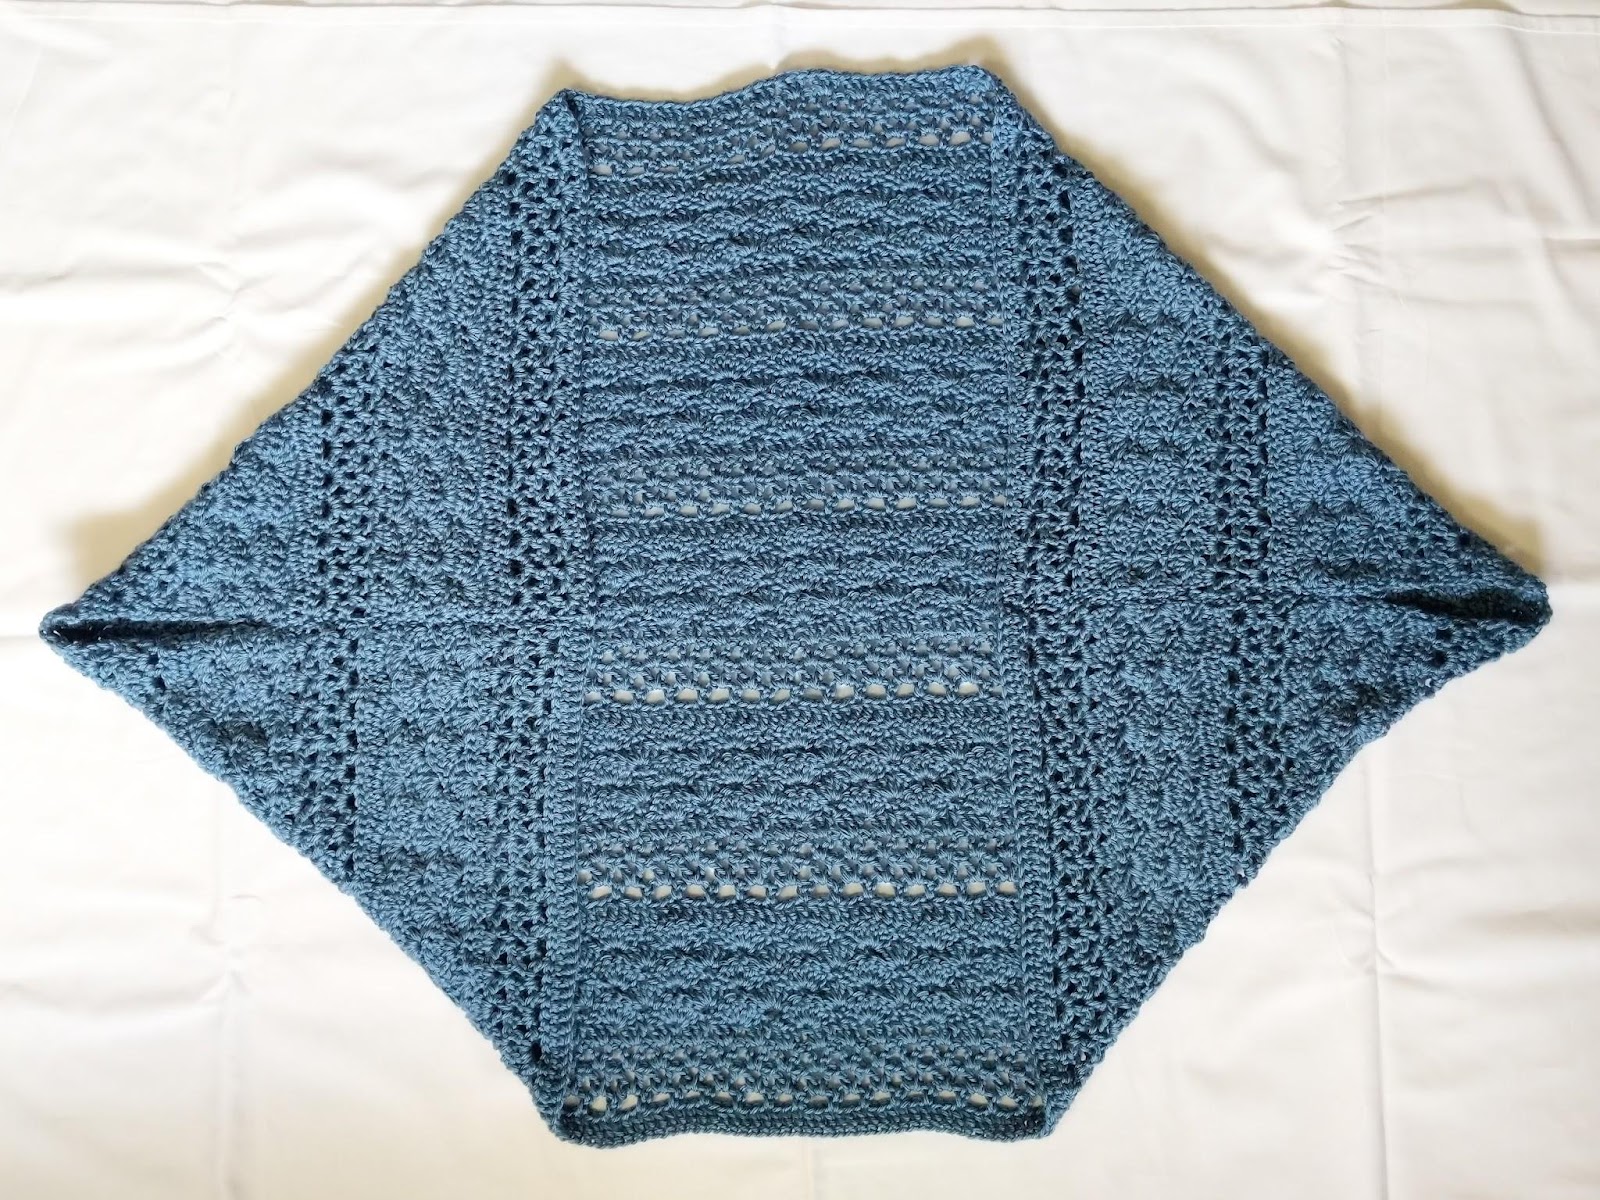
– Fold the rectangle in half, bringing the top down to the bottom. (See figure 2)
– Decide how large you would like your sleeves to be. I wanted my arm holes to be 10” around, so I placed my stitch marker 5” down from the fold. Use a locking stitch marker to pin the two layers together. (See figure 3)
– Place another locking stitch marker at the corner, again pinning the two layers together. (See figure 3)
– Repeat for the other side.
– Use your long yarn tails to whip stitch the two layers together from the corners, up to the arm holes. You should now have something resembling figure 4.


Turn your shrug right side out. Join your yarn anywhere on the edge of a sleeve with the right side facing you and sc evenly around the edge. I find that my edges come out even if I sc in the following manner: 1 sc in every sc, ch3 row. 1 sc in every hdc, ch1 row. 1 sc in each Sh row ending in a sc. 2 sc in every Sh row ending in a dc. 2 sc in every Vst and dc row. Once you have made it all the way around the sleeve edge, ss to the 1st sc and bind off. Repeat for the other sleeve.
Outer Edging
For the edging we will be working in the round, without joining at the end of each round. You will need a stitch marker to keep track of where your rounds end.
Begin by joining your yarn in the top of your shrug near the middle, with the right side facing you.
1. Ch 1. Sc in 1st st and each st around. Place a stitch marker in your last sc. – 242 (278, 326, 374, 434) sc
2. Hdc in 1st st and each st around. Move your stitch marker up to your last hdc. – 242 (278, 326, 374, 434) hdc
3. Working this round in 3rd LO: Dc in 1st st and each st around. Move your stitch marker up to your last dc. – 242 (278, 326, 374, 434) dc
Repeat rounds 2 & 3, four more times. You should now have 11 rows.
12. Hdc in 1st st and each st until you have 1 st left unworked. Sc in last st. Ss to your 1st st. Bind off. – 242 (278, 326, 374, 434) sts
Weave in all of your loose ends, and you’re done!
I hope you love your new shrug, and I look forward to seeing all of your beautiful pictures on Ravelry!
If you’d like to know when I post new patterns and tutorials, head on over to my Facebook and Instagram and give me a like and a follow!
If you enjoyed this free pattern for The Aerwyna Shrug, you may want to check out my other designs!

And until next time… Happy Hooking! 😉