
The Bauble Tee – Free Crochet Pattern is copyrighted by I Need It Crochet. You may not copy, share, change, or sell the pattern itself. Also, you may not claim this pattern as your own. All pictures contained in this pattern fall under the copyright and may not be used.
Finished items made from The Bauble Tee – Free Crochet Pattern belong to you and you may do what you wish with them. If you choose to sell them on Etsy, I would very much appreciate it if you credited me as the pattern designer.


Or… Just scroll down to see it for free!
Can you tell that I have a love affair with the Bead Stitch? Is it that obvious? Oh well. I think the Bead Stitch is just gorgeous, and I’ll never change my mind about it! 😉
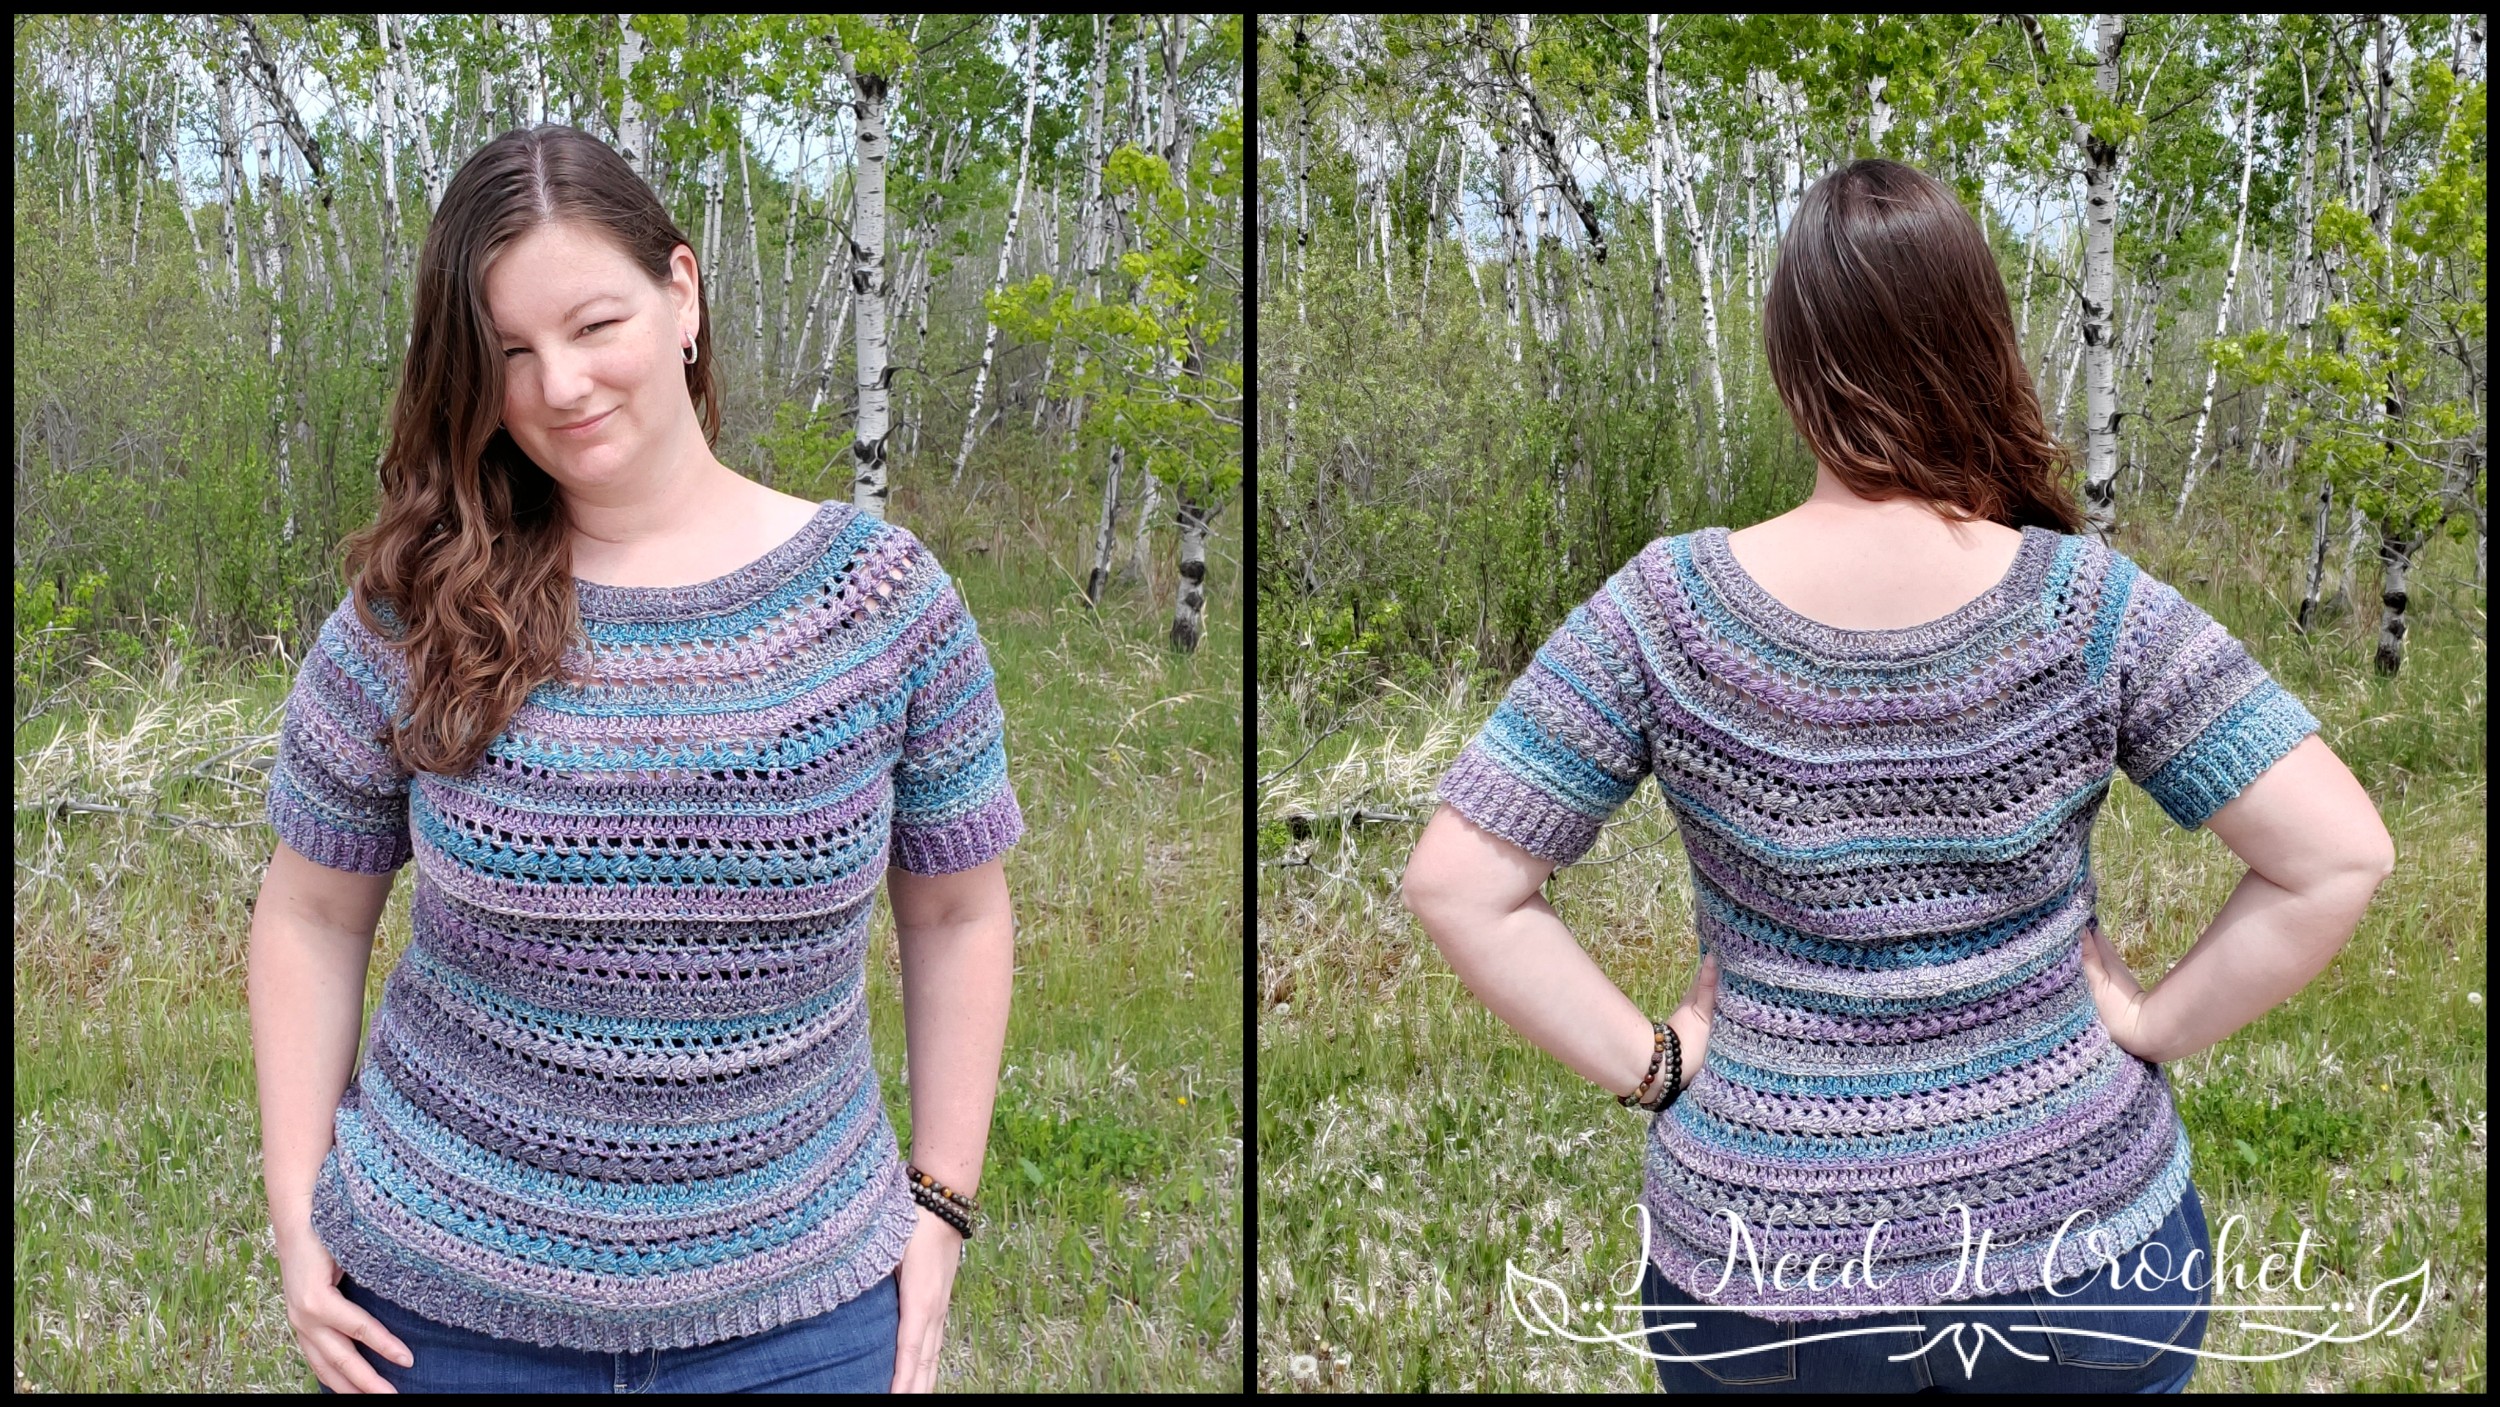
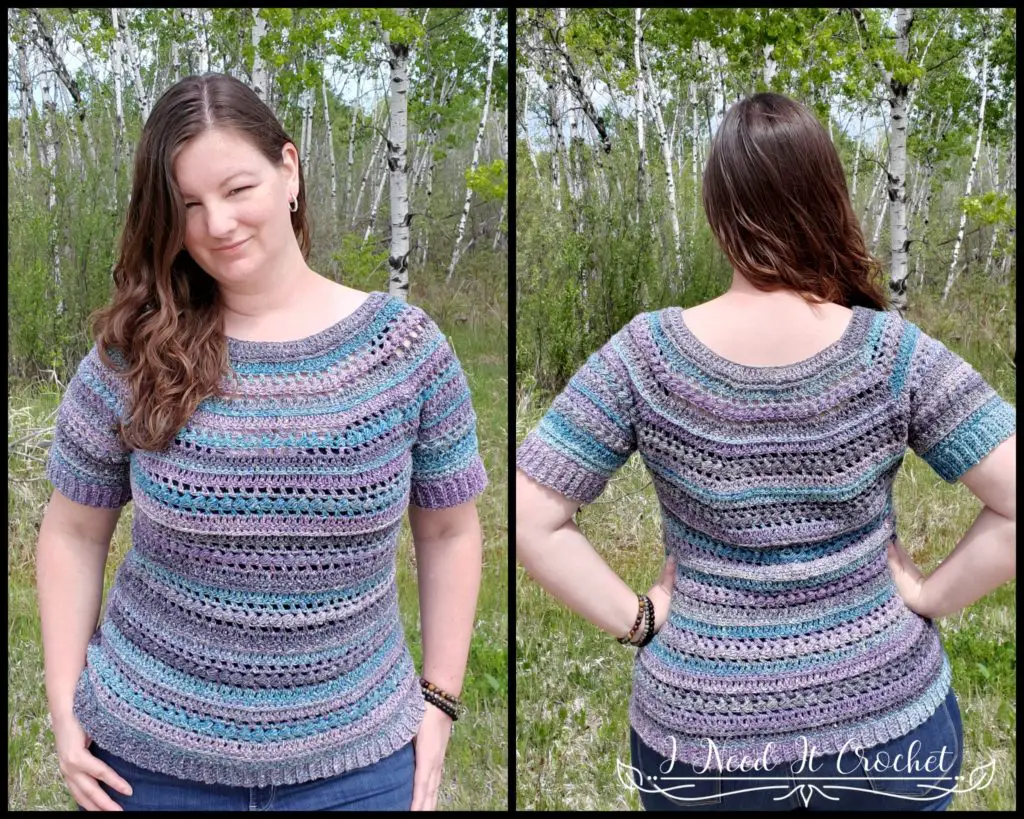
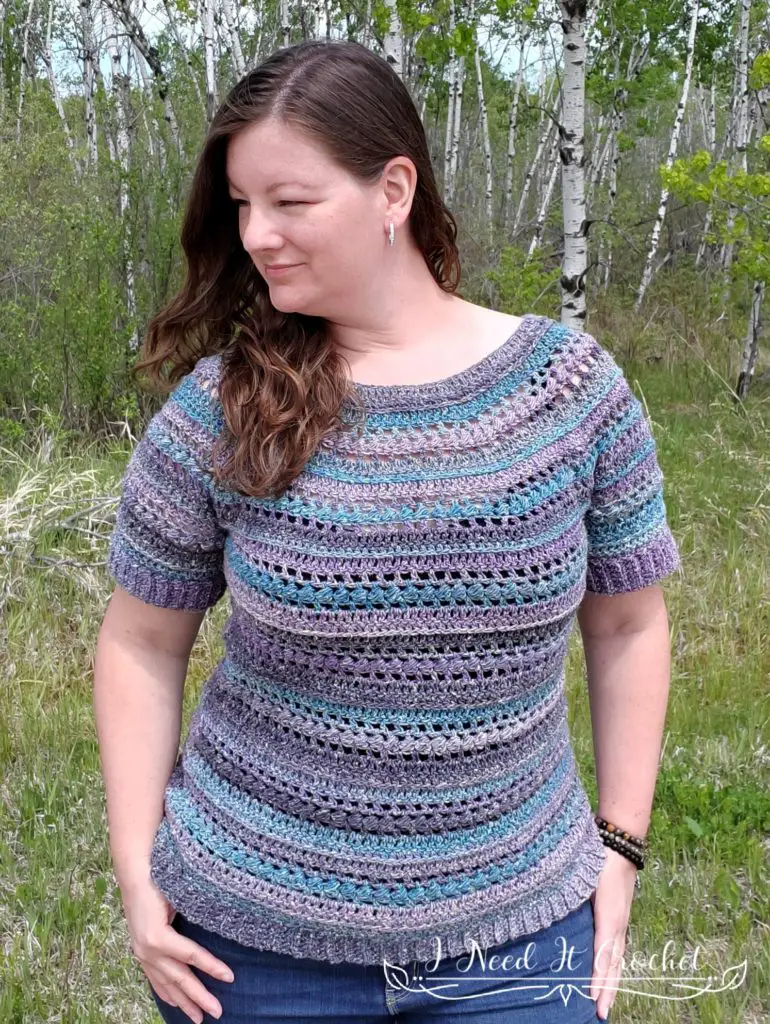
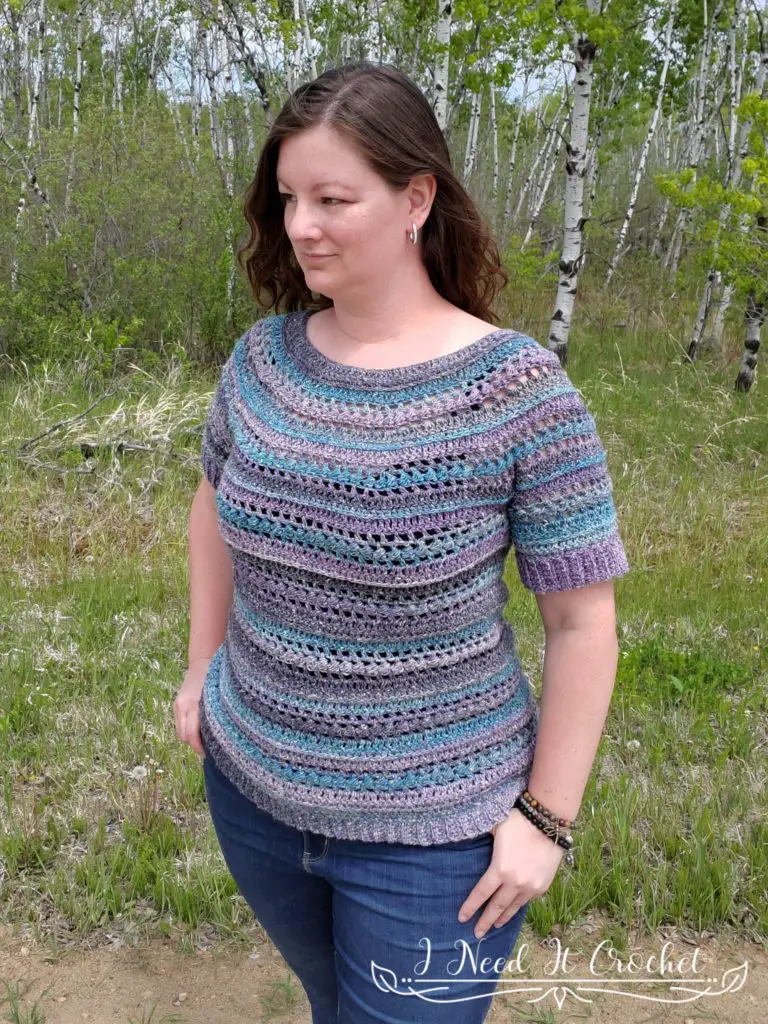
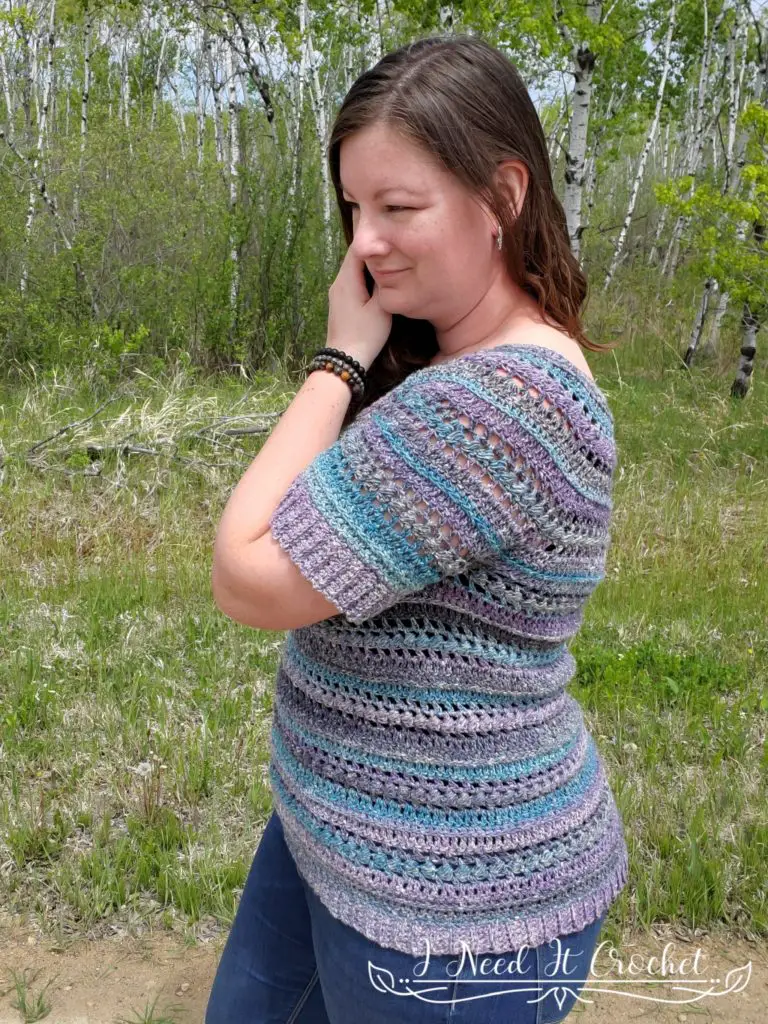
For this pattern, I took the stitch pattern that I used for the Bauble Bandana Cowl, Slouch, and Gloves and created a top-down, round yoke tee. I chose Loops & Threads Cottonie Silk, which made this top so comfortable and perfect for the warm weather.
Finished Sizes:
Instructions given to fit size X-small; changes for small, medium, large, X-large, 2X-large, 3X-large, 4X-large, and 5X-large are in ()
XS (S, M, L, XL, 2XL, 3XL, 4XL, 5XL)
Finished Bust: 34” (36”, 38”, 40”, 44”, 48”, 52”, 56”, 60”)
Finished Length: Customizable. Length on model shown is 26”
Sleeve Circumference: 11″ (11 1/2″, 12″, 13″, 14 1/2″, 16 1/2″, 18, 19 1/2″ 20 1/2″)
Materials:
I used Loops & Threads Cottonie Silk, which is 60% Polyester/20% Cotton/20% Silk, #3 Dk weight yarn.
Any yarn of similar weight would work.
Approximately 650 (750, 850, 950, 1050, 1150, 1250, 1350) yds.
I/5.5mm Hook
Stitch Markers
Yarn Needle
Scissors
Abbreviations:
Sk = Skip
Sp = Space
St = Stitch
Ss = Slip Stitch
Ch = Chain
Sc = Single Crochet
Hdc = Half Double Crochet
Dc= Double Crochet
Bd = Bead Stitch (See Notes Below and Tutorial Here)
BLO = Back Loop Only
Gauge:
See gauge swatch pattern below.
Notes:
Ch1 or ch2 at the beginning of a row is never considered a stitch.
Ch1 between Hdc is always considered a stitch.
Ch3 at the beginning of a row is always considered a Dc.
A Bead Stitch counts as 2 stitches.
I have written Tutorials for the Bead Stitch, Working into the 3rd Loop, and an Alternative Join Method for Working Into The 3rd Loop. You can find them at these links.
I have added many pictures to help you along the way.
The model above has a 40” bust and is wearing a size Large.
Choose your size according to the finished measurements noted above and your preferences.
Gauge Swatch Pattern
With 5.5mm Hook
Ch 20
1. Hdc in 2nd ch from hook and each ch across. Turn. – 19 st
2. Working the row in 3rd LO: Ch3. Dc in 1st st and each st across. Turn. – 19 st
3. Ch1, hdc in 1st st. *Ch1, sk1 st, hdc in next st. ** Repeat from * to ** across. Turn. – 19 st
4. Ch2, Bd in next ch1 sp and each ch1 sp across. Dc in last st. Turn. – 19 st
5. Ch1, hdc in 1st st. *Ch1, sk1 st, hdc in next st. ** Repeat from * to ** across. Turn. – 19 st
6. Ch3. Dc in 1st st and each st across. Turn. – 19 st
7. Ch1. Hdc in 1st st and each ch across. Turn. – 19 st
8. Working the row in 3rd LO: Ch3. Dc in 1st st and each st across. Turn. – 19 st
9. Ch1, hdc in 1st st. *Ch1, sk1 st, hdc in next st. ** Repeat from * to ** across. Turn. – 19 st
10. Ch2, Bd in next ch1 sp and each ch1 sp across. Dc in last st. Turn. – 19 st
Your swatch should measure 5” x 5”.
The Bauble Tee – Free Crochet Pattern

Instructions
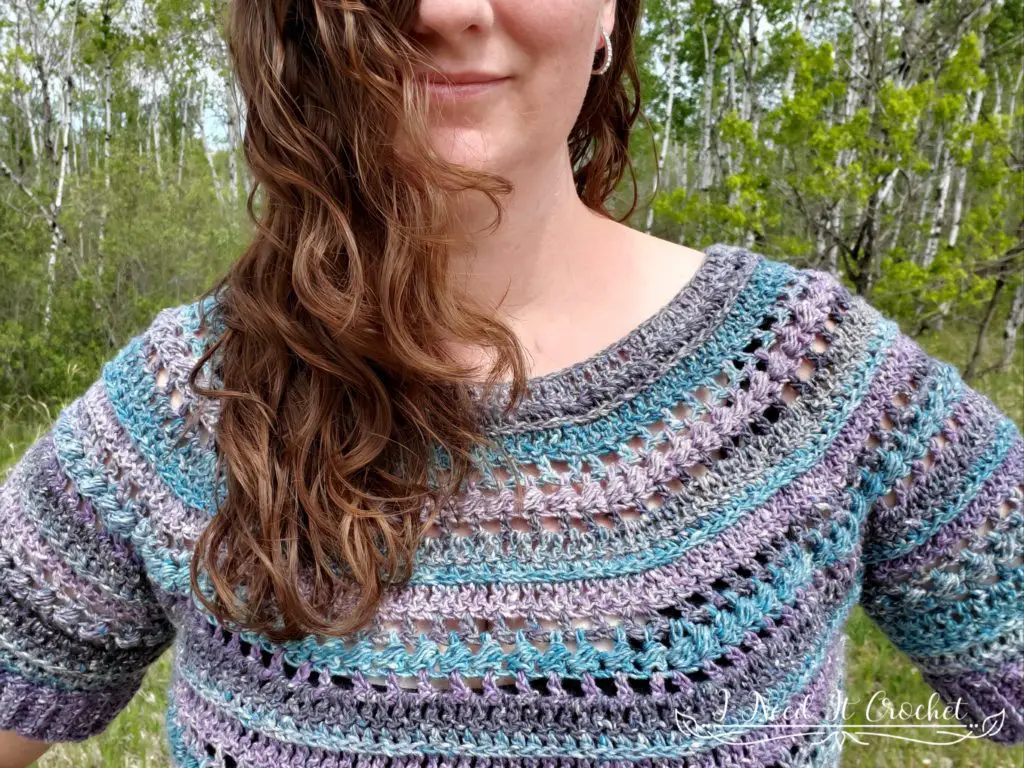
The pattern is worked from the top down, starting at the neck and working down to finish the body. Then the sleeves are added. There is no sewing! (Yay!) We will be working in the round but still turning at the end of each round.
Upper Body
With 5.5mm Hook (or the hook you used to achieve gauge)
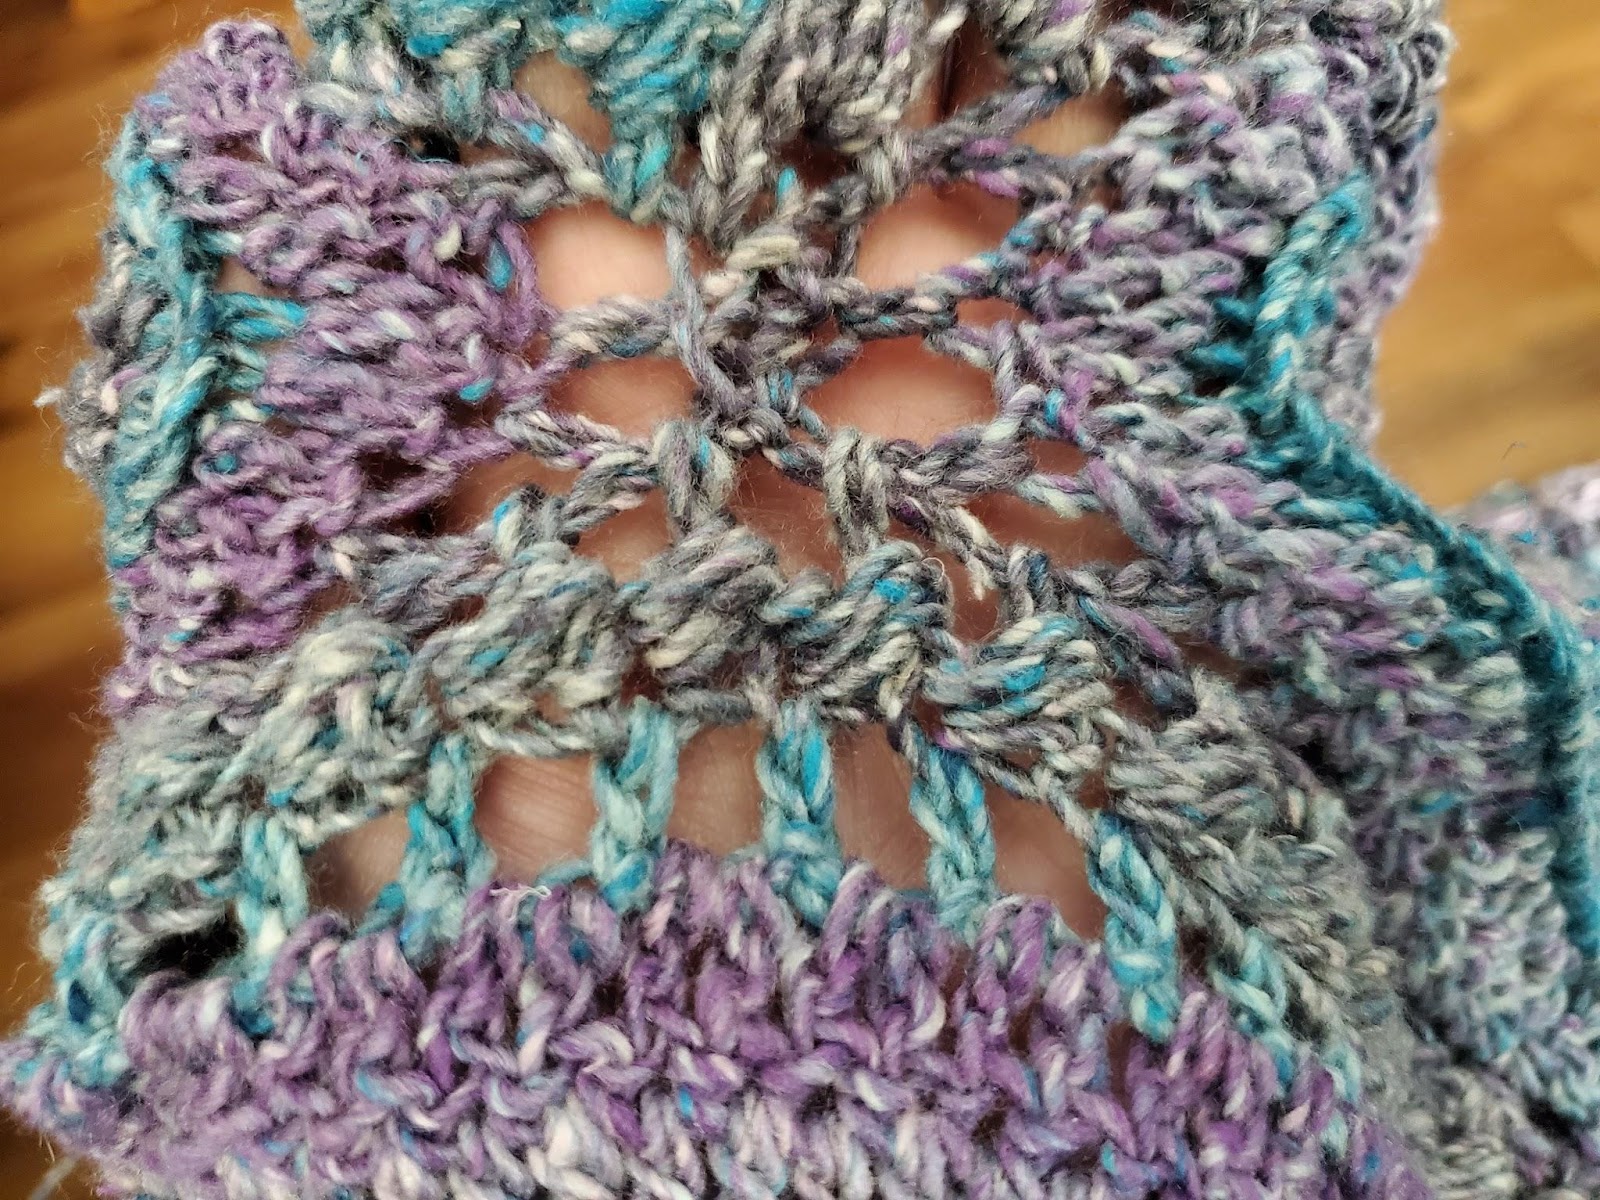
Ch 90 (90, 100, 100, 100, 110, 110, 120, 120) and Ss into the back hump of the 1st ch to form a ring. Be careful not to twist your chain before joining.
1. Ch3. Dc in next 7 (7, 8, 8, 8, 9, 9, 10, 10) sts. 2dc in next st. *Dc in next 8 (8, 9, 9, 9, 10, 10, 11, 11) sts. 2dc in next st. ** Repeat from * to ** around. Ss to join to 1st st. Turn. – 100 (100, 110, 110, 110, 120, 120, 130, 130) st
2. Ch1. Hdc in 1st st and next 8 (8, 9, 9, 9, 8, 8, 11, 11) sts. 2hdc in next st. *Hdc in next 9 (9, 10, 10, 10, 9, 9, 12, 12) sts. 2hdc in next st. ** Repeat from * to ** around. Ss to join to 1st st. (Optional: Use the Alternative Join Method) Turn. – 110 (110, 120, 120, 120, 132, 132, 140, 140) st
3. Working in 3rd LO: Ch3, Dc in next 9 (9, 10, 10, 8, 9, 9, 8, 8) sts. 2dc in next st. *Dc in next 10 (10, 11, 11, 9, 10, 10, 9, 9) sts. 2dc in next st. ** Repeat from * to ** around. Ss to join to 1st st. Turn. – 120 (120, 130, 130, 132, 144, 144, 154, 154) st
4. Sound advice: Turn off the TV and send the kids to somewhere else. This round requires a bit of concentration.
Ch1. *[Hdc, ch1, sk1] to a total of 5 (5, 6, 6, 5, 5, 5, 5, 5) times. Hdc, ch1, hdc in next st [Ch1, sk1, hdc] to a total of 6 (6, 6, 6, 5, 6, 6, 5, 5) times, ch1 (do not sk1). ** Repeat from * to ** around. Ss to join to 1st st. Turn. – 130 (130, 140, 140, 144, 156, 156, 168, 168) st
5. Ch2. *Bd in next 12 (12, 13, 13, 11, 12, 12, 11, 11) ch1 sp. 2Bd in next ch1 sp. ** Repeat from * to ** around. Ss to join to 1st st. Turn. – 140 (140, 150, 150, 156, 168, 168, 182, 182) st
6. Again, you may want to get rid of distractions.
Ch1. *[Hdc, ch1, sk1] to a total of 6 (6, 7, 7, 6, 6, 6, 6, 6) times. Hdc, ch1, hdc in next st [Ch1, sk1, hdc] to a total of 7 (7, 7, 7, 6, 7, 7, 6, 6) times, ch1 (do not sk1). ** Repeat from * to ** around. Ss to join to 1st st. Turn. – 150 (150, 160, 160, 168, 180, 180, 196, 196) st
7. Ch3. Dc in next 23 (13, 18, 14, 12, 13, 13, 12, 12) sts. 2dc in next st. *Dc in next 24 (14, 19, 15, 13, 14, 14, 13, 13) sts. 2dc in next st. ** Repeat from * to ** around. Ss to join to 1st st. Turn. – 156 (160, 168, 170, 180, 192, 192, 210, 210) st
8. Ch1. Hdc in 1st st and next 24 (18, 19, 15, 13, 14, 14, 13, 13) sts. 2hdc in next st. *Hdc in next 25 (19, 20, 16, 14, 15, 15, 14, 14) sts. 2hdc in next st. ** Repeat from * to ** around. Ss to join to 1st st. (Optional: Use the Alternative Join Method) Turn. – 162 (168, 176, 180, 192, 204, 204, 224, 224) st
9. Working in the 3rd LO: Ch3. Dc in next 25 (19, 20, 16, 14, 15, 15, 14, 14) sts. 2dc in next st. *Dc in next 26 (20, 21, 17, 15, 16, 16, 15, 15) sts. 2dc in next st. ** Repeat from * to ** around. Ss to join to 1st st. Turn. – 168 (176, 184, 190, 204, 216, 216, 238, 238) st
10. You’re doing great! Here’s another hard one.
Ch1. *[Hdc, ch1, sk1] to a total of 13 (10, 11, 9, 8, 8, 8, 8, 8) times. Hdc, ch1, hdc in next st [Ch1, sk1, hdc] to a total of 14 (11, 11, 9, 8, 9, 9, 8, 8) times, ch1 (do not sk1). ** Repeat from * to ** around. Ss to join to 1st st. Turn. – 174 (184, 192, 200, 216, 228, 228, 252, 252) st
11. Ch2. *Bd in next 28 (22, 23, 19, 17, 18, 18, 17, 17) ch1 sp. 2Bd in next ch1 sp. ** Repeat from * to ** around. Turn. – 180 (192, 200, 210, 228, 240, 240, 266, 266) st
12. Great work! Now concentrate.
Ch1. *[Hdc, ch1, sk1] to a total of 14 (15, 12, 10, 9, 11, 9, 9, 9) times. Hdc, ch1, hdc in next st [Ch1, sk1, hdc] to a total of 15 (16, 12, 10, 9, 12, 10, 9, 9) times, ch1 (do not sk1). ** Repeat from * to ** around. Ss to join to 1st st. Turn. – 186 (198, 208, 220, 240, 250, 252, 280, 280) st
13. Ch3. Dc in next 29 (31, 24, 20, 28, 23, 19, 26, 18) sts. 2dc in next st. *Dc in next 30 (32, 25, 21, 29, 24, 20, 27, 19) sts. 2dc in next st. ** Repeat from * to ** around. Ss to join to 1st st. Turn. – 192, (204, 216, 230, 248, 260, 264, 290, 294) st
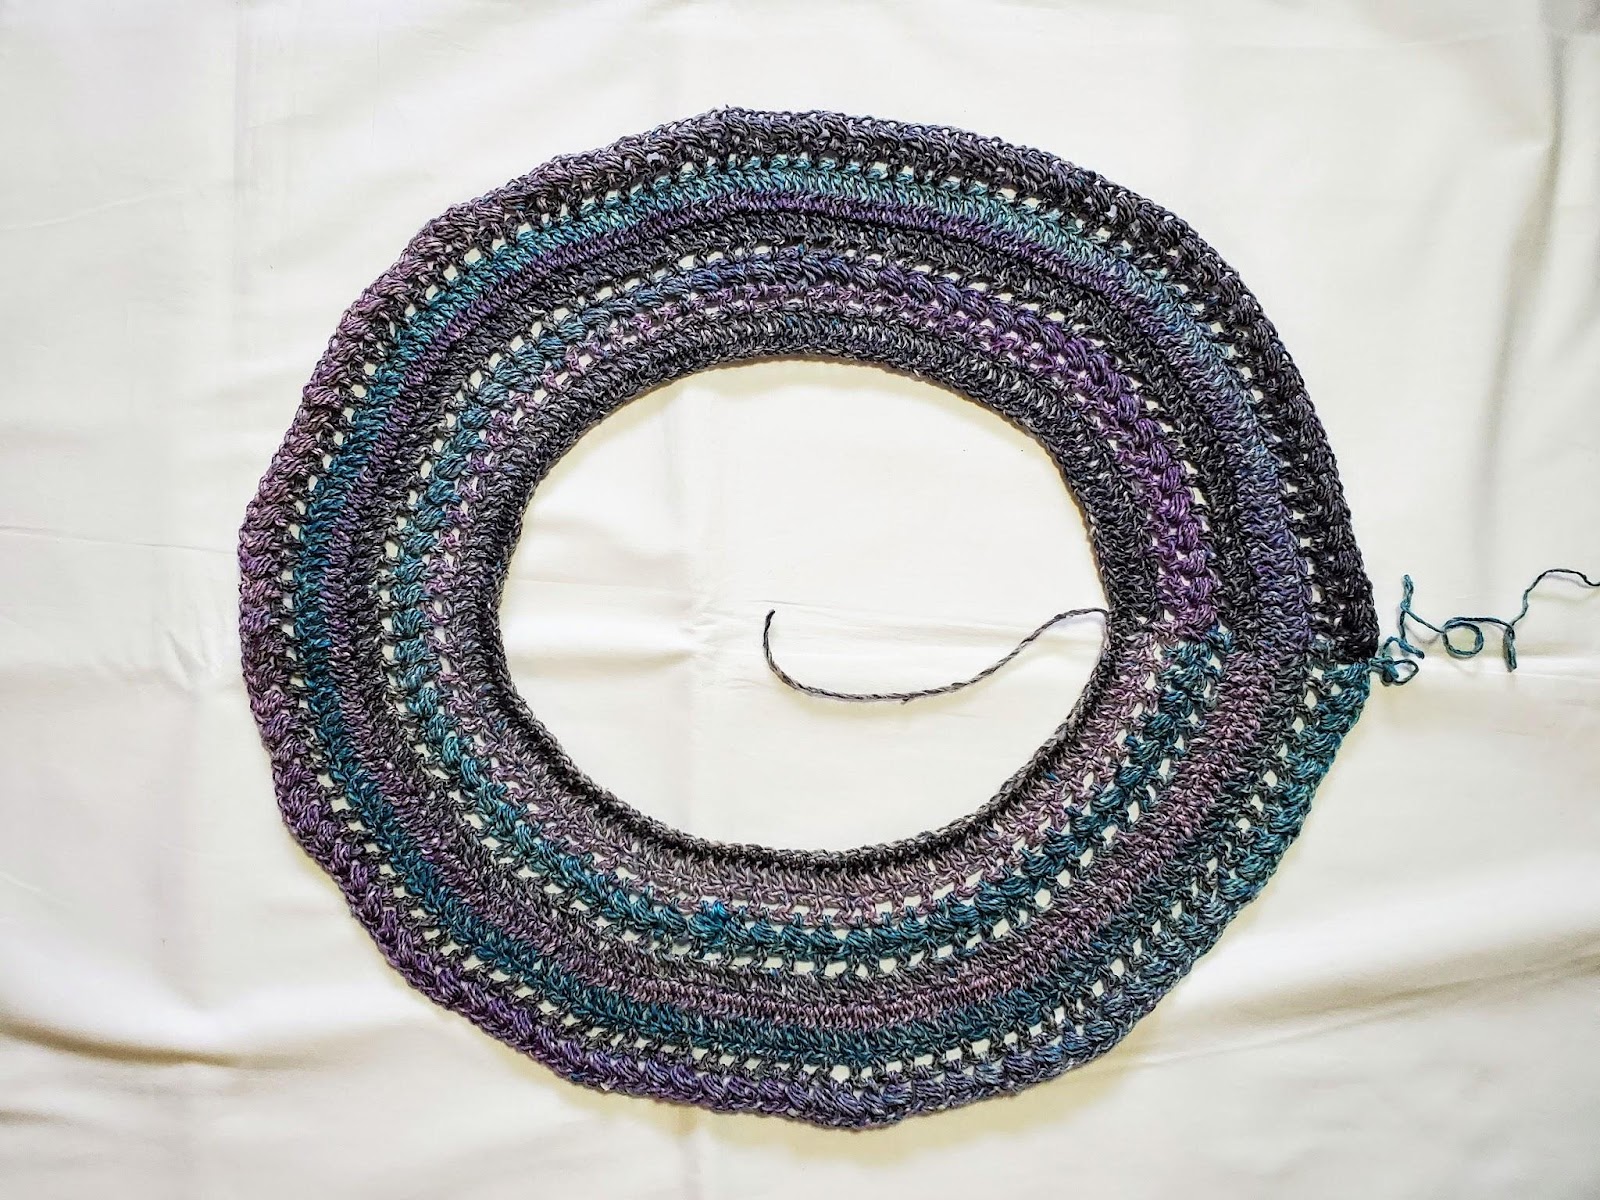
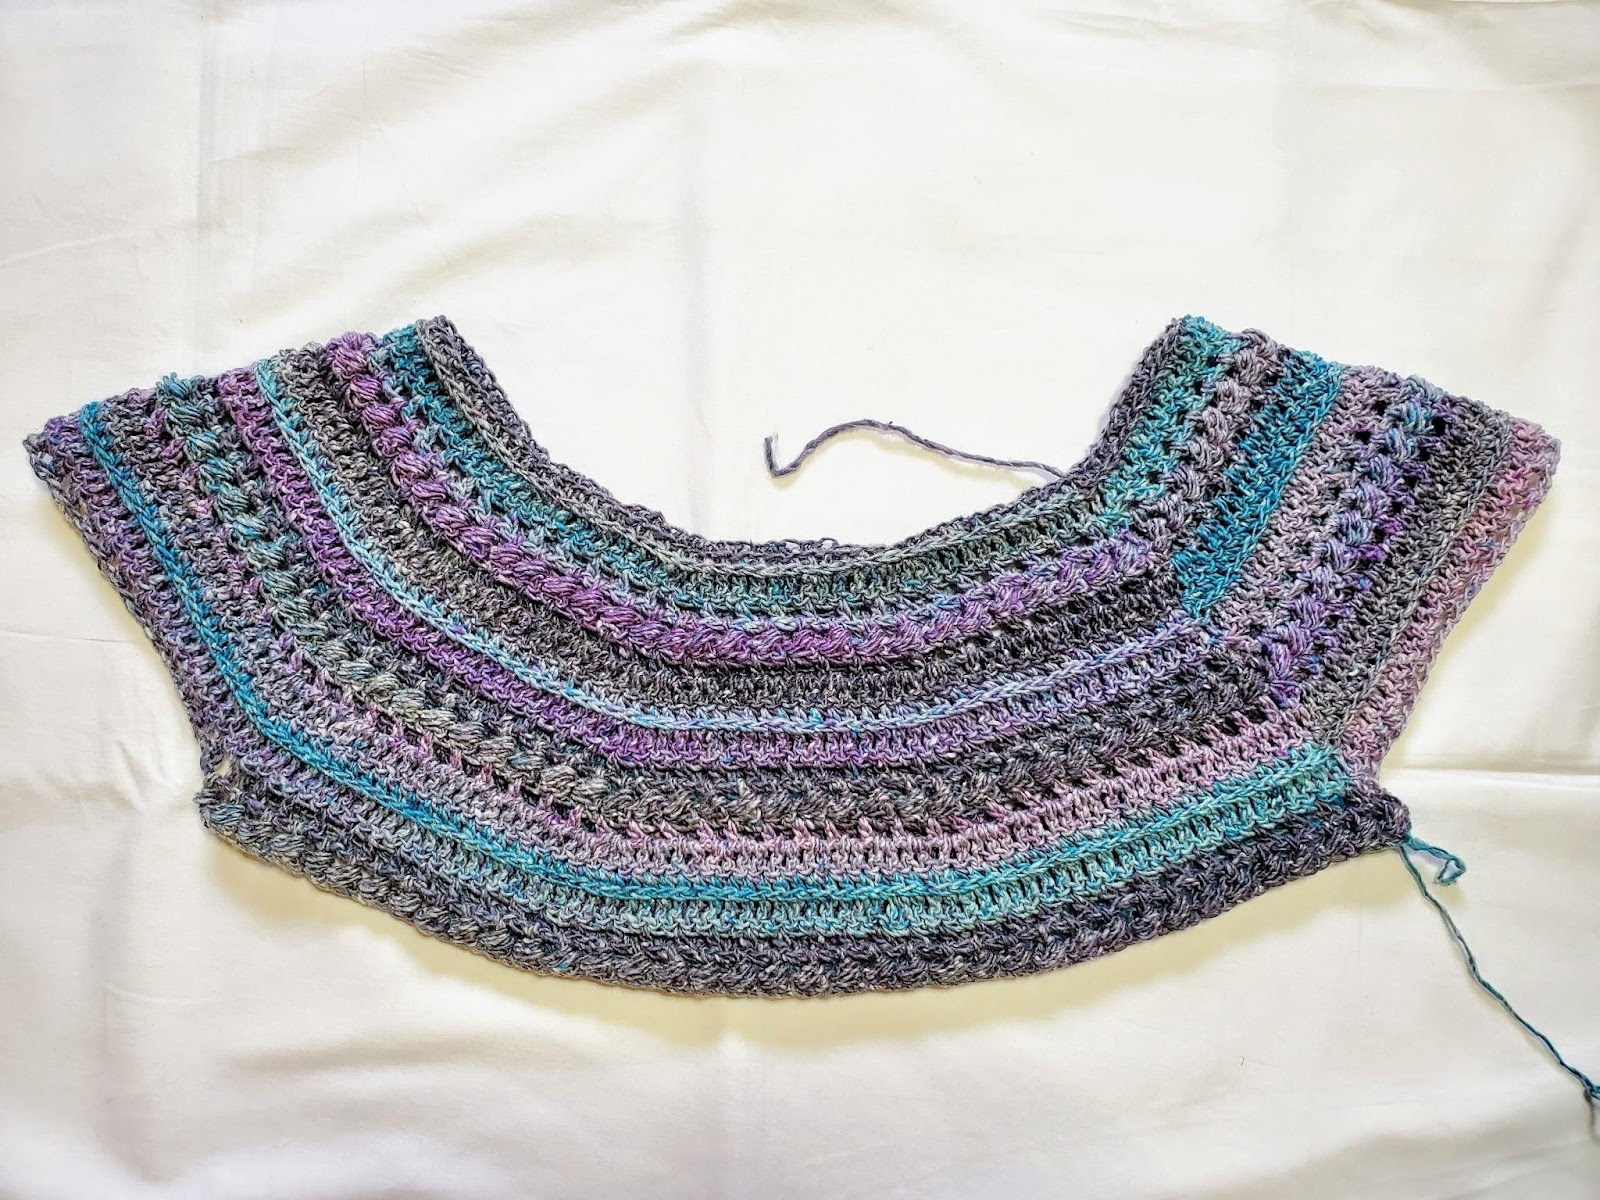
Size XS: Your Upper Body is complete. You should have a large round piece that looks similar to Figure 1 below. Skip rounds 14-21 and continue on to the instructions below.
14. Ch1. Hdc in 1st st and next n/a (32, 25, 21, 29, 24, 20, 27, 19) sts. 2hdc in next st. *Hdc in next n/a (33, 26, 22, 30, 25, 21, 28, 20) sts. 2hdc in next st. ** Repeat from * to ** around. Ss to join to 1st st. (Optional: Use the Alternative Join Method) Turn. – n/a (210, 224, 240, 256, 270, 276, 300, 308) st
Size S: Your Upper Body is complete. You should have a large round piece that looks similar to Figure 1 below. Skip rounds 15-21 and continue on to the instructions below.
15. Working in the 3rd LO: Ch3. Dc in next n/a (n/a, 54, 28, 30, 25, 21, 28, 20) sts. 2dc in next st. *Dc in next n/a (n/a, 55, 29, 31, 26, 22, 29, 21) sts. 2dc in next st. ** Repeat from * to ** around. Ss to join to 1st st. Turn. – n/a (n/a, 228, 248, 264, 280, 288, 310, 322) st
Size M: Your Upper Body is complete. You should have a large round piece that looks similar to Figure 1 below. Skip rounds 16-21 and continue on to the instructions below.
16. You’re almost there. Turn off those distractions.
Ch1. *[Hdc, ch1, sk1] to a total of n/a (n/a, n/a, 30, 16, 13, 11, 15, 11) times. Hdc, ch1, hdc in next st [Ch1, sk1, hdc] to a total of n/a (n/a, n/a, 31, 16, 14, 12, 15, 11) times, ch1 (do not sk1). ** Repeat from * to ** around. Ss to join to 1st st. Turn. – n/a (n/a, n/a, 252, 272, 290, 300, 320, 336) st
Size L: Your Upper Body is complete. You should have a large round piece that looks similar to Figure 1 below. Skip rounds 17-21 and continue on to the instructions below.
17. Ch2. *Bd in next n/a (n/a, n/a, n/a, 67, 28, 24, 31, 23) ch1 sp. 2Bd in next ch1 sp. ** Repeat from * to ** around. Turn. – n/a (n/a, n/a, n/a, 276, 300, 312, 330, 350) st
Size XL: Your Upper Body is complete. You should have a large round piece that looks similar to Figure 1 below. Skip rounds 18-21 and continue on to the instructions below.
18. This is the last hard one! You got this!
Ch1. *[Hdc, ch1, sk1] to a total of n/a (n/a, n/a, n/a, n/a, 24, 12, 16, 17) times. Hdc, ch1, hdc in next st [Ch1, sk1, hdc] to a total of n/a (n/a, n/a, n/a, n/a, 25, 13, 16, 17) times, ch1 (do not sk1). ** Repeat from * to ** around. Ss to join to 1st st. Turn. – n/a (n/a, n/a, n/a, n/a, 306, 324, 340, 360) st
Size 2X: Your Upper Body is complete. You should have a large round piece that looks similar to Figure 1 below. Skip rounds 19-21 and continue on to the instructions below.
19. Ch3. Dc in next n/a (n/a, n/a, n/a, n/a, n/a, 25, 32, 34) sts. 2dc in next st. *Dc in next n/a (n/a, n/a, n/a, n/a, n/a, 26, 33, 35) sts. 2dc in next st. ** Repeat from * to ** around. Ss to join to 1st st. Turn. – n/a (n/a, n/a, n/a, n/a, n/a, 336, 350, 370) st
Size 3X: Your Upper Body is complete. You should have a large round piece that looks similar to Figure 1 below. Skip rounds 20-21 and continue on to the instructions below.
20. Ch1. Hdc in 1st st and next n/a (n/a, n/a, n/a, n/a, n/a, n/a, 33, 35) sts. 2hdc in next st. *Hdc in next n/a (n/a, n/a, n/a, n/a, n/a, n/a, 34, 36) sts. 2hdc in next st. ** Repeat from * to ** around. Ss to join to 1st st. (Optional: Use the Alternative Join Method) Turn. – n/a (n/a, n/a, n/a, n/a, n/a, n/a, 360, 380) st
Size 4X: Your Upper Body is complete. You should have a large round piece that looks similar to Figure 1 below. Skip round 21 and continue on to the instructions below.
21. Working in 3rd LO: Ch3. Dc in next n/a (n/a, n/a, n/a, n/a, n/a, n/a, n/a, 93) sts. 2dc in next st. *Dc in next n/a (n/a, n/a, n/a, n/a, n/a, n/a, n/a, 94) sts. 2dc in next st. ** Repeat from * to ** around. Ss to join to 1st st. Turn. – n/a (n/a, n/a, n/a, n/a, n/a, n/a, n/a, 384) st
Size 5X: Your Upper Body is complete. You should have a large round piece that looks similar to Figure 1 below. Continue on to the instructions below.
Lower Body
We will now work on the lower body. Make sure you remember to turn at the end of the last round you worked and do not bind off. We will create spaces for each arm hole in the first round.
1. Work this round according to your size.
Sizes XS & 3X:
Ch1. Hdc in 1st st and next 53 (n/a, n/a, n/a, n/a, n/a, 99, n/a, n/a) sts. Sk next 42 (n/a, n/a, n/a, n/a, n/a, 68, n/a, n/a) sts. Hdc in next 54 (n/a, n/a, n/a, n/a, n/a, 100, n/a, n/a) sts. Sk last 42 (n/a, n/a, n/a, n/a, n/a, 68, n/a, n/a) sts. Ss to join to 1st st. (Optional: Use the Alternative Join Method) Turn. – 108 (n/a, n/a, n/a, n/a, n/a, 200, n/a, n/a) st
Sizes S & 4X:
Working in 3rd LO: Ch3. Dc in next n/a (60, n/a, n/a, n/a, n/a, n/a, 105, n/a) sts. Sk next n/a (44, n/a, n/a, n/a, n/a, n/a, 74, n/a) sts. Dc in next n/a (61, n/a, n/a, n/a, n/a, n/a, 106, n/a) sts. Sk last n/a (44, n/a, n/a, n/a, n/a, n/a, 74, n/a) sts. Ss to join to 1st st. Turn. – n/a (122, n/a, n/a, n/a, n/a, n/a, 212, n/a) sts.
Sizes M, XL, & 5X:
Ch1. Hdc in 1st st, ch1, sk1. [Hdc in next st, ch1, sk1]. Repeat [] to a total of n/a (n/a, 32, n/a, 40, n/a, n/a, n/a, 55) times. Hdc in next st, ch1. Sk next n/a (n/a, 47, n/a, 55, n/a, n/a, n/a, 79) sts. [Hdc in next st, ch1, sk1]. Repeat [] to a total of n/a (n/a, 33, n/a, 41, n/a, n/a, n/a, 56) times. Hdc in next st, ch1. Sk last n/a (n/a, 47, n/a, 55, n/a, n/a, n/a, 79) sts. SS to join to 1st st. Turn. – n/a (n/a, 136, n/a, 168, n/a, n/a, n/a, 228) st
Size L:
Ch2. Bd in next n/a (n/a, n/a, 38, n/a, n/a, n/a, n/a, n/a) ch1 sp. Sk next n/a (n/a, n/a, 25, n/a, n/a, n/a, n/a, n/a) ch1 sp. Bd in next n/a (n/a, n/a, 38, n/a, n/a, n/a, n/a, n/a) ch1 sp. Sk last n/a (n/a, n/a, 25, n/a, n/a, n/a, n/a, n/a) ch1 sp. ss to join to 1st st. Turn. – n/a (n/a, n/a, 152, n/a, n/a, n/a, n/a, n/a) st
Size 2X:
Ch3. Dc in next n/a (n/a, n/a, n/a, n/a, 91, n/a, n/a, n/a) sts. Sk next n/a (n/a, n/a, n/a, n/a, 62, n/a, n/a, n/a) sts. Dc in next n/a (n/a, n/a, n/a, n/a, 91, n/a, n/a, n/a) sts. Sk last n/a (n/a, n/a, n/a, n/a, 62, n/a, n/a, n/a) sts. Ss to join to 1st st. Turn. – n/a (n/a, n/a, n/a, n/a, 182, n/a, n/a, n/a) st
Your piece should now look similar to Figure 2.
From here, you will be working evenly in the same stitch pattern as before. Begin with the round that is marked with your size and continue on with the subsequent rounds. For example: If you are making a size L, you would begin at round 5 and continue to rounds 6 & 7. Then you would follow the instructions below.
2. Sizes XS & 4X begin here: (Wrong Side) Working in the 3rd LO: Ch3. Dc in next st and each st around. Ss to join to 1st st. Turn. – 108 (122, 136, 152, 168, 182, 200, 212, 228) st
3. Sizes S & 4X begin here: (Right Side) Ch1. Hdc in 1st st, ch1, sk1 st. [Hdc in next st, ch1, sk1 st.] Repeat [] around. Ss to join to 1st st. Turn. – 108 (122, 136, 152, 168, 182, 200, 212, 228) st
4. Sizes M & 5X begin here: (Wrong Side) Ch2. Bd in next ch1 sp and each ch1 sp around. Ss to join to 1st st. Turn. – 108 (122, 136, 152, 168, 182, 200, 212, 228) st
5. Size L begin here: (Right Side) Ch1. Hdc in 1st st, ch1, sk1 st. [Hdc in next st, ch1, sk1 st.] Repeat [] around. Ss to join to 1st st. Turn. – 108 (122, 136, 152, 168, 182, 200, 212, 228) st
6. Size XL begin here: (Wrong Side) Ch3. Dc in next st and each st around. Ss to join to 1st st. Turn. – 108 (122, 136, 152, 168, 182, 200, 212, 228) st
7. Size 2X begin here: (Right Side) Ch1. Hdc in 1st st and each st around. Ss to join to 1st st. (Optional: Use the Alternative Join Method) Turn. – 108 (122, 136, 152, 168, 182, 200, 212, 228) st
Repeat rounds 2-7 until you have achieved your desired length, minus 1 ½”. For the top pictured, I worked a total of 30 rounds for the lower body. Once you have your desired length, work round 8 below.
8. Ch1. Sc in 1st st and each st around. Ss to join to 1st st. Do not bind off. – 108 (122, 136, 152, 168, 182, 200, 212, 228) st
Bottom Band
Now we will add a ribbed bottom band. This band is made by working short rows off of each stitch of the bottom. Turn your work so that the wrong side is facing you.
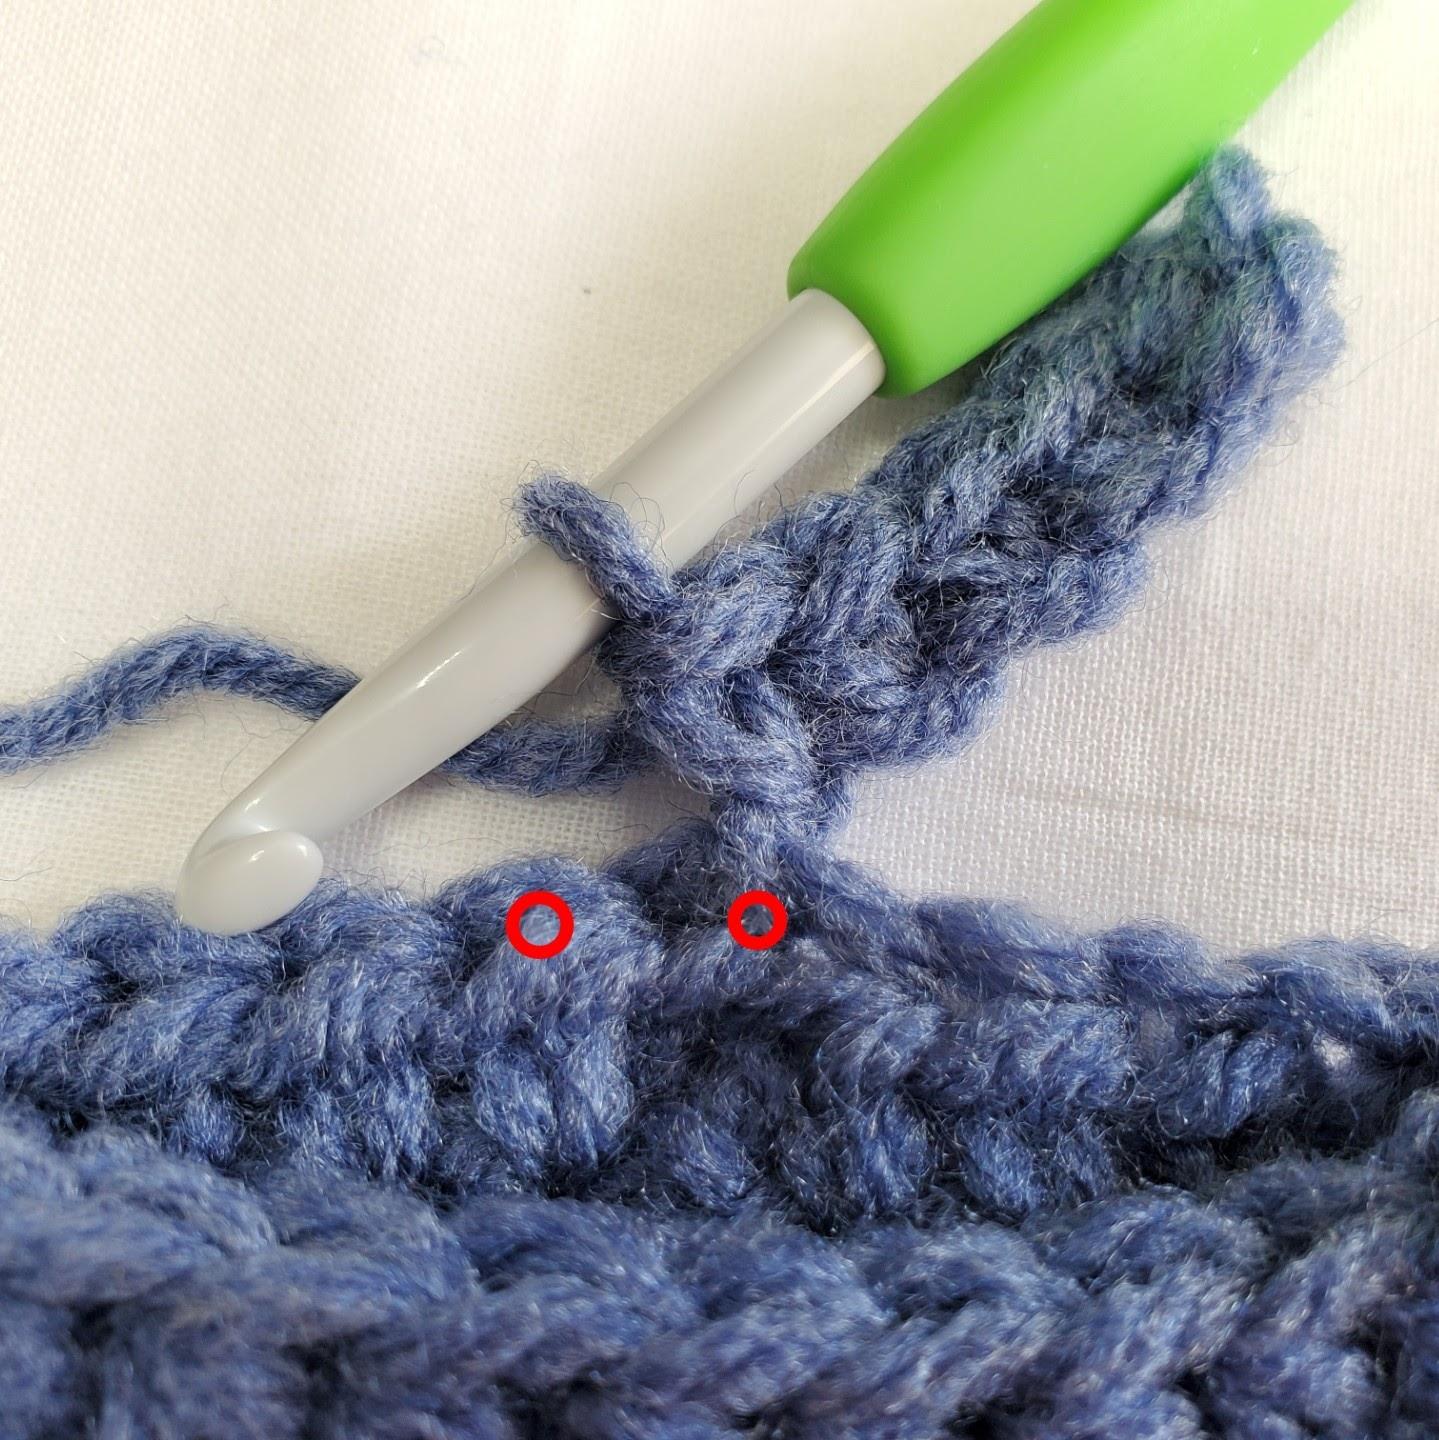
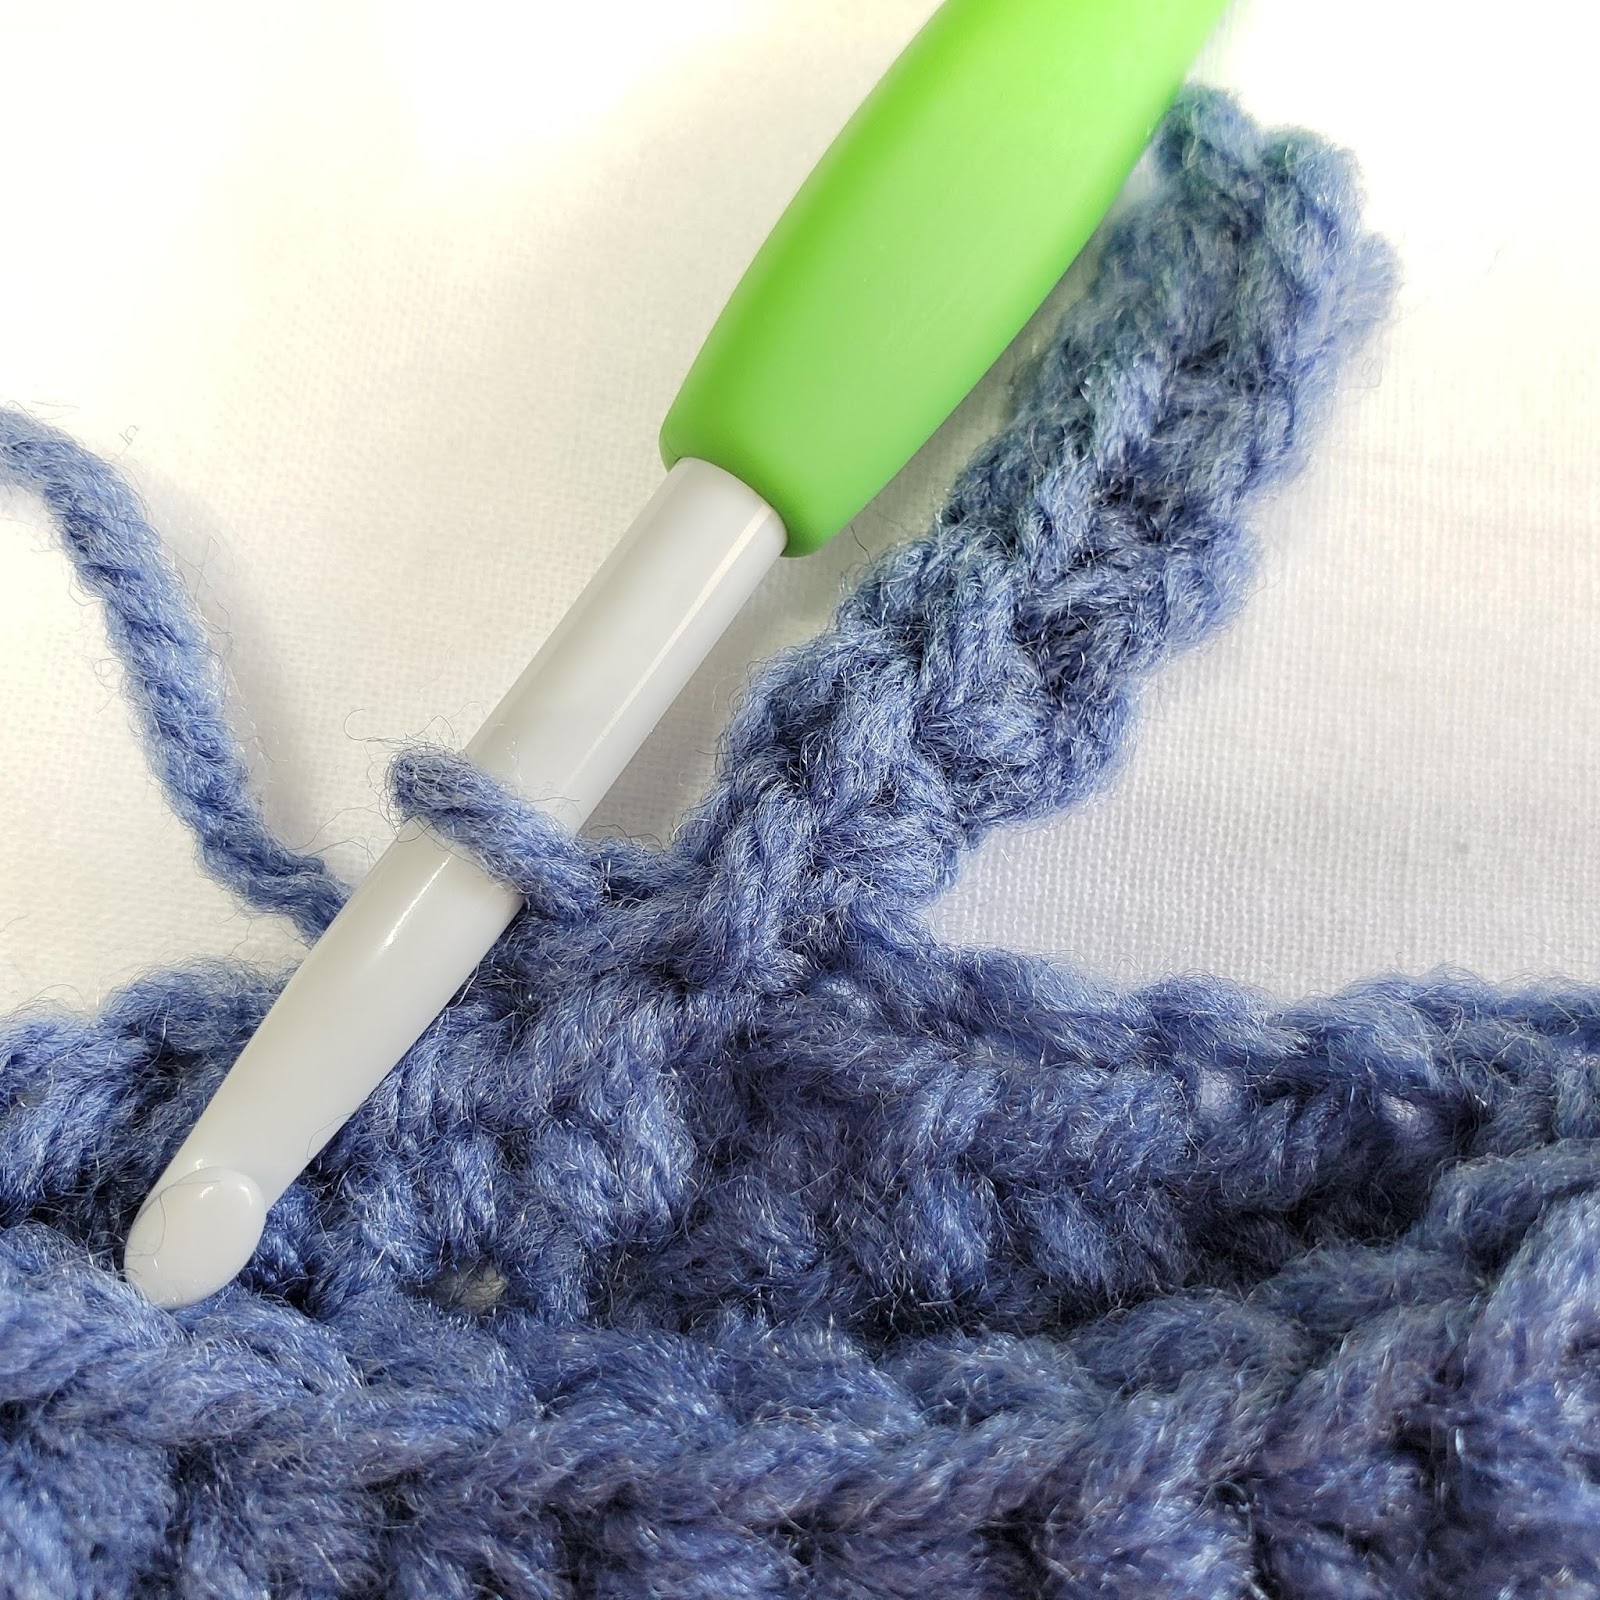
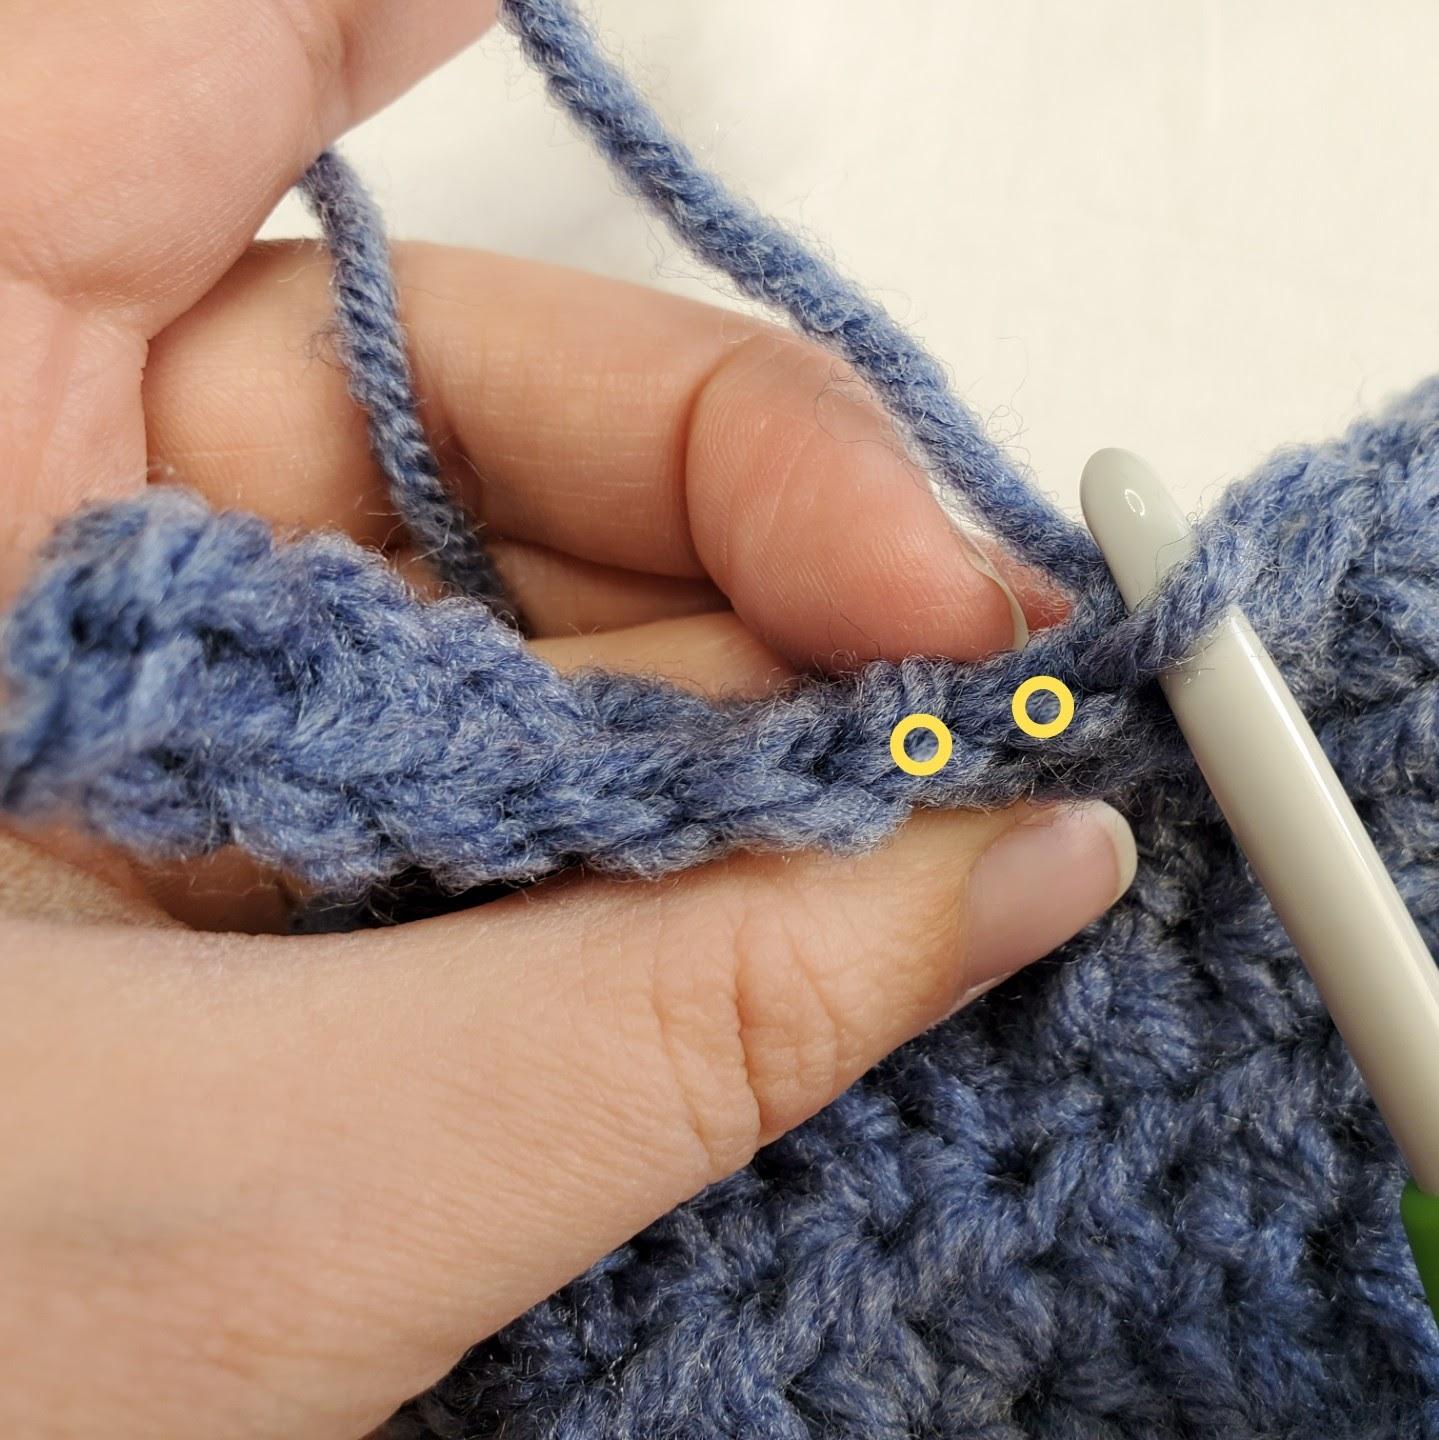
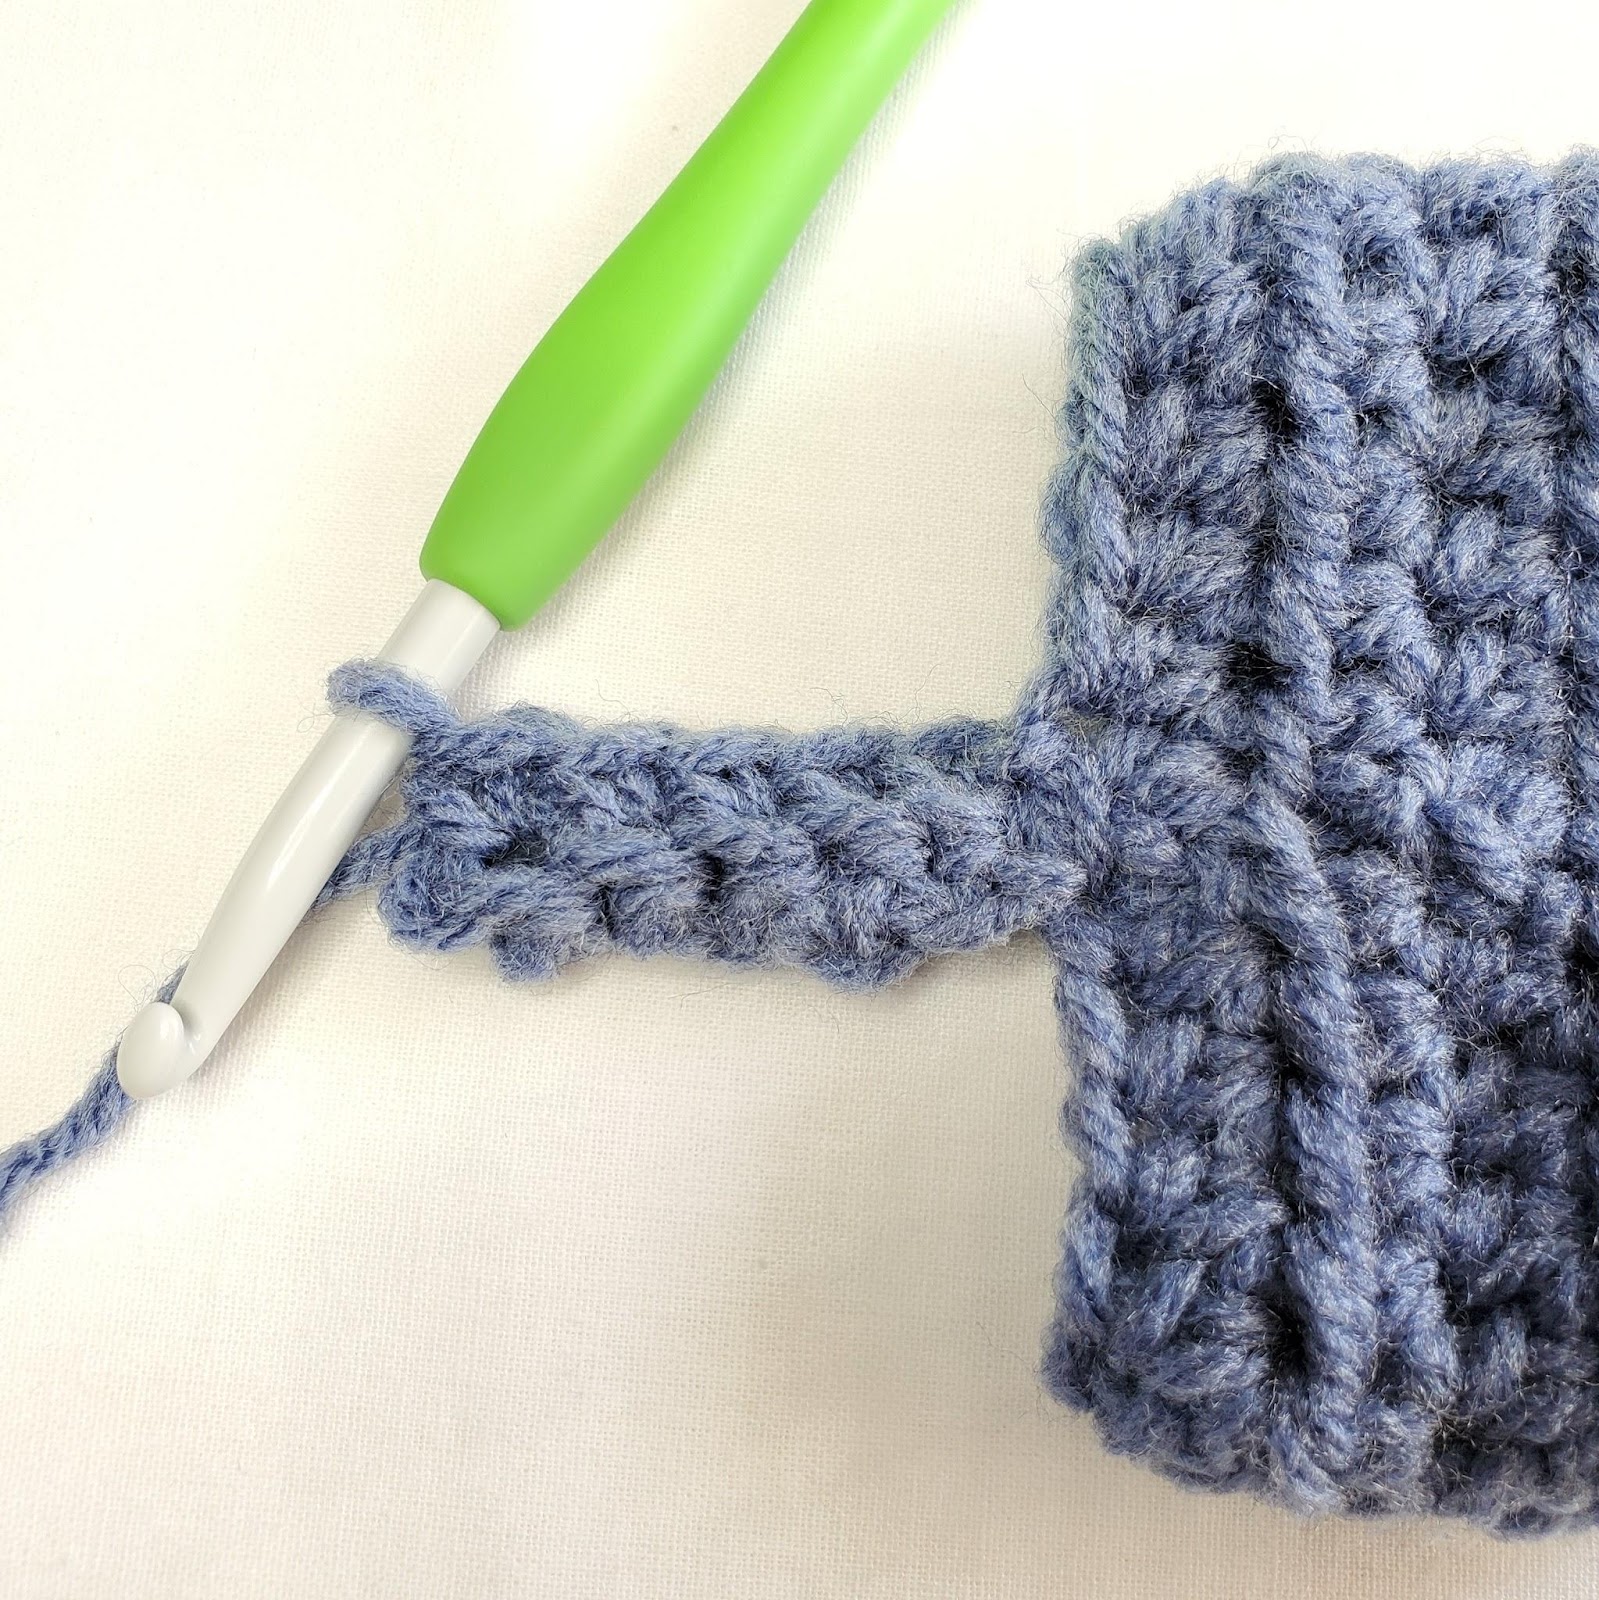
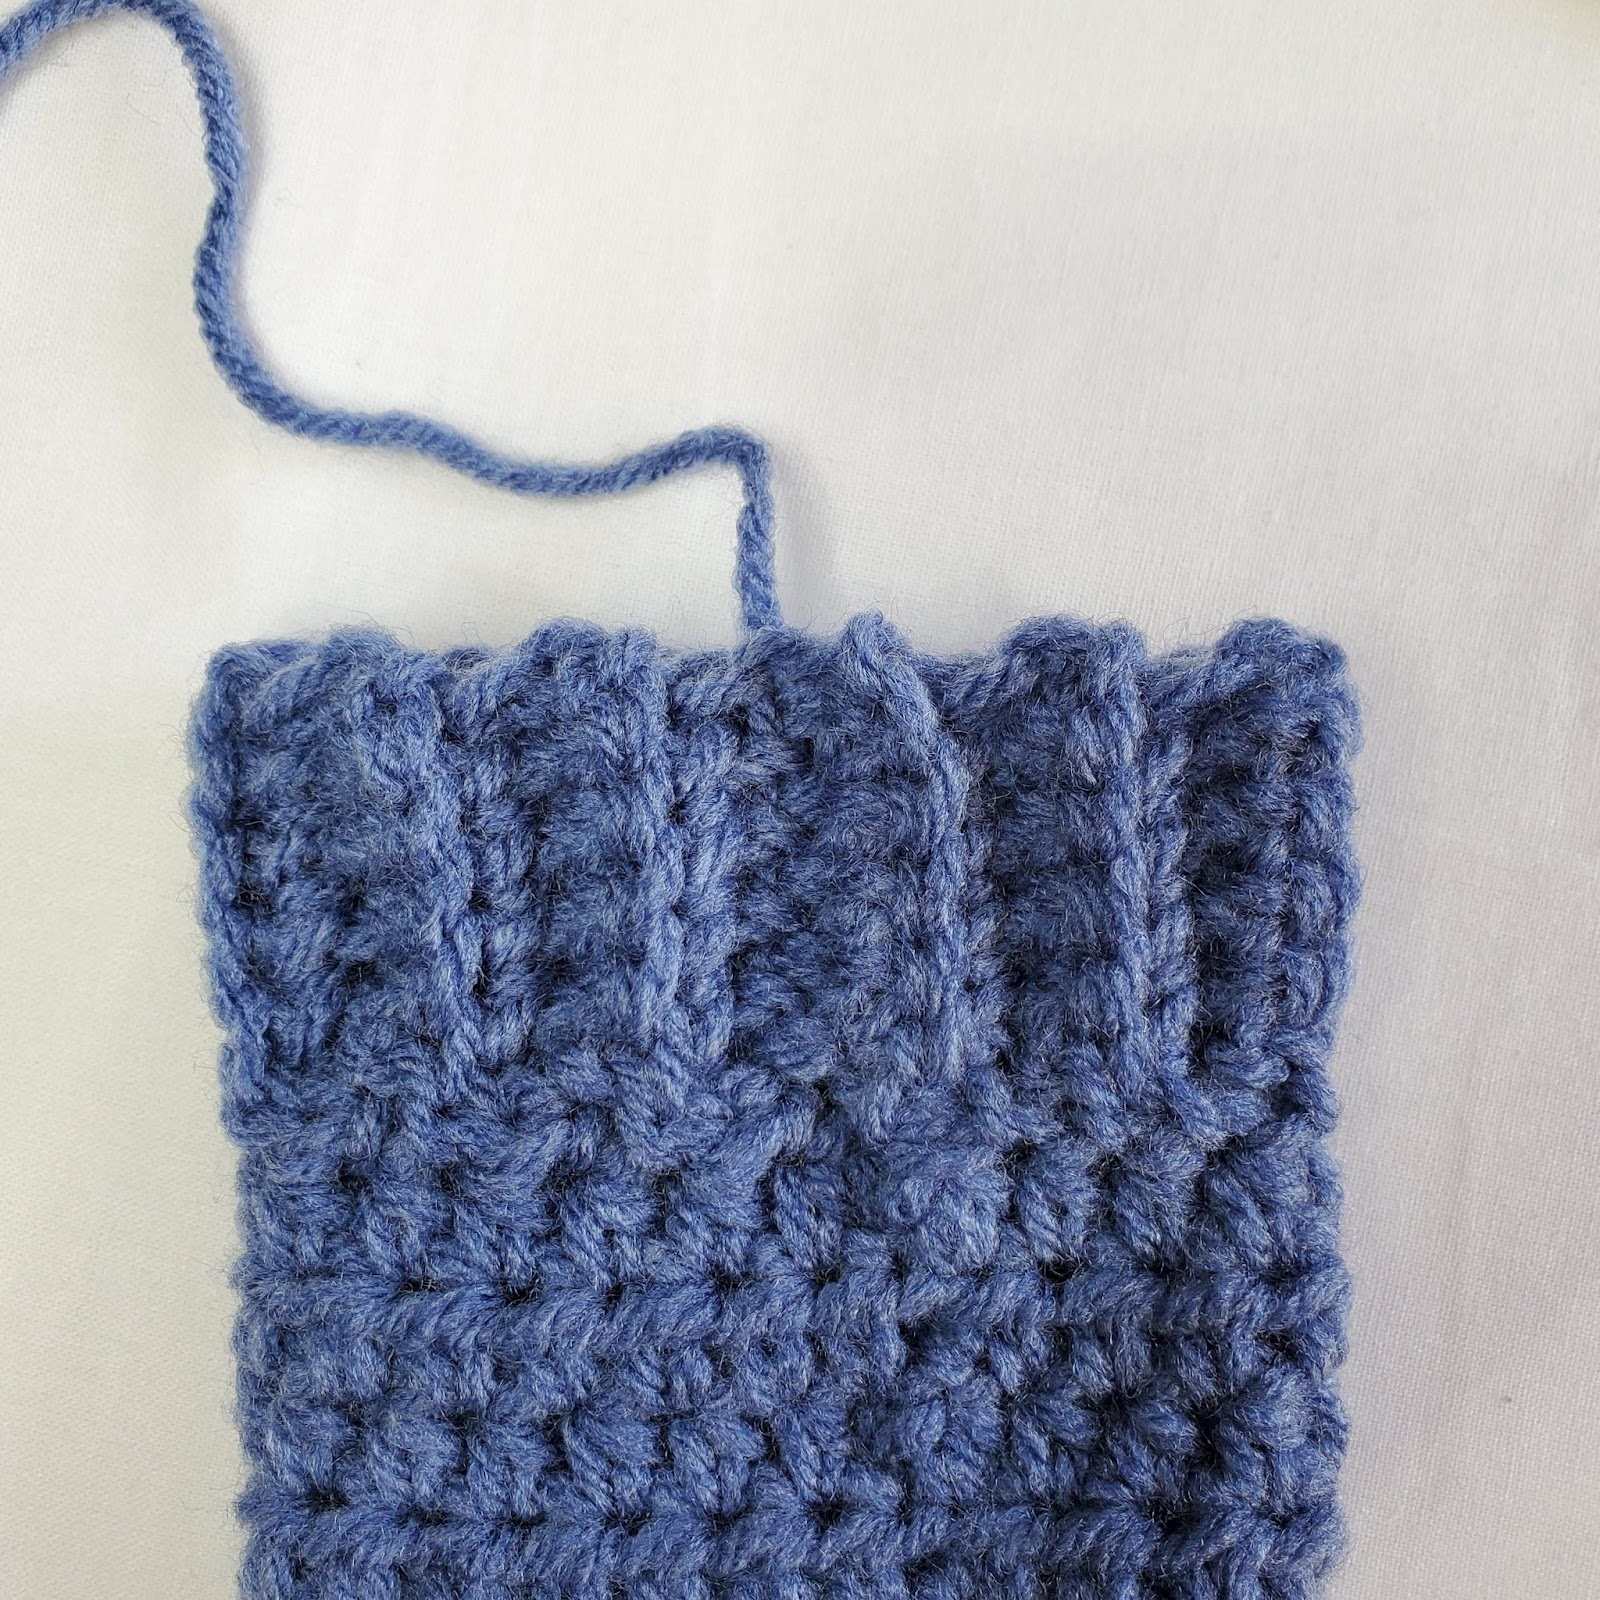
1. Ch6. Sc in 2nd ch from hook and each ch across. Ss into 1st st on bottom (the st where you chained from marked in red in Figure 3), ss into the next unworked st on bottom (marked in red in Figure 3). Your work should now look like Figure 4. Turn. – 5 st
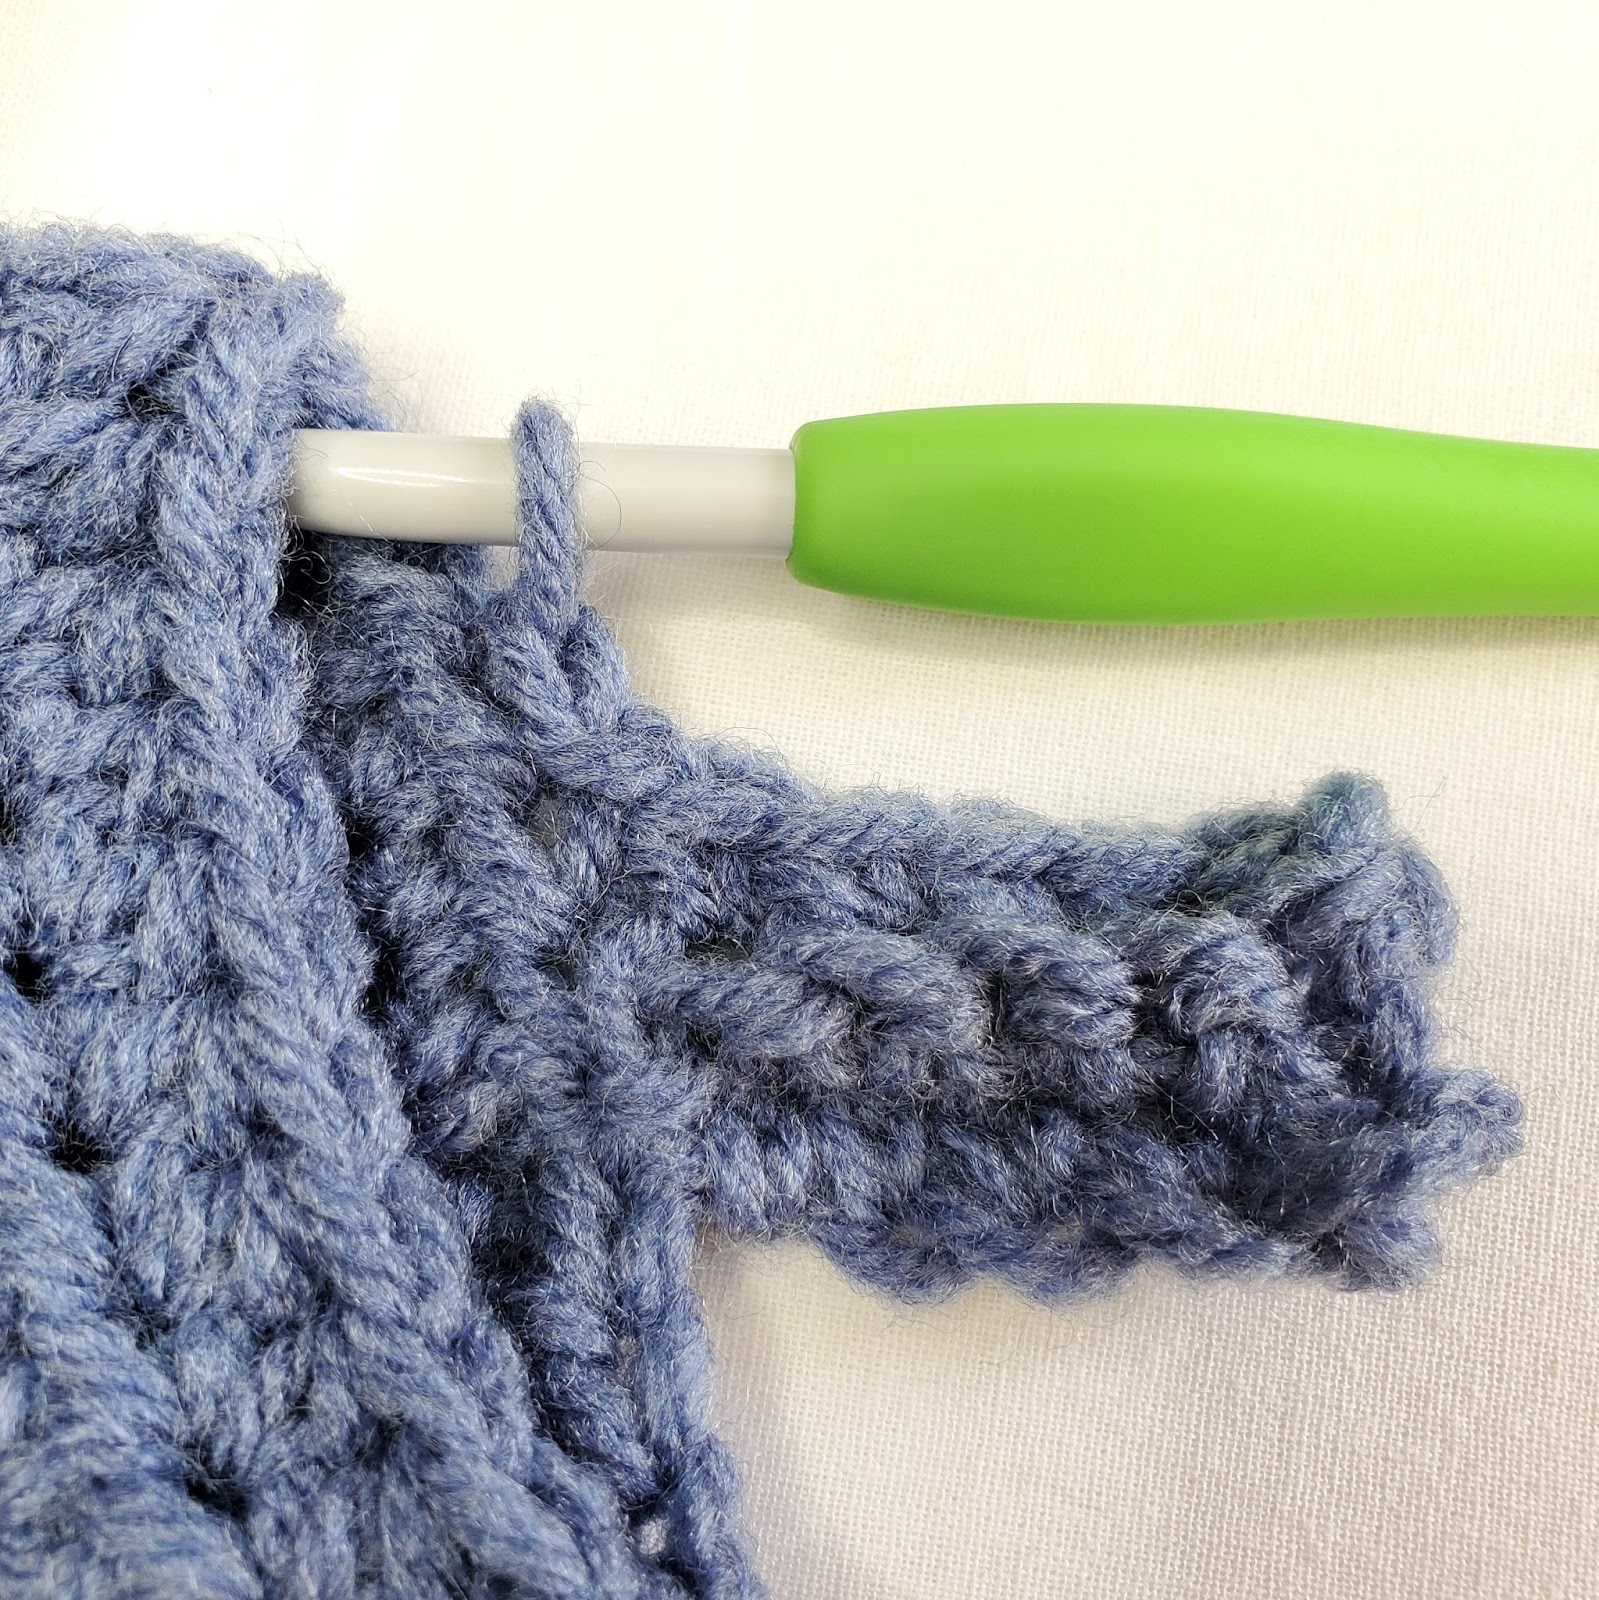
2. Working this row in BLO: Sk 2 ss (marked in yellow in Figure 5). Sc in next st and each st across. Your work should now look like Figure 6. Turn. – 5 st
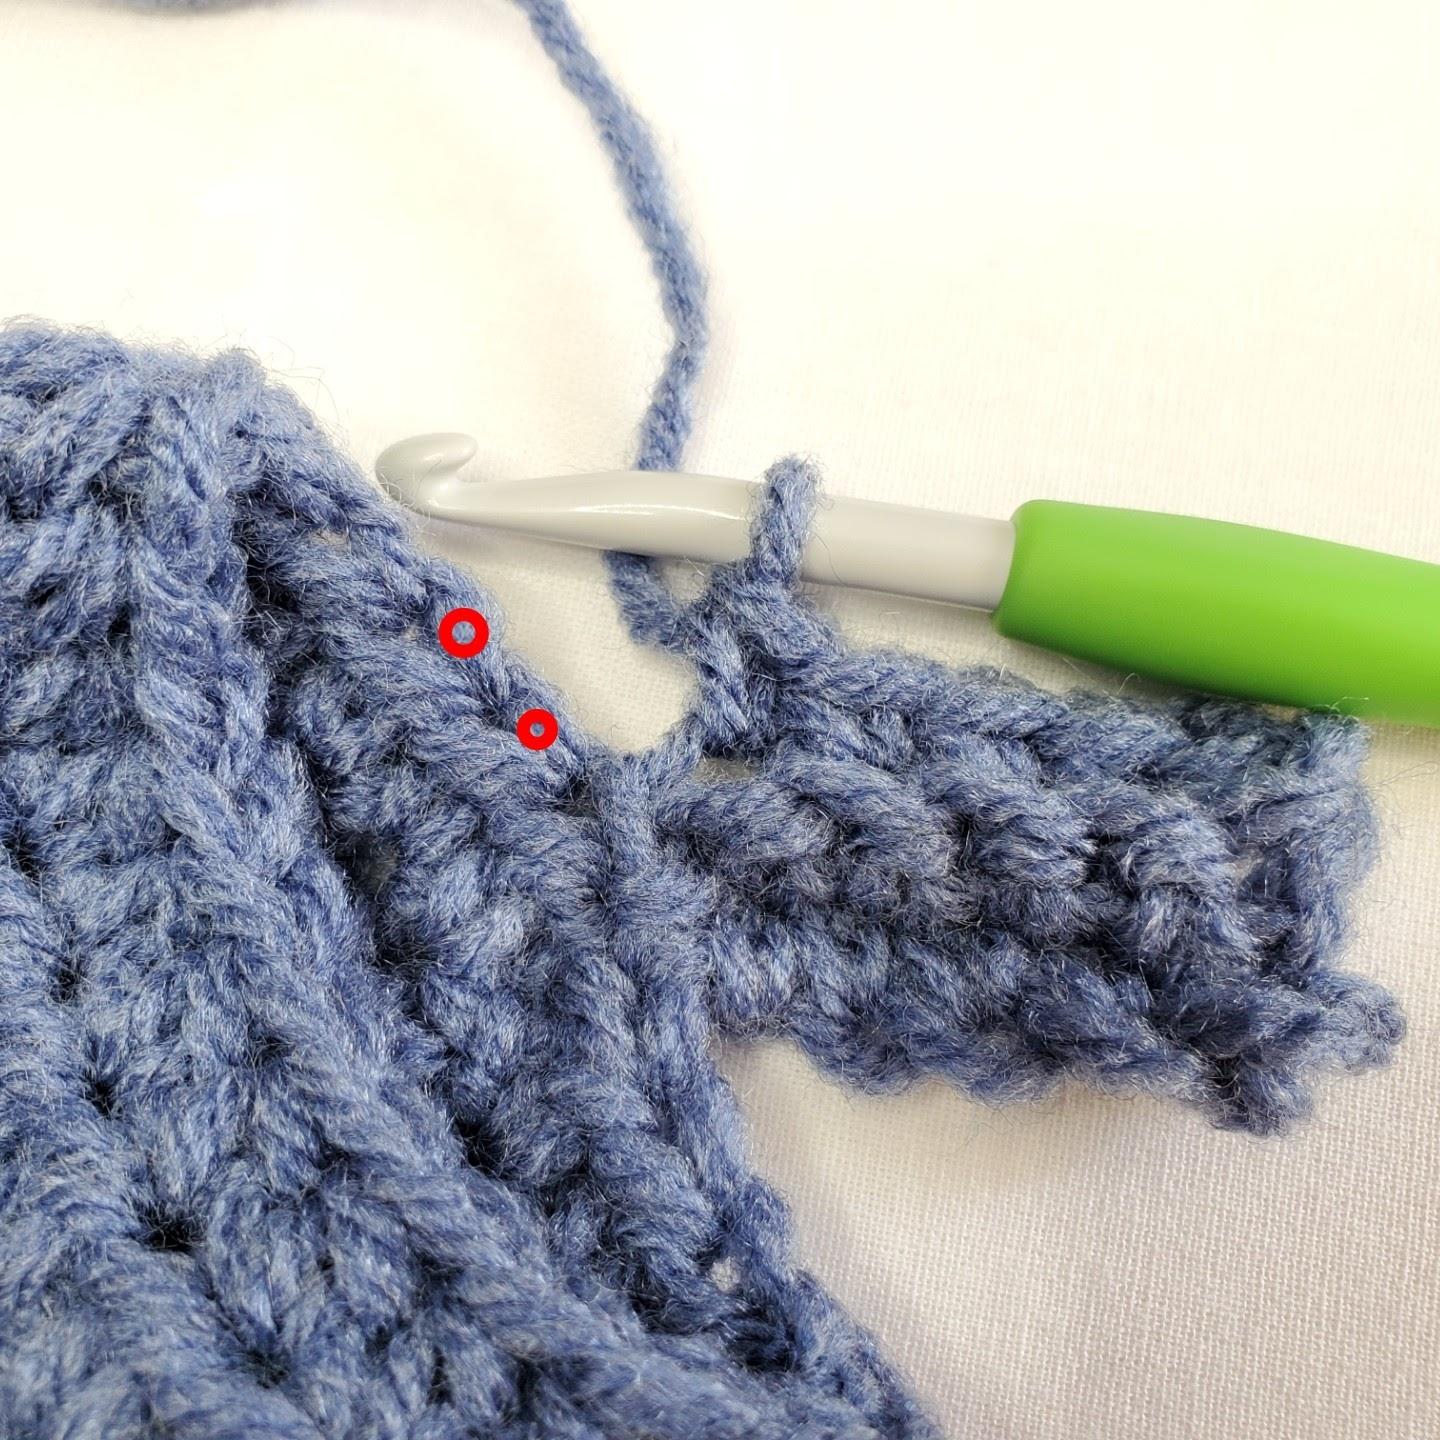
3. Working this row in the BLO: Ch1. Sc in 1st st and each st across. Ss into next 2 unworked sts on bottom (marked in red in Figure 7). Your work should now look like Figure 8. Turn. – 5 st
Repeat rows 2 & 3 around the entire bottom edge. You should now have worked a short row off of each of the bottom stitches and ended with a row 2 repeat. Turn so that the wrong side is facing you again. Ss the edge closed through the BLO of your last row (marked in red in Figure 9) and the bottom bar of your 1st row (marked in yellow in Figure 9). Bind off. Your seam should be invisible like in Figure 10.

Sleeves
We will now add the sleeves. They are worked in the same stitch pattern as before. Join your yarn in the 1st available st near the underarm of your sleeve. Note: You may notice a hole in the underarm after completing round 1. After the sleeve is complete, we will fix that with the starting end of your yarn.
1. Work this round according to your size. Pay attention to your stitch count.
Sizes XS & 3X: Join with right side facing you.
Ch1. Hdc in 1st st and next 42 (n/a, n/a, n/a, n/a, n/a, 68, n/a, n/a) sts. Ss to join to 1st st. (Optional: Use the Alternative Join Method) Turn. – 42 (n/a, n/a, n/a, n/a, n/a, 68, n/a, n/a) st
Sizes S & 4X: Join with wrong side facing you.
Working in 3rd LO: Ch3. Dc in next n/a (44, n/a, n/a, n/a, n/a, n/a, 74, n/a) sts. Ss to join to 1st st. Turn. – n/a (44, n/a, n/a, n/a, n/a, n/a, 74, n/a) st
Sizes M, XL, & 5X: Join with right side facing you.
Ch1. Hdc in 1st st, ch1, sk1. [Hdc in next st, ch1, sk1]. Repeat [] to a total of n/a (n/a, 22, n/a, 26, n/a, n/a, n/a, 38) times. SS to join to 1st st. Turn. – n/a (n/a, 46, n/a, 54, n/a, n/a, n/a, 78) st
Size L: Join with wrong side facing you.
Ch2. Bd in next n/a (n/a, n/a, 25, n/a, n/a, n/a, n/a, n/a) ch1 sp. Ss to join to 1st st. Turn. – n/a (n/a, n/a, 50, n/a, n/a, n/a, n/a, n/a) st
Size 2X: Join with wrong side facing you.
Ch3. Dc in next n/a (n/a, n/a, n/a, n/a, 62, n/a, n/a, n/a) sts. Ss to join to 1st st. Turn. – n/a (n/a, n/a, n/a, n/a, 62, n/a, n/a, n/a) st
From here, you will be working evenly in the same stitch pattern as before. Begin with the round that is marked with your size and continue on with the subsequent rounds until you have achieved your desired length, minus 1 ½”. For example, if you are making a size L, you would begin with round 5, then continue to rounds 6 & 7. Then follow the instructions below. For my sleeves, I only worked 4 rounds before moving on to the cuff. But, you are welcome to make your sleeves as long or as short as you please!
2. Sizes XS & 3X begin here: (Wrong Side) Working in the 3rd LO: Ch3. Dc in next st and each st around. Ss to join to 1st st. Turn. – 42 (44, 46, 50, 54, 62, 68, 74, 78) st
3. Sizes S & 4X begin here: (Right Side) Ch1. Hdc in 1st st, ch1, sk1 st. [Hdc in next st, ch1, sk1 st.] Repeat [] around. Ss to join to 1st st. Turn. – 42 (44, 46, 50, 54, 62, 68, 74, 78) st
4. Sizes M & 5X begin here: (Wrong Side) Ch2. Bd in next ch1 sp and each ch1 sp around. Ss to join to 1st st. Turn. – 42 (44, 46, 50, 54, 62, 68, 74, 78) st
5. Size L begin here: (Right Side) Ch1. Hdc in 1st st, ch1, sk1 st. [Hdc in next st, ch1, sk1 st.] Repeat [] around. Ss to join to 1st st. Turn. – 42 (44, 46, 50, 54, 62, 68, 74, 78) st
6. Size XL begin here: (Wrong Side) Ch3. Dc in next st and each st around. Ss to join to 1st st. Turn. – 42 (44, 46, 50, 54, 62, 68, 74, 78) st
7. Size 2X begin here: (Right Side) Ch1. Hdc in 1st st and each st around. Ss to join to 1st st. (Optional: Use the Alternative Join Method) Turn. – 42 (44, 46, 50, 54, 62, 68, 74, 78) st
Repeat rounds 2-7 until your sleeve is the desired length, minus 1 ½”. Then work round 8 below.
8. Ch1. Sc in 1st st and each st around. Ss to join to 1st st. Do not bind off. – 42 (44, 46, 50, 54, 62, 68, 74, 78) st
Sleeve Cuff
The sleeve cuff is worked in the same manner as the Bottom Band. Turn your work so that the wrong side is facing you. The figures mentioned are the same used for the Bottom Band above.
1. Ch8. Sc in 2nd ch from hook and each ch across. Ss into 1st st on the sleeve (the st where you chained from marked in red in Figure 3), ss into the next unworked st on the sleeve (marked in red in Figure 3). Your work should now look like Figure 4. Turn. – 7 st
2. Working this row in BLO: Sk 2 ss (marked in yellow in Figure 5). Sc in next st and each st across. Your work should now look like Figure 6. Turn. – 7 st
3. Working this row in the BLO: Ch1. Sc in 1st st and each st across. Ss into next 2 unworked sts on bottom (marked in red in Figure 7). Your work should now look like Figure 8. Turn. – 7 st
Repeat rows 2 & 3 around the entire sleeve. You should now have worked a short row off of each of the sleeve stitches and ended with a row 2 repeat. Turn so that the wrong side is facing you again. Ss the edge closed through the BLO of your last row (marked in red in Figure 9) and the bottom bar of your 1st row (marked in yellow in Figure 9). Bind off. Your seam should be invisible like in Figure 10.
For some sizes, you may have a big hole in the underarm (see Figure 11). That’s just not very attractive. So take the tail of yarn where you joined at the start of your sleeve and use it to whip stitch the hole closed. You don’t need to close it up completely, just make it so the stitches sit properly (see Figure 12).

Neck Edging
Lastly, we want to stabilize the neck. I find with many wide neck tops (especially if you make them out of cotton blend yarn), the neck can sag and stretch over time. To counter this, join your yarn anywhere on the neck and ss tightly around the whole neck edge. You may use a hook 1 size smaller if that makes it easier. The goal isn’t to make the neck smaller, just more stable.
Weave in your ends, and you’re done!
I hope you love your new top, and I look forward to seeing all of your beautiful pictures on Ravelry!
If you’d like to know when I post new patterns and tutorials, head on over to my Facebook and Instagram and give me a like and a follow!
If you enjoyed The Bauble Tee – Free Crochet Pattern, you may want to check out my other designs!
And until next time… Happy Hooking! 😉